【iOS】UICollectionView
文章目录
- 前言
- 一、实现简单九宫格布局
- 二、UICollectionView中的常用方法和属性
- 1.UICollectionViewFlowLayout相关属性
- 2.UICollectionView相关属性
- 三、协议和代理方法:
- 四、九宫格式的布局进行升级
- 五、实现瀑布流布局
- 实现思路
- 实现原理
- 代码
- 调用顺序
- 实现步骤
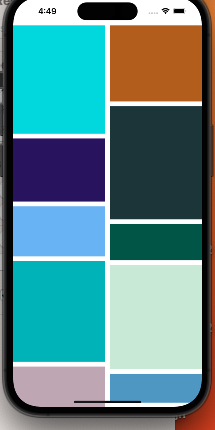
- 实现效果
- 总结
前言
UICollectionView是iOS6之后引入的一个新的UI控件,它和UITableView有着诸多的相似之处,其中许多代理方法都十分类似。简单来说,UICollectionView是比UITbleView更加强大的一个UI控件,有如下几个方面:
1、支持水平与垂直布局
2、通过layout配置的方式进行布局
3、CollectionView中Item的大小与位置可以自由定义
4、通过layout布局回调的代理方法,可以动态的定制每个item的大小和collection的大体布局属性
5、更加强大一点,完全自定义一套layout布局方案,可以实现意想不到的效果
一、实现简单九宫格布局
我们先来看一下简单九宫格的实现效果:
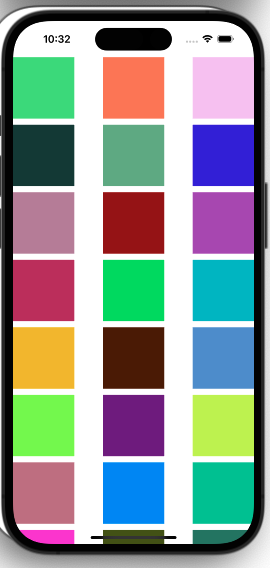
实现步骤:
1、创建布局类并为其各个属性赋值
2、将自定义的布局类作为参数传递给UICollectionView的初始化方法- (instancetype)initWithFrame:(CGRect)frame collectionViewLayout:(UICollectionViewLayout *)layout NS_DESIGNATED_INITIALIZER;
3、设置代理,实现协议函数
//创建一个layout布局类
UICollectionViewFlowLayout * layout = [[UICollectionViewFlowLayout alloc]init];
//设置布局方向为垂直流布局
layout.scrollDirection = UICollectionViewScrollDirectionVertical;
//设置每个item的大小为100*100
layout.itemSize = CGSizeMake(100, 100);
//创建collectionView 通过一个布局策略layout来创建
UICollectionView * collect = [[UICollectionView alloc]initWithFrame:self.view.frame collectionViewLayout:layout];
//代理设置
collect.delegate=self;
collect.dataSource=self;
//注册item类型 这里使用系统的类型
[collect registerClass:[UICollectionViewCell class] forCellWithReuseIdentifier:@"cellid"];[self.view addSubview:collect];
这里有一点需要注意,collectionView在完成代理回调前,必须注册一个cell,类似如下:
[collect registerClass:[UICollectionViewCell class] forCellWithReuseIdentifier:@"cellid"];
这便是collectionView与tableView不同的一点,tableView除了注册cell的方法外,还可以通过临时创建来做:
//tableView在从复用池中取cell的时候,有如下两种方法
//使用这种方式如果复用池中无,是可以返回nil的,我们在临时创建即可
- (nullable __kindof UITableViewCell *)dequeueReusableCellWithIdentifier:(NSString *)identifier;
//6.0后使用如下的方法直接从注册的cell类获取创建,如果没有注册 会崩溃
- (__kindof UITableViewCell *)dequeueReusableCellWithIdentifier:(NSString *)identifier forIndexPath:(NSIndexPath *)indexPath NS_AVAILABLE_IOS(6_0);
在UICollectionView中,注册cell是必需的,因为UICollectionView没有默认的cell类型,而是完全依赖于开发者提前注册cell类或nib以供后续使用。
在UITableView中,历史上早期版本的iOS SDK并没有引入注册机制。在那些版本中,你只需在cellForRowAtIndexPath:代理方法中创建或重用cell即可。而且如果你没有注册cell,UITableView会尝试使用默认的UITableViewCell来呈现内容。
所以我们可以知道因为
UITableView引入的版本较早,当时还未引入注册机制,在那时只需在cellForRowAtIndexPath方法中创建或者重用cell即可,而UICollectionView是在iOS
6.0引入的,相对较新。为了支持更灵活的布局和更复杂的cell类型,Apple在引入时就采用了注册机制。
上面的设置完成后我们再实现几个与tableview相同的代理方法
另外有一点细节:
我们在设置布局方式的时候设置了垂直布局:
layout.scrollDirection = UICollectionViewScrollDirectionVertical;
//这个是水平布局
//layout.scrollDirection = UICollectionViewScrollDirectionHorizontal;
这样可以实现当我们的第一行充满后会自动进行第二行的布局
二、UICollectionView中的常用方法和属性
1.UICollectionViewFlowLayout相关属性
(1)初始化cell样式
UICollectionViewFlowLayout *layout = [[UICollectionViewFlowLayout alloc] init];
(2)布局类的方向
layout.scrollDirection = UICollectionViewScrollDirectionVertical;
UICollectionViewScrollDirectionVertical竖向排布
UICollectionViewScrollDirectionHorizontal横向排布
(3)设置item的大小
layout.itemSize = CGSizeMake(120, 100);
(4)设置item的上下间距
layout.minimumLineSpacing = 100;
(5)设置item的左右间距
layout.minimumInteritemSpacing = 10;
(6)设置item的内间距
layout.sectionInset = UIEdgeInsetsMake(5, 5, 5, 5);
2.UICollectionView相关属性
(1)UICollectionView实例化对象和大小
self.collectionView = [[UICollectionView alloc] initWithFrame:self.view.frame collectionViewLayout:layout];
(2)刷新对应的列
[self.collectionView performBatchUpdates:^{[self.collectionView reloadSections:[NSIndexSet indexSetWithIndex:0]];
} completion:nil];
三、协议和代理方法:
(1)遵守的协议:
<UICollectionViewDelegate, UICollectionViewDataSource>
(2)代理方法:
UICollectionViewDelegate协议
该协议用来设置和处理collectionView的功能和一些逻辑,所有的方法都是可选实现。
是否允许某个item的高亮,返回NO,则不能进入高亮状态
(BOOL)collectionView:(UICollectionView *)collectionView shouldHighlightItemAtIndexPath:(NSIndexPath *)indexPath;
当item高亮时触发的方法(void)collectionView:(UICollectionView *)collectionView didHighlightItemAtIndexPath:(NSIndexPath *)indexPath;
结束高亮状态时触发的方法(void)collectionView:(UICollectionView *)collectionView didUnhighlightItemAtIndexPath:(NSIndexPath *)indexPath;
是否可以选中某个item,返回NO,则不能选中(BOOL)collectionView:(UICollectionView *)collectionView shouldSelectItemAtIndexPath:(NSIndexPath *)indexPath;
是否可以取消选中某个item(BOOL)collectionView:(UICollectionView *)collectionView shouldDeselectItemAtIndexPath:(NSIndexPath *)indexPath;
已经选中某个item时触发的方法(void)collectionView:(UICollectionView *)collectionView didSelectItemAtIndexPath:(NSIndexPath *)indexPath;
取消选中某个item时触发的方法(void)collectionView:(UICollectionView *)collectionView didDeselectItemAtIndexPath:(NSIndexPath *)indexPath;
将要加载某个item时调用的方法(void)collectionView:(UICollectionView *)collectionView willDisplayCell:(UICollectionViewCell *)cell forItemAtIndexPath:(NSIndexPath *)indexPath NS_AVAILABLE_IOS(8_0);
将要加载头尾视图时调用的方法(void)collectionView:(UICollectionView *)collectionView willDisplaySupplementaryView:(UICollectionReusableView *)view forElementKind:(NSString *)elementKind atIndexPath:(NSIndexPath *)indexPath NS_AVAILABLE_IOS(8_0);
已经展示某个item时触发的方法(void)collectionView:(UICollectionView *)collectionView didEndDisplayingCell:(UICollectionViewCell *)cell forItemAtIndexPath:(NSIndexPath *)indexPath;
已经展示某个头尾视图时触发的方法(void)collectionView:(UICollectionView *)collectionView didEndDisplayingSupplementaryView:(UICollectionReusableView *)view forElementOfKind:(NSString *)elementKind atIndexPath:(NSIndexPath *)indexPath;
UICollectionView进行重新布局时调用的方法(nonnull UICollectionViewTransitionLayout *)collectionView:(UICollectionView *)collectionView transitionLayoutForOldLayout:(UICollectionViewLayout *)fromLayout newLayout:(UICollectionViewLayout *)toLayout;
UICollectionViewDataSource协议
必须实现的方法:
设置每个分区的item数
(NSInteger)collectionView:(UICollectionView *)collectionView numberOfItemsInSection:(NSInteger)section;
设置返回每个item的属性(UICollectionViewCell *)collectionView:(UICollectionView *)collectionView cellForItemAtIndexPath:(NSIndexPath *)indexPath;
可选实现的方法:
设置分区数,虽然这个方法是可选的,一般我们都会去实现,不去设置它的话,它的默认值为1(NSInteger)numberOfSectionsInCollectionView:(UICollectionView *)collectionView;
对头视图或者尾视图进行设置(UICollectionReusableView *)collectionView:(UICollectionView *)collectionView viewForSupplementaryElementOfKind:(NSString *)kind atIndexPath:(NSIndexPath *)indexPath;
设置某个item是否可以被移动,返回NO则不能移动(BOOL)collectionView:(UICollectionView *)collectionView canMoveItemAtIndexPath:(NSIndexPath *)indexPath NS_AVAILABLE_IOS(9_0);
移动item的时候,会调用这个方法(void)collectionView:(UICollectionView *)collectionView moveItemAtIndexPath:(NSIndexPath *)sourceIndexPath toIndexPath:(NSIndexPath*)destinationIndexPath;
四、九宫格式的布局进行升级
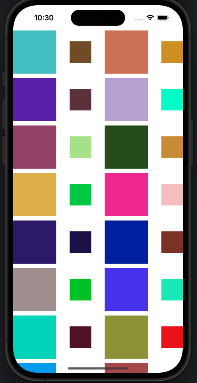
有时候一个简单的九宫格并不能满足我们的需求,有时我们需要item展现不同的大小
//设置每个item的大小,双数的为50*50 单数的为100*100
-(CGSize)collectionView:(UICollectionView *)collectionView layout:(UICollectionViewLayout *)collectionViewLayout sizeForItemAtIndexPath:(NSIndexPath *)indexPath{if (indexPath.row%2!=0) {return CGSizeMake(50, 50);}else{return CGSizeMake(100, 100);}
}
五、实现瀑布流布局
实现思路
UIcollectionView的精髓是UICollectionViewLayout,UICollectionViewLayout决定了我们的UIcollectionView是如何显现在我们的界面上的,为了实现我们的自定义瀑布流式布局,我们需要在子类里重写生成布局的方法,创建我们自己需要的布局
实现原理
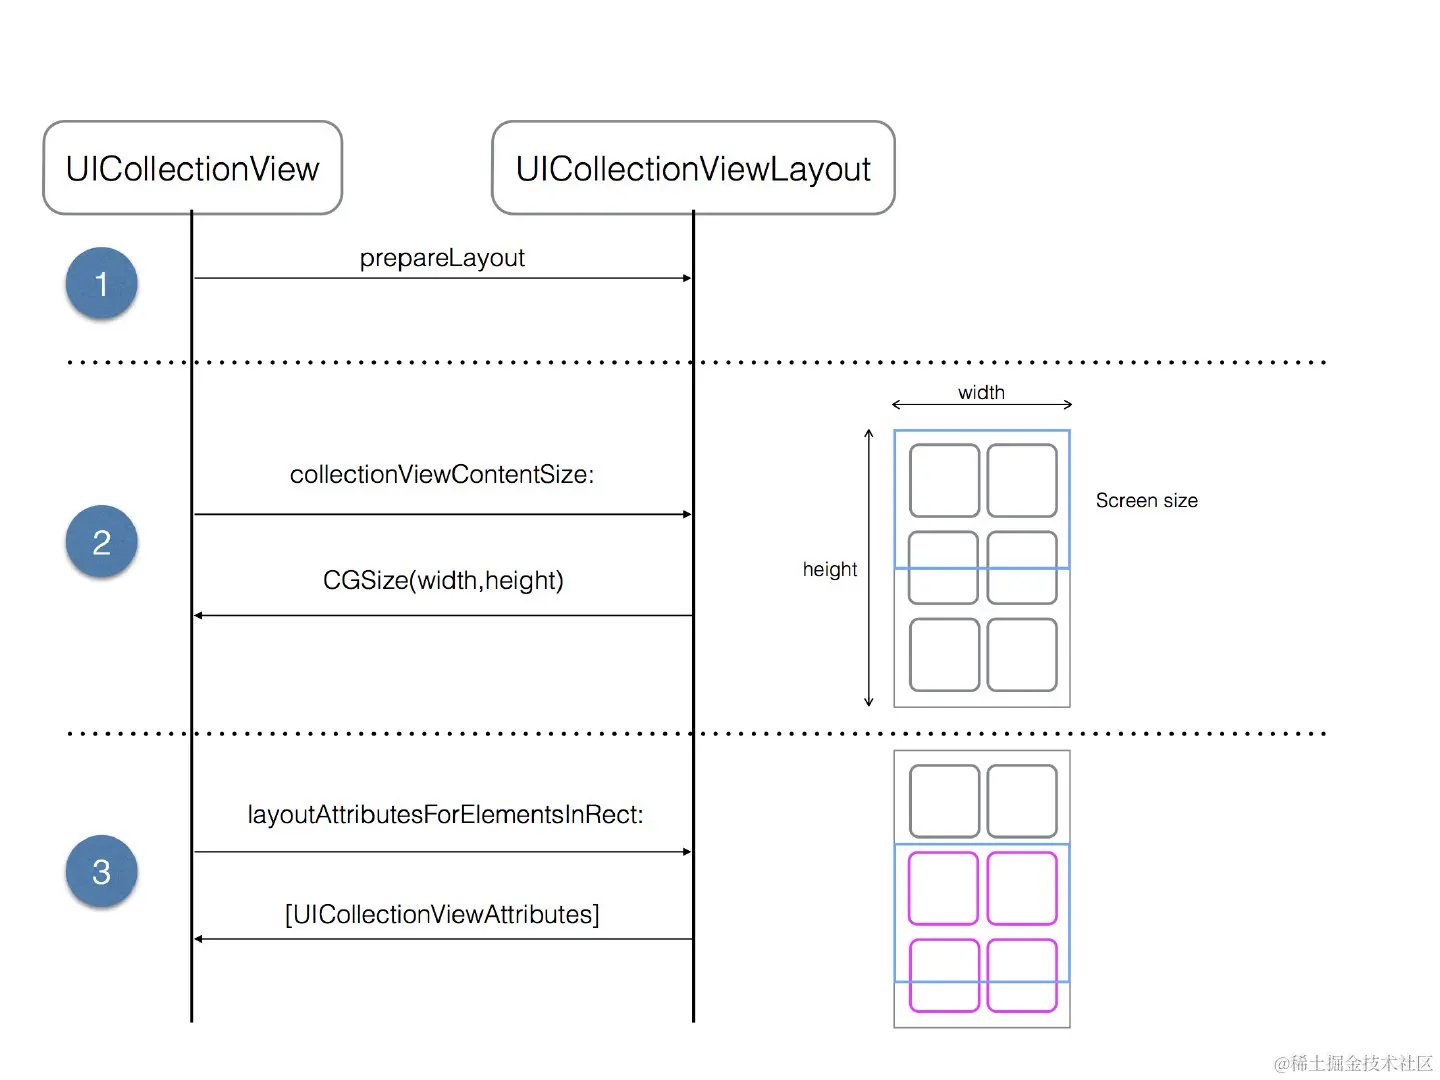
在实现该功能之前,我们先了解一下 UICollectionView 的布局过程,它与布局对象之间的关系是一种协作的关系,当
UICollectionView 需要一些布局信息的时候,它会去调用布局对象的一些函数,这些函数的执行是有一定的次序的,如图所示:
所以我们的创建的继承自UICollectionViewLayout的子类实现以下方法:
- (void)prepareLayout;//进行提前创建布局
- (CGSize)collectionViewContentSize//返回内容画布的大小
- (NSArray<UICollectionViewLayoutAttributes *> *)layoutAttributesForElementsInRect:(CGRect)rect//返回rect中所有元素的布局属性,返回的是一个数组
 - (UICollectionViewLayoutAttributes *)layoutAttributesForItemAtIndexPath:(NSIndexPath *)indexPath
//返回对应的indexPath的位置的cell的布局属性。
重写
- (nullable UICollectionViewLayoutAttributes *)layoutAttributesForSupplementaryViewOfKind:(NSString *)elementKind atIndexPath:(NSIndexPath *)indexPath;方法返回对应indexPath的位置的追加视图的布局属性,如果没有就不用重载
重写- (nullable UICollectionViewLayoutAttributes )layoutAttributesForDecorationViewOfKind:(NSString)elementKind atIndexPath:(NSIndexPath *)indexPath;方法返回对应indexPath的位置的装饰视图的布局属性,如果没有也不需要重载
重写- (BOOL)shouldInvalidateLayoutForBoundsChange:(CGRect)newBounds;当边界发生改变时,是否应该刷新。
由此我们可以知道如果我们想要实现自定义瀑布流,必须需要对以下方法进行重写

其中我们在prepareLayout方法进行布局前的准备,其主要有两个作用:
初始化布局参数: 在 prepareLayout 中,你可以进行一些初始化工作,例如计算和缓存用于布局的参数。这可能包括计算每个单元格的大小、计算行列的数量、初始化用于存储布局属性的数据结构等。
计算并缓存布局属性: 你可以在 prepareLayout 中计算并缓存集合视图中所有单元格的布局属性(UICollectionViewLayoutAttributes)。这样,当集合视图需要显示或进行交互时,可以直接访问缓存的布局属性,而不需要在运行时动态计算。
而- (CGSize)collectionViewContentSize决定了集合视图可以滚动的范围,即集合视图可以在其内容区域内滚动的最大范围。在自定义布局中,你需要根据布局的具体逻辑来计算内容尺寸。这个尺寸通常是在所有的布局属性(UICollectionViewLayoutAttributes)被计算之后确定的,以确保能够容纳所有的元素。
(NSArray<UICollectionViewLayoutAttributes *> *)layoutAttributesForElementsInRect:(CGRect)rect方法则是用于返回在给定矩形区域内的所有视图的布局属性(UICollectionViewLayoutAttributes 实例)数组
代码
下面给出各个函数的代码:
prepareLayout:
//数组的相关设置在这个方法中
//布局前的准备 会调用这个方法
- (void)prepareLayout {[super prepareLayout];self.attributeArray = [NSMutableArray array]; // 使用实例变量,而不是全局变量// 设置为静态的2列// 计算每一个item的宽度CGFloat itemWidth = (self.collectionView.bounds.size.width - self.sectionInset.left - self.sectionInset.right - self.minimumInteritemSpacing) / 2;// 定义数组保存每一列的高度// 这个数组的主要作用是保存每一列的总高度,这个样在布局时,我们可以始终将下一个item放在最短的列下面// prepareLayout 中self.columnHeights = [NSMutableArray arrayWithObjects:@(self.sectionInset.top), @(self.sectionInset.top), nil];// itemCount是外界传进来的item的个数 遍历来设置每一个item的布局for (int i = 0; i < _itemCount; i++) {// 设置每一个item的位置等相关属性NSIndexPath *index = [NSIndexPath indexPathForItem:i inSection:0];// 创建一个布局属性类, 通过indexPath来创建UICollectionViewLayoutAttributes *attris = [UICollectionViewLayoutAttributes layoutAttributesForCellWithIndexPath:index];// 随意一个高度 在60-260之间CGFloat height = arc4random() % 200 + 60;// 哪一行高度小 则放到哪一列下面// 标记最短的列NSInteger shortestColumn = [_columnHeights[0] doubleValue] < [_columnHeights[1] doubleValue] ? 0 : 1;// 将新的item高度加入到短的一列_columnHeights[shortestColumn] = @([_columnHeights[shortestColumn] doubleValue] + height + self.minimumLineSpacing);// 设置item的位置attris.frame = CGRectMake(self.sectionInset.left + (self.minimumInteritemSpacing + itemWidth) * shortestColumn,[_columnHeights[shortestColumn] doubleValue] - height - self.minimumLineSpacing,itemWidth, height);[self.attributeArray addObject:attris];}
这里的sectionInset的top与bottom让笔者理解了一段时间,这里用一张图解释一下:
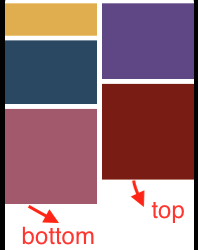
(NSArray<UICollectionViewLayoutAttributes *> *)layoutAttributesForElementsInRect:(CGRect)rect:
//返回布局数组
- (NSArray<__kindof UICollectionViewLayoutAttributes *> *)layoutAttributesForElementsInRect:(CGRect)rect {return _attributeArray;
}
- (CGSize)collectionViewContentSize:
- (CGSize)collectionViewContentSize {// collectionView的contentSize的高度等于所有列高度中最大的值CGFloat maxColumnHeight = [self.columnHeights[0] doubleValue];for (NSInteger i = 1; i < 2; i++) {CGFloat columnHeight = [self.columnHeights[i] doubleValue];if (maxColumnHeight < columnHeight) {maxColumnHeight = columnHeight;}NSLog(@"%f", maxColumnHeight);}return CGSizeMake(0, maxColumnHeight);
}
(UICollectionViewCell *)collectionView:(UICollectionView *)collectionView cellForItemAtIndexPath:(NSIndexPath *)indexPath:
//返回每个item
- (UICollectionViewCell *)collectionView:(UICollectionView *)collectionView cellForItemAtIndexPath:(NSIndexPath *)indexPath {UICollectionViewCell *cell = [collectionView dequeueReusableCellWithReuseIdentifier:@"cell" forIndexPath:indexPath];cell.backgroundColor = [UIColor colorWithRed:arc4random() % 255 / 255.0 green:arc4random() % 255 / 255.0 blue:arc4random() % 250 / 250.0 alpha:1];return cell;}
调用顺序
对于UICollectionView,函数调用顺序为
prepareLayout:
调用时机: 在布局发生变化之前,比如初始化时、调用 reloadData、invalidateLayout 等方法时。
作用: 进行一些布局的准备工作。collectionViewContentSize:
调用时机: 在需要计算集合视图内容尺寸时,比如初始化时、布局发生变化时。
作用: 返回整个集合视图内容的尺寸。layoutAttributesForElementsInRect::
调用时机: 在需要显示或更新某个区域内的视图时,比如滚动时、布局发生变化时。
作用: 返回给定矩形区域内所有视图的布局属性。(UICollectionViewCell *)collectionView:(UICollectionView *)collectionView cellForItemAtIndexPath:(NSIndexPath *)indexPath
调用时机:创建item时调用
作用:创建和配置单元格
其中prepareLayout方法只会调用一次,之后在往下滑动UICollectionView时会不断重复调用其他三种方法
相较于仅能纵向单列数据展示的tableView,UICollectionView允许我们进行更加自由且灵活的布局,而轻松实现这种效果则归功于我们的自定义的UICollectionViewFlowLayout类,我们可以通过重写此类中的一些方法来实现我们单元格的多样布局。
实现步骤
由此我们得出自定义布局的实现步骤:
- 创建自定义布局类
UICollectionViewFlowLayout - 重写布局方法,确定布局数组
_attributeArray(重要) - 注册自定义布局类
MyCustomFlowLayout *customLayout = [[MyCustomFlowLayout alloc] init]; [self.collectionView setCollectionViewLayout:customLayout]; - 创建cell
实现效果
总结
通过学习UICollectionView,笔者认为最重要的便是知道我们的UICollectionView是如何去创建我们的单元格的:
通过使用默认或是自定义的流布局UICollectionViewLayout来实现我们的灵活布局,这便需要我们先去实现我们的布局属性数组,确定如何布局后程序会去创建我们的cell,然后将cell逐个填入我们的布局数组中=
笔者在这里仅仅浅薄地学习了UICollectionView,如有不足请不吝指出,而对于UICollectionView的核心,笔者认为其为确定布局
相关文章:

【iOS】UICollectionView
文章目录 前言一、实现简单九宫格布局二、UICollectionView中的常用方法和属性1.UICollectionViewFlowLayout相关属性2.UICollectionView相关属性 三、协议和代理方法:四、九宫格式的布局进行升级五、实现瀑布流布局实现思路实现原理代码调用顺序实现步骤实现效果 总…...
Linux poll 和 select 机制
poll select 介绍 使用非阻塞 I/O 的应用程序常常使用 poll, select, 和 epoll 系统调用. poll, select 和 epoll 本质上有相同的功能: 每个允许一个进程来决定它是否可读或者写一个 或多个文件而不阻塞. 这些调用也可阻塞进程直到任何一个给定集合的文件描述符可用来 读或写.…...
【JVM基础】 JVM 如何加载一个类以及类加载机制
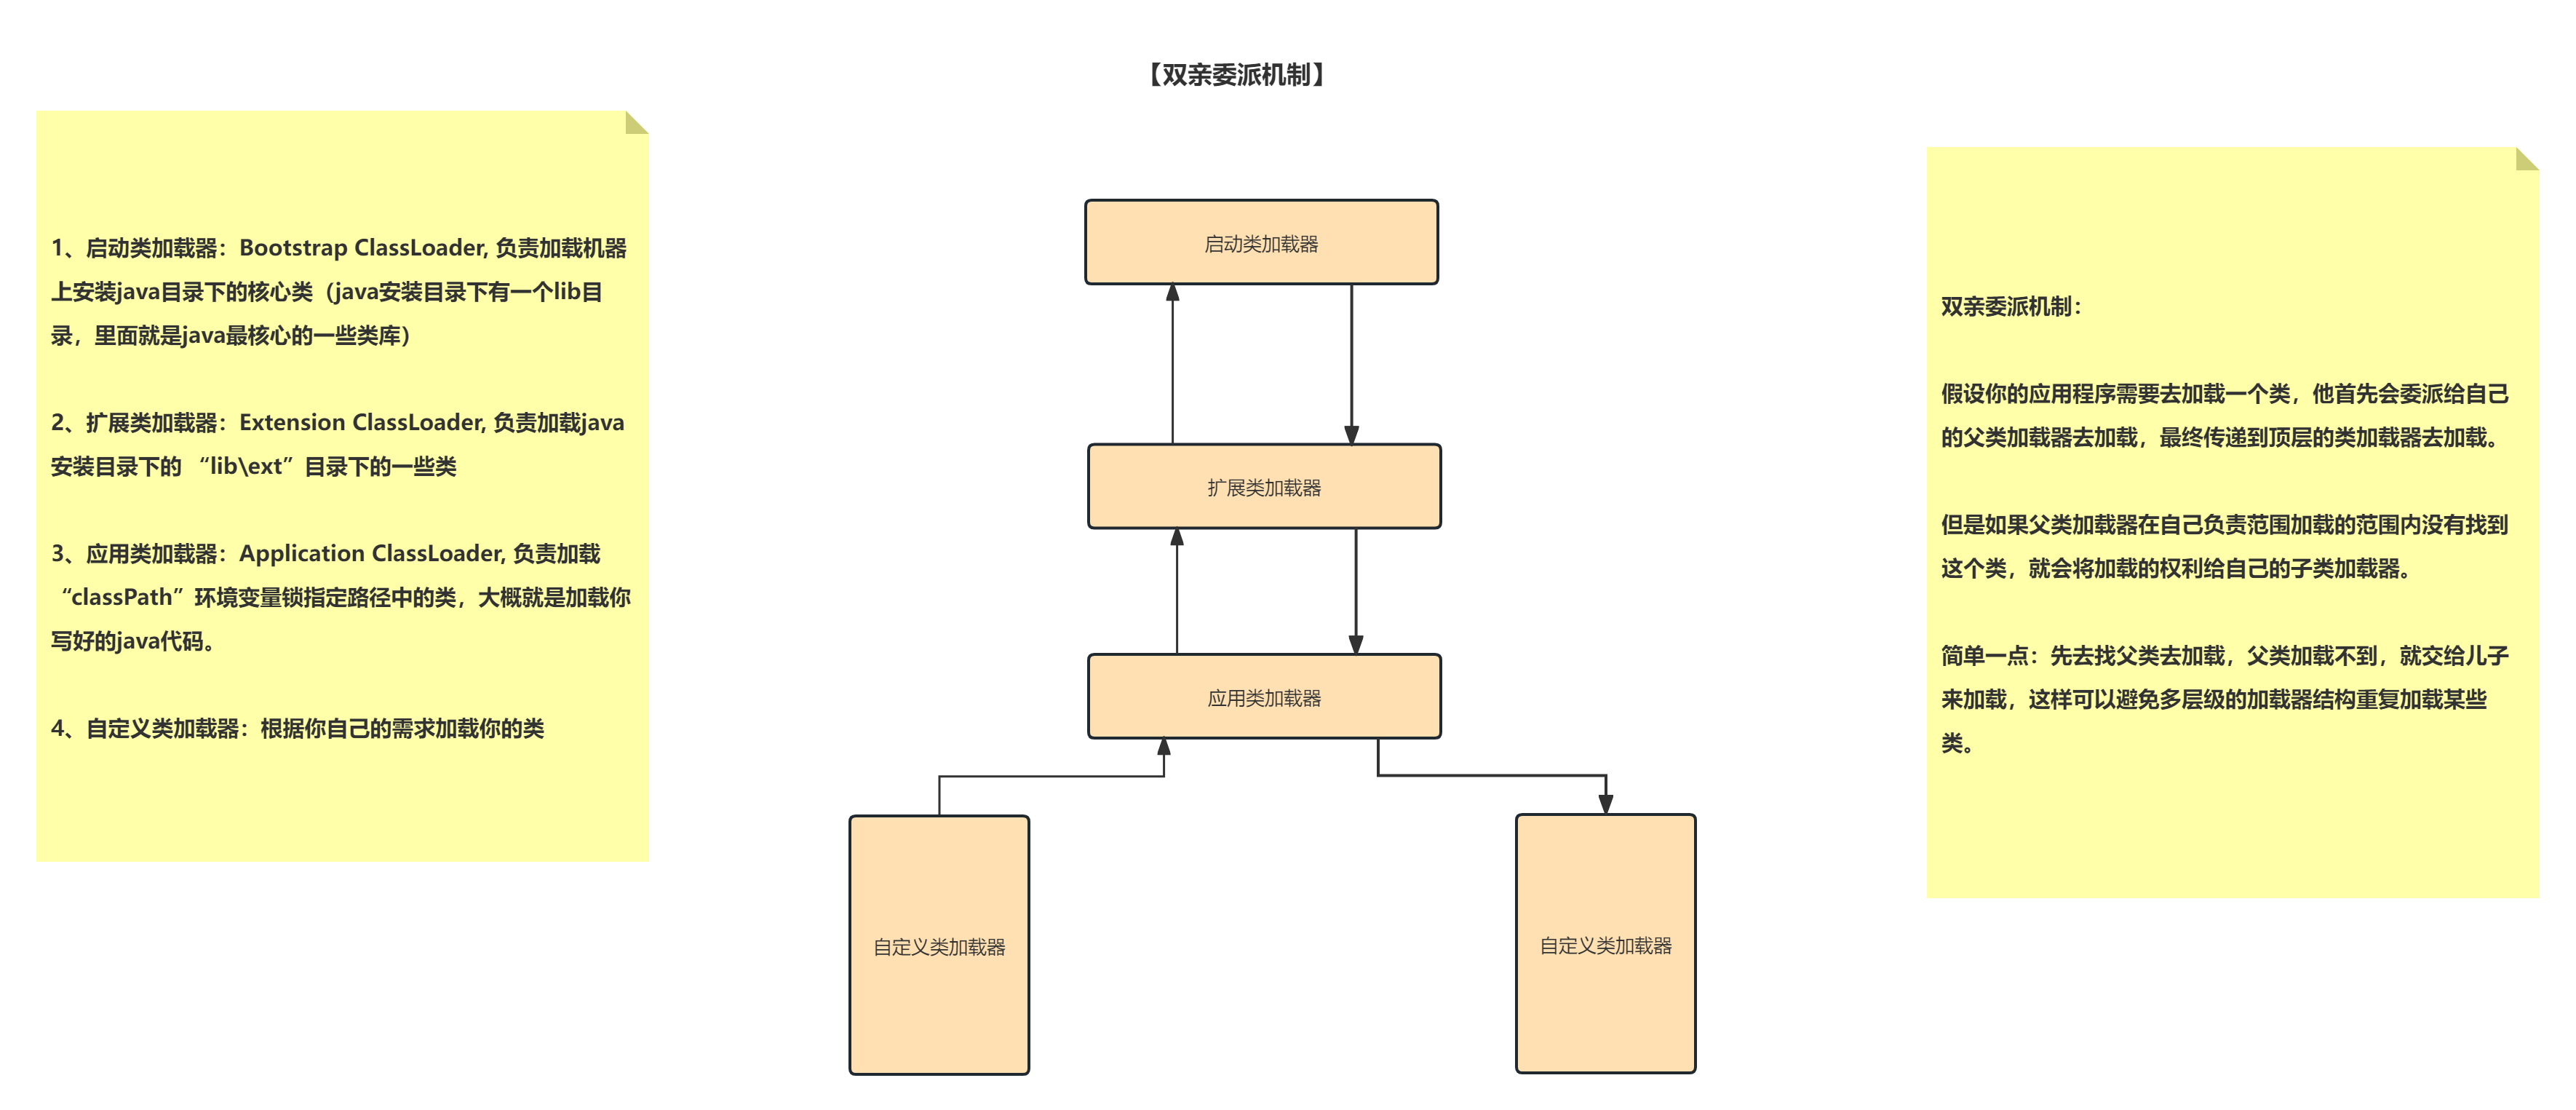
文章目录 1、什么时候一个类会被加载?1、包含 main 方法的主类2、非 包含 main 方法的主类,什么时候去加载? 3、类加载器如何加载一个类?1、验证阶段:2、准备阶段:3、解析阶段:4、初始化&#x…...
Android Studio使用Genymotion
1. Genymotion介绍 GenyMotion速度之快令人发指,模拟效果堪比真机调试,支持绝大部分的模拟器功能,甚至包括语音,Google Now,支持eclipse, android studio。非常适合用来开发和演示效果。 2. Genymotion下载 Genymotio…...

Mysql sql_mode参数配置
今天在使用数据库查询时使用了Group语句,遇到问题: SELECT t1.UnderlyingInstrumentID, t2.* FROM t_OptionInstrument t1 LEFT JOIN t_Instrument t2 ON t2.InstrumentID t1.UnderlyingInstrumentID GROUP BY t1.UnderlyingInstrumentID > 1055 - …...

SpringIOC之AbstractMessageSource
博主介绍:✌全网粉丝5W,全栈开发工程师,从事多年软件开发,在大厂呆过。持有软件中级、六级等证书。可提供微服务项目搭建与毕业项目实战,博主也曾写过优秀论文,查重率极低,在这方面有丰富的经验…...
详解Vue3中的基础路由和动态路由
本文主要介绍Vue3中的基础路由和动态路由。 目录 一、基础路由二、动态路由 Vue3中的路由使用的是Vue Router库,它是一个官方提供的用于实现应用程序导航的工具。Vue Router在Vue.js的核心库上提供了路由的功能,使得我们可以在单页应用中实现页面的切换、…...
)
Mysql四种事务隔离级别(简易理解)
读未提交:简单理解就是读到没有提交事务的执行结果;读已提交:简单理解就是只能读到已经提交的事务执行结果;可重复读:简单理解就是确保并发读取数据库时,读到的数据一致,这是mysql默认隔离级别&…...
react中使用redux最简单最方便的方式,配合rematch简化操作,5分钟学会
react中使用状态管理的方式也很多,比如redux和mobx等,今天这一片就讲一下redux的入门到熟练使用,主要是要理解它redux的组成有哪些,到怎么创建,和组建中怎么使用三个问题。这里先放上官网文档,不理解的地方…...
vmware安装中标麒麟高级服务器操作系统软件 V7.0操作系统
vmware安装中标麒麟高级服务器操作系统软件 V7.0操作系统 1、下载中标麒麟高级服务器操作系统软件 V7.0镜像2、安装中标麒麟高级服务器操作系统软件 V7.0操作系统 1、下载中标麒麟高级服务器操作系统软件 V7.0镜像 官方提供使用通道 访问官网 链接: https://www.kylinos.cn/ 下…...
OpenCV | 霍夫变换:以车道线检测为例
霍夫变换 霍夫变换只能灰度图,彩色图会报错 lines cv2.HoughLinesP(edge_img,1,np.pi/180,15,minLineLength40,maxLineGap20) 参数1:要检测的图片矩阵参数2:距离r的精度,值越大,考虑越多的线参数3:距离…...

【C#与Redis】--目录
1. 介绍 2. Redis 数据结构 3. Redis 命令 3.1 基本命令 3.2 字符串命令 3.3 哈希命令 3.4 列表命令 3.5 集合命令 3.6 有序集合命令 4. C# 操作 Redis 4.1 使用 Redis 库 4.2 连接 Redis 服务器 4.3 操作 Redis 数据结构 4.5 执行 Redis 命令 5. 高级主题 5.1 Redis 事…...
html旋转相册
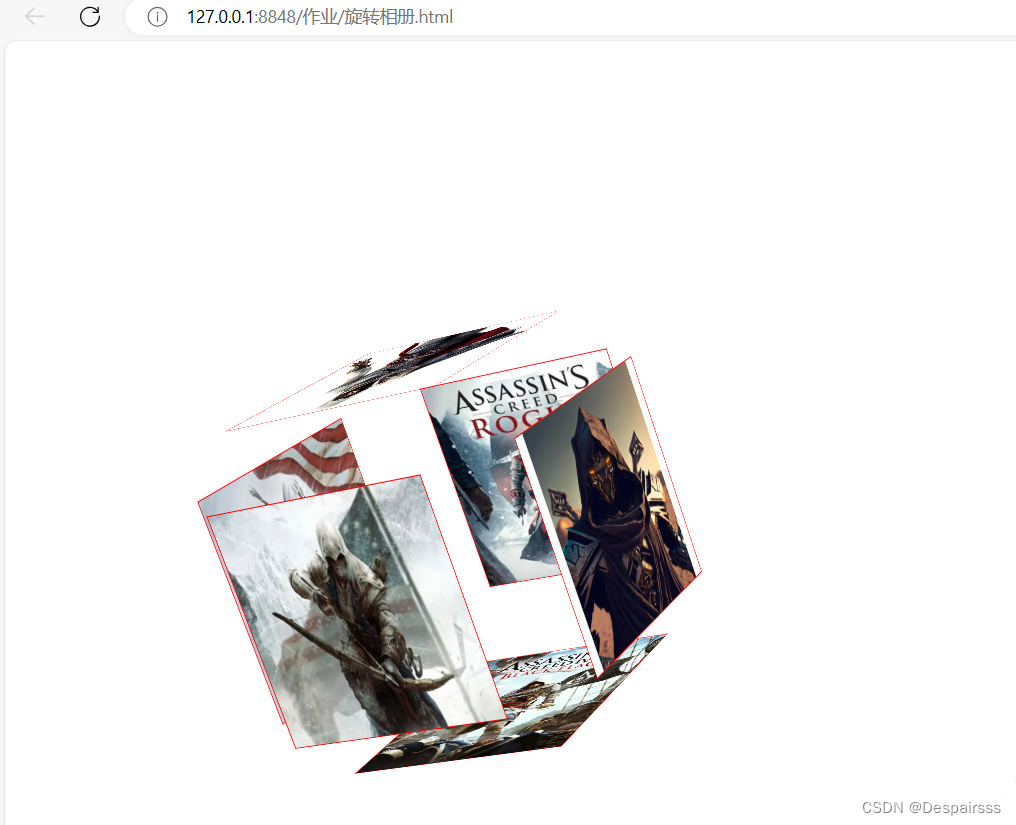
一、实验题目 做一个旋转的3d相册,当鼠标停留在相册时,相册向四面散开 二、实验代码 <!DOCTYPE html> <html lang"zh"><head><meta charset"UTF-8"><meta http-equiv"X-UA-Compatible" con…...
Plantuml之对象图语法介绍(十九)
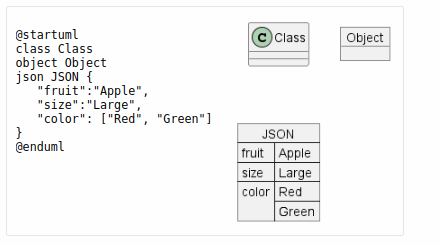
简介: CSDN博客专家,专注Android/Linux系统,分享多mic语音方案、音视频、编解码等技术,与大家一起成长! 优质专栏:Audio工程师进阶系列【原创干货持续更新中……】🚀 优质专栏:多媒…...
深度学习(八):bert理解之transformer
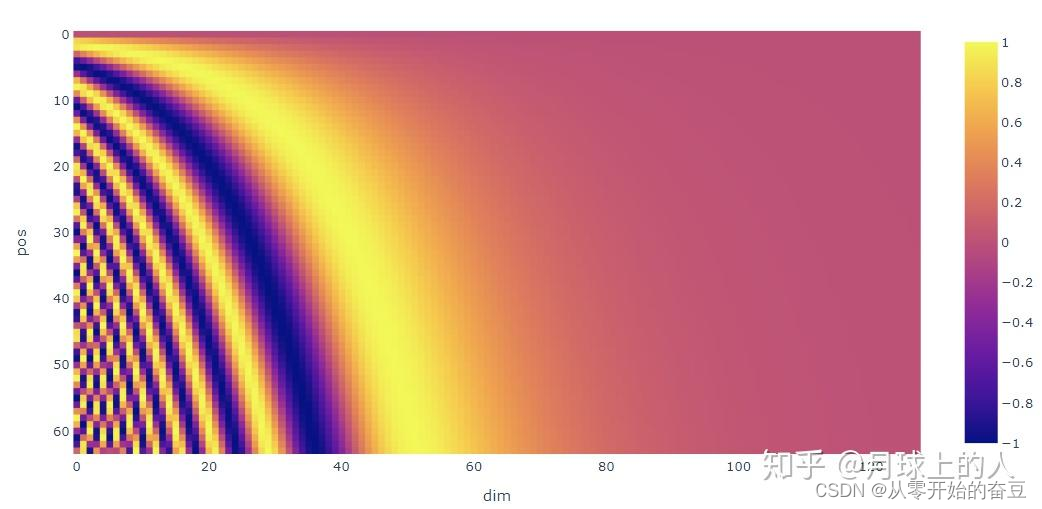
1.主要结构 transformer 是一种深度学习模型,主要用于处理序列数据,如自然语言处理任务。它在 2017 年由 Vaswani 等人在论文 “Attention is All You Need” 中提出。 Transformer 的主要特点是它完全放弃了传统的循环神经网络(RNN&#x…...
, Filter(), Find(), Map(), Negate(), Position())
R语言中的函数28:Reduce(), Filter(), Find(), Map(), Negate(), Position()
文章目录 介绍Reduce()实例 Filter()实例 Find()实例 Map()实例 Negate()实例 Position()实例 介绍 R语言中的Reduce(), Filter(), Find(), Map(), Negate(), Position()是base包中的一些高级函数。随后,很多包也给这些函数提供了更多的扩展。 Reduce() 该函数根…...
RTP/RTCP/RTSP/SIP/SDP/RTMP对比
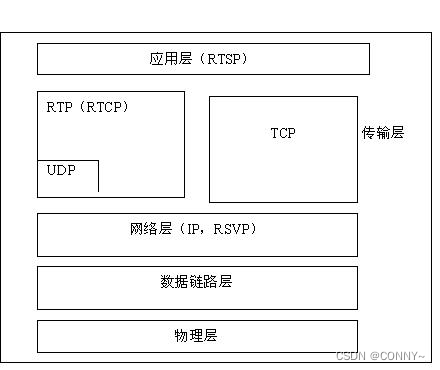
RTP(Real-time Transport Protocol)是一种用于实时传输音频和视频数据的协议。它位于传输层和应用层之间,主要负责对媒体数据进行分包、传输和定时。 RTCP(Real-Time Control Protocol)是 RTP 的控制协议,…...
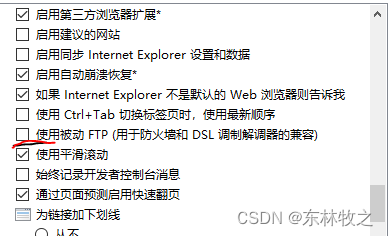
Centos安装vsftpd:centos配置vsftpd,ftp报200和227错误
一、centos下载安装vsftpd(root权限) 1、下载安装 yum -y install vsftpd 2、vsftpd的配置文件 /etc/vsftpd.conf 3、备份原来的配置文件 sudo cp /etc/vsftpd.conf /etc/vsftpd.conf.backup 4、修改配置文件如下:vi /etc/vsftpd.conf …...

软件测试职业规划
软件测试人员的发展误区【4】 公司开发的产品专业性较强,软件测试人员需要有很强的专业知识,现在软件测试人员发展出现了一种测试管理者不愿意看到的景象: 1、开发技术较强的软件测试人员转向了软件开发(非测试工具开发); 2、业务…...

C语言数据结构
C 语言是一种强大的编程语言,它提供了许多数据结构的实现。在本文档中,我们将讨论一些常见的数据结构,并提供相应的代码示例。 数组(Array) 数组是一种线性数据结构,它可以存储相同类型的元素。数组的大小…...
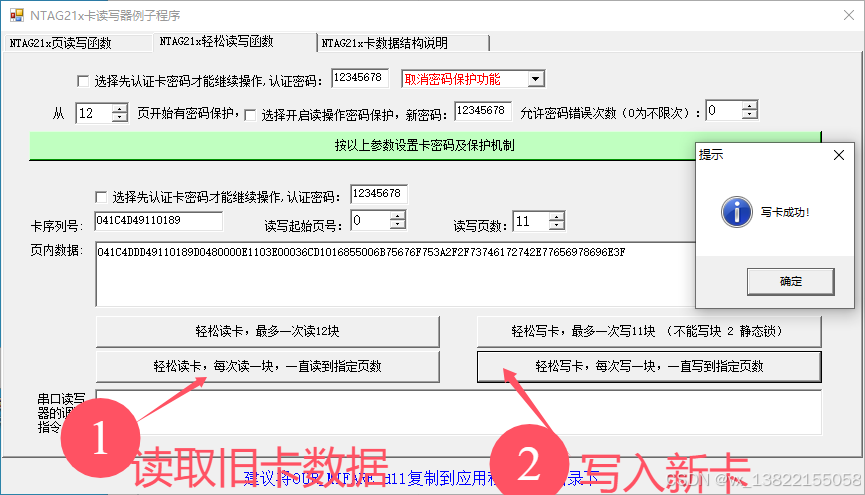
VB.net复制Ntag213卡写入UID
本示例使用的发卡器:https://item.taobao.com/item.htm?ftt&id615391857885 一、读取旧Ntag卡的UID和数据 Private Sub Button15_Click(sender As Object, e As EventArgs) Handles Button15.Click轻松读卡技术支持:网站:Dim i, j As IntegerDim cardidhex, …...

【入坑系列】TiDB 强制索引在不同库下不生效问题
文章目录 背景SQL 优化情况线上SQL运行情况分析怀疑1:执行计划绑定问题?尝试:SHOW WARNINGS 查看警告探索 TiDB 的 USE_INDEX 写法Hint 不生效问题排查解决参考背景 项目中使用 TiDB 数据库,并对 SQL 进行优化了,添加了强制索引。 UAT 环境已经生效,但 PROD 环境强制索…...

【SQL学习笔记1】增删改查+多表连接全解析(内附SQL免费在线练习工具)
可以使用Sqliteviz这个网站免费编写sql语句,它能够让用户直接在浏览器内练习SQL的语法,不需要安装任何软件。 链接如下: sqliteviz 注意: 在转写SQL语法时,关键字之间有一个特定的顺序,这个顺序会影响到…...
)
相机Camera日志分析之三十一:高通Camx HAL十种流程基础分析关键字汇总(后续持续更新中)
【关注我,后续持续新增专题博文,谢谢!!!】 上一篇我们讲了:有对最普通的场景进行各个日志注释讲解,但相机场景太多,日志差异也巨大。后面将展示各种场景下的日志。 通过notepad++打开场景下的日志,通过下列分类关键字搜索,即可清晰的分析不同场景的相机运行流程差异…...

Rapidio门铃消息FIFO溢出机制
关于RapidIO门铃消息FIFO的溢出机制及其与中断抖动的关系,以下是深入解析: 门铃FIFO溢出的本质 在RapidIO系统中,门铃消息FIFO是硬件控制器内部的缓冲区,用于临时存储接收到的门铃消息(Doorbell Message)。…...

Java 二维码
Java 二维码 **技术:**谷歌 ZXing 实现 首先添加依赖 <!-- 二维码依赖 --><dependency><groupId>com.google.zxing</groupId><artifactId>core</artifactId><version>3.5.1</version></dependency><de…...

基于Java Swing的电子通讯录设计与实现:附系统托盘功能代码详解
JAVASQL电子通讯录带系统托盘 一、系统概述 本电子通讯录系统采用Java Swing开发桌面应用,结合SQLite数据库实现联系人管理功能,并集成系统托盘功能提升用户体验。系统支持联系人的增删改查、分组管理、搜索过滤等功能,同时可以最小化到系统…...
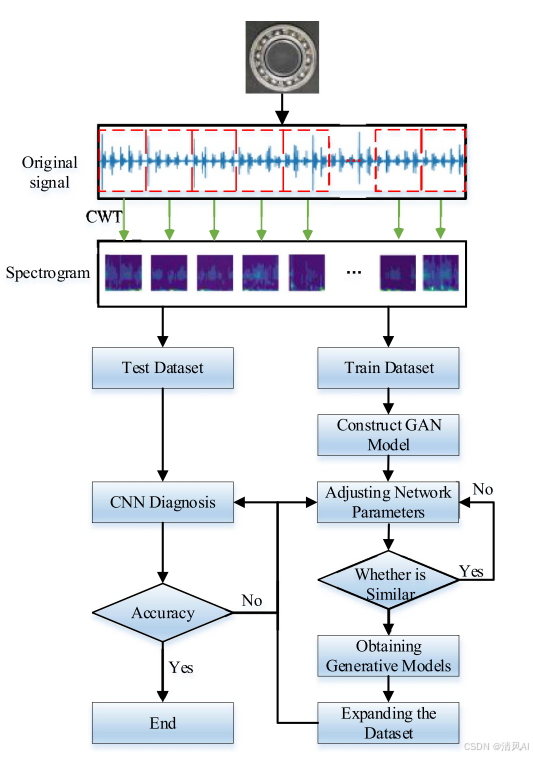
基于IDIG-GAN的小样本电机轴承故障诊断
目录 🔍 核心问题 一、IDIG-GAN模型原理 1. 整体架构 2. 核心创新点 (1) 梯度归一化(Gradient Normalization) (2) 判别器梯度间隙正则化(Discriminator Gradient Gap Regularization) (3) 自注意力机制(Self-Attention) 3. 完整损失函数 二…...
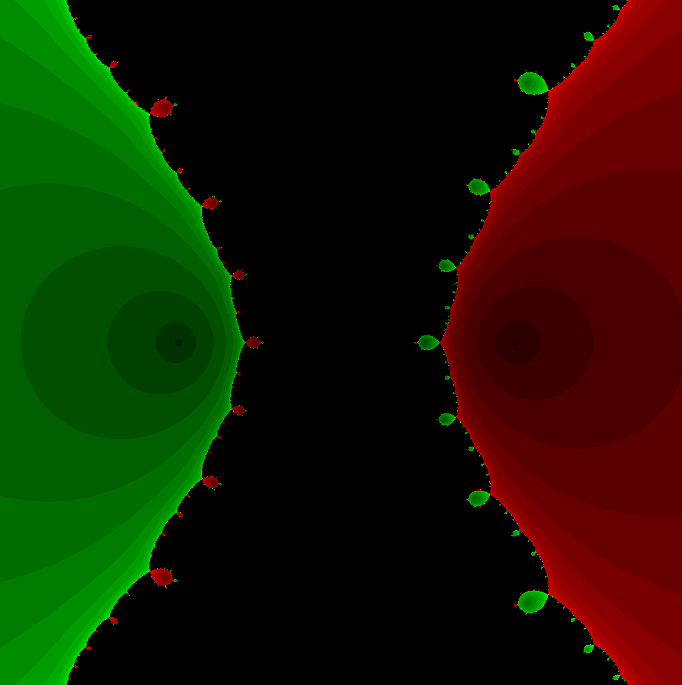
在Mathematica中实现Newton-Raphson迭代的收敛时间算法(一般三次多项式)
考察一般的三次多项式,以r为参数: p[z_, r_] : z^3 (r - 1) z - r; roots[r_] : z /. Solve[p[z, r] 0, z]; 此多项式的根为: 尽管看起来这个多项式是特殊的,其实一般的三次多项式都是可以通过线性变换化为这个形式…...
(一)单例模式
一、前言 单例模式属于六大创建型模式,即在软件设计过程中,主要关注创建对象的结果,并不关心创建对象的过程及细节。创建型设计模式将类对象的实例化过程进行抽象化接口设计,从而隐藏了类对象的实例是如何被创建的,封装了软件系统使用的具体对象类型。 六大创建型模式包括…...

