Android10.0 人脸解锁流程分析
人脸解锁概述
人脸解锁即用户通过注视设备的正面方便地解锁手机或平板。Android 10 为支持人脸解锁的设备在人脸认证期间添加了一个新的可以安全处理相机帧、保持隐私与安全的人脸认证栈的支持,也为安全合规地启用集成交易的应用(网上银行或其他服务)提供了一种容易实现的方式。
Android 原生的人脸认证栈在 Android 10 是一种新的实现,与 Android P 不一样了。新增 IBiometricsFace.hal ,IBiometricsFaceClientCallback.hal 和 types.hal 这些接口。例如:我这边的源码都是 extends 以上接口,进行了些扩展后再实现的。
底层 Face HIDL简单认识
为了实现 Face HIDL,必须在供应商 (vendor) 指定的库 (library) 里实现 IBiometricsFace.hal 的所有方法。接下来我们就来看看 hardware/interfaces/biometrics/face/1.0 目录下的源代码。
hardware/interfaces/biometrics/face/1.0/IBiometricsFace.hal
package android.hardware.biometrics.face@1.0;
import IBiometricsFaceClientCallback;
/*** 用于人脸认证的 HAL 接口*/
interface IBiometricsFace {/*** 设置当前的客户端回调*/@callflow(next={"setActiveUser"})@entrysetCallback(IBiometricsFaceClientCallback clientCallback)generates (OptionalUint64 result);/*** 设置所有随后的 HAL 操作作用于上面的活跃用户*/@callflow(next={"authenticate", "generateChallenge", "enumerate", "remove"})setActiveUser(int32_t userId, string storePath) generates (Status status);/*** 生成随机数,用于 token 校验*/@callflow(next={"enroll", "revokeChallenge", "setFeature"})generateChallenge(uint32_t challengeTimeoutSec)generates (OptionalUint64 result);/*** 录入一张用户的人脸*/@callflow(next={"cancel", "enroll", "revokeChallenge", "remove"})enroll(vec<uint8_t> hat, uint32_t timeoutSec, vec<Feature> disabledFeatures)generates (Status status);/*** 撤销随机数*/@callflow(next={"authenticate", "setActiveUser", "enumerate", "remove"})revokeChallenge() generates (Status status);setFeature(Feature feature, bool enabled, vec<uint8_t> hat, uint32_t faceId)generates(Status status);getFeature(Feature feature, uint32_t faceId) generates (OptionalBool result);/*** 返回和当前人脸集关联的标识符 (ID),认证者 ID*/@callflow(next={"authenticate"})getAuthenticatorId() generates (OptionalUint64 result);/*** 取消当前的录入、认证、删除人脸或枚举人脸的操作*/@callflow(next={"authenticate", "enroll", "enumerate", "remove","setActiveUser"})cancel() generates (Status status);/*** 枚举正在使用系统的用户的所有人脸模板*/@callflow(next={"remove", "enroll", "authenticate", "setActiveUser"})enumerate() generates (Status status);/*** 删除正在使用系统的用户的一个或所有人脸模板*/@callflow(next={"enumerate", "authenticate", "cancel", "getAuthenticatorId","setActiveUser"})remove(uint32_t faceId) generates (Status status);/*** 认证当前用户是否登录系统的用户*/@callflow(next={"cancel", "generateChallenge", "remove"})authenticate(uint64_t operationId) generates (Status status);userActivity() generates (Status status);/*** 为当前用户重置禁用状态*/resetLockout(vec<uint8_t> hat) generates (Status status);
};
hardware/interfaces/biometrics/face/1.0/IBiometricsFaceClientCallback.hal
package android.hardware.biometrics.face@1.0;
/*** 这个回调接口被客户端用来接收人脸 HAL 的(状态)更新*/
interface IBiometricsFaceClientCallback {/*** 当录入的步骤完成时被回调*/oneway onEnrollResult(uint64_t deviceId, uint32_t faceId, int32_t userId,uint32_t remaining);/*** 当一张人脸被成功认证时被回调*/oneway onAuthenticated(uint64_t deviceId, uint32_t faceId, int32_t userId,vec<uint8_t> token);/*** 当底层获得一张人脸时被回调*/oneway onAcquired(uint64_t deviceId, int32_t userId,FaceAcquiredInfo acquiredInfo, int32_t vendorCode);/*** 当错误发生时被回调*/oneway onError(uint64_t deviceId, int32_t userId, FaceError error,int32_t vendorCode);/*** 当人脸模板被删除时被回调*/oneway onRemoved(uint64_t deviceId, vec<uint32_t> removed, int32_t userId);/*** 枚举所有人脸模板的回调*/oneway onEnumerate(uint64_t deviceId, vec<uint32_t> faceIds,int32_t userId);/*** 当禁用状态改变时被回调*/oneway onLockoutChanged(uint64_t duration);
};
供应商(主要是手机厂商)需要实现上述接口的方法并集成人脸识别算法,完成录入和认证等的底层实现。
hardware/interfaces/biometrics/face/1.0/types.hal
package android.hardware.biometrics.face@1.0;
/** 在这里 setActiveUser 不会被调用,所有错误消息会返回这个用户 ID*/
enum UserHandle : int32_t {NONE = -1
};
/*** 状态码*/
enum Status : uint32_t {/*** 方法被成功调用*/OK = 0,/*** 方法调用的参数之一无效*/ILLEGAL_ARGUMENT = 1,/*** 人脸 HAL 不支持这个操作*/OPERATION_NOT_SUPPORTED = 2,/***  HAL 遭遇内部错误,不能完成请求*/INTERNAL_ERROR = 3,/*** 没有录入人脸*/NOT_ENROLLED = 4
};
enum Feature : uint32_t {/*** 要求注视*/REQUIRE_ATTENTION = 1,/*** 要求录入时姿势多样(有变化) */REQUIRE_DIVERSITY = 2
};
/*** onError 回调的人脸错误消息*/
enum FaceError : int32_t {/*** 不能被解析的硬件错误*/HW_UNAVAILABLE = 1,/*** 不能处理当前操作*/UNABLE_TO_PROCESS = 2,/*** 超时*/TIMEOUT = 3,/*** 没有足够的存储空间去完成当前的操作*/NO_SPACE = 4,/*** 被取消*/CANCELED = 5,/*** 无法删除*/UNABLE_TO_REMOVE = 6,/*** 30s 禁用*/LOCKOUT = 7,/*** 用来开启供应商指定的错误消息*/VENDOR = 8,/*** 禁用直到使用主身份认证*/LOCKOUT_PERMANENT = 9
};
/*** 向客户端反馈获取人脸的消息(质量),以便用户做出相应的改变*/
enum FaceAcquiredInfo : int32_t {GOOD = 0,/*** 无效人脸*/INSUFFICIENT = 1,/*** 人脸太亮*/TOO_BRIGHT = 2,/*** 人脸太暗*/TOO_DARK = 3,/*** 人脸太近*/TOO_CLOSE = 4,/*** 人脸太远*/TOO_FAR = 5,/*** 人脸太高,只有下半部分*/FACE_TOO_HIGH = 6,/*** 人脸太低*/FACE_TOO_LOW = 7,/*** 人脸偏右*/FACE_TOO_RIGHT = 8,/*** 人脸偏左*/FACE_TOO_LEFT = 9,/*** 凝视不佳*/POOR_GAZE = 10,/*** 未检测到人脸*/NOT_DETECTED = 11,/*** 检测到运动过多*/TOO_MUCH_MOTION = 12,/*** 重新校正*/RECALIBRATE = 13,/*** 和前一帧差异太大*/TOO_DIFFERENT = 14,/*** 和前一帧太相似*/TOO_SIMILAR = 15,/*** 摇射角度太大,直面相机角度为 0*/PAN_TOO_EXTREME = 16,/*** 倾斜角度太大*/TILT_TOO_EXTREME = 17,/*** 侧倾角幅度太大*/ROLL_TOO_EXTREME = 18,/*** 人脸被遮挡*/FACE_OBSCURED = 19,START = 20,/*** 传感器(摄像头)脏了*/SENSOR_DIRTY = 21,/*** 用于开启供应商指定的获取人脸的消息*/VENDOR = 22
};
/*** 结果*/
struct OptionalUint64 {/*** 返回的状态*/Status status;/*** 只意味着状态是 OK 的*/uint64_t value;
};
/*** 结果*/
struct OptionalBool {/*** 返回的状态*/Status status;/*** 只意味着状态是 OK 的*/bool value;
};
人脸识别调用流程(注册监听、捕获人脸、比对)
人脸解锁的入口在Keyguard中,但息屏的处理是从PowerManager开始,最终到锁屏的核心类KeyguardViewMediator,息屏处理的大致流程如下:

前面几步就跳过,直接从PhoneWindowManager开始分析。灭屏之后会调用PhoneWindowManager的startedGoingToSleep方法:
frameworks/base/services/core/java/com/android/server/policy/PhoneWindowManager.java
// Called on the PowerManager's Notifier thread.@Overridepublic void startedGoingToSleep(int why) {if (DEBUG_WAKEUP) {Slog.i(TAG, "Started going to sleep... (why="+ WindowManagerPolicyConstants.offReasonToString(why) + ")");}mGoingToSleep = true;mRequestedOrGoingToSleep = true;if (mKeyguardDelegate != null) {mKeyguardDelegate.onStartedGoingToSleep(why);}}
在该方法中又调用了KeyguardServiceDelegate类的onStartedGoingToSleep方法。
KeyguardServiceDelegate#onStartedGoingToSleep →KeyguardServiceWrapper#onStartedGoingToSleep → KeyguardService#onStartedGoingToSleep → KeyguardViewMediator#onStartedGoingToSleep,最终会调用到KeyguardViewMediator锁屏核心类。
frameworks/base/packages/SystemUI/src/com/android/keyguard/KeyguardUpdateMonitor.java
public void onStartedGoingToSleep(int why) {if (DEBUG) Log.d(TAG, "onStartedGoingToSleep(" + why + ")");synchronized (this) {mDeviceInteractive = false;mGoingToSleep = true;// 这位置的代码作用具体不知,但放在前面可以解决息屏后又立马使用指纹解锁时:出现1.2s内没反应的问题。mUpdateMonitor.dispatchKeyguardGoingAway(false);// Lock immediately based on setting if secure (user has a pin/pattern/password).// This also "locks" the device when not secure to provide easy access to the// camera while preventing unwanted input.int currentUser = KeyguardUpdateMonitor.getCurrentUser();final boolean lockImmediately =mLockPatternUtils.getPowerButtonInstantlyLocks(currentUser)|| !mLockPatternUtils.isSecure(currentUser);long timeout = getLockTimeout(KeyguardUpdateMonitor.getCurrentUser());mLockLater = false;// 省略部分代码......//判断是否需要播放锁屏音if (mPendingLock) {playSounds(true);}}// 使得KeyguardUpdateMonitor可以监听到GoingToSleep// KeyguardUpdateMonitor 是Keyguard更新监视器mUpdateMonitor.dispatchStartedGoingToSleep(why);//通知开始息屏notifyStartedGoingToSleep();}
这里主要分析的是屏幕自己息屏,则重点关注mUpdateMonitor.dispatchStartedGoingToSleep(why)。
frameworks/base/packages/SystemUI/src/com/android/keyguard/KeyguardUpdateMonitor.java
// 等待屏幕超时息屏,handler会发送 MSG_STARTED_GOING_TO_SLEEPpublic void dispatchStartedGoingToSleep(int why) {mHandler.sendMessage(mHandler.obtainMessage(MSG_STARTED_GOING_TO_SLEEP, why, 0));}// 注意:如果说按电源键息屏,handler会发送 MSG_STARTED_WAKING_UPpublic void dispatchStartedWakingUp() {synchronized (this) {mDeviceInteractive = true;}mHandler.sendEmptyMessage(MSG_STARTED_WAKING_UP);}
屏幕超时息屏堆栈:
12-10 09:43:41.437  1468  1468 D updateFaceListeningState: java.lang.Throwable
12-10 09:43:41.437  1468  1468 D updateFaceListeningState:      at com.android.keyguard.KeyguardUpdateMonitor.updateFaceListeningState(KeyguardUpdateMonitor.java:2128)
12-10 09:43:41.437  1468  1468 D updateFaceListeningState:      at com.android.keyguard.KeyguardUpdateMonitor.updateBiometricListeningState(KeyguardUpdateMonitor.java:2053)
12-10 09:43:41.437  1468  1468 D updateFaceListeningState:      at com.android.keyguard.KeyguardUpdateMonitor.setKeyguardGoingAway(KeyguardUpdateMonitor.java:575)
12-10 09:43:41.437  1468  1468 D updateFaceListeningState:      at com.android.keyguard.KeyguardUpdateMonitor.handleKeyguardGoingAway(KeyguardUpdateMonitor.java:1727)
12-10 09:43:41.437  1468  1468 D updateFaceListeningState:      at com.android.keyguard.KeyguardUpdateMonitor.access$5000(KeyguardUpdateMonitor.java:143)
12-10 09:43:41.437  1468  1468 D updateFaceListeningState:      at com.android.keyguard.KeyguardUpdateMonitor$16.handleMessage(KeyguardUpdateMonitor.java:1872)
12-10 09:43:41.437  1468  1468 D updateFaceListeningState:      at android.os.Handler.dispatchMessage(Handler.java:106)
12-10 09:43:41.437  1468  1468 D updateFaceListeningState:      at android.os.Looper.loop(Looper.java:223)
12-10 09:43:41.437  1468  1468 D updateFaceListeningState:      at android.app.ActivityThread.main(ActivityThread.java:7945)
12-10 09:43:41.437  1468  1468 D updateFaceListeningState:      at java.lang.reflect.Method.invoke(Native Method)
12-10 09:43:41.437  1468  1468 D updateFaceListeningState:      at com.android.internal.os.RuntimeInit$MethodAndArgsCaller.run(RuntimeInit.java:603)
12-10 09:43:41.437  1468  1468 D updateFaceListeningState:      at com.android.internal.os.ZygoteInit.main(ZygoteInit.java:947)
12-10 09:43:41.437  1468  1468 V KeyguardUpdateMonitor:         at com.android.keyguard.KeyguardUpdateMonitor.updateFaceListeningState(KeyguardUpdateMonitor.java:2129)
电源键息屏堆栈:
12-10 09:43:41.437  1468  1468 D updateFaceListeningState: java.lang.Throwable
12-10 09:43:41.437  1468  1468 D updateFaceListeningState:      at com.android.keyguard.KeyguardUpdateMonitor.updateFaceListeningState(KeyguardUpdateMonitor.java:2128)
12-10 09:43:41.437  1468  1468 D updateFaceListeningState:      at com.android.keyguard.KeyguardUpdateMonitor.updateBiometricListeningState(KeyguardUpdateMonitor.java:2053)
12-10 09:43:41.437  1468  1468 D updateFaceListeningState:      at com.android.keyguard.KeyguardUpdateMonitor.setKeyguardGoingAway(KeyguardUpdateMonitor.java:575)
12-10 09:43:41.437  1468  1468 D updateFaceListeningState:      at com.android.keyguard.KeyguardUpdateMonitor.handleKeyguardGoingAway(KeyguardUpdateMonitor.java:1727)
12-10 09:43:41.437  1468  1468 D updateFaceListeningState:      at com.android.keyguard.KeyguardUpdateMonitor.access$5000(KeyguardUpdateMonitor.java:143)
12-10 09:43:41.437  1468  1468 D updateFaceListeningState:      at com.android.keyguard.KeyguardUpdateMonitor$16.handleMessage(KeyguardUpdateMonitor.java:1872)
12-10 09:43:41.437  1468  1468 D updateFaceListeningState:      at android.os.Handler.dispatchMessage(Handler.java:106)
12-10 09:43:41.437  1468  1468 D updateFaceListeningState:      at android.os.Looper.loop(Looper.java:223)
12-10 09:43:41.437  1468  1468 D updateFaceListeningState:      at android.app.ActivityThread.main(ActivityThread.java:7945)
12-10 09:43:41.437  1468  1468 D updateFaceListeningState:      at java.lang.reflect.Method.invoke(Native Method)
12-10 09:43:41.437  1468  1468 D updateFaceListeningState:      at com.android.internal.os.RuntimeInit$MethodAndArgsCaller.run(RuntimeInit.java:603)
12-10 09:43:41.437  1468  1468 D updateFaceListeningState:      at com.android.internal.os.ZygoteInit.main(ZygoteInit.java:947)
12-10 09:43:41.437  1468  1468 V KeyguardUpdateMonitor:         at com.android.keyguard.KeyguardUpdateMonitor.updateFaceListeningState(KeyguardUpdateMonitor.java:2129)
这里通过handler发送消息让:handleStartedGoingToSleep处理
frameworks/base/packages/SystemUI/src/com/android/keyguard/KeyguardUpdateMonitor.java
protected void handleStartedGoingToSleep(int arg1) {checkIsHandlerThread();mLockIconPressed = false;clearBiometricRecognized();for (int i = 0; i < mCallbacks.size(); i++) {KeyguardUpdateMonitorCallback cb = mCallbacks.get(i).get();if (cb != null) {cb.onStartedGoingToSleep(arg1);}}mGoingToSleep = true;// 更新生物识别(指纹、人脸)updateBiometricListeningState();}private void updateBiometricListeningState() {updateFingerprintListeningState();updateFaceListeningState();}
updateFaceListeningState(),更新人脸状态。
frameworks/base/packages/SystemUI/src/com/android/keyguard/KeyguardUpdateMonitor.java
private void updateFaceListeningState() {// 如果此消息存在,我们不应再次进行身份验证if (mHandler.hasMessages(MSG_BIOMETRIC_AUTHENTICATION_CONTINUE)) {return;}mHandler.removeCallbacks(mRetryFaceAuthentication);boolean shouldListenForFace = shouldListenForFace();if (mFaceRunningState == BIOMETRIC_STATE_RUNNING && !shouldListenForFace) {stopListeningForFace();} else if (mFaceRunningState != BIOMETRIC_STATE_RUNNING && shouldListenForFace) {// 在这里开始监听人脸/*重点关注*/startListeningForFace();}}
startListeningForFace()
frameworks/base/packages/SystemUI/src/com/android/keyguard/KeyguardUpdateMonitor.java
private void startListeningForFace() {if (mFaceRunningState == BIOMETRIC_STATE_CANCELLING) {setFaceRunningState(BIOMETRIC_STATE_CANCELLING_RESTARTING);return;}if (DEBUG) Log.v(TAG, "startListeningForFace()");int userId = getCurrentUser();if (isUnlockWithFacePossible(userId)) {if (mFaceCancelSignal != null) {mFaceCancelSignal.cancel();}mFaceCancelSignal = new CancellationSignal();/*重点关注*/mFaceManager.authenticate(null, mFaceCancelSignal, 0,mFaceAuthenticationCallback, null, userId);setFaceRunningState(BIOMETRIC_STATE_RUNNING);}}
FaceManager#authenticate()
frameworks/base/core/java/android/hardware/face/FaceManager.java
public void authenticate(@Nullable CryptoObject crypto, @Nullable CancellationSignal cancel,int flags, @NonNull AuthenticationCallback callback, @Nullable Handler handler,int userId) {if (callback == null) {throw new IllegalArgumentException("Must supply an authentication callback");}if(mPendingFaceAuth != null) {Log.w(TAG, "authentication too frequent");}if(mAuthenticationCallback != null) {mPendingFaceAuth = new PendingFaceAuth(crypto, cancel, flags, callback, handler, userId);Log.w(TAG, "pengding face auth");return;} else {/*重点关注*/authenticateInternel(crypto, cancel, flags, callback, handler, userId);}}void authenticateInternel(CryptoObject crypto, CancellationSignal cancel,int flags, AuthenticationCallback callback, Handler handler, int userId) {if (cancel != null) {if (cancel.isCanceled()) {Log.w(TAG, "authentication already canceled");return;} else {cancel.setOnCancelListener(new OnAuthenticationCancelListener(crypto));}}//mSurface = null;//onFaceidStarted();if (mService != null) {try {useHandler(handler);mAuthenticationCallback = callback;mCryptoObject = crypto;long sessionId = crypto != null ? crypto.getOpId() : 0;Trace.beginSection("FaceManager#authenticate");/*重点关注*/ // 进行人脸认证 mService.authenticate(mToken, sessionId, userId, mServiceReceiver,flags, mContext.getOpPackageName());/* UNISOC: Modify for bug1374210 {@ */if (callback != null) {callback.onAuthenticationStarted();}/* @} */} catch (RemoteException e) {// 省略部分代码......} finally {Trace.endSection();}}}
FaceService#authenticate()
frameworks/base/services/core/java/com/android/server/biometrics/face/FaceService.java
@Override // Binder callpublic void authenticate(final IBinder token, final long opId, int userId,final IFaceServiceReceiver receiver, final int flags,final String opPackageName) {checkPermission(USE_BIOMETRIC_INTERNAL);updateActiveGroup(userId, opPackageName);final boolean restricted = isRestricted();final AuthenticationClientImpl client = new FaceAuthClient(getContext(),mDaemonWrapper, mHalDeviceId, token, new ServiceListenerImpl(receiver),mCurrentUserId, 0 /* groupId */, opId, restricted, opPackageName,0 /* cookie */, false /* requireConfirmation */);/*重点关注*/authenticateInternal(client, opId, opPackageName);}
BiometricServiceBase#authenticateInternal()
protected void authenticateInternal(AuthenticationClientImpl client, long opId,String opPackageName) {final int callingUid = Binder.getCallingUid();final int callingPid = Binder.getCallingPid();final int callingUserId = UserHandle.getCallingUserId();authenticateInternal(client, opId, opPackageName, callingUid, callingPid, callingUserId);}protected void authenticateInternal(AuthenticationClientImpl client, long opId,String opPackageName, int callingUid, int callingPid, int callingUserId) {if (!canUseBiometric(opPackageName, true /* foregroundOnly */, callingUid, callingPid,callingUserId)) {if (DEBUG) Slog.v(getTag(), "authenticate(): reject " + opPackageName);return;}mHandler.post(() -> {mMetricsLogger.histogram(getConstants().tagAuthToken(), opId != 0L ? 1 : 0);// Get performance stats object for this user.HashMap<Integer, PerformanceStats> pmap= (opId == 0) ? mPerformanceMap : mCryptoPerformanceMap;PerformanceStats stats = pmap.get(mCurrentUserId);if (stats == null) {stats = new PerformanceStats();pmap.put(mCurrentUserId, stats);}mPerformanceStats = stats;mIsCrypto = (opId != 0);/*重点关注*/startAuthentication(client, opPackageName);});}private void startAuthentication(AuthenticationClientImpl client, String opPackageName) {if (DEBUG) Slog.v(getTag(), "startAuthentication(" + opPackageName + ")");int lockoutMode = getLockoutMode();// getLockoutMode() 判断是否锁定,会返回一个 int 值if (lockoutMode != AuthenticationClient.LOCKOUT_NONE) {Slog.v(getTag(), "In lockout mode(" + lockoutMode + ") ; disallowing authentication");int errorCode = lockoutMode == AuthenticationClient.LOCKOUT_TIMED ?BiometricConstants.BIOMETRIC_ERROR_LOCKOUT :BiometricConstants.BIOMETRIC_ERROR_LOCKOUT_PERMANENT;if (!client.onError(getHalDeviceId(), errorCode, 0 /* vendorCode */)) {Slog.w(getTag(), "Cannot send permanent lockout message to client");}return;}/*重点关注*/startClient(client, true /* initiatedByClient */);//这里将AuthenticationClient传递进去} private void startClient(ClientMonitor newClient, boolean initiatedByClient) {ClientMonitor currentClient = mCurrentClient;if (currentClient != null) {if (DEBUG) Slog.v(getTag(), "request stop current client " +currentClient.getOwnerString());if (currentClient instanceof InternalEnumerateClient|| currentClient instanceof InternalRemovalClient) {// 省略部分代码......} else {currentClient.stop(initiatedByClient);mHandler.removeCallbacks(mResetClientState);mHandler.postDelayed(mResetClientState, CANCEL_TIMEOUT_LIMIT);}mPendingClient = newClient;} else if (newClient != null) {// 省略部分代码......// We are not a BiometricPrompt client, start the client immediatelymCurrentClient = newClient;/*重点关注*/startCurrentClient(mCurrentClient.getCookie());//这里继续将AuthenticationClient传递进去}}protected void startCurrentClient(int cookie) {// 省略部分代码....../*重点关注*///这里调用的是AuthenticationClient的start方法int status = mCurrentClient.start();if (status == 0) {notifyClientActiveCallbacks(true);}// ... ...}
mCurrentClient是ClientMonitor的对象,而AuthenticationClient继承了ClientMonitor类;
AuthenticationClient#start()
frameworks/base/services/core/java/com/android/server/biometrics/sensors/AuthenticationClient.java
// 开始验证public int start() {mStarted = true;onStart();try {/*重点关注*/// 获取 DaemonWrappe 对象开始鉴权,这里如果鉴权完成会回调注册的 ClientMonito r的 onAuthenticated 接口//到这一步 DaemonWrappe 对象 进入等待捕获人脸信息,摄像头会给到DaemonWrappe对象人脸信息。// 这里对调用到 DaemonWrapper 在 FaceService 里有实现,在那里会直接调用到 HAL 层final int result = getDaemonWrapper().authenticate(mOpId, getGroupId());if (result != 0) {Slog.w(getLogTag(), "startAuthentication failed, result=" + result);mMetricsLogger.histogram(mConstants.tagAuthStartError(), result);onError(getHalDeviceId(), BiometricConstants.BIOMETRIC_ERROR_HW_UNAVAILABLE,0 /* vendorCode */);return result;}if (DEBUG) Slog.w(getLogTag(), "client " + getOwnerString() + " is authenticating...");} catch (RemoteException e) {Slog.e(getLogTag(), "startAuthentication failed", e);return ERROR_ESRCH;}return 0; // success}
start方法会调用faced,调用底层的人脸库,底层库返回结果后会调用onAuthenticated来反馈结果给receiver,在往上层反馈。
补充:IExtBiometricsFace.hal 这个接口在 ExtBiometricsFace.cpp中实现。
frameworks/base/services/core/java/com/android/server/biometrics/face/FaceService.java
@Overridepublic void onStart() {super.onStart();// 在初始化后会建立和HAL层的通信,即连接到 FaceService,//并通过getFaceDaemon()拿到用于通信的 IExtBiometricsFace对象(binder)publishBinderService(Context.FACE_SERVICE, new FaceServiceWrapper());SystemServerInitThreadPool.submit(() -> mHandler.post(this::getFaceDaemon),TAG + ".onStart");}
屏幕解锁(结果回调、移除锁)
底层库回调onAuthenticated堆栈:
12-10 16:33:49.998  1017  1017 D longzhiye  : longzhiye:FaceService.java ServiceListenerImpl onAuthenticationSucceeded()
12-10 16:33:49.998  1017  1017 D longzhiye  : java.lang.Throwable
12-10 16:33:49.998  1017  1017 D longzhiye  :      at com.android.server.biometrics.face.FaceService$ServiceListenerImpl.onAuthenticationSucceeded(FaceService.java:918)
12-10 16:33:49.998  1017  1017 D longzhiye  :      at com.android.server.biometrics.AuthenticationClient.onAuthenticated(AuthenticationClient.java:235)
12-10 16:33:49.998  1017  1017 D longzhiye  :      at com.android.server.biometrics.face.FaceService$FaceAuthClient.onAuthenticated(FaceService.java:297)
12-10 16:33:49.998  1017  1017 D longzhiye  :      at com.android.server.biometrics.BiometricServiceBase.handleAuthenticated(BiometricServiceBase.java:729)
12-10 16:33:49.998  1017  1017 D longzhiye  :      at com.android.server.biometrics.face.FaceService.access$11801(FaceService.java:110)
12-10 16:33:49.998  1017  1017 D longzhiye  :      at com.android.server.biometrics.face.FaceService$1.lambda$onAuthenticated$2$FaceService$1(FaceService.java:1040)
12-10 16:33:49.998  1017  1017 D longzhiye  :      at com.android.server.biometrics.face.-$$Lambda$FaceService$1$GcU4ZG1fdDLhKvSxuMwfPargEnI.run(Unknown Source:8)
12-10 16:33:49.998  1017  1017 D longzhiye  :      at android.os.Handler.handleCallback(Handler.java:938)
12-10 16:33:49.998  1017  1017 D longzhiye  :      at android.os.Handler.dispatchMessage(Handler.java:99)
12-10 16:33:49.998  1017  1017 D longzhiye  :      at android.os.Looper.loop(Looper.java:223)
12-10 16:33:49.998  1017  1017 D longzhiye  :      at com.android.server.SystemServer.run(SystemServer.java:647)
12-10 16:33:49.998  1017  1017 D longzhiye  :      at com.android.server.SystemServer.main(SystemServer.java:431)
12-10 16:33:49.998  1017  1017 D longzhiye  :      at java.lang.reflect.Method.invoke(Native Method)
12-10 16:33:49.998  1017  1017 D longzhiye  :      at com.android.internal.os.RuntimeInit$MethodAndArgsCaller.run(RuntimeInit.java:603)
12-10 16:33:49.998  1017  1017 D longzhiye  :      at com.android.internal.os.ZygoteInit.main(ZygoteInit.java:925)
根据前面的讲的 底层 Face HIDL 可以知道 IExtBiometricsFaceClientCallback 是回调人脸识别结果的。onAuthenticated()是当一张人脸被成功认证时被回调。
frameworks/base/services/core/java/com/android/server/biometrics/face/FaceService.java
/*** Receives callbacks from the HAL.*/private IExtBiometricsFaceClientCallback mDaemonCallback =new IExtBiometricsFaceClientCallback.Stub() {// 省略部分代码 ......@Overridepublic void onAuthenticated(final long deviceId, final int faceId, final int userId,ArrayList<Byte> token) {mHandler.post(() -> {final Face face = new Face("", faceId, deviceId);final boolean authenticated = faceId != 0;/*重点在这里*/FaceService.super.handleAuthenticated(authenticated, face, token);});}// 省略部分代码 ......};
通过上面 FaceService.super.handleAuthenticated(authenticated, face, token) 的调用。将会调用到:
BiometricServiceBase#handleAuthenticated()
// BiometricServiceBase.javaprotected void handleAuthenticated(boolean authenticated,BiometricAuthenticator.Identifier identifier, ArrayList<Byte> token) {Log.d("longzhiye","longzhiye:AuthenticationClient.java ----------------2 ");ClientMonitor client = mCurrentClient;// 重点在后半句判断,通过前面的分析可以知道 client 其实是 FaceAuthClient 的对象if (client != null && client.onAuthenticated(identifier, authenticated, token)) {removeClient(client);}if (authenticated) {mPerformanceStats.accept++;} else {mPerformanceStats.reject++;}}
通过前面的分析可以知道 client 其实是 FaceAuthClient 的对象,在FaceService.java 的内部类FaceServiceWrapper的authenticate()方法进行实例化传过去的。反正最终将会回调到FaceService.java 的内部类FaceAuthClient的onAuthenticated()方法
@Overridepublic boolean onAuthenticated(BiometricAuthenticator.Identifier identifier,boolean authenticated, ArrayList<Byte> token) {Log.d("longzhiye","longzhiye onAuthenticated ",new Throwable());// 重点关注superfinal boolean result = super.onAuthenticated(identifier, authenticated, token);mUsageStats.addEvent(new AuthenticationEvent(getStartTimeMs(),System.currentTimeMillis() - getStartTimeMs() /* latency */,authenticated,0 /* error */,0 /* vendorError */,getTargetUserId()));// For face, the authentication lifecycle ends either when// 1) Authenticated == true// 2) Error occurred// 3) Authenticated == false// Fingerprint currently does not end when the third condition is met which is a bug,// but let's leave it as-is for now.return result || !authenticated;}
这里的super将会调到父类AuthenticationClient中的onAuthenticated()。
AuthenticationClient#onAuthenticated()
frameworks/base/services/core/java/com/android/server/biometrics/sensors/AuthenticationClient.java
public boolean onAuthenticated(BiometricAuthenticator.Identifier identifier,boolean authenticated, ArrayList<Byte> token) {super.logOnAuthenticated(getContext(), authenticated, mRequireConfirmation,getTargetUserId(), isBiometricPrompt());// 省略部分代码 ......try {if (DEBUG) Slog.v(getLogTag(), "onAuthenticated(" + authenticated + ")"+ ", ID:" + identifier.getBiometricId()+ ", Owner: " + getOwnerString()+ ", isBP: " + isBiometricPrompt()+ ", listener: " + listener+ ", requireConfirmation: " + mRequireConfirmation+ ", user: " + getTargetUserId());if (authenticated) { // 省略部分代码 ......try {// Explicitly have if/else here to make it super obvious in case the code is// touched in the future.if (!getIsRestricted()) {/*重点关注*/ // getIsRestricted() 获取有没有权限登录,说白了就是验证是否成功listener.onAuthenticationSucceeded(getHalDeviceId(), identifier, getTargetUserId());} else {listener.onAuthenticationSucceeded(getHalDeviceId(), null, getTargetUserId());}} catch (RemoteException e) {Slog.e(getLogTag(), "Remote exception", e);}} else {// Client not listeningSlog.w(getLogTag(), "Client not listening");result = true;}} else {// 省略部分代码 ......}} catch (RemoteException e) {Slog.e(getLogTag(), "Remote exception", e);result = true;}return result;}
这里的 listener 其实是 BiometricServiceBase.ServiceListener 接口的回调,BiometricServiceBase的内部类BiometricServiceListener也实现了该接口,但是没有实现onAuthenticationSucceeded() 方法,而该ServiceListener 接口在FaceService中的内部类ServiceListenerImpl 也有实现,并且实现了onAuthenticationSucceeded() 方法。所以将会回调到FaceService内部类的 ServiceListenerImpl#onAuthenticationSucceeded()。
ServiceListenerImpl#onAuthenticationSucceeded()
/*** 从 ClientMonitor 实现接收回调。结果被转发到 FaceManager*/private class ServiceListenerImpl implements ServiceListener {private IFaceServiceReceiver mFaceServiceReceiver;public ServiceListenerImpl(IFaceServiceReceiver receiver) {mFaceServiceReceiver = receiver;}// 省略部分代码 ......@Overridepublic void onAuthenticationSucceeded(long deviceId,BiometricAuthenticator.Identifier biometric, int userId)throws RemoteException {if (mFaceServiceReceiver != null) {if (biometric == null || biometric instanceof Face) {// 重点关注这里mFaceServiceReceiver.onAuthenticationSucceeded(deviceId, (Face) biometric,userId, isStrongBiometric());} else {Slog.e(TAG, "onAuthenticationSucceeded received non-face biometric");}}}// 省略部分代码 ......}
ServiceListenerImpl 这个类是负责将回调结果,转发到 FaceManager 中的。通过 IFaceServiceReceiver 的对象,回调 FaceManager 中的 onAuthenticationSucceeded() 方法。
FaceManager#onAuthenticationSucceeded()
frameworks/base/core/java/android/hardware/face/FaceManager.java
private IFaceServiceReceiver mServiceReceiver = new IFaceServiceReceiver.Stub() {// 省略部分代码 ......@Override // binder callpublic void onAuthenticationSucceeded(long deviceId, Face face, int userId,boolean isStrongBiometric) {mHandler.obtainMessage(MSG_AUTHENTICATION_SUCCEEDED, userId, isStrongBiometric ? 1 : 0,face).sendToTarget();//onFaceidStopped();}// 省略部分代码 ......};
在这里通过 mHandler 发送了 MSG_AUTHENTICATION_SUCCEEDED 消息,在 handleMessage 中将会执行 sendAuthenticatedSucceeded() 方法。
frameworks/base/core/java/android/hardware/face/FaceManager.java
private void sendAuthenticatedSucceeded(Face face, int userId, boolean isStrongBiometric) {if (mAuthenticationCallback != null) {final AuthenticationResult result =new AuthenticationResult(mCryptoObject, face, userId, isStrongBiometric);// 主要关注这里mAuthenticationCallback.onAuthenticationSucceeded(result); mAuthenticationCallback = null;if(mPendingFaceAuth != null) {authenticateInternel(mPendingFaceAuth.mCrypto, mPendingFaceAuth.mCancel, mPendingFaceAuth.mFlags, mPendingFaceAuth.mCallback, mPendingFaceAuth.mHandler, mPendingFaceAuth.mUserId);mPendingFaceAuth = null;}}}
在 sendAuthenticatedSucceeded() 方法中将会执行 BiometricAuthenticator.AuthenticationCallback 的接口的回调,将会把结果回调到 KeyguardUpdateMonitor 中FaceManager.AuthenticationCallback 的onAuthenticationSucceeded() 方法。
FaceManager.AuthenticationCallback#onAuthenticationSucceeded()
可以看一个堆栈图:
12-10 16:33:50.024  1414  1414 D longzhiye  : java.lang.Throwable
12-10 16:33:50.024  1414  1414 D longzhiye  :      at com.android.keyguard.KeyguardUpdateMonitor$15.onAuthenticationSucceeded(KeyguardUpdateMonitor.java:1427)
12-10 16:33:50.024  1414  1414 D longzhiye  :      at android.hardware.face.FaceManager.sendAuthenticatedSucceeded(FaceManager.java:1212)
12-10 16:33:50.024  1414  1414 D longzhiye  :      at android.hardware.face.FaceManager.access$1300(FaceManager.java:63)
12-10 16:33:50.024  1414  1414 D longzhiye  :      at android.hardware.face.FaceManager$MyHandler.handleMessage(FaceManager.java:1120)
12-10 16:33:50.024  1414  1414 D longzhiye  :      at android.os.Handler.dispatchMessage(Handler.java:106)
12-10 16:33:50.024  1414  1414 D longzhiye  :      at android.os.Looper.loop(Looper.java:223)
12-10 16:33:50.024  1414  1414 D longzhiye  :      at android.app.ActivityThread.main(ActivityThread.java:7945)
12-10 16:33:50.024  1414  1414 D longzhiye  :      at java.lang.reflect.Method.invoke(Native Method)
12-10 16:33:50.024  1414  1414 D longzhiye  :      at com.android.internal.os.RuntimeInit$MethodAndArgsCaller.run(RuntimeInit.java:603)
12-10 16:33:50.024  1414  1414 D longzhiye  :      at com.android.internal.os.ZygoteInit.main(ZygoteInit.java:947)
frameworks/base/packages/SystemUI/src/com/android/keyguard/KeyguardUpdateMonitor.java
@VisibleForTestingFaceManager.AuthenticationCallback mFaceAuthenticationCallback= new FaceManager.AuthenticationCallback() {@Overridepublic void onAuthenticationFailed() {// 身份验证失败handleFaceAuthFailed();}/* UNISOC: Modify for bug1374210 {@ */@Overridepublic void onAuthenticationStarted() {handleFaceAuthStarted();}/* @} */@Overridepublic void onAuthenticationSucceeded(FaceManager.AuthenticationResult result) {Log.d("longzhiye","longzhiye",new Throwable());Trace.beginSection("KeyguardUpdateMonitor#onAuthenticationSucceeded");// 重点关注handleFaceAuthenticated(result.getUserId(), result.isStrongBiometric());Trace.endSection();}@Overridepublic void onAuthenticationHelp(int helpMsgId, CharSequence helpString) {handleFaceHelp(helpMsgId, helpString.toString());}@Overridepublic void onAuthenticationError(int errMsgId, CharSequence errString) {// 人脸处理操作已取消或未识别到handleFaceError(errMsgId, errString.toString());}@Overridepublic void onAuthenticationAcquired(int acquireInfo) {handleFaceAcquired(acquireInfo);}};
KeyguardUpdateMonitor#handleFaceAuthenticated()
frameworks/base/packages/SystemUI/src/com/android/keyguard/KeyguardUpdateMonitor.java
private void handleFaceAuthenticated(int authUserId) {Trace.beginSection("KeyGuardUpdateMonitor#handlerFaceAuthenticated");try {final int userId;try {userId = ActivityManager.getService().getCurrentUser().id;} catch (RemoteException e) {Log.e(TAG, "Failed to get current user id: ", e);return;}if (userId != authUserId) {Log.d(TAG, "Face authenticated for wrong user: " + authUserId);return;}if (isFaceDisabled(userId)) {Log.d(TAG, "Face authentication disabled by DPM for userId: " + userId);return;}/*重点关注*/onFaceAuthenticated(userId);} finally {setFaceRunningState(BIOMETRIC_STATE_STOPPED);}Trace.endSection();}
handleFaceAuthenticated#onFaceAuthenticated
frameworks/base/packages/SystemUI/src/com/android/keyguard/KeyguardUpdateMonitor.java
protected void onFaceAuthenticated(int userId) {Trace.beginSection("KeyGuardUpdateMonitor#onFaceAuthenticated");mUserFaceAuthenticated.put(userId, true);// Update/refresh trust state only if user can skip bouncerif (getUserCanSkipBouncer(userId)) {mTrustManager.unlockedByBiometricForUser(userId, BiometricSourceType.FACE);}// Don't send cancel if authentication succeedsmFaceCancelSignal = null;for (int i = 0; i < mCallbacks.size(); i++) {/*重点关注*/KeyguardUpdateMonitorCallback cb = mCallbacks.get(i).get();if (cb != null) {/*重点关注*/cb.onBiometricAuthenticated(userId,BiometricSourceType.FACE);}}mHandler.sendMessageDelayed(mHandler.obtainMessage(MSG_BIOMETRIC_AUTHENTICATION_CONTINUE),BIOMETRIC_CONTINUE_DELAY_MS);// Only authenticate face once when assistant is visiblemAssistantVisible = false;Trace.endSection();}
这里开始调用接口将解锁成功消息层层传递直至keyguard解锁,与指纹解锁逻辑一致
可以看到在 onFaceAuthenticated(userId) 方法中调用了 KeyguardUpdateMonitorCallback 这个抽象类的 onBiometricAuthenticated() 抽象方法,而 BiometricUnlockController extends KeyguardUpdateMonitorCallback,并且注册了回调 mUpdateMonitor.registerCallback(this)。
BiometricUnlockController #onBiometricAuthenticated()
frameworks/base/packages/SystemUI/src/com/android/systemui/statusbar/phone/BiometricUnlockController.java
@Overridepublic void onBiometricAuthenticated(int userId, BiometricSourceType biometricSourceType,boolean isStrongBiometric) {// 省略部分代码......if (unlockAllowed) {mKeyguardViewMediator.userActivity();/*重点关注*/// 开始唤醒和解锁startWakeAndUnlock(biometricSourceType, isStrongBiometric);} else {Log.d(TAG, "onBiometricAuthenticated aborted by bypass controller");}}
BiometricUnlockController#startWakeAndUnlock
frameworks/base/packages/SystemUI/src/com/android/systemui/statusbar/phone/BiometricUnlockController.java
public void startWakeAndUnlock(int mode) {// 省略部分代码......Runnable wakeUp = ()-> {if (!wasDeviceInteractive) {if (DEBUG_BIO_WAKELOCK) {Log.i(TAG, "bio wakelock: Authenticated, waking up...");}mPowerManager.wakeUp(SystemClock.uptimeMillis(), PowerManager.WAKE_REASON_GESTURE,"android.policy:BIOMETRIC");}if (delayWakeUp) {/*重点关注*/mKeyguardViewMediator.onWakeAndUnlocking();}Trace.beginSection("release wake-and-unlock");releaseBiometricWakeLock();Trace.endSection();};// 省略部分代码......mStatusBar.notifyBiometricAuthModeChanged();Trace.endSection();}
KeyguardViewMediator#onWakeAndUnlocking()
frameworks/base/packages/SystemUI/src/com/android/systemui/keyguard/KeyguardViewMediator.java
public void onWakeAndUnlocking() {Trace.beginSection("KeyguardViewMediator#onWakeAndUnlocking");mWakeAndUnlocking = true;/*重点关注*/keyguardDone();Trace.endSection();}
KeyguardViewMediator#keyguardDone()
frameworks/base/packages/SystemUI/src/com/android/systemui/keyguard/KeyguardViewMediator.java
public void keyguardDone() {Trace.beginSection("KeyguardViewMediator#keyguardDone");if (DEBUG) Log.d(TAG, "keyguardDone()");userActivity();EventLog.writeEvent(70000, 2);/*重点关注*/Message msg = mHandler.obtainMessage(KEYGUARD_DONE);mHandler.sendMessage(msg);Trace.endSection();}
keyguardDone()该方法发送了一条 KEYGUARD_DONE 消息,在 handleMessage 中将会执行 handleKeyguardDone() 方法。
KeyguardViewMediator#handleKeyguardDone()
frameworks/base/packages/SystemUI/src/com/android/systemui/keyguard/KeyguardViewMediator.java
private void handleKeyguardDone() {Trace.beginSection("KeyguardViewMediator#handleKeyguardDone");final int currentUser = KeyguardUpdateMonitor.getCurrentUser();// 省略部分代码....../** 重点关注* 处理隐藏**/handleHide();Trace.endSection();}
KeyguardViewMediator# handleHide()
frameworks/base/packages/SystemUI/src/com/android/systemui/keyguard/KeyguardViewMediator.java
private void handleHide() {Trace.beginSection("KeyguardViewMediator#handleHide");// It's possible that the device was unlocked in a dream state. It's time to wake up.if (mAodShowing) {PowerManager pm = mContext.getSystemService(PowerManager.class);pm.wakeUp(SystemClock.uptimeMillis(), PowerManager.WAKE_REASON_GESTURE,"com.android.systemui:BOUNCER_DOZING");}synchronized (KeyguardViewMediator.this) {if (DEBUG) Log.d(TAG, "handleHide");if (mustNotUnlockCurrentUser()) {if (DEBUG) Log.d(TAG, "Split system user, quit unlocking.");return;}mHiding = true;if (mShowing && !mOccluded) {mKeyguardGoingAwayRunnable.run();} else {/*重点关注*/// 处理开始键盘保护退出动画handleStartKeyguardExitAnimation(SystemClock.uptimeMillis() + mHideAnimation.getStartOffset(),mHideAnimation.getDuration());}}Trace.endSection();}
KeyguardViewMediator#handleStartKeyguardExitAnimation()
frameworks/base/packages/SystemUI/src/com/android/systemui/keyguard/KeyguardViewMediator.java
private void handleStartKeyguardExitAnimation(long startTime, long fadeoutDuration) {Trace.beginSection("KeyguardViewMediator#handleStartKeyguardExitAnimation");// 省略部分代码......mWakeAndUnlocking = false;setShowingLocked(false, mAodShowing);mDismissCallbackRegistry.notifyDismissSucceeded();/*重点关注*/mStatusBarKeyguardViewManager.hide(startTime, fadeoutDuration);resetKeyguardDonePendingLocked();mHideAnimationRun = false;adjustStatusBarLocked();sendUserPresentBroadcast();}Trace.endSection();}
下面就不详细分析了,将会按如下顺序执行:StatusBarKeyguardViewManager#hide()→StatusBarKeyguardViewManager#hideBouncer()→KeyguardBouncer#hide()→KeyguardBouncer#mRemoveViewRunnable→KeyguardBouncer#removeView()。
相关文章:
Android10.0 人脸解锁流程分析
人脸解锁概述 人脸解锁即用户通过注视设备的正面方便地解锁手机或平板。Android 10 为支持人脸解锁的设备在人脸认证期间添加了一个新的可以安全处理相机帧、保持隐私与安全的人脸认证栈的支持,也为安全合规地启用集成交易的应用(网上银行或其他服务&am…...

P8598 [蓝桥杯 2013 省 AB] 错误票据
题目背景 某涉密单位下发了某种票据,并要在年终全部收回。 题目描述 每张票据有唯一的 ID 号,全年所有票据的 ID 号是连续的,但 ID 的开始数码是随机选定的。因为工作人员疏忽,在录入 ID 号的时候发生了一处错误,造…...

【Android进阶篇】Android中PreferenceScreen的作用和详细用法介绍
1,PreferenceScreen的作用 在Android开发中,PreferenceScreen是一个非常重要的布局控件,主要用于创建设置界面(settings page)。它可以包含多个Preference子项,如CheckBoxPreference, ListPreference等&am…...

test-03-java 单元测试框架 testNG 入门介绍 junit/junit5/testNG 详细对比
拓展阅读 test-01-java 单元测试框架 junit 入门介绍 test-02-java 单元测试框架 junit5 入门介绍 test-03-java 单元测试框架 testNG 入门介绍 junit/junit5/testNG 详细对比 test assert-01-Google Truth 断言 test 系统学习-03-TestNG Spock testng 入门使用教程 开源…...

Maven 项目依赖仓库配置详解:pom.xml 中的 repositories 与 Maven 配置文件的调用顺序
Maven 项目依赖仓库配置详解:pom.xml 中的 repositories 与 Maven 配置文件的调用顺序 Maven(Apache Maven)是一个流行的项目管理工具,广泛用于Java项目的构建、依赖管理以及项目生命周期的管理。在Maven项目中,pom.x…...

JS深浅拷贝
区分 B复制了A的值,如果A被修改,B的值也被改变,那就是浅拷贝。 如果B的值没有跟着修改,那就是深拷贝 深浅拷贝的方式 1、遍历赋值 2、Object.create() 3、JSON.parse()和JSON.stringify() 浅拷贝-遍历 let a {name:"…...
uni-app 命令行创建
1. 首先创建项目,命令如下: npx degit dcloudio/uni-preset-vue#vite-ts uni-app-demo如果出现报错,如下图. 大概率就是没有目录C:\Users\Administrator\AppData\Roaming\npm 解决办法: 创建目录 C:\Users\Administrator\AppData\Roaming\n…...

ImageJ二值图像处理:形态学和分割
文章目录 二值化形态学处理分割 ImageJ系列: 安装与初步💎 灰度图像处理💎 图像滤波 二值化 在Process->Binary下有两个命令用于生成一个二值化图像,分别是 Make BinaryConvert to Mask 但当前图像是RGB或者灰度图时&…...
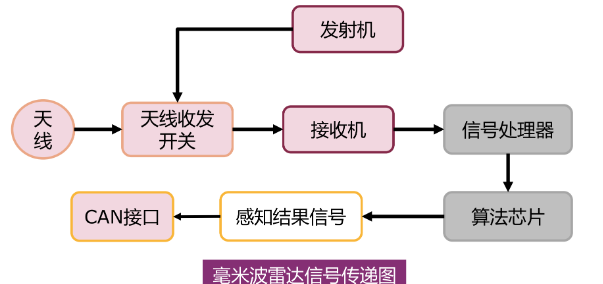
自动驾驶中的“雷达”
自动驾驶中有好几种雷达,新手可能会混淆,这里统一介绍一下它们。 首先,所有雷达的原理都是发射波,接收回波(可能是声波或电磁波),并通过发射和接收的时间差以及波的速度计算距离。只不过发射的…...

Web 3.0 是什么
第 1 章 明晰Web 3.0 从本章开始,就进入了本书的第一篇章,入门Web3.0,在第一篇章中将会让读者对Web3.0有一个整体的认知,为学习后面的章节打下基础。 在本章中,主要介绍的是Web的发展历史,包涵Web1.0、Web2.0、Web3.0的发展过程,以及资本为什么需要入场Web3.0、Web3.0…...

四种NAT的网络结构
四种NAT的网络结构 引言1 完全圆锥型NAT2 IP限制圆锥型NAT3 Port限制圆锥型NAT4 对称型NAT5 总结 引言 NAT是将内网地址映射转换为外网地址的一种地址转换方式,这节省了有限的IP地址资源。一般来讲,分为对称型NAT和圆锥形NAT,其中圆锥形NAT又…...
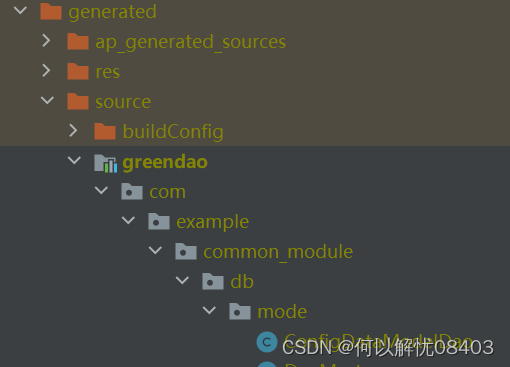
Android studio 使用greenDao根据实体类生成dao类
1.遇到的问题 使用android studio根据实体类生成dao其实也很简单,你只要实现 Parcelable Entity public class ConfigDataModel implements Parcelable {Id(autoincrement true)private Long id null; } 2.使用自带的方法生成 使用build-->make Project生成 …...

redis 从0到1完整学习 (九):SkipList 数据结构
文章目录 1. 引言2. redis 源码下载3. skipList 数据结构4. 参考 1. 引言 前情提要: 《redis 从0到1完整学习 (一):安装&初识 redis》 《redis 从0到1完整学习 (二):redis 常用命令》 《re…...

智能优化算法应用:基于金豺算法3D无线传感器网络(WSN)覆盖优化 - 附代码
智能优化算法应用:基于金豺算法3D无线传感器网络(WSN)覆盖优化 - 附代码 文章目录 智能优化算法应用:基于金豺算法3D无线传感器网络(WSN)覆盖优化 - 附代码1.无线传感网络节点模型2.覆盖数学模型及分析3.金豺算法4.实验参数设定5.算法结果6.参考文献7.MA…...
Isaac Sim 仿真机器人urdf文件导入
本教程展示如何在 Omniverse Isaac Sim 中导入 urdf 一. 使用内置插件导入urdf 安装urdf 插件 方法是转到“window”->“Extensions” 搜索框中输入urdf, 并启用 通过转至Isaac Utils -> Workflows -> URDF Importer菜单来访问 urdf 扩展。 表格中的 1,2,3 对应着…...
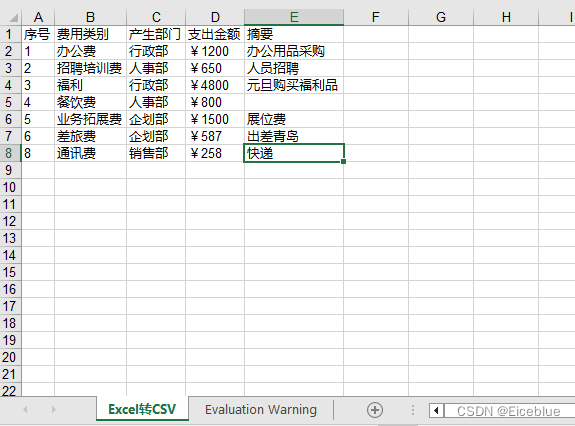
Python 实现Excel和CSV之间的相互转换
通过使用Python编程语言,编写脚本来自动化Excel和CSV之间的转换过程,可以批量处理大量文件,定期更新数据,并集成转换过程到自动化工作流程中。本文将介绍如何使用第三方库Spire.XLS for Python 实现: 使用Python将Exc…...
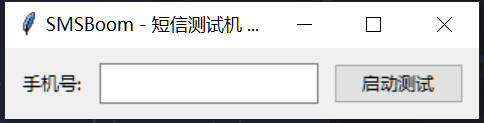
【GitHub精选项目】短信系统测试工具:SMSBoom 操作指南
前言 本文为大家带来的是 OpenEthan 开发的 SMSBoom 项目 —— 一种用于短信服务测试的工具。这个工具能够发送大量短信,通常用于测试短信服务的稳定性和处理能力。在合法和道德的范畴内,SMSBoom 可以作为一种有效的测试工具,帮助开发者和系统…...
【Filament】立方体贴图(6张图)
1 前言 本文通过一个立方体贴图的例子,讲解三维纹理贴图(子网格贴图)的应用,案例中使用 6 张不同的图片给立方体贴图,图片如下。 读者如果对 Filament 不太熟悉,请回顾以下内容。 Filament环境搭建绘制三角…...

SpringBoot 3.2.0 结合Redisson接入Redis
依赖版本 JDK 17 Spring Boot 3.2.0 Redisson 3.25.0 工程源码:Gitee 集成Redis步骤 导入依赖 <properties><redisson.version>3.25.0</redisson.version> </properties> <dependencies><dependency><groupId>org.pr…...

C++ 比C语言增加的新特性 5 之字符串string
1. c 的string类型 1.1 创建和初始化字符串 string.cpp #include "iostream" #include <string>using namespace std;//创建和初始化字符串 int main() {// 初始化空字符串string emptyString;// 使用字符串字面量初始化字符串string greeting "hello, …...

开源数字微流控平台OpenDrop:3步打造你的微型生物实验室
开源数字微流控平台OpenDrop:3步打造你的微型生物实验室 【免费下载链接】OpenDrop Open Source Digital Microfluidics Bio Lab 项目地址: https://gitcode.com/gh_mirrors/ope/OpenDrop 你是否曾梦想在桌面上建立一个完整的生物实验室?OpenDrop…...

如何快速自定义游戏光标:提升操作精度的完整指南
如何快速自定义游戏光标:提升操作精度的完整指南 【免费下载链接】YoloMouse Game Cursor Changer 项目地址: https://gitcode.com/gh_mirrors/yo/YoloMouse 在激烈的游戏战斗中,你是否经常因为找不到鼠标光标而错失良机?当屏幕特效绚…...

架构解密:如何通过FastExcel流式处理引擎重塑Java Excel操作效率标准
架构解密:如何通过FastExcel流式处理引擎重塑Java Excel操作效率标准 【免费下载链接】fastexcel Generate and read big Excel files quickly 项目地址: https://gitcode.com/gh_mirrors/fas/fastexcel 在当今数据驱动的企业环境中,Excel文件处理…...

互联网大厂Java面试实录:严肃面试官 vs. 搞笑程序员谢飞机
互联网大厂Java面试实录:严肃面试官 vs. 搞笑程序员谢飞机第一轮:基础问题 面试官:你好,谢飞机。既然你是来应聘Java开发岗位的,那我先问一些简单的问题。第一个问题,Java中的HashMap是线程安全的吗&#x…...

3分钟掌握AI图像分层:从单张图片到专业PSD的智能转换
3分钟掌握AI图像分层:从单张图片到专业PSD的智能转换 【免费下载链接】layerdivider A tool to divide a single illustration into a layered structure. 项目地址: https://gitcode.com/gh_mirrors/la/layerdivider 你是否曾经面对一张精美的插画ÿ…...

Cursor Pro破解工具终极指南:三步轻松解锁AI编程助手高级功能
Cursor Pro破解工具终极指南:三步轻松解锁AI编程助手高级功能 【免费下载链接】cursor-free-vip [Support 0.45](Multi Language 多语言)自动注册 Cursor Ai ,自动重置机器ID , 免费升级使用Pro 功能: Youve reached y…...

9大网盘直链下载助手:告别限速,免费实现高速下载自由
9大网盘直链下载助手:告别限速,免费实现高速下载自由 【免费下载链接】Online-disk-direct-link-download-assistant 一个基于 JavaScript 的网盘文件下载地址获取工具。基于【网盘直链下载助手】修改 ,支持 百度网盘 / 阿里云盘 / 中国移动云…...

Jellyfin Android TV客户端:打造家庭影院的终极大屏解决方案
Jellyfin Android TV客户端:打造家庭影院的终极大屏解决方案 【免费下载链接】jellyfin-androidtv Android TV Client for Jellyfin 项目地址: https://gitcode.com/gh_mirrors/je/jellyfin-androidtv Jellyfin Android TV客户端是一款专为智能电视和流媒体设…...

BilibiliDown音频提取技术指南:Java实现与配置深度解析
BilibiliDown音频提取技术指南:Java实现与配置深度解析 【免费下载链接】BilibiliDown (GUI-多平台支持) B站 哔哩哔哩 视频下载器。支持稍后再看、收藏夹、UP主视频批量下载|Bilibili Video Downloader 😳 项目地址: https://gitcode.com/gh_mirrors/…...

3分钟掌握智慧职教刷课脚本:全平台自动学习解决方案
3分钟掌握智慧职教刷课脚本:全平台自动学习解决方案 【免费下载链接】auto-play-course 简单好用的刷课脚本[支持平台:职教云,智慧职教,资源库] 项目地址: https://gitcode.com/gh_mirrors/hc/auto-play-course 还在为重复的网课学习任务烦恼吗?智…...