SpringSecurity深度学习
SpringSecurity简介
spring Security是什么?
Spring Security 是一个强大且高度可定制的身份验证和访问控制框架,用于保护基于Spring的应用程序。它是Spring项目的一部分,旨在为企业级系统提供全面的安全性解决方案。
一个简单的授权和校验流程
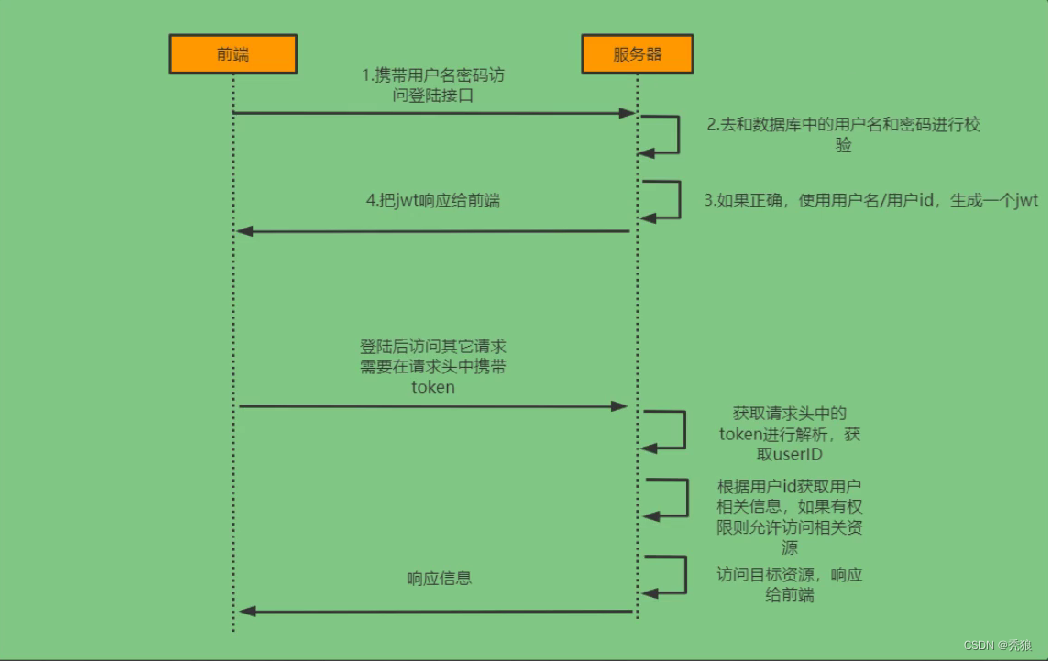
检验流程
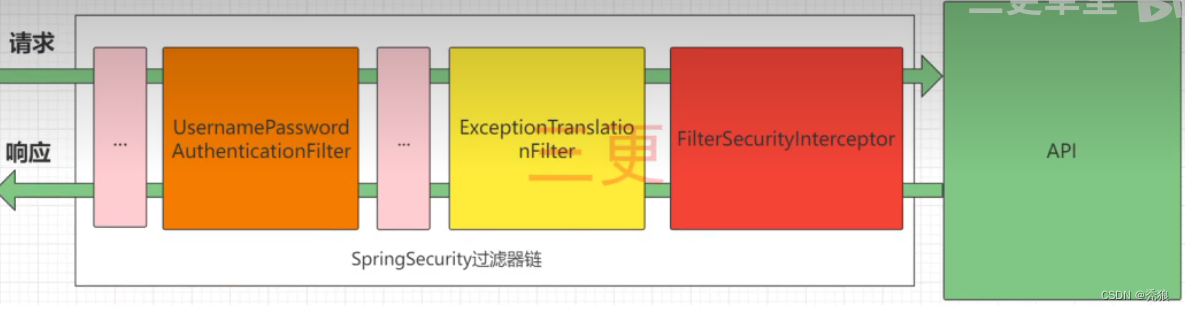
总流程

SpringSecurity使用
认证
对应依赖
<dependency><groupId>org.springframework.boot</groupId><artifactId>spring-boot-starter-security</artifactId></dependency>在自定义检验的时候,主要就是实现UserDetailsService接口,重写loadUserByUserName方法,在该方法中就是去检验账号和密码的准确性。(一般都是进行数据库的查询校验,默认的密码格式就是 ·{}密码·)
前后端分离项目登录流程
1.在springSecurity中我们的需要设置密文的配置,在项目中大多都是使 BCryptPasswordEncoder类来做密码的加密。
@Configuration
public class SecurityConfig extends WebSecurityConfigurerAdapter {@Beanpublic PasswordEncoder passwordEncoder() {return new BCryptPasswordEncoder();}}
2.创建对应的login接口和service
Controller
@RestController
@RequestMapping("/user")
public class LoginController {@AutowiredLoginService loginService;@PostMapping("/login")public ResponseResult login(@RequestBody User user) {return loginService.login(user);}
}
Service
@Service
public class LoginServiceImpl implements LoginService {@Autowiredprivate AuthenticationManager authenticationManager;@AutowiredRedisCache redisCache;@Overridepublic ResponseResult login(User user) {//authenticationManager authenticate进行用户验证UsernamePasswordAuthenticationToken authenticationToken = new UsernamePasswordAuthenticationToken(user.getUserName(), user.getPassword());Authentication authenticate = authenticationManager.authenticate(authenticationToken);//执行我们对饮的认证方法,在该方法中会返回LoginUser类型的数据//如果没有通过通过直接抛异常if(ObjectUtil.isEmpty(authenticate)) {throw new RuntimeException("登录失败");}//如果成功直接生成token,将其也map返回LoginUser loginUser = (LoginUser)authenticate.getPrincipal();String jwt = JwtUtil.createJWT(loginUser.getUser().getId().toString());Map<String, String> data = new HashMap<>();data.put("token", jwt);redisCache.setCacheObject(loginUser.getUser().getId().toString(), user);//返回tokenreturn new ResponseResult(200, "登录成功", data);}
}
因为AuthenticationManager默认不在ioc中,我们需要将其配置到ioc中,并且配置对应的校验规则。在里面就包括 无效校验的接口(比如:登录接口)和其他一些前后端分离的配置。
@Configuration
public class SecurityConfig extends WebSecurityConfigurerAdapter {@Beanpublic PasswordEncoder passwordEncoder() {return new BCryptPasswordEncoder();}//将AuthenticationManager配置到ioc中@Bean@Overridepublic AuthenticationManager authenticationManagerBean() throws Exception {return super.authenticationManagerBean();}//配置权限规则,主要就睡要放行登录接口,不然登录接口都会被了解,以及其他不要的前后端分离的配置@Overrideprotected void configure(HttpSecurity http) throws Exception {http//由于是前后端分离项目,所以要关闭csrf.csrf().disable()//由于是前后端分离项目,所以session是失效的,我们就不通过Session获取SecurityContext.sessionManagement().sessionCreationPolicy(SessionCreationPolicy.STATELESS).and()//指定让spring security放行登录接口的规则.authorizeRequests()// 对于登录接口 anonymous表示允许匿名访问.antMatchers("/user/login").anonymous()// 除上面外的所有请求全部需要鉴权认证.anyRequest().authenticated();}
}
进行测试,校验成功。

前后端分离项目校验流程
1.创建一个校验过滤器
@Component
public class JwtAuthenticationTokenFilter extends OncePerRequestFilter {@AutowiredRedisCache redisCache;@Overrideprotected void doFilterInternal(HttpServletRequest request, HttpServletResponse response, FilterChain filterChain) throws ServletException, IOException {//获取token,token会存在header中String token = request.getHeader("token");if(StrUtil.isEmpty(token)) {//由后续的拦截器进行拦截filterChain.doFilter(request, response);//后续会返回回来,需要return,不然会执行下面的语句return ;}//解析tokenString userId;try {Claims claims = JwtUtil.parseJWT(token);userId = claims.getSubject();if(StringUtil.isNullOrEmpty(userId)) {throw new RuntimeException("token解析失败");}} catch (Exception e) {throw new RuntimeException(e);}//从redis中获取用户的信息LoginUser loginUser = redisCache.getCacheObject(userId);if(ObjectUtil.isEmpty(loginUser)) {throw new RuntimeException("Redis中没有用户信息");}//将数据存储到SecurityContextHolderUsernamePasswordAuthenticationToken authenticationToken = new UsernamePasswordAuthenticationToken(loginUser, null, null);SecurityContextHolder.getContext().setAuthentication(authenticationToken);//放行filterChain.doFilter(request, response);}
}
使用三个参数的UsernamePasswordAuthenticationToken的构造器,该构造器会设置授权成功。

2.将过滤器设置到用户验证过滤器之前
@Configuration
public class SecurityConfig extends WebSecurityConfigurerAdapter {@AutowiredJwtAuthenticationTokenFilter jwtAuthenticationTokenFilter;//设置加密方式@Beanpublic PasswordEncoder passwordEncoder() {return new BCryptPasswordEncoder();}//将AuthenticationManager配置到ioc中@Bean@Overridepublic AuthenticationManager authenticationManagerBean() throws Exception {return super.authenticationManagerBean();}//配置权限规则,主要就睡要放行登录接口,不然登录接口都会被了解,以及其他不要的前后端分离的配置@Overrideprotected void configure(HttpSecurity http) throws Exception {http//由于是前后端分离项目,所以要关闭csrf.csrf().disable()//由于是前后端分离项目,所以session是失效的,我们就不通过Session获取SecurityContext.sessionManagement().sessionCreationPolicy(SessionCreationPolicy.STATELESS).and()//指定让spring security放行登录接口的规则.authorizeRequests()// 对于登录接口 anonymous表示允许匿名访问.antMatchers("/user/login").anonymous()// 除上面外的所有请求全部需要鉴权认证.anyRequest().authenticated();//将过滤器添加到用户登录处理器之前http.addFilterBefore(jwtAuthenticationTokenFilter, UsernamePasswordAuthenticationFilter.class);}
}
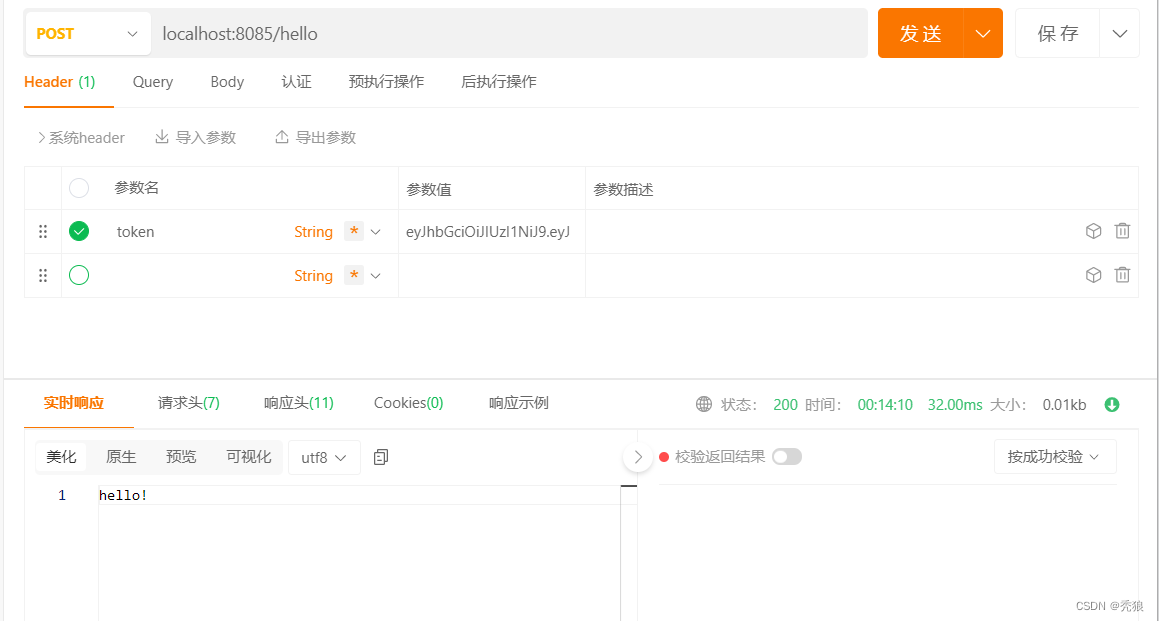
进行测试,将成功的token放入header中,进行校验。最终校验成功。

退出登录流程
1.编写退出登录接口
@RestController
@RequestMapping("/user")
public class LoginController {@AutowiredLoginService loginService;@RequestMapping("/logout")public ResponseResult logout() {return loginService.logout();}
}
2.编写service实现类,删除redis中用户信息的数据,即可完成退出登录操作。在解析的时候redis中的数据不存在就会直接被拦截。
@Service
public class LoginServiceImpl implements LoginService {@Autowiredprivate AuthenticationManager authenticationManager;@AutowiredRedisCache redisCache;@Overridepublic ResponseResult logout() {//在进入此接口时会先进行解析,成功之后才会执行logout,此时SecurityContextHolder中是有用户信息的UsernamePasswordAuthenticationToken authentication = (UsernamePasswordAuthenticationToken) SecurityContextHolder.getContext().getAuthentication();LoginUser loginUser = (LoginUser) authentication.getPrincipal();if(ObjectUtil.isEmpty(loginUser)) {throw new RuntimeException("LoginUser不存在");}//把redis中的数据删除之后,下次解析的时候就会直接报错,在解析中我们对redis的数据做了判空的操作redisCache.deleteObject(loginUser.getUser().getId().toString());return new ResponseResult(200, "退出登录成功", null);}
}
进行测试,最终成功。

授权
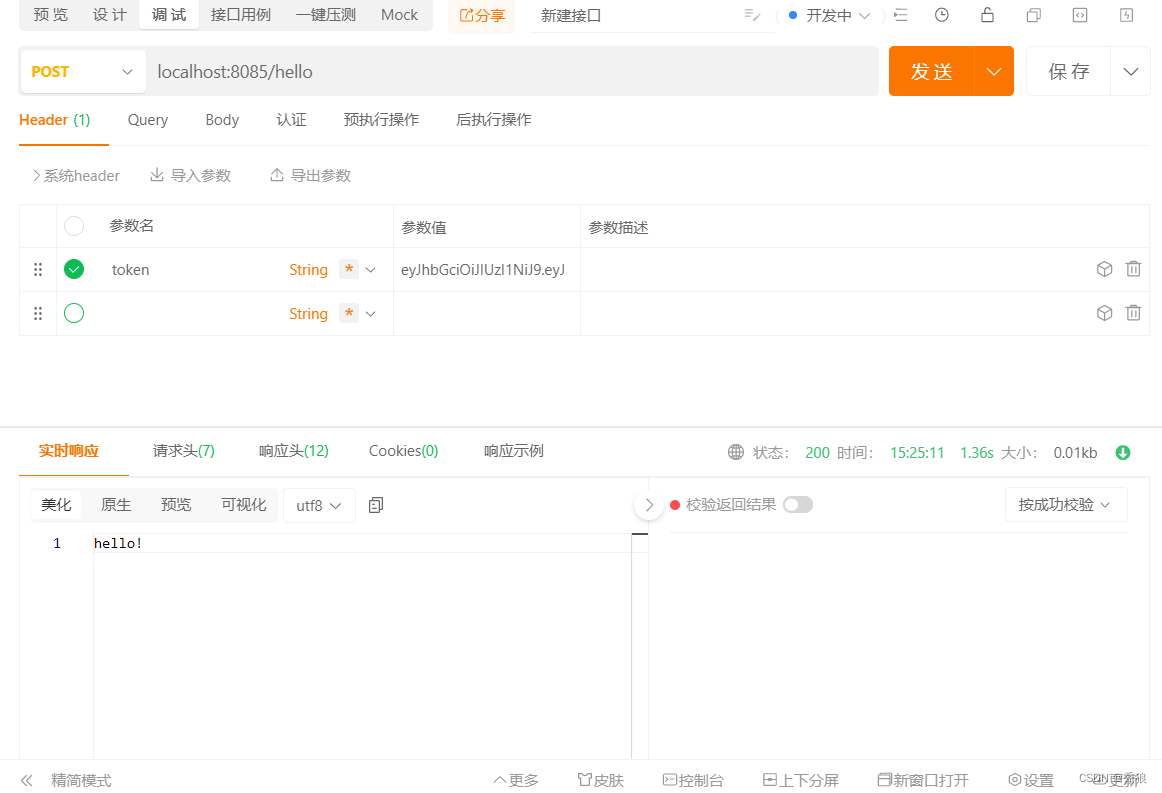
1.开启授权功能,在对应的security的配置类中添加对应的注解。
@EnableGlobalMethodSecurity(prePostEnabled = true) //开启授权2.为接口设置对应的权限需求
@RestController
public class baseController {@RequestMapping("/hello")//拥有text倾向才能访问@PreAuthorize("hasAuthority('text')")public String hello() {return "hello!";}
}
3.在用户进行认证的时候查询用户拥有的权限集合,并设置到 authenticationToken中。
- 在返回类型中设置权限集合属性和重写获取权限集合方法。
@Data
@NoArgsConstructor
public class LoginUser implements UserDetails {private User user;private List<String> authorities2String;public LoginUser(User user, List<String> authorities2String) {this.user = user;this.authorities2String = authorities2String;}@JSONField(serialize = false)private List<GrantedAuthority> authorities;@Overridepublic Collection<? extends GrantedAuthority> getAuthorities() {if(CollUtil.isEmpty(authorities)) {return authorities2String.stream().map(item -> new SimpleGrantedAuthority(item)).collect(Collectors.toList());}return authorities;}@Overridepublic String getPassword() {return user.getPassword();}@Overridepublic String getUsername() {return user.getUserName();}@Overridepublic boolean isAccountNonExpired() {return true;}@Overridepublic boolean isAccountNonLocked() {return true;}@Overridepublic boolean isCredentialsNonExpired() {return true;}@Overridepublic boolean isEnabled() {return true;}
}
- 在校验Service中查询对应的权限列表。
@Service
public class UserService implements UserDetailsService {@AutowiredUserMapper userMapper;@Overridepublic UserDetails loadUserByUsername(String username) throws UsernameNotFoundException {QueryWrapper<com.huang.springsecuritydemo.entity.User> userQueryWrapper = new QueryWrapper<>();userQueryWrapper.eq("user_name", username);com.huang.springsecuritydemo.entity.User user = userMapper.selectOne(userQueryWrapper);if(ObjectUtil.isEmpty(user)) {throw new RuntimeException("用户不存在");}//todo 查询并设置对应的权限信息//模拟查到的权限信息List<String> data = Arrays.asList("test", "text");return new LoginUser(user, data);}
}
- 在JWT认证中向authenticationToken中设置权限集合,最终设置到SecurityContextHolder中。
@Component
public class JwtAuthenticationTokenFilter extends OncePerRequestFilter {@AutowiredRedisCache redisCache;@Overrideprotected void doFilterInternal(HttpServletRequest request, HttpServletResponse response, FilterChain filterChain) throws ServletException, IOException {//获取token,token会存在header中String token = request.getHeader("token");if(StrUtil.isEmpty(token)) {//由后续的拦截器进行拦截filterChain.doFilter(request, response);//后续会返回回来,需要return,不然会执行下面的语句return ;}//解析tokenString userId;try {Claims claims = JwtUtil.parseJWT(token);userId = claims.getSubject();if(StringUtil.isNullOrEmpty(userId)) {throw new RuntimeException("token解析失败");}} catch (Exception e) {throw new RuntimeException(e);}//从redis中获取用户的信息LoginUser loginUser = redisCache.getCacheObject(userId);if(ObjectUtil.isEmpty(loginUser)) {throw new RuntimeException("Redis中没有用户信息");}//将数据存储到SecurityContextHolder//todo 设置对应的权限信息UsernamePasswordAuthenticationToken authenticationToken = new UsernamePasswordAuthenticationToken(loginUser, null, loginUser.getAuthorities());SecurityContextHolder.getContext().setAuthentication(authenticationToken);//放行filterChain.doFilter(request, response);}
}
进行测试,授权成功。
RDAB模型例子(基本通用,看进行二次开发)
1.创建五个数据库 用户表,角色表,权限表,用户角色关联表,角色权限关联表。
2.编写SQL语句查询用户的所有权限,并使用 mybatis-plus进行封装为一个函数进行调用。
SELECTDISTINCT m.`perms`FROMsys_user_role urLEFT JOIN `sys_role` r ON ur.`role_id` = r.`id`LEFT JOIN `sys_role_menu` rm ON ur.`role_id` = rm.`role_id`LEFT JOIN `sys_menu` m ON m.`id` = rm.`menu_id`WHEREuser_id = #{id}AND r.`status` = 0AND m.`status` = 03.在校验是进行调用,并返回对应的权限集合。
@Service
public class UserService implements UserDetailsService {@AutowiredUserMapper userMapper;@AutowiredMenuMapper menuMapper;@Overridepublic UserDetails loadUserByUsername(String username) throws UsernameNotFoundException {QueryWrapper<com.huang.springsecuritydemo.entity.User> userQueryWrapper = new QueryWrapper<>();userQueryWrapper.eq("user_name", username);com.huang.springsecuritydemo.entity.User user = userMapper.selectOne(userQueryWrapper);if(ObjectUtil.isEmpty(user)) {throw new RuntimeException("用户不存在");}//todo 查询并设置对应的权限信息List<String> data = menuMapper.selectPermsByUserId(user.getId());return new LoginUser(user, data);}
}
修改接口所需要的权限。
@RestController
public class baseController {@RequestMapping("/hello")//拥有text倾向才能访问@PreAuthorize("hasAuthority('system:test:list')")public String hello() {return "hello!";}
}
进行测试,最终成功。

自定义失败处理
1.自定义授权异常处理器和校验异常处理器。
- 校验异常处理器
//校验失败异常处理器
@Component
public class AuthenticationEntryPointImpl implements AuthenticationEntryPoint {@Overridepublic void commence(HttpServletRequest request, HttpServletResponse response, AuthenticationException authException) throws IOException, ServletException {//创建统一的返回对象,设置到response中ResponseResult responseResult = new ResponseResult(HttpStatus.HTTP_UNAUTHORIZED, "校验失败!");String json = JSON.toJSONString(responseResult);//将统一的结果设置到Response中,本质就是将对应的数据设置到response中WebUtil.renderString(response, json);}
}- 授权异常处理器
//授权失败异常处理器
@Component
public class AccessDeniedHandlerImpl implements AccessDeniedHandler {@Overridepublic void handle(HttpServletRequest request, HttpServletResponse response, AccessDeniedException accessDeniedException) throws IOException, ServletException {ResponseResult responseResult = new ResponseResult(HttpStatus.HTTP_UNAUTHORIZED, "授权失败!");String json = JSON.toJSONString(responseResult);WebUtil.renderString(response, json);}
}
对应的webUtil工具类
public class WebUtil {/*** 将字符串渲染到客户端** @param response 渲染对象* @param string 待渲染的字符串* @return null*/public static String renderString(HttpServletResponse response, String string) {try{response.setStatus(200);response.setContentType("application/json");response.setCharacterEncoding("utf-8");//将结果json以流的形式写入response中response.getWriter().print(string);}catch (IOException e){e.printStackTrace();}return null;}
}
2.将自定义的异常处理器进行配置
@Configuration
@EnableGlobalMethodSecurity(prePostEnabled = true)
public class SecurityConfig extends WebSecurityConfigurerAdapter {@AutowiredJwtAuthenticationTokenFilter jwtAuthenticationTokenFilter;@AutowiredAuthenticationEntryPoint authenticationEntryPoint;@AutowiredAccessDeniedHandler accessDeniedHandler;@Beanpublic PasswordEncoder passwordEncoder() {return new BCryptPasswordEncoder();}//将AuthenticationManager配置到ioc中@Bean@Overridepublic AuthenticationManager authenticationManagerBean() throws Exception {return super.authenticationManagerBean();}//配置权限规则,主要就睡要放行登录接口,不然登录接口都会被了解,以及其他不要的前后端分离的配置@Overrideprotected void configure(HttpSecurity http) throws Exception {http//由于是前后端分离项目,所以要关闭csrf.csrf().disable()//由于是前后端分离项目,没有session.sessionManagement().sessionCreationPolicy(SessionCreationPolicy.STATELESS).and()//指定让spring security放行登录接口的规则.authorizeRequests()// 对于登录接口 anonymous表示允许匿名访问, permitAll就是 登录和没登录都可以访问.antMatchers("/user/login").anonymous() //匿名访问,未登录就可以访问// 除上面外的所有请求全部需要鉴权认证后访问.anyRequest().authenticated();//将过滤器添加到用户登录处理器之前http.addFilterBefore(jwtAuthenticationTokenFilter, UsernamePasswordAuthenticationFilter.class);//设置自定义的异常处理器http.exceptionHandling()//校验异常处理器.authenticationEntryPoint(authenticationEntryPoint)//授权异常处理器.accessDeniedHandler(accessDeniedHandler);}
}
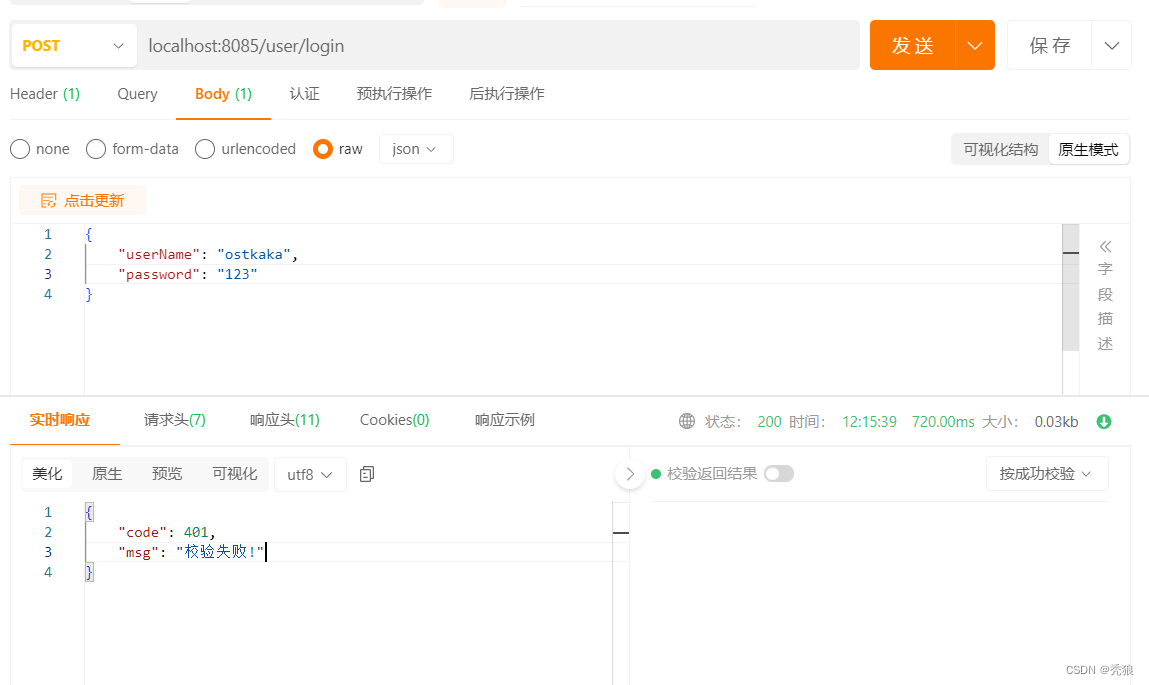
进行测试,异常显示成功。

允许跨域
1.开启springboot的允许跨域。
@Configuration
public class CorsConfig implements WebMvcConfigurer {@Override//重写spring提供的WebMvcConfigurer接口的addCorsMappings方法public void addCorsMappings(CorsRegistry registry) {//设置可以跨域的映射地址registry.addMapping("/**")// 设置可以跨域的源.allowedOriginPatterns("*")// 是否允许使用cookie.allowCredentials(true)// 设置允许的请求方式.allowedMethods("GET", "POST", "DELETE", "PUT")// 设置允许的header属性.allowedHeaders("*")// 跨域允许时间.maxAge(3600);}
}
2.开启springsecurity的允许跨域。
@Configuration
@EnableGlobalMethodSecurity(prePostEnabled = true)
public class SecurityConfig extends WebSecurityConfigurerAdapter {@AutowiredJwtAuthenticationTokenFilter jwtAuthenticationTokenFilter;@AutowiredAuthenticationEntryPoint authenticationEntryPoint;@AutowiredAccessDeniedHandler accessDeniedHandler;@Beanpublic PasswordEncoder passwordEncoder() {return new BCryptPasswordEncoder();}//将AuthenticationManager配置到ioc中@Bean@Overridepublic AuthenticationManager authenticationManagerBean() throws Exception {return super.authenticationManagerBean();}//配置权限规则,主要就睡要放行登录接口,不然登录接口都会被了解,以及其他不要的前后端分离的配置@Overrideprotected void configure(HttpSecurity http) throws Exception {http//由于是前后端分离项目,所以要关闭csrf.csrf().disable()//由于是前后端分离项目,没有session.sessionManagement().sessionCreationPolicy(SessionCreationPolicy.STATELESS).and()//指定让spring security放行登录接口的规则.authorizeRequests()// 对于登录接口 anonymous表示允许匿名访问, permitAll就是 登录和没登录都可以访问.antMatchers("/user/login").anonymous() //匿名访问,未登录就可以访问// 除上面外的所有请求全部需要鉴权认证后访问.anyRequest().authenticated();//将过滤器添加到用户登录处理器之前http.addFilterBefore(jwtAuthenticationTokenFilter, UsernamePasswordAuthenticationFilter.class);//设置自定义的异常处理器http.exceptionHandling()//校验异常处理器.authenticationEntryPoint(authenticationEntryPoint)//授权异常处理器.accessDeniedHandler(accessDeniedHandler);//允许跨域http.cors();}
}
最终设置完成。
自定义权限校验方法(比较灵活,可以自定义策略)
1.自定义校验类
@Component("itolen") //设置该类在ioc中的名称
public class ExpressionRoot {//判断权限是否存在public boolean hasAuthority(String authority) {LoginUser loginUser = (LoginUser) SecurityContextHolder.getContext().getAuthentication().getPrincipal();List<String> authorities2String = loginUser.getAuthorities2String();return authorities2String.contains(authority);}
}
2.在对应的接口上调用自定义方法。
@RestController
public class baseController {@RequestMapping("/hello")//拥有text倾向才能访问@PreAuthorize("@itolen.hasAuthority('system:test:list')")public String hello() {return "hello!";}
}
进行测试。
其他处理器
- 认证成功处理器和认证失败处理器
//认证成功处理器实现类
@Component
public class AuthenticationSuccessHandlerImpl implements AuthenticationSuccessHandler {@Overridepublic void onAuthenticationSuccess(HttpServletRequest request, HttpServletResponse response, Authentication authentication) throws IOException, ServletException {//认证成功后就会进行该方法System.out.println("认证成功!");}
}
//认证失败处理器实现类
@Component
public class AuthenticationFailureHandlerImpl implements AuthenticationFailureHandler {@Overridepublic void onAuthenticationFailure(HttpServletRequest request, HttpServletResponse response, AuthenticationException exception) throws IOException, ServletException {//认证失败后执行该方法System.out.println("认证失败!");}
}
将两个类进行配置。
@Configuration
@EnableGlobalMethodSecurity(prePostEnabled = true)
public class SecurityConfig extends WebSecurityConfigurerAdapter {@Autowiredprivate AuthenticationSuccessHandler authenticationSuccessHandler;@Autowiredprivate AuthenticationFailureHandler authenticationFailureHandler;//配置权限规则,主要就睡要放行登录接口,不然登录接口都会被了解,以及其他不要的前后端分离的配置@Overrideprotected void configure(HttpSecurity http) throws Exception {//设置校验成功处理器和校验失败处理器http.formLogin().successHandler(authenticationSuccessHandler).failureHandler(authenticationFailureHandler);}
}
- 注销成功处理器
@Component
public class LogoutSuccessHandlerImpl implements LogoutSuccessHandler {@Overridepublic void onLogoutSuccess(HttpServletRequest request, HttpServletResponse response, Authentication authentication) throws IOException, ServletException {//注销成功后执行的方法System.out.println("注销成功!");}
}
将该类进行配置。
@Configuration
@EnableGlobalMethodSecurity(prePostEnabled = true)
public class SecurityConfig extends WebSecurityConfigurerAdapter {@Autowiredprivate LogoutSuccessHandler logoutSuccessHandler;//配置权限规则,主要就睡要放行登录接口,不然登录接口都会被了解,以及其他不要的前后端分离的配置@Overrideprotected void configure(HttpSecurity http) throws Exception {//设置注销成功处理器http.logout().logoutSuccessHandler(logoutSuccessHandler);}
}
相关文章:
SpringSecurity深度学习
SpringSecurity简介 spring Security是什么? Spring Security 是一个强大且高度可定制的身份验证和访问控制框架,用于保护基于Spring的应用程序。它是Spring项目的一部分,旨在为企业级系统提供全面的安全性解决方案。 一个简单的授权和校验…...

odoo17 | 用户界面的基本交互
前言 现在我们已经创建了我们的新模型及其 相应的访问权限,是时候了 与用户界面交互。 在本章结束时,我们将创建几个菜单以访问默认列表 和窗体视图。 数据文件 (XML) Odoo在很大程度上是数据驱动的,因此模块定义的…...

Intel 性能监视器之二
全文来自Intel开发者手册:Intel? 64 and IA-32 Architectures Software Developer’s Manual Volume 3B System Programming Guide.pdf 注意:下文中已经指出手册中的对应页面和章节,请对照手册原文看,任何个人理解错误ÿ…...

Vert.x学习笔记-什么是事件总线
广义事件总线介绍Vert.x的事件总线Vert.x的事件总线的实现方式Vert.x的事件总线通信模式事件总线与消息队列的区别点对点通信模式请求-应答通信模式发布-订阅通信模式 Vert.x的事件总线应用场景Vert.x的事件总线消息Vert.x的事件总线消息示例Vert.x的事件总线的消息类型 拓展 广…...
STM32学习笔记二十二:WS2812制作像素游戏屏-飞行射击游戏(12)总结
至此,飞行射击游戏已经基本实现该有的功能,已经比较接近早期的商业游戏了。 如果采用脚本,可以完成关卡游戏,如果不用,也可以做成无限挑战游戏。 我们汇总一下制作的过程: 1、建模UML 2、主循环处理过程…...
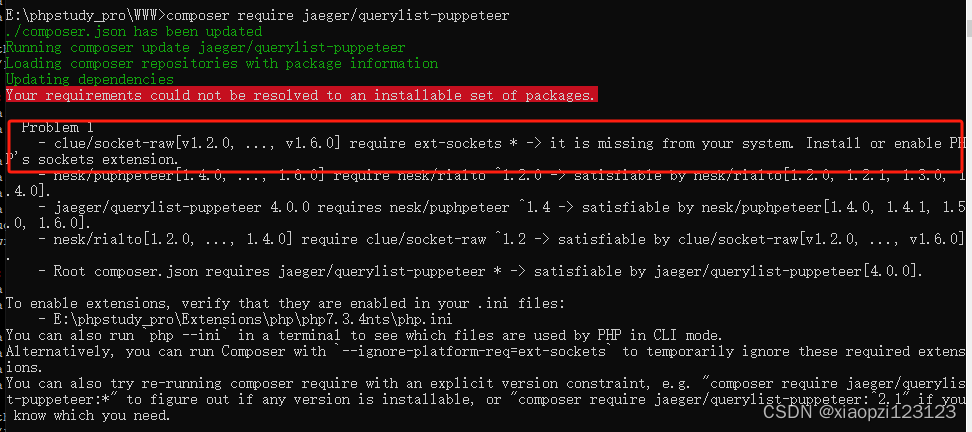
astadmin安装querylist插件Puppeteer
我本来是想在linux服务器上安装,折腾了一天也没安装成功,由于急着用,就先做window10上安装了,以后有时间再研究centos7上安装 一 首先需要安装fastadmin 框架和querylist插件 这个大家可以自行安装,querylist安装地址…...

Python从入门到网络爬虫(MySQL链接)
前言 在实际数据分析和建模过程中,我们通常需要从数据库中读取数据,并将其转化为 Pandas dataframe 对象进行进一步处理。而 MySQL 数据库是最常用的关系型数据库之一,因此在 Python 中如何连接 MySQL 数据库并查询数据成为了一个重要的问题…...
2020年认证杯SPSSPRO杯数学建模A题(第二阶段)听音辨位全过程文档及程序
2020年认证杯SPSSPRO杯数学建模 A题 听音辨位 原题再现: 把若干 (⩾ 1) 支同样型号的麦克风固定安装在一个刚性的枝形架子上 (架子下面带万向轮,在平地上可以被水平推动或旋转,但不会歪斜),这样的设备称为一个麦克风树。不同的麦…...

深入理解CRON表达式:时间调度的艺术
😄 19年之后由于某些原因断更了三年,23年重新扬帆起航,推出更多优质博文,希望大家多多支持~ 🌷 古之立大事者,不惟有超世之才,亦必有坚忍不拔之志 🎐 个人CSND主页——Mi…...
网络安全—模拟IP代理隐藏身份
文章目录 网络拓扑安装使用代理服务器设置隐藏者设置 使用古老的ccproxy实现代理服务器,仅做实验用途,禁止做违法犯罪的事情,后果自负。 网络拓扑 均使用Windows Server 2003系统 Router 外网IP:使用NAT模式 IP DHCP自动分配或者…...
)
Resilience4j相关问题及答案(2024)
1、什么是Resilience4j,与Hystrix有何不同? Resilience4j是一个为Java 8和函数式编程设计的故障恢复库,它主要利用了Vavr库中的函数式编程概念。Resilience4j提供了一系列的故障恢复机制,包括断路器(Circuit Breaker&…...

XSKY SDS 产品率先获得 OceanBase V4 新版本认证
近日,北京奥星贝斯科技有限公司(简称:OceanBase)与北京星辰天合科技股份有限公司(简称:XSKY 星辰天合)顺利完成产品兼容性认证。 XSKY 的高性能全闪存储以及混闪存储,与 OceanBase V…...
:静态方法(staticmethod)和类方法(classmethod)-[基础知识])
系统学习Python——类(class):静态方法(staticmethod)和类方法(classmethod)-[基础知识]
分类目录:《系统学习Python》总目录 我们可以在类中定义两种方法,它们不需要一个实例就可以被调用:静态方法(staticmethod)大致与一个类中简单的无实例函数的工作方式类似,而类方法则被传人一个类而不是一个…...
kotlin isEmpty/isNotEmpty/isNullOrEmpty和isBlank/isNotBlank/isNullOrBlank
kotlin 中 isEmpty :如果判断的字符为空返回值返回true否则返回false 它的源码 kotlin.internal.InlineOnly public inline fun CharSequence.isEmpty(): Boolean length 0 length 0: 首先检查字符序列的长度是否为 0。如果长度为 0,则表明这个字…...
Qt/QML编程学习之心得:Linux下USB接口使用(25)
很多linux嵌入式系统都有USB接口,那么如何使用USB接口呢? 首先,linux的底层驱动要支持,在linux kernal目录下可以找到对应的dts文件,(device tree) usb0: usb@ee520000{compatible = "myusb,musb";status = "disabled";reg = <0xEE520000 0x100…...

概率论与数理统计 知识点+课后习题
文章目录 💖 [学习资源整合](https://www.cnblogs.com/duisheng/p/17872980.html)📚 总复习📙 选择题📙 填空题📙 大题1. 概率2. 概率3. 概率4. P5. 概率6. 概率密度函数 F ( X ) F(X) F(X)7. 分布列求方差 V ( X ) …...

Spring Boot实战:深入理解@Service与@Mapper注解
1. Service 注解 Service 是Spring框架提供的一个注解,用于标记类为业务逻辑层的组件。当类上标注了Service注解后,Spring容器会自动扫描并创建该类的一个实例(即Bean),这样我们就可以在其他地方通过自动装配…...
【DevOps-06】Jenkins实现CI/CD操作
一、简要说明 基于Jenkins拉取GitLab的SpringBoot代码进行构建发布到测试环境实现持续集成 基于Jenkins拉取GitLab指定发行版本的SpringBoot代码进行构建发布到生产环境实现CD实现持续部署 二、准备Springboot工程 1、IDEA新建工程 2、填写项目工程信息 3、选择Springboot版本…...
华为面经总结
为了帮助大家更好的应对面试,我整理了往年华为校招面试的题目,供大家参考~ 面经1 技术一面 自我介绍说下项目中的难点volatile和synchronized的区别, 问的比较细大顶堆小顶堆怎么删除根节点CSRF攻击是什么,怎么预防线程通信方式…...
大模型实战营Day1 书生·浦语大模型全链路开源体系
1.大模型为发展通用人工智能的重要途经 专用模型:针对特定任务解决特定问题 通用大模型:一个模型对应多模态多任务 2.InternLM大模型开源历程 3.InternLM-20B大模型性能 4.从模型到应用:智能客服、个人助手、行业应用 5.书生浦语全链条开源…...

借助 Taotoken 多模型聚合能力为开源项目构建智能问答机器人
🚀 告别海外账号与网络限制!稳定直连全球优质大模型,限时半价接入中。 👉 点击领取海量免费额度 借助 Taotoken 多模型聚合能力为开源项目构建智能问答机器人 为开源项目添加一个智能问答助手,能显著提升社区体验&…...
Code Coverage:从覆盖率收集到报告生成的全流程实战)
【VCS】(6)Code Coverage:从覆盖率收集到报告生成的全流程实战
1. 代码覆盖率基础概念 第一次接触代码覆盖率这个概念时,我也是一头雾水。记得当时领导问我:"这个模块的验证覆盖率多少了?"我只能支支吾吾说还在跑仿真。后来才明白,代码覆盖率是衡量验证完整性的重要指标,…...

AI工作效率入门:普通人必须了解的10个AI工具
AI工作效率入门:普通人必须了解的10个AI工具你不需要是程序员,也不需要懂技术,只需要会用这10个工具,你的工作效率就能翻倍。为什么普通人也需要学AI工具? 根据麦肯锡2024年的调研报告,使用AI辅助工作的员工…...

国产多模态大模型如何“看懂”三维世界?3D场景理解深度解析
国产多模态大模型如何“看懂”三维世界?3D场景理解深度解析 引言 在人工智能向物理世界进军的浪潮中,让机器理解我们身处的三维空间,已成为核心挑战与前沿阵地。与依赖二维图像的视觉识别不同,3D场景理解要求模型能融合视觉、几何…...

Steam库存管理革命:5分钟掌握批量操作终极指南
Steam库存管理革命:5分钟掌握批量操作终极指南 【免费下载链接】Steam-Economy-Enhancer 中文版:Enhances the Steam Inventory and Steam Market. 项目地址: https://gitcode.com/gh_mirrors/ste/Steam-Economy-Enhancer Steam Economy Enhancer…...

2026年实战指南:Jrebel本地与远程热加载的配置、排错与进阶场景
1. 热加载技术的前世今生 第一次接触热加载是在2016年,当时还在用Eclipse开发Spring项目。每次改完代码都要经历漫长的重启等待,直到同事推荐了JRebel这个神器。十年过去,热加载已经成为现代Java开发的标配,特别是在2026年的今天&…...

i.MX6Q高温满负载压力测试:从散热原理到嵌入式产品可靠性设计
1. 项目概述与测试背景 在嵌入式产品的研发过程中,尤其是在工业控制、车载电子、户外设备等严苛应用场景下,系统的长期稳定性和可靠性是衡量产品成败的关键。其中,处理器作为系统的“大脑”,其在高负载、高温环境下的表现…...

KV缓存优化与RAG系统性能提升实践
1. KV缓存技术原理与RAG系统挑战 在大型语言模型(LLM)推理过程中,KV(Key-Value)缓存技术通过存储注意力机制计算产生的中间状态来避免重复计算。具体来说,Transformer架构中的每个解码器层都会为输入序列生成键(Key)和值(Value)矩…...
3个步骤让你的外文漫画秒变中文:BallonsTranslator零门槛入门指南
3个步骤让你的外文漫画秒变中文:BallonsTranslator零门槛入门指南 【免费下载链接】BallonsTranslator 深度学习辅助漫画翻译工具, 支持一键机翻和简单的图像/文本编辑 | Yet another computer-aided comic/manga translation tool powered by deeplearning 项目地…...

ElevenLabs藏文语音生成上线仅72小时:开发者必须立即掌握的5个API调用避坑要点
更多请点击: https://intelliparadigm.com 第一章:ElevenLabs藏文语音生成上线背景与技术意义 藏语作为中国官方认可的少数民族语言之一,拥有超过600万母语使用者,主要分布在西藏、青海、四川、甘肃和云南等地区。长期以来&…...