inflate流程分析
一.inflate的三参数重载方法else里面逻辑
我们先看到setContentView里面的inflate的调用链:
public View inflate(@LayoutRes int resource, @Nullable ViewGroup root) {return inflate(resource, root, root != null);}public View inflate(@LayoutRes int resource, @Nullable ViewGroup root, boolean attachToRoot) {final Resources res = getContext().getResources();if (DEBUG) {Log.d(TAG, "INFLATING from resource: \"" + res.getResourceName(resource) + "\" ("+ Integer.toHexString(resource) + ")");}View view = tryInflatePrecompiled(resource, res, root, attachToRoot);if (view != null) {return view;}XmlResourceParser parser = res.getLayout(resource);try {return inflate(parser, root, attachToRoot);} finally {parser.close();}}重点看三参数的方法:
public View inflate(XmlPullParser parser, @Nullable ViewGroup root, boolean attachToRoot) {synchronized (mConstructorArgs) {Trace.traceBegin(Trace.TRACE_TAG_VIEW, "inflate");final Context inflaterContext = mContext;final AttributeSet attrs = Xml.asAttributeSet(parser);Context lastContext = (Context) mConstructorArgs[0];mConstructorArgs[0] = inflaterContext;View result = root;try {advanceToRootNode(parser);final String name = parser.getName();if (DEBUG) {System.out.println("**************************");System.out.println("Creating root view: "+ name);System.out.println("**************************");}if (TAG_MERGE.equals(name)) {if (root == null || !attachToRoot) {throw new InflateException("<merge /> can be used only with a valid "+ "ViewGroup root and attachToRoot=true");}rInflate(parser, root, inflaterContext, attrs, false);} else {// Temp is the root view that was found in the xmlfinal View temp = createViewFromTag(root, name, inflaterContext, attrs);ViewGroup.LayoutParams params = null;if (root != null) {if (DEBUG) {System.out.println("Creating params from root: " +root);}// Create layout params that match root, if suppliedparams = root.generateLayoutParams(attrs);if (!attachToRoot) {// Set the layout params for temp if we are not// attaching. (If we are, we use addView, below)temp.setLayoutParams(params);}}if (DEBUG) {System.out.println("-----> start inflating children");}// Inflate all children under temp against its context.rInflateChildren(parser, temp, attrs, true);if (DEBUG) {System.out.println("-----> done inflating children");}// We are supposed to attach all the views we found (int temp)// to root. Do that now.if (root != null && attachToRoot) {root.addView(temp, params);}// Decide whether to return the root that was passed in or the// top view found in xml.if (root == null || !attachToRoot) {result = temp;}}} catch (XmlPullParserException e) {final InflateException ie = new InflateException(e.getMessage(), e);ie.setStackTrace(EMPTY_STACK_TRACE);throw ie;} catch (Exception e) {final InflateException ie = new InflateException(getParserStateDescription(inflaterContext, attrs)+ ": " + e.getMessage(), e);ie.setStackTrace(EMPTY_STACK_TRACE);throw ie;} finally {// Don't retain static reference on context.mConstructorArgs[0] = lastContext;mConstructorArgs[1] = null;Trace.traceEnd(Trace.TRACE_TAG_VIEW);}return result;}}在这个方法里面,先拿到我们xml的根布局对象,如果是merge的话,直接取merge的子view添加。我们先看一下不是merge会怎么样。
创建根布局View
先执行createViewFromTag方法,这个传入的name是根布局的name,这个方法就是创建布局的根View:
View createViewFromTag(View parent, String name, Context context, AttributeSet attrs,boolean ignoreThemeAttr) {if (name.equals("view")) {name = attrs.getAttributeValue(null, "class");}// Apply a theme wrapper, if allowed and one is specified.if (!ignoreThemeAttr) {final TypedArray ta = context.obtainStyledAttributes(attrs, ATTRS_THEME);final int themeResId = ta.getResourceId(0, 0);if (themeResId != 0) {context = new ContextThemeWrapper(context, themeResId);}ta.recycle();}try {View view = tryCreateView(parent, name, context, attrs);if (view == null) {final Object lastContext = mConstructorArgs[0];mConstructorArgs[0] = context;try {if (-1 == name.indexOf('.')) {view = onCreateView(context, parent, name, attrs);} else {view = createView(context, name, null, attrs);}} finally {mConstructorArgs[0] = lastContext;}}return view;} catch (InflateException e) {throw e;} catch (ClassNotFoundException e) {final InflateException ie = new InflateException(getParserStateDescription(context, attrs)+ ": Error inflating class " + name, e);ie.setStackTrace(EMPTY_STACK_TRACE);throw ie;} catch (Exception e) {final InflateException ie = new InflateException(getParserStateDescription(context, attrs)+ ": Error inflating class " + name, e);ie.setStackTrace(EMPTY_STACK_TRACE);throw ie;}}重点看到这段代码:
if (-1 == name.indexOf('.')) {view = onCreateView(context, parent, name, attrs);} else {view = createView(context, name, null, attrs);}这里分为两种情况了,一种是有点,一种是全路径没有点的。
全路径名称有点(自定义的view)
先看看看有点是什么情况:
public final View createView(@NonNull Context viewContext, @NonNull String name,@Nullable String prefix, @Nullable AttributeSet attrs)throws ClassNotFoundException, InflateException {Objects.requireNonNull(viewContext);Objects.requireNonNull(name);Constructor<? extends View> constructor = sConstructorMap.get(name);if (constructor != null && !verifyClassLoader(constructor)) {constructor = null;sConstructorMap.remove(name);}Class<? extends View> clazz = null;try {Trace.traceBegin(Trace.TRACE_TAG_VIEW, name);if (constructor == null) {// Class not found in the cache, see if it's real, and try to add itclazz = Class.forName(prefix != null ? (prefix + name) : name, false,mContext.getClassLoader()).asSubclass(View.class);if (mFilter != null && clazz != null) {boolean allowed = mFilter.onLoadClass(clazz);if (!allowed) {failNotAllowed(name, prefix, viewContext, attrs);}}constructor = clazz.getConstructor(mConstructorSignature);constructor.setAccessible(true);sConstructorMap.put(name, constructor);} else {// If we have a filter, apply it to cached constructorif (mFilter != null) {// Have we seen this name before?Boolean allowedState = mFilterMap.get(name);if (allowedState == null) {// New class -- remember whether it is allowedclazz = Class.forName(prefix != null ? (prefix + name) : name, false,mContext.getClassLoader()).asSubclass(View.class);boolean allowed = clazz != null && mFilter.onLoadClass(clazz);mFilterMap.put(name, allowed);if (!allowed) {failNotAllowed(name, prefix, viewContext, attrs);}} else if (allowedState.equals(Boolean.FALSE)) {failNotAllowed(name, prefix, viewContext, attrs);}}}Object lastContext = mConstructorArgs[0];mConstructorArgs[0] = viewContext;Object[] args = mConstructorArgs;args[1] = attrs;try {final View view = constructor.newInstance(args);if (view instanceof ViewStub) {// Use the same context when inflating ViewStub later.final ViewStub viewStub = (ViewStub) view;viewStub.setLayoutInflater(cloneInContext((Context) args[0]));}return view;} finally {mConstructorArgs[0] = lastContext;}}......}
可以看到有点的直接反射创建出这个view了。
全路径名称没有点(android系统的view)
再来看看没有点的情况:
public View onCreateView(@NonNull Context viewContext, @Nullable View parent,@NonNull String name, @Nullable AttributeSet attrs)throws ClassNotFoundException {return onCreateView(parent, name, attrs);}protected View onCreateView(View parent, String name, AttributeSet attrs)throws ClassNotFoundException {return onCreateView(name, attrs);}实际上LayoutInflater是一个抽象类,它的实现类是PhoneLayoutInflater:
public class PhoneLayoutInflater extends LayoutInflater {private static final String[] sClassPrefixList = {"android.widget.","android.webkit.","android.app."};/*** Instead of instantiating directly, you should retrieve an instance* through {@link Context#getSystemService}** @param context The Context in which in which to find resources and other*                application-specific things.** @see Context#getSystemService*/public PhoneLayoutInflater(Context context) {super(context);}protected PhoneLayoutInflater(LayoutInflater original, Context newContext) {super(original, newContext);}/** Override onCreateView to instantiate names that correspond to thewidgets known to the Widget factory. If we don't find a match,call through to our super class.*/@Override protected View onCreateView(String name, AttributeSet attrs) throws ClassNotFoundException {for (String prefix : sClassPrefixList) {try {View view = createView(name, prefix, attrs);if (view != null) {return view;}} catch (ClassNotFoundException e) {// In this case we want to let the base class take a crack// at it.}}return super.onCreateView(name, attrs);}public LayoutInflater cloneInContext(Context newContext) {return new PhoneLayoutInflater(this, newContext);}
}
所以在LayoutInflater里面调用的两参方法最后会执行PhoneLayoutInflater的两参方法:
@Override protected View onCreateView(String name, AttributeSet attrs) throws ClassNotFoundException {for (String prefix : sClassPrefixList) {try {View view = createView(name, prefix, attrs);if (view != null) {return view;}} catch (ClassNotFoundException e) {// In this case we want to let the base class take a crack// at it.}}return super.onCreateView(name, attrs);}这个方法先进行三个参数的处理,如果这三个参数对不上,会执行super的两参方法,再进行一个参数的处理。实际上是进行了四个参数的处理:
private static final String[] sClassPrefixList = {"android.widget.","android.webkit.","android.app."};protected View onCreateView(String name, AttributeSet attrs)throws ClassNotFoundException {return createView(name, "android.view.", attrs);}从没有点的情况来看,先把全路径给补全了,然后再和有点的情况一样,反射创建出View。
总结
其实创建xml的根布局的时候,如果是全路径名称有点的话,就是我们自己创建的view,比如:
androidx.constraintlayout.widget.ConstraintLayout这个是谷歌自定义的根布局,直接反射创建view就行。
如果在布局文件里面根布局没有点:
LinearLayout这就是android系统自带的根布局,我们无法反射创建它,所以补全全路径后再反射创建就行了。
创建根布局包裹的子View
在inflate的三参重载方法里面,我们通过:
final View temp = createViewFromTag(root, name, inflaterContext, attrs);创建出了根布局view。接下来我们执行下面代码创建子view:
rInflateChildren(parser, temp, attrs, true); void rInflate(XmlPullParser parser, View parent, Context context,AttributeSet attrs, boolean finishInflate) throws XmlPullParserException, IOException {final int depth = parser.getDepth();int type;boolean pendingRequestFocus = false;while (((type = parser.next()) != XmlPullParser.END_TAG ||parser.getDepth() > depth) && type != XmlPullParser.END_DOCUMENT) {if (type != XmlPullParser.START_TAG) {continue;}final String name = parser.getName();if (TAG_REQUEST_FOCUS.equals(name)) {pendingRequestFocus = true;consumeChildElements(parser);} else if (TAG_TAG.equals(name)) {parseViewTag(parser, parent, attrs);} else if (TAG_INCLUDE.equals(name)) {if (parser.getDepth() == 0) {throw new InflateException("<include /> cannot be the root element");}parseInclude(parser, context, parent, attrs);} else if (TAG_MERGE.equals(name)) {throw new InflateException("<merge /> must be the root element");} else {final View view = createViewFromTag(parent, name, context, attrs);final ViewGroup viewGroup = (ViewGroup) parent;final ViewGroup.LayoutParams params = viewGroup.generateLayoutParams(attrs);rInflateChildren(parser, view, attrs, true);viewGroup.addView(view, params);}}if (pendingRequestFocus) {parent.restoreDefaultFocus();}if (finishInflate) {parent.onFinishInflate();}}从这个函数我们可以看到循环解析我们的xml文件,如果是include不能定义在xml的根里面,merge又只能定义在xml的根里面。
这几种情况都除外的话,接下来又是进入和xml根view一样的解析流程了。
二.inflate函数几个参数的作用
根布局是merge
主要文件
R.layout.activity_main:
<LinearLayout xmlns:android="http://schemas.android.com/apk/res/android"xmlns:tools="http://schemas.android.com/tools"android:layout_width="match_parent"android:layout_height="match_parent"android:id="@+id/ll"tools:context=".MainActivity2"><Buttonandroid:id="@+id/button1"android:layout_width="wrap_content"android:layout_height="wrap_content"android:text="Button" /></LinearLayout>R.layout.merge_layout:
<merge xmlns:android="http://schemas.android.com/apk/res/android"android:layout_width="match_parent"android:layout_height="match_parent"><Buttonandroid:id="@+id/button1"android:layout_width="wrap_content"android:layout_height="wrap_content"android:text="Button" /></merge>我在mainActivty里面通过LayoutInflater把R.layout.merge_layout加载到R.layout.activity_main里面。
第一种方式:
//第一种LayoutInflater.from(this).inflate(R.layout.merge_layout, layout, true);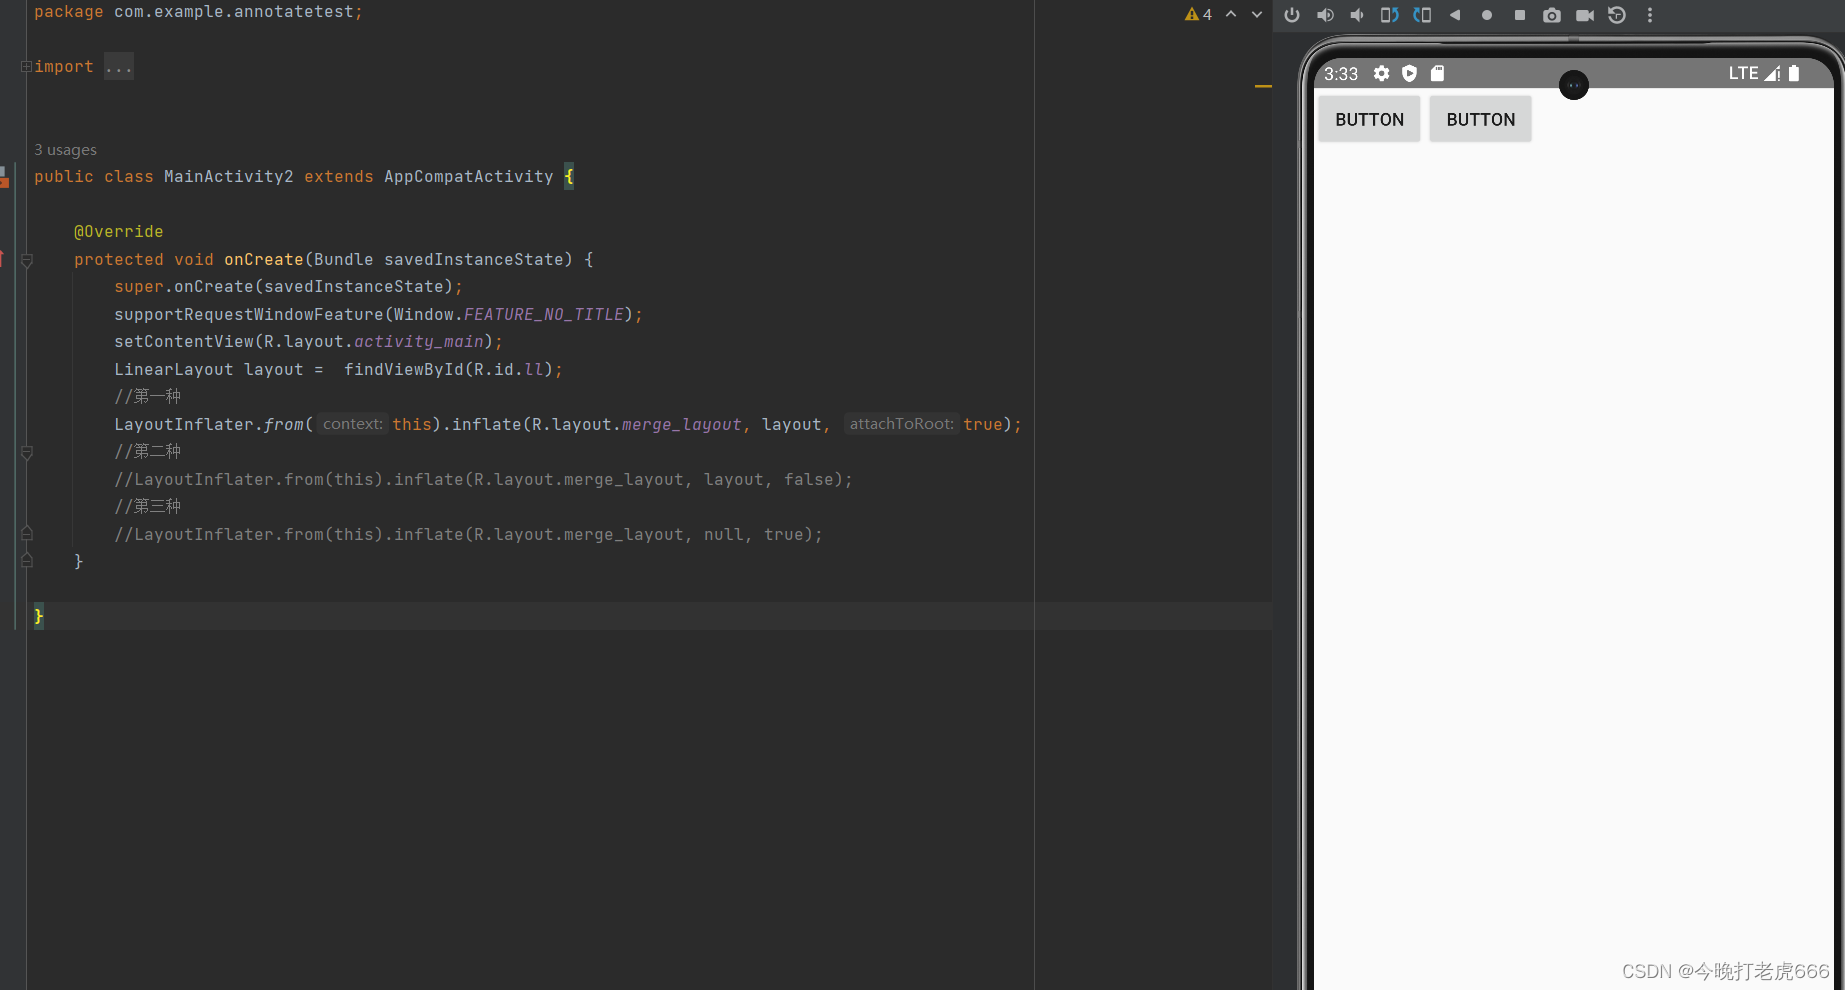
可以看到第一种方式完美加入。
第二种,第三种方式:
//第二种LayoutInflater.from(this).inflate(R.layout.merge_layout, layout, false);
//第三种LayoutInflater.from(this).inflate(R.layout.merge_layout, null, true);
第二种和第三种方式会报错,这是为什么呢?
在inflate的三参构造方法里面:
if (TAG_MERGE.equals(name)) {if (root == null || !attachToRoot) {throw new InflateException("<merge /> can be used only with a valid "+ "ViewGroup root and attachToRoot=true");}rInflate(parser, root, inflaterContext, attrs, false);}如果xml的根布局是merge的话,root为空和attachToRoot是false都会报错。
根布局不是merge
涉及到inflate的参数的几处地方分别是在下面:
if (root != null) {if (DEBUG) {System.out.println("Creating params from root: " +root);}// Create layout params that match root, if suppliedparams = root.generateLayoutParams(attrs);if (!attachToRoot) {// Set the layout params for temp if we are not// attaching. (If we are, we use addView, below)temp.setLayoutParams(params);}}if (root != null && attachToRoot) {root.addView(temp, params);}if (root == null || !attachToRoot) {result = temp;}这里的root就是我们传入的root,temp是xml的根布局。
R.layout.inflater_activity:
<LinearLayout xmlns:android="http://schemas.android.com/apk/res/android"android:layout_width="match_parent"android:layout_height="match_parent"android:id="@+id/ll"></LinearLayout>R.layout.inflater_layout:
<LinearLayout xmlns:android="http://schemas.android.com/apk/res/android"android:layout_width="200dp"android:layout_height="200dp"android:background="@color/teal_200"><Buttonandroid:layout_gravity="center"android:background="@color/cardview_dark_background"android:layout_width="wrap_content"android:layout_height="wrap_content"/></LinearLayout>第一种方式:
public class InflaterActivity extends AppCompatActivity {@Overrideprotected void onCreate(Bundle savedInstanceState) {super.onCreate(savedInstanceState);supportRequestWindowFeature(Window.FEATURE_NO_TITLE);setContentView(R.layout.inflater_activity);LinearLayout layout = findViewById(R.id.ll);//第一种方式成功添加LayoutInflater.from(this).inflate(R.layout.inflater_layout, layout, true);}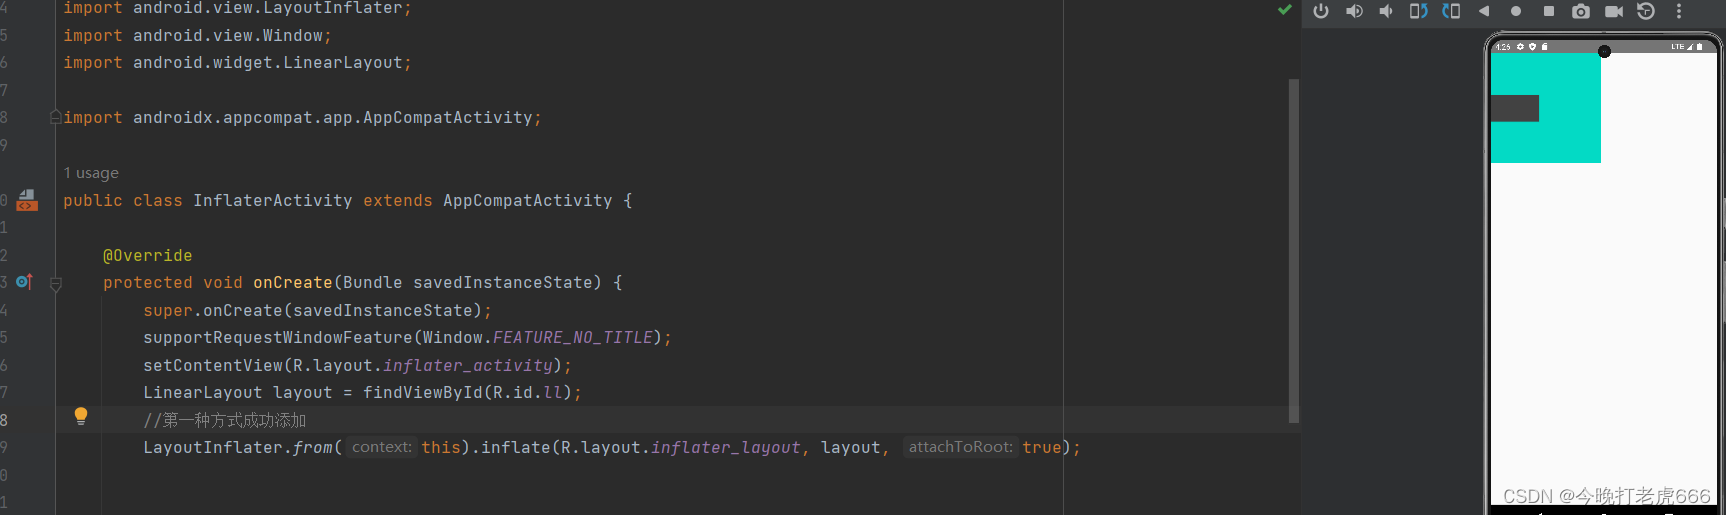 第一种方式成功添加。
第二种方式:
public class InflaterActivity extends AppCompatActivity {@Overrideprotected void onCreate(Bundle savedInstanceState) {super.onCreate(savedInstanceState);supportRequestWindowFeature(Window.FEATURE_NO_TITLE);setContentView(R.layout.inflater_activity);LinearLayout layout = findViewById(R.id.ll);//第一种方式成功添加//LayoutInflater.from(this).inflate(R.layout.inflater_layout, layout, true);//第二种方式,报错The specified child already has a parent. You must call removeView() on the child's parent first.View view = LayoutInflater.from(this).inflate(R.layout.inflater_layout, layout, true);layout.addView(view);}
}
第二种方式会报错,因为root不为空,attachToRoot为true的情况下,会执行:
if (root != null && attachToRoot) {root.addView(temp, params);}第三种方式:
public class InflaterActivity extends AppCompatActivity {@Overrideprotected void onCreate(Bundle savedInstanceState) {super.onCreate(savedInstanceState);supportRequestWindowFeature(Window.FEATURE_NO_TITLE);setContentView(R.layout.inflater_activity);LinearLayout layout = findViewById(R.id.ll);//第一种方式成功添加//LayoutInflater.from(this).inflate(R.layout.inflater_layout, layout, true);//第二种方式,报错The specified child already has a parent. You must call removeView() on the child's parent first.//View view = LayoutInflater.from(this).inflate(R.layout.inflater_layout, layout, true);//layout.addView(view);//第三种方式,布局成功//想让R.layout.inflater_layout的根节点的属性(宽高)有效,又不想让其处于某一个容器里面View view = LayoutInflater.from(this).inflate(R.layout.inflater_layout, layout, false);layout.addView(view);}
}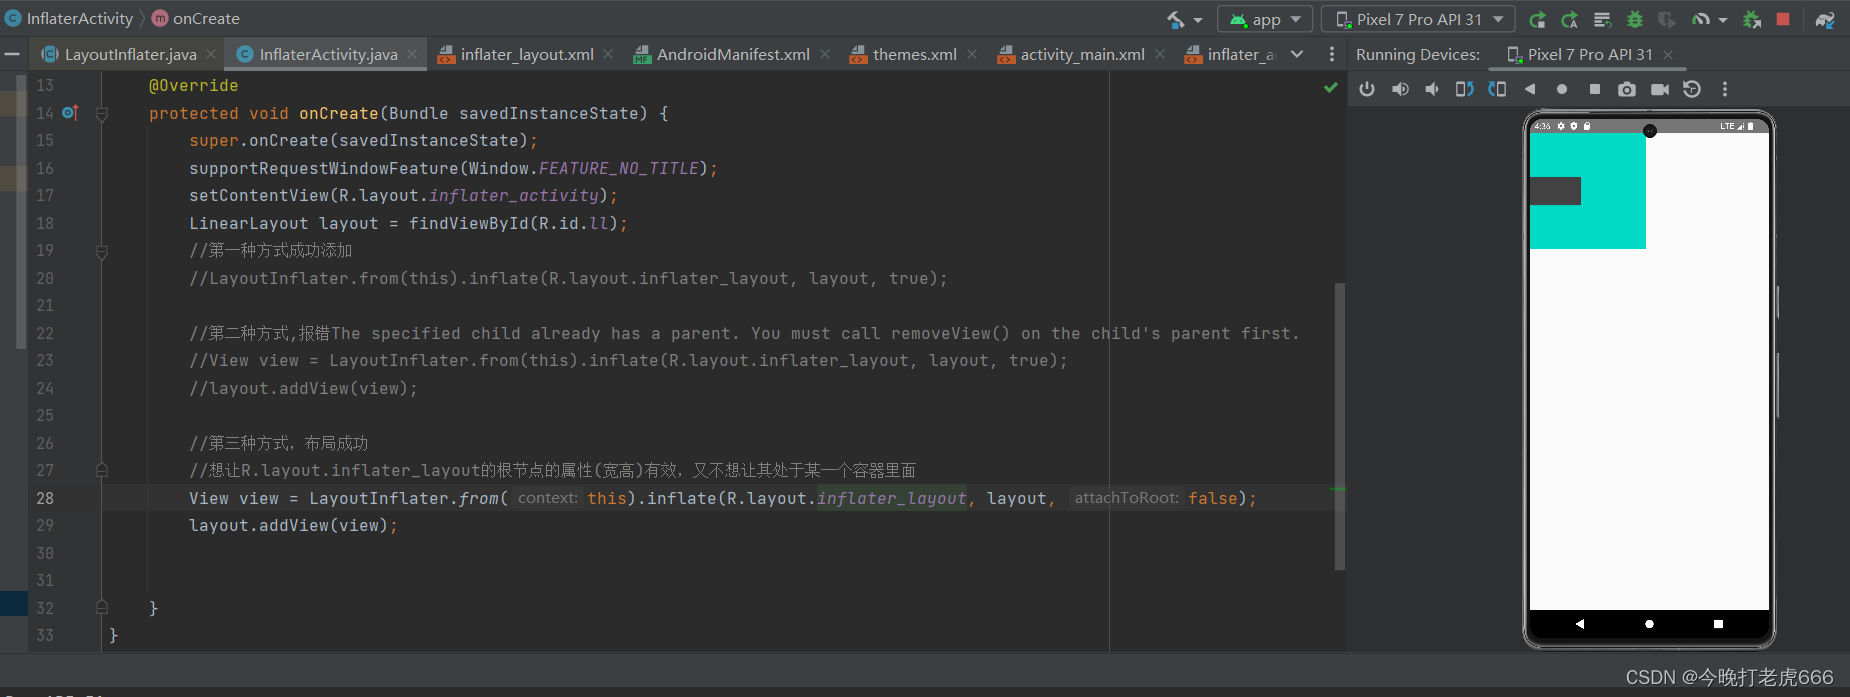
第三种方式布局有效,会执行:
if (root != null) {// Create layout params that match root, if suppliedparams = root.generateLayoutParams(attrs);if (!attachToRoot) {// Set the layout params for temp if we are not// attaching. (If we are, we use addView, below)temp.setLayoutParams(params);}}第四种方式:
public class InflaterActivity extends AppCompatActivity {@Overrideprotected void onCreate(Bundle savedInstanceState) {super.onCreate(savedInstanceState);supportRequestWindowFeature(Window.FEATURE_NO_TITLE);setContentView(R.layout.inflater_activity);LinearLayout layout = findViewById(R.id.ll);//第一种方式成功添加//LayoutInflater.from(this).inflate(R.layout.inflater_layout, layout, true);//第二种方式,报错The specified child already has a parent. You must call removeView() on the child's parent first.//View view = LayoutInflater.from(this).inflate(R.layout.inflater_layout, layout, true);//layout.addView(view);//第三种方式,布局成功//想让R.layout.inflater_layout的根节点的属性(宽高)有效,又不想让其处于某一个容器里面//View view = LayoutInflater.from(this).inflate(R.layout.inflater_layout, layout, false);//layout.addView(view);//第四种方式,布局成功//root为空的时候,不管第三个参数是什么,效果都是一样的//R.layout.inflater_layout根布局的宽高失效,只是包裹子View//但是子View(button)有效,因为Button是在容器下的View view = LayoutInflater.from(this).inflate(R.layout.inflater_layout, null, false);layout.addView(view);}
}
总结:
当xml的根布局是merge的话,添加到root里面。三个参数必须都填且最后一个参数是true。
当xml的根布局不是merge的话:
当root为空时,不管第三个参数是true还是false,xml的根布局的宽高都无效,且需要手动addView到root里面;
当root不为空时,第三个参数为true的话,xml根布局宽高有效,且自动帮我们添加到root里面;第三个参数为false的话,xml根布局宽高有效,需要我们手动addView到root里面。
三.标签特性
merge
1.优化布局,使用merge减少一次循环解析
2.必须用作更布局
include
1.如果include的标签设置了id,findViewById去查找通过include标签映入的xml的根布局的id是找不到的,会被include的标签的id给覆盖
2.不能用作根布局
ViewStub
1.与include差不多
2.viewStub构造函数里面会隐藏viewStub,具有懒加载作用
(在调用inflate()或者setVisibility()时,ViewStub才会加载真正的布局资源并在控件层级结构中替换为真正的控件,同时ViewStub从控件层级结构中移除,这是“懒加载”的核心思想)
相关文章:
inflate流程分析
一.inflate的三参数重载方法else里面逻辑 我们先看到setContentView里面的inflate的调用链: public View inflate(LayoutRes int resource, Nullable ViewGroup root) {return inflate(resource, root, root ! null);}public View inflate(LayoutRes int resource…...

数据挖掘实战-基于机器学习的电商文本分类模型
🤵♂️ 个人主页:艾派森的个人主页 ✍🏻作者简介:Python学习者 🐋 希望大家多多支持,我们一起进步!😄 如果文章对你有帮助的话, 欢迎评论 💬点赞Ǵ…...
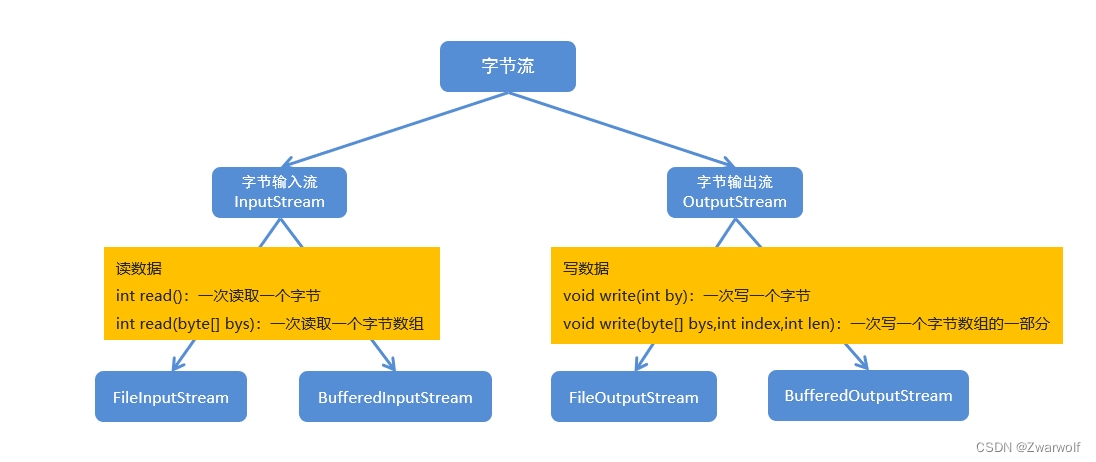
第8章-第4节-Java中字节流的缓冲流
1、缓冲流:属于高级IO流,并不能直接读写数据,需要依赖于基础流。缓冲流的目的是为了提高文件的读写效率?那么是如何提高文件的读写效率的呢? 在内存中设置一个缓冲区,缓冲区的默认大小是8192字节ÿ…...

NULL是什么?
NULL是一个编程术语,通常用于表示一个空值或无效值。在很多编程语言中,NULL用于表示一个变量或指针不引用任何有效的对象或内存位置。 NULL可以看作是一个特殊的值,表示缺少有效的数据或引用。当一个变量被赋予NULL值时,它表示该变…...

FreeRTOS 基础知识
这个基础知识也是非常重要的,那我们要学好 FreeRTOS,这些都是必不可少的。 那么就来看一下本节有哪些内容: 首先呢就是介绍一下什么是任务调度器。接着呢就是任务它拥有哪一些状态了。那这里的内容不多,但是呢都是非常重要的。 …...
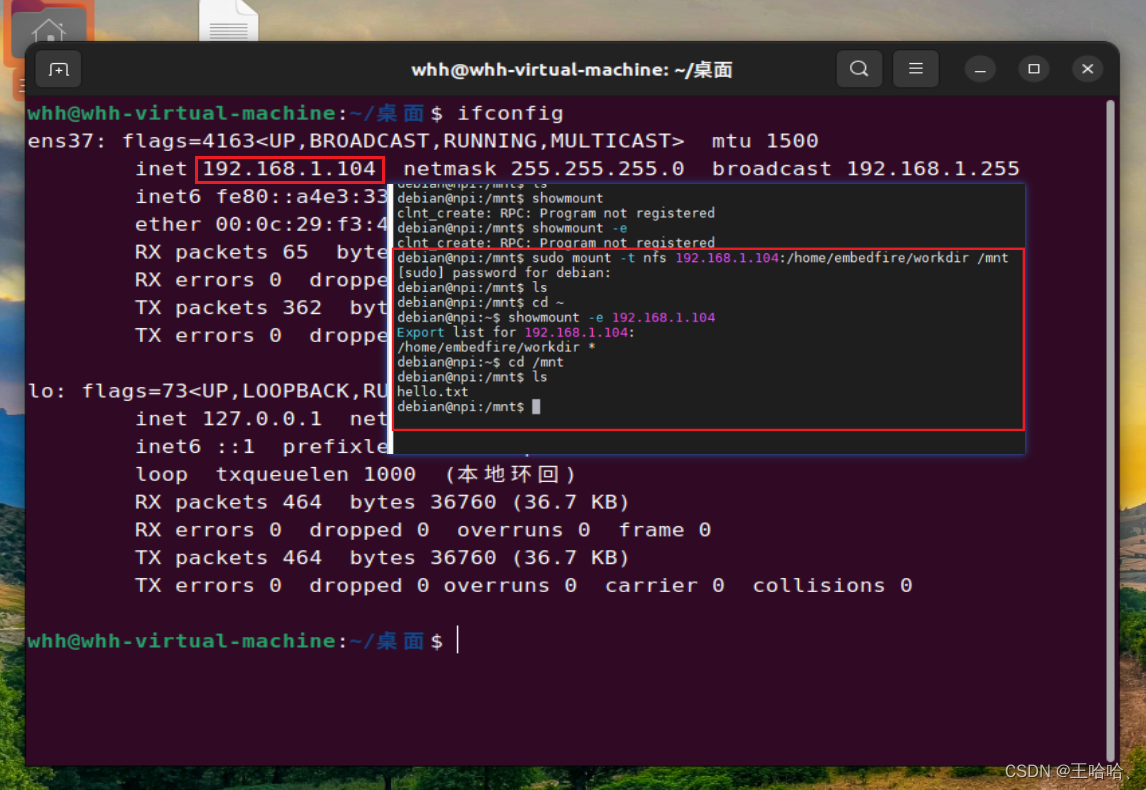
【野火i.MX6NULL开发板】挂载 NFS 网络文件系统
0、前言 参考资料: (误人子弟)《野火 Linux 基础与应用开发实战指南基于 i.MX6ULL 系列》PDF 第22章 参考视频:(成功) https://www.bilibili.com/video/BV1JK4y1t7io?p26&vd_sourcefb8dcae0aee3f1aab…...
方法或展开语法(...)来合并对象,Object.freeze()方法来冻结对象,防止对象被修改)
在JavaScript中,Object.assign()方法或展开语法(...)来合并对象,Object.freeze()方法来冻结对象,防止对象被修改
文章目录 一、Object.freeze()方法来冻结对象,防止对象被修改1、基本使用2、冻结数组2.1、浅冻结2.1、深冻结 3、应用场景4、Vue中使用Object.freeze 二、Object.assign()方法或展开语法(...)来合并对象1、Object.assign()1.1、语法1.2、参数…...
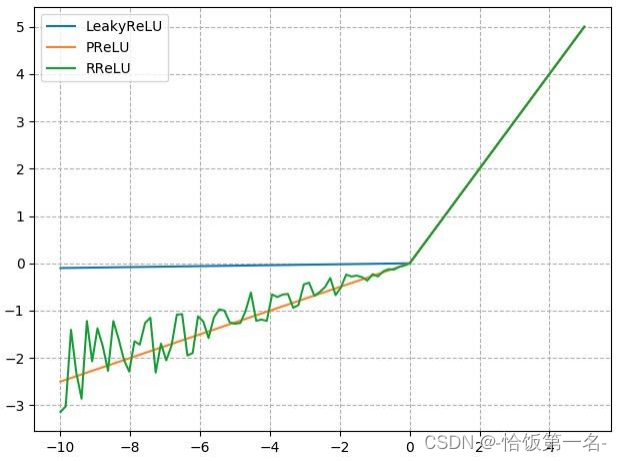
池化、线性、激活函数层
一、池化层 池化运算是深度学习中常用的一种操作,它可以对输入的特征图进行降采样,从而减少特征图的尺寸和参数数量。 池化运算的主要目的是通过“收集”和“总结”输入特征图的信息来提取出主要特征,并且减少对细节的敏感性。在池化运算中…...
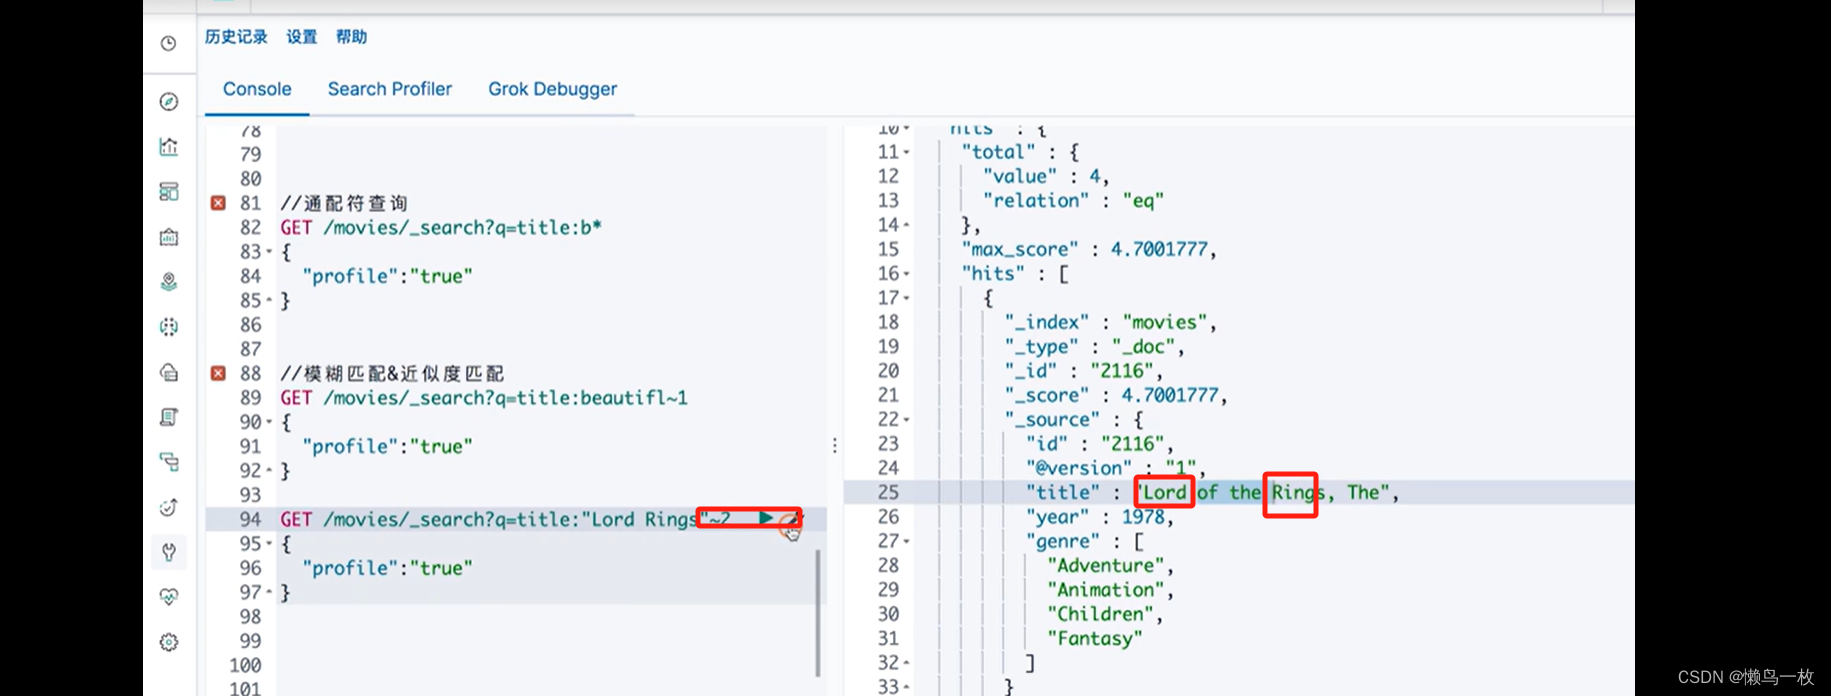
ES-极客学习第二部分ES 入门
基本概念 索引、文档、节点、分片和API json 文档 文档的元数据 需要通过Kibana导入Sample Data的电商数据。具体参考“2.2节-Kibana的安装与界面快速浏览” 索引 kibana 管理ES索引 在系统中找到kibana配置文件(我这里是etc/kibana/kibana.yml) vim /…...

Nodejs软件安装
Nodejs软件安装 一、简介 Node.js 是一个基于 Chrome V8 引擎的 JavaScript 运行环境。 官网:http://nodejs.cn/api/ 我们关注于 node.js 的 npm 功能,NPM 是随同 NodeJS 一起安装的包管理工具,JavaScript-NPM,Java-Maven&…...
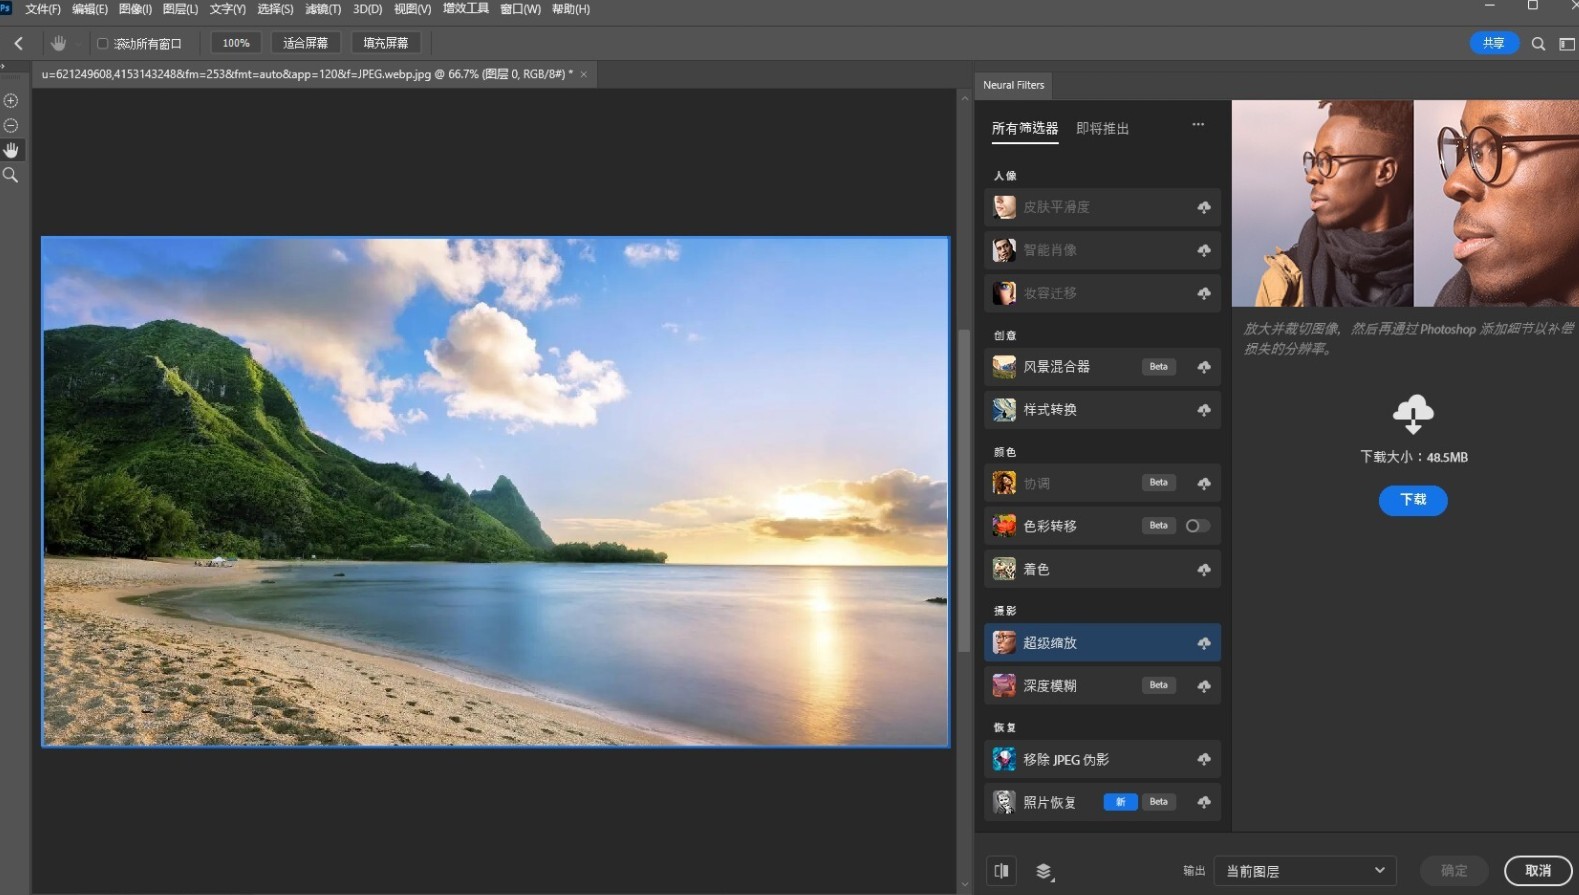
Photoshop 2024 (PS2024) v25 直装版 支持win/mac版
Photoshop 2024 提供了多种创意工具,如画笔、铅笔、涂鸦和渐变等,用户可以通过这些工具来创建独特和令人印象深刻的设计效果。增强的云同步:通过 Adobe Creative Cloud,用户可以方便地将他们的工作从一个设备无缝同步到另一个设备…...

ChatGPT绘画生成软件MidTool:智能艺术的新纪元
在人工智能的黄金时代,创新技术不断涌现,改变着我们的生活和工作方式。其中,ChatGPT绘画生成软件MidTool无疑是这一变革浪潮中的佼佼者。它不仅是一个软件,更是一位艺术家,一位智能助手,它的出现预示着智能…...

linux安装MySQL5.7(安装、开机自启、定时备份)
一、安装步骤 我喜欢安装在/usr/local/mysql目录下 #切换目录 cd /usr/local/ #下载文件 wget https://dev.mysql.com/get/Downloads/MySQL-5.7/mysql-5.7.38-linux-glibc2.12-x86_64.tar.gz #解压文件 tar -zxvf mysql-5.7.38-linux-glibc2.12-x86_64.tar.gz -C /usr/local …...

openGauss学习笔记-195 openGauss 数据库运维-常见故障定位案例-分析查询语句运行状态
文章目录 openGauss学习笔记-195 openGauss 数据库运维-常见故障定位案例-分析查询语句运行状态195.1 分析查询语句运行状态195.1.1 问题现象195.1.2 处理办法 openGauss学习笔记-195 openGauss 数据库运维-常见故障定位案例-分析查询语句运行状态 195.1 分析查询语句运行状态…...

Oracle篇—实例中和name相关参数的区别和作用
☘️博主介绍☘️: ✨又是一天没白过,我是奈斯,DBA一名✨ ✌✌️擅长Oracle、MySQL、SQLserver、Linux,也在积极的扩展IT方向的其他知识面✌✌️ ❣️❣️❣️大佬们都喜欢静静的看文章,并且也会默默的点赞收藏加关注❣…...
python + selenium 初步实现数据驱动
如果在进行自动化测试的时候将测试数据写在代码中,若测试数据有变,不利于数据的修改和维护。但可以尝试通过将测试数据放到excel文档中来实现测试数据的管理。 示例:本次涉及的项目使用的12306 selenium 重构------三层架构 excel文件数据如…...
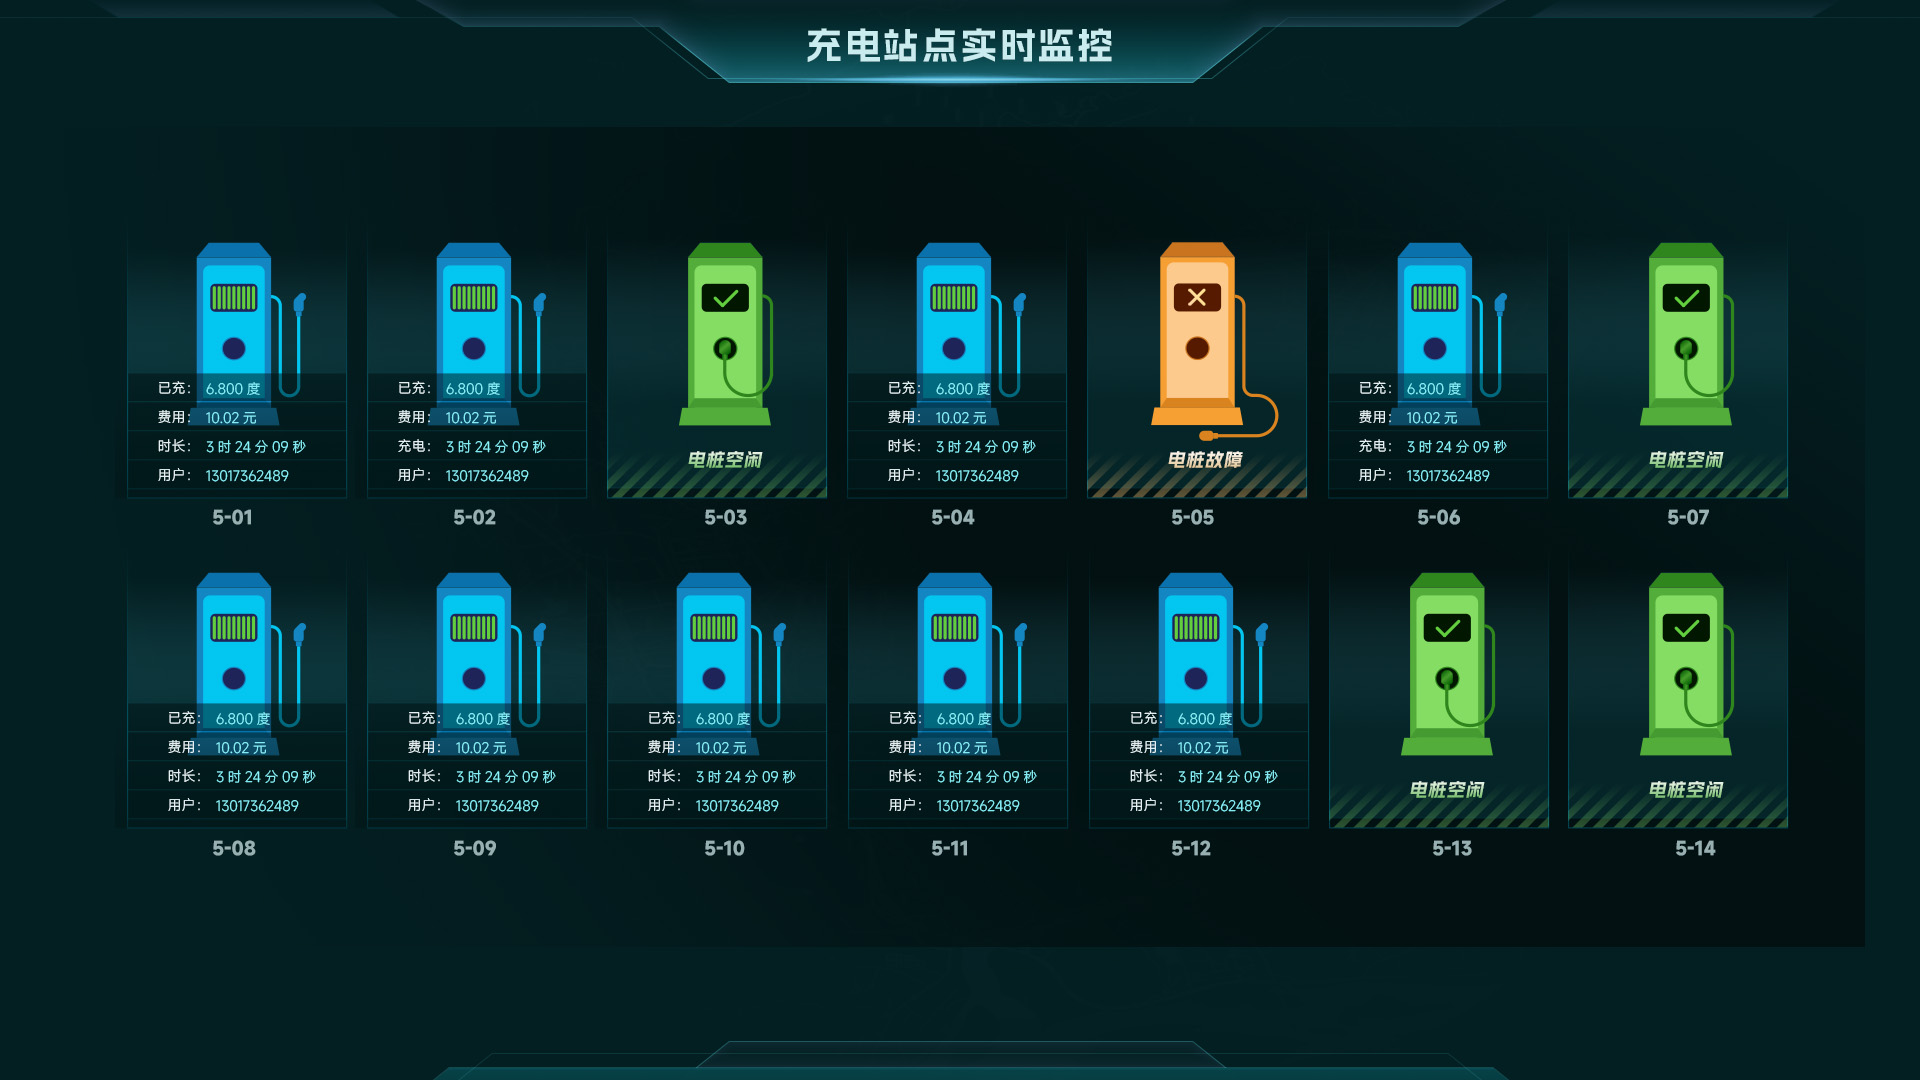
数字孪生+可视化技术 构建智慧新能源汽车充电站监管平台
前言 充电基础设施为电动汽车提供充换电服务,是重要的交通能源融合类基础设施。近年来,随着新能源汽车产业快速发展,我国充电基础设施持续增长,已建成世界上数量最多、服务范围最广、品种类型最全的充电基础设施体系。着眼未来新…...
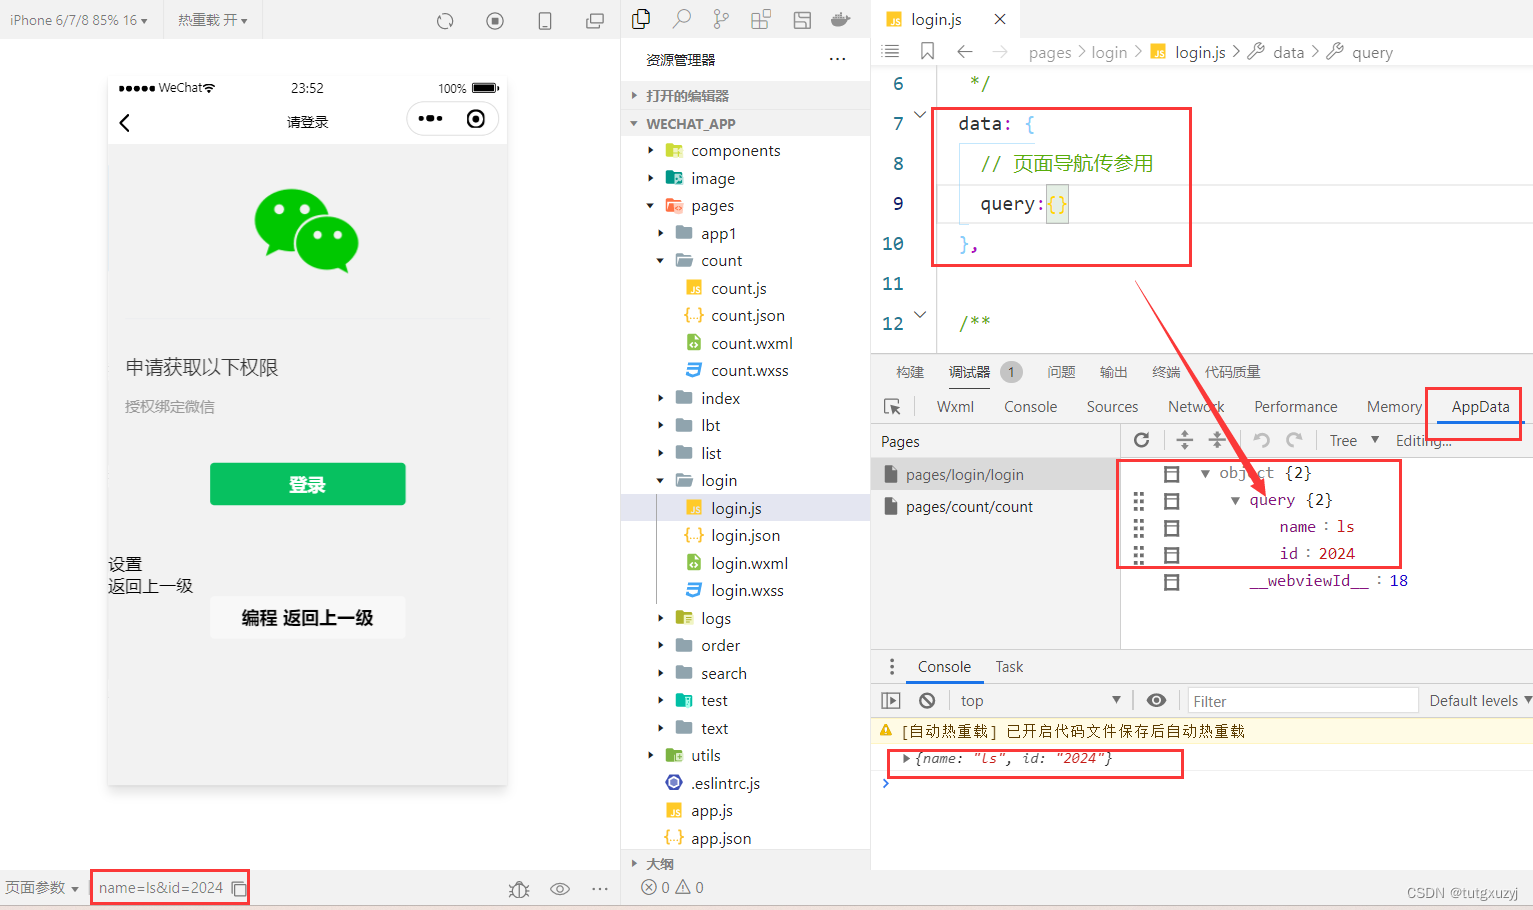
微信小程序开发学习笔记《11》导航传参
微信小程序开发学习笔记《11》导航传参 博主正在学习微信小程序开发,希望记录自己学习过程同时与广大网友共同学习讨论。导航传参 官方文档 一、声明式导航传参 navigator组件的url属性用来指定将要跳转到的页面的路径。同时,路径的后面还可以携带参数…...
BikeDNA(七)外在分析:OSM 与参考数据的比较1
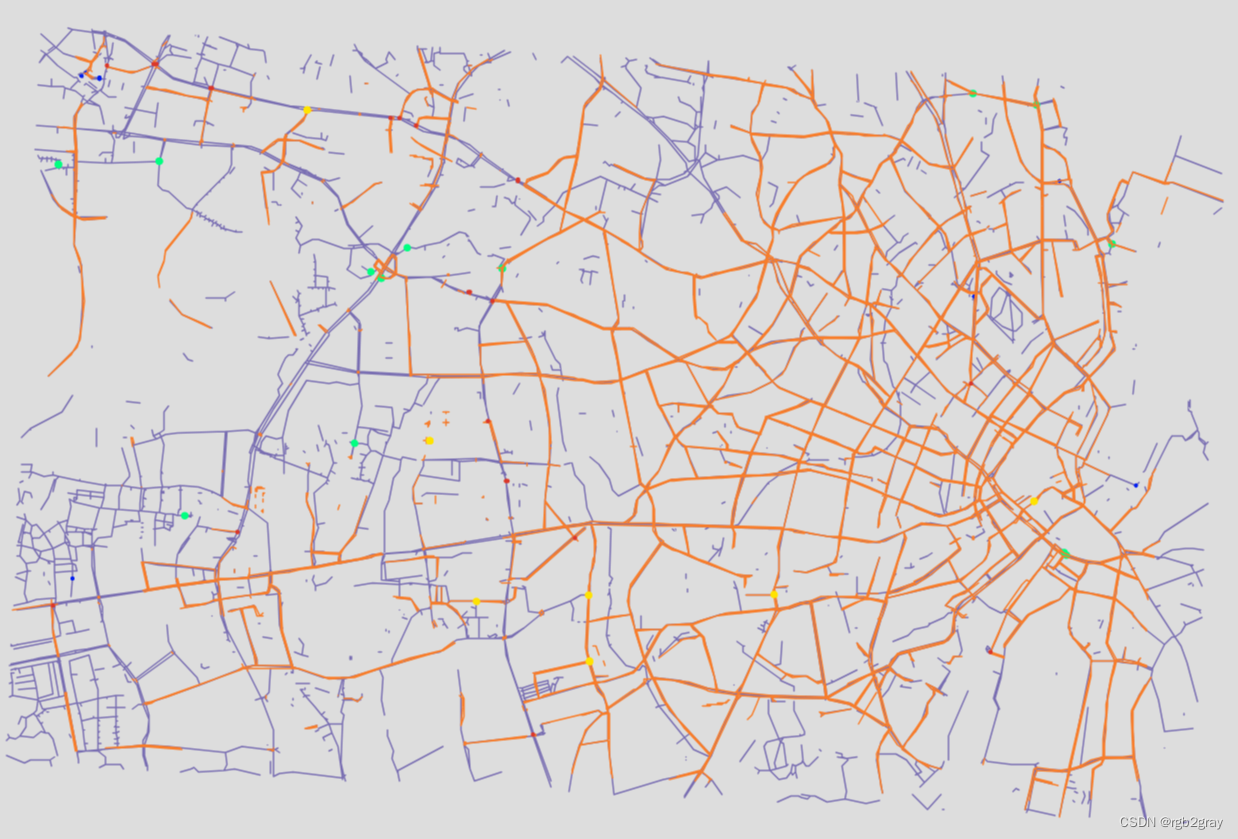
BikeDNA(七)外在分析:OSM 与参考数据的比较1 该笔记本将提供的参考自行车基础设施数据集与同一区域的 OSM 数据进行所谓的外部质量评估进行比较。 为了运行这部分分析,必须有一个参考数据集可用于比较。 该分析基于将参考数据集…...

KY43 全排列
全排列板子 ti #include<bits/stdc.h>using namespace std;string s; map<string, int>mp;void swap(char &a, char &b){char em a;a b;b em; }void dfs(int n){ //将s[n~l]的全排列转化成s[n]s[n1~l]的全排列 if(n s.length()){mp[s] 1;return ;}f…...
Pixel Couplet Gen 生成效果对比分析:不同参数下的对联质量评估
Pixel Couplet Gen 生成效果对比分析:不同参数下的对联质量评估 1. 引言:当AI遇上传统对联 春节贴对联是中国延续千年的文化传统,但创作一副既工整又有新意的对联并非易事。Pixel Couplet Gen作为一款AI对联生成工具,通过调整Te…...

实战指南:基于快马平台,快速构建可部署的unet卫星图像分割系统
今天想和大家分享一个实战项目:基于UNet的卫星图像建筑物分割系统。这个项目特别适合在InsCode(快马)平台上快速搭建,因为它涉及从数据处理到模型部署的完整流程,而平台的一键部署功能正好能省去繁琐的环境配置工作。 项目背景与需求分析 卫星…...

5个步骤彻底修复Windows更新问题:Reset Windows Update Tool完整指南
5个步骤彻底修复Windows更新问题:Reset Windows Update Tool完整指南 【免费下载链接】Reset-Windows-Update-Tool Troubleshooting Tool with Windows Updates (Developed in Dev-C). 项目地址: https://gitcode.com/gh_mirrors/re/Reset-Windows-Update-Tool …...
告别双流!用Vision Transformer (ViT) 搭建单流目标跟踪器OSTrack,实测速度提升40%
单流目标跟踪新范式:ViT驱动的OSTrack实战解析 在计算机视觉领域,目标跟踪技术正经历着从传统双流架构向单流范式的革命性转变。当我们面对复杂场景中的实时跟踪需求时,传统方法的性能瓶颈日益凸显——特征提取与关系建模的割裂处理导致计算冗…...
)
2026年全国青少年信息素养大赛算法应用主题赛(C++赛项初赛模拟卷3:文末附答案)
2026年全国青少年信息素养大赛算法应用主题赛(C赛项初赛模拟卷3:文末附答案) 一、单选题 在C中,以下哪个关键字用于定义一个整型变量? A. int B. float C. char D. double 一支商队从长安出发,每天行进80里…...

5步清理60GB重复视频:Krokiet视频查重工具全攻略
5步清理60GB重复视频:Krokiet视频查重工具全攻略 【免费下载链接】czkawka 一款跨平台的重复文件查找工具,可用于清理硬盘中的重复文件、相似图片、零字节文件等。它以高效、易用为特点,帮助用户释放存储空间。 项目地址: https://gitcode.…...

【计算机网络工程论文】基于三层交换的局域网设计:连平中学教学楼VLAN划分与eNSP仿真应用
摘 要 随着连平中学发展和信息化平台的建设,面对庞大的信息数据和高要求的管理效率,网络的规划、管理、安全逐渐成为关键。对教学楼而言,规划一个高效、稳定、可扩展的局域网至关重要。 本文针对连平中学教学单位,鉴于其所有部门…...
)
保姆级避坑指南:用YOLOX和ByteTrack在Windows上实现多目标跟踪(附完整代码修改)
Windows平台实战:YOLOX与ByteTrack多目标跟踪避坑全攻略 刚接触多目标跟踪的研究生小王盯着屏幕上的报错信息已经三小时了——明明按照GitHub教程一步步操作,却在运行demo_track.py时遭遇了编码错误、CUDA版本不匹配和依赖冲突的连环暴击。这场景你是否熟…...

王二明古方草解毒茶商城模式解析
王二明古方草解毒茶商城模式解析:架构、争议与合规思考在社交电商与大健康产业的交叉赛道中,“王二明古方草解毒茶”凭借其独特的草本茶饮定位与多级分销模式,曾一度引发市场关注。该模式以产品为核心,通过数字化商城系统构建了一…...

Phi-3-Mini-128K多轮对话效果实测:复杂任务规划与分解
Phi-3-Mini-128K多轮对话效果实测:复杂任务规划与分解 最近,我花了不少时间深度体验了Phi-3-Mini-128K这款模型。它的名字里带着“128K”,这超长的上下文长度,让我特别好奇它在处理复杂、多轮对话时的真实表现。毕竟,…...