Shiro框架:Shiro登录认证流程源码解析
目录
1.用户登录认证流程
1.1 生成认证Token
1.2 用户登录认证
1.2.1 SecurityManager login流程解析
1.2.1.1 authenticate方法进行登录认证
1.2.1.1.1 单Realm认证
1.2.1.2 认证通过后创建登录用户对象
1.2.1.2.1 复制SubjectContext
1.2.1.2.2 对subjectContext设置securityManager
1.2.1.2.3 对subjectContext设置session
1.2.1.2.4 对subjectContext设置Principals
1.2.1.2.5 根据subjectContext创建Subject
1.2.1.2.6 保存Subject
Shiro作为一款比较流行的登录认证、访问控制安全框架,被广泛应用在程序员社区;Shiro登录验证、访问控制、Session管理等流程内部都是委托给SecurityManager安全管理器来完成的,SecurityManager安全管理器上篇文章已经进行了详细解析,详见:Shiro框架:Shiro SecurityManager安全管理器解析-CSDN博客,在此基础上,本篇文章继续对Shiro关联链路处理流程之一---登录认证流程 进行解析;
想要深入了解Shiro框架整体原理,可移步:
Shiro框架:ShiroFilterFactoryBean过滤器源码解析-CSDN博客、
Shiro框架:Shiro内置过滤器源码解析-CSDN博客
1.用户登录认证流程
在Shiro框架:Shiro内置过滤器源码解析-CSDN博客内置过滤器分析中,我们知道用户执行登录的认证操作是在过滤器FormAuthenticationFilter中执行的,如下:
protected boolean onAccessDenied(ServletRequest request, ServletResponse response) throws Exception {if (isLoginRequest(request, response)) {if (isLoginSubmission(request, response)) {if (log.isTraceEnabled()) {log.trace("Login submission detected. Attempting to execute login.");}return executeLogin(request, response);} else {if (log.isTraceEnabled()) {log.trace("Login page view.");}//allow them to see the login page ;)return true;}} else {if (log.isTraceEnabled()) {log.trace("Attempting to access a path which requires authentication. Forwarding to the " +"Authentication url [" + getLoginUrl() + "]");}saveRequestAndRedirectToLogin(request, response);return false;}}
登录认证操作是在executeLogin方法中完成的:
protected boolean executeLogin(ServletRequest request, ServletResponse response) throws Exception {AuthenticationToken token = createToken(request, response);if (token == null) {String msg = "createToken method implementation returned null. A valid non-null AuthenticationToken " +"must be created in order to execute a login attempt.";throw new IllegalStateException(msg);}try {Subject subject = getSubject(request, response);subject.login(token);return onLoginSuccess(token, subject, request, response);} catch (AuthenticationException e) {return onLoginFailure(token, e, request, response);}}上述源码的执行过程表示为时序图会更直观,时序图如下:
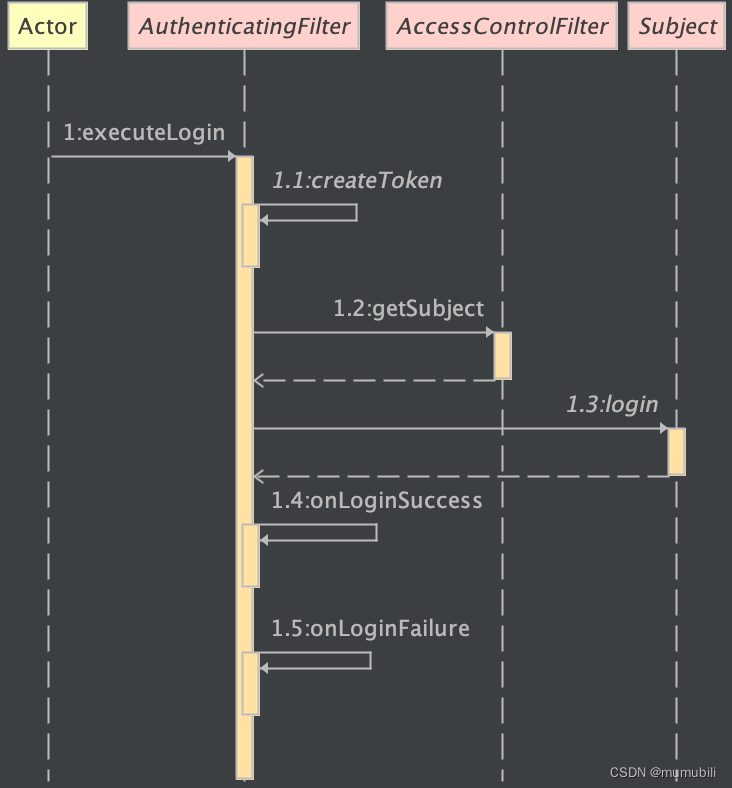
该认证过程主要包含以下几个部分:
- 根据用户名密码等生成认证Token
- 获取当前登录用户Subject
- 调用Subject的login方法进行登录认证
- 其它的登录成功、或登录失败的拦截方法
下面主要对生成认证Token和用户登录认证实现进行详细说明;
1.1 生成认证Token
createToken的实现在FormAuthenticationFilter内,如下:
这里用户名和密码是通过request请求对象获取的:
protected AuthenticationToken createToken(ServletRequest request, ServletResponse response) {String username = getUsername(request);String password = getPassword(request);return createToken(username, password, request, response);}在父类AuthenticatingFilter中进一步实现如下,这里构造了UsernamePasswordToken类,表示采用用户名密码的认证方式;
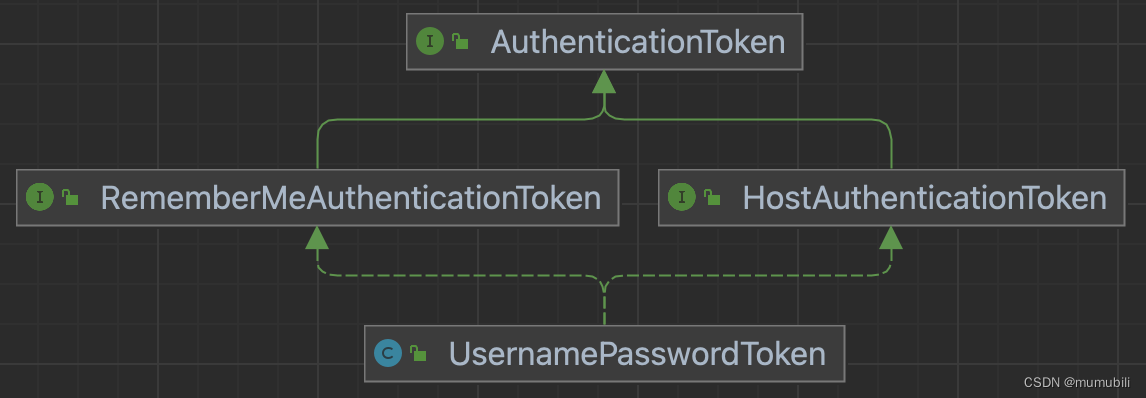
protected AuthenticationToken createToken(String username, String password,ServletRequest request, ServletResponse response) {boolean rememberMe = isRememberMe(request);String host = getHost(request);return createToken(username, password, rememberMe, host);}protected AuthenticationToken createToken(String username, String password,boolean rememberMe, String host) {return new UsernamePasswordToken(username, password, rememberMe, host);}图示UsernamePasswordToken的继承结构:
1.2 用户登录认证
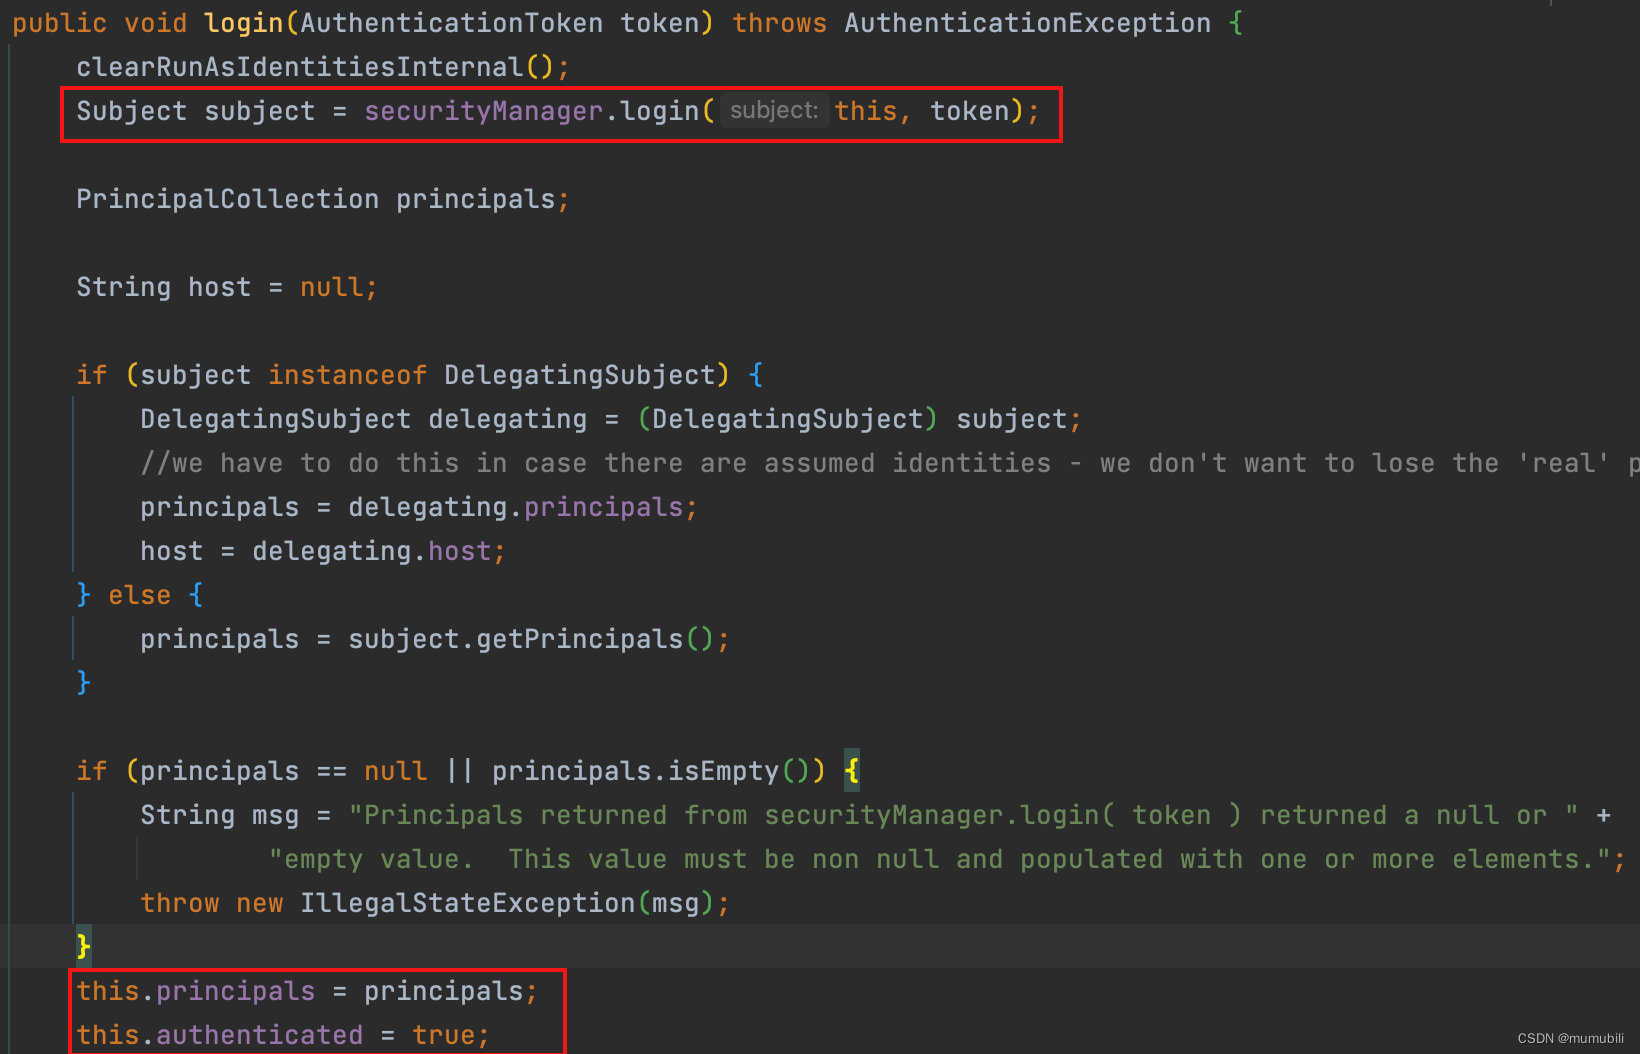
在Subject的login的具体实现如下:
- 实际的login是委托给SecurityManager完成的
- 登录成功后设置当前登录对象为认证成功
下面主要对SecurityManager的login方法进行具体分析;
1.2.1 SecurityManager login流程解析
login方法具体实现如下:
public Subject login(Subject subject, AuthenticationToken token) throws AuthenticationException {AuthenticationInfo info;try {info = authenticate(token);} catch (AuthenticationException ae) {try {onFailedLogin(token, ae, subject);} catch (Exception e) {if (log.isInfoEnabled()) {log.info("onFailedLogin method threw an " +"exception. Logging and propagating original AuthenticationException.", e);}}throw ae; //propagate}Subject loggedIn = createSubject(token, info, subject);onSuccessfulLogin(token, info, loggedIn);return loggedIn;}上述登录流程主要包含2部分内容:
- 通过authenticate方法进行登录认证
- 认证通过后创建登录用户对象
下面分别进行展开分析;
1.2.1.1 authenticate方法进行登录认证
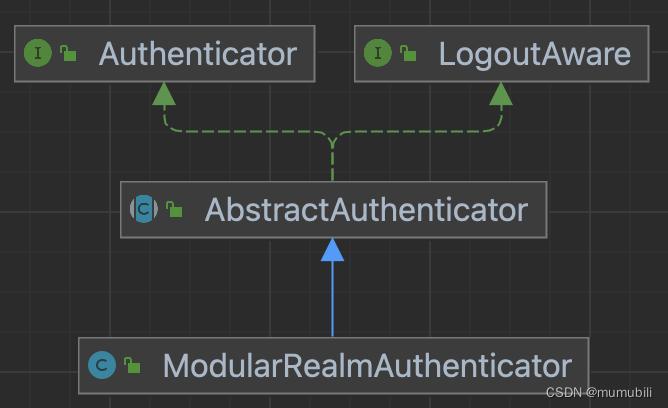
具体的authenticate实现内部又委托给了认证器Authenticator来实现,具体的认证器为ModularRealmAuthenticator,其继承结构如下:
authenticate方法具体实现是在父类AbstractAuthenticator中,如下:
public final AuthenticationInfo authenticate(AuthenticationToken token) throws AuthenticationException {if (token == null) {throw new IllegalArgumentException("Method argument (authentication token) cannot be null.");}log.trace("Authentication attempt received for token [{}]", token);AuthenticationInfo info;try {info = doAuthenticate(token);if (info == null) {String msg = "No account information found for authentication token [" + token + "] by this " +"Authenticator instance. Please check that it is configured correctly.";throw new AuthenticationException(msg);}} catch (Throwable t) {AuthenticationException ae = null;if (t instanceof AuthenticationException) {ae = (AuthenticationException) t;}if (ae == null) {//Exception thrown was not an expected AuthenticationException. Therefore it is probably a little more//severe or unexpected. So, wrap in an AuthenticationException, log to warn, and propagate:String msg = "Authentication failed for token submission [" + token + "]. Possible unexpected " +"error? (Typical or expected login exceptions should extend from AuthenticationException).";ae = new AuthenticationException(msg, t);if (log.isWarnEnabled())log.warn(msg, t);}try {notifyFailure(token, ae);} catch (Throwable t2) {if (log.isWarnEnabled()) {String msg = "Unable to send notification for failed authentication attempt - listener error?. " +"Please check your AuthenticationListener implementation(s). Logging sending exception " +"and propagating original AuthenticationException instead...";log.warn(msg, t2);}}throw ae;}log.debug("Authentication successful for token [{}]. Returned account [{}]", token, info);notifySuccess(token, info);return info;}通过方法doAuthenticate对认证Token进行认证,通过notifySuccess、notifyFailure监听认证通过或失败的事件并调用注册的监听器;
方法doAuthenticate的具体实现是在子类完成的,如下:
protected AuthenticationInfo doAuthenticate(AuthenticationToken authenticationToken) throws AuthenticationException {assertRealmsConfigured();Collection<Realm> realms = getRealms();if (realms.size() == 1) {return doSingleRealmAuthentication(realms.iterator().next(), authenticationToken);} else {return doMultiRealmAuthentication(realms, authenticationToken);}}这里首先获取已注册的安全组件Realm,其注册过程是在RealmSecurityManager初始化的过程中完成的(对SecurityManager安全管理器的处理过程感兴趣可以参见:Shiro框架:Shiro SecurityManager安全管理器解析-CSDN博客)
然后根据Realm的个数分别执行单Realm认证或多Realm认证,这里已单Realm认证为例进行说明,多Realm认证类似;
1.2.1.1.1 单Realm认证
通过doSingleRealmAuthentication方法完成单Realm认证,实现如下:
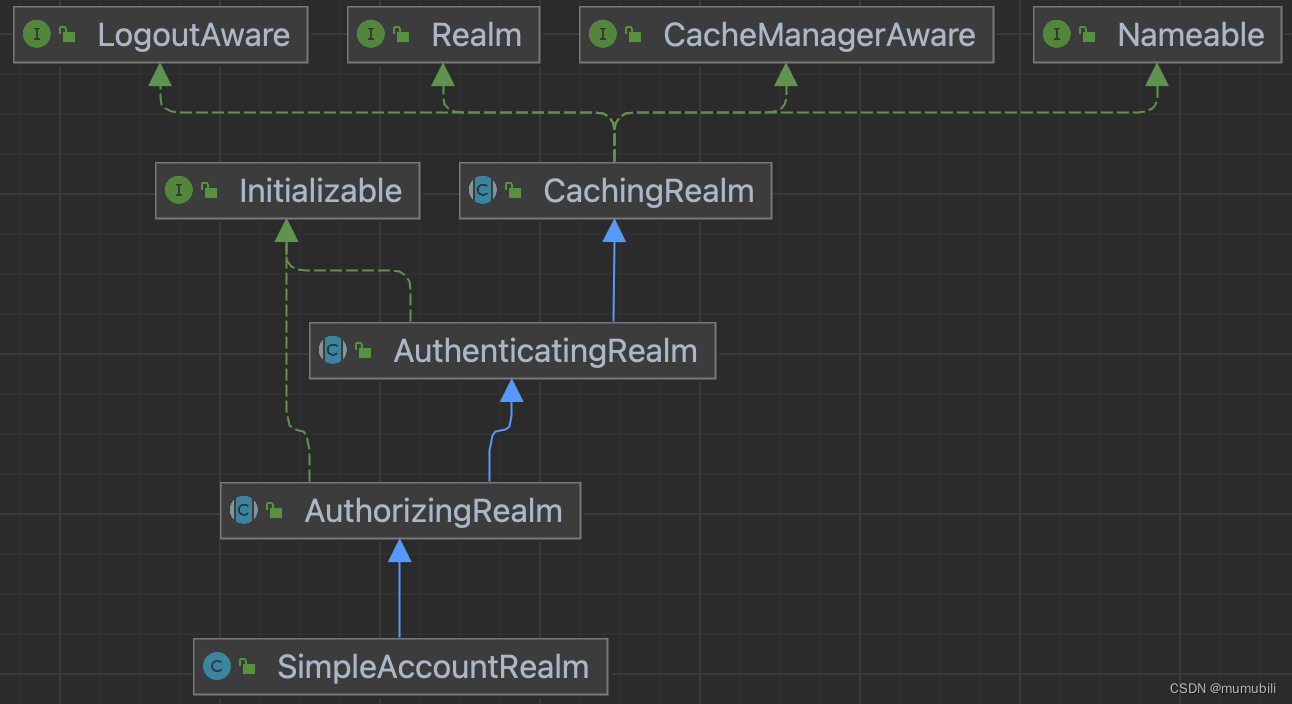
protected AuthenticationInfo doSingleRealmAuthentication(Realm realm, AuthenticationToken token) {if (!realm.supports(token)) {String msg = "Realm [" + realm + "] does not support authentication token [" +token + "]. Please ensure that the appropriate Realm implementation is " +"configured correctly or that the realm accepts AuthenticationTokens of this type.";throw new UnsupportedTokenException(msg);}AuthenticationInfo info = realm.getAuthenticationInfo(token);if (info == null) {String msg = "Realm [" + realm + "] was unable to find account data for the " +"submitted AuthenticationToken [" + token + "].";throw new UnknownAccountException(msg);}return info;}这里Reaml接口包含一整套的继承层次实现,如下,这里不过多展开解析;
getAuthenticationInfo是在AuthenticatingRealm中完成的,如下:
public final AuthenticationInfo getAuthenticationInfo(AuthenticationToken token) throws AuthenticationException {AuthenticationInfo info = getCachedAuthenticationInfo(token);if (info == null) {//otherwise not cached, perform the lookup:info = doGetAuthenticationInfo(token);log.debug("Looked up AuthenticationInfo [{}] from doGetAuthenticationInfo", info);if (token != null && info != null) {cacheAuthenticationInfoIfPossible(token, info);}} else {log.debug("Using cached authentication info [{}] to perform credentials matching.", info);}if (info != null) {assertCredentialsMatch(token, info);} else {log.debug("No AuthenticationInfo found for submitted AuthenticationToken [{}]. Returning null.", token);}return info;}这里首先获取AuthenticationInfo对象,要么从缓存中获取,要么通过引入的抽象方法doGetAuthenticationInfo获取(交由应用层子类具体实现);
获取到AuthenticationInfo后,将其余用户录入的登录Token进行比对,这部分具体是方法assertCredentialsMatch完成的,具体如下:
protected void assertCredentialsMatch(AuthenticationToken token, AuthenticationInfo info) throws AuthenticationException {CredentialsMatcher cm = getCredentialsMatcher();if (cm != null) {if (!cm.doCredentialsMatch(token, info)) {//not successful - throw an exception to indicate this:String msg = "Submitted credentials for token [" + token + "] did not match the expected credentials.";throw new IncorrectCredentialsException(msg);}} else {throw new AuthenticationException("A CredentialsMatcher must be configured in order to verify " +"credentials during authentication. If you do not wish for credentials to be examined, you " +"can configure an " + AllowAllCredentialsMatcher.class.getName() + " instance.");}}这里获取了默认的匹配器SimpleCredentialsMatcher,并调用doCredentialsMatch方法进行匹配,匹配实现如下:
public boolean doCredentialsMatch(AuthenticationToken token, AuthenticationInfo info) {Object tokenCredentials = getCredentials(token);Object accountCredentials = getCredentials(info);return equals(tokenCredentials, accountCredentials);}首先获取Credentials,也即用户密码,然后调用equals方法进行匹配,如下通过字节流的方式进行比对(主要是为了安全考虑,系统处理时采用非明文形式)。
protected boolean equals(Object tokenCredentials, Object accountCredentials) {if (log.isDebugEnabled()) {log.debug("Performing credentials equality check for tokenCredentials of type [" +tokenCredentials.getClass().getName() + " and accountCredentials of type [" +accountCredentials.getClass().getName() + "]");}if (isByteSource(tokenCredentials) && isByteSource(accountCredentials)) {if (log.isDebugEnabled()) {log.debug("Both credentials arguments can be easily converted to byte arrays. Performing " +"array equals comparison");}byte[] tokenBytes = toBytes(tokenCredentials);byte[] accountBytes = toBytes(accountCredentials);return MessageDigest.isEqual(tokenBytes, accountBytes);} else {return accountCredentials.equals(tokenCredentials);}}至此,用户账号密码匹配完成,匹配完成后,会重新创建用户登录对象,并更新用户状态等,下面具体分析;
1.2.1.2 认证通过后创建登录用户对象
认证通过后创建Subject的实现如下:
protected Subject createSubject(AuthenticationToken token, AuthenticationInfo info, Subject existing) {SubjectContext context = createSubjectContext();context.setAuthenticated(true);context.setAuthenticationToken(token);context.setAuthenticationInfo(info);if (existing != null) {context.setSubject(existing);}return createSubject(context);}@Overrideprotected SubjectContext createSubjectContext() {return new DefaultWebSubjectContext();}这里创建了DefaultWebSubjectContext,用户Subject创建,其中设置了认证状态、认证Token、已认证信息,然后调用createSubject方法继续进行构造,如下:
public Subject createSubject(SubjectContext subjectContext) {//create a copy so we don't modify the argument's backing map:SubjectContext context = copy(subjectContext);//ensure that the context has a SecurityManager instance, and if not, add one:context = ensureSecurityManager(context);//Resolve an associated Session (usually based on a referenced session ID), and place it in the context before//sending to the SubjectFactory. The SubjectFactory should not need to know how to acquire sessions as the//process is often environment specific - better to shield the SF from these details:context = resolveSession(context);//Similarly, the SubjectFactory should not require any concept of RememberMe - translate that here first//if possible before handing off to the SubjectFactory:context = resolvePrincipals(context);Subject subject = doCreateSubject(context);//save this subject for future reference if necessary://(this is needed here in case rememberMe principals were resolved and they need to be stored in the//session, so we don't constantly rehydrate the rememberMe PrincipalCollection on every operation).//Added in 1.2:save(subject);return subject;}如上创建过程包含了以下几部分,分别进行分析;
1.2.1.2.1 复制SubjectContext
对subjectContext调用复制构造方法进行复制,subjectContext底层通过backingMap保存上下文信息:
public MapContext(Map<String, Object> map) {this();if (!CollectionUtils.isEmpty(map)) {this.backingMap.putAll(map);}}1.2.1.2.2 对subjectContext设置securityManager
获取securityManager的顺序如下:
- 首先从subjectContext中获取
- 若无,则从当前线程上下文中获取
- 否则将当前securityManager设置到subjectContext中
protected SubjectContext ensureSecurityManager(SubjectContext context) {if (context.resolveSecurityManager() != null) {log.trace("Context already contains a SecurityManager instance. Returning.");return context;}log.trace("No SecurityManager found in context. Adding self reference.");context.setSecurityManager(this);return context;} public SecurityManager resolveSecurityManager() {SecurityManager securityManager = getSecurityManager();if (securityManager == null) {if (log.isDebugEnabled()) {log.debug("No SecurityManager available in subject context map. " +"Falling back to SecurityUtils.getSecurityManager() lookup.");}try {securityManager = SecurityUtils.getSecurityManager();} catch (UnavailableSecurityManagerException e) {if (log.isDebugEnabled()) {log.debug("No SecurityManager available via SecurityUtils. Heuristics exhausted.", e);}}}return securityManager;}1.2.1.2.3 对subjectContext设置session
解析session方法如下,其中session的解析顺序为:
- 首先从subjectContext获取session,判断是否已设置session(见源码2)
- 否则,通过subjectContext中保存的Subject对象获取关联的session(见源码2)
- 其次,通过sessionManager Session管理器获取(见源码3)
- Web服务中,具体的Session管理器为ServletContainerSessionManager,尝试从request请求中获取Servlet管理的Session;(见源码4)
源码1:
protected SubjectContext resolveSession(SubjectContext context) {if (context.resolveSession() != null) {log.debug("Context already contains a session. Returning.");return context;}try {//Context couldn't resolve it directly, let's see if we can since we have direct access to //the session manager:Session session = resolveContextSession(context);if (session != null) {context.setSession(session);}} catch (InvalidSessionException e) {log.debug("Resolved SubjectContext context session is invalid. Ignoring and creating an anonymous " +"(session-less) Subject instance.", e);}return context;}源码2:
public Session resolveSession() {Session session = getSession();if (session == null) {//try the Subject if it exists:Subject existingSubject = getSubject();if (existingSubject != null) {session = existingSubject.getSession(false);}}return session;}源码3:
protected Session resolveContextSession(SubjectContext context) throws InvalidSessionException {SessionKey key = getSessionKey(context);if (key != null) {return getSession(key);}return null;}public Session getSession(SessionKey key) throws SessionException {return this.sessionManager.getSession(key);}源码4: ServletContainerSessionManager获取Session
public Session getSession(SessionKey key) throws SessionException {if (!WebUtils.isHttp(key)) {String msg = "SessionKey must be an HTTP compatible implementation.";throw new IllegalArgumentException(msg);}HttpServletRequest request = WebUtils.getHttpRequest(key);Session session = null;HttpSession httpSession = request.getSession(false);if (httpSession != null) {session = createSession(httpSession, request.getRemoteHost());}return session;}1.2.1.2.4 对subjectContext设置Principals
resolvePrincipals方法实现如下,这里获取Principals的顺序为:
- 先从SubjectContext中直接获取Principals(见源码2)
- 否则,通过SubjectContext中已认证的AuthenticationInfo获取(见源码2)
- 其次,通过SubjectContext中的Subject获取(见源码2)
- 再次,通过SubjectContext中的Session获取(见源码2)
- 最后,通过RememberMeManager中的Cookie中获取
源码1:
protected SubjectContext resolvePrincipals(SubjectContext context) {PrincipalCollection principals = context.resolvePrincipals();if (isEmpty(principals)) {log.trace("No identity (PrincipalCollection) found in the context. Looking for a remembered identity.");principals = getRememberedIdentity(context);if (!isEmpty(principals)) {log.debug("Found remembered PrincipalCollection. Adding to the context to be used " +"for subject construction by the SubjectFactory.");context.setPrincipals(principals);} else {log.trace("No remembered identity found. Returning original context.");}}return context;}源码2:从SubjectContext获取Principals
public PrincipalCollection resolvePrincipals() {PrincipalCollection principals = getPrincipals();if (isEmpty(principals)) {//check to see if they were just authenticated:AuthenticationInfo info = getAuthenticationInfo();if (info != null) {principals = info.getPrincipals();}}if (isEmpty(principals)) {Subject subject = getSubject();if (subject != null) {principals = subject.getPrincipals();}}if (isEmpty(principals)) {//try the session:Session session = resolveSession();if (session != null) {principals = (PrincipalCollection) session.getAttribute(PRINCIPALS_SESSION_KEY);}}return principals;}1.2.1.2.5 根据subjectContext创建Subject
如下,通过createSubject创建了WebDelegatingSubject对象;
public Subject createSubject(SubjectContext context) {if (!(context instanceof WebSubjectContext)) {return super.createSubject(context);}WebSubjectContext wsc = (WebSubjectContext) context;SecurityManager securityManager = wsc.resolveSecurityManager();Session session = wsc.resolveSession();boolean sessionEnabled = wsc.isSessionCreationEnabled();PrincipalCollection principals = wsc.resolvePrincipals();boolean authenticated = wsc.resolveAuthenticated();String host = wsc.resolveHost();ServletRequest request = wsc.resolveServletRequest();ServletResponse response = wsc.resolveServletResponse();return new WebDelegatingSubject(principals, authenticated, host, session, sessionEnabled,request, response, securityManager);}1.2.1.2.6 保存Subject
Subject保存是通过DefaultSubjectDAO完成的,
如下,通过saveToSession方法保存Principals和认证状态到Session中;
protected void saveToSession(Subject subject) {//performs merge logic, only updating the Subject's session if it does not match the current state:mergePrincipals(subject);mergeAuthenticationState(subject);}这里在保存Principals的过程中,如果Principals不为空,且非Servlet Session的条件下,这里会调用subject.getSession()方法创建shiro管理的native Session对象:

subject.getSession()方法实现如下:
public Session getSession() {return getSession(true);}public Session getSession(boolean create) {if (log.isTraceEnabled()) {log.trace("attempting to get session; create = " + create +"; session is null = " + (this.session == null) +"; session has id = " + (this.session != null && session.getId() != null));}if (this.session == null && create) {//added in 1.2:if (!isSessionCreationEnabled()) {String msg = "Session creation has been disabled for the current subject. This exception indicates " +"that there is either a programming error (using a session when it should never be " +"used) or that Shiro's configuration needs to be adjusted to allow Sessions to be created " +"for the current Subject. See the " + DisabledSessionException.class.getName() + " JavaDoc " +"for more.";throw new DisabledSessionException(msg);}log.trace("Starting session for host {}", getHost());SessionContext sessionContext = createSessionContext();Session session = this.securityManager.start(sessionContext);this.session = decorate(session);}return this.session;}如上,通过securityManager的start方法创建Session对象,start具体实现为 :
public Session start(SessionContext context) throws AuthorizationException {return this.sessionManager.start(context);}这里又委托给了Session管理器完成session创建,这里的Session管理器实现为AbstractNativeSessionManager,start方法实现如下:
public Session start(SessionContext context) {Session session = createSession(context);applyGlobalSessionTimeout(session);onStart(session, context);notifyStart(session);//Don't expose the EIS-tier Session object to the client-tier:return createExposedSession(session, context);}上述主要完成了以下几部分功能:
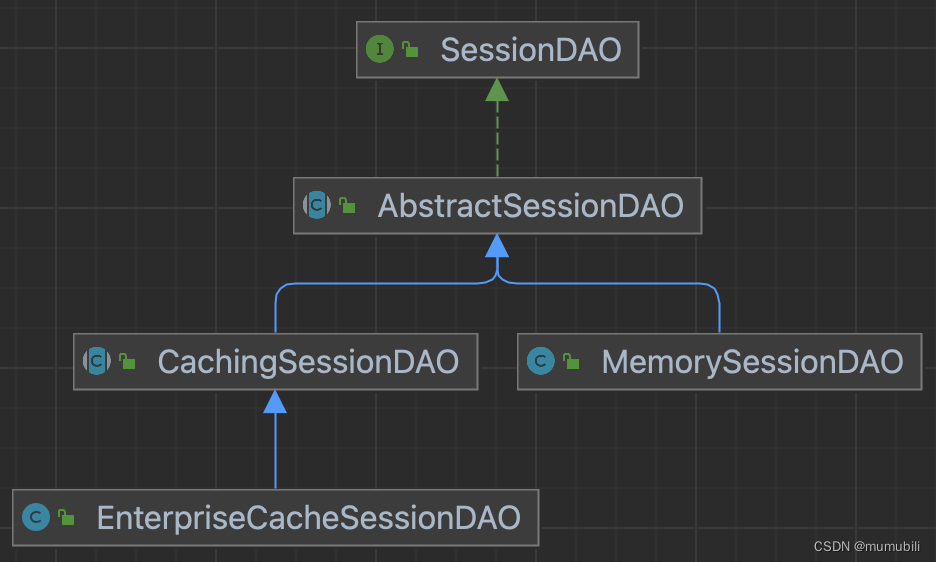
1. 通过createSession方法创建SimpleSession对象,其中包括了Session创建、Session保存到 sessionDAO中(比如保存到内存中的子类MemorySessionDAO,或者保存在数据库中的子类 EnterpriseCacheSessionDAO等),SessionId生成等操作;
图示sessionDAO的整体继承结构:
2. Session全局超时时间配置(默认超时时间为30min)
3. onStart将SessionId存储到Cookie中,如下:
private void storeSessionId(Serializable currentId, HttpServletRequest request, HttpServletResponse response) {if (currentId == null) {String msg = "sessionId cannot be null when persisting for subsequent requests.";throw new IllegalArgumentException(msg);}Cookie template = getSessionIdCookie();Cookie cookie = new SimpleCookie(template);String idString = currentId.toString();cookie.setValue(idString);cookie.saveTo(request, response);log.trace("Set session ID cookie for session with id {}", idString);}至此,用户登录认证过程完成了生成认证Token、通过Realm从应用中获取用户认证信息、用户认证Token匹配,以及认证成功后创建用户Subject对象、保存Subject到Session、SessionId保存到Cookie等操作。
相关文章:
Shiro框架:Shiro登录认证流程源码解析
目录 1.用户登录认证流程 1.1 生成认证Token 1.2 用户登录认证 1.2.1 SecurityManager login流程解析 1.2.1.1 authenticate方法进行登录认证 1.2.1.1.1 单Realm认证 1.2.1.2 认证通过后创建登录用户对象 1.2.1.2.1 复制SubjectContext 1.2.1.2.2 对subjectContext设…...
WEB前端人机交互导论实验-实训2格式化文本、段落与列表
1.项目1 文本与段落标记的应用: A.题目要求: B.思路: (1)首先,HTML文档的基本结构是通过<html>...</html>标签包围的,包含了头部信息和页面主体内容。 (2)在头部信息…...

Python:list列表与tuple元组的区别
在Python中,List(列表) 和Tuple(元组) 都是用于存储一组有序元素的数据结构,但它们有一些关键的区别,包括可变性、性能、语法等方面。 1. List(列表) 用法:…...

如何基于 Gin 封装出属于自己 Web 框架?
思路 在基于 Gin 封装出属于自己的 Web 框架前,你需要先了解 Gin 的基本用法和设计理念。 然后,你可以通过以下步骤来封装自己的 Web 框架: 封装路由:Gin 的路由是通过 HTTP 方法和 URL 路径进行匹配的,你可以根据自己…...
VUE element-ui实现表格动态展示、动态删减列、动态排序、动态搜索条件配置、表单组件化。
1、实现效果 1.1、文件目录 1.2、说明 1、本组件支持列表的表头自定义配置,checkbox实现 2、本组件支持列表列排序,vuedraggable是拖拽插件,上图中字段管理里的拖拽效果 ,需要的话请自行npm install 3、本组件支持查询条件动态…...

压测工具ab
Apache Benchmark(简称ab) 是Apache安装包中自带的压力测试工具 ,简单易用, Apache的ab命令模拟多线程并发请求,测试服务器负载压力,也可以适用于其他服务:nginx、lighthttp、tomcat、IIS等其它Web服务器的压力 采用平台…...

P4学习(一) 环境搭建
系列文章目录 第一章 P4学习入门之虚拟机环境搭建 文章目录 系列文章目录前言一、P4是什么?二、搭建步骤1.下载虚拟机镜像2.虚拟机管理软件载入镜像2.1 找到你镜像的所在位置2.2 打开VMware Workstation2.3 载入镜像 3.检验环境是否配置成功 P4 的真机环境搭建 前言…...
openssl3.2 - 官方demo学习 - server-arg.c
文章目录 openssl3.2 - 官方demo学习 - server-arg.c概述笔记备注END openssl3.2 - 官方demo学习 - server-arg.c 概述 TLS服务器, 等客户端来连接; 如果客户端断开了, 通过释放bio来释放客户端socket, 然后继续通过bio读来aceept. 笔记 对于开源工程, 不可能有作者那么熟悉…...

Windows RPC运行时漏洞事后总结
2022年4月前后,Windows RPC运行时被曝出存在远程代码执行漏洞,当时曾引起很多人广泛关注。微软很快做出反应,发布补丁程序进行修补。这次事件中,Windows远程过程调用(RPC)运行时共出现三个关键漏洞…...
运算电路(1)——加法器
一、引言 微处理器是由一片或少数几片大规模集成电路组成的中央处理器。这些电路执行控制部件和算术逻辑部件的功能。微处理器能完成取指令、执行指令,以及与外界存储器和逻辑部件交换信息等操作,是微型计算机的运算控制部分。它可与存储器和外围电路芯片…...
)
ESP32-WIFI(Arduino)
ESP32-WIFI Wi-Fi是一种基于IEEE 802.11标准的无线局域网技术,是Wi-Fi联盟制造商的商标作为产品的品牌认证。它可以让电脑、手机、平板电脑等设备通过无线信号连接到互联网 。 在无线网络中,AP(Access Point)和 STA(St…...

【网络虚拟化】网络设备常见冗余方式——堆叠、M-Lag、DRNI
网络设备常见冗余设计——堆叠、M-Lag、DRNI 提示:这里可以添加系列文章的所有文章的目录,目录需要自己手动添加 网络设备常见冗余设计——堆叠、M-Lag、DRNI 网络设备常见冗余设计——堆叠、M-Lag、DRNI前言一、网络设备虚拟化二、堆叠技术1.技术原理2.…...

arm的侏罗纪二 cache学习
个人觉得inner shareable和outer shareable;POU和POC 是难点,慢慢学习吧。 inner shareable是cluster内 outer shareable是cluster之间 参考文献: 深入学习Cache系列 1: 带着几个疑问,从Cache的应用场景学起 https://www.eet-c…...
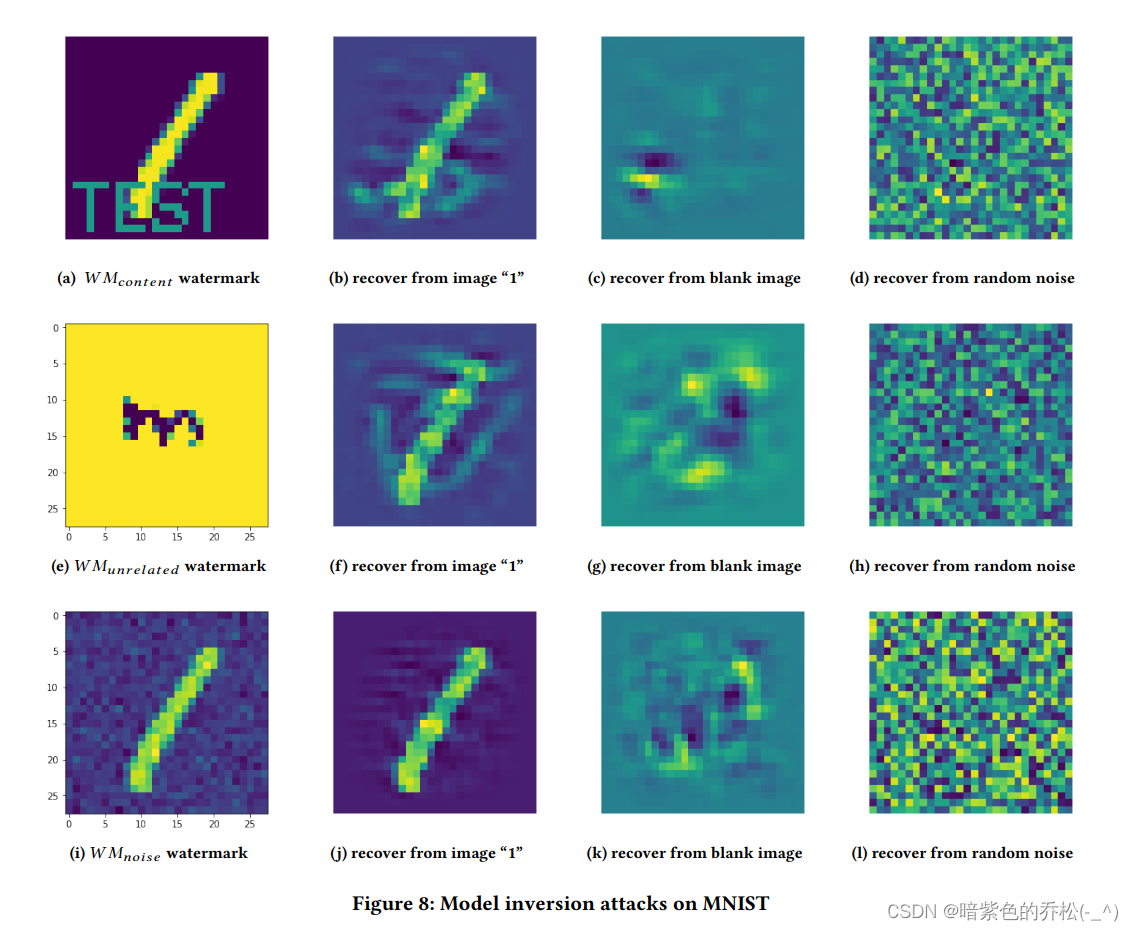
Protecting Intellectual Property of Deep NeuralNetworks with Watermarking
保护深度神经网络的知识产权与数字水印技术 ABSTRACT 深度学习是当今人工智能服务的关键组成部分,在视觉分析、语音识别、自然语言处理等多个任务方面表现出色,为人类提供了接近人类水平的能力。构建一个生产级别的深度学习模型是一项非常复杂的任务&a…...
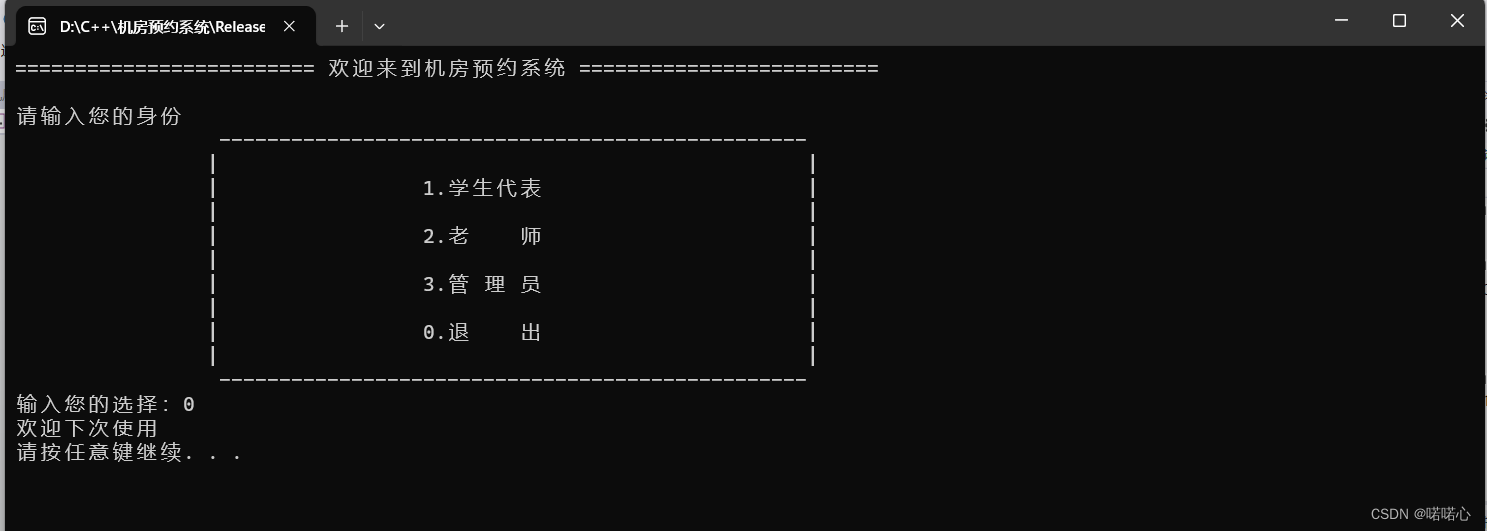
c++学习笔记-STL案例-机房预约系统1-准备工作
前言 准备工作包括:需求分析、项目创建、主菜单实现、退出功能实现 目录 1 机房预约系统需求 1.1 简单介绍 1.2 身份介绍 1.3 机房介绍 1.4 申请介绍 1.5 系统具体要求 1.6 预约系统-主界面思维导图 2 创建项目 2.1 创建项目 2.2 添加文件 编辑 3 创建…...

AnnData:单细胞和空间组学分析的数据基石
AnnData:单细胞和空间组学分析的数据基石 今天我们来系统学习一下单细胞分析的标准数据类型——AnnData! AnnData就是有注释的数据,全称是Annotated Data。 AnnData是为了矩阵类型数据设计的,也就是长得和表格一样的数据。比如…...

C语言中的 `string.h` 头文件包含的函数
C语言中的 string.h 头文件包含了许多与字符串或数字相关的函数。这些函数可以用于字符串的复制、连接、搜索、比较等操作。 常用字符串函数 函数名功能strlen()返回字符串的长度strcpy()将一个字符串复制到另一个字符串中strncpy()将最多 n 个字符从一个字符串复制到另一个字…...

kotlin的抽象类和抽象方法
在 Kotlin 中,抽象类和抽象方法是面向对象编程中的概念,用于实现抽象和多态性。抽象类无法实例化,这意味着我们无法创建抽象类的对象。与其他类不同,抽象类总是打开的,因此我们不需要使用open关键字。 抽象类ÿ…...
)
2022年面经记录(base杭州)
duandian科技(笔试未通过) 笔试题:leetCode热题第20题有效的括号 面后感:没怎么刷算法题,js 基础不扎实 laiweilai(三面未通过) 一面:笔试题 写一个函数,获取url中的指定…...

安装Docker图形管理界面portainer
安装Docker图形管理界面portainer 映射data文件夹根据自己环境更换 docker run -d --name portainer -p 9000:9000 -v /var/run/docker.sock:/var/run/docker.sock -v /yourpath/docker/portainer:/data --restartalways portainer/portainer-ce:latest好好享受吧!…...

Unity UGUI轻量UI框架:200行代码实现零GC界面管理
1. 为什么还要自己手写UI框架?——当UGUI原生方案开始“卡脖子”很多人看到这个标题第一反应是:“都2024年了,还手写UI框架?Asset Store里几十个成熟方案,NGUI、FairyGUI、TextMeshPro配套的UI系统一抓一大把ÿ…...

HFSS仿真结果怎么看?以T型波导为例,读懂S参数与电场动态图
HFSS仿真结果深度解析:从S参数到电场动态图的实战指南当你第一次在HFSS中完成T型波导仿真后,面对满屏的曲线和彩色云图,是否感到既兴奋又困惑?那些起伏的S参数曲线究竟告诉你什么信息?电场图中跳跃的颜色又代表怎样的物…...

为什么视频代剪辑会影响你的内容传播效果
为什么你精心拍的视频,发出去却没人看? 你有没有过这样的经历:花了一整天拍Vlog,素材画质高清、内容真实,可一剪出来就显得平淡无奇,点赞寥寥?或者婚礼当天感动全场,回看成片却像流水…...

组态王通用扫码枪配置
使用组态王扫码枪驱动,是绑定变量,扫码后直接就可以显示扫码内容。解决每次扫码输入数据时必须先用鼠标点进输入框内的问题。驱动安装先添加驱动,亚控网站的文件为 barcodescanner,这个文件是组态王通用扫码枪的驱动,但…...

3步解锁专业级MMD创作:Blender插件如何重塑二次元动画工作流
3步解锁专业级MMD创作:Blender插件如何重塑二次元动画工作流 【免费下载链接】blender_mmd_tools MMD Tools is a blender addon for importing/exporting Models and Motions of MikuMikuDance. 项目地址: https://gitcode.com/gh_mirrors/bl/blender_mmd_tools …...

0.2毫秒快速启动的操作系统
在工业控制以及航空航天等核心场景,极速启动就是高可靠系统的生命线。0.2毫秒超快启动搭配硬件看门狗,让设备在掉电重启、异常恢复时瞬时归位,关键任务永不延误! https://www.bilibili.com/video/BV11mLY6VERt/?spm_id_from333.1…...

Unity动态自然系统:Forest Environment-Dynamic Nature深度解析
1. 这不是“贴图堆砌”,而是自然系统级建模:Forest Environment-Dynamic Nature 的真实定位你有没有试过在Unity里拖进几棵树、铺点草、加个天空盒,然后发现场景像一张静止的风景明信片——风不动、叶不摇、雨不落、雾不散?我做过…...

AI圈内火热的Agent、MCP、Skill、CLI是啥?用装修房子讲透,看完秒懂
本文用装修房子的比喻,详细解释了AI领域的四个核心概念:Agent如同会自主规划任务的私人助理;MCP是AI与外部工具数据的统一接口,类似USB-C;Skill是指导AI按标准操作执行的手册;CLI则是不依赖图形界面的命令行…...
原理与ScalableHD架构优化实践)
超维计算(HDC)原理与ScalableHD架构优化实践
1. 超维计算(HDC)基础解析超维计算(Hyperdimensional Computing, HDC)是一种受大脑信息处理机制启发的计算范式,其核心思想是用高维随机向量(通常称为超向量或HV)来表示和处理信息。与传统神经网…...

MobX社区资源大全:10个必备工具、插件和扩展库推荐 [特殊字符]
MobX社区资源大全:10个必备工具、插件和扩展库推荐 🚀 【免费下载链接】MobX-Docs-CN MobX 中文文档 项目地址: https://gitcode.com/gh_mirrors/mo/MobX-Docs-CN MobX作为一个简单、可扩展的状态管理库,已经成为React开发者不可或缺的…...