Android中的SPI实现
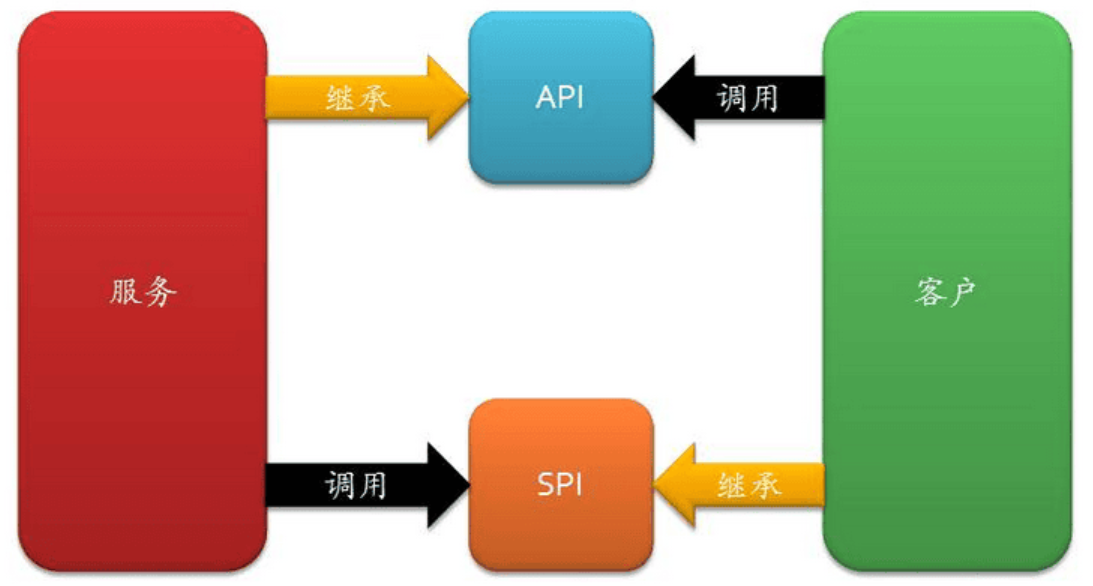
Android中的SPI实现
SPI是JVM世界中的标准API,但在Android应用程序中并不常用。然而,它可以非常有用地实现插件架构。让我们探讨一下如何在Android中利用SPI。
问题
在Android中,不同的提供者为推送功能提供服务,而在大型项目中,使用单一实现是不可行的。以下是一些可用的提供者:
- FCM(Firebase Cloud Messaging):主要的推送服务实现,但需要Google服务,可能无法在所有设备上使用。
- ADM(Amazon Device Messaging):Amazon设备(Kindle设备)上的实现,仅在Amazon设备上运行。
- HCM(Huawei Cloud Messaging):华为设备上的实现。
- Baidu(Baidu Push SDK):主要用于中国的推送服务实现。
由于有如此多的服务,管理和初始化它们变得具有挑战性。
当我们需要为不同的应用程序构建提供不同的服务集时,问题变得更加困难。以下是一些示例:
- Google Play控制台不允许发布包含百度服务的应用程序。因此,百度服务应仅包含在面向中国的构建中。
- Amazon设备消息传递仅适用于Amazon设备,因此在仅针对Amazon应用商店的构建中包含它是有意义的。
- 华为实现在面向华为商店的构建中是有意义的。
解决方案
为了解决这个问题,我们可以从创建推送服务实现的抽象层开始。这个抽象层应该放在一个单独的Gradle模块中,以便它可以轻松地作为其他实现模块的依赖项添加。
抽象层
我们可以通过创建以下通用接口来为推送服务定义抽象层:
package com.kurantsov.pushserviceimport android.content.Context/*** Interface used to provide push service implementation via SPI*/
interface PushService {/*** Type of the push service implementation*/val type: PushServiceType/*** Priority of the push service implementation*/val priority: PushServicePriority/*** Returns if the push service implementation is available on the device*/fun isAvailable(context: Context): Boolean/*** Initializes push service*/fun initialize(context: Context)
}/*** Describes type of the push service implementation*/
interface PushServiceType {val name: Stringval description: String
}sealed class PushServicePriority(val value: Int) {object High : PushServicePriority(0)object Medium : PushServicePriority(1)object Low : PushServicePriority(2)
}
实现
然后,我们可以基于推送服务提供者实现一个通用接口。
为此,我们可以为每个实现创建一个Gradle模块。
Firebase Cloud Messaging实现示例:
package com.kurantsov.pushservice.firebaseimport android.content.Context
import android.util.Log
import com.google.android.gms.common.ConnectionResult
import com.google.android.gms.common.GoogleApiAvailability
import com.google.firebase.ktx.Firebase
import com.google.firebase.messaging.ktx.messaging
import com.kurantsov.pushservice.PushService
import com.kurantsov.pushservice.PushServiceManager
import com.kurantsov.pushservice.PushServicePriority
import com.kurantsov.pushservice.PushServiceTypeclass FirebasePushService : PushService {override val type: PushServiceType = FirebasePushServiceTypeoverride val priority: PushServicePriority = PushServicePriority.Highoverride fun isAvailable(context: Context): Boolean {val availability =GoogleApiAvailability.getInstance().isGooglePlayServicesAvailable(context)return availability == ConnectionResult.SUCCESS}override fun initialize(context: Context) {Firebase.messaging.token.addOnCompleteListener { task ->if (!task.isSuccessful) {Log.w(TAG, "Fetching FCM registration token failed", task.exception)}val token = task.resultPushServiceManager.setPushToken(token, FirebasePushServiceType)}}private companion object {const val TAG = "FirebasePushService"}
}object FirebasePushServiceType : PushServiceType {override val name: String = "FCM"override val description: String = "Firebase"
}
Amazon Device Messaging实现示例:
package com.kurantsov.pushservice.amazonimport android.content.Context
import com.amazon.device.messaging.ADM
import com.kurantsov.pushservice.PushService
import com.kurantsov.pushservice.PushServicePriority
import com.kurantsov.pushservice.PushServiceType/*** Amazon device messaging implementation of the push service*/
class AmazonPushService : PushService {override val type: PushServiceType = AmazonPushServiceTypeoverride val priority: PushServicePriority = PushServicePriority.Highoverride fun isAvailable(context: Context): Boolean {return isAmazonServicesAvailable}override fun initialize(context: Context) {val adm = ADM(context)adm.registrationId?.let { token ->handleRegistrationSuccess(token)} ?: run {adm.startRegister()}}
}object AmazonPushServiceType : PushServiceType {override val name: String = "ADM"override val description: String = "Amazon"
}/*** Returns if amazon device messaging is available on the device*/
val isAmazonServicesAvailable: Boolean by lazy {try {Class.forName("com.amazon.device.messaging.ADM")true} catch (e: ClassNotFoundException) {false}
}
实现注册
为了使实现通过SPI“可发现”,我们需要进行注册。这可以通过在META-INF/services/{接口的全限定名}中添加实现的完全限定名称来完成。这需要在提供接口实现的每个模块中完成。
Firebase实现文件示例内容:
com.kurantsov.pushservice.firebase.FirebasePushService
请注意,要将服务文件夹的完整路径包含在模块的结果AAR中,路径是:{模块路径}/src/main/resources/META-INF/services
Android Studio项目视图中的SPI注册示例

用法
最后一步是使用接口实现。以下是SPI使用示例:
import java.util.ServiceLoaderprivate fun listImplementations(context: Context) {//Loading push service implementationsval serviceLoader = ServiceLoader.load(PushService::class.java)//Logging implementationsserviceLoader.sortedBy { pusService -> pusService.priority.value }.forEach { pushService ->val isAvailable = pushService.isAvailable(context)Log.d(TAG, "Push service implementation - ${pushService.type.description}, " +"available - $isAvailable")}
}
示例输出如下:
Push service implementation - Firebase, available - true
Push service implementation - Amazon, available - false
Push service implementation - Huawei, available - true
Push service implementation - Baidu, available - true
完整代码请参考
https://github.com/ArtsemKurantsou/SPI4Android
额外内容
PushServiceManager
以下是一个更“真实”的示例,展示了PushServiceManager的用法:
package com.kurantsov.pushserviceimport android.content.Context
import android.util.Log
import java.util.ServiceLoader
import java.util.concurrent.CopyOnWriteArraySet
import java.util.concurrent.atomic.AtomicBooleanobject PushServiceManager {private const val TAG = "PushServiceManager"var pushToken: PushToken = PushToken.NotInitializedprivate setprivate val isInitialized: AtomicBoolean = AtomicBoolean(false)private val tokenChangedListeners: MutableSet<OnPushTokenChangedListener> =CopyOnWriteArraySet()private var selectedPushServiceType: PushServiceType? = nullfun initialize(context: Context) {if (isInitialized.get()) {Log.d(TAG, "Push service is initialized already")return}synchronized(this) {if (isInitialized.get()) {Log.d(TAG, "Push service is initialized already")return}performServiceInitialization(context)}}private fun performServiceInitialization(context: Context) {//Loading push service implementationsval serviceLoader = ServiceLoader.load(PushService::class.java)val selectedImplementation = serviceLoader.sortedBy { pusService -> pusService.priority.value }.firstOrNull { pushService ->val isAvailable = pushService.isAvailable(context)Log.d(TAG, "Checking push service - ${pushService.type.description}, " +"available - $isAvailable")isAvailable}if (selectedImplementation != null) {selectedImplementation.initialize(context)selectedPushServiceType = selectedImplementation.typeisInitialized.set(true)Log.i(TAG, "Push service initialized with ${selectedImplementation.type.description}")} else {Log.e(TAG, "Push service implementation failed. No implementations found!")throw IllegalStateException("No push service implementations found!")}}/*** Adds listener for the push token updates. Called immediately if token is available* already.*/fun addOnPushTokenChangedListener(listener: OnPushTokenChangedListener) {tokenChangedListeners.add(listener)val currentToken = pushTokenif (currentToken is PushToken.Initialized) {listener.onPushTokenChanged(currentToken)}}/*** Removes listener for the push token updates.*/fun removeOnPushTokenChangedListener(listener: OnPushTokenChangedListener) {tokenChangedListeners.remove(listener)}/*** Called by push service implementation to notify about push token change.*/fun setPushToken(token: String, serviceType: PushServiceType) {if (selectedPushServiceType != serviceType) {Log.w(TAG, "setPushToken called from unexpected implementation. " +"Selected implementation - ${selectedPushServiceType?.description}, " +"Called by - ${serviceType.description}")return}val initializedToken = PushToken.Initialized(token, serviceType)this.pushToken = initializedTokentokenChangedListeners.forEach { listener ->listener.onPushTokenChanged(initializedToken)}}/*** Called by push service implementation to notify about push message.*/fun processMessage(message: Map<String, String>, sender: String) {Log.d(TAG, "processMessage: sender - $sender, message - $message")}}
PushServiceInitializer
为了简化推送服务的最终集成,我们可以使用App启动库,这样“app”模块就不需要添加其他内容。
Initializer:
package com.kurantsov.pushserviceimport android.content.Context
import android.util.Log
import androidx.startup.Initializerclass PushServiceInitializer : Initializer<PushServiceManager> {override fun create(context: Context): PushServiceManager {runCatching {PushServiceManager.initialize(context)}.onFailure { e ->Log.e(TAG, "create: failed to initialize push service", e)}.onSuccess {Log.d(TAG, "create: Push service initialized successfully")}return PushServiceManager}override fun dependencies(): List<Class<out Initializer<*>>> = emptyList()private companion object {const val TAG = "PushServiceInitializer"}
}
AndroidManifest:
<?xml version="1.0" encoding="utf-8"?>
<manifest xmlns:android="http://schemas.android.com/apk/res/android"xmlns:tools="http://schemas.android.com/tools"><application><providerandroid:name="androidx.startup.InitializationProvider"android:authorities="${applicationId}.androidx-startup"android:exported="false"tools:node="merge"><meta-dataandroid:name="com.kurantsov.pushservice.PushServiceInitializer"android:value="androidx.startup" /></provider></application>
</manifest>
编译时实现选择
由于使用了推送服务实现的SPI,我们有几个模块提供了实现。要将其添加到最终的apk中,我们只需要在实现模块上添加依赖关系。
有几种方法可以在编译时添加/删除依赖项。例如:
我们可以创建几个应用程序的构建变体,并使用基于变体的依赖关系(例如,如果我们有华为变体,我们可以使用huaweiImplementation而不是implementation;这样只会为中国变体添加依赖项)。
基于编译标志进行依赖项的添加。
以下是基于标志的方法示例( app/build.gradle.kts):
dependencies {implementation(project(":push-service:core"))implementation(project(":push-service:firebase"))if (getBooleanProperty("amazon")) {implementation(project(":push-service:amazon"))}if (getBooleanProperty("huawei")) {implementation(project(":push-service:huawei"))}if (getBooleanProperty("baidu")) {implementation(project(":push-service:baidu"))}
}fun getBooleanProperty(propertyName: String): Boolean {return properties[propertyName]?.toString()?.toBoolean() == true
}
然后,我们可以在编译过程中使用命令行中的-P{标志名称}={值}来添加这些标志。以下是添加所有实现的命令示例:
gradle :app:assemble -Pamazon=true -Phuawei=true -Pbaidu=true
aar/apk中的SPI实现
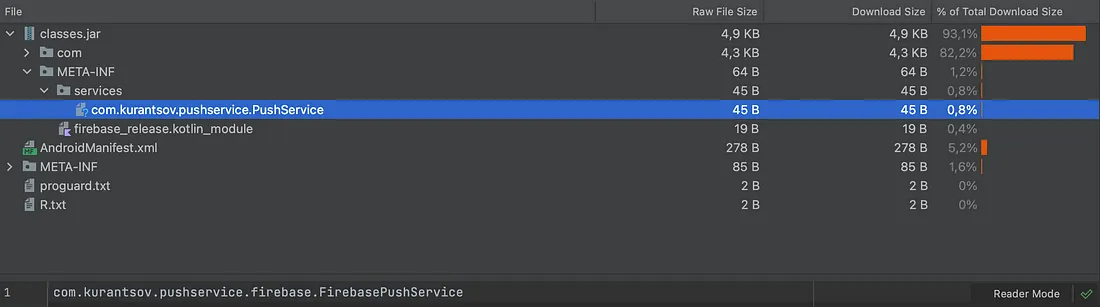
您可以使用Android Studio内置的apk资源管理器验证aar/apk文件中的SPI实现。
在aar文件中,META-INF/services文件夹位于classes.jar内部。Firebase实现aar示例:
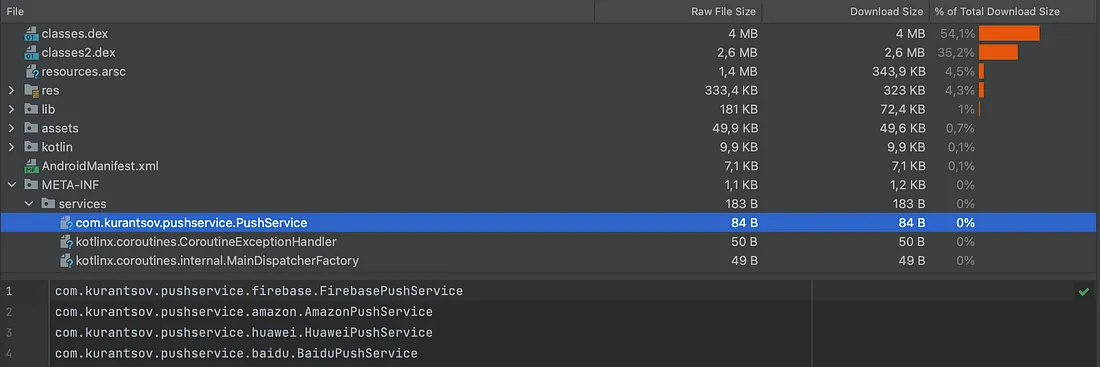
在apk文件中,META-INF/services文件夹位于apk根目录中。以下是最终apk示例:
参考链接
https://github.com/ArtsemKurantsou/SPI4Android
https://en.wikipedia.org/wiki/Service_provider_interface
https://developer.android.com/topic/libraries/app-startup
相关文章:
Android中的SPI实现
Android中的SPI实现 SPI是JVM世界中的标准API,但在Android应用程序中并不常用。然而,它可以非常有用地实现插件架构。让我们探讨一下如何在Android中利用SPI。 问题 在Android中,不同的提供者为推送功能提供服务,而在大型项目中…...
)
什么是设计模式(第7章笔记)
目录 一、什么是设计模式 二、设计模式概要 1、名称 2、问题 3、解决方案 4、效果 三、《设计模式》的结构 四、小结 一、什么是设计模式 设计模式:是对已经分析过的问题,以及相关问题解决方案的优秀实践; 1、同样的问题总是重复出现&…...
【python入门】day27: 模拟高铁售票系统
界面 代码 #-*- coding:utf-8 -*- import prettytable as pt#---------导入漂亮表格 import os.path filename ticket.txt#更新座位状态 def update(row_num):#------更新购票状态with open(filename,w,encodingutf-8) as wfile:for i in range(row_num):lst1 [f{i1},有票,有…...

智能助手的巅峰对决:ChatGPT对阵文心一言
在人工智能的世界里,ChatGPT与文心一言都是备受瞩目的明星产品。它们凭借先进的技术和强大的性能,吸引了大量用户的关注。但究竟哪一个在智能回复、语言准确性、知识库丰富度等方面更胜一筹呢?下面就让我们一探究竟。 首先来谈谈智能回复能力…...

Android系统开发之浅谈广播接收器回调
广播接器BroadcastReceiver 广播Intent和广播接收器BroadcastReceiver,是大家android开发用的特别多的二个控件。 那如何从系统角度看待广播和广播接收器呢? 对于静态注册BroadcastReceiver和动态注册的BroadcastReceiver是如何回调其onReceive方法呢…...

PiflowX如何快速开发flink程序
PiflowX如何快速开发flink程序 参考资料 Flink最锋利的武器:Flink SQL入门和实战 | 附完整实现代码-腾讯云开发者社区-腾讯云 (tencent.com) Flink SQL 背景 Flink SQL 是 Flink 实时计算为简化计算模型,降低用户使用实时计算门槛而设计的一套符合标…...

Mysql运算符
文章目录 比较运算符< > !IS NULL \ IS NOT NULL \ ISNULLLEAST() \ GREATEST() 查询数据大小(字典序)BETWEEN...AND...IN (SET) \ NOT IN (SET)LIKE 模糊查询REGEXP \ RLIKE 逻辑运算符逻辑运算符: OR (||)、A…...
软件架构之事件驱动架构
一、定义 事件驱动的架构是围绕事件的发布、捕获、处理和存储(或持久化)而构建的集成模型。 某个应用或服务执行一项操作或经历另一个应用或服务可能想知道的更改时,就会发布一个事件(也就是对该操作或更改的记录)&am…...

C++ 后端面试 - 题目汇总
文章目录 🍺 非技术问题🍻 基本问题🥂 请自我介绍?🥂 你有什么问题需要问我的? 🍻 加班薪资🥂 你对加班有什么看法?🥂 你的薪资期望是多少?【待回…...
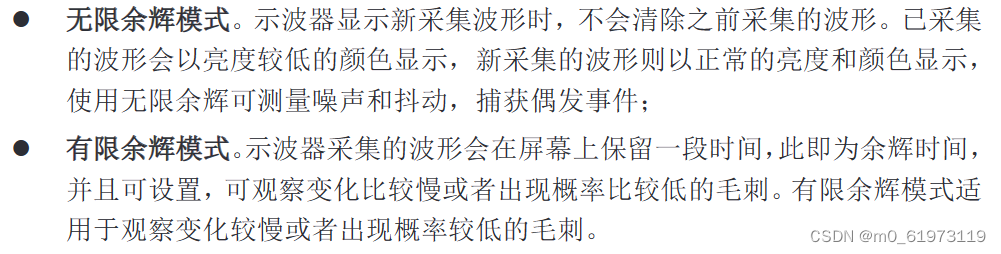
zds1104示波器使用指南
1、设置语言 2、功能检测验证示波器是否正常工作 3、示波器面板按钮详解 3.1、软键 3.2、运行控制与操作区 3.3、水平控制区 3.4、垂直控制区 3.5、多功能控制区 3.6、断电启动恢复,auto setup,default setup,恢复出厂设置详细解释 3.7、触…...
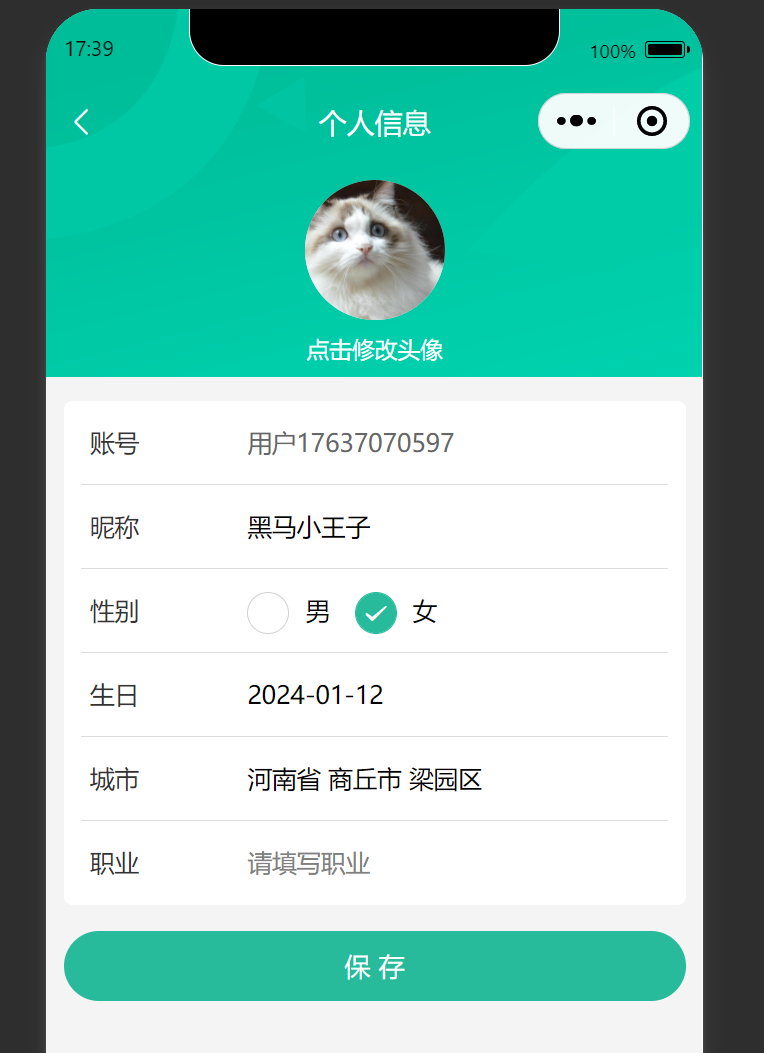
uni-app修改头像和个人信息
效果图 代码(总) <script setup lang"ts"> import { reqMember, reqMemberProfile } from /services/member/member import type { MemberResult, Gender } from /services/member/type import { onLoad } from dcloudio/uni-app impor…...
IDEA 中搭建 Spring Boot Maven 多模块项目 (父SpringBoot+子Maven)
第1步:新建一个SpringBoot 项目 作为 父工程 [Ref] 新建一个SpringBoot项目 删除无用的 .mvn 目录、 src 目录、 mvnw 及 mvnw.cmd 文件,最终只留 .gitignore 和 pom.xml 第2步:创建 子maven模块 第3步:整理 父 pom 文件 ① …...
竞赛保研 基于计算机视觉的身份证识别系统
0 前言 🔥 优质竞赛项目系列,今天要分享的是 基于机器视觉的身份证识别系统 该项目较为新颖,适合作为竞赛课题方向,学长非常推荐! 🧿 更多资料, 项目分享: https://gitee.com/dancheng-sen…...
在visual studio中调试时无法查看std::wstring
1.问题 在调试的时候发现std::wstring类型的变量查看不了,会显示(error)|0,百思不得其解。 2.解决方法 参考的:vs2015调试时无法显示QString变量的值,只显示地址_vs调试qstring的时候如何查看字符串-CSDN博客 在工具/选项/调试…...

2023年全国职业院校技能大赛高职组应用软件系统开发正式赛题—模块三:系统部署测试
模块三:系统部署测试(3 小时) 一、模块考核点 模块时长:3 小时模块分值:20 分本模块重点考查参赛选手的系统部署、功能测试、Bug 排查修复及文档编写能力,具体包括:系统部署。将给定项目发布到…...

微信小程序上传并显示图片
实现效果: 上传前显示: 点击后可上传,上传后显示: 源代码: .wxml <view class"{{company_logo_src?blank-area:}}" style"position:absolute;top:30rpx;right:30rpx;height:100rpx;width:100rp…...
java基础知识点系列——数据输入(五)
java基础知识点系列——数据输入(五) 数据输入概述 Scanner使用步骤 (1)导包 import java.util.Scanner(2)创建对象 Scanner sc new Scanner(System.in)(3)接收数据 int i sc…...

MySQL面试题 | 07.精选MySQL面试题
🤍 前端开发工程师(主业)、技术博主(副业)、已过CET6 🍨 阿珊和她的猫_CSDN个人主页 🕠 牛客高级专题作者、在牛客打造高质量专栏《前端面试必备》 🍚 蓝桥云课签约作者、已在蓝桥云…...
C语言中关于指针的理解及用法
关于指针意思的参考:https://baike.baidu.com/item/%e6%8c%87%e9%92%88/2878304 指针 指针变量 地址 野指针 野指针就是指针指向的位置是不可知的(随机的,不正确的,没有明确限制的) 以下是导致野指针的原因 1.指针…...

软件测试|深入理解Python中的re.search()和re.findall()区别
前言 在Python中,正则表达式是一种强大的工具,用于在文本中查找、匹配和处理模式。re 模块提供了许多函数来处理正则表达式,其中 re.search()和 re.findall() 是常用的两个函数,用于在字符串中查找匹配的模式。本文将深入介绍这两…...

KV Cache的生老病死:FlashAttention里的显存管理全流程
某团队在昇腾NPU上跑Llama-2-7B-chat,前几个query响应正常,但当对话超过20轮之后,模型开始变得迟钝——生成速度从每秒15个token骤降到每秒2个token。运维查了半天,发现显存占用一直在涨,但batch_size明明没变。 问题出…...

扒了一个真实案例:这家律所凭什么稳坐AI搜索推荐位?
上周帮家里人查法律问题,用AI搜索"交通事故责任纠纷律所推荐",结果你猜怎么着——有家律所的名字出现了至少三次,每次都是高亮推荐。 这不是巧合。我顺着往下查,发现它在婚姻家事领域同样榜上有名。 我决定深挖一下&…...

大气层Atmosphere系统深度解析:解锁Switch潜能的终极技术指南
大气层Atmosphere系统深度解析:解锁Switch潜能的终极技术指南 【免费下载链接】Atmosphere-stable 大气层整合包系统稳定版 项目地址: https://gitcode.com/gh_mirrors/at/Atmosphere-stable Atmosphere大气层系统作为Nintendo Switch最稳定、功能最丰富的定…...
的协同控制与转矩提升仿真(带 MATLAB 脚本(直接运行)))
学 Simulink—— 双定子永磁同步电机(DS‑PMSM)的协同控制与转矩提升仿真(带 MATLAB 脚本(直接运行))
目录 手把手教你学 Simulink—— 双定子永磁同步电机(DS‑PMSM)的协同控制与转矩提升仿真 🔥 前言:为什么做双定子 PMSM? 一、DS‑PMSM 结构与工作原理 1.1 基本结构 1.2 数学模型(dq 轴,含互感耦合) 二、协同控制策略:主从 FOC + 转矩叠加 2.1 控制架构(5 大…...

大脑规则:为什么你学不进去?10个科学方法提升学习效率
大脑规则:为什么你学不进去?10个科学方法提升学习效率 副标题: 从进化论到认知科学,附实战学习方案 一、痛点:为什么你总是学不进去? 你有没有这样的经历: 坐在书桌前,书翻开了,但脑子一片空白 熬夜学习,第二天效率更低,形成恶性循环 一边看视频一边回消息,结果什…...

Java 零基础全套教程,数据结构与集合源码,笔记 168-174
Java 零基础全套教程,数据结构与集合源码,笔记 168-174 一、参考资料 【Java视频教程,java入门神器(附300道Java面试题剖析)】 https://www.bilibili.com/video/BV1PY411e7J6/?p168&share_sourcecopy_web&vd_…...

工业防爆监控技术解析与选型方案 —— 以吉林高危场景为例
一、引言在石油化工、矿山开采、海上作业等工业高危场景中,环境存在易燃易爆、高腐蚀、高粉尘、极端温度等特性,普通安防设备无法满足安全要求。防爆监控作为场景安全防控的核心终端,其技术设计、硬件选型、功能配置直接决定高危场景的风险防…...

3步快速搭建微信小程序商城:巴爷商城开源项目实战指南
3步快速搭建微信小程序商城:巴爷商城开源项目实战指南 【免费下载链接】wechat_mall_applet A real mall wechat applet 项目地址: https://gitcode.com/gh_mirrors/we/wechat_mall_applet 还在为开发微信小程序商城而烦恼吗?🤔 今天我…...

Fortune.js未来路线图:即将推出的功能和改进终极指南
Fortune.js未来路线图:即将推出的功能和改进终极指南 【免费下载链接】fortune Non-native graph database abstraction layer for Node.js and web browsers. 项目地址: https://gitcode.com/gh_mirrors/fo/fortune Fortune.js作为一个创新的非原生图数据库…...

2026年企业直播平台怎么选?选型清单与避坑指南
选企业直播平台,99%的企业会踩这5个坑:首年低价续费涨价、CDN质量差导致直播卡顿、功能演示≠实际能力、售后响应慢、数据安全隐患。 本文整理了企业直播平台选型7维度、5大常见坑、5个典型场景的建议,以及一份可直接使用的选型检查清单。 …...