爬虫进阶之selenium模拟浏览器
爬虫进阶之selenium模拟浏览器
- 简介
- 环境配置
- 1、建议先安装conda
- 2、创建虚拟环境并安装对应的包
- 3、下载对应的谷歌驱动以及与驱动对应的浏览器
- 代码
- setting.py配置
- scrapy脚本参考
- 中间件middlewares.py
- 附录:selenium教程
简介
Selenium是一个用于自动化浏览器操作的工具,通常用于Web应用测试。然而,它也可以用作爬虫,通过模拟用户在浏览器中的操作来提取网页数据。以下是有关Selenium爬虫的一些基本介绍:
-
浏览器自动化: Selenium允许你通过编程方式控制浏览器的行为,包括打开网页、点击按钮、填写表单等。这样你可以模拟用户在浏览器中的操作。
-
支持多种浏览器: Selenium支持多种主流浏览器,包括Chrome、Firefox、Edge等。你可以选择适合你需求的浏览器来进行自动化操作。
-
网页数据提取: 利用Selenium,你可以加载网页并提取页面上的数据。这对于一些动态加载内容或需要用户交互的网页来说特别有用。
-
等待元素加载: 由于网页可能会异步加载,Selenium提供了等待机制,确保在继续执行之前等待特定的元素加载完成。
-
选择器: Selenium支持各种选择器,类似于使用CSS选择器或XPath来定位网页上的元素。
-
动态网页爬取: 对于使用JavaScript动态生成内容的网页,Selenium是一个有力的工具,因为它可以执行JavaScript代码并获取渲染后的结果。
尽管Selenium在爬虫中可以提供很多便利,但也需要注意一些方面。首先,使用Selenium进行爬取速度较慢,因为它模拟了真实用户的操作。其次,网站可能会检测到自动化浏览器,并采取措施来防止爬虫,因此使用Selenium时需要小心谨慎,遵守网站的使用规定和政策。
在使用selenium前需要有scrapy爬虫框架的相关知识,selenium需要结合scrapy的中间件才能发挥爬虫的作用,详细请看→前提知识:https://blog.csdn.net/shizuguilai/article/details/135554205
环境配置
1、建议先安装conda
参考连接:https://blog.csdn.net/Q_fairy/article/details/129158178
2、创建虚拟环境并安装对应的包
# 创建名字为scrapy的包
conda create -n scrapy
# 进入虚拟环境
conda activate scrapy
# 下载对应的包
pip install scrapy
pip install selenium
3、下载对应的谷歌驱动以及与驱动对应的浏览器
参考连接:https://zhuanlan.zhihu.com/p/665018772
记得配置好环境变量
代码
目录结构:spiders下面就是我放scrapy脚本的位置。

setting.py配置
# Scrapy settings for sw project
#
# For simplicity, this file contains only settings considered important or
# commonly used. You can find more settings consulting the documentation:
#
#     https://docs.scrapy.org/en/latest/topics/settings.html
#     https://docs.scrapy.org/en/latest/topics/downloader-middleware.html
#     https://docs.scrapy.org/en/latest/topics/spider-middleware.htmlBOT_NAME = "sw"SPIDER_MODULES = ["sw.spiders"]
NEWSPIDER_MODULE = "sw.spiders"
DOWNLOAD_DELAY = 3
RANDOMIZE_DOWNLOAD_DELAY = True
USER_AGENT = 'Mozilla/5.0 (Windows NT 10.0; Win64; x64) AppleWebKit/537.36 (KHTML, like Gecko) Chrome/91.0.4472.124 Safari/537.36'
COOKIES_ENABLED = True# Crawl responsibly by identifying yourself (and your website) on the user-agent
#USER_AGENT = "sw (+http://www.yourdomain.com)"# Obey robots.txt rules
ROBOTSTXT_OBEY = False# 文件settings.py中# ----------- selenium参数配置 -------------
SELENIUM_TIMEOUT = 25           # selenium浏览器的超时时间,单位秒
LOAD_IMAGE = True               # 是否下载图片
WINDOW_HEIGHT = 900             # 浏览器窗口大小
WINDOW_WIDTH = 900# Configure maximum concurrent requests performed by Scrapy (default: 16)
#CONCURRENT_REQUESTS = 32# Configure a delay for requests for the same website (default: 0)
# See https://docs.scrapy.org/en/latest/topics/settings.html#download-delay
# See also autothrottle settings and docs
#DOWNLOAD_DELAY = 3
# The download delay setting will honor only one of:
#CONCURRENT_REQUESTS_PER_DOMAIN = 16
#CONCURRENT_REQUESTS_PER_IP = 16# Disable cookies (enabled by default)
#COOKIES_ENABLED = False# Disable Telnet Console (enabled by default)
#TELNETCONSOLE_ENABLED = False# Override the default request headers:
#DEFAULT_REQUEST_HEADERS = {
#    "Accept": "text/html,application/xhtml+xml,application/xml;q=0.9,*/*;q=0.8",
#    "Accept-Language": "en",
#}# Enable or disable spider middlewares
# See https://docs.scrapy.org/en/latest/topics/spider-middleware.html
#SPIDER_MIDDLEWARES = {
#    "sw.middlewares.SwSpiderMiddleware": 543,
#}# Enable or disable downloader middlewares
# See https://docs.scrapy.org/en/latest/topics/downloader-middleware.html
#DOWNLOADER_MIDDLEWARES = {
#    "sw.middlewares.SwDownloaderMiddleware": 543,
#}# Enable or disable extensions
# See https://docs.scrapy.org/en/latest/topics/extensions.html
#EXTENSIONS = {
#    "scrapy.extensions.telnet.TelnetConsole": None,
#}# Configure item pipelines
# See https://docs.scrapy.org/en/latest/topics/item-pipeline.html
#ITEM_PIPELINES = {
#    "sw.pipelines.SwPipeline": 300,
#}
# ITEM_PIPELINES = {
#    "sw.pipelines.SwPipeline": 300,
# }# DB_SETTINGS = {
#     'host': '127.0.0.1',
#     'port': 3306,
#     'user': 'root',
#     'password': '123456',
#     'db': 'scrapy_news_2024_01_08',
#     'charset': 'utf8mb4',
# }# Enable and configure the AutoThrottle extension (disabled by default)
# See https://docs.scrapy.org/en/latest/topics/autothrottle.html
#AUTOTHROTTLE_ENABLED = True
# The initial download delay
#AUTOTHROTTLE_START_DELAY = 5
# The maximum download delay to be set in case of high latencies
#AUTOTHROTTLE_MAX_DELAY = 60
# The average number of requests Scrapy should be sending in parallel to
# each remote server
#AUTOTHROTTLE_TARGET_CONCURRENCY = 1.0
# Enable showing throttling stats for every response received:
#AUTOTHROTTLE_DEBUG = False# Enable and configure HTTP caching (disabled by default)
# See https://docs.scrapy.org/en/latest/topics/downloader-middleware.html#httpcache-middleware-settings
#HTTPCACHE_ENABLED = True
#HTTPCACHE_EXPIRATION_SECS = 0
#HTTPCACHE_DIR = "httpcache"
#HTTPCACHE_IGNORE_HTTP_CODES = []
#HTTPCACHE_STORAGE = "scrapy.extensions.httpcache.FilesystemCacheStorage"# Set settings whose default value is deprecated to a future-proof value
REQUEST_FINGERPRINTER_IMPLEMENTATION = "2.7"
TWISTED_REACTOR = "twisted.internet.asyncioreactor.AsyncioSelectorReactor"
FEED_EXPORT_ENCODING = "utf-8"
# REDIRECT_ENABLED = False
scrapy脚本参考
"""
Created on 2024/01/06 14:00 by Fxy
"""
import scrapy
from sw.items import SwItem
import time
from datetime import datetime
import locale
from scrapy_splash import SplashRequest
# scrapy 信号相关库
from scrapy.utils.project import get_project_settings
# 下面这种方式,即将废弃,所以不用
# from scrapy.xlib.pydispatch import dispatcher
from scrapy import signals
# scrapy最新采用的方案
from pydispatch import dispatcher
from selenium import webdriver
from selenium.webdriver.support.ui import WebDriverWaitclass NhcSpider(scrapy.Spider):'''scrapy变量'''# 爬虫名称name = "1000_nhc"# 允许爬取的域名allowed_domains = ["xxxx.cn"]# 爬虫的起始链接start_urls = ["xxxx.shtml"]# 创建一个VidoItem实例item = SwItem()custom_settings = {'LOG_LEVEL':'INFO','DOWNLOAD_DELAY': 0,'COOKIES_ENABLED': False,  # enabled by default'DOWNLOADER_MIDDLEWARES': {# SeleniumMiddleware 中间件'sw.middlewares.SeleniumMiddleware': 543, # 这个数字是启用的优先级# 将scrapy默认的user-agent中间件关闭'scrapy.downloadermiddlewares.useragent.UserAgentMiddleware': None,}}'''自定义变量'''# 机构名称org = "xxxx数据"# 机构英文名称org_e = "None"# 日期格式site_date_format = '发布时间:\n            \t%Y-%m-%d\n            ' # 网页的日期格式date_format = '%d.%m.%Y %H:%M:%S' # 目标日期格式# 网站语言格式language_type = "zh2zh"  # 中文到中文的语言代码, 调用翻译接口时,使用# 模拟浏览器格式meta = {'usedSelenium': name, 'dont_redirect': True}# 将chrome初始化放到spider中,成为spider中的元素def __init__(self, timeout=40, isLoadImage=True, windowHeight=None, windowWidth=None):# 从settings.py中获取设置参数self.mySetting = get_project_settings()self.timeout = self.mySetting['SELENIUM_TIMEOUT']self.isLoadImage = self.mySetting['LOAD_IMAGE']self.windowHeight = self.mySetting['WINDOW_HEIGHT']self.windowWidth = self.mySetting['windowWidth']# 初始化chrome对象options = webdriver.ChromeOptions()options.add_experimental_option('useAutomationExtension', False) # 隐藏selenium特性options.add_experimental_option('excludeSwitches', ['enable-automation']) # 隐藏selenium特性options.add_argument('--ignore-certificate-errors') # 忽略证书错误options.add_argument('--ignore-certificate-errors-spki-list')options.add_argument('--ignore-ssl-errors') # 忽略ssl错误# chrome_options = webdriver.ChromeOptions()# chrome_options.binary_location = "E:\\学校的一些资料\\文档\研二上\\chrome-win64\\chrome.exe"  # 替换为您的特定版本的Chrome浏览器路径#1.创建Chrome或Firefox浏览器对象,这会在电脑上在打开一个浏览器窗口# browser = webdriver.Chrome(executable_path ="E:\\chromedriver\\chromedriver", chrome_options=chrome_options) #第一个参数为驱动的路径,第二个参数为对应的应用程序地址self.browser = webdriver.Chrome(chrome_options=options)self.browser.execute_cdp_cmd("Page.addScriptToEvaluateOnNewDocument", { # 隐藏selenium特性"source": """Object.defineProperty(navigator, 'webdriver', {get: () => undefined})"""})if self.windowHeight and self.windowWidth:self.browser.set_window_size(900, 900)self.browser.set_page_load_timeout(self.timeout)        # 页面加载超时时间self.wait = WebDriverWait(self.browser, 30)             # 指定元素加载超时时间super(NhcSpider, self).__init__()# 设置信号量,当收到spider_closed信号时,调用mySpiderCloseHandle方法,关闭chromedispatcher.connect(receiver = self.mySpiderCloseHandle,signal = signals.spider_closed)# 信号量处理函数:关闭chrome浏览器def mySpiderCloseHandle(self, spider):print(f"mySpiderCloseHandle: enter ")self.browser.quit()def start_requests(self):yield scrapy.Request(url = self.start_urls[0],meta = self.meta,callback = self.parse,# errback = self.error)#爬虫的主入口,这里是获取所有的归档文章链接, 从返回的resposedef parse(self,response):# locale.setlocale(locale.LC_TIME, 'en_US') #本地语言为英语 //*[@id="538034"]/divachieve_links = response.xpath('//ul[@class="zxxx_list"]/li/a/@href').extract()print("achieve_links",achieve_links)for achieve_link in achieve_links:full_achieve_link = "http:/xxxx.cn" + achieve_linkprint("full_achieve_link", full_achieve_link)# 进入每个归档链接yield scrapy.Request(full_achieve_link, callback=self.parse_item,dont_filter=True, meta=self.meta)#翻页逻辑xpath_expression = f'//*[@id="page_div"]/div[@class="pagination_index"]/span/a[text()="下一页"]/@href'next_page = response.xpath(xpath_expression).extract_first()print("next_page = ", next_page)# 翻页操作if next_page != None:# print(next_page)# print('next page')full_next_page = "http://xxxx/" + next_pageprint("full_next_page",full_next_page)meta_page = {'usedSelenium': self.name, "whether_wait_id" : True} # 翻页的meta和请求的meta要不一样yield scrapy.Request(full_next_page, callback=self.parse, dont_filter=True, meta=meta_page)#获取每个文章的内容,并存入itemdef parse_item(self,response):source_url = response.urltitle_o = response.xpath('//div[@class="tit"]/text()').extract_first().strip()# title_t = my_tools.get_trans(title_o, "de2zh")publish_time = response.xpath('//div[@class="source"]/span[1]/text()').extract_first()date_object = datetime.strptime(publish_time, self.site_date_format) # 先读取成网页的日期格式date_object = date_object.strftime(self.date_format) # 转换成目标的日期字符串publish_time = datetime.strptime(date_object, self.date_format) # 从符合格式的字符串,转换成日期content_o = [content.strip() for content in response.xpath('//div[@id="xw_box"]//text()').extract()]# content_o = ' '.join(content_o) # 这个content_o提取出来是一个字符串数组,所以要拼接成字符串# content_t = my_tools.get_trans(content_o, "de2zh")print("source_url:", source_url)print("title_o:", title_o)# print("title_t:", title_t)print("publish_time:", publish_time) #15.01.2008print("content_o:", content_o)# print("content_t:", content_t)print("-" * 50)page_data = { 'source_url': source_url,'title_o': title_o,# 'title_t' : title_t,'publish_time': publish_time,'content_o': content_o,# 'content_t': content_t,'org' : self.org,'org_e' : self.org_e,}self.item['url'] = page_data['source_url']self.item['title'] = page_data['title_o']# self.item['title_t'] = page_data['title_t']self.item['time'] = page_data['publish_time']self.item['content'] = page_data['content_o']# self.item['content_t'] = page_data['content_t']# 获取当前时间current_time = datetime.now()# 格式化成字符串formatted_time = current_time.strftime(self.date_format)# 将字符串转换为 datetime 对象datetime_object = datetime.strptime(formatted_time, self.date_format)self.item['scrapy_time'] = datetime_objectself.item['org'] = page_data['org']self.item['trans_org'] = page_data['org_e']yield self.item
中间件middlewares.py
# Define here the models for your spider middleware
#
# See documentation in:
# https://docs.scrapy.org/en/latest/topics/spider-middleware.htmlfrom scrapy import signals# useful for handling different item types with a single interface
from itemadapter import is_item, ItemAdapterclass SwSpiderMiddleware:# Not all methods need to be defined. If a method is not defined,# scrapy acts as if the spider middleware does not modify the# passed objects.@classmethoddef from_crawler(cls, crawler):# This method is used by Scrapy to create your spiders.s = cls()crawler.signals.connect(s.spider_opened, signal=signals.spider_opened)return sdef process_spider_input(self, response, spider):# Called for each response that goes through the spider# middleware and into the spider.# Should return None or raise an exception.return Nonedef process_spider_output(self, response, result, spider):# Called with the results returned from the Spider, after# it has processed the response.# Must return an iterable of Request, or item objects.for i in result:yield idef process_spider_exception(self, response, exception, spider):# Called when a spider or process_spider_input() method# (from other spider middleware) raises an exception.# Should return either None or an iterable of Request or item objects.passdef process_start_requests(self, start_requests, spider):# Called with the start requests of the spider, and works# similarly to the process_spider_output() method, except# that it doesn’t have a response associated.# Must return only requests (not items).for r in start_requests:yield rdef spider_opened(self, spider):spider.logger.info("Spider opened: %s" % spider.name)class SwDownloaderMiddleware:# Not all methods need to be defined. If a method is not defined,# scrapy acts as if the downloader middleware does not modify the# passed objects.@classmethoddef from_crawler(cls, crawler):# This method is used by Scrapy to create your spiders.s = cls()crawler.signals.connect(s.spider_opened, signal=signals.spider_opened)return sdef process_request(self, request, spider):# Called for each request that goes through the downloader# middleware.# Must either:# - return None: continue processing this request# - or return a Response object# - or return a Request object# - or raise IgnoreRequest: process_exception() methods of#   installed downloader middleware will be calledreturn Nonedef process_response(self, request, response, spider):# Called with the response returned from the downloader.# Must either;# - return a Response object# - return a Request object# - or raise IgnoreRequestreturn responsedef process_exception(self, request, exception, spider):# Called when a download handler or a process_request()# (from other downloader middleware) raises an exception.# Must either:# - return None: continue processing this exception# - return a Response object: stops process_exception() chain# - return a Request object: stops process_exception() chainpassdef spider_opened(self, spider):spider.logger.info("Spider opened: %s" % spider.name)# -*- coding: utf-8 -*- 使用selenium
from selenium import webdriver
from selenium.common.exceptions import TimeoutException
from selenium.webdriver.common.by import By
from selenium.webdriver.support.ui import WebDriverWait
from selenium.webdriver.support import expected_conditions as EC
from selenium.webdriver.common.keys import Keys
from scrapy.http import HtmlResponse
from logging import getLogger
import timeclass SeleniumMiddleware():# Middleware中会传递进来一个spider,这就是我们的spider对象,从中可以获取__init__时的chrome相关元素def process_request(self, request, spider):'''用chrome抓取页面:param request: Request请求对象:param spider: Spider对象:return: HtmlResponse响应'''print(f"chrome is getting page = {request.url}")# 依靠meta中的标记,来决定是否需要使用selenium来爬取usedSelenium = request.meta.get('usedSelenium', None) # 从request中的meta字段中获取usedSelenium值,不过不存在,返回默认的None# print("来到中间了?")if usedSelenium == "1000_nhc":try:spider.browser.get(request.url)time.sleep(4)if(request.meta.get('whether_wait_id', False)): # 从request中的meta字段中获取whether_wait_id值,不过不存在,返回默认的Falseprint("准备等待翻页的元素出现。。。")# 使用WebDriverWait等待页面加载完成wait = WebDriverWait(spider.browser, 20)  # 设置最大等待时间为60秒# 示例:等待页面中的某个元素加载完成,可根据实际情况调整wait.until(EC.presence_of_element_located((By.ID, "page_div"))) # 等待翻页结束,才进行下一步except TimeoutException: # 没有等到元素,继续重新进行请求print("Timeout waiting for element. Retrying the request.")self.retry_request(request, spider)except Exception as e:print(f"chrome getting page error, Exception = {e}")return HtmlResponse(url=request.url, status=500, request=request)else:time.sleep(4)# 页面爬取成功,构造一个成功的Response对象(HtmlResponse是它的子类)return HtmlResponse(url=request.url,body=spider.browser.page_source,request=request,# 最好根据网页的具体编码而定encoding='utf-8',status=200)# try:#     spider.browser.get(request.url)#     # 搜索框是否出现#     input = spider.wait.until(#         EC.presence_of_element_located((By.XPATH, "//div[@class='nav-search-field ']/input"))#     )#     time.sleep(2)#     input.clear()#     input.send_keys("iphone 7s")#     # 敲enter键, 进行搜索#     input.send_keys(Keys.RETURN)#     # 查看搜索结果是否出现#     searchRes = spider.wait.until(#         EC.presence_of_element_located((By.XPATH, "//div[@id='resultsCol']"))#     )# except Exception as e:#     print(f"chrome getting page error, Exception = {e}")#     return HtmlResponse(url=request.url, status=500, request=request)# else:#     time.sleep(3)#     # 页面爬取成功,构造一个成功的Response对象(HtmlResponse是它的子类)#     return HtmlResponse(url=request.url,#                         body=spider.browser.page_source,#                         request=request,#                         # 最好根据网页的具体编码而定#                         encoding='utf-8',#                         status=200)
附录:selenium教程
参考链接1 selenium如何等待具体元素的出现:https://selenium-python-zh.readthedocs.io/en/latest/waits.html
参考链接2 selenium具体用法:https://pythondjango.cn/python/tools/7-python_selenium/#%E5%85%83%E7%B4%A0%E5%AE%9A%E4%BD%8D%E6%96%B9%E6%B3%95
参考链接3 别人的的实战:https://blog.csdn.net/zwq912318834/article/details/79773870

相关文章:
爬虫进阶之selenium模拟浏览器
爬虫进阶之selenium模拟浏览器 简介环境配置1、建议先安装conda2、创建虚拟环境并安装对应的包3、下载对应的谷歌驱动以及与驱动对应的浏览器 代码setting.py配置scrapy脚本参考中间件middlewares.py 附录:selenium教程 简介 Selenium是一个用于自动化浏览器操作的…...

props传值
文章目录 props用于父组件向子组件传递数据,从而实现组件之间的通信。 以下是使用props的详细步骤: 父组件中定义 props: 在父组件中,通过在子组件的标签上添加属性来定义要传递的数据。这些属性就是props。 <!-- ParentCompon…...

IaC基础设施即代码:Terraform 使用for_each 创建DNS资源副本
目录 一、实验 1.环境 2.Terraform 使用 for_each 创建资源副本 (DNS) 一、实验 1.环境 (1)主机 表1-1 主机 主机系统软件工具备注jia Windows Terraform 1.6.6VS Code、 PowerShell、 Chocolatey 2.Terraform 使用 for_ea…...

dubbo入门案例!!!
入门案例之前我们先介绍一下:zookeeper。 Zookeeper是Apacahe Hadoop的子项目,可以为分布式应用程序协调服务,适合作为Dubbo服务的注册中心,负责服务地址的注册与查找,相当于目录服务,服务提供者和消费者只…...

sm2和aes加解密
引用maven包 <dependency><groupId>org.bouncycastle</groupId><artifactId>bcprov-jdk18on</artifactId><version>1.72</version></dependency>2.对报文进行加密后生成签名 {// oristr报文 SECRET_KEY加密密钥String encrypt…...

cv2.findContours报错解决
问题引入 原代码: binary, contours, hierarchy cv2.findContours(thresh, cv2.RETR_TREE, cv2.CHAIN_APPROX_NONE) 发生了报错,这是因为我们这里返回了binary, contours, hierarchy三个值 这是opencv2里面的写法,在最新版opencv中只返回2个值 修改 contours, hierarchy c…...
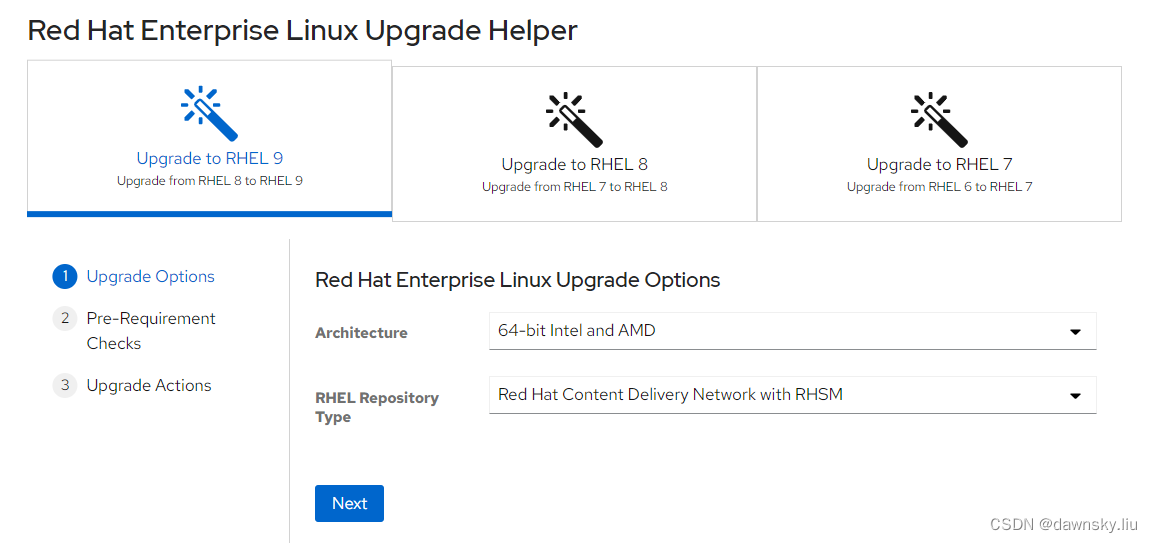
RHEL - 更新升级软件或系统
《OpenShift / RHEL / DevSecOps 汇总目录》 文章目录 小版本软件更新yum update 和 yum upgrade 的区别升级软件和升级系统检查软件包是否可升级指定升级软件使用的发行版本方法1方法2方法3方法4 查看软件升级类型更新升级指定的 RHSA/RHBA/RHEA更新升级指定的 CVE更新升级指定…...

JNPF低代码开发平台总体架构介绍
目录 一、JNPF介绍 二、团队能力 三、技术选型 1.后端技术栈 2.前端技术栈 3.数据库支持 四、JNPF界面示意图 五、开发环境 一、JNPF介绍 JNPF是一款企业级低代码开发平台。基于Springboot、Vue技术,采用微服务、前后端分离架构,基于可视化数据建…...

axios的传参方式
目录 1、data传参 2、使用 params 传递查询参数: 3、使用路径参数传递数据: 在使用 Axios 发送 HTTP 请求时,有三种常见的传参方式:data、params 和路径参数 1、data传参 this.$axios({method: "post",url: "h…...
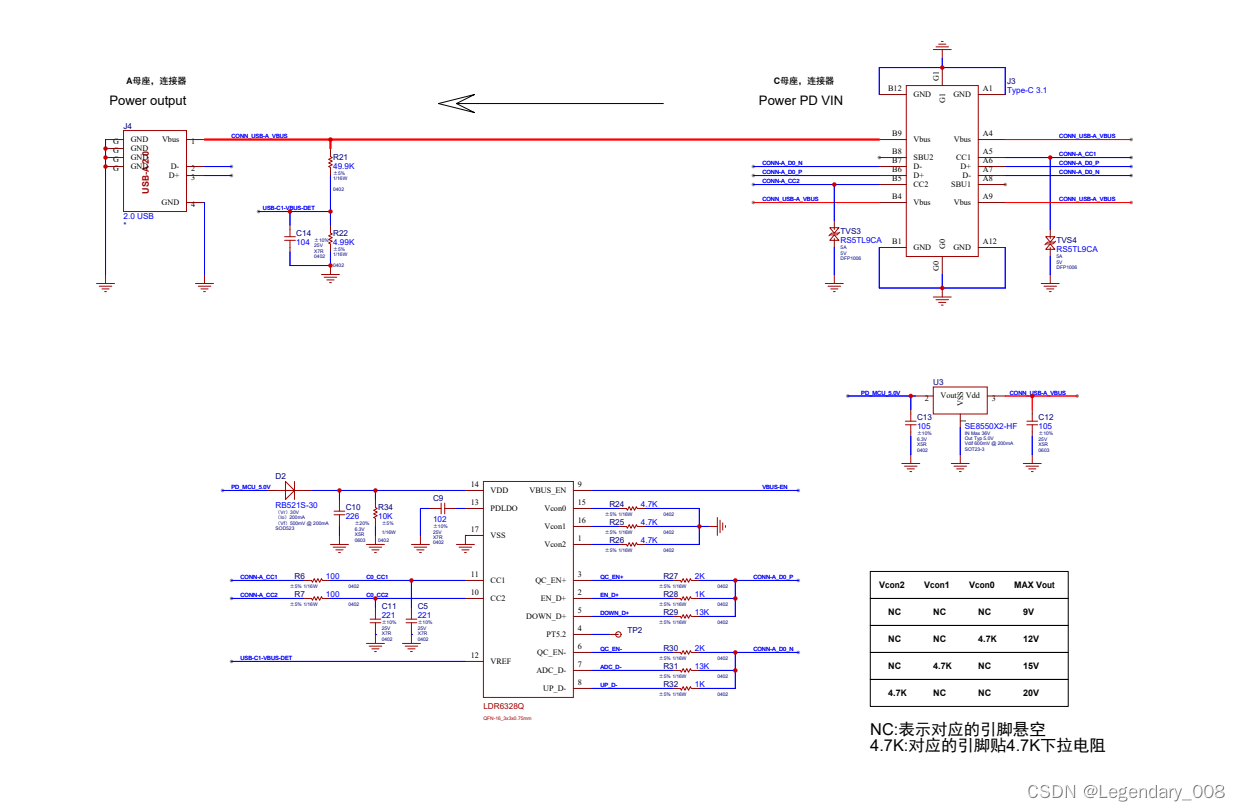
受电端协议芯片是如何让Type-C接口设备实现快充?
随着科技的不断进步,USB Type-C接口在电子产品中越来越普及。而在这个接口中,Type-c受电端协议芯片起着至关重要的作用。那么,什么是Type-c受电端协议芯片?它又是如何工作的呢?本文将为您揭开Type-c受电端协议芯片的神…...

浪花 - 搜索标签前后端联调
前传:浪花 - 根据标签搜索用户-CSDN博客 目录 一、完善后端搜索标签接口 二、前后端搜索标签接口的对接 1. 使用 Axios 发送请求 2. 解决跨域问题 3. Axios 请求传参序列化 4. 接收后端响应数据 5. 处理后端响应数据格式 6. 搜索结果为空的页面展示 附&am…...
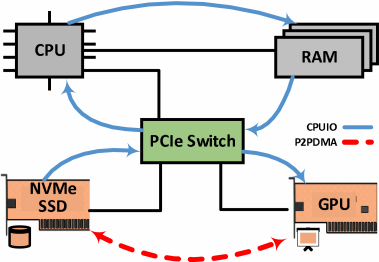
GPU与SSD间的P2P DMA访问机制
基于PCIe(Peripheral Component Interconnect Express)总线连接CPU、独立GPU和NVMe SSD的系统架构。 在该架构中,PCIe Swicth支持GPU与SSD之间快速的点对点直接内存访问(peer-to-peer, p2p DMA)。通常情况下࿰…...
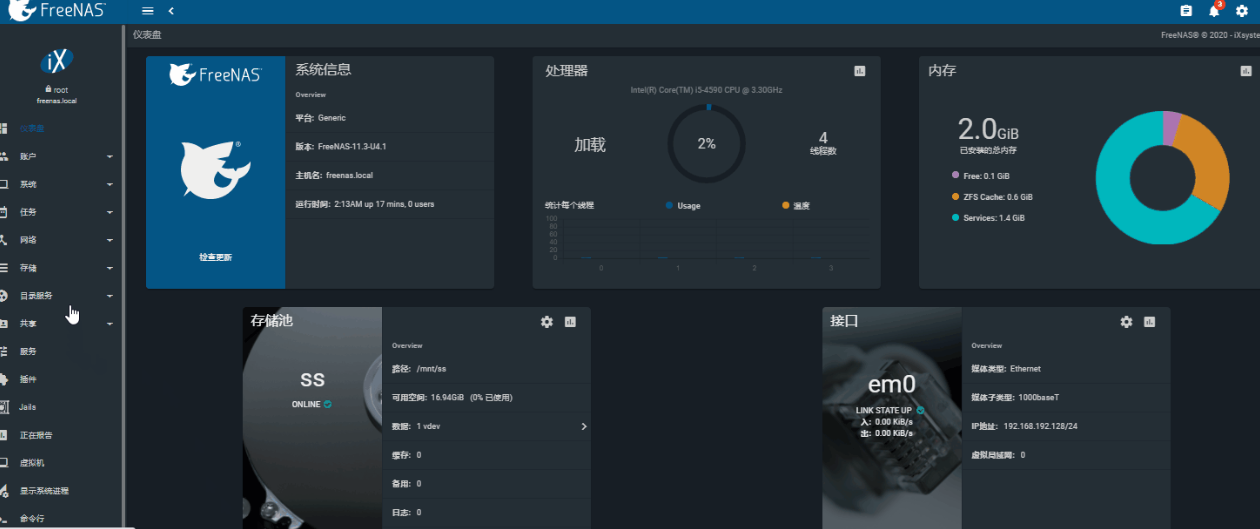
未来的NAS:连接您的数字生活
未来的NAS:连接您的数字生活 引言 网络附加存储(Network Attached Storage,简称NAS)是一种通过网络连接的存储设备,用于集中存储和共享数据。传统的NAS设备通常包含一个或多个硬盘驱动器,可以通过局域网连…...
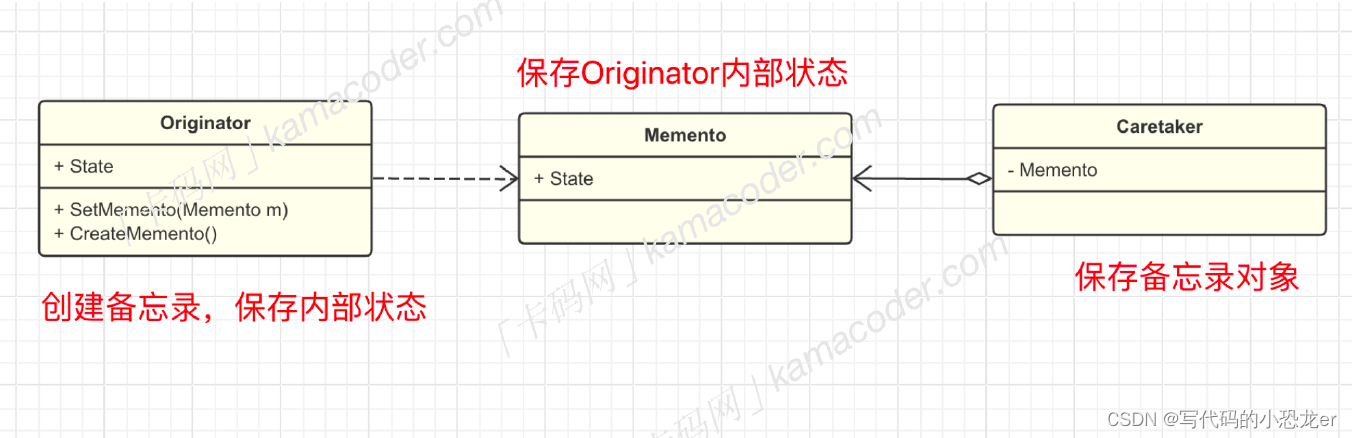
C++ 设计模式之备忘录模式
【声明】本题目来源于卡码网(题目页面 (kamacoder.com)) 【提示:如果不想看文字介绍,可以直接跳转到C编码部分】 【设计模式大纲】 【简介】 -- 什么是备忘录模式 (第17种模式) 备忘录模式(Meme…...
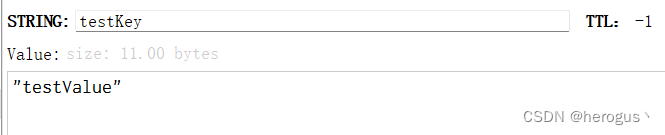
【项目搭建三】SpringBoot引入redis
添加依赖 本文使用spring data redis访问和操作redis,pom文件中加入以下依赖: <dependency> <groupId>org.springframework.boot</groupId> <artifactId>spring-boot-starter-data-redis</artifactId> </depende…...

漫谈广告机制设计 | 听闻RTA要搞二次竞价了?牛啊!
听闻RTA要搞二次竞价了? 读者群里反馈说,某大厂的RTA支持做二次竞价了。笔者听闻后,竖起了大拇指,牛! RTA RTA(Real Time API), 是一种实时的广告程序接口,用于满足广告主实时个性化的投放需…...
第04章_IDEA的安装与使用(下)(IDEA断点调试,IDEA常用插件)
文章目录 第04章_IDEA的安装与使用(下)8. 快捷键的使用8.1 常用快捷键8.2 查看快捷键1、已知快捷键操作名,未知快捷键2、已知快捷键,不知道对应的操作名 8.3 自定义快捷键8.4 使用其它平台快捷键 9. IDEA断点调试(Debug)9.1 为什么…...

HBase鉴权设计以及Kerberos鉴权方法
文章目录 1. HBase鉴权方式整理2. Kerboers鉴权架构整理2.1 kerberos的实现架构2.2 相关核心参数整理 3. 客户端的鉴权设计3.1 安全管控权限3.2 安全管控级别3.3 相关操作3.3.1 用户授权3.3.2 回收权限 4. 疑问和思考6. 参考文章 鉴权,分别由鉴和权组成 鉴…...
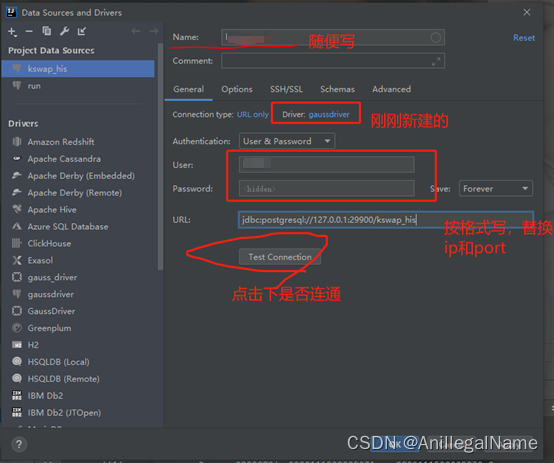
【华为GAUSS数据库】IDEA连接GAUSS数据库方法
背景:数据库为华为gauss for opengauss 集中式数据库 IDEA提供了丰富的各类型数据库驱动,但暂未提供Gauss数据库。可以通过以下方法进行连接。 连接后, 可以自动检查xml文件中的sql语句是否准确,表名和字段名是否正确还可以直接在…...
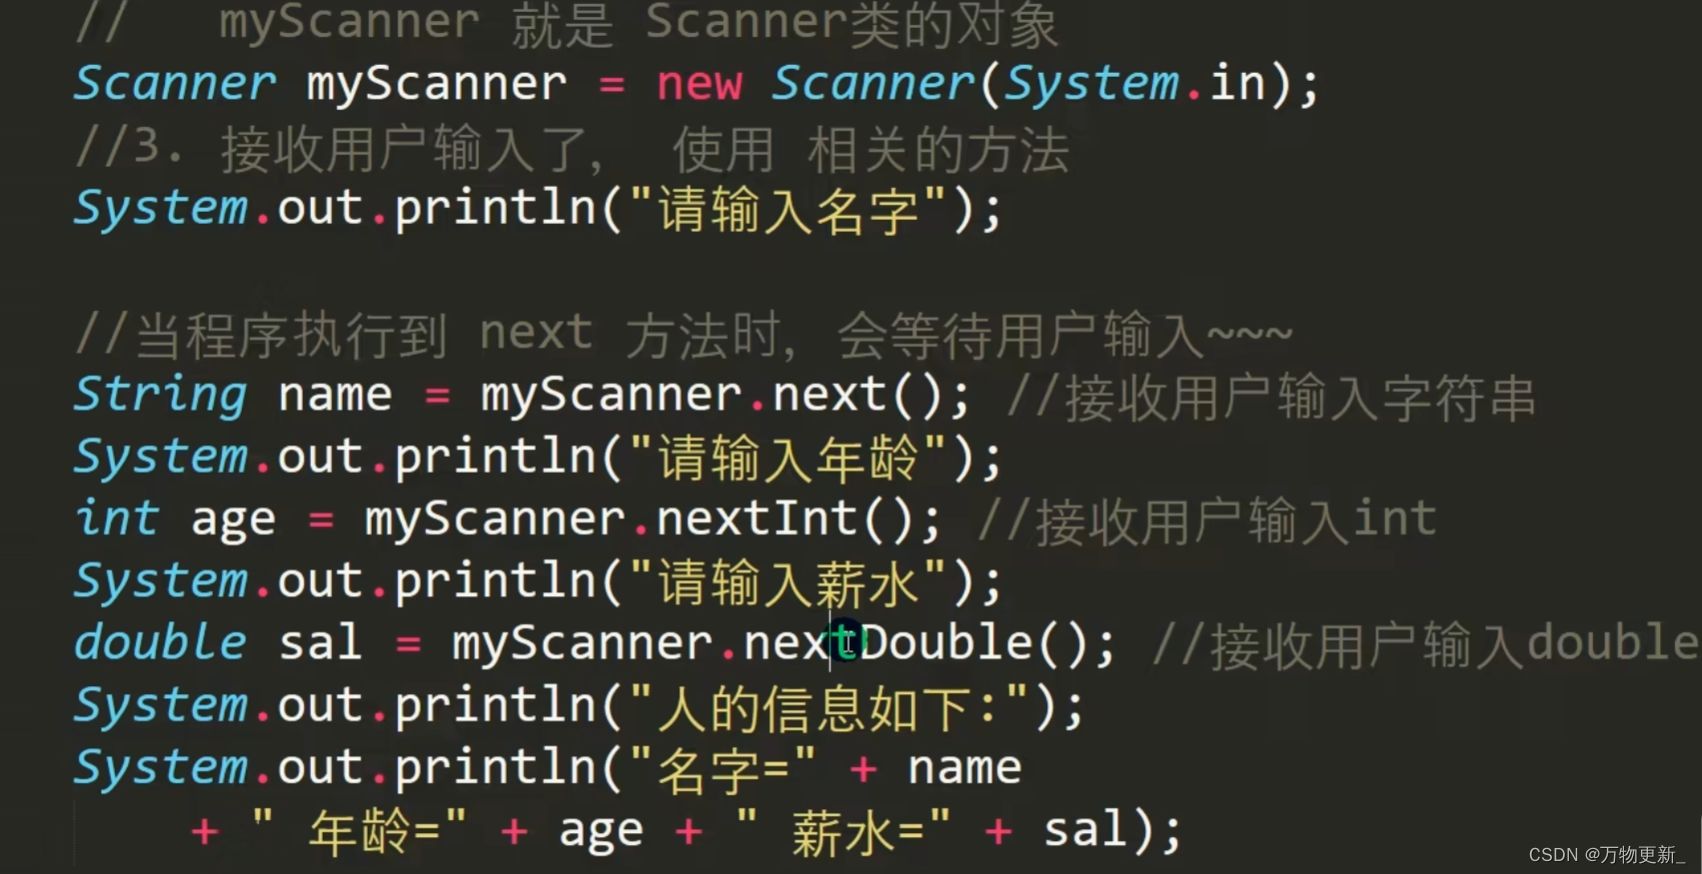
[java基础揉碎]键盘输入语句
介绍 在编程中,需要接收用户输入的数据,就可以使用键盘输入语句来获取。 需要一个扫描器(对象),就是Scanner 用到的scanner代码例子...

【Ansible 入门实战】三种变量详解
Ansible 同名变量优先级实战详解这篇教程基于你当前的 Ansible 环境,通过 三种同名变量(主机变量 / 外部变量 / Play 变量) 的对比实验,完整展示变量优先级的验证过程。一、实验目标在同一个 Ansible Playbook 中,定义…...

钉钉里藏了个 AI 员工?OpenClaw 接入玩法深度拆解
前言 本文将指导您如何将OpenClaw工具与钉钉企业内部机器人进行无缝对接,实现业务信息和任务的自动化同步,有效提升团队协作效率。我们提供了完整的接入流程指南,包含详细的操作步骤、常见问题解决方案以及实用优化技巧,帮助开…...
)
告别手动配置!用Matlab+LUA脚本自动化DCA1000雷达数据采集(附1843配置实例)
雷达数据采集自动化:Matlab与LUA脚本的高效协作方案 在毫米波雷达研发领域,数据采集是每个工程师日常工作中不可或缺的环节。传统的手动配置方式不仅耗时耗力,还容易因人为操作失误导致数据质量不稳定。本文将介绍如何通过Matlab与LUA脚本的协…...

vscode过滤文件
const fs require(fs); const { exec } require(child_process);// 在这里输入你的关键词,每行一个 const keywordsStr BV1wmXwBCEsZ BV1MR6wBREhY BV1DuoSYuEpX ; // // 将多行字符串按换行符分割,过滤掉空行 const keywords keywordsStr.trim()…...

大疆L1点云与ContextCapture融合实战:从Sbet轨迹到三维实景模型的完整数据流
1. 大疆L1点云与ContextCapture融合的核心价值 如果你手头有大疆L1激光雷达采集的点云数据,想要在ContextCapture(现在叫iTwin Capture)里生成高精度三维模型,但卡在了轨迹文件转换这一步,那这篇文章就是为你准备的。…...

测试TVS:SP0503BAHTG
简 介: 本文测试了SP0503BAHTG三通道TVS二极管阵列的特性。通过设计测试电路板,测量了该器件对1kHz正弦波的限幅效果,测得反向导通电压约-0.8V,顶部饱和电压6.3V。在1MHz高频测试中观察到快速响应特性,通过矩形波上升沿…...

大模型应用开发指南:从入门到实践,收藏这份从Demo到生产落地的完整攻略
本文分享了AI应用开发中从Demo到生产落地的完整实践,涵盖技术选型、架构设计、核心算法优化及部署经验。通过LangGraph、RAGFlow和Langfuse等工具,解决上下文超限、Prompt管理混乱等问题,最终实现准确率提升25%的工业级AI系统。适合程序员和小…...

ncmdump终极指南:5分钟解锁网易云音乐NCM加密文件
ncmdump终极指南:5分钟解锁网易云音乐NCM加密文件 【免费下载链接】ncmdump 项目地址: https://gitcode.com/gh_mirrors/ncmd/ncmdump 你是否曾在网易云音乐下载了心爱的歌曲,却发现只能在特定客户端播放?当你想在车载音响、智能音箱…...

终极指南:用iTorrent在iOS上实现专业级种子下载的完整方案
终极指南:用iTorrent在iOS上实现专业级种子下载的完整方案 【免费下载链接】iTorrent Torrent client for iOS 16 项目地址: https://gitcode.com/gh_mirrors/it/iTorrent 你是否曾在iPhone上寻找一个真正能用的种子下载器?是否厌倦了那些功能残缺…...

基于RK3588S与鸿蒙系统的SOM核心板:高性能嵌入式AIoT开发实战
1. 项目概述:一颗“全能芯”的鸿蒙新载体最近在嵌入式圈子里,一个消息挺让人兴奋的:触觉智能基于瑞芯微RK3588S这颗“明星”SoC打造的SOM3588S核心板,正式支持鸿蒙系统并上市了。这不仅仅是又多了一块高性能的核心板,它…...