web架构师编辑器内容-拖动元素改变元素的位置和大小的完成
拖动移动元素
改变编辑器的定位系统
我们目前的元素都是按照块级元素直接自上而下的排列在画布中,为了让元素实现精确的定位和调整,我们需要改变这些元素的定位实现。我们需要让这些元素画布区域来进行绝对定位。如果我们有一个元素有这些已经保存的 css 属性,那么它就可以在编辑器,或者是在另外的 H5 端渲染出这样的一个样式。
基本指导思想
交互的最终结果只是修改这些样式而已,比如拖动定位,最终就是在修改 top 和 left 的值而已,那么缩放大小,最终就是在修改 width 和 height 的值而已。
基本分析
1 拖动是在按下鼠标,然后鼠标移动这个过程中发生的。所以首先我们要响应的是鼠标按下按下的时候,也就是 MouseDown 的时候开始运作。
2 在鼠标移动的时候,我们需要将 top,left 的值更新到新的值,这个就是过程的重点。
结合交互图进行分析:可以在线查看,地址为:https://whimsical.com/RTJphPrwzksyotCdA32LQU@VsSo8s35WxESA3XwhpMUni
计算鼠标点下去,元素偏移量:
getBoundingClientRect
Element.getBoundingClientRect() 方法返回一个 DOMRect 对象,其提供了元素的大小及其相对于视口的位置。

<template><div class="edit-wrapper"ref="editWrapper":style="styles"@mousedown="startMove"@click="onItemClick(id)" :class="{ active: active, hidden: hidden }"><slot></slot></div>
</template><script lang="ts">
import { defineComponent, computed, ref } from 'vue'
import { pick } from 'lodash-es'
export default defineComponent({props: {id: {type: String,required: true},active: {type: Boolean,default: false},hidden: {type: Boolean,default: false},props: {type: Object}},emits: ['set-active'],setup(props, context) {const editWrapper = ref<null | HTMLElement>(null)const onItemClick = (id: string) => {context.emit('set-active', id)}const gap = {x: 0,y: 0}const styles = computed(() => pick(props.props, ['position', 'top', 'left', 'width', 'height']))const startMove = (e: MouseEvent) => {const currentElement = editWrapper.valueif (currentElement) {const { left, top } = currentElement.getBoundingClientRect() gap.x = e.clientX - leftgap.y = e.clientY - topconsole.log(gap)}}return {onItemClick,styles,editWrapper,startMove}}
})
</script><style>
.edit-wrapper {padding: 0px;cursor: pointer;border: 1px solid transparent;user-select: none;
}
.edit-wrapper > * {position: static !important;width: 100% !important;height: 100% !important;left: auto !important;top: auto !important;
}
.edit-wrapper:hover {border: 1px dashed #ccc;
}
.edit-wrapper.hidden {display: none;
}
.edit-wrapper.active {border: 1px solid #1890ff;user-select: none;z-index: 1500;
}
</style>
拖动移动实现元素移动:
HTMLElement.offsetTop
HTMLElement.offsetTop 为只读属性,它返回当前元素相对于其 offsetParent 元素的顶部内边距的距离。和getBoundingClientRect有些类似
// EditWrapper.vue
<divclass="edit-wrapper"ref="editWrapper":style="styles":data-component-id="id"@mousedown="startMove"@click="onItemClick(id)":class="{ active: active, hidden: hidden }"
></div>// 在移动的过程中,计算top和left的值
const caculateMovePosition = (e: MouseEvent) => {// 拿到画布最外层的dom元素(offsetLeft也可以使用Element.getBoundingClientRect())// 由于 canvas-area 元素的定位是fixed,所以其offsetParent为null,返回的值和 Element.getBoundingClientRect()是一样的const container = document.getElementById('canvas-area') as HTMLElementconst left = e.clientX - gap.x - container.offsetLeft;const top = e.clientY - gap.y - container.offsetTopconsole.log(container.offsetParent);console.log(container.offsetLeft, container.getBoundingClientRect().left);return {left,top,};
};
const startMove = (e: MouseEvent) => {const currentElement = editWrapper.value;if (currentElement) {const { left, top } = currentElement.getBoundingClientRect();gap.x = e.clientX - left;gap.y = e.clientY - top;console.log(gap);}const handleMove = (e: MouseEvent) => {const { left, top } = caculateMovePosition(e);console.log(left, top);if (currentElement) {currentElement.style.top = top + 'px'currentElement.style.left = left + 'px'}};// 鼠标松开的时候,做一些清除的工作const handleMouseUp = () => {document.removeEventListener('mousemove', handleMove)} document.addEventListener('mousemove', handleMove);document.addEventListener('mouseup', handleMouseUp);
};
这里还是有个问题:松开鼠标的时候,位置恢复到了原来的位置。
原因是我们的数据流是自上而下的,这个坐标值是从上面的属性中props中传递下来的,我们现在是直接在样式中进行修改的,所以当松开鼠标的时候,原来的属性并没有进行修改,就会回到原来的位置。现在需要在松开鼠标的时候,发射一个事件,触发对应的mutation,更新鼠标的坐标值。
拖动移动更新元素属性:
<template><divclass="edit-wrapper"ref="editWrapper":style="styles"@mousedown="startMove"@click="onItemClick(id)":class="{ active: active, hidden: hidden }"><slot></slot></div>
</template><script lang="ts">
// EditWrapper.vue
import { defineComponent, computed, ref } from 'vue';
import { pick } from 'lodash-es';
export default defineComponent({props: {id: {type: String,required: true,},active: {type: Boolean,default: false,},hidden: {type: Boolean,default: false,},props: {type: Object,},},emits: ['set-active', 'update-position'],setup(props, context) {const editWrapper = ref<null | HTMLElement>(null);const onItemClick = (id: string) => {context.emit('set-active', id);};const gap = {x: 0,y: 0,};const styles = computed(() =>pick(props.props, ['position', 'top', 'left', 'width', 'height']));const caculateMovePosition = (e: MouseEvent) => {const container = document.getElementById('canvas-area') as HTMLElement;const left = e.clientX - gap.x - container.offsetLeft;const top = e.clientY - gap.y - container.offsetTop;return {left,top,};};// 这里添加这个标识,主要是为了让鼠标只有在移动完成之后才能进行更新,直接在元素上面进行点击,触发一套mouseup,mousedown动作,是不需要更新的。let isMoving = false;// @mousedown="startMove"const startMove = (e: MouseEvent) => {const currentElement = editWrapper.value;if (currentElement) {const { left, top } = currentElement.getBoundingClientRect();gap.x = e.clientX - left;gap.y = e.clientY - top;console.log(gap);}const handleMove = (e: MouseEvent) => {const { left, top } = caculateMovePosition(e);isMoving = true;console.log(left, top);if (currentElement) {currentElement.style.top = top + 'px';currentElement.style.left = left + 'px';}};const handleMouseUp = (e: MouseEvent) => {document.removeEventListener('mousemove', handleMove);if (isMoving) {const { left, top } = caculateMovePosition(e);context.emit('update-position', { left, top, id: props.id });isMoving = false;}// 做清理工作nextTick(() => {document.removeEventListener('mouseup', handleMouseUp);
});};document.addEventListener('mousemove', handleMove);document.addEventListener('mouseup', handleMouseUp);};return {onItemClick,styles,editWrapper,startMove,};},
});
</script><style>
.edit-wrapper {padding: 0px;cursor: pointer;border: 1px solid transparent;user-select: none;
}
.edit-wrapper > * {position: static !important;width: 100% !important;height: 100% !important;left: auto !important;top: auto !important;
}
.edit-wrapper:hover {border: 1px dashed #ccc;
}
.edit-wrapper.hidden {display: none;
}
.edit-wrapper.active {border: 1px solid #1890ff;user-select: none;z-index: 1500;
}
</style>
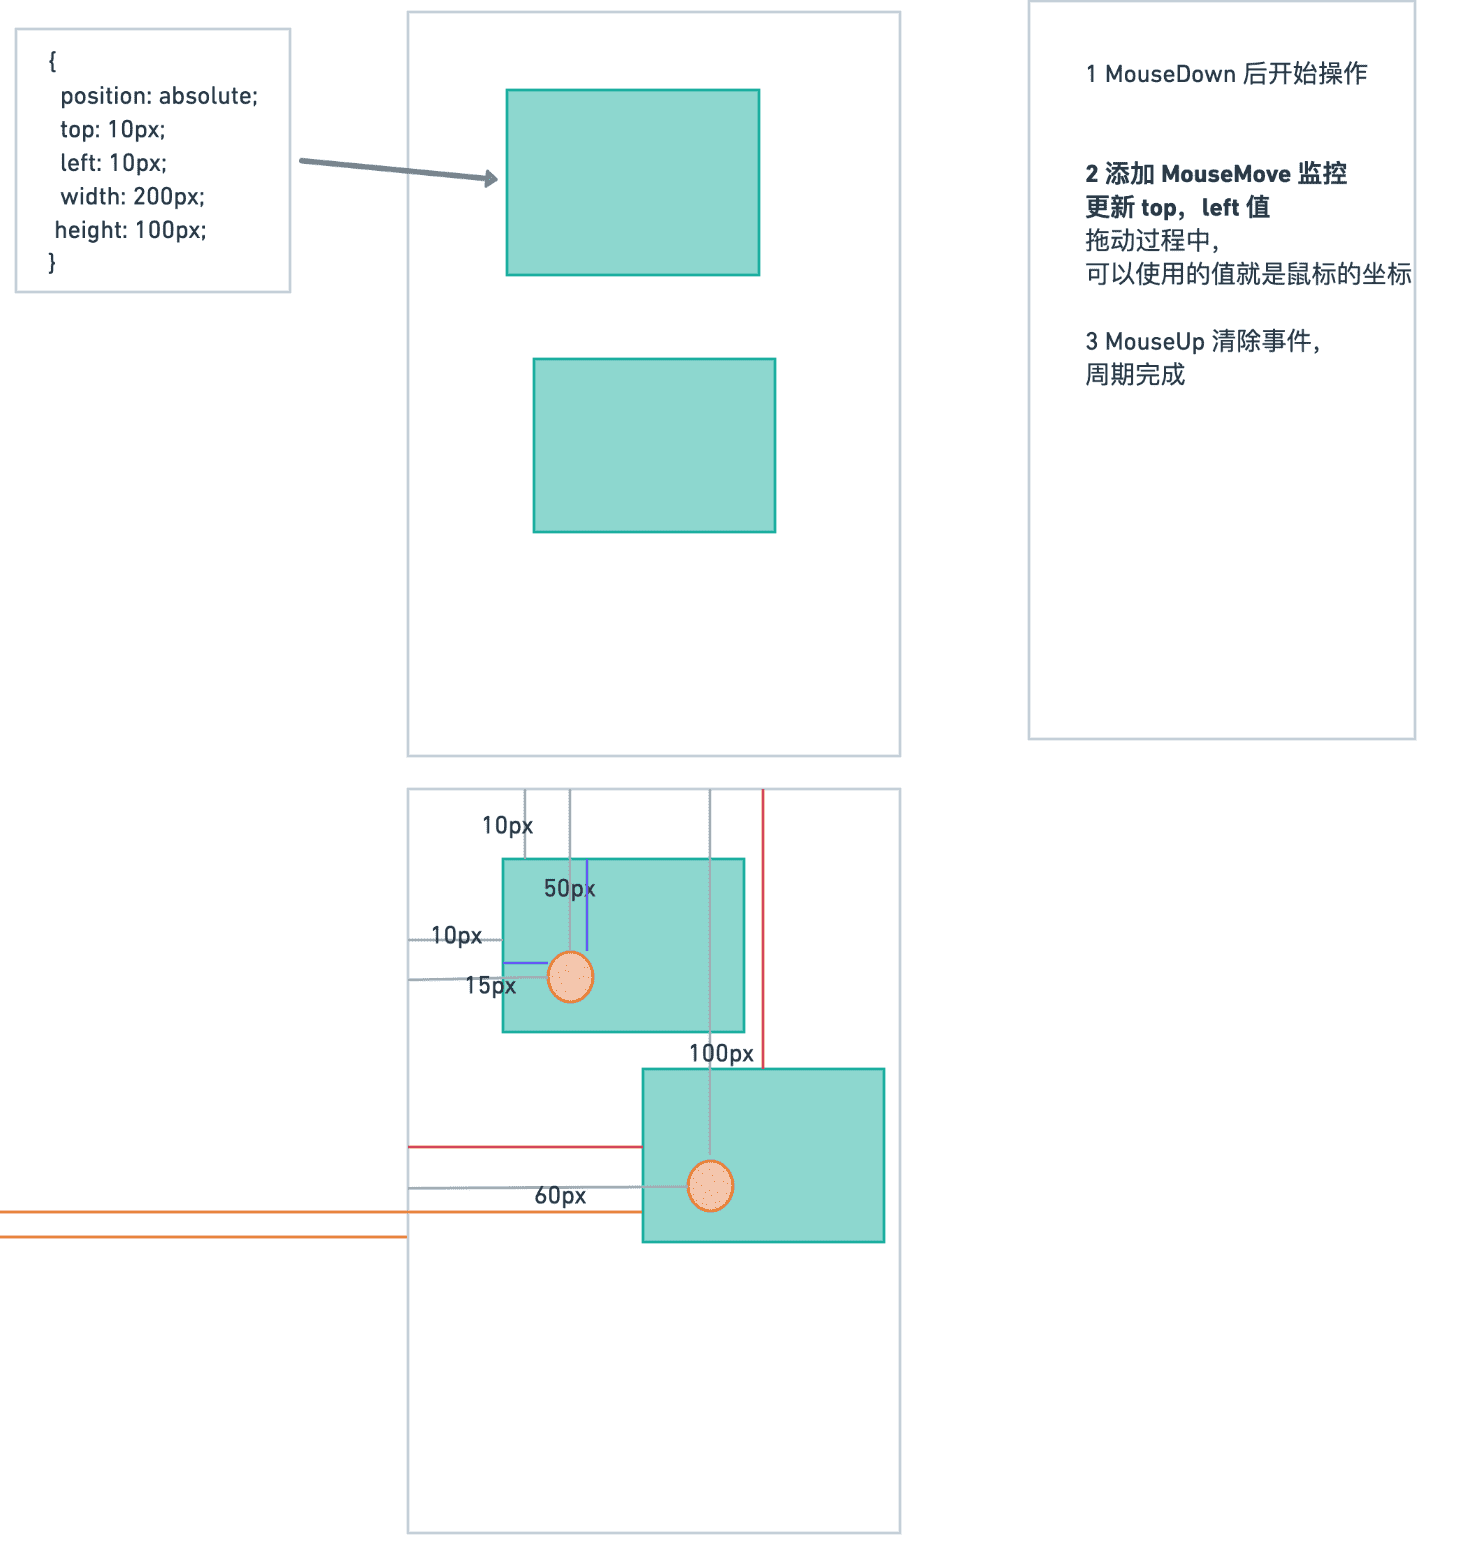
拖动改变大小
根本目的
改变大小最终的目的也是通过一系列的鼠标事件来改变一系列定位的值,上一次我们改变的值只有 top,left,现在还有有 width 和 height。
创建 handler
创建四个点就可以了,分别位于这个图层的四个角上。
创建这四个 handler 应该不是很难,我们只需要创建四个对应的 div,将他们做成圆形,然后让它们使用绝对定位,设置 top,left,right,bottom 值即可,就可以创建出这样的一个样式。
添加事件
我们分别在四个点,添加 mouseDown,mouseMove,然后到 mouseUp 的一系列事件,完成整个过程。
之前在改变定位的过程中,我们只需要在移动的时候改变 top,left 值即可,现在拖动改变大小要比原来复杂一些,还有 width 和 height 值的修改,同时对于四个角度的拖动,有不同的处理。
请看具体的交互图
拖动改变大小代码实现
- 实现右下方拖拽大小
首先对先择块的样式进行处理,添四个点的css 样式
.edit-wrapper .resizers {display: none;
}
.edit-wrapper.active .resizers {display: block;
}
.edit-wrapper.active .resizers .resizer {width: 10px;height: 10px;border-radius: 50%;background: #fff;border: 3px solid #1890ff;position: absolute;
}
.edit-wrapper .resizers .resizer.top-left {left: -5px;top: -5px;cursor: nwse-resize;
}
.edit-wrapper .resizers .resizer.top-right {right: -5px;top: -5px;cursor: nesw-resize;
}
.edit-wrapper .resizers .resizer.bottom-left {left: -5px;bottom: -5px;cursor: nesw-resize;
}
.edit-wrapper .resizers .resizer.bottom-right {right: -5px;bottom: -5px;cursor: nwse-resize;
}

- 接下来添加拖动右下脚圆点改区块大小(最简单方法)
// EditWrapper.vue
// 如果不给 resizer添加stop事件,由于冒泡事件机制,所以会冒泡到最外层editWrapper上面,从而触发 startMove事件
<divclass="edit-wrapper"ref="editWrapper":style="styles":data-component-id="id"@mousedown="startMove"@click="onItemClick(id)":class="{ active: active, hidden: hidden }"
><slot></slot><div class="resizers"><divclass="resizer top-left"@mousedown.stop="startResize('top-left')"></div><divclass="resizer top-right"@mousedown.stop="startResize('top-right')"></div><divclass="resizer bottom-left"@mousedown.stop="startResize('bottom-left')"></div><divclass="resizer bottom-right"@mousedown.stop="startResize('bottom-right')></div></div>
</div>const startResize = () => {const currentElement = editWrapper.value;const handleMove = (e: MouseEvent) => {if (currentElement) {const { left, top } = currentElement.getBoundingClientRect();currentElement.style.height = e.clientY - top + 'px';currentElement.style.width = e.clientX - left + 'px';}};const handleMouseUp = () => {document.removeEventListener('mousemove', handleMove);};document.addEventListener('mousemove', handleMove);document.addEventListener('mouseup', handleMouseUp);};
我们已实现右下脚拖动改变
现在就是在其他几个方向重用这个方法进行尺寸改变
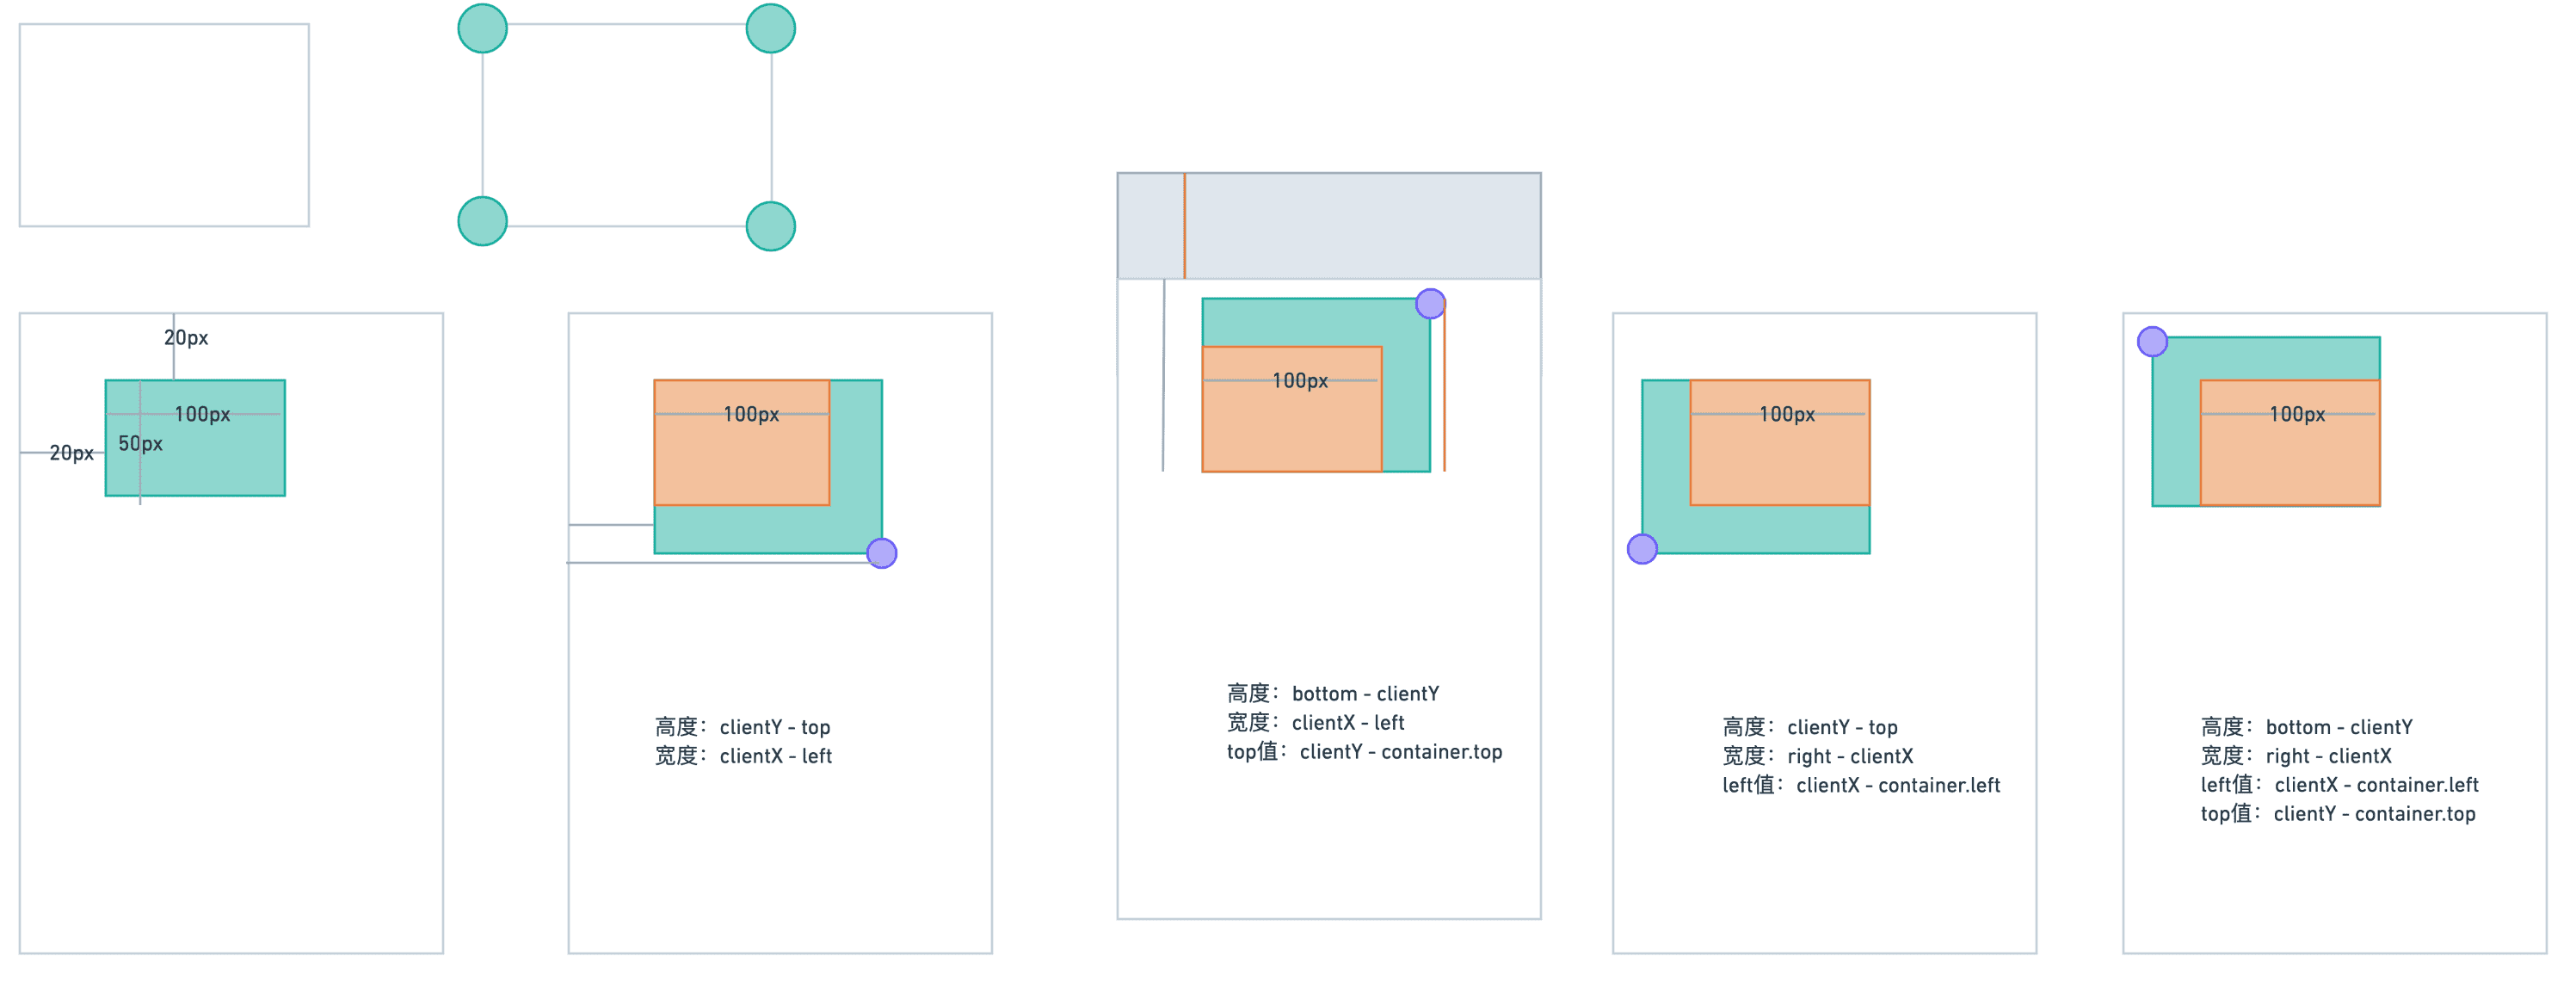
type ResizeDirection = 'top-left' | 'top-right' | 'bottom-left' | 'bottom-right'
interface OriginalPositions {left: number;right: number;top: number;bottom: number;
}const caculateMovePosition = (e: MouseEvent) => {const container = document.getElementById('canvas-area') as HTMLElement;const left = e.clientX - gap.x - container.offsetLeft;const top = e.clientY - gap.y - container.offsetTop;return {left,top,};};const caculateSize = (direction: ResizeDirection,e: MouseEvent,positions: OriginalPositions) => {const { clientX, clientY } = e;const { left, right, top, bottom } = positions;const container = document.getElementById('canvas-area') as HTMLElement;const rightWidth = clientX - left;const leftWidth = right - clientX;const bottomHeight = clientY - top;const topHeight = bottom - clientY;const topOffset = clientY - container.offsetTop;const leftOffset = clientX - container.offsetLeft;switch (direction) {case 'top-left':return {width: leftWidth,height: topHeight,top: topOffset,left: leftOffset,};case 'top-right':return {width: rightWidth,height: topHeight,top: topOffset,};case 'bottom-left':return {width: leftWidth,height: bottomHeight,left: leftOffset,};case 'bottom-right':return {width: rightWidth,height: bottomHeight,};default:break;}};const startResize = (direction: ResizeDirection) => {const currentElement = editWrapper.value as HTMLElement;const { left, right, top, bottom } =currentElement.getBoundingClientRect();const handleMove = (e: MouseEvent) => {const size = caculateSize(direction, e, { left, right, top, bottom });const { style } = currentElement;if (size) {style.width = size.width + 'px';style.height = size.height + 'px';if (size.left) {style.left = size.left + 'px';}if (size.top) {style.top = size.top + 'px';}}};const handleMouseUp = () => {document.removeEventListener('mousemove', handleMove);};document.addEventListener('mousemove', handleMove);document.addEventListener('mouseup', handleMouseUp);};- 数据更新
- 将变化数据发射出去:
const handleMouseUp = (e: MouseEvent) => {document.removeEventListener('mousemove', handleMove);const size = caculateSize(direction, e, { left, right, top, bottom });context.emit('update-position', { ...size, id: props.id})nextTick(() => {document.removeEventListener('mouseup', handleMouseUp)})};
修改Editor.vue中事件监听
const updatePosition = (data: {left: number;top: number;id: string;
}) => {const { id } = data;const updatedData = pickBy<number>(data, (v,k) => k !== 'id')forEach(updatedData, (v, key) => {store.commit('updateComponent', { key, value: v + 'px', id})})
};
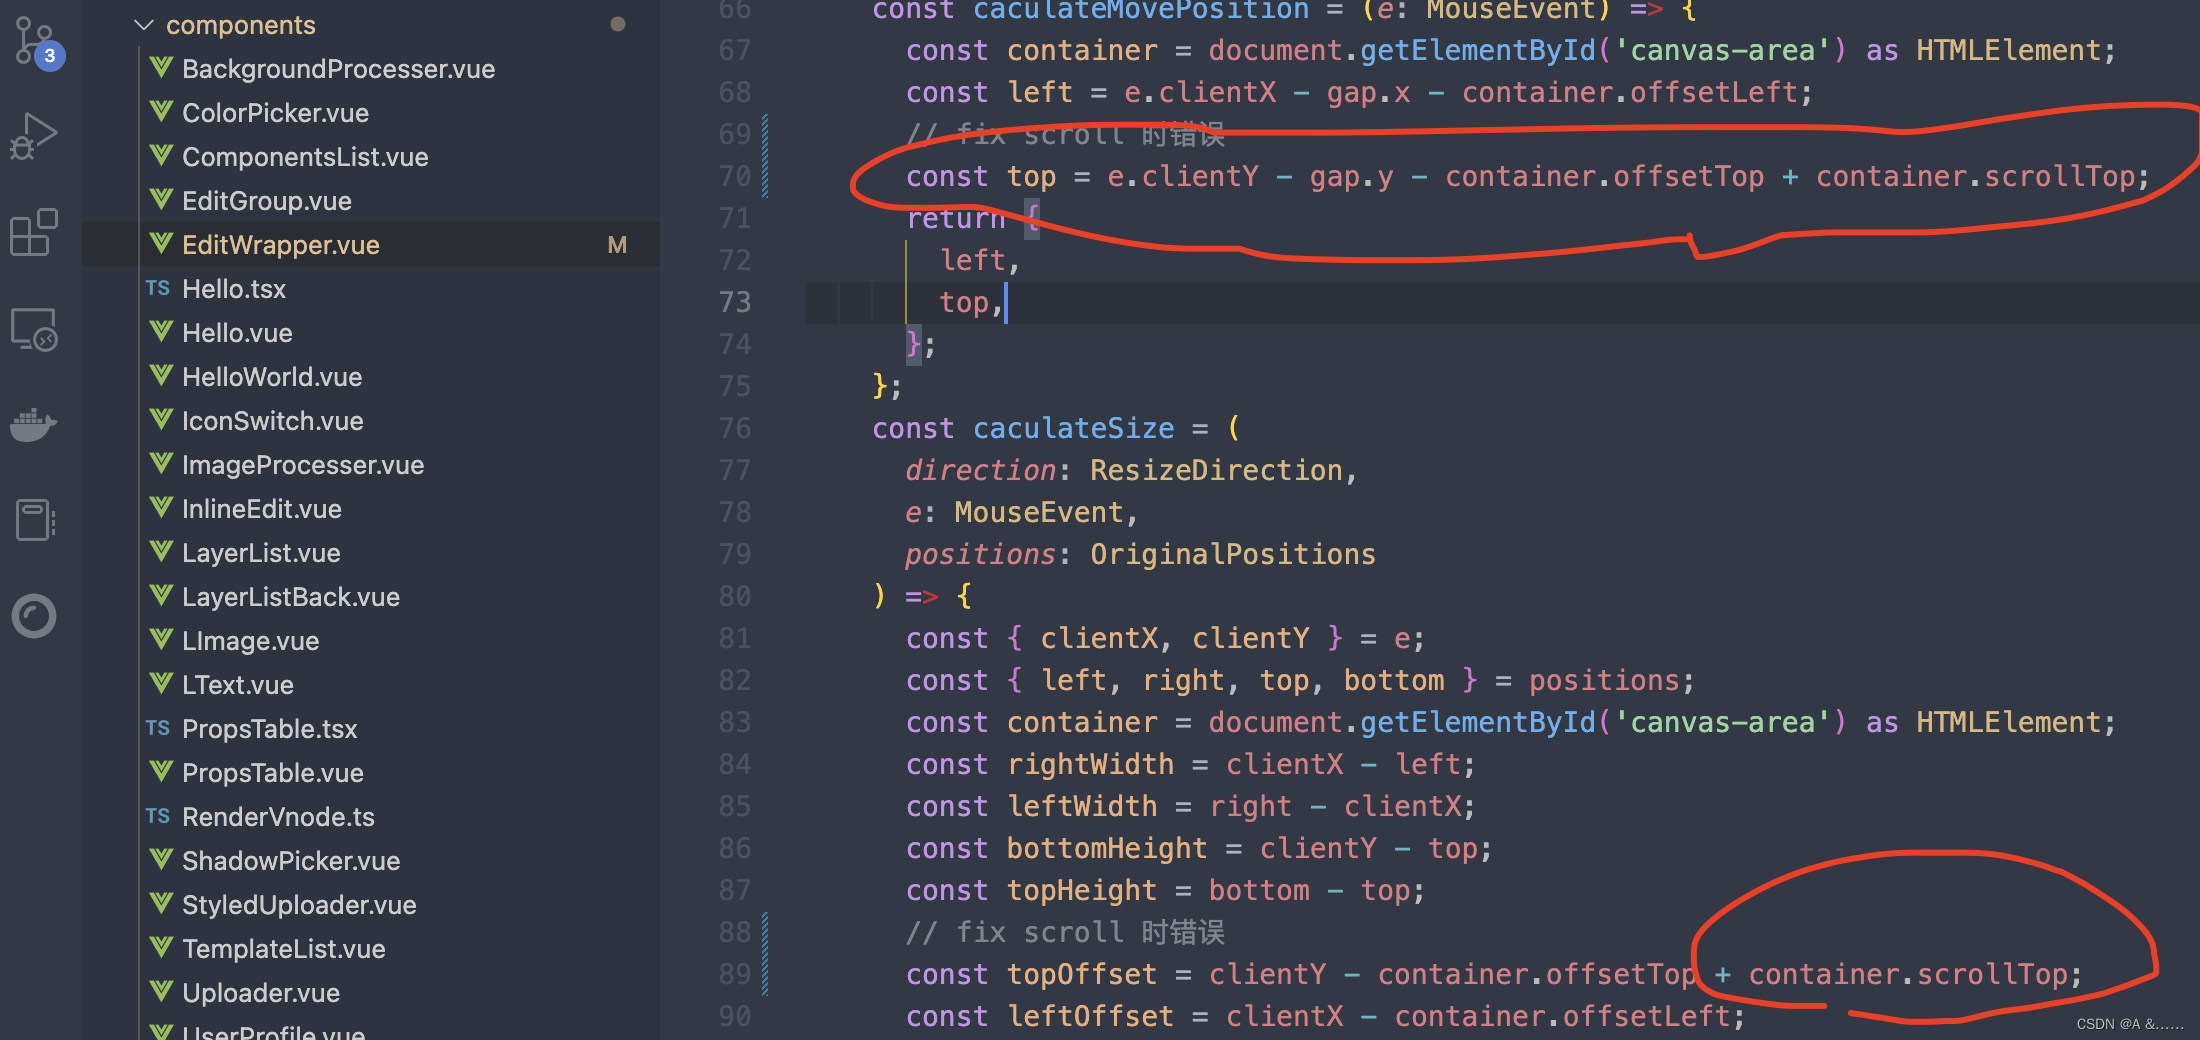
修复有滚动条时的Bug:
在contanier出现滚动条,并且把滚动条滚动到下方,将元素向上拖,元素会出现向上的突然抖动,会造成数据的错误。
最终的效果:
相关文章:
web架构师编辑器内容-拖动元素改变元素的位置和大小的完成
拖动移动元素 改变编辑器的定位系统 我们目前的元素都是按照块级元素直接自上而下的排列在画布中,为了让元素实现精确的定位和调整,我们需要改变这些元素的定位实现。我们需要让这些元素画布区域来进行绝对定位。如果我们有一个元素有这些已经保存的 c…...

基于CNN的水果识别-含数据集训练模型
数据集介绍,下载本资源后,界面如下: 有一个文件夹一个是存放数据集的文件。 数据集介绍: 一共含有:8个类别,包含:Apple, Banana, Cherry, Dragon Fruit, Mango, Orange, Papaya, Pineapple等。 然后本地的train.txt和…...
Hadoop基本概论
目录 一、大数据概论 1.大数据的概念 2.大数据的特点 3.大数据应用场景 二、Hadoop概述 1.Hadoop定义 2.Hadoop发展历史 3.Hadoop发行版本 4.Hadoop优势 5.Hadoop1.x/2.x/3.x 6.HDFS架构 7.Yarn架构 8.MapReduce架构 9.大数据技术生态体系 一、大数据概论 1.大数…...
2023年12月 Scratch 图形化(一级)真题解析#中国电子学会#全国青少年软件编程等级考试
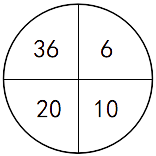
Scratch图形化等级考试(1~4级)全部真题・点这里 一、单选题(共25题,每题2分,共50分) 第1题 观察下列每个圆形中的四个数,找出规律,在括号里填上适当的数?( ) A:9 B:17 C:21 D:5 答案:C 左上角的数=下面两个数的和+右上角的数...
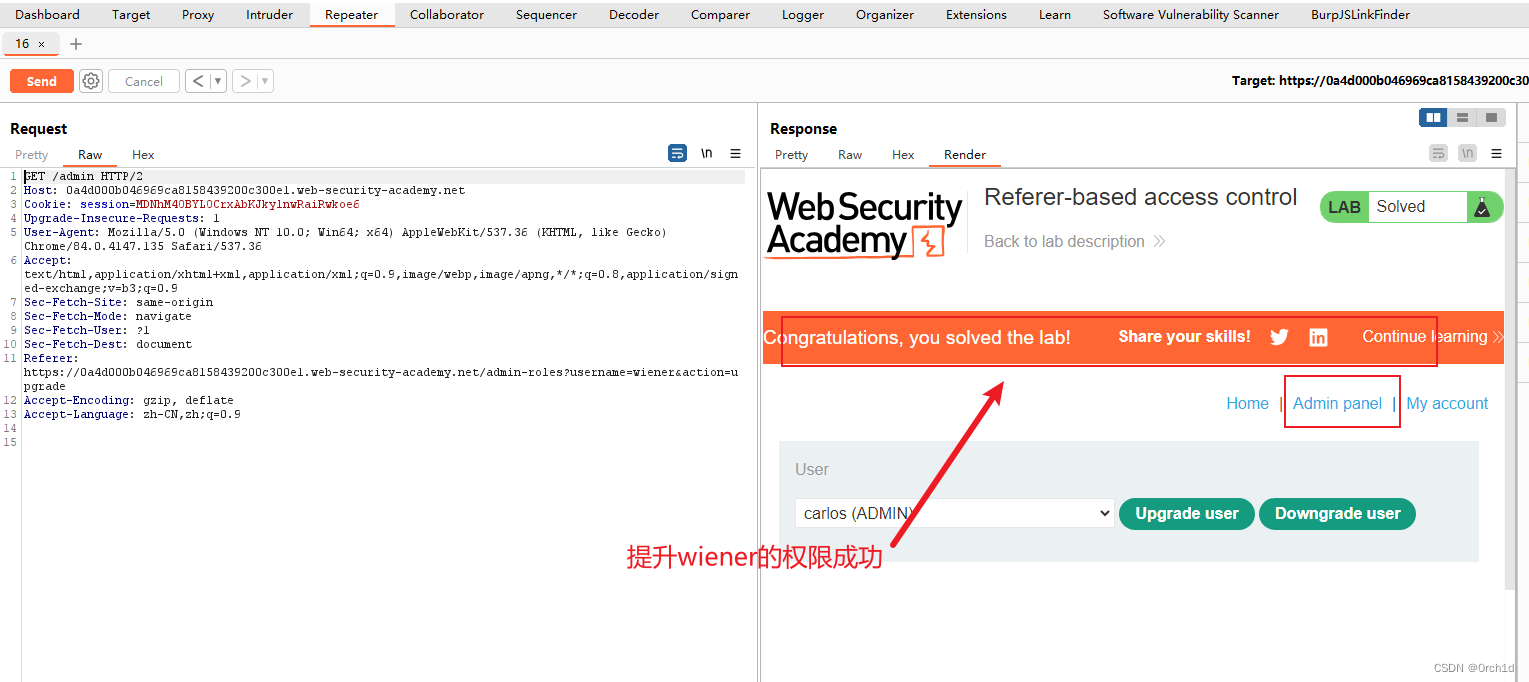
burp靶场--访问控制【越权】
【Burp系列】超全越权漏洞实验总结 https://portswigger.net/web-security/access-control/lab-unprotected-admin-functionality 1. 访问控制【越权】 https://portswigger.net/web-security/access-control#what-is-access-control ### 什么是访问控制: 访问控…...

C#使用DateTime.Now静态属性动态获得系统当前日期和时间
目录 一、实例 1.源码 2.生成效果 二、相关知识点 1.Thread类 (1)Thread.Sleep()方法 (2)Thread(ThreadStart) (3)IsBackground (4)Invoke( ) 2.CreateGrap…...

华为机考入门python3--(0)模拟题2-vowel元音字母翻译
分类:字符串 知识点: 字符串转list,每个字符成为list中的一个元素 list(string) 字符串变大小写 str.upper(), str.lower() 题目来自【华为招聘模拟考试】 # If you need to import additional packages or classes, please import …...

【轮式平衡机器人】——角度/速度/方向控制分析软件控制框架
轮式平衡机器人具有自不稳定性,可类比一级倒立摆系统的控制方法,常见有反馈线性化方法、非线性PID控制、自适应控制、自抗扰控制,还有改进的传统缺乏对外界干扰和参数改变鲁棒性的滑模变结构控制。我们采用较为简单的双闭环PID控制实现平衡模…...
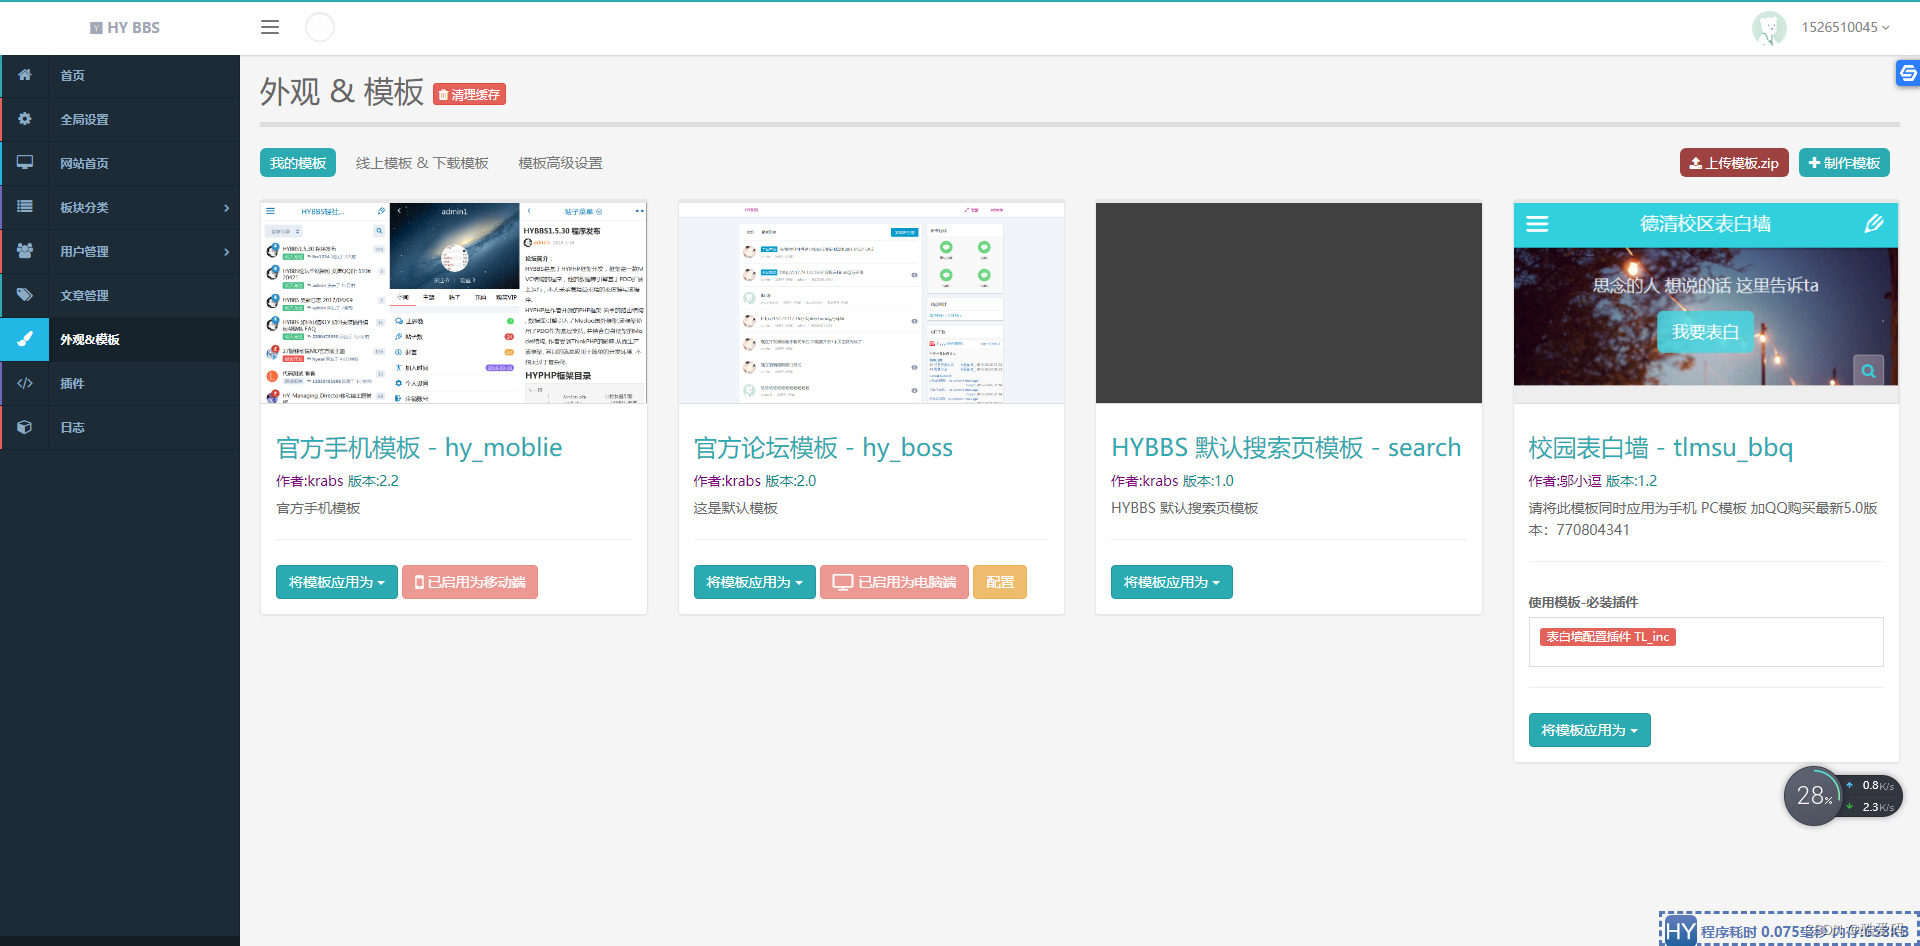
HYBBS 表白墙网站PHP程序源码 可封装成APP
源码介绍 PHP表白墙网站源码,可以做校园内的,也可以做校区间的,可封装成APP。告别QQ空间的表白墙吧。 安装PHP5.6以上随意 上传程序安装,然后设置账号密码,登陆后台切换模板手机PC都要换开启插件访问前台。 安装完…...
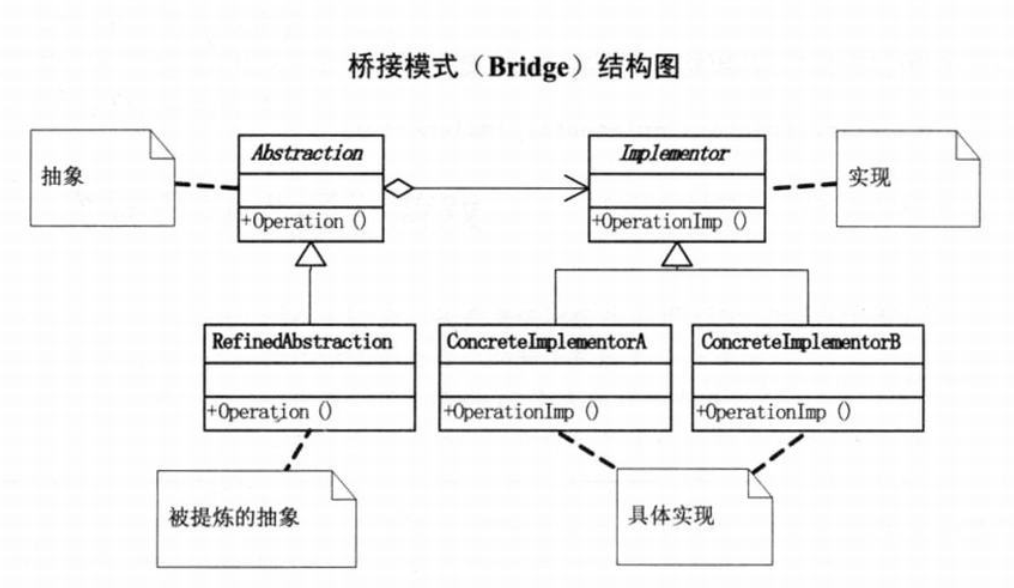
【设计模式】适配器和桥接器模式有什么区别?
今天我探讨一下适配器模式和桥接模式,这两种模式往往容易被混淆,我们希望通过比较他们的区别和联系,能够让大家有更清晰的认识。 适配器模式:连接不兼容接口 当你有一个类的接口不兼容你的系统,而你又不希望修改这个…...

C语言应用层程序热补丁
一、热补丁简介 一个正在运行的程序,要是有某函数或某流程有问题,需要修改,有两个方式: 1.通过设置LD_PRELOAD把需要的库重新定向,但这种方式需要重启正在运行的程序。 2.通过修改可执行文件某个函数指向的地址&…...
【代码随想录+力扣hot100】双指针
文章目录 27. 移除元素思路:代码: 26. 删除有序数组中的重复项代码:思路一:重复元素必相邻思路二:从第一个位置开始考虑快慢指针 977.有序数组的平方思路:代码: 283. 移动零代码:思路…...
【Java程序员面试专栏 专业技能篇】MySQL核心面试指引(三):性能优化策略
关于MySQL部分的核心知识进行一网打尽,包括三部分:基础知识考察、核心机制策略、性能优化策略,通过一篇文章串联面试重点,并且帮助加强日常基础知识的理解,全局思维导图如下所示 本篇Blog为第三部分:性能优化策略,子节点表示追问或同级提问 读写分离 分布式数据库的…...
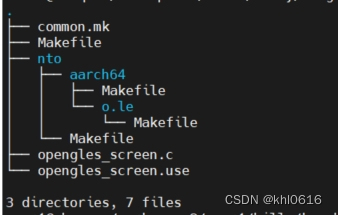
qnx 上screen + egl + opengles 最简实例
文章目录 前言一、qnx 上的窗口系统——screen二、screen + egl + opengles 最简实例1.使用 addvariant 命令创建工程目录2. 添加源码文件3. common.mk 文件4. 编译与执行总结参考资料前言 本文主要介绍如何在QNX 系统上使用egl和opengles 控制GPU渲染一个三角形并显示到屏幕上…...

python基础学习-02
基本的程序设计模式 任何的程序设计都包含IPO,它们分别代表如下: I:Input 输入,程序的输入 P:Process 处理,程序的主要逻辑过程 O:Output 输出,程序的输出 因此如果想要通过计算…...

服务调用Ribbon,LoadBalance,Feign
服务调用Ribbon、Fegin Ribbon实现负载均衡的原理 1:LoadBalancerAutoConfiguration这个类,这个类主要做的就是把LoadBalancer拦截器封装到RestTemplte拦截器集合里面去。 2:然后在代码里面调用restTemplate.getForObject或者其他方法的时候&…...
一条sql是如何运行的
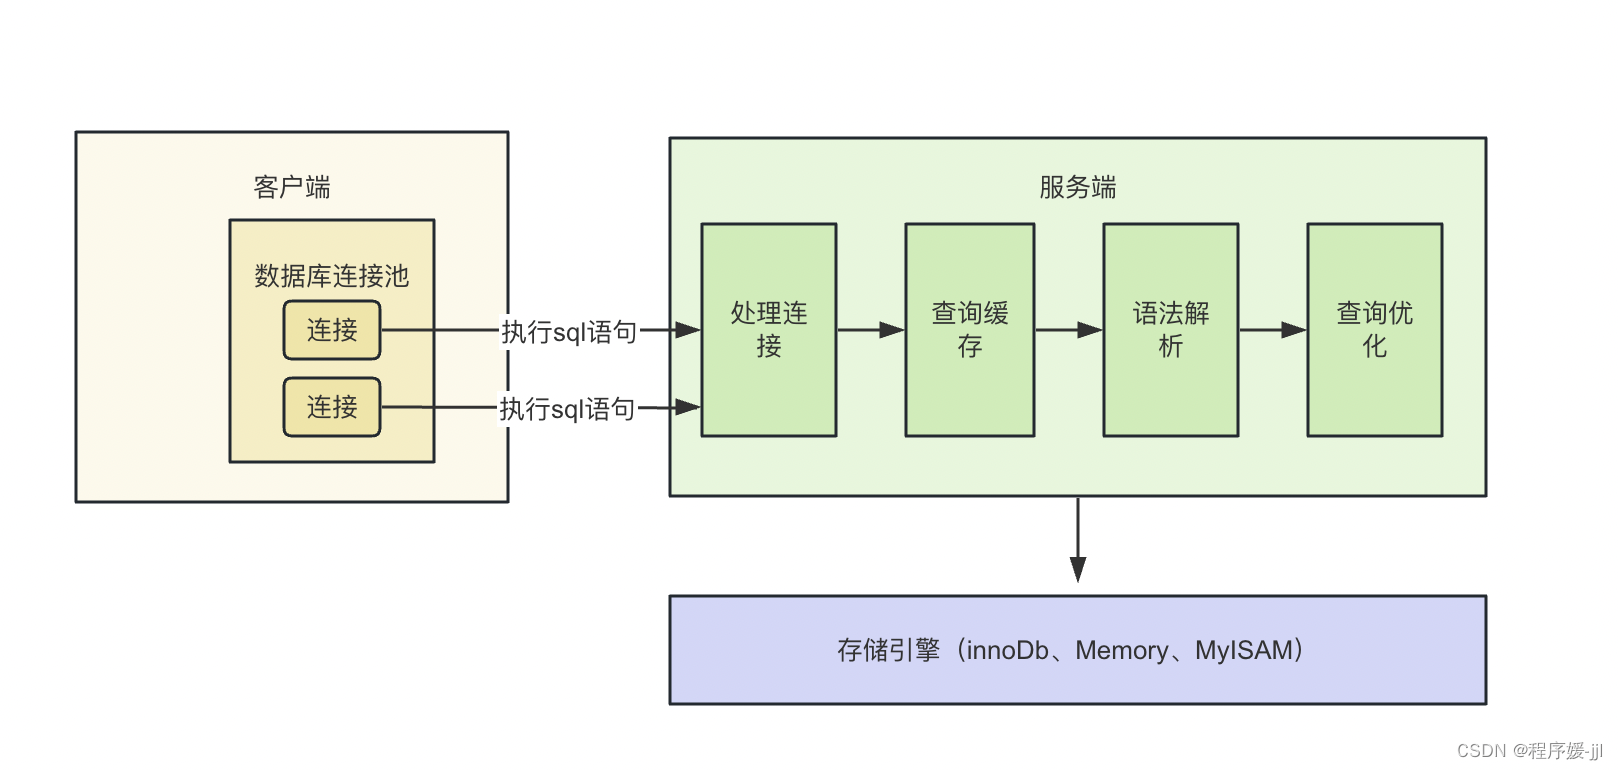
在我们平时使用sql的时候,基本是基于黑盒的使用方式,在客户端输入一条sql语句,然后回显想要的数据,对于mysql server端内部如何运行的以及与存储引擎如何交互的不得而知。 通过下面一幅图,大致描述客户端和服务端交互…...

SystemC学习笔记(三) - 查看模块的波形
简述 波形在Simulation/Emulation中地位十分重要,尤其是在研发初期,只能通过波形来查看软件hang住的位置。 对于TLM来说,查看波形一般是指查看pvbus上的transaction,而对于SystemC本身来说,查看波形就是使用Gtkwave或…...
复习提纲5)
计算机网络(第六版)复习提纲5
SS2.2 有关信道的几个基本概念 2.通信模型 三个主要部分:信源、信道、信宿 3.通信方式: a)术语:消息(传递的内容)、数据(传递的形式)、信号(数据表现形式,有模拟信号和数字信号两种&…...
JavaScript 学习笔记(WEB APIs Day3)
「写在前面」 本文为 b 站黑马程序员 pink 老师 JavaScript 教程的学习笔记。本着自己学习、分享他人的态度,分享学习笔记,希望能对大家有所帮助。推荐先按顺序阅读往期内容: 1. JavaScript 学习笔记(Day1) 2. JavaSc…...

SystemC随机验证环境构建:从约束生成到覆盖率驱动的自动化测试
1. 项目概述:从确定性仿真到随机验证的跨越在芯片设计和验证领域,SystemC 早已不是陌生的名字。它作为 C 的类库扩展,为系统级建模和硬件/软件协同验证提供了强大的框架。然而,很多刚接触 SystemC 验证的朋友,往往止步…...
)
别再硬编码了!用Unity动画事件实现音效与攻击判定的动态解耦(附完整C#脚本)
告别硬编码:Unity动画事件驱动的模块化开发实战 在游戏开发中,动画系统与游戏逻辑的耦合常常成为后期维护的噩梦。想象一下这样的场景:每次调整动画帧数都需要同步修改代码中的硬编码数值,或者音效资源路径被直接写在脚本里导致资…...

Claude Code + OpenCode + OpenSpec 规范驱动开发实战:AI 驱动智能客服管理系统开发
当 AI 编程从“凭感觉聊天”升级为“按规范执行的流水线” 一、引言:AI 编程的“效率悖论” 2024 年 Google DORA 报告揭示了一个令人困惑的数据:AI 编码助手采用率每提升 25%,软件交付稳定性反而下降 7.2%。主观上开发者觉得用 AI 写代码速…...

Knot高级技巧:局域网设备抓包和跨设备数据同步
Knot高级技巧:局域网设备抓包和跨设备数据同步 【免费下载链接】Knot 一款iOS端基于MITM(中间人攻击技术)实现的HTTPS抓包工具,完整的App,核心代码使用SwiftNIO实现 项目地址: https://gitcode.com/gh_mirrors/kn/Knot Knot是一款iOS端…...

STR71X中断服务程序定位与Keil MDK配置详解
1. STR71X中断服务程序定位问题解析在基于ARM7架构的STR71X系列微控制器开发过程中,中断服务程序(ISR)的定位是一个关键但容易被忽视的技术细节。STR71X采用增强型中断控制器(EIC),其硬件设计要求所有中断服务例程必须位于同一个64KB内存段内。这个限制源…...

2026年终极指南:JetBrains IDE试用期重置完整解决方案
2026年终极指南:JetBrains IDE试用期重置完整解决方案 【免费下载链接】ide-eval-resetter 项目地址: https://gitcode.com/gh_mirrors/id/ide-eval-resetter JetBrains IDE试用期重置是每个开发者都可能遇到的挑战,当IntelliJ IDEA、PyCharm、W…...

FRED应用:背散射教程
这个教程描述一个有散射性质的简单plano-plano透镜,这样一条入射光就会散射回发射方向。教程首先,在FRED中创建一个新的系统,在树视图中的Geometry上右击,选择“Create New Lens…”并在出现的对话框上点OK按钮,在全局…...

从RTL Viewer到仿真波形:用Quartus II给你的Verilog代码做一次‘可视化体检’
从RTL Viewer到仿真波形:用Quartus II给你的Verilog代码做一次‘可视化体检’ 在数字电路设计的浩瀚宇宙中,Verilog代码就像工程师手中的魔法咒语,但如何确认这些咒语真正转化成了预期的电路结构?Quartus II提供的RTL Viewer与仿真…...
)
手把手教你给M301H-BYT盒子刷当贝纯净桌面(附Hi3798芯片短接点位图)
从零开始:M301H-BYT盒子刷机实战指南 家里的老旧电视盒子用久了总是卡顿、存储不足,还限制应用安装?今天我们就来彻底解决这个问题。本文将手把手教你如何为M301H-BYT盒子刷入当贝纯净桌面系统,让你的老设备重获新生。不同于简单的…...

基于姿态识别的互动健身系统:用烟花激励锻炼
1. 项目概述:当健身遇上烟花秀这个项目最让我兴奋的点在于:它把枯燥的健身动作变成了创造烟花的魔法。想象一下,当你做一个标准的深蹲,屏幕上会绽放出金色烟花;手臂举到完美角度时,紫色烟火会螺旋上升——这…...