Django从入门到放弃
Django从入门到放弃
Django最初被设计用于具有快速开发需求的新闻类站点,目的是实现简单快捷的网站开发。
安装Django
- 使用anaconda创建环境
conda create -n django_env python=3.10
conda activate django_env
- 使用pip安装django
python -m pip install Django
- 查看安装的django版本
python
>>> import django
>>> print(django.get_version())
5.0.1
编写你的第一个Django应用
创建一个基本的投票应用程序,由两部分组成:一个让人们查看和投票的公共站点,一个让你能添加、修改和删除投票的管理站点。
- 创建项目
# 在当前目录下创建一个mysite目录
django-admin startproject mysite
- 切换到mysite目录,启动django开发服务器,这个服务器不要用于生产
# 默认8000端口,会自动重新加载的服务器runserver
python manage.py runserver
# 更换端口
python manage.py runserver 8080
- 创建投票应用
在 Django 中,每一个应用都是一个 Python 包,并且遵循着相同的约定。Django 自带一个工具,可以帮你生成应用的基础目录结构,这样你就能专心写代码,而不是创建目录了。
应用是一个专门做某件事的网络应用程序——比如博客系统,或者公共记录的数据库,或者小型的投票程序。项目则是一个网站使用的配置和应用的集合。项目可以包含很多个应用。应用可以被很多个项目使用。
python manage.py startapp polls
- 编写第一个视图
(1)打开polls/views.py,添加以下代码。
from django.shortcuts import render
from django.http import HttpResponsedef index(request):return HttpResponse("Hello, world. You're at the polls index.")
(2)在polls目录中创建一个URL配置,创建urls.py,添加以下代码。
from django.urls import path
from . import viewsurlpatterns = [path("", views.index, name="index"),
]
(3)在根URLconf文件中指定创建的polls.urls模块,在mysite/urls.py文件中添加以下代码。
from django.contrib import admin
from django.urls import path, includeurlpatterns = [# include允许引用其他URLConfspath("polls/", include("polls.urls")),path('admin/', admin.site.urls),
]
(4)函数path有四个参数,两个必传参数route和view,两个可选参数kwargs和name。
- route:route是一个匹配URL的准则,类似正则表达式。当Django响应一个请求时,它会从urlpatterns的第一项开始按顺序依次匹配列表中的项,直到找到匹配的项。这些准则不会匹配GET和POST参数或域名。
- view:当Django找到了一个匹配的准则,就会调用这个特定的视图函数,并传入HttpRequest对象作为第一个参数,被捕获的参数以关键词参数的形式传入。
- kwarg:任意个关键词参数可以作为一个字典传递给目标视图函数。
- name:为你的URL取名能使你在Django的任意地方唯一地引用它。
- 数据库配置
(1)打开mysite/setting.py,该配置包含了Django项目设置的Python模块。
- 通常配置文件使用
SQLite作为默认数据库。
DATABASES = {'default': {# ENGINE的可选值:'django.db.backends.sqlite3','django.db.backends.postgresql',# 'django.db.backends.mysql',或 'django.db.backends.oracle''ENGINE': 'django.db.backends.sqlite3',# NAME是数据库名称,如果使用SQLite,就是文件的完整的绝对路径# 如果不适用SQLite,需要添加USER、PASSWORD、HOST等'NAME': BASE_DIR / 'db.sqlite3',}
}
- 如果使用SQLite以外的数据库,确认在使用前已经创建了数据库。
(2)设置TIME_ZONE为自己的时区。
LANGUAGE_CODE = 'zh-hans'
TIME_ZONE = 'Asia/Shanghai'
(3)设置应用,默认开启的应用需要至少一个数据表,使用前需要创建一些表
# 这个 migrate 命令查看 INSTALLED_APPS 配置,并根据 mysite/settings.py 文件中的数据库配置和随应用提供的数据库迁移文件,创建任何必要的数据库表。你会看到它应用的每一个迁移都有一个消息。
python manage.py migrate
INSTALLED_APPS = [# 默认包含了以下自带应用    # 管理员站点'django.contrib.admin',# 认证授权系统'django.contrib.auth',# 内容类型框架'django.contrib.contenttypes',# 会话框架'django.contrib.sessions',# 消息框架'django.contrib.messages',# 管理静态文件的框架'django.contrib.staticfiles',    # 添加应用配置'polls.apps.PollsConfig',
]
- 模型
(1)一个模型就是单个定义你的数据的信息源。模型中包含了不可缺少的数据区域和你存储数据的行为。
(2)创建两个模型
-
问题Question:包括问题描述和发布时间;
-
选项Choice:包括选项描述和当前得票数。
-
打开
polls/models.py文件,添加以下内容。
import datetime
from django.db import models
from django.utils import timezone# 每个模型都是django.db.models.Model类的子类
class Question(models.Model):# 模型的变量表示一个数据库字段,每个字段都是Field类的实例# question_text也是字段名question_text = models.CharField(max_length=200)pub_date = models.DateTimeField("date published")def __str__(self):return self.question_textdef was_published_recently(self):return self.pub_date >= timezone.now() - datetime.timedelta(days=1)class Choice(models.Model):question = models.ForeignKey(Question, on_delete=models.CASCADE)choice_text = models.CharField(max_length=200)votes = models.IntegerField(default=0)def __str__(self):return self.choice_text
(3)激活模型
首先把polls应用安装到我们的项目里。在INSTALLED_APPS中添加配置。因为PollConfig类写在文件polls/apps.py中,所以它的路径是’polls.apps.PollsConfig’。
# 通过运行 makemigrations 命令,Django 会检测你对模型文件的修改,并且把修改的部分储存为一次迁移。
# migrate是自动执行数据库迁移并同步管理你的数据库结构的命令。
python manage.py makemigrations polls
# 查看迁移命令会执行哪些SQL语句
# 主键id会被自动创建,也可以自定义;数据库表名由应用名polls和模型名如question连接而来;
# 默认Django会在外键字段名后追加字符串"_id"
python manage.py sqlmigrate polls 0001
# 检查项目中的问题
python manage.py check
# 再次运行migrate在数据库里创建新定义的模型的数据表
python manage.py migrate
- 初始API
(1)进入交互式Python命令行
# 我们使用这个命令而不是简单的使用“python”是因为 manage.py 会设置 DJANGO_SETTINGS_MODULE 环境变量,这个变量会让 Django 根据 mysite/settings.py 文件来设置 Python 包的导入路径。
python manage.py shell
# 进入shell后就可以探索数据库API
>>> from polls.models import Choice, Question
>>> Question.objects.all()
>>> from django.utils import timezone
# 添加记录
>>> q = Question(question_text="What's new?", pub_date=timezone.now())
>>> q.save()
>>> q.id
>>> q.question_text
>>> q.pub_date
# 修改字段值
>>> q.question_text = "What's up?"
>>> q.save()
# 关键词查找
>>> Question.objects.filter(id=1)
>>> Question.objects.filter(question_text__startswith="What")
# 获取今年发布的问题
>>> from django.utils import timezone
>>> current_year = timezone.now().year
>>> Question.objects.get(pub_date__year=current_year)
# 请求不存在的记录会抛出一个异常
>>> Question.objects.get(id=2)
# 查找主键值
>>> Question.objects.get(pk=1)
>>> q = Question.objects.get(pk=1)
>>> q.was_published_recently()
>>> q.choice_set.all()
# 创建三个选项
>>> q.choice_set.create(choice_text="Not much", votes=0)
>>> q.choice_set.create(choice_text="The sky", votes=0)
>>> c = q.choice_set.create(choice_text="Just hacking again", votes=0)
>>> c.question
>>> q.choice_set.count()
# 删除选项
>>> c = q.choice_set.filter(choice_text__startswith="Just hacking")
>>> c.delete()
- Django管理界面
(1)创建一个管理员账号
# 创建一个能登录管理页面的用户,添加用户admin/admin
python manage.py createsuperuser
(2)启动开发服务器
Django的管理界面默认就是启用的,启动开发服务器,访问/admin/目录。
(3)向管理界面中加入投票应用
# 打开polls/admin.py
from django.contrib import admin
from .models import Questionadmin.site.register(Question)
- 视图
Django中的视图是一类具有相同功能和模板的网页的集合。网页和其他内容都是从视图派生而来。每个视图表现为一个Python函数,会根据用户请求的URL来选择使用哪个视图。
(1)投票应用中需要的视图
- 问题索引页——展示最近的几个投票问题。
- 问题详情页——展示某个投票的问题和不带结果的选项列表。
- 问题结果页——展示某个投票的结果。
- 投票处理器——用于响应用户为某个问题的特定选项投票的操作。
(2)URLconf将URL模式映射到视图
(3)编写更多的视图
# 向polls/views.py中添加更多视图
def detail(request, question_id):return HttpResponse("You're looking at question %s." % question_id)def results(request, question_id):response = "You're looking at the results of question %s."return HttpResponse(response % question_id)def vote(request, question_id):return HttpResponse("You're voting on question %s." % question_id)# 把新视图加入到polls/urls.py文件
urlpatterns = [path("", views.index, name="index"),# 使用尖括号获得网址部分后发送给视图函数作为一个关键字参数# question_id部分定义了要使用的名字,用来识别相匹配的模式# int部分是一种转换形式,用来确定应该匹配网址路径的什么模式# 冒号用来分隔转换形式和模式名path("<int:question_id>/", views.detail, name="detail"),path("<int:question_id>/results/", views.results, name="results"),path("<int:question_id>/vote/", views.vote, name="vote"),
]
(4)重构index方法
每个视图必须要要做的只有两个事情:返回一个包含被请求页面内容的HttpResponse对象或者抛出一个异常。
from django.shortcuts import render
from .models import Question# Create your views here.
from django.http import HttpResponse
# 展示数据库里以发布日期排序的最近5个投票问题
def index(request):latest_question_list = Question.objects.order_by("-pub_date")[:5]output = ", ".join([q.question_text for q in latest_question_list])    return HttpResponse(output)def detail(request, question_id):return HttpResponse("You're looking at question %s." % question_id)def results(request, question_id):response = "You're looking at the results of question %s."return HttpResponse(response % question_id)def vote(request, question_id):return HttpResponse("You're voting on question %s." % question_id)
(5)使用Django的模板系统
在polls目录里新建一个templates目录,TEMPLATES配置项描述了如何载入和渲染模板。默认的设置文件设置了DjangoTemplates后端,并将APP_DIRS设置为True。这一选项将会让
DjangoTemplates在每个 INSTALLED_APPS 文件夹中寻找 “templates” 子目录。在你刚刚创建的templates目录里,再创建一个目录polls,然后在其中新建一个文件index.html。换句话说,你的模板文件的路径应该是polls/templates/polls/index.html。因为app_directories模板加载器是通过上述描述的方法运行的,所以 Django 可以引用到polls/index.html这一模板了。
# polls/settings.py
TEMPLATES = [{'BACKEND': 'django.template.backends.django.DjangoTemplates','DIRS': [],'APP_DIRS': True,'OPTIONS': {'context_processors': ['django.template.context_processors.debug','django.template.context_processors.request','django.contrib.auth.context_processors.auth','django.contrib.messages.context_processors.messages',],},},
]
<!-- polls/templates/polls/index.html -->
{% if latest_question_list %}<ul>{% for question in latest_question_list %}<!-- 硬编码连接 --><!-- <li><a href="/polls/{{ question.id }}/">{{ question.question_text }}</a></li> --><!-- 在polls.urls模块的URL定义中寻具有指定名字的条目 --><li><a href="{% url 'detail' question.id %}">{{ question.question_text }}</a></li>{% endfor %}</ul>
{% else %}<p>No polls are available.</p>
{% endif %}
# 更新index视图
from django.template import loader# 载入模板文件并传递一个上下文
def index(request):latest_question_list = Question.objects.order_by("-pub_date")[:5]template = loader.get_template("polls/index.html")context = {"latest_question_list": latest_question_list}return HttpResponse(template.render(context, request))
(6)快捷函数render
render函数载入模板,填充上下文,再返回由它生成的HttpResponse对象。
# 更新index视图,我们不在需要导入loader和HttpResponse
from django.shortcuts import render
from .models import Questiondef index(request):latest_question_list = Question.objects.order_by("-pub_date")[:5]    context = {"latest_question_list": latest_question_list}return render(request, "polls/index.html", context)
(7)抛出404错误
# 更新detail视图
from django.http import Http404
from django.shortcuts import render
from .models import Questiondef detail(request, question_id):try:question = Question.objects.get(pk=question_id)except Question.DoesNotExist:raise Http404("Question does not exist")return render(request, "polls/detail.html", {"question":question})
<!-- polls/templates/polls/detail.html -->
<!-- 模板系统使用点符号访问变量的属性 -->
<h1>{{ question.question_text }}</h1>
<ul>
{% for choice in question.choice_set.all %}<li>{{ choice.choice_text }}</li>
{% endfor %}
</ul>
(8)快捷函数get_object_or_404
from django.shortcuts import render, get_object_or_404
# 更新detail视图
def detail(request, question_id):question = get_object_or_404(Question, pk=question_id)return render(request, "polls/detail.html", {"question":question})
(9)为URL名称添加命名空间
# 在根URLconf中添加命名空间,修改polls/urls.py
from django.urls import path
from . import viewsapp_name = "polls"
urlpatterns = [path("", views.index, name="index"),path("<int:question_id>/", views.detail, name="detail"),path("<int:question_id>/results/", views.results, name="results"),path("<int:question_id>/vote/", views.vote, name="vote"),
]
<!-- polls/templates/polls/index.html -->
<li><a href="{% url 'polls:detail' question.id %}">{{ question.question_text }}</a></li>
- 表单处理
(1)编写一个简单的表单
<!-- 更新polls/detail.html模板 -->
<form action="{% url 'polls:vote' question.id %}" method="post">
<!-- 防止跨站请求伪造 -->
{% csrf_token %}
<fieldset><legend><h1>{{ question.question_text }}</h1></legend>{% if error_message %}<p><strong>{{ error_message }}</strong></p>{% endif %}{% for choice in question.choice_set.all %}<!-- 在每个选项前加上一个单选按钮,value属性对应选项的ID --><!-- 当有人选择一个单选按钮并提交表单,会发送一个POST数据choice=ID --><!-- forloop.counter指示for标签已经循环多少次 --><input type="radio" name="choice" id="choice{{ forloop.counter }}" value="{{ choice.id }}"><label for="choice{{ forloop.counter }}">{{ choice.choice_text }}</label><br>{% endfor %}
</fieldset>
<input type="submit" value="投票">
</form>
(2)更新vote和result视图
# polls/views.py
from django.http import HttpResponse, HttpResponseRedirect
from django.shortcuts import render, get_object_or_404
from django.urls import reverse
from .models import Question, Choice def vote(request, question_id):question = get_object_or_404(Question, pk=question_id)try: # request.POST是一个类字典对象,通过关键字的名字获取提交的字符串数据        selected_choice = question.choice_set.get(pk=request.POST["choice"])except (KeyError, Choice.DoesNotExist):return render(request, "polls/detail.html", {"question":question,"error_message":"You didn't select a choice."})else:selected_choice.votes += 1selected_choice.save()# 增加选项的投票后重定向到结果页# reverse函数避免在视图函数中硬编码URL,需要传递的是要跳转的视图名字和参数return HttpResponseRedirect(reverse("polls:results", args=(question.id,)))   def results(request, question_id):question = get_object_or_404(Question, pk=question_id)return render(request, "polls/results.html", {"question":question})
(3)创建一个结果页面
<!-- polls/results.html -->
<h1>{{ question.question_text }}</h1>
<ul>
{% for choice in question.choice_set.all %}<li>{{ choice.choice_text }} -- {{ choice.votes }} vote{{ choice.votes|pluralize }}</li>
{% endfor %}
</ul>
<a href="{% url 'polls:detail' question.id %}">Vote again?</a>
(4)使用通用视图精简代码
- 转换URLconf;
- 删除一些旧的、不再需要的视图;
- 基于Django的通用视图引入新的视图。
(5)改良URLconf
# polls/urls.py
from django.urls import path
from . import viewsapp_name = "polls"
urlpatterns = [path("", views.IndexView.as_view(), name="index"),path("<int:pk>/", views.DetailView.as_view(), name="detail"),path("<int:pk>/results/", views.ResultsView.as_view(), name="results"),path("<int:question_id>/vote/", views.vote, name="vote"),
]
(6)改良视图
# polls/views.py
from django.http import HttpResponseRedirect
from django.shortcuts import render, get_object_or_404
from django.urls import reverse
from django.views import generic
from .models import Question, Choice class IndexView(generic.ListView):template_name = "polls/index.html"# 替代默认提供的对象context_object_name = "latest_question_list"def get_queryset(self):return Question.objects.order_by("-pub_date")[:5] class DetailView(generic.DetailView):# 每个通用模型都需要知道它要操作的模型# 通过model属性提供这个信息或者定义get_queryset()方法来实现model = Question# 默认情况下,DetailView会使用<app name>/<model name>_detail.html的模板# template_name属性是用来告诉Django使用一个指定的模板名字,而不是自动生成的默认名字template_name = "polls/detail.html"class ResultsView(generic.DetailView):model = Questiontemplate_name = "polls/results.html"def vote(request, question_id):question = get_object_or_404(Question, pk=question_id)try: selected_choice = question.choice_set.get(pk=request.POST["choice"])except (KeyError, Choice.DoesNotExist):return render(request, "polls/detail.html", {"question":question,"error_message":"You didn't select a choice."})else:selected_choice.votes += 1selected_choice.save()return HttpResponseRedirect(reverse("polls:results", args=(question.id,)))
- 自动化测试
测试代码是用来检查你的代码是否能够正常运行的程序。测试在不同的层次中都存在。自动化测试是由某个系统帮你自动完成的。当你创建好了一系列测试,每次修改应用代码后,就可以自动检查出修改后的代码是否还像你曾经预期的那样正常工作。你不需要花费大量时间来进行手动测试。
(1)为什么你需要写测试
- 测试帮你节约你的时间;
- 测试不仅能发现错误,而且能够预防错误;
- 测试使你的代码更有吸引力;
- 测试有利于团队协作。
(2)基础测试策略
一些开发者遵循“测试驱动”的开发原则,他们在写代码之前先写测试。
(3)开始写一个测试
我们的
polls应用现在就有一个小 bug 需要被修复:我们的要求是如果 Question 是在一天之内发布的,Question.was_published_recently()方法将会返回True,然而现在这个方法在Question的pub_date字段比当前时间还晚时也会返回 True。
# 打开shell,查看这个问题
python manage.py shell
>>> import datetime
>>> from django.utils import timezone
>>> from polls.models import Question
>>> future_question = Question(pub_date=timezone.now() + datetime.timedelta(days=30))
>>> future_question.was_published_recently()
True
# 测试需要写在polls/tests.py中,测试系统会自动寻找以test开头的测试函数并执行
import datetime
import datetime
from django.test import TestCase
from django.utils import timezone
from .models import Questionclass QuestionModelTests(TestCase):def test_was_published_recently_with_future_question(self):time = timezone.now() + datetime.timedelta(days=30)future_question = Question(pub_date=time)self.assertIs(future_question.was_published_recently(), False)
# 在终端运行测试,会自动寻找polls应用中的测试代码,找到TestCase的子类创建一个特殊的数据库供测试使用,寻找类中的test开头的方法执行
python manage.py test polls
# 修复这个问题,更新models.py中方法后再次运行测试问题解决
def was_published_recently(self):now = timezone.now()return now - datetime.timedelta(days=1) <= self.pub_date <= now
(4)测试视图
Django提供了一个供测试使用的Client来模拟用户和视图层代码的交互。
# setup_test_environment()安装了一个模板渲染器,使我们能够检查响应上的一些额外属性
>>> from django.test.utils import setup_test_environment
>>> setup_test_environment()
# 导入测试客户端类
>>> from django.test import Client
>>> client = Client()
# 获取'/'的响应
>>> response = client.get("/")
>>> response.status_code
404
>>> from django.urls import reverse
>>> response = client.get(reverse("polls:index"))
>>> response.status_code
200
>>> response.content
>>> response.context['latest_question_list']
from django.utils import timezone
# 更新ListView视图类
class IndexView(generic.ListView):template_name = "polls/index.html"context_object_name = "latest_question_list"def get_queryset(self):return Question.objects.filter(pub_date__lte=timezone.now()).order_by("-pub_date")[:5]
# 更新polls/tests.py
import datetime
from django.test import TestCase
from django.utils import timezone
from .models import Question
from django.urls import reverse# 封装了创建投票的流程,减少了重复代码
def create_question(question_text, days):time = timezone.now() + datetime.timedelta(days=days)return Question.objects.create(question_text=question_text, pub_date=time)class QuestionIndexViewTests(TestCase):def test_no_questions(self):response = self.client.get(reverse("polls:index"))self.assertEqual(response.status_code, 200)self.assertContains(response, "No polls are available.")self.assertQuerySetEqual(response.context["latest_question_list"], [])def test_past_question(self):        question = create_question(question_text="Past question.", days=-30)response = self.client.get(reverse("polls:index"))self.assertQuerySetEqual(response.context["latest_question_list"],[question],)class QuestionModelTests(TestCase):def test_was_published_recently_with_future_question(self):time = timezone.now() + datetime.timedelta(days=30)future_question = Question(pub_date=time)self.assertIs(future_question.was_published_recently(), False)
# 更新DetailView视图,排除还未发布的问题
class DetailView(generic.DetailView):model = Questiontemplate_name = "polls/detail.html"def get_queryset(self):return Question.objects.filter(pub_date__lte=timezone.now())
- 添加样式表和图像
(1)自定义应用的界面和风格
在polls目录下新建static目录,Django将在该目录下查找静态文件。Django 的
STATICFILES_FINDERS设置包含了一系列的查找器,它们知道去哪里找到static文件。AppDirectoriesFinder是默认查找器中的一个,它会在每个INSTALLED_APPS中指定的应用的子文件中寻找名称为static的特定文件夹,就像我们在polls中刚创建的那个一样。管理后台采用相同的目录结构管理它的静态文件。
/* 在polls目录下创建static目录,在创建polls目录,然后添加style.css样式表polls/static/polls/style.css */
li a {color: green;
}
<!-- 在polls/templates/polls/index.html中添加样式表 -->
<!-- static模板标签生成静态文件的绝对路径 -->
{% load static %}
<link rel="stylesheet" href="{% static 'polls/style.css' %}">
(2)添加背景图
在
polls/static/polls/目录中创建images子目录。 在此目录中,添加您想用作背景的任何图像文件。
- Django自动生成的后台
(1)自定义后台表单
通过
admin.site.register(Question)注册Question模型,Django 能够构建一个默认的表单用于展示。通常来说,你期望能自定义表单的外观和工作方式。你可以在注册模型时将这些设置告诉 Django。
# polls/admin.py
from django.contrib import admin
from .models import Questionclass QuestionAdmin(admin.ModelAdmin):fields = ["pub_date", "question_text"]
# 创建一个模型后台类,接着将其作为第二个参数传递给函数
admin.site.register(Question, QuestionAdmin)
# 将表单分为几个字段集
from django.contrib import admin
from .models import Questionclass QuestionAdmin(admin.ModelAdmin):fieldsets = [# fieldsets元组第一个元素是字段集的标题(None, {"fields": ["question_text"]}),("Date information", {"fields": ["pub_date"]}),]admin.site.register(Question, QuestionAdmin)
(2)添加关联的对象
- 向后台注册Choice;
- 在创建投票对象时直接添加好几个选项。
# polls/admin.py
from django.contrib import admin
from .models import Question, Choice# 使用admin.TabularInline可以使关联对象以一种表格的方式展示
class ChoiceInline(admin.StackedInline):model = Choiceextra = 3class QuestionAdmin(admin.ModelAdmin):fieldsets = [(None, {"fields": ["question_text"]}),("Date information", {"fields": ["pub_date"]}),]inlines = [ChoiceInline]admin.site.register(Question, QuestionAdmin)
(3)自定义后台更改列表
默认情况下,Django 显示每个对象的
str()返回的值。但有时如果我们能够显示单个字段,它会更有帮助。为此,使用list_display后台选项,它是一个包含要显示的字段名的元组,
# polls/admin.py
class QuestionAdmin(admin.ModelAdmin):class QuestionAdmin(admin.ModelAdmin):fieldsets = [(None, {"fields": ["question_text"]}),("Date information", {"fields": ["pub_date"]}),]inlines = [ChoiceInline]list_display = ["question_text", "pub_date", "was_published_recently"]# 优化过滤器,添加了一个过滤器侧边栏list_filter = ["pub_date"]# 列表顶部添加搜索框search_fields = ["question_text"]
# polls/models.py
import datetime
from django.db import models
from django.utils import timezone
from django.contrib import adminclass Question(models.Model):question_text = models.CharField(max_length=200)pub_date = models.DateTimeField("date published")def __str__(self):return self.question_text# 通过display装饰器给方法添加排序字段@admin.display(boolean=True,ordering="pub_date",description="Published recently?",)def was_published_recently(self):now = timezone.now()return now - datetime.timedelta(days=1) <= self.pub_date <= now
(4)自定义后台界面和风格
在工程目录(包含manage.py的那个文件夹)内创建一个templates目录。
# mysite/settings.py中添加DIRS选项
TEMPLATES = [{"BACKEND": "django.template.backends.django.DjangoTemplates","DIRS": [BASE_DIR / "templates"],"APP_DIRS": True,"OPTIONS": {"context_processors": ["django.template.context_processors.debug","django.template.context_processors.request","django.contrib.auth.context_processors.auth","django.contrib.messages.context_processors.messages",],},},
]
在templates目录中创建一个admin目录,将默认的Django管理界面模板目录中的模板文件复制到该目录中(admin/base_site.html)。默认的 Django 管理界面模板目录位于 Django 源代码中django/contrib/admin/templates。
# 获取Django源码的位置
python -c "import django;print(django.__path__)"
<!-- 修改base_site.html内容 -->
{% extends "admin/base.html" %}{% block title %}{% if subtitle %}{{ subtitle }} | {% endif %}{{ title }} | {{ site_title|default:_('Django site admin') }}{% endblock %}{% block branding %}
<div id="site-name"><a href="{% url 'admin:index' %}">Polls Administration</a></div>
{% if user.is_anonymous %}{% include "admin/color_theme_toggle.html" %}
{% endif %}
{% endblock %}{% block nav-global %}{% endblock %}
(5)自定义你应用的模板
DIRS默认是空的,Django 是怎么找到默认的后台模板的?因为
APP_DIRS被置为True,Django 会自动在每个应用包内递归查找templates/子目录
(6)自定义后台主页
默认情况下,它展示了所有配置在
INSTALLED_APPS中,已通过后台应用注册,按拼音排序的应用。你可能想对这个页面的布局做重大的修改。毕竟,索引页是后台的重要页面,它应该便于使用。需要自定义的模板是admin/index.html。
- 使用第三方包
以Django Debug Toolbar为例。
(1)安装
python -m pip install django-debug-toolbar
与 Django 集成的第三方包需要一些安装后的设置,以将它们与你的项目整合在一起。通常,你需要将包的 Django 应用程序添加到你的
INSTALLED_APPS设置中。有些包需要其他更改,比如添加到你的 URL 配置(urls.py)中。
(2)安装其他第三方包
可以使用Django资源 Django Packages来查找更多的第三方包。
相关文章:

Django从入门到放弃
Django从入门到放弃 Django最初被设计用于具有快速开发需求的新闻类站点,目的是实现简单快捷的网站开发。 安装Django 使用anaconda创建环境 conda create -n django_env python3.10 conda activate django_env使用pip安装django python -m pip install Django查…...
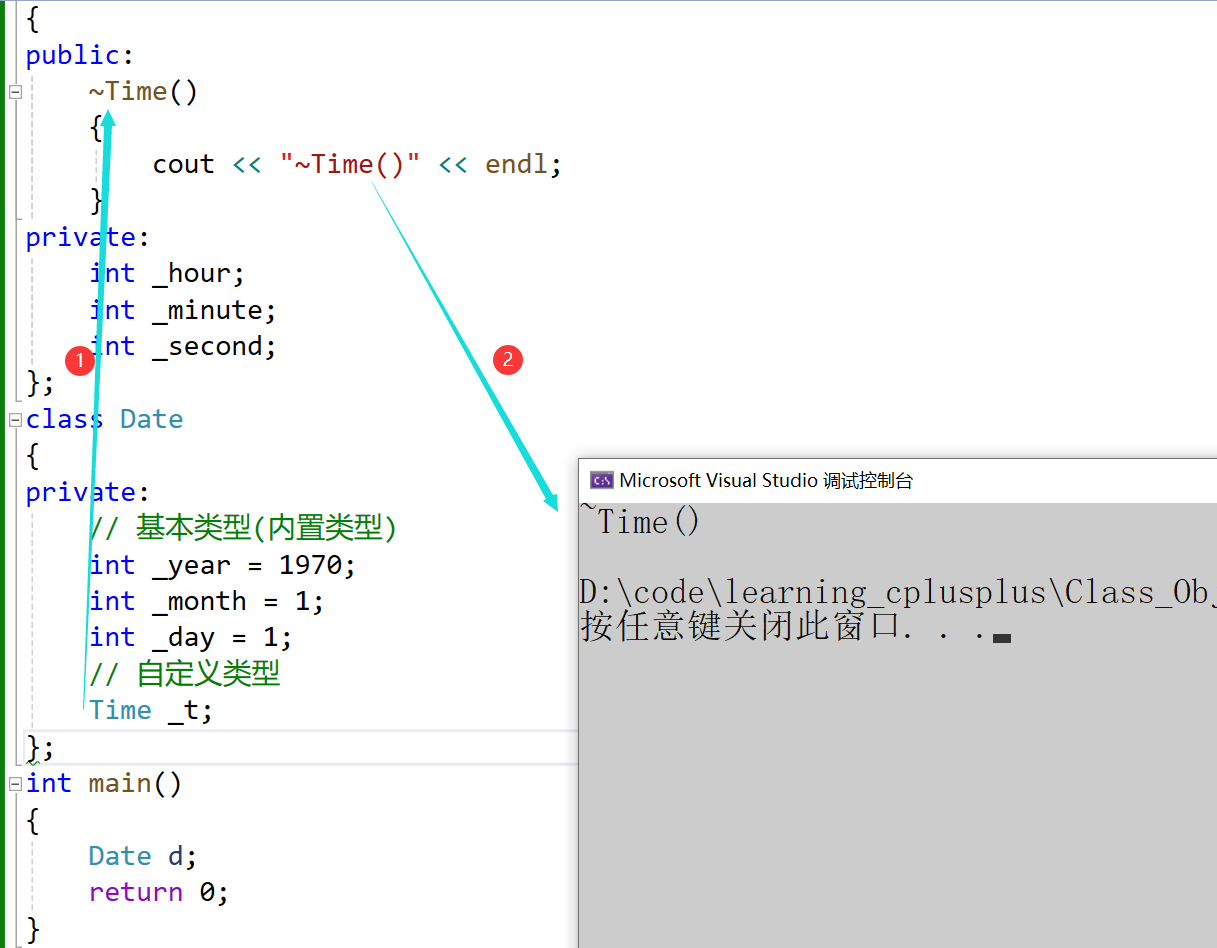
C++中类的6个默认成员函数【构造函数】 【析构函数】
文章目录 前言构造函数构造函数的概念构造函数的特性 析构函数 前言 在学习C我们必须要掌握的6个默认成员函数,接下来本文讲解2个默认成员函数 构造函数 如果一个类中什么成员都没有,简称为空类。 空类中真的什么都没有吗?并不是,…...
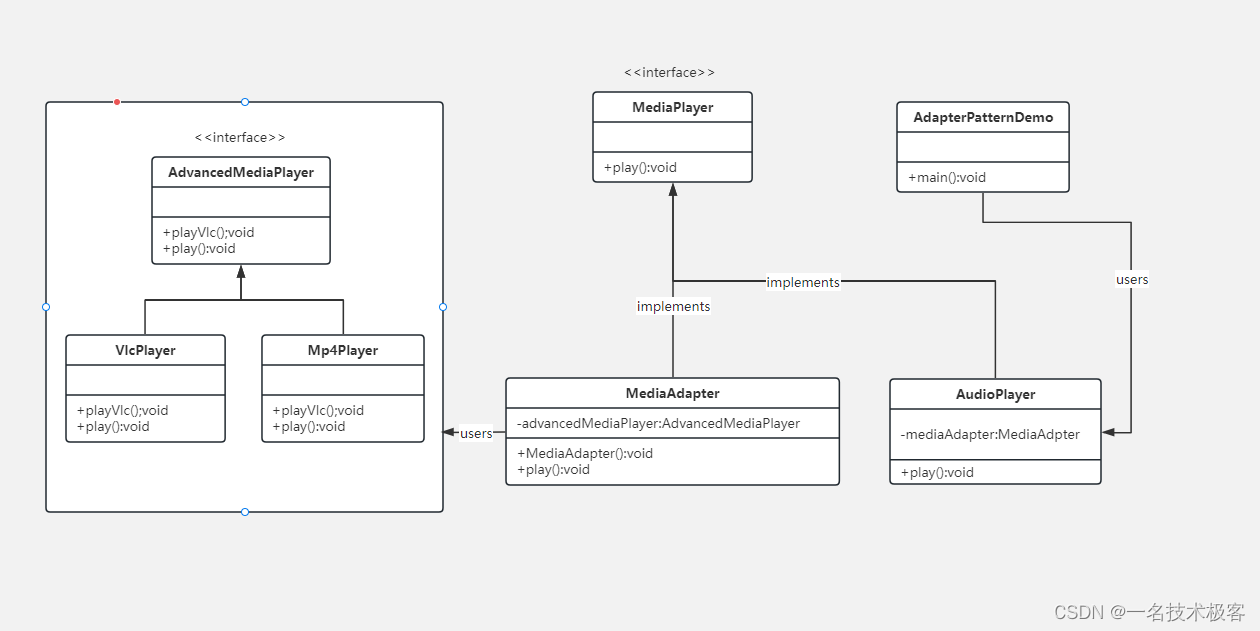
06-Java适配器模式 ( Adapter Pattern )
原型模式 摘要实现范例 适配器模式(Adapter Pattern)是作为两个不兼容的接口之间的桥梁 适配器模式涉及到一个单一的类,该类负责加入独立的或不兼容的接口功能 举个真实的例子,读卡器是作为内存卡和笔记本之间的适配器。您将内…...
C# CAD交互界面-自定义面板集-添加快捷命令(五)
运行环境 vs2022 c# cad2016 调试成功 一、引用 using Autodesk.AutoCAD.ApplicationServices; using Autodesk.AutoCAD.Runtime; using Autodesk.AutoCAD.Windows; using System; using System.Drawing; using System.Windows.Forms; 二、代码说明 [CommandMethod("Cre…...

Spring boot集成各种数据源操作数据库
一、最基础的数据源方式 1.导入maven依赖 <dependency><groupId>org.springframework.boot</groupId><artifactId>spring-boot-starter-jdbc</artifactId></dependency <dependency><groupId>com.mysql</groupId><art…...
K8s环境下rook-v1.13.3部署Ceph-v18.2.1集群
文章目录 1.K8s环境搭建2.Ceph集群部署2.1 部署Rook Operator2.2 镜像准备2.3 配置节点角色2.4 部署operator2.5 部署Ceph集群2.6 强制删除命名空间2.7 验证集群 3.Ceph界面 1.K8s环境搭建 参考:CentOS7搭建k8s-v1.28.6集群详情,把K8s集群完成搭建&…...
【JavaEE】传输层网络协议
传输层网络协议 1. UDP协议 1.1 特点 面向数据报(DatagramSocket)数据报大小限制为64k全双工不可靠传输有接收缓冲区,无发送缓冲区 UDP的特点,我理解起来就是工人组成的**“人工传送带”**: 面向数据报(…...
08-Java过滤器模式 ( Filter Pattern )
Java过滤器模式 实现范例 过滤器模式(Filter Pattern)或允许开发人员使用不同的标准来过滤一组对象,通过逻辑运算以解耦的方式把它们连接起来 过滤器模式(Filter Pattern) 又称 标准模式(Criteria Pattern…...

ChatGPT高效提问—prompt常见用法(续篇八)
ChatGPT高效提问—prompt常见用法(续篇八) 1.1 对抗 对抗是一个重要主题,深入探讨了大型语言模型(LLM)的安全风险。它不仅反映了人们对LLM可能出现的风险和安全问题的理解,而且能够帮助我们识别这些潜在的风险,并通过切实可行的技术手段来规避。 截至目前,网络…...

微软.NET6开发的C#特性——接口和属性
我是荔园微风,作为一名在IT界整整25年的老兵,看到不少初学者在学习编程语言的过程中如此的痛苦,我决定做点什么,下面我就重点讲讲微软.NET6开发人员需要知道的C#特性,然后比较其他各种语言进行认识。 C#经历了多年发展…...

容器基础知识:容器和虚拟化的区别
虚拟化与容器化对比 容器化和虚拟化都是用于优化资源利用率并实现高效应用程序部署的技术。然而,它们在方法和关键特征上存在差异: 虚拟化: 可以理解为创建虚拟机 (VM)。虚拟机模拟一台拥有自己硬件(CPU、内存、存储)和操作系统…...
【Linux】vim的基本操作与配置(下)
Hello everybody!今天我们继续讲解vim的操作与配置,希望大家在看过这篇文章与上篇文章后都能够轻松上手vim! 1.补充 在上一篇文章中我们说过了,在底行模式下set nu可以显示行号。今天补充一条:set nonu可以取消行号。这两条命令大家看看就可…...

[office] 图文演示excel怎样给单元格添加下拉列表 #知识分享#经验分享
图文演示excel怎样给单元格添加下拉列表 在Excel表格中输入数据的时候,为了简便快捷的输入,经常需要给Excel单元格添加一个下拉菜单,这样在输入数据时不必按键盘,只是用鼠标选择选项就可以了。 比的位置。 4、可以看到一个预览的…...

【RT-DETR有效改进】利用SENetV2重构化网络结构 (ILSVRC冠军得主,全网独家首发)
👑欢迎大家订阅本专栏,一起学习RT-DETR👑 一、本文介绍 本文给大家带来的改进机制是SENetV2,其是2023.11月的最新机制(所以大家想要发论文的可以在上面下点功夫),其是一种通过调整卷积网络中的通道关系来提升性能的网络结构。SENet并不是一个独立的网络模型,而…...

【Linux】学习-进程间通信
进程间通信 介绍 进程间通信的本质 进程间通信的前提,首先需要让不同的进程看到同一块“内存”此“内存”一定不属于任何进程,而应该强调共享二字 进程间通信的目的 数据传输:一个进程需要将它的数据发送给另一个进程 资源共享:…...

45. C++ 字符指针和字符串
一、字符指针可以指向一个字符串。 我们可以用字符串常量对字符指针进行初始化。例如,有说明语句: char *str "This is a string.";是对字符指针进行初始化。此时,字符指针指向的是一个字符串常量的首地址,即指向字符…...

如何制作一款3D FPS游戏
制作一款3D FPS游戏是一个复杂的过程,需要涵盖多个方面,包括游戏设计、游戏引擎选择、模型制作、音效制作、关卡设计等。下面是一个关于如何制作一款3D FPS游戏的超长文章。 游戏设计 首先,你需要确定游戏的整体设计和核心玩法。这包括游戏的…...
人工智能|深度学习——使用多层级注意力机制和keras实现问题分类
代码下载 使用多层级注意力机制和keras实现问题分类资源-CSDN文库 1 准备工作 1.1 什么是词向量? ”词向量”(词嵌入)是将一类将词的语义映射到向量空间中去的自然语言处理技术。即将一个词用特定的向量来表示,向量之间的距离(例…...

C语言常见面试题:C语言中如何进行网页开发编程?
在C语言中进行网页开发通常不是一个直接的过程,因为C语言主要用于系统级编程,而不是Web开发。传统的Web开发主要使用高级语言如JavaScript、Python、Ruby、PHP等,以及与Web相关的技术,如HTML、CSS和数据库。 然而,如果…...
DevOps落地笔记-20|软件质量:决定系统成功的关键
上一课时介绍通过提高工程效率来提高价值交付效率,从而提高企业对市场的响应速度。在提高响应速度的同时,也不能降低软件的质量,这就是所谓的“保质保量”。具备高质量软件,高效率的企业走得更快更远。相反,低劣的软件…...

TPS5430玩点不一样的:15V输入如何生成一个干净的-12V电源?电路设计与极性电容防炸指南
TPS5430负压生成实战:从15V到-12V的电路设计精要 在模拟电路设计中,双电源供电系统(如12V)是音频设备、运算放大器和高精度ADC的常见需求。然而,当系统仅提供单路正电压输入时,如何高效生成稳定的负电压轨成…...
)
51单片机控制LED灯实现流水灯效果(程序+Proteus仿真)
51单片机控制LED灯实现流水灯效果(程序Proteus仿真) 【下载地址】51单片机控制LED灯实现流水灯效果程序Proteus仿真 本资源提供了一个完整的项目,使用51单片机控制LED灯实现流水灯效果。资源内容包括Keil5 C语言程序和Proteus软件仿真文件&am…...

ESJsonFormat-Xcode与MJExtension完美结合:构建高效iOS数据模型
ESJsonFormat-Xcode与MJExtension完美结合:构建高效iOS数据模型 【免费下载链接】ESJsonFormat-Xcode 将JSON格式化输出为模型的属性 项目地址: https://gitcode.com/gh_mirrors/es/ESJsonFormat-Xcode ESJsonFormat-Xcode是一款专为iOS开发者打造的JSON转模…...

日期时间数据在数据分析中的实际应用
下面的内容摘录自《用R探索医药数据科学》专栏文章的部分内容(原文6364字)。 2篇2章16节:R 语言中日期时间数据的关键处理要点_r语言从数字转为日期-CSDN博客 一、日期时间数据的概念 二、获取当前日期和时间 三、日期时间数据的转换与处理…...

Real World Rails实战:10个高效学习Rails开发的最佳实践
Real World Rails实战:10个高效学习Rails开发的最佳实践 【免费下载链接】real-world-rails Real World Rails applications and their open source codebases for developers to learn from 项目地址: https://gitcode.com/gh_mirrors/re/real-world-rails …...

HTML代码加密工具源码_在线网页加密解密_防复制源码
概述 在前端开发与网页设计中,保护原创代码不被轻易复制或篡改是许多开发者的核心诉求。无论是为了隐藏核心逻辑,还是防止样式被恶意盗用,一款高效、安全的加密工具都显得尤为重要。为此,幽络源源码网特别整理并分享这款HTML代码…...

iPhone/iPad移动端CircuitPython嵌入式开发实战指南
1. 项目概述:当嵌入式开发遇上移动生产力作为一名在嵌入式硬件和创客领域折腾了十多年的老玩家,我经历过各种开发环境的变迁。从早年抱着一台厚重的笔记本电脑在实验室里调试,到后来用树莓派做便携式开发机,我一直希望能有一种更轻…...

终极GBFR Logs指南:掌握碧蓝幻想Relink伤害分析的完整教程
终极GBFR Logs指南:掌握碧蓝幻想Relink伤害分析的完整教程 【免费下载链接】gbfr-logs GBFR Logs lets you track damage statistics with a nice overlay DPS meter for Granblue Fantasy: Relink. 项目地址: https://gitcode.com/gh_mirrors/gb/gbfr-logs …...

Multisim导入自定义三极管S8050/S8550保姆级教程:从SPICE文件到成功仿真
Multisim实战:从零构建S8050三极管模型与仿真验证全流程 在电子电路设计与仿真领域,准确的三极管模型往往是项目成功的关键。许多工程师和爱好者在使用Multisim时都遇到过这样的困境:官方元件库中缺少特定型号的三极管(如常见的S8…...

基于Vercel AI SDK与Next.js 14构建智能编程助手:从架构到部署实战
1. 项目概述:一个面向开发者的AI编程助手脚手架最近在GitHub上看到一个挺有意思的项目,叫vercel-labs/coding-agent-template。光看名字,你大概能猜到,这是一个跟AI编程助手相关的模板项目。没错,它本质上是一个预先配…...