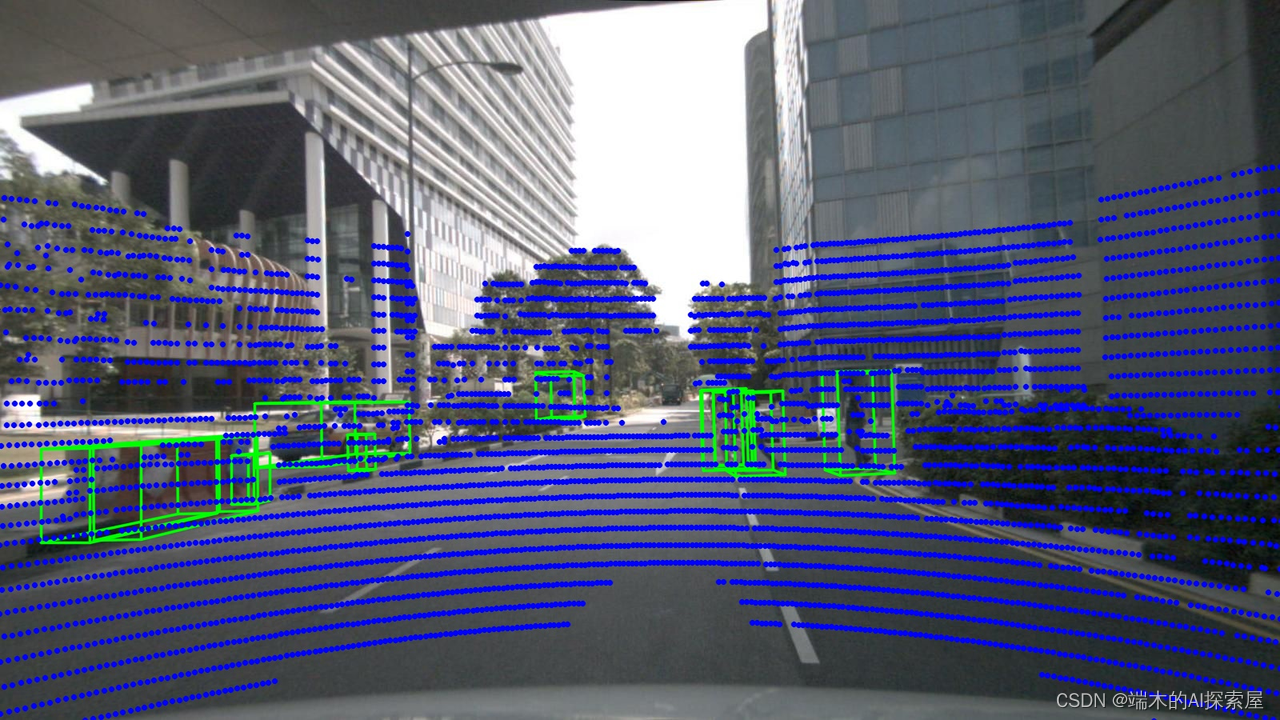
Nuscenes数据集点云数据如何转换到图像上
零、概要
注意:该文章是手写ai自动驾驶,Nuscenes数据集的笔记。
- 首先,学习需要使用到 nuScenes 数据集。python 工具需要使用到 nuscenes-devkit、pyquaternion
from nuscenes.nuscenes import NuScenes
from pyquaternion import Quaternion # 四元数操作的包
https://github.com/nutonomy/nuscenes-devkit/tree/master
-
官网https://github.com/nutonomy/nuscenes-devkit/blob/master/python-sdk/tutorials/nuscenes_tutorial.ipynb可以看非常好
-
https://www.nuscenes.org/nuscenes#explore该网址能够可视化了解nuscenes数据集。
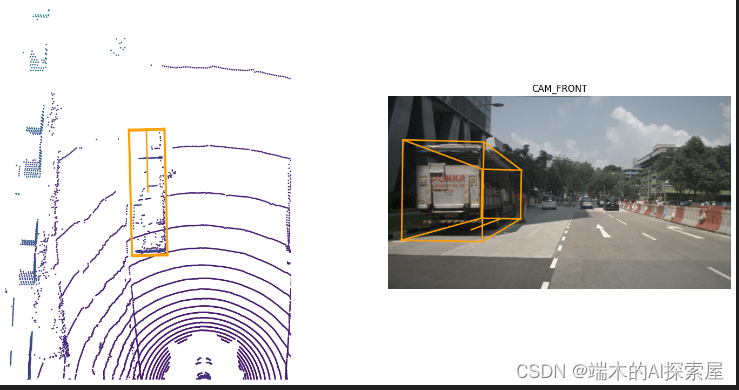
一、提出疑问
- 如何将Lidar的点与图片对应,画出
二、代码大体了解
# pip install nuscenes-devkit               # tingfeng1 需要包 nuscenes-devkit
from nuscenes.nuscenes import NuScenes
from nuscenes.utils.data_classes import Box
from pyquaternion import Quaternion
import numpy as np
import cv2
import osnp.set_printoptions(precision=3, suppress=True)version = "mini"
dataroot = "/data/mini"
nuscenes = NuScenes(version='v1.0-{}'.format(version), dataroot=dataroot, verbose=False) # tingfeng2 实例化类NuScenescameras = ['CAM_FRONT_LEFT', 'CAM_FRONT', 'CAM_FRONT_RIGHT', 'CAM_BACK_LEFT', 'CAM_BACK', 'CAM_BACK_RIGHT']
sample  = nuscenes.sample[0] # tingfeng3获取第一个样本def to_matrix4x4_2(rotation, translation, inverse=True):output = np.eye(4)output[:3, :3] = rotationoutput[:3, 3]  = translationif inverse:output = np.linalg.inv(output)return outputdef to_matrix4x4(m):output = np.eye(4)output[:3, :3] = mreturn output# tingfeng4 拿到样本后,获取Lidar的信息
# Lidar的点云是基于Lidar坐标系的
# 需要将lidar的坐标转换到ego,然后ego到global
lidar_sample_data = nuscenes.get('sample_data', sample['data']["LIDAR_TOP"])
lidar_file        = os.path.join(nuscenes.dataroot, lidar_sample_data["filename"])
lidar_pointcloud  = np.fromfile(lidar_file, dtype=np.float32).reshape(-1, 5)
ego_pose          = nuscenes.get('ego_pose', lidar_sample_data['ego_pose_token'])
ego_to_global     = to_matrix4x4_2(Quaternion(ego_pose['rotation']).rotation_matrix, np.array(ego_pose['translation']), False)
lidar_sensor      = nuscenes.get('calibrated_sensor', lidar_sample_data['calibrated_sensor_token'])
lidar_to_ego      = to_matrix4x4_2(Quaternion(lidar_sensor['rotation']).rotation_matrix, np.array(lidar_sensor['translation']), False)
lidar_to_global   = ego_to_global @ lidar_to_ego
lidar_points      = np.concatenate([lidar_pointcloud[:, :3], np.ones((len(lidar_pointcloud), 1))], axis=1)
lidar_points      = lidar_points @ lidar_to_global.T # tingfeng5 点云转到global坐标系# tingfeng6 获取每一个camera的信息
# 1. annotation标注是global坐标系的
# 2. 由于时间戳的缘故,每个camera/lidar/radar都有ego_pose用于修正差异
for camera in cameras:camera_sample_data = nuscenes.get('sample_data', sample['data'][camera])image_file         = os.path.join(nuscenes.dataroot, camera_sample_data["filename"])ego_pose           = nuscenes.get('ego_pose', camera_sample_data['ego_pose_token'])global_to_ego      = to_matrix4x4_2(Quaternion(ego_pose['rotation']).rotation_matrix, np.array(ego_pose['translation']))camera_sensor    = nuscenes.get('calibrated_sensor', camera_sample_data['calibrated_sensor_token']) camera_intrinsic = to_matrix4x4(camera_sensor['camera_intrinsic'])ego_to_camera    = to_matrix4x4_2(Quaternion(camera_sensor['rotation']).rotation_matrix, np.array(camera_sensor['translation']))global_to_image  = camera_intrinsic @ ego_to_camera @ global_to_ego # tingfeng7 根据相机中得到的信息得到的三个矩阵,将global坐标系的坐标转换到image上image = cv2.imread(image_file)  for annotation_token in sample['anns']:   # tingfeng8 标注的框的信息,在sample['anns']中,遍历标注框instance = nuscenes.get('sample_annotation', annotation_token)box = Box(instance['translation'], instance['size'], Quaternion(instance['rotation']))corners = np.ones((4, 8))corners[:3, :] = box.corners() corners = (global_to_image @ corners)[:3]   # tingfeng11 注意角点是global坐标,这里转换到image上corners[:2] /= corners[[2]]corners = corners.T.astype(int) # tingfeng9 到此是计算框的角点ix, iy = [0, 1, 2, 3, 0, 1, 2, 3, 4, 5, 6, 7], [4, 5, 6, 7, 1, 2, 3, 0, 5, 6, 7, 4]for p0, p1 in zip(corners[ix], corners[iy]):if p0[2] <= 0 or p1[2] <= 0: continuecv2.line(image, (p0[0], p0[1]), (p1[0], p1[1]), (0, 255, 0), 2, 16) # tingfeng10 到此是把角点划到image上image_based_points = lidar_points @ global_to_image.T   # tingfeng12 雷达的信息也投射到image上image_based_points[:, :2] /= image_based_points[:, [2]]show_points = image_based_points[image_based_points[:, 2] > 0][:, :2].astype(np.int32)for x, y in show_points:cv2.circle(image, (x, y), 3, (255, 0, 0), -1, 16) # # tingfeng13 lidar的信息画到image上cv2.imwrite(f"{camera}.jpg", image)
三、手写
3.1 了解 NuScenes 的实例对象
-
了解如何实例化,参数需要什么
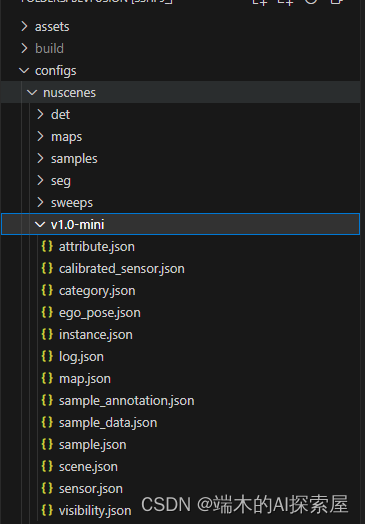
- 第一个参数 version。目前理解是给 nuscenes 下载下来。那个有一堆 json 文件的文件夹名字。
- 通常是
v1.0-{mini, test, trainval}
- 通常是
- 第二个参数是数据集根目录。图片上是 nuscenes
- 第一个参数 version。目前理解是给 nuscenes 下载下来。那个有一堆 json 文件的文件夹名字。
-
了解如何获取数据,数据是什么样
- 如下实例化后。就能简单查看里面的数据了。
from nuscenes.nuscenes import NuScenes
import numpy as np
import cv2
import os# 1. 实例化NuScenes
version = "v1.0-mini"  # 因为我们是用的是mini数据集
dataroot = "/home/shenlan09/tingfeng/BEVFusion/BEVfusion/bevfusion/configs/nuscenes"
# 我的数据集放这里了,我用的绝对路径
nuscenes = NuScenes(version=version, dataroot=dataroot, verbose=False)
# print(len(nuscenes.sample)) # 404sample = nuscenes.sample[0] # 读取sample中第一个数据,具体了解
print(nuscenes)
- 另外。官方教程上,拿到第一个 sample 可以用
%matplotlib inline
from nuscenes.nuscenes import NuScenes
nusc = NuScenes(version='v1.0-mini', dataroot="/home/shenlan09/tingfeng/BEVFusion/BEVfusion/bevfusion/configs/nuscenes", verbose=True)
'''
Loading NuScenes tables for version v1.0-mini...
23 category,
8 attribute,
4 visibility,
911 instance,
12 sensor,
120 calibrated_sensor,
31206 ego_pose,
8 log,
10 scene,
404 sample,
31206 sample_data,
18538 sample_annotation,
4 map,
Done loading in 0.5 seconds.
============================Reverse indexing ...
Done reverse indexing in 0.1 seconds.
====================================='''
nusc.list_scenes()'''
scene-0061, Parked truck, construction, intersectio... [18-07-24 03:28:47]   19s, singapore-onenorth, #anns:4622
scene-0103, Many peds right, wait for turning car, ... [18-08-01 19:26:43]   19s, boston-seaport, #anns:2046
scene-0655, Parking lot, parked cars, jaywalker, be... [18-08-27 15:51:32]   20s, boston-seaport, #anns:2332
scene-0553, Wait at intersection, bicycle, large tr... [18-08-28 20:48:16]   20s, boston-seaport, #anns:1950
scene-0757, Arrive at busy intersection, bus, wait ... [18-08-30 19:25:08]   20s, boston-seaport, #anns:592
scene-0796, Scooter, peds on sidewalk, bus, cars, t... [18-10-02 02:52:24]   20s, singapore-queensto, #anns:708
scene-0916, Parking lot, bicycle rack, parked bicyc... [18-10-08 07:37:13]   20s, singapore-queensto, #anns:2387
scene-1077, Night, big street, bus stop, high speed... [18-11-21 11:39:27]   20s, singapore-hollandv, #anns:890
scene-1094, Night, after rain, many peds, PMD, ped ... [18-11-21 11:47:27]   19s, singapore-hollandv, #anns:1762
scene-1100, Night, peds in sidewalk, peds cross cro... [18-11-21 11:49:47]   19s, singapore-hollandv, #anns:935
'''
my_scene = nusc.scene[0]
'''
{'token': 'cc8c0bf57f984915a77078b10eb33198',
'log_token': '7e25a2c8ea1f41c5b0da1e69ecfa71a2',
'nbr_samples': 39,
'first_sample_token': 'ca9a282c9e77460f8360f564131a8af5',
'last_sample_token': 'ed5fc18c31904f96a8f0dbb99ff069c0',
'name': 'scene-0061',
'description': 'Parked truck, construction, intersection, turn left, following a van'}
'''first_sample_token = my_scene['first_sample_token']# The rendering command below is commented out because it tends to crash in notebooksnusc.render_sample(first_sample_token) # 能够在 ipynb 文件中渲染
3.1.1 数据格式
- (nuscenes.sample[0]的打印输出信息)nuscenes.sample[0]是指第一个样本。是某时刻的所有数据
- 包含多个相机数据token、Lidar数据对应的token。anns是3D标注边框的token
{'token': 'ca9a282c9e77460f8360f564131a8af5',
'timestamp': 1532402927647951,
'prev': '',
'next': '39586f9d59004284a7114a68825e8eec',
'scene_token': 'cc8c0bf57f984915a77078b10eb33198',
'data!!传感器信息!!': {'RADAR_FRONT': '==每个里面的字符串叫token,根据这个就能找到位置的信息==37091c75b9704e0daa829ba56dfa0906', 'RADAR_FRONT_LEFT': '11946c1461d14016a322916157da3c7d', 'RADAR_FRONT_RIGHT': '491209956ee3435a9ec173dad3aaf58b', 'RADAR_BACK_LEFT': '312aa38d0e3e4f01b3124c523e6f9776', 'RADAR_BACK_RIGHT': '07b30d5eb6104e79be58eadf94382bc1', 'LIDAR_TOP': '9d9bf11fb0e144c8b446d54a8a00184f', 'CAM_FRONT': 'e3d495d4ac534d54b321f50006683844', 'CAM_FRONT_RIGHT': 'aac7867ebf4f446395d29fbd60b63b3b', 'CAM_BACK_RIGHT': '79dbb4460a6b40f49f9c150cb118247e', 'CAM_BACK': '03bea5763f0f4722933508d5999c5fd8', 'CAM_BACK_LEFT': '43893a033f9c46d4a51b5e08a67a1eb7', 'CAM_FRONT_LEFT': 'fe5422747a7d4268a4b07fc396707b23'}, 'anns': ['ef63a697930c4b20a6b9791f423351da', '6b89da9bf1f84fd6a5fbe1c3b236f809', '924ee6ac1fed440a9d9e3720aac635a0', '91e3608f55174a319246f361690906ba', 'cd051723ed9c40f692b9266359f547af', '36d52dfedd764b27863375543c965376', '70af124fceeb433ea73a79537e4bea9e', '63b89fe17f3e41ecbe28337e0e35db8e', 'e4a3582721c34f528e3367f0bda9485d', 'fcb2332977ed4203aa4b7e04a538e309', 'a0cac1c12246451684116067ae2611f6', '02248ff567e3497c957c369dc9a1bd5c', '9db977e264964c2887db1e37113cddaa', 'ca9c5dd6cf374aa980fdd81022f016fd', '179b8b54ee74425893387ebc09ee133d', '5b990ac640bf498ca7fd55eaf85d3e12', '16140fbf143d4e26a4a7613cbd3aa0e8', '54939f11a73d4398b14aeef500bf0c23', '83d881a6b3d94ef3a3bc3b585cc514f8', '74986f1604f047b6925d409915265bf7', 'e86330c5538c4858b8d3ffe874556cc5', 'a7bd5bb89e27455bbb3dba89a576b6a1', 'fbd9d8c939b24f0eb6496243a41e8c41', '198023a1fb5343a5b6fad033ab8b7057', 'ffeafb90ecd5429cba23d0be9a5b54ee', 'cc636a58e27e446cbdd030c14f3718fd', '076a7e3ec6244d3b84e7df5ebcbac637', '0603fbaef1234c6c86424b163d2e3141', 'd76bd5dcc62f4c57b9cece1c7bcfabc5', '5acb6c71bcd64aa188804411b28c4c8f', '49b74a5f193c4759b203123b58ca176d', '77519174b48f4853a895f58bb8f98661', 'c5e9455e98bb42c0af7d1990db1df0c9', 'fcc5b4b5c4724179ab24962a39ca6d65', '791d1ca7e228433fa50b01778c32449a', '316d20eb238c43ef9ee195642dd6e3fe', 'cda0a9085607438c9b1ea87f4360dd64', 'e865152aaa194f22b97ad0078c012b21', '7962506dbc24423aa540a5e4c7083dad', '29cca6a580924b72a90b9dd6e7710d3e', 'a6f7d4bb60374f868144c5ba4431bf4c', 'f1ae3f713ba946069fa084a6b8626fbf', 'd7af8ede316546f68d4ab4f3dbf03f88', '91cb8f15ed4444e99470d43515e50c1d', 'bc638d33e89848f58c0b3ccf3900c8bb', '26fb370c13f844de9d1830f6176ebab6', '7e66fdf908d84237943c833e6c1b317a', '67c5dbb3ddcc4aff8ec5140930723c37', 'eaf2532c820740ae905bb7ed78fb1037', '3e2d17fa9aa5484d9cabc1dfca532193', 'de6bd5ffbed24aa59c8891f8d9c32c44', '9d51d699f635478fbbcd82a70396dd62', 'b7cbc6d0e80e4dfda7164871ece6cb71', '563a3f547bd64a2f9969278c5ef447fd', 'df8917888b81424f8c0670939e61d885', 'bb3ef5ced8854640910132b11b597348', 'a522ce1d7f6545d7955779f25d01783b', '1fafb2468af5481ca9967407af219c32', '05de82bdb8484623906bb9d97ae87542', 'bfedb0d85e164b7697d1e72dd971fb72', 'ca0f85b4f0d44beb9b7ff87b1ab37ff5', 'bca4bbfdef3d4de980842f28be80b3ca', 'a834fb0389a8453c810c3330e3503e16', '6c804cb7d78943b195045082c5c2d7fa', 'adf1594def9e4722b952fea33b307937', '49f76277d07541c5a584aa14c9d28754', '15a3b4d60b514db5a3468e2aef72a90c', '18cc2837f2b9457c80af0761a0b83ccc', '2bfcc693ae9946daba1d9f2724478fd4']}
- 直接使用下方代码,可以直接打印
nuscenes.list_sample(sample["token"])
'''
Sample: ca9a282c9e77460f8360f564131a8af5sample_data_token: 37091c75b9704e0daa829ba56dfa0906, mod: radar, channel: RADAR_FRONT
sample_data_token: 11946c1461d14016a322916157da3c7d, mod: radar, channel: RADAR_FRONT_LEFT
sample_data_token: 491209956ee3435a9ec173dad3aaf58b, mod: radar, channel: RADAR_FRONT_RIGHT
sample_data_token: 312aa38d0e3e4f01b3124c523e6f9776, mod: radar, channel: RADAR_BACK_LEFT
sample_data_token: 07b30d5eb6104e79be58eadf94382bc1, mod: radar, channel: RADAR_BACK_RIGHT
sample_data_token: 9d9bf11fb0e144c8b446d54a8a00184f, mod: lidar, channel: LIDAR_TOP
sample_data_token: e3d495d4ac534d54b321f50006683844, mod: camera, channel: CAM_FRONT
sample_data_token: aac7867ebf4f446395d29fbd60b63b3b, mod: camera, channel: CAM_FRONT_RIGHT
sample_data_token: 79dbb4460a6b40f49f9c150cb118247e, mod: camera, channel: CAM_BACK_RIGHT
sample_data_token: 03bea5763f0f4722933508d5999c5fd8, mod: camera, channel: CAM_BACK
sample_data_token: 43893a033f9c46d4a51b5e08a67a1eb7, mod: camera, channel: CAM_BACK_LEFT
sample_data_token: fe5422747a7d4268a4b07fc396707b23, mod: camera, channel: CAM_FRONT_LEFTsample_annotation_token: ef63a697930c4b20a6b9791f423351da, category: human.pedestrian.adult
sample_annotation_token: 6b89da9bf1f84fd6a5fbe1c3b236f809, category: human.pedestrian.adult
sample_annotation_token: 924ee6ac1fed440a9d9e3720aac635a0, category: vehicle.car
sample_annotation_token: 91e3608f55174a319246f361690906ba, category: human.pedestrian.adult
sample_annotation_token: cd051723ed9c40f692b9266359f547af, category: movable_object.trafficcone
sample_annotation_token: 36d52dfedd764b27863375543c965376, category: vehicle.bicycle
sample_annotation_token: 70af124fceeb433ea73a79537e4bea9e, category: human.pedestrian.adult
sample_annotation_token: 63b89fe17f3e41ecbe28337e0e35db8e, category: vehicle.car
sample_annotation_token: e4a3582721c34f528e3367f0bda9485d, category: human.pedestrian.adult
sample_annotation_token: fcb2332977ed4203aa4b7e04a538e309, category: movable_object.barrier
...
sample_annotation_token: 49f76277d07541c5a584aa14c9d28754, category: vehicle.car
sample_annotation_token: 15a3b4d60b514db5a3468e2aef72a90c, category: movable_object.barrier
sample_annotation_token: 18cc2837f2b9457c80af0761a0b83ccc, category: movable_object.barrier
sample_annotation_token: 2bfcc693ae9946daba1d9f2724478fd4, category: movable_object.barrier
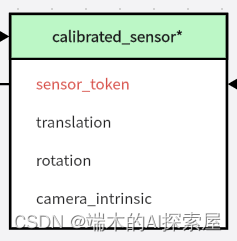
'''3.1.2 数据格式–官网图例
- 这个图例学完下面的代码,回来看。就能取到自己想要的数据。
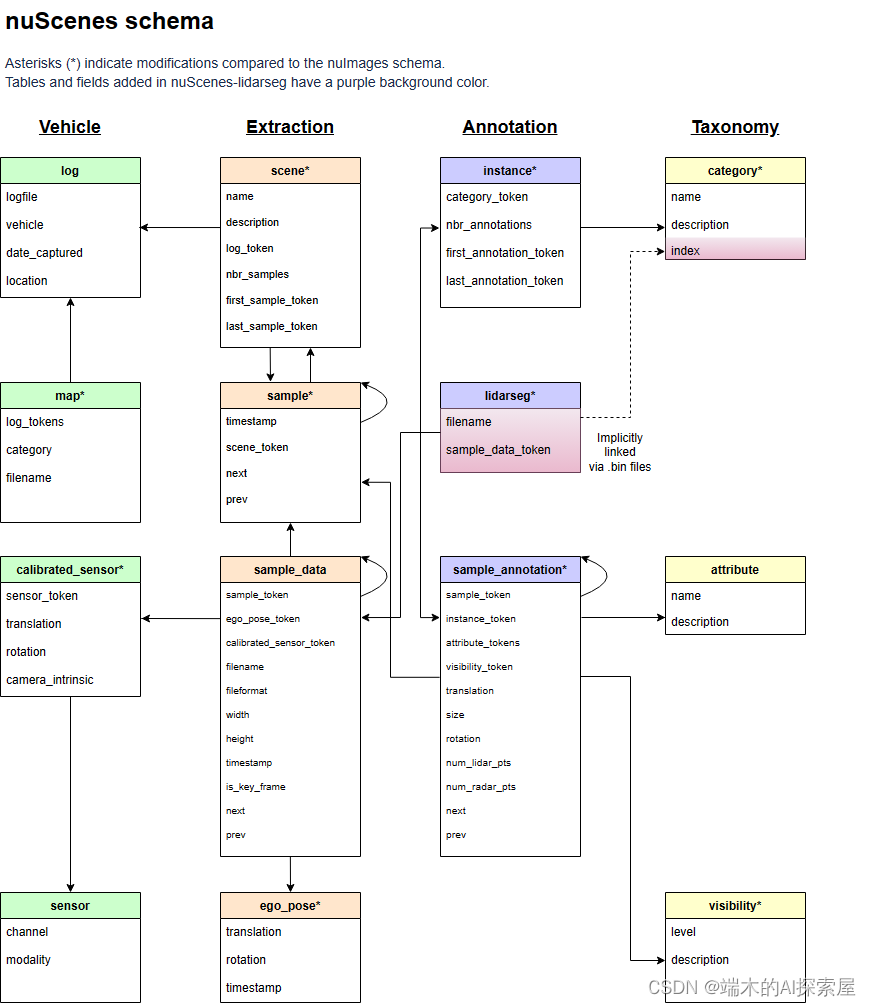
- 得到sample_data,获取不同数据需使用不同代码
- 通过sample_data 的filename 定位到具体文件。用 np.fromfile读取数据
- 通过sample_data 的calibrated_sensor_token,用nuscenes定位定位calibrated_sensor,拿到标定数据
3.1.2.1 上图理解–sample_token 获取 sample_data
sample["data"]["LIDAR_TOP"]sample["data"]中存储了 RADAR LIDAR CAM的信息sample["data"]["LIDAR_TOP"]能拿到相机对应的sample_token- 图中的弧线箭头,我理解为通过这个 sample_token 是能够获得 sample_data的
sample_data = nuscenes.get('sample_data', lidar_sample_token)是通过sample_token 获得 sample_data的具体方法- 当得到了 sample_data 我们就能得到 sample_data 中的其他信息
print(sample_data)
{'token': '9d9bf11fb0e144c8b446d54a8a00184f',
'sample_token': 'ca9a282c9e77460f8360f564131a8af5',
'ego_pose_token': '9d9bf11fb0e144c8b446d54a8a00184f',
'calibrated_sensor_token': 'a183049901c24361a6b0b11b8013137c',
'timestamp': 1532402927647951,
'fileformat': 'pcd',
'is_key_frame': True,
'height': 0,
'width': 0,
'filename': 'samples/LIDAR_TOP/n015-2018-07-24-11-22-45+0800__LIDAR_TOP__1532402927647951.pcd.bin',
'prev': '',
'next': '0cedf1d2d652468d92d23491136b5d15',
'sensor_modality': 'lidar',
'channel': 'LIDAR_TOP'}
可视化
- 会输出名字为123.png的图像
nuscenes.render_sample_data(lidar_sample_data["token"], out_path="./123")3.1.2.2 通过sampe_data中的filename拿到具体的雷达数据.pcd.bin文件
lidar_filename = sample_data["filename"] # samples/LIDAR_TOP/n015-2018-07-24-11-22-45+0800__LIDAR_TOP__1532402927647951.pcd.bin
data = np.fromfile(os.path.join(dataroot, lidar_filename), dtype=np.float32).reshape(-1, 5)
print(data.shape) # (34688, 5) #x y z  intensity   ring_index
- 实际上拿到的是某种路径:
samples/LIDAR_TOP/n015-2018-07-24-11-22-45+0800__LIDAR_TOP__1532402927647951.pcd.bin - 暂时理解为
os.path.join(dataroot, lidar_filename)
3.2 坐标系的理解
3. 坐标系3.1 全局坐标系,global coordinate- 可以简单的认为,车辆在t0时刻的位置认为是全局坐标系的原点 3.2 车体坐标系,ego_pose. ego coordinate- 以车体为原点的坐标系3.3 传感器坐标系- lidar 的坐标系- camera 的坐标系- radar 的坐标系
3.3 标定的理解
- 第一个理解。整个过程如下:
- 即将 lidar 点云转换到 global,再转换到图片上
过程为 timestamp = t0 时的lidar_points -> ego_pose0 -> global -> ego_pose1 -> camera -> intrinsic -> image
- 第二个理解,拿到 4*4 变换矩阵的过程
4. 标定calibater
lidar的标定,获得的结果是:lidar相对于ego而言的位置(translation),和旋转(rotation) - translation 可以用3个float数字表示位置- 相对于ego而言的位置- rotation则是用4个float表示旋转,用的是四元数camera的标定,获得的结果是:camera相对于ego而言的位置 (translation),和旋转(rotation) - translation 可以用3个float数字表示位置- 相对于ego而言的位置- rotation则是用4个float表示旋转,用的是四元数- carmera 还多了一个camera_intrinsic 相机的内参(3d->2d平面)- 相机畸变参数(目前nuScenes数据集不考虑)
- 通过
lidar_calibrated_data = nuscenes.get("calibrated_sensor", lidar_sample_data["calibrated_sensor_token"])类似的语句,就能拿到传感器的标定
3.3.1 LIDAR calibrated_sensor
- 主要完成 lidar_points -> ego_pose0 -> global
拿到 lidar 相对 ego 的标定数据
通过 lidar_calibrated_data = nuscenes.get("calibrated_sensor", lidar_sample_data["calibrated_sensor_token"]) 拿到 lidar 的标定数据。
标定数据 rotation 四元数 转 旋 转矩阵的过程。
'''
# lidar_calibrated_data = nuscenes.get("calibrated_sensor", lidar_sample_data["calibrated_sensor_token"])
# calibrated_sensor 中的rotation属性使用四元数
lidar_calibrated_data["rotation"] ----》[0.7077955119163518, -0.006492242056004365, 0.010646214713995808, -0.7063073142877817]Quaternion(lidar_calibrated_data["rotation"]).rotation_matrix- 使用四元数转换成旋转矩阵,如下:[[ 0.00203327  0.99970406  0.02424172][-0.99998053  0.00217566 -0.00584864][-0.00589965 -0.02422936  0.99968902]]
'''
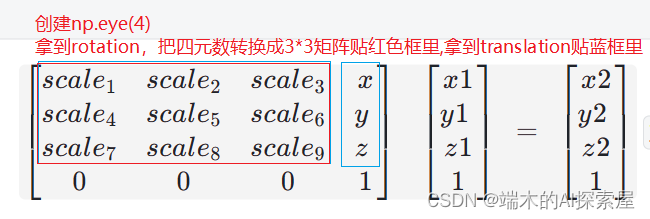
旋转矩阵平移矩阵合并
理解lidar 旋转矩阵 与 平移矩阵 合并
- 旋转矩阵是 3*3 与 平移矩阵
- 合并就是创建一个4*4 的对角矩阵,把前三行前三列替换为旋转矩阵。前三行第四列替换为
- 二维数据的矩阵一般22就搞定,旋转和平移合并就变成33.这里用二维,简单理解3维为啥要变成4*4。 [ s c a l e 0 x 0 s c a l e y 0 0 1 ] [ x 1 y 1 1 ] = [ x 2 y 2 1 ] \begin{bmatrix} scale&0&x\\ 0&scale&y \\ 0&0&1\end{bmatrix} \begin{bmatrix} x1\\ y1 \\ 1\end{bmatrix} = \begin{bmatrix} x2\\ y2 \\ 1\end{bmatrix} scale000scale0xy1 x1y11 = x2y21
- 代码
def get_matrix(calibrated_data):output = np.eye(4)output[:3, :3] = Quaternion(calibrated_data["rotation"]).rotation_matrixoutput[:3, 3] = calibrated_data["translation"]return outputlidar_calibrated_data = nuscenes.get("calibrated_sensor", lidar_sample_data["calibrated_sensor_token"])
# 6.1.2
# lidar_to_ego_matrix 是基于ego而言的。
# point = lidar_to_ego_matrix @ lidar_points.T   代表了lidar -> ego 的过程。
lidar_to_ego_matrix = get_matrix(lidar_calibrated_data)
print(lidar_to_ego_matrix)
'''
[[ 0.00203327  0.99970406  0.02424172  0.943713  ][-0.99998053  0.00217566 -0.00584864  0.        ][-0.00589965 -0.02422936  0.99968902  1.84023   ][ 0.          0.          0.          1.        ]]
'''- $$\begin{bmatrix} scale_1&scale_2&scale_3&x\\ scale_4&scale_5&scale_6&y \\ scale_7&scale_8&scale_9&z \\
0&0&0&1\end{bmatrix}  \begin{bmatrix} x1\\ y1 \\ z1 \\1\end{bmatrix} = \begin{bmatrix} x2\\ y2 \\z2\\ 1\end{bmatrix} $$lidar_points.T 是方便矩阵乘法
[图片]#### 得到 lidar_to_ego_matrix```python
lidar_calibrated_data = nuscenes.get("calibrated_sensor", lidar_sample_data["calibrated_sensor_token"])
lidar_to_ego_matrix = get_matrix(lidar_calibrated_data)
print(lidar_to_ego_matrix)
'''
[[ 0.00203327  0.99970406  0.02424172  0.943713  ][-0.99998053  0.00217566 -0.00584864  0.        ][-0.00589965 -0.02422936  0.99968902  1.84023   ][ 0.          0.          0.          1.        ]]
拿到 ego 相对于 global 的标定
ego_pose_data0 = nuscenes.get("ego_pose", lidar_sample_data["ego_pose_token"])
# print(ego_pose_data0)
'''
{'token': '9d9bf11fb0e144c8b446d54a8a00184f',
'timestamp': 1532402927647951,
'rotation': [0.5720320396729045, -0.0016977771610471074, 0.011798001930183783, -0.8201446642457809],
'translation': [411.3039349319818, 1180.8903791765097, 0.0]}
'''
拿到 ego_to_global_matrix
go_to_global_matrix = get_matrix(ego_pose_data0)
print(ego_to_global_matrix)
'''
[[-3.45552926e-01  9.38257989e-01  1.62825160e-02  4.11303935e+02][-9.38338111e-01 -3.45280305e-01 -1.74097708e-02  1.18089038e+03][-1.07128245e-02 -2.12945025e-02  9.99715849e-01  0.00000000e+00][ 0.00000000e+00  0.00000000e+00  0.00000000e+00  1.00000000e+00]]
'''
具体变换
lidar_to_global_matrix = ego_to_global_matrix @ lidar_to_ego_matrix # lidar-ego-global
global_points = lidar_point @ lidar_to_global_matrix.T # 真正变换点
代码
def get_matrix(calibrated_data, inverse=False):"""args:@calibrated_data : calibrated_sensor对象。一般通过nuscenes.get("calibrated_sensor",token..)得到@inverse : 是否取逆矩阵。具体根据calibrated_sensor对象里面的 rotation 与 translation 计算出一个4*4的旋转平移矩阵。如果inverse设置为ture。则对这个矩阵逆变换"""output = np.eye(4)output[:3, :3] = Quaternion(calibrated_data["rotation"]).rotation_matrixoutput[:3, 3] = calibrated_data["translation"]if inverse:output = np.linalg.inv(output)return outputlidar_calibrated_data = nuscenes.get("calibrated_sensor", lidar_sample_data["calibrated_sensor_token"])# 6.1.2
# lidar_to_ego_matrix 是基于ego而言的。
# point = lidar_to_ego_matrix @ lidar_points.T   代表了lidar -> ego 的过程。
lidar_to_ego_matrix = get_matrix(lidar_calibrated_data)
print(lidar_to_ego_matrix)
'''
[[ 0.00203327  0.99970406  0.02424172  0.943713  ][-0.99998053  0.00217566 -0.00584864  0.        ][-0.00589965 -0.02422936  0.99968902  1.84023   ][ 0.          0.          0.          1.        ]]
'''# 6.2 timestamp = t0 时的ego_pose0 -> global
# ego_to_global_matrix 是基于ego而言的。
# point = ego_to_global_matrix @ lidar_points.T
ego_pose_data0 = nuscenes.get("ego_pose", lidar_sample_data["ego_pose_token"])
# print(ego_pose_data0)
'''
{'token': '9d9bf11fb0e144c8b446d54a8a00184f',
'timestamp': 1532402927647951,
'rotation': [0.5720320396729045, -0.0016977771610471074, 0.011798001930183783, -0.8201446642457809],
'translation': [411.3039349319818, 1180.8903791765097, 0.0]}
'''
ego_to_global_matrix = get_matrix(ego_pose_data0)
print(ego_to_global_matrix)
'''
[[-3.45552926e-01  9.38257989e-01  1.62825160e-02  4.11303935e+02][-9.38338111e-01 -3.45280305e-01 -1.74097708e-02  1.18089038e+03][-1.07128245e-02 -2.12945025e-02  9.99715849e-01  0.00000000e+00][ 0.00000000e+00  0.00000000e+00  0.00000000e+00  1.00000000e+00]]
'''
3.3.2 相机 camera 的标定
- 主要完成 global -> ego_pose1 -> camera -> intrinsic -> image
- camera 有很多,要循环处理
- 相机标定注意点。求得的变换矩阵后,求逆矩阵
拿到 camera 相对 ego 的标定数据
通过 lidar_calibrated_data = nuscenes.get("calibrated_sensor", lidar_sample_data["calibrated_sensor_token"]) 拿到 lidar 的标定数据。
- 代码
camera_token = sample["data"][cam]
camera_data  = nuscenes.get("sample_data", camera_token)image_file = os.path.join(dataroot, camera_data["filename"])
image = cv2.imread(image_file)camera_calibrated_token = camera_data["calibrated_sensor_token"]
camera_calibrated_data = nuscenes.get("calibrated_sensor", camera_calibrated_token)
'''camera多了camera_intrinsic 所以写下来。
{'token': '75ad8e2a8a3f4594a13db2398430d097',
'sensor_token': 'ec4b5d41840a509984f7ec36419d4c09',
'translation': [1.52387798135, 0.494631336551, 1.50932822144],
'rotation': [0.6757265034669446, -0.6736266522251881, 0.21214015046209478, -0.21122827103904068],
'camera_intrinsic': [[1272.5979470598488, 0.0, 826.6154927353808], [0.0, 1272.5979470598488, 479.75165386361925], [0.0, 0.0, 1.0]]}
得到camera_to_ego_matrix,然后取逆,得到ego_to_camera_matrix
ego_to_camera_matrix = get_matrix(camera_calibrated_data, True) # 不加True得到的是camera_to_ego_matrix
拿到 ego 相对于 global 的标定
camera_ego_pose = nuscenes.get("ego_pose", camera_data["ego_pose_token"])
拿到 ego_to_global_matrix,然后取逆,得到 global_to_ego_matrix
global_to_ego_matrix = get_matrix(camera_ego_pose, True) # 不加True得到的是ego_to_global_matrix
相比 lidar,新增相机内参矩阵
## 7.2 新增步骤,处理camera_intrinsiccamera_intrinsic = np.eye(4)camera_intrinsic[:3, :3] = camera_calibrated_data["camera_intrinsic"] # shape= 【3 * 3】
具体变换
global_to_image = camera_intrinsic @ ego_to_camera_matrix @ global_to_ego_matrix
3.3.3 画框
for token in sample["anns"]:annotation = nuscenes.get("sample_annotation", token)box = Box(annotation["translation"], annotation['size'], Quaternion(annotation["rotation"]))corners = box.corners().T # box.corners()形状是[3, 8]global_corners = np.concatenate((corners, np.ones((len(corners), 1))), axis=1)image_base_corners = global_corners @ global_to_image.Timage_base_corners[:, :2] /= image_base_corners[:, [2]]image_base_corners = image_base_corners.astype(np.int32)ix, iy = [0, 1, 2, 3, 0, 1, 2, 3, 4, 5, 6, 7], [4, 5, 6, 7, 1, 2, 3, 0, 5, 6, 7, 4]for p0, p1 in zip(image_base_corners[ix], image_base_corners[iy]):if p0[2] <= 0 or p1[2] <= 0: continuecv2.line(image, (p0[0], p0[1]), (p1[0], p1[1]), (0, 255, 0), 2, 16)''' 循环表示,画0 与 4 的边 画1 与 5 的边 画2 与 6 的边 画3 与 7 的边 画0 与 1 的边 画1 与 2 的边 画2 与 3 的边 画3 与 0 的边 画4 与 5 的边 画5 与 6 的边 画6 与 7 的边 画7 与 4 的边 0 ------ 1/ | / |4 ------ 5 || 3 ---|-- 2 | / | /7 ------ 6'''
可视化
nuscenes.render_annotation(token, out_path="./234")
相关文章:
Nuscenes数据集点云数据如何转换到图像上
零、概要 注意:该文章是手写ai自动驾驶,Nuscenes数据集的笔记。 首先,学习需要使用到 nuScenes 数据集。python 工具需要使用到 nuscenes-devkit、pyquaternion from nuscenes.nuscenes import NuScenes from pyquaternion import Quatern…...
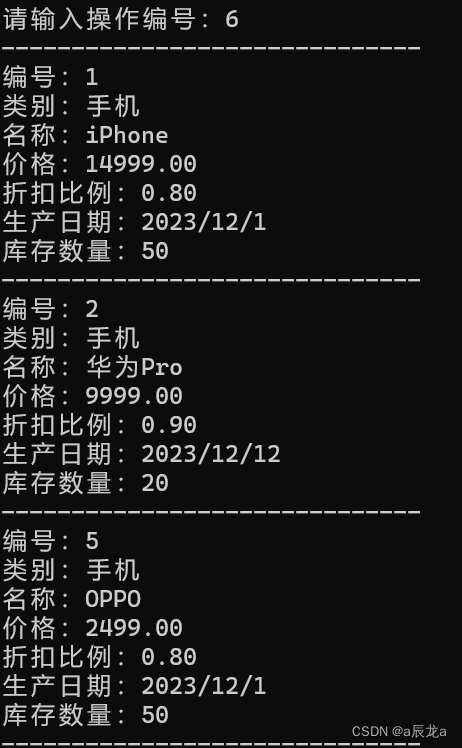
【C语言期末】商品管理系统
本文资源:https://download.csdn.net/download/weixin_47040861/88820155 1.题目要求 商品管理系统 商品信息包括:包括编号、类别、名称、价格、折扣比例、生产时间 、存货数量等要求:1、信息首先保存在文件中,然后打开文件进行…...
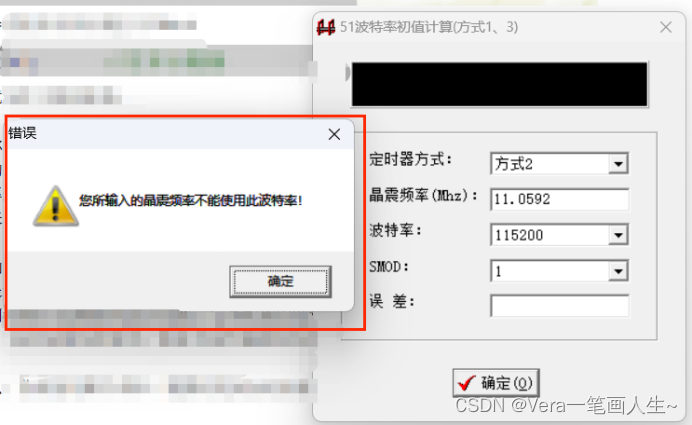
单片机学习笔记---串口通信(2)
目录 串口内部结构 串口相关寄存器 串口控制寄存器SCON SM0和SM1 SM2 REN TB8和RB8 TI和RI 电源控制寄存器PCON SMOD 串口工作方式 方式0 方式0输出: 方式0输入 方式1 方式1输出。 方式1输入 方式2和方式3 方式2和方式3输出: 方式2和…...

【Java】乐观锁有哪些常见实现方式?
Java中的乐观锁主要有两种常见的实现方式: CAS(Compare and Swap):这是实现乐观锁的核心算法。CAS操作包含三个参数:内存地址V、旧的预期值A和要修改的新值B。执行CAS操作时,会先比较内存地址V中的值是否等…...
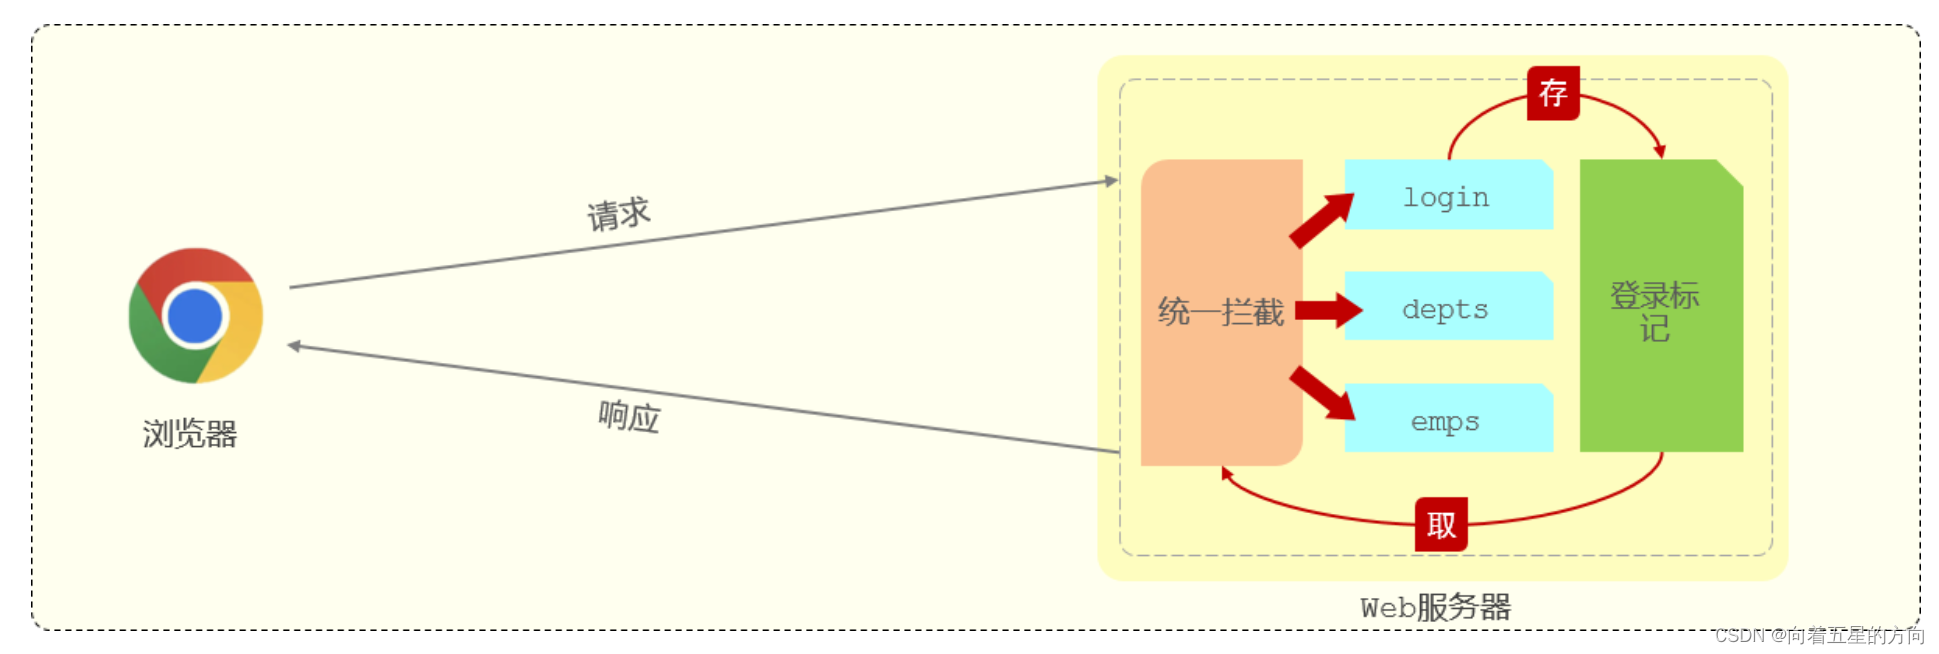
Javaweb之SpringBootWeb案例之登录校验功能的详细解析
2. 登录校验 2.1 问题分析 我们已经完成了基础登录功能的开发与测试,在我们登录成功后就可以进入到后台管理系统中进行数据的操作。 但是当我们在浏览器中新的页面上输入地址:http://localhost:9528/#/system/dept,发现没有登录仍然可以进…...

CSS之盒模型
盒模型概念 浏览器盒模型(Box Model)是CSS中的基本概念,它描述了元素在布局过程中如何占据空间。盒模型由内容(content)、内边距(padding)、边框(border)、和外边距&…...
博客系统-SpringBoot版本
相比于之前使用Servlet来完成的博客系统,SpringBoot版本的博客系统功能更完善,使用到的技术更接近企业级,快来看看吧~ 目录 1.项目介绍 2.数据库准备 3.实体化类 4.返回格式 5.登录和注册功能 6.登出(注销)功能…...
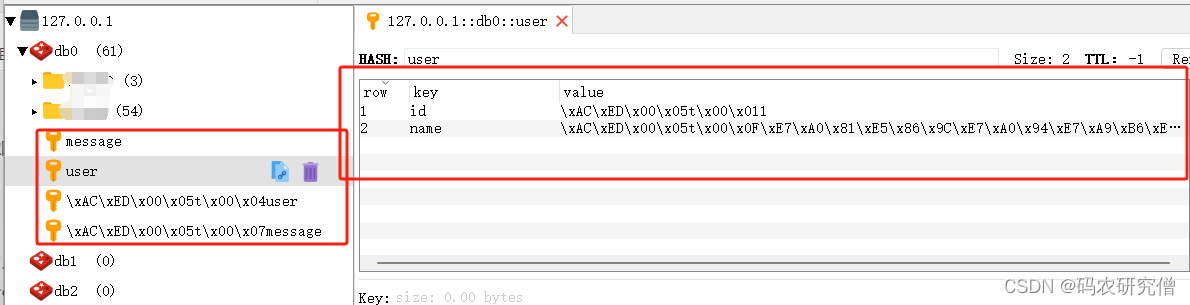
详细分析Redis中数值乱码的根本原因以及解决方式
目录 前言1. 问题所示2. 原理分析3. 拓展 前言 对于这方面的相关知识推荐阅读: Redis框架从入门到学精(全)Java关于RedisTemplate的使用分析 附代码java框架 零基础从入门到精通的学习路线 附开源项目面经等(超全) …...
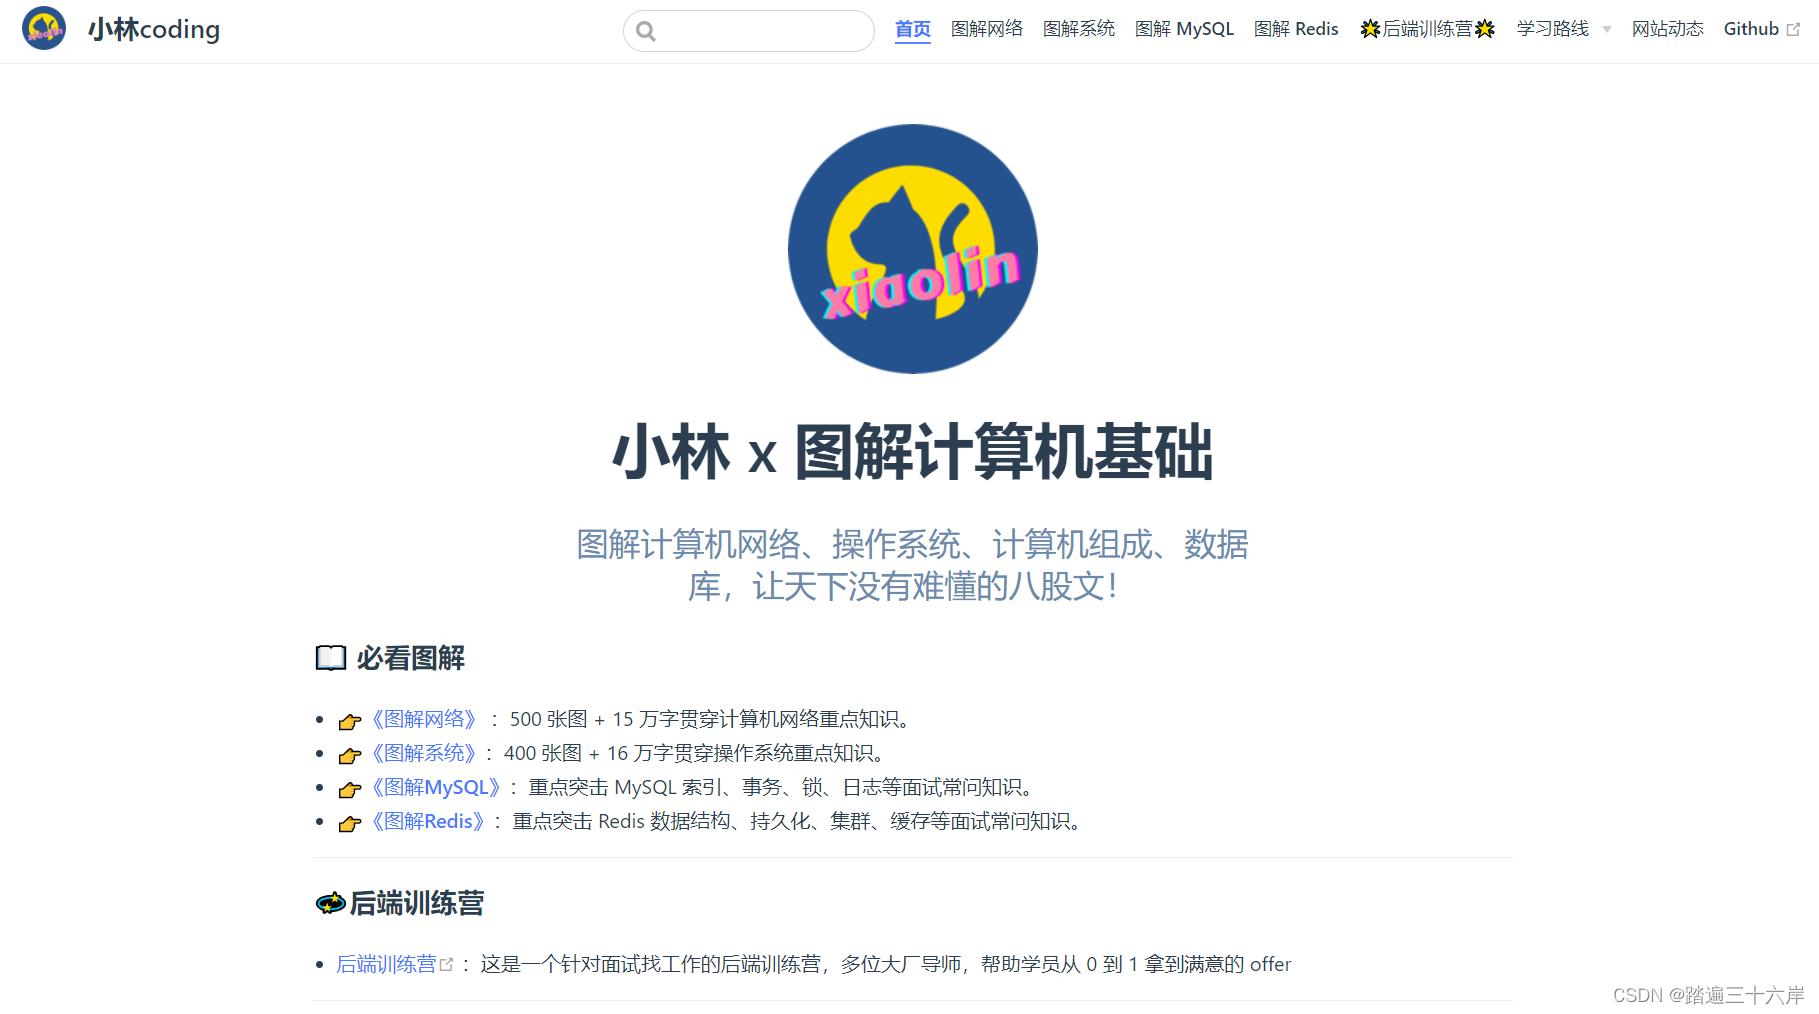
网络专栏目录
大家好我是苏麟 , 这是网络专栏目录 . 图解网络 资料来源 : 小林coding 小林官方网站 : 小林coding (xiaolincoding.com) 图解网络目录 基础篇 基础篇 TCP/IP网络模型有几层? : TCP/IP网络模型 键入网址到页面显示,期间发生了什么? : 键入网址到页面显示,期间发生了什么 现阶…...
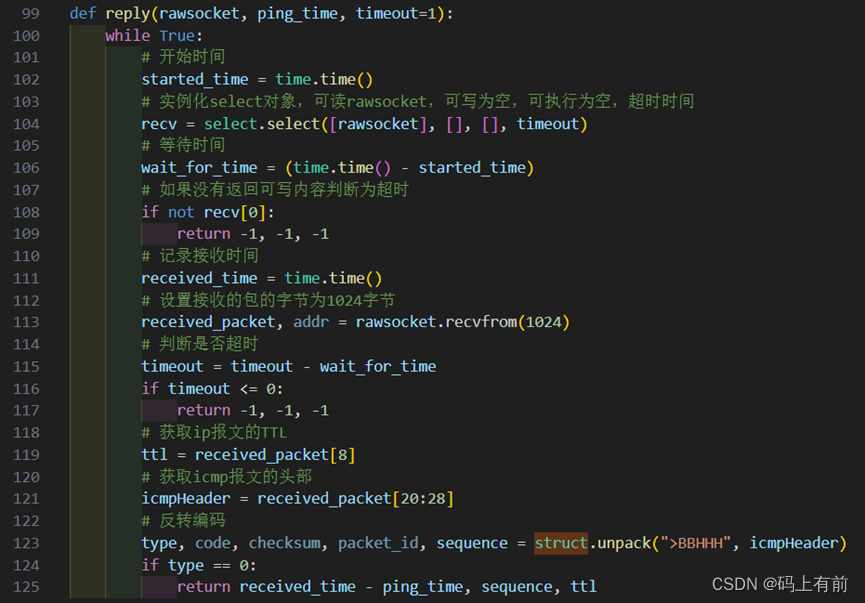
【Python网络编程之Ping命令的实现】
🚀 作者 :“码上有前” 🚀 文章简介 :Python开发技术 🚀 欢迎小伙伴们 点赞👍、收藏⭐、留言💬 Python网络编程之Ping命令的实现 代码见资源,效果图如下一、实验要求二、协议原理2…...

OpenHarmony轻量级驱动开发
OpenHarmony轻量级驱动开发 思维导图: https://download.csdn.net/download/lanlingxueyu/88817155 GPlO(General-purpose input/output)即通用型输入输出 描述 GPlO(General-purpose input/output)即通用型输入输出。通俗地说,GPlO口就是一些引脚可以通过它们输出高低…...

C语言如何输⼊字符数组?
一、问题 在程序中,scanf()函数可以输⼊任意类型的数据,gets()函数只能输⼊字符串等,但是如何更好地输⼊字符数组呢? 二、解答 我们知道如何使⽤格式输⼊函数 scanf(),那么可以使⽤%c 格式符逐个输⼊字符。这样输⼊有…...
人脸追踪案例及机器学习认识
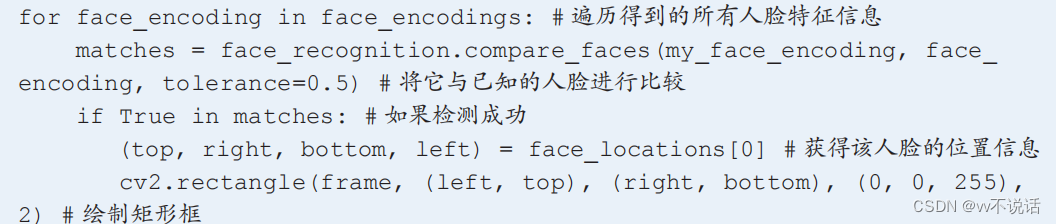
1.人脸追踪机器人初制 用程序控制舵机运动的方法与机械臂项目完全相同。 由于摄像头的安装方式为上下倒转安装,我们在编写程序读取图像时需使用 flip 函数将 图像上下翻转。 现在,只需要使用哈尔特征检测得到人脸在图像中的位置,再指示舵机运…...
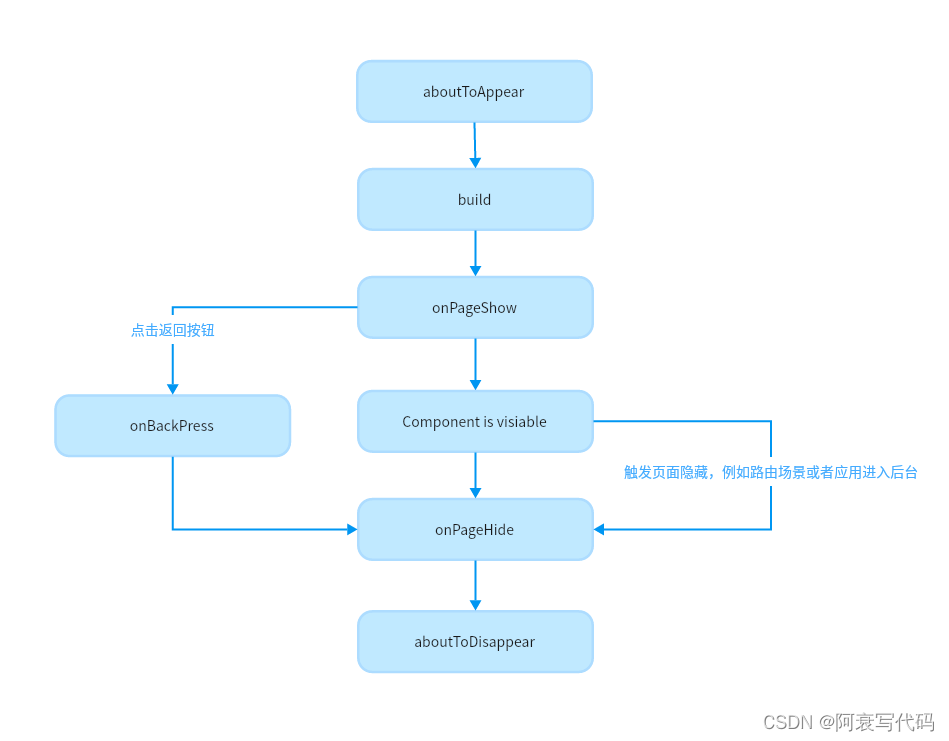
鸿蒙开发理论之页面和自定义组件生命周期
1、自定义组件和页面的关系 页面:即应用的UI页面。可以由一个或者多个自定义组件组成,Entry装饰的自定义组件为页面的入口组件,即页面的根节点,一个页面有且仅能有一个Entry。只有被Entry装饰的组件才可以调用页面的生命周期。自…...

docker-compose部署gitlab和jenkins
通过docker-compose部署gitlab和jenkins,方便后续工作 注意: gitlab占用资源较多,最好系统内存在8G以上,CPU4核心以上,否则gitlab有可能报错无法启动。docker版本用最新版本,低版本的docker可能会导致doc…...

Pytorch 复习总结 1
Pytorch 复习总结,仅供笔者使用,参考教材: 《动手学深度学习》 本文主要内容为:Pytorch 张量的常见运算、线性代数、高等数学、概率论。 Pytorch 张量的常见运算、线性代数、高等数学、概率论 部分 见 Pytorch 复习总结 1&…...
)
谷歌免费开放模糊测试框架OSS-Fuzz(物联网、车联网、供应链安全、C/C++)
目录 模糊测试的智能化和自动化 模糊测试不能代替安全设计原则 AI驱动的漏洞修补...
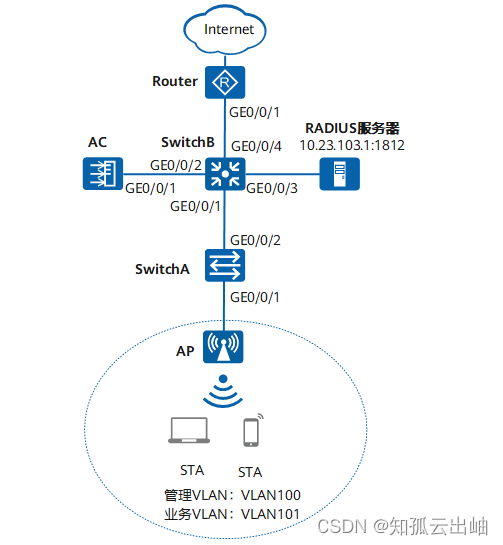
华为配置内部人员接入WLAN网络示例(802.1X认证)
配置内部人员接入WLAN网络示例(802.1X认证) 组网图形 图1 配置802.1X认证组网图 业务需求组网需求数据规划配置思路配置注意事项操作步骤配置文件 业务需求 用户接入WLAN网络,使用802.1X客户端进行认证,输入正确的用户名和密…...
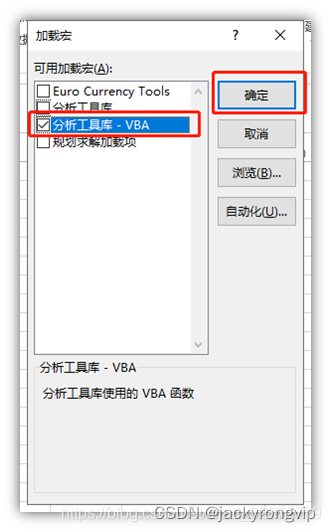
EXCEL中如何调出“数据分析”的菜单
今天发现,原来WPS还是和EXCEL比,还是少了“数据分析”这个日常基本做统计的菜单,只好用EXCEL了,但奇怪发现我的EXCEL中没发现这个菜单,然后查了下,才发现,要用如下的方法打开: 1&…...
基于Qt的人脸识别项目(功能:颜值检测,口罩检测,表情检测,性别检测,年龄预测等)
完整代码链接在文章末尾 效果展示 代码讲解(待更新) qt图片文件上传 #include <QtWidgets> #include <QFileDialog>...

YetiClaw Studio:本地部署AI游戏开发工作室实战指南
1. 项目概述:YetiClaw Studio,一个运行在本地硬件上的AI游戏开发工作室如果你是一个独立游戏开发者,或者是一个小型工作室的成员,那么你一定对游戏开发中那些繁琐、重复但又至关重要的环节深有体会:从最初那个模糊的创…...
)
别再手动敲YAML了!阿里云ACK部署应用的3种实战姿势(含私有镜像避坑)
阿里云ACK高效部署指南:3种实战方案与私有镜像避坑技巧 在Kubernetes生态中,阿里云容器服务ACK(Alibaba Cloud Container Service for Kubernetes)已成为众多企业部署容器化应用的首选平台。然而,许多开发者虽然掌握了…...

长期使用Taotoken聚合服务对开发运维效率的实际提升
🚀 告别海外账号与网络限制!稳定直连全球优质大模型,限时半价接入中。 👉 点击领取海量免费额度 长期使用Taotoken聚合服务对开发运维效率的实际提升 在构建和迭代基于大语言模型的应用时,开发者常常需要面对一个现实…...

终极指南:5分钟快速免费解锁Cursor AI编程助手Pro功能完整教程
终极指南:5分钟快速免费解锁Cursor AI编程助手Pro功能完整教程 【免费下载链接】cursor-free-vip [Support 0.45](Multi Language 多语言)自动注册 Cursor Ai ,自动重置机器ID , 免费升级使用Pro 功能: Youve reached …...

系统架构设计-①软件架构风格
目的: 软件体系结构,另一个名叫软件架构(Software Architecture,SA),所以下文中提到的“体系结构”“架构”。 软件体系结构设计的一个重要核心目标是达到体系结构级的复用,所以需要研究透彻各个…...

基于苏格拉底式提问的LLM深度推理:从概念澄清到工程实践
1. 项目概述:当AI学会“苏格拉底式提问”最近在探索如何让大语言模型(LLM)的推理能力更上一层楼时,我遇到了一个非常有意思的开源项目:jumasheff/socratic-rules。这个名字本身就充满了哲学与技术碰撞的火花——“苏格…...

专利撰写难、公开不规范,patent-disclosure-skill:一站式专利公开技巧工具,搞定专利文书规范撰写难题
在知识产权越来越受重视的当下,不管是科研人员、技术开发者,还是企业知识产权相关从业者,在专利相关工作中,总会遇到各种各样的棘手问题。 很多人深耕技术研发,好不容易做出创新成果,可一到专利公开、文书梳…...

火山引擎AgentKit实战:从零构建企业级AI智能体应用
1. 从零到一:AgentKit代码工坊深度解析与实战指南如果你正在寻找一个能快速上手、功能强大的企业级AI Agent开发平台,那么火山引擎的AgentKit绝对值得你花时间深入研究。最近,我花了大量时间泡在它的官方代码示例仓库bytedance/agentkit-samp…...

FastAPI多智能体开发:AI团队自动化后端工程实践
1. 项目概述:当AI智能体成为你的专属FastAPI工程团队如果你是一名后端开发者,尤其是使用FastAPI框架的,那么你一定经历过这样的场景:产品经理或你自己灵光一现,需要一个新功能,比如“给文章加个评论系统”。…...

智能算法车队换道决策与轨迹规划【附仿真】
✨ 长期致力于车队换道、支持向量机、决策树、换道决策、多目标优化研究工作,擅长数据搜集与处理、建模仿真、程序编写、仿真设计。 ✅ 专业定制毕设、代码 ✅ 如需沟通交流,点击《获取方式》 (1)NGSIM数据清洗与特征重构…...