【Git版本控制 02】分支管理
目录
一、创建分支
二、切换分支
三、合并分支
四、删除分支
五、合并冲突
六、分支策略
七、bug分支
一、创建分支
# 当前仓库只有 master 一个主分支
# 可通过 git branch 是进行分支管理的命令,可通过不同参数对分支进行查看、创建、删除(base) [root@localhost gitcode]# cat .git/HEAD
ref: refs/heads/master
(base) [root@localhost gitcode]# cat .git/refs/heads/master
84b615bfb313b40010c263cbadc67f24ce1ed1d3
(base) [root@localhost gitcode]# git branch
* master
(base) [root@localhost gitcode]# git branch dev
(base) [root@localhost gitcode]# git branchdev
* master
(base) [root@localhost gitcode]# ls .git/refs/heads/
dev  master
(base) [root@localhost gitcode]# cat .git/refs/heads/*
84b615bfb313b40010c263cbadc67f24ce1ed1d3
84b615bfb313b40010c263cbadc67f24ce1ed1d3
(base) [root@localhost gitcode]# # * 表示当前 HEAD 指向的分支是 master 分支
# git branch 只能查看本地分支,git branch -r 可查看远程分支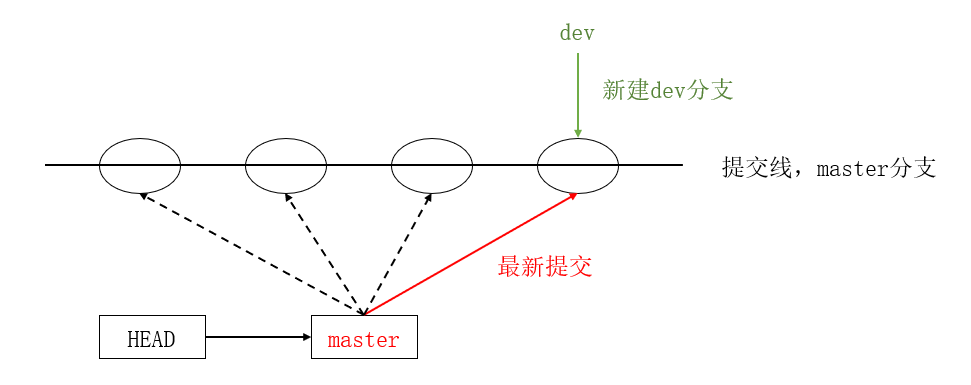
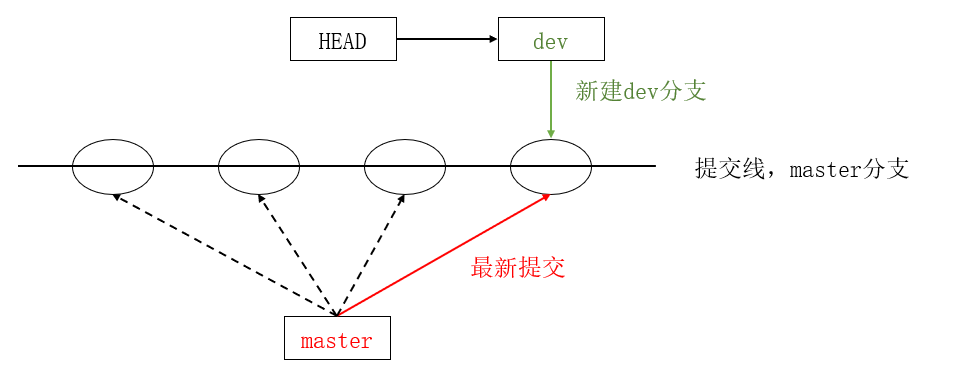
二、切换分支
(base) [root@localhost gitcode]# git checkout dev
切换到分支 'dev'
(base) [root@localhost gitcode]# cat .git/HEAD
ref: refs/heads/dev
(base) [root@localhost gitcode]# git branch
* devmaster
(base) [root@localhost gitcode]#
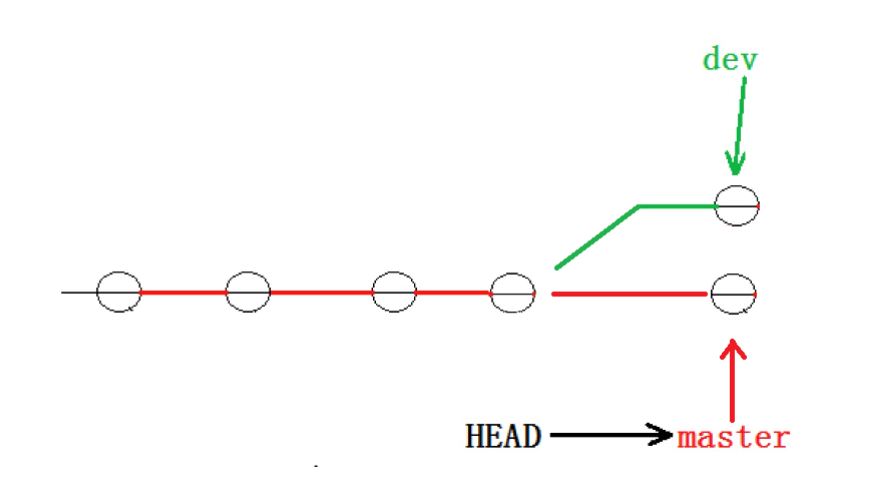
# 在新分支上修改文件内容(base) [root@localhost gitcode]# vim file1
(base) [root@localhost gitcode]# cat file1
hello git
hello world
add vertion1
add vertion2
write sth. for new branch: dev
(base) [root@localhost gitcode]# git add .
(base) [root@localhost gitcode]# git commit -m "modify file1 for dev"
[dev 088ce6d] modify file1 for dev1 file changed, 1 insertion(+)
(base) [root@localhost gitcode]# git checkout master
切换到分支 'master'
(base) [root@localhost gitcode]# cat file1
hello git
hello world
add vertion1
add vertion2
(base) [root@localhost gitcode]# # 为什么 dev分支 和 master分支 上同一个文件的内容不一样呢?
# 我们可以看到 dev分支和 master分支 上两者指向的提交是不一样的(base) [root@localhost gitcode]# cat .git/refs/heads/dev
088ce6d478daaadbd94870ceebd47bd05bf1b4e1
(base) [root@localhost gitcode]# cat .git/refs/heads/master
84b615bfb313b40010c263cbadc67f24ce1ed1d3
(base) [root@localhost gitcode]# 
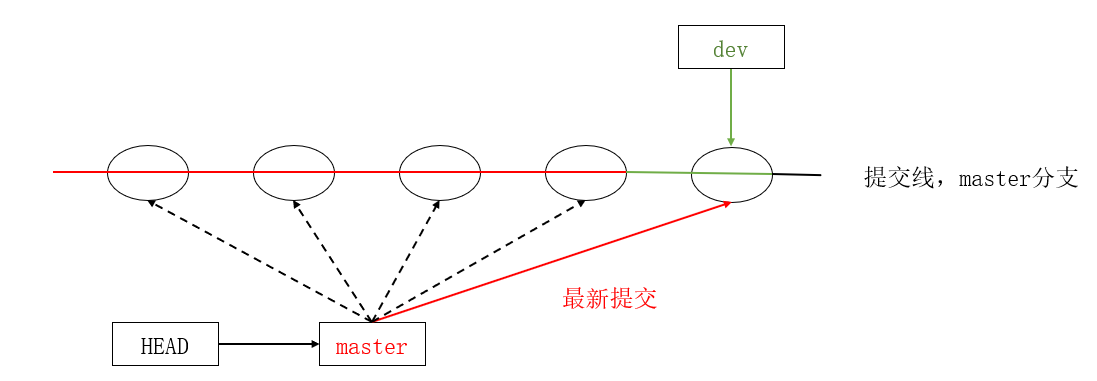
三、合并分支
# 先切回到 master分支,再通过 git merge 合并 dev分支(base) [root@localhost gitcode]# git checkout master
切换到分支 'master'
(base) [root@localhost gitcode]# cat file1
hello git
hello world
add vertion1
add vertion2
(base) [root@localhost gitcode]# git merge dev
更新 84b615b..088ce6d
Fast-forwardfile1 | 1 +1 file changed, 1 insertion(+)
(base) [root@localhost gitcode]# cat file1
hello git
hello world
add vertion1
add vertion2
write sth. for new branch: dev
(base) [root@localhost gitcode]# 
Fast-forward代表“快进模式”,也就是直接把master指向dev的当前提交,所以合并速度非常快。
四、删除分支
合并完成后, dev分⽀ 对于我们来说就没⽤了,那么 dev分⽀ 就可以被删除掉,注意如果当前正处于某分⽀下,就不能删除当前分⽀。
(base) [root@localhost gitcode]# git branch
* devmaster
(base) [root@localhost gitcode]# git branch -d dev
error: 无法删除您当前所在的分支 'dev'。
(base) [root@localhost gitcode]# git checkout master
切换到分支 'master'
(base) [root@localhost gitcode]# git branch -d dev
已删除分支 dev(曾为 088ce6d)。
(base) [root@localhost gitcode]# git branch
* master
(base) [root@localhost gitcode]#
因为创建、合并和删除分⽀⾮常快,所以Git⿎励你使⽤分⽀完成某个任务,合并后再删掉分⽀,这和直接在master分⽀上⼯作效果是⼀样的,但过程更安全。
五、合并冲突
在实际分⽀合并的时候,并不是想合并就能合并成功的,有时候可能会遇到代码冲突的问题。
# git checkout -b 可以创建并跳转到新分支
# 分别在 dev1分支 和 master分支上对file1文件修改并提交(base) [root@localhost gitcode]# git checkout -b dev1
切换到一个新分支 'dev1'
(base) [root@localhost gitcode]# git branch
* dev1master
(base) [root@localhost gitcode]# vim file1
(base) [root@localhost gitcode]# cat file1
hello git
hello world
add vertion1
add vertion2
write sth. for new branch: dev1
(base) [root@localhost gitcode]# git add .
(base) [root@localhost gitcode]# git commit -m "modify file1 for dev1"
[dev1 77f1455] modify file1 for dev11 file changed, 1 insertion(+), 1 deletion(-)
(base) [root@localhost gitcode]# git checkout master
切换到分支 'master'
(base) [root@localhost gitcode]# cat file1
hello git
hello world
add vertion1
add vertion2
write sth. for new branch: dev
(base) [root@localhost gitcode]# vim file1
(base) [root@localhost gitcode]# cat file1
hello git
hello world
add vertion1
add vertion2
write sth. for new branch: master
(base) [root@localhost gitcode]# git add .
(base) [root@localhost gitcode]# git commit -m "modify file1 for master"
[master b7534ec] modify file1 for master1 file changed, 1 insertion(+), 1 deletion(-)
(base) [root@localhost gitcode]#
这种情况下,Git只能试图把各⾃的修改合并起来,但这种合并就可能会有冲突,如下所⽰:
(base) [root@localhost gitcode]# git branchdev1
* master
(base) [root@localhost gitcode]# git merge dev1
自动合并 file1
冲突(内容):合并冲突于 file1
自动合并失败,修正冲突然后提交修正的结果。
(base) [root@localhost gitcode]# git status
# 位于分支 master
# 您有尚未合并的路径。
#   (解决冲突并运行 "git commit")
#
# 未合并的路径:
#   (使用 "git add <file>..." 标记解决方案)
#
#       双方修改:     file1
#
修改尚未加入提交(使用 "git add" 和/或 "git commit -a")
(base) [root@localhost gitcode]# cat file1
hello git
hello world
add vertion1
add vertion2
<<<<<<< HEAD
write sth. for new branch: master
=======
write sth. for new branch: dev1
>>>>>>> dev1
(base) [root@localhost gitcode]#
Git会⽤ <<<<<<<,=======,>>>>>>> 来标记出不同分⽀的冲突内容,此时我们必须要⼿动调整冲突代码,并需要再次提交修正后的结果!!
(base) [root@localhost gitcode]# vim file1
(base) [root@localhost gitcode]# cat file1
hello git
hello world
add vertion1
add vertion2
write sth. for new branch: master
write sth. for new branch: dev1
(base) [root@localhost gitcode]# git add .
(base) [root@localhost gitcode]# git commit -m "modify file1 for master and dev1"
[master 0dc19d0] modify file1 for master and dev1
(base) [root@localhost gitcode]# git status
# 位于分支 master
无文件要提交,干净的工作区
(base) [root@localhost gitcode]# 
# 用带参数的 git log 也可以看到分支合并情况(base) [root@localhost gitcode]# git log --graph --pretty=oneline --abbrev-commit
*   0dc19d0 modify file1 for master and dev1
|\
| * 77f1455 modify file1 for dev1
* | b7534ec modify file1 for master
|/
* 088ce6d modify file1 for dev
* 84b615b delete file3
* 0f28717 delete file4
* c31b56a modigy: add vertion2
* 167def0 modify: add vertion1
* 7df1e32 modify: file1
* f2e9210 Add three files
* fc3a350 Add first file
(base) [root@localhost gitcode]#
# 分支使用完最好删除掉(base) [root@localhost gitcode]# git branch -d dev1
已删除分支 dev1(曾为 77f1455)。
(base) [root@localhost gitcode]# git branch
* master
(base) [root@localhost gitcode]# 六、分支策略
通常合并分⽀时,如果可能,Git会采⽤ Fast forward 模式。
在这种 Fast forward 模式下,删除分⽀后,查看分⽀历史时,会丢掉分⽀信息,看不出来最新提交到底是 merge 进来的还是正常提交的。
但在合并冲突部分,我们也看到通过解决冲突问题,会再进⾏⼀次新的提交。
那么这就不是 Fast forward 模式了,这样的好处是,从分⽀历史上就可以看出分⽀信息。
Git ⽀持我们强制禁⽤ Fast forward 模式,那么就会在 merge 时⽣成⼀个新的 commit ,这样,从分⽀历史上就可以看出分⽀信息。
# 新建 dev2分支 并在新分支上修改 file1(base) [root@localhost gitcode]# git checkout -b dev2
切换到一个新分支 'dev2'
(base) [root@localhost gitcode]# vim file1
(base) [root@localhost gitcode]# cat file1
hello git
hello world
add vertion1
add vertion2
write sth. for new branch: master
write sth. for new branch: dev1
write sth. for new branch: dev2
(base) [root@localhost gitcode]# git add .
(base) [root@localhost gitcode]# git commit -m "modify file1 for dev2"
[dev2 13c3c71] modify file1 for dev21 file changed, 1 insertion(+)
(base) [root@localhost gitcode]#
# 使用 git -merge --no-ff 合并分支会提交一个新的 commit(base) [root@localhost gitcode]# git checkout master
切换到分支 'master'
(base) [root@localhost gitcode]# cat file1
hello git
hello world
add vertion1
add vertion2
write sth. for new branch: master
write sth. for new branch: dev1
(base) [root@localhost gitcode]# git merge --no-ff -m "merge with no-ff: dev2" dev2
Merge made by the 'recursive' strategy.file1 | 1 +1 file changed, 1 insertion(+)
(base) [root@localhost gitcode]# cat file1
hello git
hello world
add vertion1
add vertion2
write sth. for new branch: master
write sth. for new branch: dev1
write sth. for new branch: dev2
(base) [root@localhost gitcode]# git log --graph --pretty=oneline --abbrev-commit
* cb70524 merge with no-ff: dev2
|\
| * 13c3c71 modify file1 for dev2
|/
* 0dc19d0 modify file1 for master and dev1
|\
| * 77f1455 modify file1 for dev1
* | b7534ec modify file1 for master
|/
* 088ce6d modify file1 for dev
* 84b615b delete file3
* 0f28717 delete file4
* c31b56a modigy: add vertion2
* 167def0 modify: add vertion1
* 7df1e32 modify: file1
* f2e9210 Add three files
* fc3a350 Add first file
(base) [root@localhost gitcode]# 可以看出,在 --no-ff 模式下,merge后的分支图为:

所以在合并分⽀时,加上 --no-ff 参数就可以⽤普通模式合并,合并后的历史有分⽀,能看出来曾经做过合并,⽽ fast forward 合并就看不出来曾经做过合并。
分支管理原则:
- master分⽀应该是⾮常稳定的,也就是仅⽤来发布新版本,平时不能在上⾯⼲活;
- ⼲活都在dev分⽀上,也就是说,dev分⽀是不稳定的,到某个时候,⽐如1.0版本发布时,再把dev分⽀合并到master上,在master分⽀发布1.0版本;
七、bug分支
假如我们现在正在 dev2 分⽀上进⾏开发,开发到⼀半,突然发现 master 分⽀上⾯有bug,需要解决。在Git中,每个bug都可以通过⼀个新的临时分⽀来修复,修复后,合并分⽀,然后将临时分⽀删除。
可现在 dev2 的代码在⼯作区中开发了⼀半,还⽆法提交,怎么办?
(base) [root@localhost gitcode]# git checkout dev2
切换到分支 'dev2'
(base) [root@localhost gitcode]# vim file1
(base) [root@localhost gitcode]# cat file1
hello git
hello world
add vertion1
add vertion2
write sth. for new branch: master
write sth. for new branch: dev1
write sth. for new branch: dev2
this is a bug ...
(base) [root@localhost gitcode]# git status
# 位于分支 dev2
# 尚未暂存以备提交的变更:
#   (使用 "git add <file>..." 更新要提交的内容)
#   (使用 "git checkout -- <file>..." 丢弃工作区的改动)
#
#       修改:      file1
#
修改尚未加入提交(使用 "git add" 和/或 "git commit -a")
(base) [root@localhost gitcode]#
# Git提供了 git stash 命令可以将当前工作区信息进行储藏
# 被储藏的内容可以在将来的某个时间恢复出来(base) [root@localhost gitcode]# git stash
Saved working directory and index state WIP on dev2: 13c3c71 modify file1 for dev2
HEAD 现在位于 13c3c71 modify file1 for dev2
(base) [root@localhost gitcode]# git status
# 位于分支 dev2
无文件要提交,干净的工作区
(base) [root@localhost gitcode]# # 储藏 dev2 ⼯作区之后,由于我们要基于master分⽀修复bug,
# 所以需要切回 master 分⽀,再新建临时分⽀来修复bug(base) [root@localhost gitcode]# git checkout master
切换到分支 'master'
(base) [root@localhost gitcode]# git checkout -b fix_bug
切换到一个新分支 'fix_bug'
(base) [root@localhost gitcode]# vim file1
(base) [root@localhost gitcode]# cat file1
hello git
hello world
add vertion1
add vertion2
write sth. for new branch: master
write sth. for new branch: dev1
write sth. for new branch: dev2
fix a bug here!
(base) [root@localhost gitcode]# git add .
(base) [root@localhost gitcode]# git commit -m "fix a bug"
[fix_bug 1ec9fbd] fix a bug1 file changed, 1 insertion(+)
(base) [root@localhost gitcode]# # 修复完成后,切换到 master 分⽀,并完成合并,最后删除 fix_bug 分⽀(base) [root@localhost gitcode]# git checkout master
切换到分支 'master'
(base) [root@localhost gitcode]# git merge --no-ff -m "merge fix_bug branch" fix_bug
Merge made by the 'recursive' strategy.file1 | 1 +1 file changed, 1 insertion(+)
(base) [root@localhost gitcode]# cat file1
hello git
hello world
add vertion1
add vertion2
write sth. for new branch: master
write sth. for new branch: dev1
write sth. for new branch: dev2
fix a bug here!
(base) [root@localhost gitcode]# git branch -d fix_bug
已删除分支 fix_bug(曾为 1ec9fbd)。
(base) [root@localhost gitcode]## bug的修复⼯作已经做完了,我们还要继续回到 dev2 分⽀进⾏开发。
# ⼯作区是⼲净的,需要恢复现场
# git stash list 查看工作现场列表
# git stash pop 恢复工作现场(base) [root@localhost gitcode]# git checkout dev2
切换到分支 'dev2'
(base) [root@localhost gitcode]# git status
# 位于分支 dev2
无文件要提交,干净的工作区
(base) [root@localhost gitcode]# git stash list
stash@{0}: WIP on dev2: 13c3c71 modify file1 for dev2
(base) [root@localhost gitcode]# git stash pop
# 位于分支 dev2
# 尚未暂存以备提交的变更:
# (使用 "git add <file>..." 更新要提交的内容)
# (使用 "git checkout -- <file>..." 丢弃工作区的改动)
#
# 修改: file1
#
修改尚未加入提交(使用 "git add" 和/或 "git commit -a")
丢弃了 refs/stash@{0} (f9841933f9d2d3112f4262fc0e5c9f882fea7fd7)
(base) [root@localhost gitcode]# git stash list
(base) [root@localhost gitcode]## 恢复完代码之后我们便可以继续完成开发,开发完成后便可以进⾏提交
# 但是修复bug的内容并没有在dev2中显示(base) [root@localhost gitcode]# cat file1
hello git
hello world
add vertion1
add vertion2
write sth. for new branch: master
write sth. for new branch: dev1
write sth. for new branch: dev2
this is a bug ...
(base) [root@localhost gitcode]# git add .
(base) [root@localhost gitcode]# git commit -m "modify file1 for dev2"
[dev2 030cb5d] modify file1 for dev21 file changed, 1 insertion(+), 1 deletion(-)
(base) [root@localhost gitcode]# 
Master 分⽀⽬前最新的提交,是要领先于新建 dev2 时基于的 master 分⽀的提交的,所以我们
在 dev2 中当然看不⻅修复bug的相关代码。
我们的最终⽬的是要让 master 合并 dev2 分⽀的,那么正常情况下我们切回 master 分⽀直接合
并即可,但这样其实是有⼀定⻛险的。
因为在合并分⽀时可能会有冲突,⽽代码冲突需要我们⼿动解决(在 master 上解决)。我们⽆法保证对于冲突问题可以正确地⼀次性解决掉,因为在实际的项⽬中,代码冲突不只⼀两⾏那么简单,有可能⼏⼗上百⾏,甚⾄更多,解决的过程中难免⼿误出错,导致错误的代码被合并到master 上。

解决这个问题的⼀个好的建议就是:最好在⾃⼰的分⽀上合并下 master ,再让 master 去合并
dev ,这样做的⽬的是有冲突可以在本地分⽀解决并进⾏测试,⽽不影响 master 。


# dev2 合并 master(base) [root@localhost gitcode]# git branch
* dev2master
(base) [root@localhost gitcode]# git merge master
自动合并 file1
冲突(内容):合并冲突于 file1
自动合并失败,修正冲突然后提交修正的结果。
(base) [root@localhost gitcode]#
# 发生冲突,将冲突解决并重新提交(base) [root@localhost gitcode]# cat file1
hello git
hello world
add vertion1
add vertion2
write sth. for new branch: master
write sth. for new branch: dev1
write sth. for new branch: dev2
<<<<<<< HEAD
this is a bug ...
=======
fix a bug here!
>>>>>>> master
(base) [root@localhost gitcode]# vim file1
(base) [root@localhost gitcode]# cat file1
hello git
hello world
add vertion1
add vertion2
write sth. for new branch: master
write sth. for new branch: dev1
write sth. for new branch: dev2
i am coding ... done!
(base) [root@localhost gitcode]# git add .
(base) [root@localhost gitcode]# git commit -m "merge master"
[dev2 9604340] merge master
(base) [root@localhost gitcode]# git status
# 位于分支 dev2
无文件要提交,干净的工作区
(base) [root@localhost gitcode]# # 切回master,合并dev2(base) [root@localhost gitcode]# git checkout master
切换到分支 'master'
(base) [root@localhost gitcode]# git merge dev2
更新 1bcd87b..9604340
Fast-forwardfile1 | 2 +-1 file changed, 1 insertion(+), 1 deletion(-)
(base) [root@localhost gitcode]# git status
# 位于分支 master
无文件要提交,干净的工作区
(base) [root@localhost gitcode]# git branch -d dev2
已删除分支 dev2(曾为 9604340)。
(base) [root@localhost gitcode]# 相关文章:
【Git版本控制 02】分支管理
目录 一、创建分支 二、切换分支 三、合并分支 四、删除分支 五、合并冲突 六、分支策略 七、bug分支 一、创建分支 # 当前仓库只有 master 一个主分支 # 可通过 git branch 是进行分支管理的命令,可通过不同参数对分支进行查看、创建、删除(base) [rootloc…...

基金分类
一、按基金运作方式分类 (一)封闭式基金 是基金份额总额在期限内固定不变,在期限内不可申购和赎回。 (二)开放式基金 是基金份额总额不固定,在期限内可以申购和赎回。 这里的开放式基金特指传统的开放式基…...
kali系统概述、nmap扫描应用、john破解密码、抓包概述、以太网帧结构、抓包应用、wireshark应用、nginx安全加固、Linux系统加固
目录 kali nmap扫描 使用john破解密码 抓包 封装与解封装 网络层数据包结构 TCP头部结构编辑 UDP头部结构 实施抓包 安全加固 nginx安全 防止缓冲区溢出 Linux加固 kali 实际上它就是一个预安装了很多安全工具的Debian Linux [rootmyhost ~]# kali resetkali …...
)
Spring Cloud 路由和消息传递 (HTTP 路由)
Spring Cloud 路由 Spring Cloud 路由是指将请求路由到特定服务的机制。Spring Cloud 提供了多种路由机制,包括: Ribbon: 一个基于 HTTP 和 TCP 的客户端负载均衡工具,提供软负载均衡、故障转移等功能。Feign: 一个声明式的 HTTP 客户端&am…...
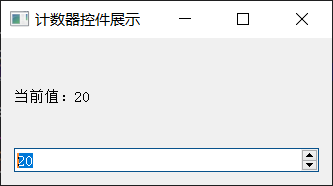
【PyQt】12-滑块、计数控件
文章目录 前言一、滑块控件 QSlider运行结果 二、计数器控件 QSpinBox运行结果 总结 前言 1、滑块控件 2、计数控件 一、滑块控件 QSlider #Author :susocool #Creattime:2024/2/15 #FileName:28-滑块控件 #Description: 通过滑块选择字体大小 import sys from PyQ…...
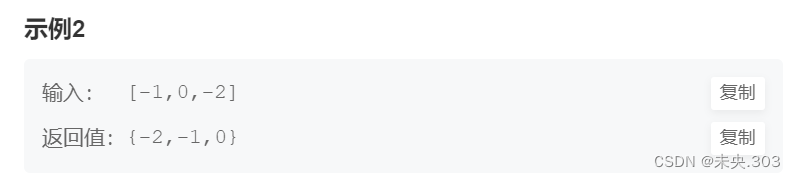
【牛客面试必刷TOP101】Day21.BM11 链表相加(二)和BM12 单链表的排序
作者简介:大家好,我是未央; 博客首页:未央.303 系列专栏:牛客面试必刷TOP101 每日一句:人的一生,可以有所作为的时机只有一次,那就是现在!!!&…...

疑似针对安全研究人员的窃密与勒索
前言 笔者在某国外开源样本沙箱平台闲逛的时候,发现了一个有趣的样本,该样本伪装成安全研究人员经常使用的某个渗透测试工具的破解版压缩包,对安全研究人员进行窃密与勒索双重攻击,这种双重攻击的方式也是勒索病毒黑客组织常用的…...

Mamba-UNet:用于医学图像分割的类似UNet的纯视觉Mamba网络
摘要 在医学图像分析的最新进展中,卷积神经网络(CNN)和视觉转换器(ViT)都取得了显著的基准成绩。前者通过其卷积操作在捕获局部特征方面表现出色,而后者则通过利用自注意力机制实现了出色的全局上下文理解。然而,这两种架构在有效建模医学图像中的长距离依赖关系时都存…...

2024/2/14
1.1、若有下面的变量定义,以下语句中合法的是( A )。 int i,a[10],*p; A) pa2; B) pa[5]; C) pa[2]2; D) p&(i2); 1.2、有以下程序 …...
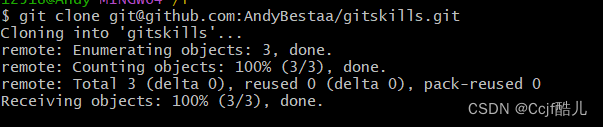
跟廖雪峰老师学习Git(持续更新)
Git简介 创建版本库 第一步,创建一个新目录 第二步,通过git init变成Git可以管理的仓库 把文件添加到文本库,不要使用Windows自带的记事本! 我用的是VS code 创建readme.txt 放入库中 commit可以一次提交很多文件࿰…...

2024,欢迎来到性价比时代
「不是XX买不起,而是YY更有性价比。」——翻开过去一年的商业消费史,这句话几乎可以贯穿始终。年轻消费者们追求性价比的眼光一旦定型,一些品牌过去被品质生活、消费升级包装出来的华丽外壳,很容易一击就碎。 胜出的「性价比之王…...
-输入捕获模式测量脉冲)
【国产MCU】-CH32V307-通用定时器(GPTM)-输入捕获模式测量脉冲
通用定时器(GPTM)-输入捕获模式测量脉冲 文章目录 通用定时器(GPTM)-输入捕获模式测量脉冲1、通用定时器(GPTM)介绍2、输入捕获模式3、驱动API介绍4、定时器输入捕获示例CH32V307的通用定时器模块包含一个16 位可自动重装的定时器(TIM2、TIM3、TIM4和TIM5),用于测量脉…...

sqlserver char,nchar varchar nvarchar的区别
在 SQL Server 中,char、nchar、varchar 和 nvarchar 是用于存储文本数据的数据类型。它们之间的区别主要在于它们所使用的字符集和存储空间方面。 char:(中文占2个字节,英文1个) char 是一种固定长度的字符数据类型&a…...
FT2232调试记录(2)
FT2232调试记录 (1)获取当前连接的FTDI设备通道个数:(2)获取当前连接的设备通道的信息:(3)配置SPI的通道:(4)如何设置GPIO:(5)DEMO测试: FT2232调…...
网络学习:数据链路层VLAN原理和配置
一、简介: VLAN又称为虚拟局域网,它是用来将使用路由器的网络分割成多个虚拟局域网,起到隔离广播域的作用,一个VLAN通常对应一个IP网段,不同VLAN通常规划到不同IP网段。划分VLAN可以提高网络的通讯质量和安全性。 二、…...
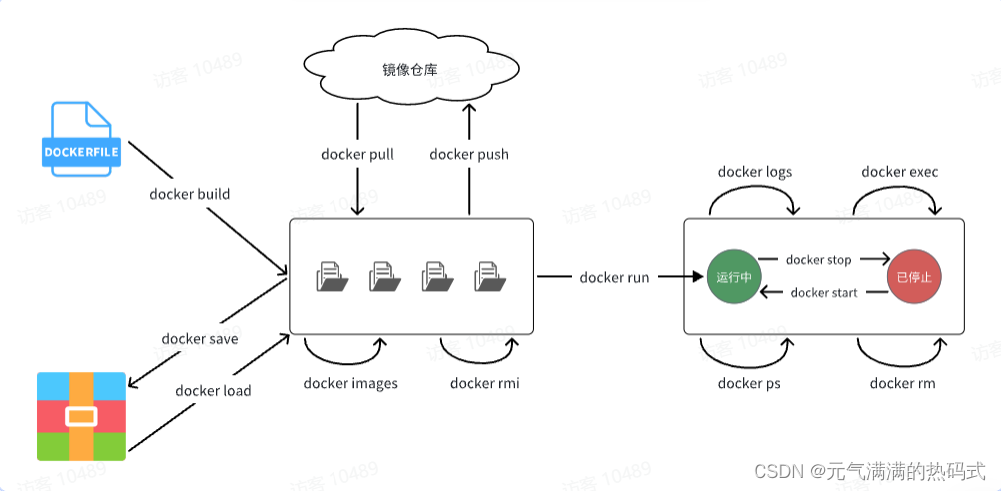
Docker的常见命令以及命令别名
常见命令 命令说明docker pull拉取镜像docker push推送镜像到DockerRegistrydocker images查看本地镜像docker rmi删除本地镜像docker run创建并允许容器docker stop停止指定容器docker start启动指定容器docker restart重新启动容器docker rm删除指定容器docker ps查看容器do…...
2024.02.14作业
1. 请编程实现二维数组的杨辉三角 #include <stdio.h> #include <stdlib.h> #include <string.h>int main() {int n;scanf("%d", &n);int a[n][n];memset(a, 0, sizeof(a));a[0][0] 1;for (int i 1; i < n; i){for (int j 0; j < i …...
SpringMVC原理(设计原理+启动原理+工作原理)
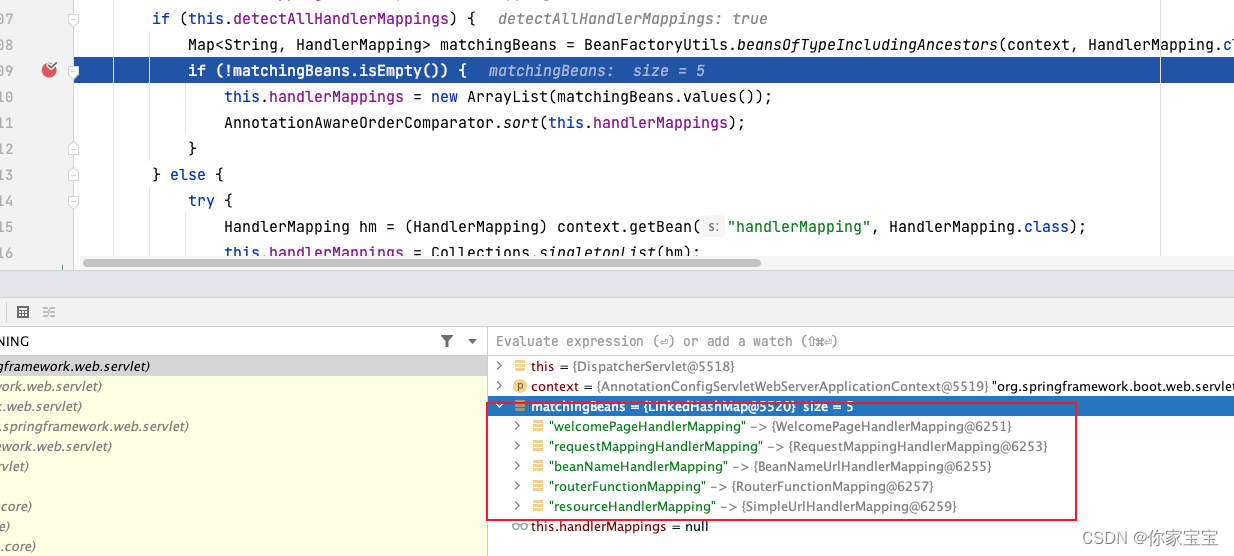
文章目录 前言正文一、设计原理1.1 servlet生命周期简述1.2 设计原理小结 二、启动原理2.1 AbstractHandlerMethodMapping 初始化 --RequestMapping注解解析2.2 DispatcherServlet 的初始化2.3 DispatcherServlet#initHandlerMappings(...) 初始化示例说明 三、工作原理 前言 …...

Java+SpringBoot构建智能捐赠管理平台
✍✍计算机编程指导师 ⭐⭐个人介绍:自己非常喜欢研究技术问题!专业做Java、Python、微信小程序、安卓、大数据、爬虫、Golang、大屏等实战项目。 ⛽⛽实战项目:有源码或者技术上的问题欢迎在评论区一起讨论交流! ⚡⚡ Java实战 |…...

ubuntu远程桌面配置以及常见问题
ubuntu桌面系统配置 ubuntu远程桌面配置如下 第一步,安装xrdp sudo apt-get isntall xrdp安装完检查一下服务是否可以正常启动, sudo systemctl status xrdp如果看到active应该就正常启动了 第二步,开启Ubuntu桌面共享 好接下来我们测试一…...
)
宇视DMX易用性推宣—即时回放进度条拖动(B3358P510版本开始支持)
一.功能介绍通过拖动进度条调整即时回放的时间点。即时回放:从当前时刻开始倒放回放画面,最多可倒放至24小时前,如无录像则无法回放。二.配置步骤1、进入平台【实况播放】界面,选中相机拖动到右侧窗格播放实…...

实在Agent实战录:解决委外加工成本核算不准,实现项目利润精准统计的架构演进路径
摘要: 步入2026年,离散制造与复杂供应链体系下的“委外加工”已成为企业调节产能的核心手段,但随之而来的“成本黑盒”与“利润虚标”依然是首席财务官(CFO)与首席信息官(CIO)的头号难题。本文由…...

NVDC充电架构深度解析:智能电源管理如何提升笔记本性能与电池寿命
1. 项目概述:NVDC充电器,一个被低估的“能量管家”如果你是一位经常需要带着笔记本电脑移动办公的资深用户,或者是一位对设备续航和充电效率有极致追求的硬件爱好者,那么“NVDC”这个词,很可能已经或即将进入你的视野。…...

MHMarkets迈汇:油价回落地缘风险有所缓和
MHMarkets迈汇:油价回落地缘风险有所缓和近期国际原油市场出现明显回吐,布伦特与WTI两大基准油价从前期高位双双滑落,地缘风险溢价随谈判预期升温而部分释放。市场围绕中东局势变化展开高频博弈,多空情绪快速切换。在这一背景下&a…...

三星固件下载器Bifrost:三分钟掌握跨平台官方固件获取指南
三星固件下载器Bifrost:三分钟掌握跨平台官方固件获取指南 【免费下载链接】Bifrost Cross-platform tool for downloading Samsung mobile device firmware. 项目地址: https://gitcode.com/gh_mirrors/sa/Bifrost 还在为三星设备找不到官方固件而烦恼吗&am…...

诺丽果汁终极选购指南——五大品牌全维度对比
我们聊过挑选诺丽果汁需要“看出身、看真材、看底牌”三大原则。今天,我们把这套标准真正落到实处,对市场上最具代表性的五个品牌——艾多美、美商大溪地、可可椰、美乐家、合百诺丽进行全维度对比,帮你看清每家的真实水平。快速结论放在最前…...

tRPC全栈类型安全实战
tRPC全栈类型安全实战:告别API类型地狱,TypeScript前后端零成本类型共享 摘要:在全栈TypeScript项目中,前后端类型不同步是最常见的Bug来源之一。tRPC通过编译时类型推导,实现了端到端的类型安全——前端调用后端API就像调用本地函数一样,类型自动推导、错误提前暴露。本…...

嵌入式开发调试实战:从内存泄漏到死锁的排查技巧与工具链
1. 项目概述:嵌入式开发的“捉虫”艺术干了十几年嵌入式,从8位单片机玩到多核ARM Cortex-A,从裸机撸到RTOS,我最大的感受就是:嵌入式开发,七分在调试,三分在写码。你代码写得再漂亮,…...

uniapp监听PDA扫码,除了广播还能怎么玩?聊聊H5+扩展与原生插件的选择
Uniapp中PDA扫码方案深度对比:从广播监听走向原生封装 在工业级移动应用开发中,PDA(便携式数据采集器)的扫码功能集成一直是刚需场景。霍尼韦尔EDA50P等专业设备虽然提供了默认的广播机制,但随着业务复杂度提升&#x…...

别再只调参了!用PyTorch玩转声纹识别:从EcapaTdnn到CAM++,7大模型实战对比与避坑指南
别再只调参了!用PyTorch玩转声纹识别:从EcapaTdnn到CAM,7大模型实战对比与避坑指南 声纹识别技术正在从实验室走向工业界,成为身份认证领域的新宠。不同于传统密码或指纹,声纹识别通过分析语音中的生物特征实现非接触式…...