Spring 用法学习总结(一)之基于 XML 注入属性
百度网盘: 👉 Spring学习书籍链接

Spring学习
- 1 Spring框架概述
- 2 Spring容器
- 3 基于XML方式创建对象
- 4 基于XML方式注入属性
- 4.1 通过set方法注入属性
- 4.2 通过构造器注入属性
- 4.3 使用p命名空间注入属性
- 4.4 注入bean与自动装配
- 4.5 注入集合
- 4.6 注入外部属性文件
- 4.7 注入属性的全部代码
1 Spring框架概述
- Spring是轻量级的开源的JavaEE框架,提供了多个模块
- Spring可以解决企业应用开发的复杂性
- Spring有两个核心部分:IOC和Aop
(1)IOC:控制反转,把创建对象过程交给Spring进行管理
(2)Aop:面向切面,不修改源代码进行功能增强 - Spring特点
(1)方便解耦,简化开发
(2)Aop编程支持
(3)方便程序测试
(4)方便和其他框架进行整合
(5)方便进行事务操作
(6)降低API开发难度
2 Spring容器
Spring提供了两种容器,分别是BeanFactory和ApplicationConetxt
BeanFactory
BeanFactory是bean的实例化工厂,主要负责bean的解析、实现和保存化操作,不提供给开发人员使用
ApplicationContext
ApplicationContext继承于BeanFactory,提供更多更强大的功能,一般由开发人员进行使用
ApplicationContext context = new ClassPathXmlApplicationContext("xml路径");
或
ApplicationContext context = new FileSystemXmlApplicationContext("xml路径");

3 基于XML方式创建对象
使用Spring需要的基础包:百度网盘

定义一个User类
package springstudy;//自己的包名public class User {public void add() {System.out.println("add...");}
}
创建一个XML文件,注意XML文件路径
其中<bean id=“user” class=“springstudy.User”></bean> 的 id是唯一标识,class是某类的全类名,即包名.类名
<?xml version="1.0" encoding="UTF-8" ?>
<beans xmlns="http://www.springframework.org/schema/beans"xmlns:xsi="http://www.w3.org/2001/XMLSchema-instance"xsi:schemaLocation="http://www.springframework.org/schema/beanshttp://www.springframework.org/schema/beans/spring-beans.xsd"><!--配置User对象创建--><bean id="user" class="springstudy.User"></bean>
</beans>
在Test类使用User类,注意ClassPathXmlApplicationContext(“bean1.xml”)的路径是./src/bean1.xml,其他位置需要使用ClassPathXmlApplicationContext(“file:xml文件绝对路径”)
package springstudy;//自己的包名
import org.springframework.context.ApplicationContext;
import org.springframework.context.support.ClassPathXmlApplicationContext;public class Test {public static void main(String[] args) {//加载Spring配置文件ApplicationContext context = new ClassPathXmlApplicationContext("bean1.xml");User user = context.getBean("user", User.class);System.out.println(user);user.add();}
}
运行结果
设置单实例还是多实例
bean 标签里面有属性(scope)用于设置单实例还是多实例
- scope=“singleton”,表示是单实例对象,是默认值
- scope=“prototype”,表示是多实例对象

设置 scope 值是 singleton 时,加载 spring 配置文件时就会创建单实例对象;设置 scope 值是 prototype 时,不是在加载 spring 配置文件时创建对象,而是在调用getBean 方法时候创建多实例对象
4 基于XML方式注入属性
DI(Dependency Injection):依赖注入,就是注入属性
控制反转是通过依赖注入实现的,其实它们是同一个概念的不同角度描述。通俗来说就是IoC是设计思想,DI是实现方式。
4.1 通过set方法注入属性
在User类中定义set方法
//属性private String name;private int age;private String address;private String degree;public User(int height, int weight) {this.height = height;this.weight = weight;}//set方法public void setName(String name) {this.name = name;}public void setAge(int age) {this.age = age;}public void setAddress(String address) {this.address = address;}public void setDegree(String degree) {this.degree = degree;}
在bean1.xml中使用 property 完成属性注入,name:类里面属性名称, value:向属性注入的值,property标签可以加 <value><![CDATA[内容]]></value> 或者<null/>(表示null)
<property name="name" value="西施"></property><property name="age"><value>18</value></property><property name="address"><null/></property>
4.2 通过构造器注入属性
在User类中定义构造器
//属性private int height;private int weight;//构造器public User(int height, int weight) {this.height = height;this.weight = weight;}
在bean1.xml中使用constructor-arg标签注入属性
<constructor-arg name="height" value="168"></constructor-arg>
<constructor-arg name="weight" value="90"></constructor-arg>
4.3 使用p命名空间注入属性
注:使用p命名空间注入属性,该属性必须定义set方法
在bean1.xml文件中添加p命名空间,在bean标签中添加p:属性名=“属性值”
xmlns:p="http://www.springframework.org/schema/p"
<bean id="user" class="springstudy.User" p:degree="本科">
4.4 注入bean与自动装配
创建Card类
package springstudy;public class Card {private int id;private double money;public void setId(int id) {this.id = id;}public void setMoney(double money) {this.money = money;}public double getMoney() {return money;}
}
在User类定义Card属性
private Card card;public void setCard(Card card) {this.card = card;}public Card getCard() {return card;}
在bean1.xml添加如下代码,如果通过<property name=“card.money” value=“999”></property>修改属性必须在User类中定义getCard方法
<bean id="user" class="springstudy.User" p:degree="本科"><!--注入bean方式1--><property name="card"><bean id="card" class="springstudy.Card"><property name="id" value="1"></property><property name="money" value="1000"></property></bean></property><!--注入bean方式2--><property name="card" ref="card"></property><property name="card.money" value="999"></property></bean><bean id="card" class="springstudy.Card"><property name="id" value="1"></property><property name="money" value="1000"></property></bean>
自动装配
自动装配是自动注入相关联的bean到另一个bean,通过bean标签的autowire属性实现
autowire=“byType”根据class类型自动装配
修改注入Bean方式1,设置autowire=“byType”,在byType(类型模式中)Spring容器会基于反射查看bean定义的类,然后找到依赖类型相同的bean注入到另外的bean中,这个过程需要set方法来完成(需要在User类中定义setCard方法),如果存在多个类型相同的bean,会注入失败,这时需要通过在不需要注入的bean中添加autowire-candidate=“false”来解决,id的属性值可以不和类中定义的属性相同(如User类中定义private Card card,但是在bean中id可以为card1)
<bean id="user" class="springstudy.User" p:degree="本科" autowrite="byType"></bean><bean id="card" class="springstudy.Card"><property name="id" value="1"></property><property name="money" value="1000"></property></bean><bean id="card1" class="springstudy.Card" autowire-candidate=“false”><property name="id" value="1"></property><property name="money" value="10000"></property></bean>
autowire=“byName”根据id属性值自动装配
设置autowire=“byName”,Spring会尝试将属性名和bean中的id进行匹配,如果找到的话就注入依赖中,没有找到该属性就为null(如User类中定义private Card card,需要bean中的id为card才能注入)
<bean id="user" class="springstudy.User" p:degree="本科" autowire="byName"></bean><bean id="card" class="springstudy.Card"><property name="id" value="1"></property><property name="money" value="1000"></property></bean>
除了通过xml方式自动装配外还可以通过注解自动装配
4.5 注入集合
在User类中定义集合的set方法
//数组private String[] costumes;//list集合private List<String> list;private List<String> testlist;//map集合private Map<String,String> maps;//set集合private Set<String> sets;public void setSets(Set<String> sets) {this.sets = sets;}public void setCostumes(String[] costumes) {this.costumes = costumes;}public void setList(List<String> list) {this.list = list;}public void setTestlist(List<String> testlist) {this.testlist = testlist;}public void setMaps(Map<String, String> maps) {this.maps = maps;}
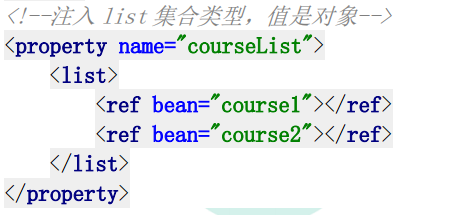
在bean1.xml注入集合属性,除了通过<array><value>值</value></array>或 <map><entry key=“值” value=“值”></entry></map>注入属性之外,还可以通过util命名空间注入属性,不过需要引入util的命令空间以及util的xsd文件
<beans xmlns="http://www.springframework.org/schema/beans"xmlns:xsi="http://www.w3.org/2001/XMLSchema-instance"xmlns:p="http://www.springframework.org/schema/p"xmlns:util="http://www.springframework.org/schema/util"xsi:schemaLocation="http://www.springframework.org/schema/beanshttp://www.springframework.org/schema/beans/spring-beans.xsdhttp://www.springframework.org/schema/utilhttp://www.springframework.org/schema/util/spring-util-4.0.xsd"><bean id="user" class="springstudy.User" p:degree="本科"><!--注入集合属性--><!--数组类型属性注入--><property name="costumes"><array><value>裙子</value><value>汉服</value></array></property><!--list 类型属性注入--><property name="list"><list><value>张三</value><value>小三</value></list></property><property name="testlist" ref="bookList"></property><!--map 类型属性注入--><property name="maps"><map><entry key="JAVA" value="java"></entry><entry key="PHP" value="php"></entry></map></property><!--set 类型属性注入--><property name="sets"><set><value>MySQL</value><value>Redis</value></set></property></bean><util:list id="bookList"><value>易筋经</value><value>九阴真经</value><value>九阳神功</value></util:list>
</beans>
此外还可以将bean注入集合
4.6 注入外部属性文件
Spring提供了读取外部properties文件的机制,可以将读到数据为bean的属性赋值
在src目录下创建user.properties配置文件
test.name=小乔
user.age=21
age=18
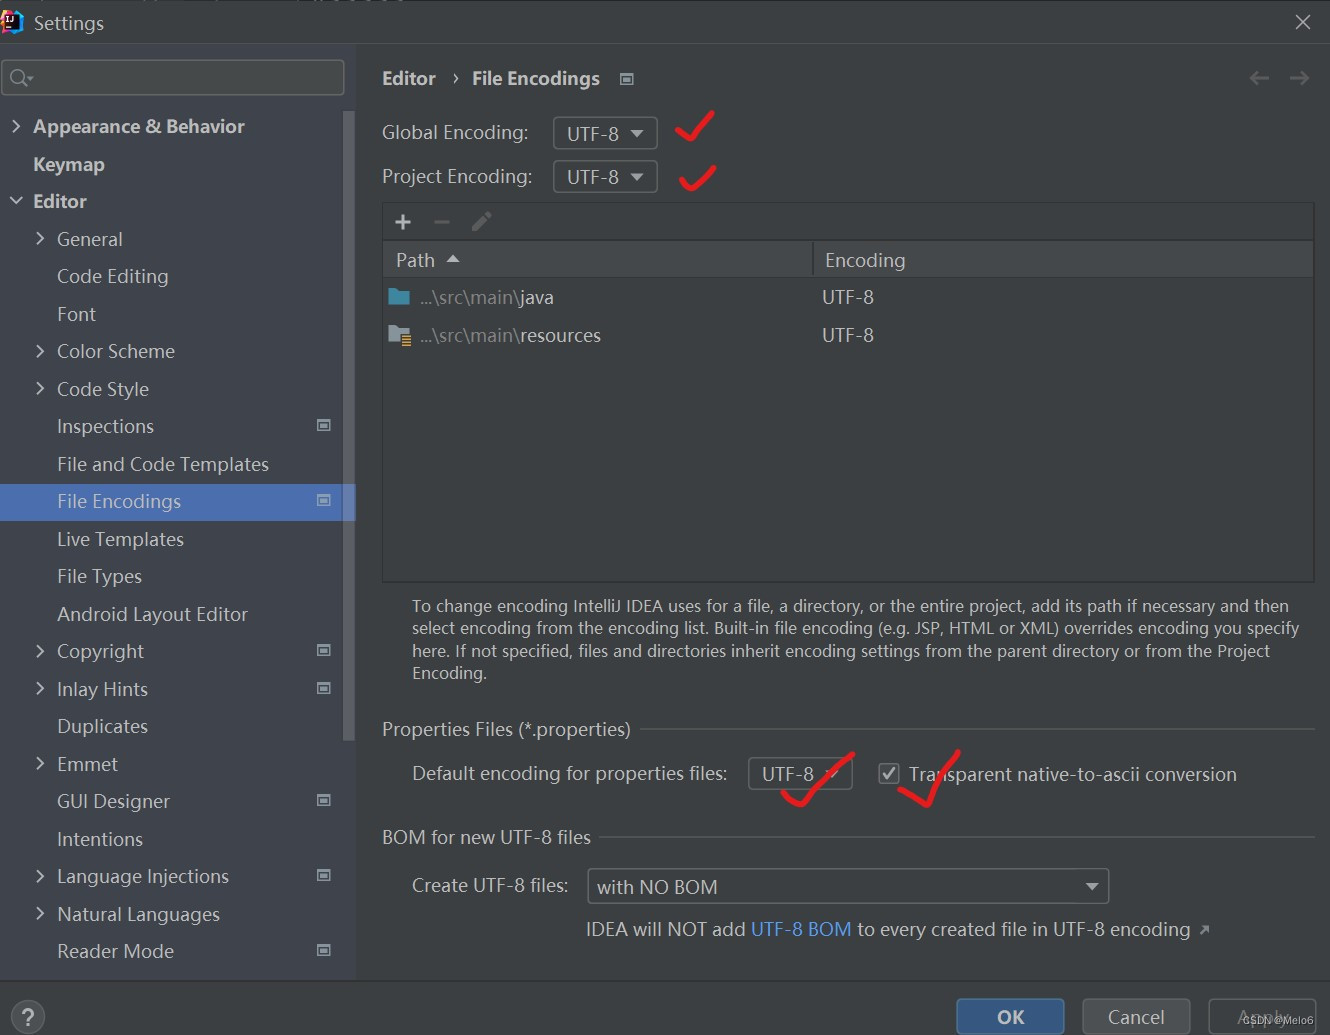
在bean1.xml文件中加入content命名空间及其xsd文件,通过property-placeholder加载properties文件(放在bean标签的外面),其中location=“classpath:user.properties” 的地址实际为 ./src/user.properties,file-encoding设置文件编码格式,避免中文乱码。如果设置file-encoding="UTF-8"出现中文为问号,请在编辑器中设置properties配置文件的格式
在IDEA打开Settings–>Editor–>File Encodings
<!--加入content命令空间及其xsd文件-->
<beans xmlns:context="http://www.springframework.org/schema/context"xsi:schemaLocation=http://www.springframework.org/schema/contexthttp://www.springframework.org/schema/context/spring-context.xsd"><context:property-placeholder location="classpath:user.properties" file-encoding="UTF-8"/>
<beans>
在bean中添加属性
<property name="name" value="${test.name}"></property>
<property name="age" value="${user.age}"></property>
发现个有意思的东西,设置value=“${user.name}”,user.name是电脑的用户名,不知道其他人会不会这样
4.7 注入属性的全部代码
User类
package springstudy;import java.util.List;
import java.util.Map;
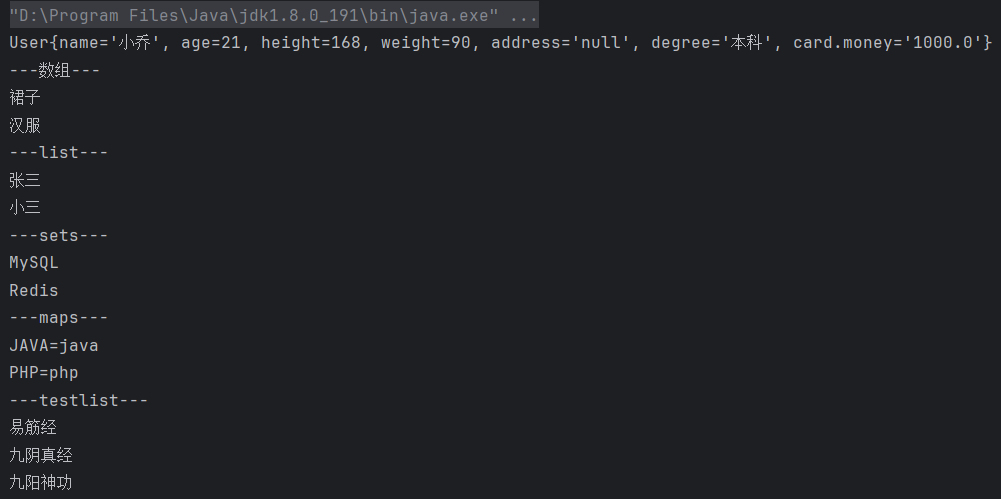
import java.util.Set;public class User {//属性private String name;private int age;private int height;private int weight;private String address;private String degree;private Card card;//数组private String[] costumes;//list集合private List<String> list;private List<String> testlist;//map集合private Map<String,String> maps;//set集合private Set<String> sets;public User(int height, int weight) {this.height = height;this.weight = weight;}//set方法public void setName(String name) {this.name = name;}public void setAge(int age) {this.age = age;}public void setAddress(String address) {this.address = address;}public void setDegree(String degree) {this.degree = degree;}public void setCard(Card card) {this.card = card;}public Card getCard() {return card;}public void setSets(Set<String> sets) {this.sets = sets;}public void setCostumes(String[] costumes) {this.costumes = costumes;}public void setList(List<String> list) {this.list = list;}public void setTestlist(List<String> testlist) {this.testlist = testlist;}public void setMaps(Map<String, String> maps) {this.maps = maps;}public void add() {System.out.println("add...");}@Overridepublic String toString() {return "User{" +"name='" + name + '\'' +", age=" + age +", height=" + height +", weight=" + weight +", address='" + address + '\'' +", degree='" + degree + '\'' +", card.money='" + card.getMoney() + '\'' +'}';}//集合输出public void print() {System.out.println("---数组---");for (String i : costumes) {System.out.println(i);}System.out.println("---list---");for (String i : list) {System.out.println(i);}System.out.println("---sets---");for (String i : sets) {System.out.println(i);}System.out.println("---maps---");for (String key : maps.keySet()){String value = (String) maps.get(key);System.out.println(key + "=" + value);}System.out.println("---testlist---");for (String i : testlist) {System.out.println(i);}}
}
bean1.xml文件
<?xml version="1.0" encoding="UTF-8" ?>
<beans xmlns="http://www.springframework.org/schema/beans"xmlns:xsi="http://www.w3.org/2001/XMLSchema-instance"xmlns:p="http://www.springframework.org/schema/p"xmlns:util="http://www.springframework.org/schema/util"xmlns:context="http://www.springframework.org/schema/context"xsi:schemaLocation="http://www.springframework.org/schema/beanshttp://www.springframework.org/schema/beans/spring-beans.xsdhttp://www.springframework.org/schema/utilhttp://www.springframework.org/schema/util/spring-util.xsdhttp://www.springframework.org/schema/contexthttp://www.springframework.org/schema/context/spring-context.xsd"><context:property-placeholder location="classpath:user.properties" file-encoding="UTF-8"/><!--配置User对象创建--><bean id="user" class="springstudy.User" p:degree="本科" autowire="byName"><!--通过set方法注入属性-->
<!--        <property name="name" value="西施"></property>-->
<!--        <property name="age"><value>18</value></property>--><property name="address"><null/></property><!--通过构造器方法注入属性--><constructor-arg name="height" value="168"></constructor-arg><constructor-arg name="weight" value="90"></constructor-arg><!--注入bean-->
<!--        <property name="card">-->
<!--            <bean id="card" class="springstudy.Card">-->
<!--                <property name="id" value="1"></property>-->
<!--                <property name="money" value="1000"></property>-->
<!--            </bean>-->
<!--        </property>-->
<!--        <property name="card" ref="card"></property>-->
<!--        <property name="card.money" value="999"></property>--><!--注入集合属性--><!--数组类型属性注入--><property name="costumes"><array><value>裙子</value><value>汉服</value></array></property><!--list 类型属性注入--><property name="list"><list><value>张三</value><value>小三</value></list></property><property name="testlist" ref="bookList"></property><!--map 类型属性注入--><property name="maps"><map><entry key="JAVA" value="java"></entry><entry key="PHP" value="php"></entry></map></property><!--set 类型属性注入--><property name="sets"><set><value>MySQL</value><value>Redis</value></set></property><property name="name" value="${test.name}"></property><property name="age" value="${user.age}"></property></bean><bean id="card" class="springstudy.Card" autowire-candidate="false"><property name="id" value="1"></property><property name="money" value="1000"></property></bean><bean id="card1" class="springstudy.Card"><property name="id" value="1"></property><property name="money" value="10000"></property></bean><!--list 集合类型属性注入--><util:list id="bookList"><value>易筋经</value><value>九阴真经</value><value>九阳神功</value></util:list>
</beans>
Card类
package springstudy;public class Card {private int id;private double money;public void setId(int id) {this.id = id;}public void setMoney(double money) {this.money = money;}public double getMoney() {return money;}
}Test类,其中System.out.println(user);会自动调用User类的toString方法
package springstudy; //自己的包
import org.springframework.context.ApplicationContext;
import org.springframework.context.support.ClassPathXmlApplicationContext;public class Test {public static void main(String[] args) {//加载Spring配置文件ApplicationContext context = new ClassPathXmlApplicationContext("bean1.xml");User user = context.getBean("user", User.class);System.out.println(user);user.print();}
}
user.properties文件
test.name=小乔
user.age=21
age=18
不想创建那么多文件,看起来太乱。。。
相关文章:
Spring 用法学习总结(一)之基于 XML 注入属性
百度网盘: 👉 Spring学习书籍链接 Spring学习 1 Spring框架概述2 Spring容器3 基于XML方式创建对象4 基于XML方式注入属性4.1 通过set方法注入属性4.2 通过构造器注入属性4.3 使用p命名空间注入属性4.4 注入bean与自动装配4.5 注入集合4.6 注入外部属性…...
免费软件推荐-开源免费批量离线图文识别(OCR)
近期要批量处理图片转电子化,为了解决这个世纪难题,试了很多软件(华为手机自带OCR识别、 PandaOCR、天若OCR、Free OCR)等软件,还是选择了这一款,方便简单 一、什么是OCR? 光学字符识别(Opt…...

2 scala集合-元组和列表
1 元组 元组也是可以存放不同数据类型的元素,并且最重要的是,元组中的元素是不可变的。 例如,定义一个元组,包含字符串 hello,数字 20。如果试图把数字 20 修改为 1,则会报错。 scala> var a ("…...

Spring Boot开启SSL/Https进行交互。
为2个springboot工程开启进行SSL进行交互的认证步骤 //哪个犬玩意举报我侵权的? 一、认证步骤 1、 为服务器生成证书 keytool -genkey -v -alias testServer -keyalg RSA -keystore E:\ssl\testServer.p12 -validity 36500 2、 为客户端生成证书 keytool -genkey -v -alias…...

88.Go设计优雅的错误处理
文章目录 导言一、Go 的约定二、简单错误创建1、 errors.New()2、fmt.Errorf() 三、哨兵错误四、对错误进行编程1、优雅的错误处理设计2、与错误有关的的API 五、总结 导言 在 75.错误码设计、实现统一异常处理和封装统一返回结果 中,我们介绍了错误码的设计&#…...
Python4Delphi: Delphi 程序使用 Python 抓取网页
想用程序去抓取一个网页的内容,Delphi 有自己的 HTTP 库。比如 Indy 的 TIdHTTP,或者 TNetHTTPClient。 这里测试一下使用 Python 的 HTTP 库抓取网页,然后把抓取的内容给 Delphi 的程序。 Delphi 程序,界面上拖控件如下&#x…...

编辑器Zed
什么是Zed 官网:https://zed.dev/ Zed 是 Atom 编辑器原作者主导的新项目 —— 一款支持多人协作的代码编辑器,底层采用 Rust,且默认支持 Rust,还自带了 rust-analyzer,主打 “高性能”,颜值也十分在线&a…...
Java的接口
目录 1.接口的概念 2.语法规则 3.接口的使用 4.接口的特性 总结: 5.实现多个接口 6.接口间的继承 1.接口的概念 接口就是公共的行为规范标准,大家在实现时,只要符合规范标准,就可以通用。 在Java中,接口可以看成…...

【计算机网络】计算机软件工程人工智能研究生复试资料整理
1、JAVA 2、计算机网络 3、计算机体系结构 4、数据库 5、计算机租场原理 6、软件工程 7、大数据 8、英文 自我介绍 2. 计算机网络 1. TCP如何解决丢包和乱序? 序列号:TCP所传送的每段数据都有标有序列号,避免乱序问题发送端确认应答、超时重传:解决丢包问题滑动窗口:避免…...

【Network Management】AUTOSAR架构下CanNm User Data详解
目录 前言 正文 1.CanNm user data概念 2.CanNm user data配置 2.1CDD方式访问CanNm user data...
量子算法入门——2.线性代数与复数
参考资料: 【【零基础入门量子计算-第03讲】线性代数初步与复数】 来自b站up:溴锑锑跃迁 建议关注他的更多高质量文章:CSDN:【溴锑锑跃迁】 0. 前言 强烈建议搭配b站原视频进行观看,这只是我当时看的笔记,…...

分别通过select、多进程、多线程实现一个并发服务器
多进程 #include<myhead.h>#define PORT 8888 //端口号 #define IP "192.168.114.74" //IP地址//定义函数处理客户端信息 int deal_cli_msg(int newfd, struct sockaddr_in cin) {//5、收发数据使用newfd完成通信char buf[128] "&qu…...

如何在 emacs 上开始使用 Tree-Sitter (archlinux)
文章目录 如何在emacs上开始使用Tree-Sitter(archlinux) 如何在emacs上开始使用Tree-Sitter(archlinux) 在archlinux上使用比windows上不知道要方便多少倍! $ sudo pacman -S emacs $ sudo pacman -S tree-sitter这里…...

FL Studio2024最新中文版有哪些其新功能特点?
除了之前提到的特点外,FL Studio 21还有以下一些值得注意的特点: 高效的音频处理:FL Studio 21具备高效的音频处理能力,能够实时处理多轨道音频,提供低延迟的音频播放和录制,确保音乐制作过程中的流畅性和实…...
Oracle的学习心得和知识总结(三十二)|Oracle数据库数据库回放功能之论文四翻译及学习
目录结构 注:提前言明 本文借鉴了以下博主、书籍或网站的内容,其列表如下: 1、参考书籍:《Oracle Database SQL Language Reference》 2、参考书籍:《PostgreSQL中文手册》 3、EDB Postgres Advanced Server User Gui…...

系统架构27 - 软件架构设计(6)
基于架构的软件开发方法 基于架构的软件开发方法(ABSD)概述概念与术语开发模型体系结构需求体系结构设计体系结构文档化体系结构复审体系结构实现体系结构的演化 基于架构的软件开发方法(ABSD) 基于体系结构的软件设计 (Architec…...
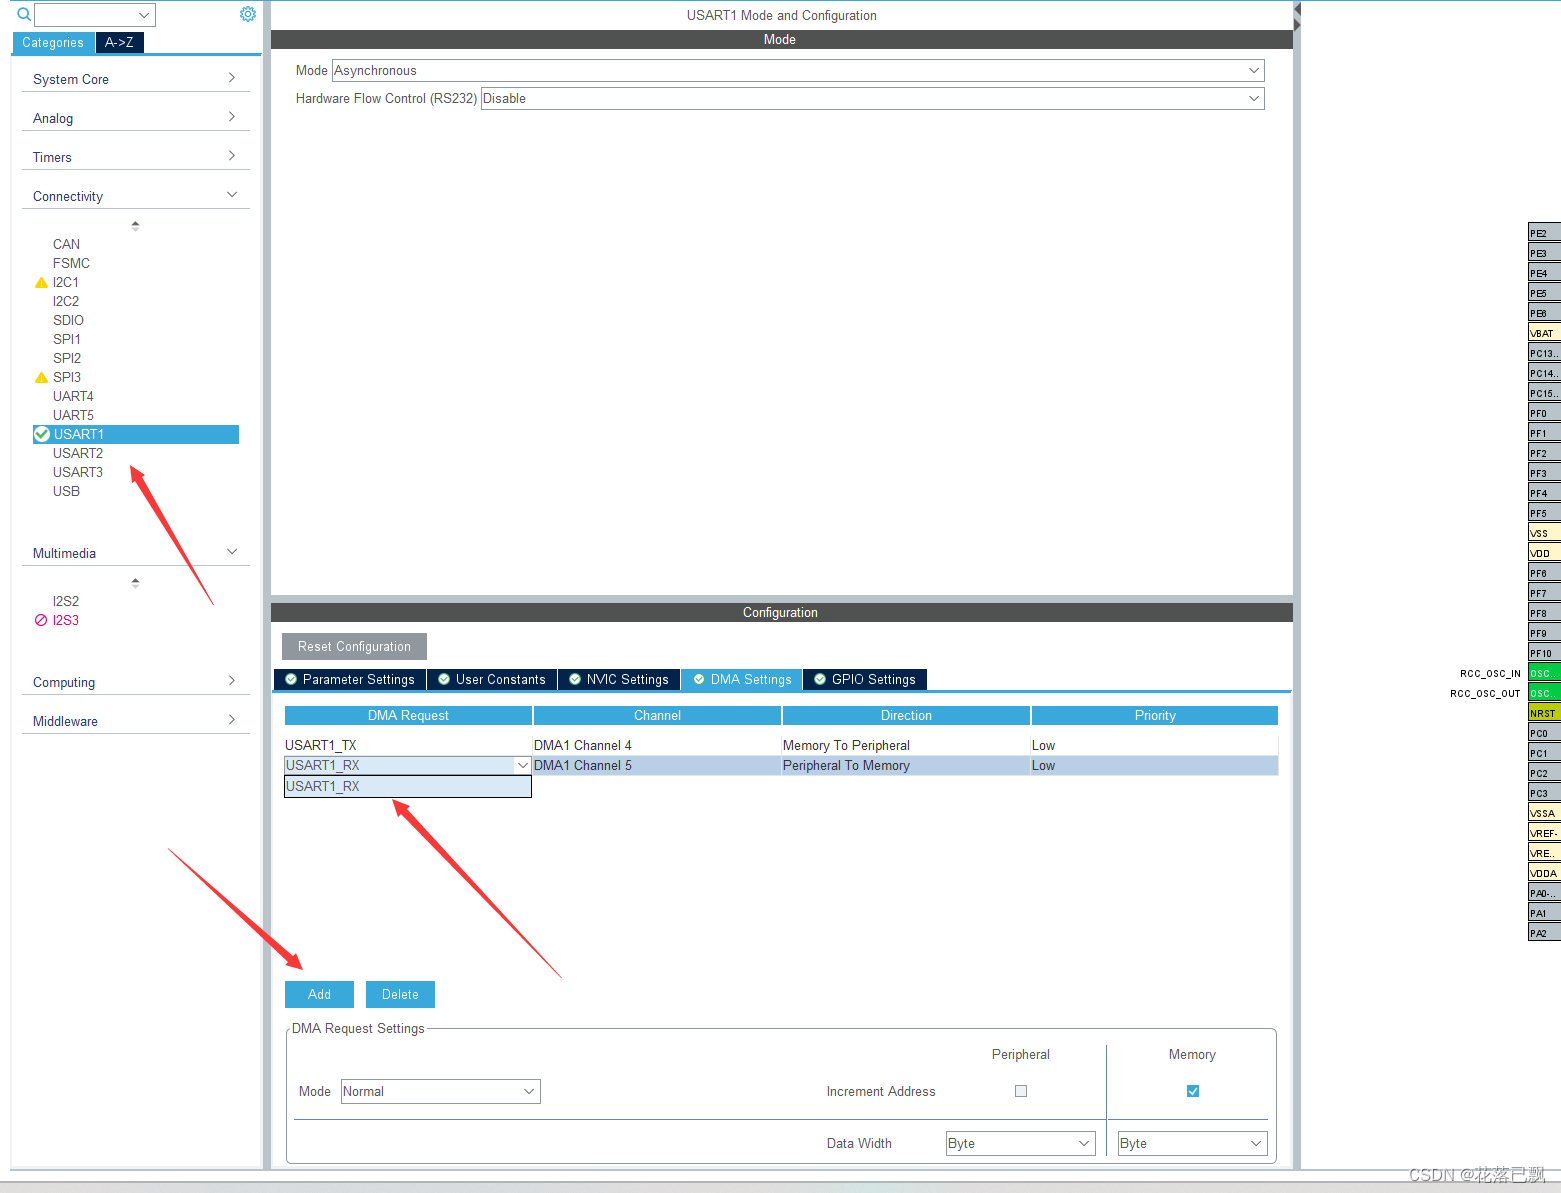
STM32 cubemx配置DMA+空闲中断接收不定长数据
文章目录 前言一、串口空闲中断二、DMA空闲中断接收不定长数据实现思路三、STM32Cubemx配置DMA空闲中断接收不定长数据四、代码编写总结 前言 本篇文章给大家讲解一下DMA串口空闲中断接收串口不定长数据,之前我们也是讲解过串口接收不定长数据的,那么本…...

Pycharm配置运行selenium教程
一、下载chrome浏览器和同版本的chromedriver chrome测试版版本120.0.6099.109 链接:https://pan.baidu.com/s/1pvFqL0WN8OkqPmURAs83kg?pwdvtsh 提取码:vtsh chromedriver版本120.0.6099.109 链接:https://pan.baidu.com/s/16fWWkrlD5C3J…...

银河麒麟V10开机后黑屏解决方法
情况描述: 单位的国产化电脑采用银河麒麟V10系统,在使用了近两个月时间后,开机到加载桌面那一步无法加载图形化桌面。 原理讲解 Linux本是纯命令行形式的系统,银河麒麟基于Linux中的Ubuntu LTS内核开发,其图形化的品牌…...

【Git版本控制 02】分支管理
目录 一、创建分支 二、切换分支 三、合并分支 四、删除分支 五、合并冲突 六、分支策略 七、bug分支 一、创建分支 # 当前仓库只有 master 一个主分支 # 可通过 git branch 是进行分支管理的命令,可通过不同参数对分支进行查看、创建、删除(base) [rootloc…...

标准输入流,输出流,错误流 以及 重定向 的原理
标准输入流、输出流、错误流在操作系统与C语言中的表达 1. 操作系统层面(Linux/Unix) 在操作系统层面,标准输入、标准输出和标准错误流通过文件描述符(File Descriptor) 来标识:流类型文件描述符 (fd)默认设…...

明日方舟自动化助手MAA:3步解放双手,让游戏回归乐趣
明日方舟自动化助手MAA:3步解放双手,让游戏回归乐趣 【免费下载链接】MaaAssistantArknights 《明日方舟》小助手,全日常一键长草!| A one-click tool for the daily tasks of Arknights, supporting all clients. 项目地址: ht…...

2025最新易支付模板源码 全开源 前台+用户中心+后台三合一
内容目录一、详细介绍二、效果展示1.部分代码2.效果图展示三、学习资料下载一、详细介绍 2025最新易支付模板源码 全开源 前台用户中心后台三合一 二、效果展示 1.部分代码 代码如下(示例): case orderList:$sql" 11";if(isse…...

枚举进阶:从常量集合到业务逻辑承载者的实战扩展技巧
1. 项目概述:从“能用”到“好用”的枚举进阶之路在软件开发中,枚举(Enum)是我们再熟悉不过的基础工具了。它把一组有限的、具名的常量组织在一起,让代码意图更清晰,避免“魔法数字”满天飞。但不知道你有没…...

从‘假阳性’到精准匹配:深入解读NAAF如何用‘负面线索’优化你的多模态搜索系统
从‘假阳性’到精准匹配:NAAF框架如何重塑多模态搜索系统的评估逻辑 当用户在电商平台搜索"白色连衣裙 蕾丝边 长袖"时,系统返回的前几条结果中混入了无袖款式;内容审核系统将"沙滩排球比赛"的文本描述错误匹配到一群孩子…...

特征对高效数值算法及在船舶轴系振动计算中的应用【附仿真】
✨ 长期致力于特征值与特征向量、对称三对角矩阵、振动计算、船舶推进轴系、并行计算研究工作,擅长数据搜集与处理、建模仿真、程序编写、仿真设计。 ✅ 专业定制毕设、代码 ✅ 如需沟通交流,点击《获取方式》 (1)分治并行三对角特…...
与独立HSM如何协作)
从芯片到系统:手把手拆解汽车MCU里的安全硬件(SHE/HSE)与独立HSM如何协作
汽车MCU安全架构实战:SHE/HSE与独立HSM的协同设计指南 当一辆现代汽车启动时,从车门解锁到发动机控制,超过1亿行代码在数百个微控制器(MCU)上同时运行。这些代码中包含着价值连城的数字资产——车主的生物特征数据、自…...

RK3568开发板TB-96AI-3568CE深度评测:从核心接口到AI应用实战
1. 从芯片到板卡:TB-96AI-3568CE的设计哲学当一块芯片从图纸走向现实,成为一块可以握在手中的开发板时,这中间的路程远不止是简单的引脚引出和电源接通。我接触过不少基于RK3568的方案,但拿到贝启科技这块TB-96AI-3568CE时&#x…...

助睿平台-零代码实现订单利润数据分流加工
一.实验背景 1.1 实验目的 本次实验旨在熟悉助睿零代码数据集成平台(ETL平台)的核心功能和操作方法,具体包括: 掌握新建转换、添加组件、执行转换等基本操作流程 熟悉表输入、记录集连接、字段选择、过滤记录、Excel输出等常用…...

良品铺子卖菜:OEM模式的极限与宿命
一家卖零食的公司开始卖菜,听起来像是一个关于“内卷”的黑色幽默。2026年5月,良品铺子在武汉开出首家“良品铺子鲜生活”超市。这家门店不再陈列整齐的包装零食,而是摆上了新鲜蔬菜、现制熟食、现烤面包和冷藏冷冻品。公司将其定位为“社区厨…...