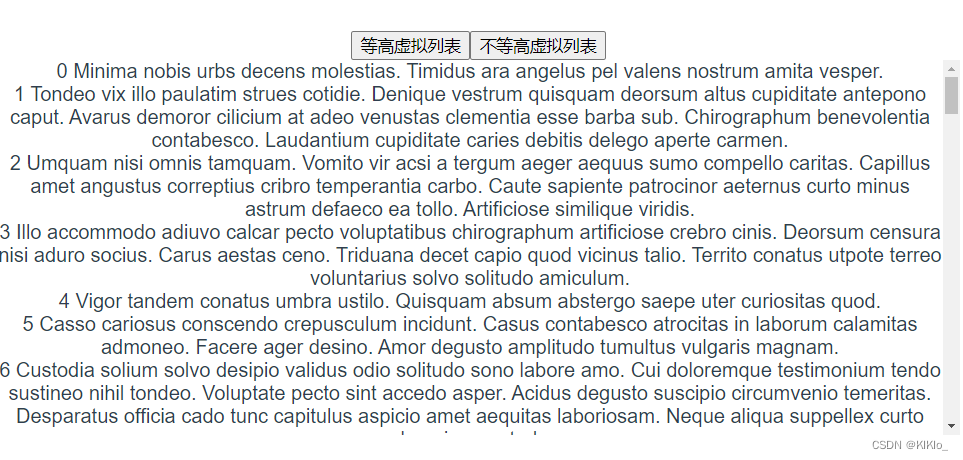
虚拟列表【vue】等高虚拟列表/非等高虚拟列表
文章目录
- 1、等高虚拟列表
- 2、非等高虚拟列表
1、等高虚拟列表
参考文章1
参考文章2

<!-- eslint-disable vue/multi-word-component-names -->
<template><divclass="waterfall-wrapper"ref="waterfallWrapperRef"@scroll="handleScroll"><div :style="scrollStyle"><div v-for="item in computedData.items" :key="item.userId">{{ item.username }}</div></div></div>
</template><script setup lang="ts">
import { computed, onMounted, ref } from "vue";
import { sameHighData } from "../data/index";const itemHeight = 18; //每个item的高度
let itemCount = ref(500); // 设置总共长度为500
const scrollTop = ref(0); // 滚动的高度
const wrapperHeight = ref(0); // 滚动容器的高度
const waterfallWrapperRef = ref();const list = ref([...sameHighData]);const handleScroll = (e: any) => {// 在content内容中距离content盒子的上部分的滚动距离scrollTop.value = e.target.scrollTop;// 判断是否接近底部,如果是则加载更多数据if (e.target.scrollHeight - e.target.clientHeight - scrollTop.value < 100) {getData();}
};const getData = () => {list.value = list.value.concat(list.value);itemCount.value = list.value.length;// scrollBarRef.value.style.height = itemCount.value * itemHeight + "px";console.log("发送网络请求", list.value.length);
};const scrollStyle = computed(() => ({height: `${itemHeight * (list.value.length - computedData.value.startIndex)}px`,transform: `translateY(${itemHeight * computedData.value.startIndex}px)`,
}));// 这里不使用方法的原因是以来了scrollTop 响应式数据来变更 所以使用computed更方便
const computedData = computed(() => {// 可视区域的索引const startIndex = Math.floor(scrollTop.value / itemHeight);// 设置上缓冲区为2 上缓冲区的索引const finialStartIndex = Math.max(0, startIndex - 2);// 可视区显示的数量 这里设置了item的高度为50const numVisible = Math.floor(wrapperHeight.value / itemHeight);// 设置下缓冲区的结束索引 上缓冲区也设置为2const endIndex = Math.min(itemCount.value, startIndex + numVisible + 2);// 将上缓冲区到下缓冲区的数据返回const items: any = [];// contentWrapRef.value!.style.height = finialStartIndex * itemHeight + "px";for (let i = finialStartIndex; i < endIndex; i++) {const item = {...list.value[i],top: itemHeight * i + "px",transform: `translateY(${itemHeight * i + "px"})`,};items.push(item);}console.log(startIndex);return { items, startIndex };
});onMounted(() => {// 在页面一挂载就获取滚动区域的高度if (waterfallWrapperRef.value) {wrapperHeight.value = waterfallWrapperRef.value?.clientHeight;}
});
</script><style scoped>
.waterfall-wrapper {height: 500px;overflow: hidden;overflow-y: scroll;position: relative;.scroll-bar {width: 100%;position: absolute;}
}
</style>
2、非等高虚拟列表
参考链接
非等高序列列表的实现逻辑并没有通过相对定位的方式,而是通过设置translateY来实现滚动
思路:
- 难点1:每个元素的高度不一样,没办法直接计算出容器的高度
-
- 容器高度的作用是足够大 可以让用户进行滚动,所以我们可以直接假设每一个元素的高度
需要保证预测的 item 高度尽量比真实的每一项 item 的高度要小或者接近所有 item 高度的平均值
- 容器高度的作用是足够大 可以让用户进行滚动,所以我们可以直接假设每一个元素的高度
- 难点2: 每个元素高度不一样,top值不能通过
count * index算出来 - 难点3: 每个元素高度不一样,不能通过
scrollTop * size计算出已经滚动的元素个数,很难获取可视区的起始索引 -
- 难度2和难度3的解决方案是先把数据渲染到页面上 之后再通过 获取正式dom的高度 来计算
- 难度2和难度3的解决方案是先把数据渲染到页面上 之后再通过 获取正式dom的高度 来计算
<template><divclass="waterfall-wrapper"ref="waterfallWrapperRef"@scroll="handleScroll"><!-- 内容显示的区域 --><div ref="listRef" :style="scrollStyle"><div v-for="(item, index) in computedData" :key="index">{{ index }} {{ item.sentence }}</div></div></div>
</template>
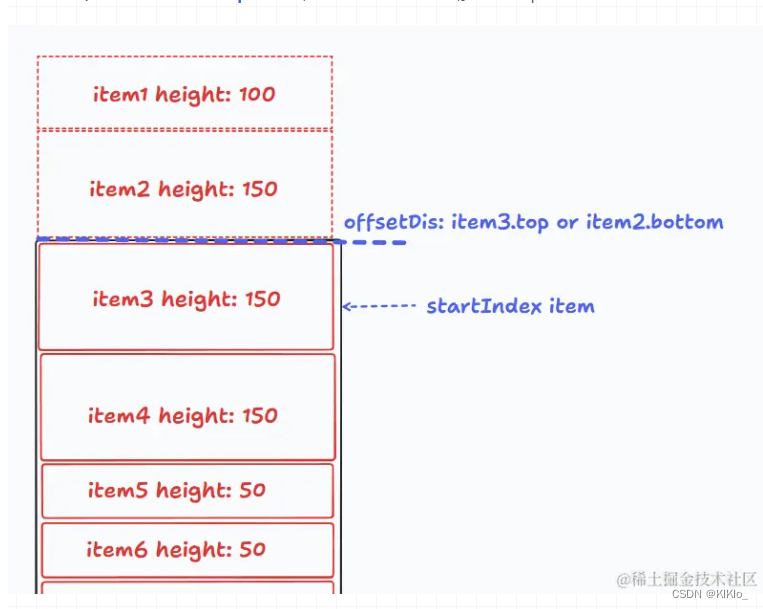
- 1、先确定预测的item高度和数据
- 2、获取滚动区域的高度且计算容器最大容量
onMounted(async () => {// 在页面一挂载就获取滚动区域的高度if (waterfallWrapperRef.value) {wrapperHeight.value = waterfallWrapperRef.value?.clientHeight;// 预测容器最多显示多少个元素maxCount.value = Math.ceil(wrapperHeight.value / estimatedHeight) + 1;await nextTick();// 先把数据显示再页面上initData();setItemHeight();}
});
- 3、引用一个新的变量来存放实际的dom和
预测结果和实际的偏差高度
interface IPosInfo {// 当前pos对应的元素索引index: number;// 元素顶部所处位置top: number;// 元素底部所处位置bottom: number;// 元素高度height: number;// 自身对比高度差:判断是否需要更新dHeight: number;
}
- 4、初始化预测的dom
参考逻辑
function initPosition() {const pos: IPosInfo[] = [];//  将获取到的数据全部进行初始化for(let i = 0; i < props.dataSource.length; i++) {pos.push({index: item.id,height: props.estimatedHeight, // 使用预测高度先填充 positionstop: item.id * props.estimatedHeight,bottom: (item.id + 1) * props.estimatedHeight,dHeight: 0,})}positions.value = pos;
}
实际代码
// 初始化数据
const initData = () => {const items: IPosInfo[] = [];// 获取需要更新位置的dom长度 即新增加的数据const len = list.value.length - preLen.value;// 已经处理好位置的长度const currentLen = initList.value.length;// 可以用三元运算符是因为初始化的时候initList的数值是空的const preTop = initList.value[currentLen - 1]? initList.value[currentLen - 1].top: 0;const preBottom = initList.value[currentLen - 1]? initList.value[currentLen - 1].bottom: 0;for (let i = 0; i < len; i++) {const currentIndex = preLen.value + i;// 获取当前要初始化的itemconst item: DiffHigh = list.value[currentIndex];items.push({id: item.id,height: estimatedHeight, // 刚开始不知道他高度 所以暂时先设置为预置的高度top: preTop? preTop + i * estimatedHeight: currentIndex * estimatedHeight,// 元素底部所处位置 这里获取的是底部的位置 所以需要+1bottom: preBottom? preBottom + (i + 1) * estimatedHeight: (currentIndex + 1) * estimatedHeight,// 高度差:判断是否需要更新dHeight: 0,});}initList.value = [...initList.value, ...items];preLen.value = list.value.length;
};
- 5、更新实际的数据,拿到实际的数据高度
-
- 通过 ref 获取到 list DOM,进而获取到它的 children
-
- 遍历 children,针对于每一个 DOM item 获取其高度信息,通过其 id 属性找到 positions 中对应的 item,更新该 item 信息
// 数据渲染之后更新item的真实高度
const setItemHeight = () => {const nodes = listRef.value.children;if (!nodes.length) return;//  Array.from(nodes): 使用 Array.from() 方法,其中 nodes 是一个类数组对象。// [...nodes]: 使用数组解构语法,其中 nodes 是一个可迭代对象,例如 NodeList。// 1、遍历节点并获取位置信息// 2、更新节点高度和位置信息:// 这里只更新了视图上的bottom 没有更新top的数值 而且只更新视图上面显示的,并没有更新整个列表,因为height发生了改变视图以外的数据也发生了变化 需要同步修改[...nodes].forEach((node: Element, index: number) => {const rect = node.getBoundingClientRect();const item = initList.value[startIndex.value + index];const dHeight = item?.height - rect?.height;if (dHeight) {item.height = rect.height;item.bottom = item.bottom - dHeight;item.dHeight = dHeight;}});// 3、将当前 item 的 dHeight 进行累计,之后再重置为 0 (更新后就不再存在高度差了)const len = initList.value.length;let startHeight = initList.value[startIndex.value]?.dHeight;if (startHeight) {initList.value[startIndex.value].dHeight = 0;}// 从渲染视图的第二个开始处理// 实际上第一项的 top 值为 0,bottom 值在上轮也更新过了,所以遍历的时候我们从第二项开始for (let i = startIndex.value + 1; i < len; i++) {const item = initList.value[i];item.top = initList.value[i - 1].bottom;item.bottom = item.bottom - startHeight;if (item.dHeight !== 0) {startHeight += item.dHeight;item.dHeight = 0;}}// 设置 list 高度listHeight.value = initList.value[len - 1].bottom;
};
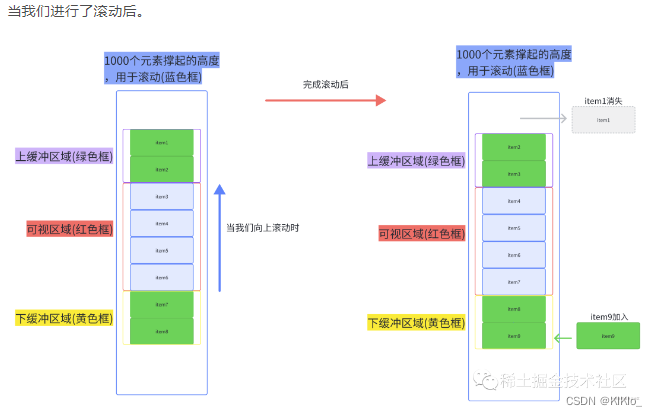
- 6、设置滚动
// 已经滚动的距离
const offsetDis = computed(() =>startIndex.value > 0 ? initList.value[startIndex.value - 1]?.bottom : 0
);const scrollStyle = computed(() => ({height: `${listHeight.value - offsetDis.value}px`,transform: `translateY(${offsetDis.value}px)`,
}));
- 7、滚动事件和 startIndex 计算
-
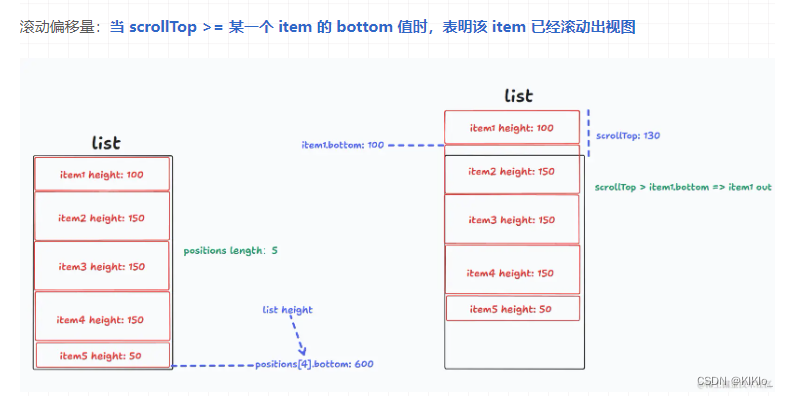
- 如何判断一个 item 滚出视图?这个问题在最早就提到过了,只需要看它的 bottom <= scrollTop
-
- 现在就好办了,我们可以遍历 positions 数组找到第一个 item.bottom >= scrollTop 的 item,它就是 startIndex 所对应的 item,那 startIndex 就拿到了
-
- 这里再补充一个细节,在 initList 数组中 item.bottom 一定是递增的,而我们现在想要做的是查找操作,有序递增 + 查找 = 二分查找
// 二分查找 找到可视区域的索引startIndex
const getStartIndex = (list: any, value: number) => {let left = 0,right = list.length - 1,templateIndex = -1;while (left < right) {const mid = Math.floor((left + right) / 2);const midValue = list[mid].bottom;// 如果找到了就用找到的索引 + 1 作为 startIndex,因为找到的 item 是它的 bottom 与 scrollTop 相等,即该 item 已经滚出去了if (midValue === value) return mid + 1;else if (midValue < value) left = mid + 1;else if (midValue > value) {if (templateIndex == -1 || templateIndex > mid) {templateIndex = mid;}right = mid;}}return templateIndex;
};
- 8、每次 startIndex 改变,不仅会改变 renderList 的计算,我们还需要重新计算 item 信息
watch(() => startIndex.value,() => {setItemHeight();}
);
<!-- eslint-disable vue/multi-word-component-names -->
<template><divclass="waterfall-wrapper"ref="waterfallWrapperRef"@scroll="handleScroll"><!-- 内容显示的区域 --><div ref="listRef" :style="scrollStyle"><div v-for="(item, index) in computedData" :key="index">{{ index }} {{ item.sentence }}</div></div></div>
</template><script setup lang="ts">
import { computed, nextTick, onMounted, ref, watch } from "vue";
import { sameDiffData } from "../data/index";interface IPosInfo {// 当前pos对应的元素索引id: number;// 元素顶部所处位置top: number;// 元素底部所处位置bottom: number;// 元素高度height: number;// 高度差:判断是否需要更新dHeight: number;
}interface DiffHigh {id: number;sentence: string;
}const waterfallWrapperRef = ref();
const listRef = ref();const estimatedHeight = 60; // 设置预估的高度为100
let itemCount = ref(500); // 设置总共长度为500
const scrollTop = ref(0); // 滚动的高度
const wrapperHeight = ref(0); // 滚动容器的高度
const preLen = ref(0); // 因为每次处理数值的时候都需要处理全部数据 这个用来记录已经处理的数据const list = ref<DiffHigh[]>([...sameDiffData]);
const initList = ref<IPosInfo[]>([]); // 用来存放已经处理好位置的数据
const listHeight = ref(0); // 列表的高度const startIndex = ref(0);
const maxCount = ref(0);const endIndex = computed(() =>Math.min(list.value.length, startIndex.value + maxCount.value + 2)
);const computedData = computed(() =>list.value.slice(Math.max(0, startIndex.value - 2), endIndex.value)
);// 已经滚动的距离
const offsetDis = computed(() =>startIndex.value > 0 ? initList.value[startIndex.value - 1]?.bottom : 0
);const scrollStyle = computed(() => ({height: `${listHeight.value - offsetDis.value}px`,transform: `translateY(${offsetDis.value}px)`,
}));const handleScroll = (e: any) => {scrollTop.value = e.target.scrollTop;// 在content内容中距离content盒子的上部分的滚动距离// 在开始滚动之后获取startIndexstartIndex.value = getStartIndex(initList.value, scrollTop.value);console.log(startIndex.value, "-0-");// 判断是否接近底部,如果是则加载更多数据if (e.target.scrollHeight - e.target.clientHeight - scrollTop.value < 100) {getMoreData();}
};watch(() => startIndex.value,() => {setItemHeight();}
);const getMoreData = async () => {list.value = list.value.concat(list.value);await nextTick();initData();setItemHeight();
};// 二分查找 找到可视区域的索引startIndex
const getStartIndex = (list: any, value: number) => {let left = 0,right = list.length - 1,templateIndex = -1;while (left < right) {const mid = Math.floor((left + right) / 2);const midValue = list[mid].bottom;if (midValue === value) return mid + 1;else if (midValue < value) left = mid + 1;else if (midValue > value) {if (templateIndex == -1 || templateIndex > mid) {templateIndex = mid;}right = mid;}}return templateIndex;
};// 初始化数据
const initData = () => {const items: IPosInfo[] = [];// 获取需要更新位置的dom长度const len = list.value.length - preLen.value;// 已经处理好位置的长度const currentLen = initList.value.length;// 可以用三元运算符是因为初始化的时候initList的数值是空的const preTop = initList.value[currentLen - 1]? initList.value[currentLen - 1].top: 0;const preBottom = initList.value[currentLen - 1]? initList.value[currentLen - 1].bottom: 0;for (let i = 0; i < len; i++) {const currentIndex = preLen.value + i;// 获取当前要初始化的itemconst item: DiffHigh = list.value[currentIndex];items.push({id: item.id,height: estimatedHeight, // 刚开始不知道他高度 所以暂时先设置为预置的高度top: preTop? preTop + i * estimatedHeight: currentIndex * estimatedHeight,// 元素底部所处位置 这里获取的是底部的位置 所以需要+1bottom: preBottom? preBottom + (i + 1) * estimatedHeight: (currentIndex + 1) * estimatedHeight,// 高度差:判断是否需要更新dHeight: 0,});}initList.value = [...initList.value, ...items];preLen.value = list.value.length;
};// 数据渲染之后更新item的真实高度
const setItemHeight = () => {const nodes = listRef.value.children;if (!nodes.length) return;//  Array.from(nodes): 使用 Array.from() 方法,其中 nodes 是一个类数组对象。// [...nodes]: 使用数组解构语法,其中 nodes 是一个可迭代对象,例如 NodeList。// 1、遍历节点并获取位置信息// 2、更新节点高度和位置信息:[...nodes].forEach((node: Element, index: number) => {const rect = node.getBoundingClientRect();const item = initList.value[startIndex.value + index];const dHeight = item?.height - rect?.height;if (dHeight) {item.height = rect.height;item.bottom = item.bottom - dHeight;item.dHeight = dHeight;}});// 3、将当前 item 的 dHeight 进行累计,之后再重置为 0 (更新后就不再存在高度差了)const len = initList.value.length;let startHeight = initList.value[startIndex.value]?.dHeight;if (startHeight) {initList.value[startIndex.value].dHeight = 0;}for (let i = startIndex.value + 1; i < len; i++) {const item = initList.value[i];item.top = initList.value[i - 1].bottom;item.bottom = item.bottom - startHeight;if (item.dHeight !== 0) {startHeight += item.dHeight;item.dHeight = 0;}}// 设置 list 高度listHeight.value = initList.value[len - 1].bottom;
};onMounted(async () => {// 在页面一挂载就获取滚动区域的高度if (waterfallWrapperRef.value) {wrapperHeight.value = waterfallWrapperRef.value?.clientHeight;// 预测容器最多显示多少个元素maxCount.value = Math.ceil(wrapperHeight.value / estimatedHeight) + 1;await nextTick();// 先把数据显示再页面上initData();setItemHeight();}
});
</script><style scoped>
.waterfall-wrapper {height: 300px;/* overflow: hidden; */overflow-y: scroll;/* position: relative; */.scroll-bar {width: 100%;}
}
</style>
相关文章:
虚拟列表【vue】等高虚拟列表/非等高虚拟列表
文章目录 1、等高虚拟列表2、非等高虚拟列表 1、等高虚拟列表 参考文章1 参考文章2 <!-- eslint-disable vue/multi-word-component-names --> <template><divclass"waterfall-wrapper"ref"waterfallWrapperRef"scroll"handleScro…...
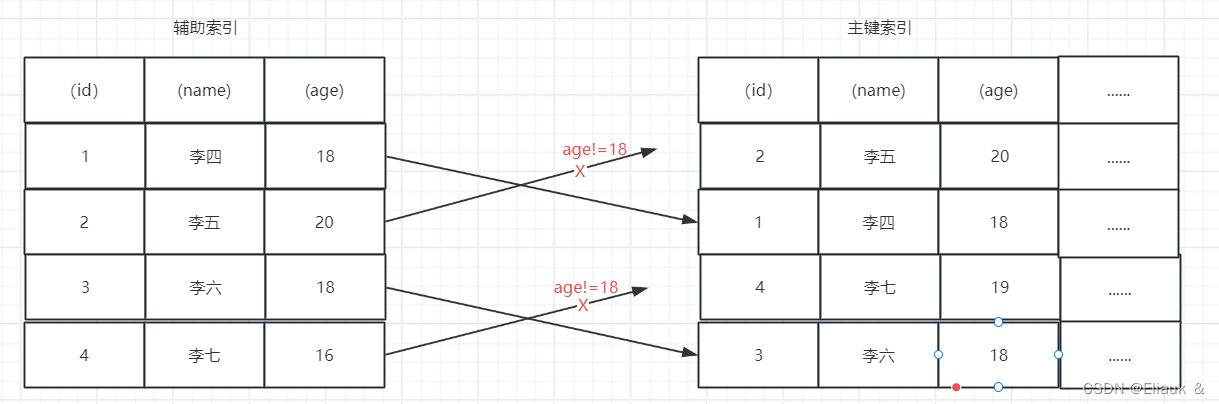
【MySQL】如何理解索引(高频面试点)
一、前言 首先这个博客会介绍一些关于MySQL中索引的基本内容以及一些基本的语法,当然里面也会有些常见的面试题的解答。 二、关于索引 1、概念 索引是一种能够帮助MySQL高效的去磁盘检索数据的一种数据结构。在MySQL的Innodb存储引擎中呢,采用的是B树的…...
:S32K3xx如何产生中心对称三相六路波形)
NXP实战笔记(四):S32K3xx如何产生中心对称三相六路波形
目录 1、概述 1.1、理论基础 2、RTD实现 2.1、Emios时基配置 2.1.1、EmiosMcl 2.1.2、EmiosCommon 2.2、Emios PWM配置 2.3、TRGMUX 2.4、LCU 2.5、外设信号配置 3、代码实现 4、测试结果 1、概述 电机控制中需要产生三相六路SVPWM进行占空比与周期调制,怎么通过RT…...
关于uniapp H5应用无法在触摸屏正常显示的处理办法
关于uniapp H5应用无法在触摸屏正常显示的处理办法 1、问题2、处理3、建议 1、问题 前几天, 客户反馈在安卓触摸大屏上无法正确打开web系统(uni-app vue3开发的h5 应用),有些页面显示不出内容。该应用在 pc 端和手机端都可以正常…...

Stable Diffusion 3 发布,AI生图效果,再次到达全新里程碑!
AI生图效果,再次到达全新里程碑! Prompt:Epic anime artwork of a wizard atop a mountain at night casting a cosmic spell into the dark sky that says "Stable Diffusion 3" made out of colorful energy 提示(意译…...
?)
单例模式怎样实现单例(独例)?
在类定义中加入私有属性 __init__flag Ture,在随后的初始化处理中,判断该属性为真时进行相应的初始化操作,否则,跳过相应的初始化操作。这个机制,保证在进行后续的调用时,不再占用额外的内存开销。 当然了,…...
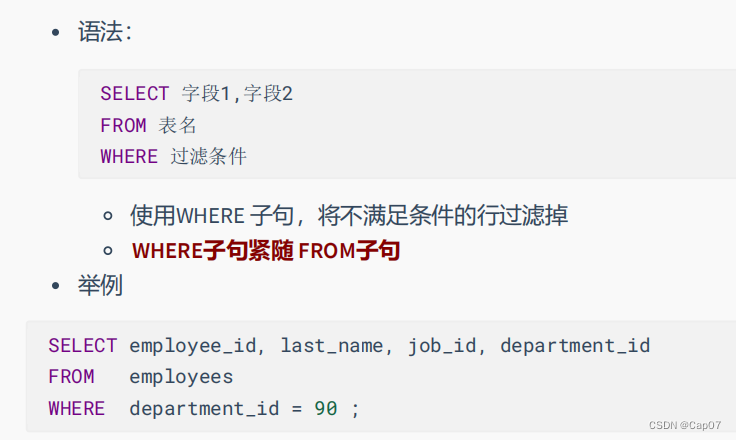
MySQL——基础内容
目录 第01章_数据库概述 关系型数据库(RDBMS)——表、关系模型 非关系型数据库(非RDBMS) 表、记录、字段 表的关联关系 一对一关联 一对多关系 多对多 自我引用 第02章_MySQL环境搭建 登录命令 常用命令 show databases; create database use 数据库名 show tables 第03章…...
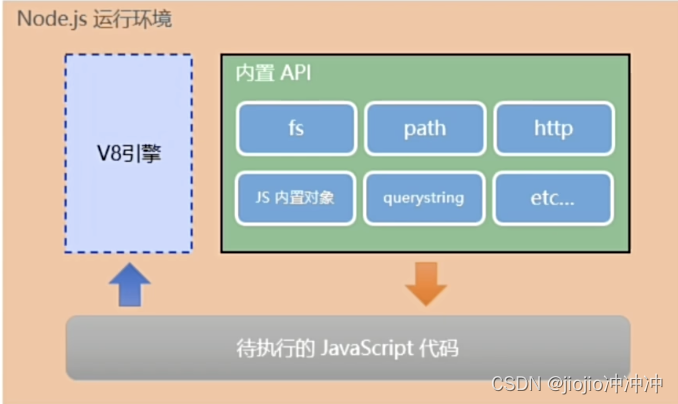
node 之 初步认识
思考:为什么JavaScript可以在浏览器中被执行 代执行的js代码——JavaScript解析引擎 不同的浏览器使用不同的JavaScript解析引擎 Chrome 浏览器 》 V8 Firefox浏览器 》OdinMonkey(奥丁猴) Safri浏览器 》JSCore IE浏览器 》Chakra(查克拉) e…...
css复习
盒模型相关: border:1px solid red (没有顺序) 单元格的border会发生重叠,如果不想要重叠设置 border-collapse:collapse (表示相邻边框合并在一起) padding padding影响盒子大小的好处使用 margin应用: 行内或行内块元素水…...
HTML5和CSS3提高
一、HTML5的新特性 增加了一些新的标签,新的表单,新的表单属性,IE9以上版本的浏览器才支持 注意: 这些语义化标准主要针对搜索引擎的 新标签可以使用多次 在IE9中需要把这些元素转化为块级元素 新增的多媒体标签 主要包含两个…...
感受2024生物发酵展示会-明章机械
参展企业介绍 温州明章机械有限公司是一家专业从事搅拌传动装置机械密封,减速机,机架,联轴器及相关配件。设计、开发及生产的服务型高新技术企业公司,座落于浙江省温州市瓯海区娄桥镇高新工业园区豪新路42号,交通位置…...
算法打卡day1|数组篇|Leetcode 704.二分查找、27.移除元素
数组理论基础 数组是存放在连续内存空间上的相同类型数据的集合,可以方便的通过下标索引的方式获取到下标下对应的数据。 1.数组下标都是从0开始的。 2.数组内存空间的地址是连续的。 正是因为数组的在内存空间的地址是连续的,所以我们在删除或者增添…...

什么是高阶组件
高阶组件(HOC)是 React 中用于复用组件逻辑的一种高级技巧。简单来说,高阶组件就是一个函数,该函数接受一个组件作为参数,并返回一个新的组件。这个新的组件会使用你传给它的组件作为子组件。 高阶组件并不是真的组件…...

python实现裂区试验方差分析
方差分析(Analysis of Variance,ANOVA)是一种统计方法,用于比较三个或三个以上组别的平均值是否存在显著差异。它通过比较组内变异和组间变异的大小来判断组别间的平均值是否有显著差异。 方差分析通常用于以下情况: …...

Vue v-for、v-if、v-show常见问题
vue使用v-for遍历对象时,是按照什么顺序遍历的?如何保证顺序? 会先判断对象是否存在iterator接口,如果有循环执行next()方法。 没有iterator的情况下,会调用Object.Keys()方法,在不同的浏览器中ÿ…...

GPT技术在学术研究中的革命性应用:开启论文创作新篇章
在学术界,撰写高质量的论文一直是一个挑战性的任务,它不仅需要深厚的专业知识,还要求良好的文献综述能力、数据分析技巧以及清晰的表达能力。近年来,随着人工智能技术的飞速发展,尤其是生成式预训练变换器(…...

【K8s】-- 描述容器中 pod 的状态
命令:kubectl describe pod -n 你的namespace名称 pod 名称 举例:kubectl describe pod -n my-flink --context prod-5 test-record-all-new-mc-taskmanager-1-1 Name: test-record-all-new-mc-taskmanager-1-1 Namespace: ky-flink Pri…...

使用yolo-seg模型实现自定义自动动态抠图
yolov8导航 如果大家想要了解关于yolov8的其他任务和相关内容可以点击这个链接,我这边整理了许多其他任务的说明博文,后续也会持续更新,包括yolov8模型优化、sam等等的相关内容。 YOLOv8(附带各种任务详细说明链接) …...
FairyGUI × Cocos Creator 3.x 场景切换
前言 前文提要: FariyGUI Cocos Creator 入门 FairyGUI Cocos Creator 3.x 使用方式 个人demo:https://gitcode.net/qq_36286039/fgui_cocos_demo_dust 个人demo可能会更新其他代码,还请读者阅读本文内容,自行理解并实现。 官…...

【Java程序设计】【C00288】基于Springboot的篮球竞赛预约平台(有论文)
基于Springboot的篮球竞赛预约平台(有论文) 项目简介项目获取开发环境项目技术运行截图 项目简介 这是一个基于Springboot的篮球竞赛预约平台 本系统分为前台功能模块、管理员功能模块以及用户功能模块。 前台功能模块:用户进入到平台首页&a…...
)
从SolidWorks到Geant4仿真:我的第一个粒子探测器CAD模型导入全记录(含CADMesh避坑点)
从SolidWorks到Geant4仿真:我的第一个粒子探测器CAD模型导入全记录(含CADMesh避坑点) 作为一名刚接触粒子探测器仿真的研究生,我花了整整两周时间才成功将SolidWorks设计的模型导入Geant4进行模拟。这个过程远比想象中复杂&#x…...

用Logisim搞定Educoder交通灯实训:从数码管驱动到状态机集成的保姆级避坑指南
用Logisim征服Educoder交通灯实训:从零搭建到联调的全链路实战手册 第一次打开Educoder平台的交通灯实训项目时,我盯着那些闪烁的数码管和错综复杂的线路图,感觉像在破解某种外星密码。三小时后,当我的第一个状态机模块终于通过测…...

5分钟快速掌握Windows右键菜单终极管理神器ContextMenuManager
5分钟快速掌握Windows右键菜单终极管理神器ContextMenuManager 【免费下载链接】ContextMenuManager 🖱️ 纯粹的Windows右键菜单管理程序 项目地址: https://gitcode.com/gh_mirrors/co/ContextMenuManager 你是不是经常在右键文件时,面对几十个…...
)
【仅剩217份】《Midjourney后印象派风格白皮书》V2.3——含17位艺术家专属LoRA适配建议、32组跨文化色彩映射表及实时风格强度校准工具(2024.06内部封测版)
更多请点击: https://intelliparadigm.com 第一章:后印象派风格的视觉基因与Midjourney语义解码 后印象派并非对自然的模仿,而是对色彩、结构与主观情绪的系统性重构——梵高旋转的星云、塞尚凝固的苹果、高更平面化的塔希提图腾,…...

数据分析师能力展示:从项目构建到报告呈现的完整指南
1. 项目概述:一个数据分析师的能力展示平台最近在GitHub上看到一个挺有意思的项目,叫“dataanalyst-showcase”。光看名字,你可能会觉得这又是一个数据科学项目合集,但点进去仔细研究后,我发现它的定位非常精准——它不…...

从零构建现代化工作流引擎:架构、实战与生产级部署指南
1. 项目概述:一个为专业开发者打造的现代化工作流引擎最近在GitHub上看到一个挺有意思的项目,叫rohitg00/pro-workflow。光看名字,你可能觉得这又是一个“工作流”工具,市面上这类工具已经多如牛毛了。但当我深入去研究它的源码、…...

碳排放混合时间窗集装箱运输调度【附算法】
✨ 长期致力于集装箱运输VRP、混合时间窗、碳排放、多目标优化、NSGA-Ⅱ、蚁群算法研究工作,擅长数据搜集与处理、建模仿真、程序编写、仿真设计。 ✅ 专业定制毕设、代码 ✅ 如需沟通交流,点击《获取方式》 (1)经济性与紧急性双目…...

基于容器技术的在线代码沙盒:架构设计与安全实践
1. 项目概述:一个开箱即用的在线代码运行沙盒最近在折腾一些需要快速验证代码片段、或者给团队做技术分享的场景,我发现一个痛点:环境配置太麻烦了。你想让新人跑个Python脚本,他可能得先装Python、配环境变量、装依赖库ÿ…...

基于Claude的AI招聘系统:从简历解析到智能评估全流程实践
1. 项目概述:当Claude成为你的招聘官最近在GitHub上看到一个挺有意思的项目,叫“hire-from-claude”。光看名字,你可能会觉得有点玄乎,难道是要让AI来面试和招聘人类?其实,这个项目的核心思路,是…...
)
从安迪·沃霍尔到AI画布:波普艺术三大视觉基因拆解,手把手复刻金罐头/玛丽莲肖像风格(含可复用prompt模板库)
更多请点击: https://intelliparadigm.com 第一章:从安迪沃霍尔到AI画布:波普艺术的范式迁移 安迪沃霍尔用丝网印刷将可口可乐瓶与玛丽莲梦露转化为大众文化的图腾,其核心并非复制,而是对**重复、去个性化与媒介即内容…...