第一个 Angular 项目 - 添加服务
第一个 Angular 项目 - 添加服务
这里主要用到的内容就是 [Angular 基础] - service 服务 提到的
前置项目在 第一个 Angular 项目 - 动态页面 这里查看
想要实现的功能是简化 shopping-list 和 recipe 之间的跨组件交流
回顾一下项目的结构:
❯ tree src/app/
src/app/
├── directives
├── header
├── recipes
│   ├── recipe-detail
│   ├── recipe-list
│   │   ├── recipe-item
│   ├── recipe.model.ts
├── shared
│   └── ingredient.model.ts
└── shopping-list├── shopping-edit11 directories, 31 files
层级结构相对来说还是有一点点复杂的,所以如果在 app 层构建一个对应的变量和事件再一层层往下传,无疑是一件非常麻烦的事情(尤其 V 层和 VM 层都要进行事件传输的对应变化),而使用 service 就能相对而言比较简单的解决这个问题
创建新的 service
这里主要会创建两个 services:
src/app/
├── services
│   ├── ingredient.service.ts
│   └── recipe.service.ts
一个用来管理所有的 ingredients——这部分是放在 shopping-list 中进行展示的,另一个就是管理所有的 recipes
ingredient service
实现代码如下:
@Injectable({providedIn: 'root',
})
export class IngredientService {ingredientChanged = new EventEmitter<Ingredient[]>();private ingredientList: Ingredient[] = [new Ingredient('Apples', 5),new Ingredient('Tomatoes', 10),];constructor() {}get ingredients() {return this.ingredientList.slice();}addIngredient(Ingredient: Ingredient) {this.ingredientList.push(Ingredient);this.ingredientChanged.emit(this.ingredients);}addIngredients(ingredients: Ingredient[]) {this.ingredientList.push(...ingredients);this.ingredientChanged.emit(this.ingredients);}
}
代码分析如下:
-
Injectable这里使用
providedIn: 'root'是因为我想让所有的组件共享一个 service,这样可以满足当 ingredient 页面修改对应的食材,并且将其发送到shopping-list的时候,数据可以进行同步渲染 -
ingredientChanged这是一个 event emitter,主要的目的就是让其他的组件可以 subscribe 到事件的变更
subscribe 是之前的 service 笔记中没提到的内容,这里暂时不会细舅,不过会放一下用法
-
get ingredients()一个语法糖,这里的
slice会创造一个 shallow copy,防止意外对数组进行修改也可以用 lodash 的
cloneDeep,或者单独创建一个函数去进行深拷贝 -
add 函数
向数组中添加元素,并向外发送数据变更的信号
recipe service
@Injectable()
export class RecipeService {private recipeList: Recipe[] = [new Recipe('Recipe 1', 'Description 1', 'http://picsum.photos/200/200', [new Ingredient('Bread', 5),new Ingredient('Ginger', 10),]),new Recipe('Recipe 2', 'Description 2', 'http://picsum.photos/200/200', [new Ingredient('Chicken', 10),new Ingredient('Bacon', 5),]),];private currRecipe: Recipe;recipeSelected = new EventEmitter<Recipe>();get recipes() {return this.recipeList.slice();}get selectedRecipe() {return this.currRecipe;}
}
这里主要讲一下 Injectable,因为 recipe service 的部分应该被限制在 recipe 这个组件下,所以这里不会采用 singleton 的方式实现
其余的实现基本和上面一样
修改 recipe
这里依旧是具体业务具体分析:
-
recipe
这里需要获取
activeRecipe+ngIf去渲染recipe-detail部分的内容,如:没有选中 recipe 选中了 recipe 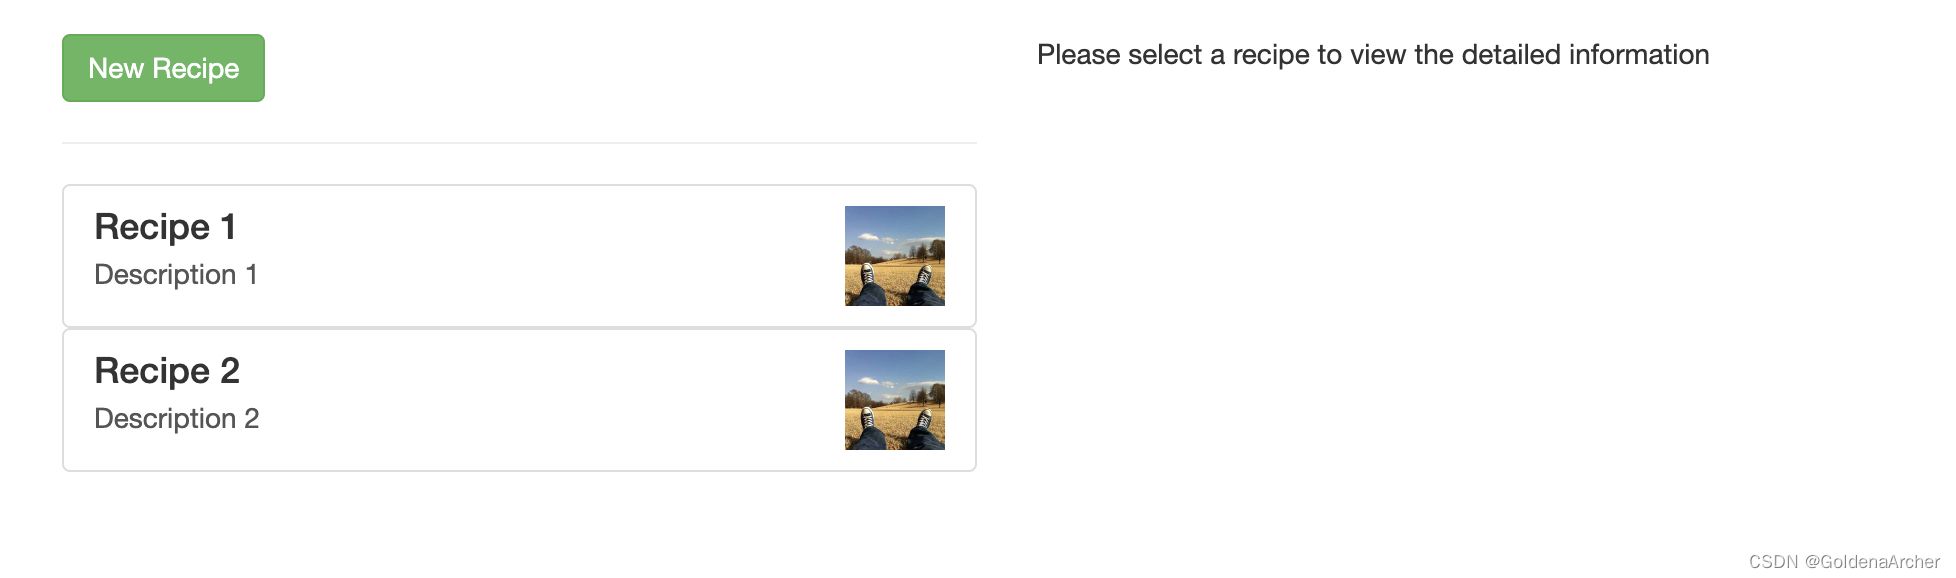
-
recipe-detail
这里需要
activeRecipe去渲染对应的数据,如上图 -
recipe-list
这里需要
recipes去完成循环,渲染对应的recipe-item -
recipe-item
这里需要
activeRecipe完成对active这个 class 的添加
recipe 组件的修改
-
V 层修改:
<div class="row"><div class="col-md-5"><app-recipe-list></app-recipe-list></div><div class="col-md-7"><app-recipe-detail[activeRecipe]="activeRecipe"*ngIf="activeRecipe; else noActiveRecipe"></app-recipe-detail><ng-template #noActiveRecipe><p>Please select a recipe to view the detailed information</p></ng-template></div> </div> -
VM 层修改
@Component({selector: 'app-recipes',templateUrl: './recipes.component.html',providers: [RecipeService],
})
export class RecipesComponent implements OnInit, OnDestroy {activeRecipe: Recipe;constructor(private recipeService: RecipeService) {}ngOnInit() {this.recipeService.recipeSelected.subscribe((recipe: Recipe) => {this.activeRecipe = recipe;});}ngOnDestroy(): void {this.recipeService.recipeSelected.unsubscribe();}
}
这里主要是对 V 层进行了一些修改,减少了一些数据绑定。大多数的用法这里都是之前在 service 的笔记中提到的,除了这个 subscribe 的使用
简单的说,在 subscribe 之后,每一次 event 触发后,在这个 subscription 里,它都可以获取 event 中传来的信息,并进行对应的更新操作
recipe-list 组件的修改
-
V 层修改如下
<div class="row"><div class="col-xs-12"><button class="btn btn-success">New Recipe</button></div> </div> <hr /> <div class="row"><div class="col-xs-12"><app-recipe-item*ngFor="let recipe of recipes"[recipe]="recipe"></app-recipe-item></div> </div> -
VM 层修改如下
@Component({selector: 'app-recipe-list',templateUrl: './recipe-list.component.html',styleUrl: './recipe-list.component.css',
})
export class RecipeListComponent implements OnInit {recipes: Recipe[];constructor(private recipeService: RecipeService) {}ngOnInit() {this.recipes = this.recipeService.recipes;}
}
这里主要就是获取数据的方式变了,也不需要向下传递 @Input,向上触发 @Output 了
reccipe-item 组件的修改
-
V 层
<ahref="#"class="list-group-item clearfix"(click)="onSelectedRecipe()"[ngClass]="{ active: isActiveRecipe }"
><div class="pull-left"><h4 class="list-group-item-heading">{{ recipe.name }}</h4><p class="list-group-item-text">{{ recipe.description }}</p></div><span class="pull-right"><img[src]="recipe.imagePath"[alt]="recipe.name"class="image-responsive"style="max-height: 50px"/></span>
</a>
这里做的另外一个修改就是把
a标签移到了 list-item 去处理,这样语义化相对更好一些 -
VM 层
@Component({selector: 'app-recipe-item',templateUrl: './recipe-item.component.html',styleUrl: './recipe-item.component.css',
})
export class RecipeItemComponent implements OnInit, OnDestroy {@Input() recipe: Recipe;isActiveRecipe = false;constructor(private recipeService: RecipeService) {}ngOnInit() {this.recipeService.recipeSelected.subscribe((recipe: Recipe) => {this.isActiveRecipe = recipe.isEqual(this.recipe);});}onSelectedRecipe() {this.recipeService.recipeSelected.emit(this.recipe);}ngOnDestroy(): void {this.recipeService.recipeSelected.unsubscribe();}
}
这里变化稍微有一点多,主要也是针对
activeRecipe和onSelectedRecipe的修改。前者的判断我在 model 写了一个
isEqual的方法用来判断名字、数量、图片等是否一样,当然只用这个方法的话还是有可能会出现数据碰撞的,因此写案例的时候我尽量不会用同一个名字去命名 ingredient。基于这个前提下,那么就可以判断当前的 recipe 是不是被选中的 recipe,同时添加active这一类名做更好的提示使用
subscribe也是基于同样的理由,需要捕获 recipe 的变动onSelectedRecipe的变化倒是没有太多,同样会触发一个事件,不过这个事件现在保存在 recipeService 中目前的实现是整个 recipe 都共享一个 service,因此这里 emit 的事件,在整个 recipe 组件下,只要 subscribe 了,就只会是同一个事件
recipe-detail 组件的修改
-
V 层
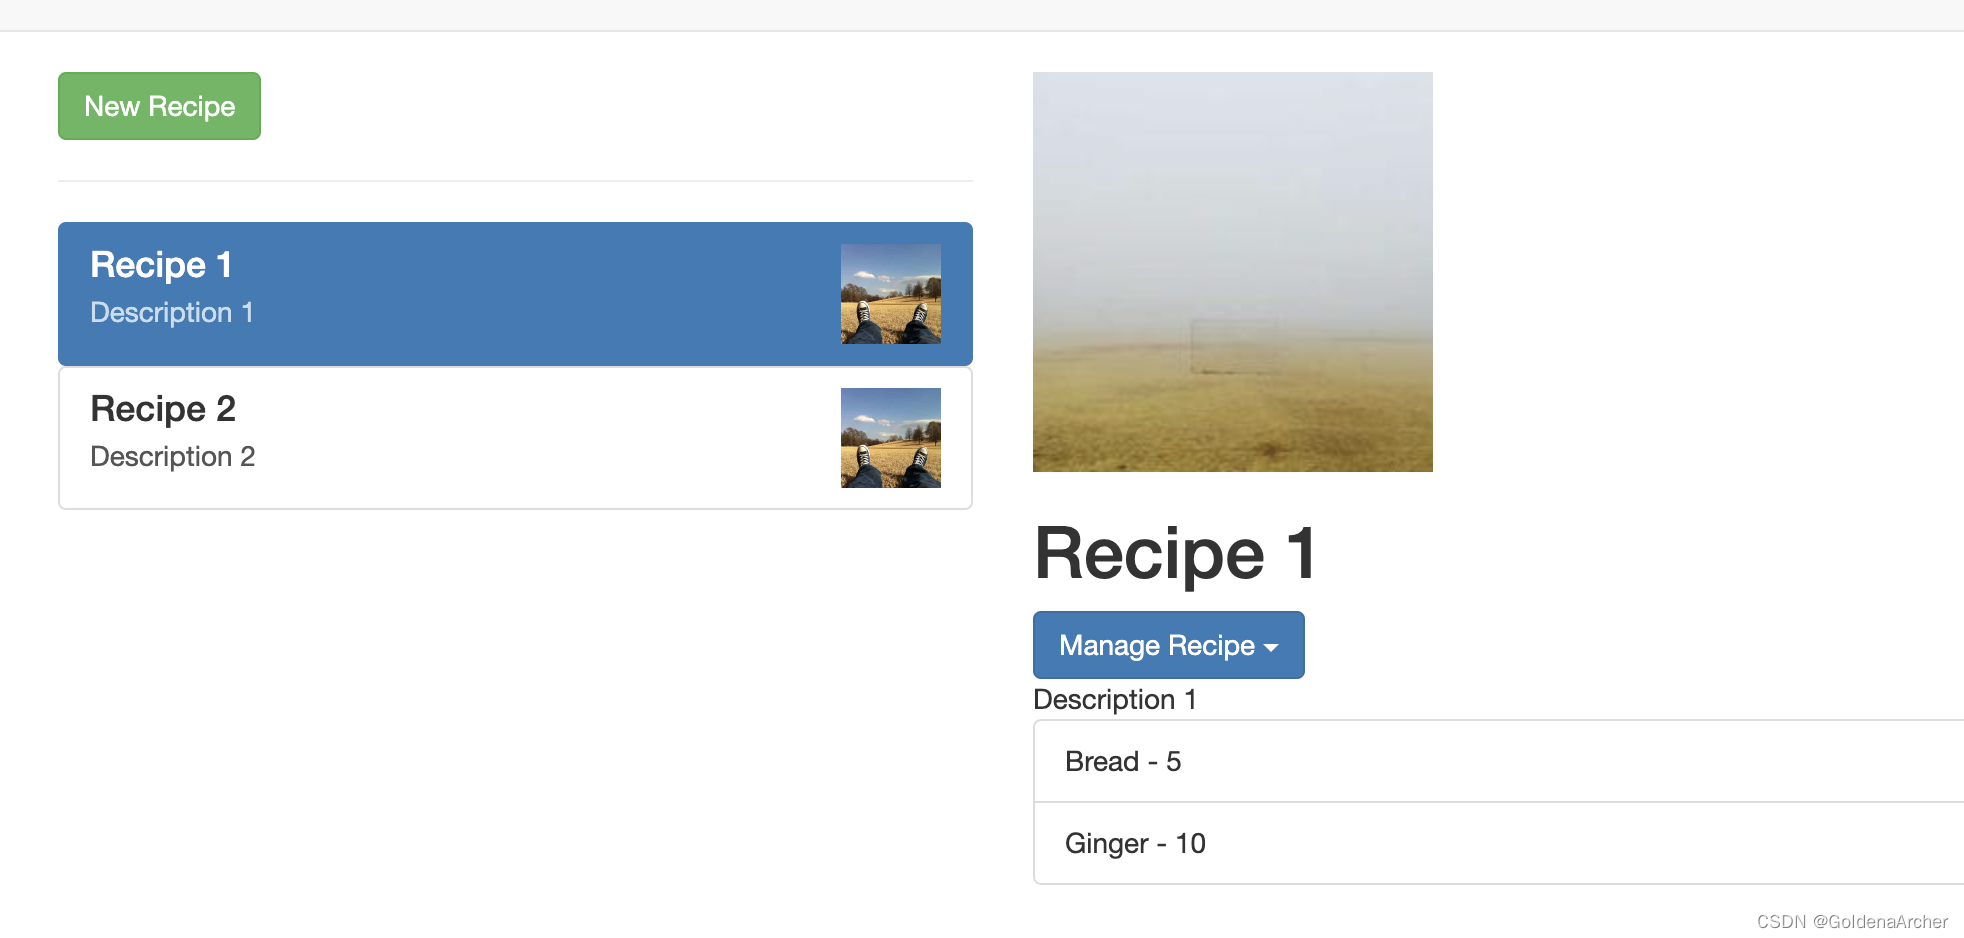
<div class="row"><div class="col-xs-12"><imgsrc="{{ activeRecipe.imagePath }}"alt=" {{ activeRecipe.name }} "class="img-responsive"/></div> </div> <div class="row"><div class="col-xs-12"><h1>{{ activeRecipe.name }}</h1></div> </div> <div class="row"><div class="col-xs-12"><div class="btn-group" appDropdown><button type="button" class="btn btn-primary dropdown-toggle">Manage Recipe <span class="caret"></span></button><ul class="dropdown-menu"><li><a href="#" (click)="onAddToShoppingList()">To Shopping List</a></li><li><a href="#">Edit Recipe</a></li><li><a href="#">Delete Recipe</a></li></ul></div></div> </div> <div class="row"><div class="col-xs-12">{{ activeRecipe.description }}</div> </div> <div class="row"><div class="col-xs-12"><ul class="list-group"><liclass="list-group-item"*ngFor="let ingredient of activeRecipe.ingredients">{{ ingredient.name }} - {{ ingredient.amount }}</li></ul></div> </div> -
VM 层
@Component({selector: 'app-recipe-detail',templateUrl: './recipe-detail.component.html',styleUrl: './recipe-detail.component.css',
})
export class RecipeDetailComponent {@Input() activeRecipe: Recipe;constructor(private ingredientService: IngredientService) {}onAddToShoppingList() {this.ingredientService.addIngredients(this.activeRecipe.ingredients);}
}
这里通过调用 ingredient service 将当前 recipe 中的 ingredient 送到 shopping-list 的 view 下,效果如下:
这里没有做 unique key 的检查,而且实现是通过 Array.push 去做的,因此只会无限增加,而不是更新已有的元素。不过大致可以看到这个跨组件的交流是怎么实现的
修改 shopping-list
这里的实现和 recipe 差不多,就只贴代码了
shopping-list 组件的修改
-
V 层
<div class="row"><div class="col-xs-10"><app-shopping-edit></app-shopping-edit><hr /><ul class="list-group"><aclass="list-group-item"style="cursor: pointer"*ngFor="let ingredient of ingredients">{{ ingredient.name }} ({{ ingredient.amount }})</a></ul></div> </div> -
VM 层
@Component({selector: 'app-shopping-list',templateUrl: './shopping-list.component.html',styleUrl: './shopping-list.component.css',
})
export class ShoppingListComponent implements OnInit, OnDestroy {ingredients: Ingredient[] = [];constructor(private ingredientService: IngredientService) {}ngOnInit(): void {this.ingredients = this.ingredientService.ingredients;this.ingredientService.ingredientChanged.subscribe((ingredients: Ingredient[]) => {this.ingredients = ingredients;});}ngOnDestroy(): void {this.ingredientService.ingredientChanged.unsubscribe();}
}
同样也是一个 subscription 的实现去动态监听 ingredients 的变化
shopping-edit 组件的修改
-
V 层
<div class="row"><div class="col-xs-12"><form><div class="row"><div class="col-sm-5 form-group"><label for="name">Name</label><input type="text" id="name" class="form-control" #nameInput /></div><div class="col-sm-2 form-group"><label for="amount">Amount</label><inputtype="number"id="amount"class="form-control"#amountInput/></div></div><div class="row"><div class="col-xs-12"><div class="btn-toolbar"><buttonclass="btn btn-success mr-2"type="submit"(click)="onAddIngredient(nameInput)">Add</button><button class="btn btn-danger mr-2" type="button">Delete</button><button class="btn btn-primary" type="button">Edit</button></div></div></div></form></div>
</div>
这里添加了一个按钮的功能,实现添加 ingredient
-
VM 层
@Component({selector: 'app-shopping-edit',templateUrl: './shopping-edit.component.html',styleUrl: './shopping-edit.component.css',
})
export class ShoppingEditComponent {@ViewChild('amountInput', { static: true })amountInput: ElementRef;constructor(private ingredientService: IngredientService) {}onAddIngredient(nameInput: HTMLInputElement) {this.ingredientService.addIngredient(new Ingredient(nameInput.value, this.amountInput.nativeElement.value));}
}
这里的
onAddIngredient实现方式和添加整个 list 基本一致,也就不多赘述了
相关文章:
第一个 Angular 项目 - 添加服务
第一个 Angular 项目 - 添加服务 这里主要用到的内容就是 [Angular 基础] - service 服务 提到的 前置项目在 第一个 Angular 项目 - 动态页面 这里查看 想要实现的功能是简化 shopping-list 和 recipe 之间的跨组件交流 回顾一下项目的结构: ❯ tree src/app/…...
红日靶场3
靶场链接:漏洞详情 在虚拟机的网络编辑器中添加两个仅主机网卡 信息搜集 端口扫描 外网机处于网端192.168.1.0/24中,扫描外网IP端口,开放了80 22 3306端口 80端口http服务,可以尝试登录网页 3306端口mysql服务,可…...
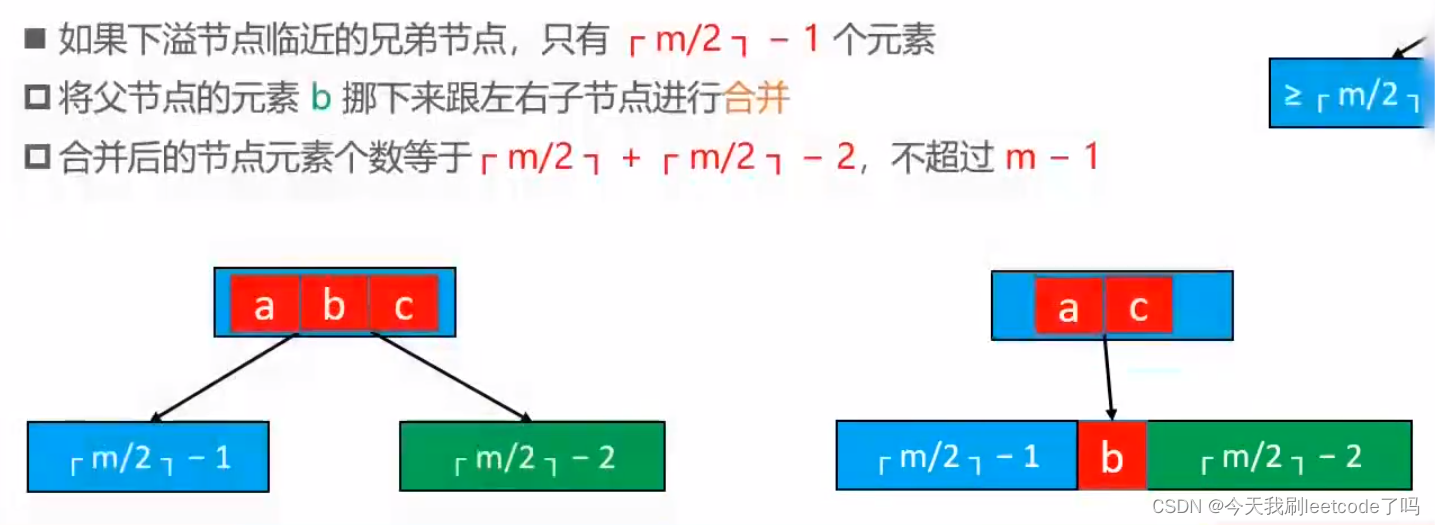
B树的介绍
R-B Tree 简介特性B树特性m阶B树的性质(这些性质是B树规定的) B树的搜索B树的添加B树的删除——非叶子结点 简介 R-B Tree又称为Red-Black Tree,红黑树。是一种特殊的二叉查找树,红黑树的每个节点上都有存储为表示结点的颜色&…...
)
《The Art of InnoDB》第二部分|第4章:深入结构-磁盘结构-撕裂的页面(doublewrite buffer)
4.5 撕裂的页面 目录 4.5 撕裂的页面 4.5.1 双写缓冲区的作用 4.5.2 双写缓冲区的结构 4.5.3 双写缓冲区与Redolog的协同工作流程 4.5.2 双写缓冲区写入时机 4.5.3 禁用双写缓冲区 4.5.4 小结 未完待续... 上文我们学习了redo log的结构和其工作原理,它是一个…...
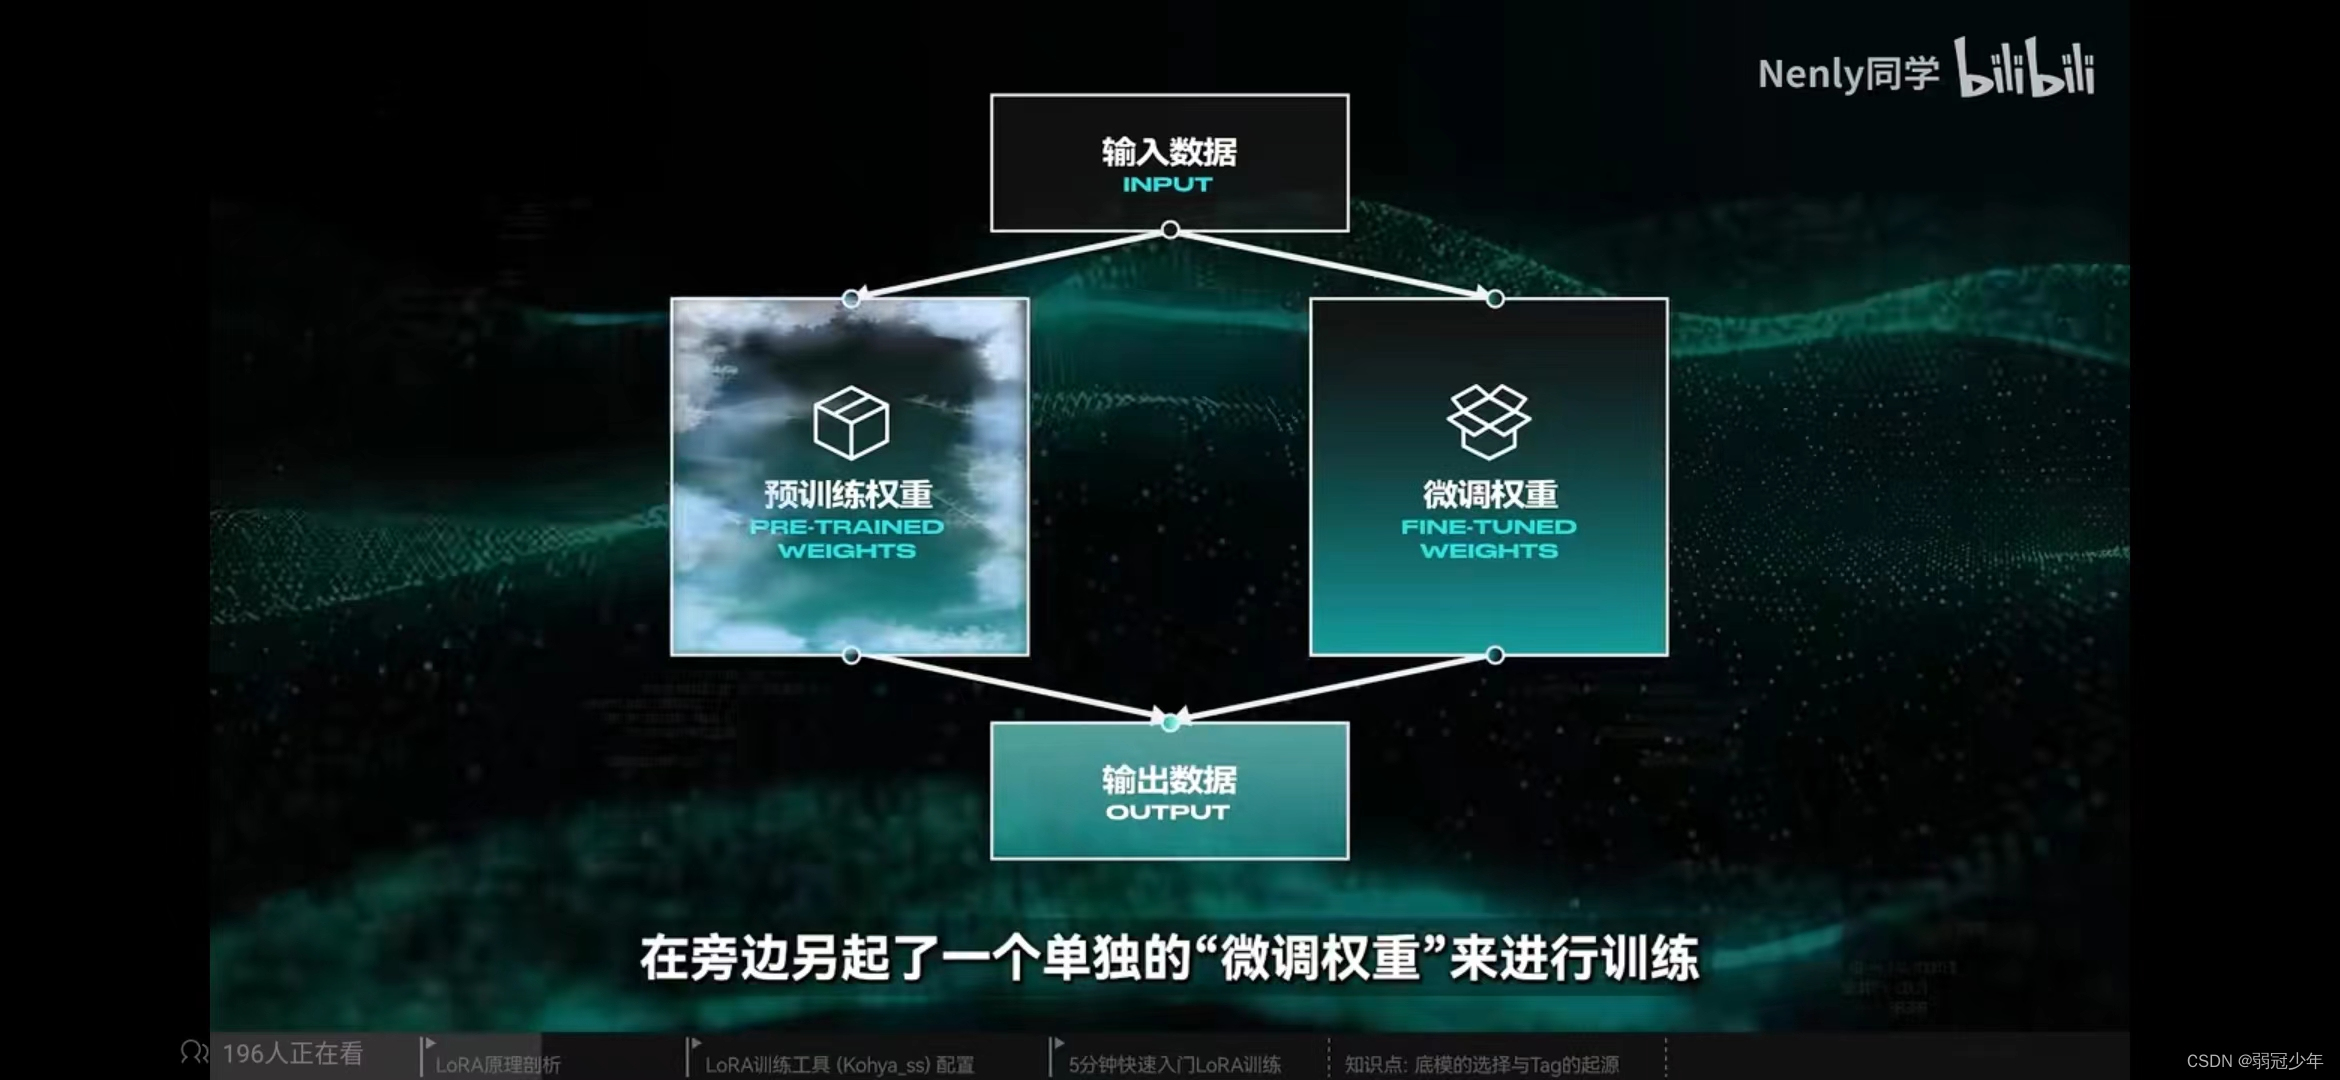
提示工程(Prompt Engineering)、微调(Fine-tuning) 和 嵌入(Embedding)
主要参考资料: 还没搞懂嵌入(Embedding)、微调(Fine-tuning)和提示工程(Prompt Engineering)?: https://blog.csdn.net/DynmicResource/article/details/133638079 B站Up主Nenly同学…...
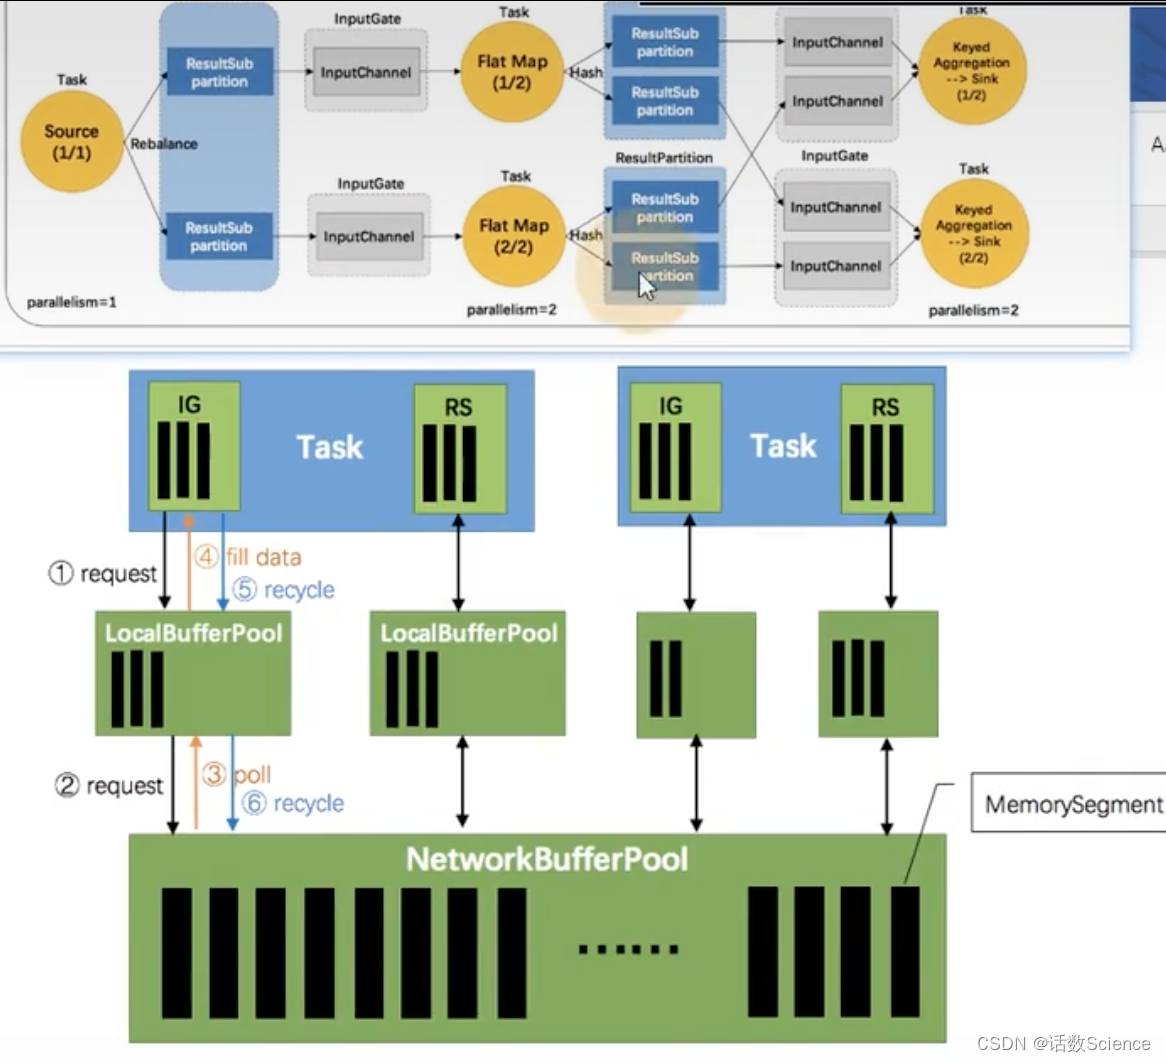
【Flink精讲】Flink 内存管理
面临的问题 目前, 大数据计算引擎主要用 Java 或是基于 JVM 的编程语言实现的,例如 Apache Hadoop、 Apache Spark、 Apache Drill、 Apache Flink 等。 Java 语言的好处在于程序员不需要太关注底层内存资源的管理,但同样会面临一个问题&…...

正则化概念及使用
正则化概念及使用 正则化概念正则化原理常用的两种正则化方法1. L1 正则化(Lasso)2. L2 正则化(Ridge) 正则化参数 正则化概念 在机器学习中,我们致力于通过从训练数据中学习模式或规律来构建模型。为了找到最佳的模型…...
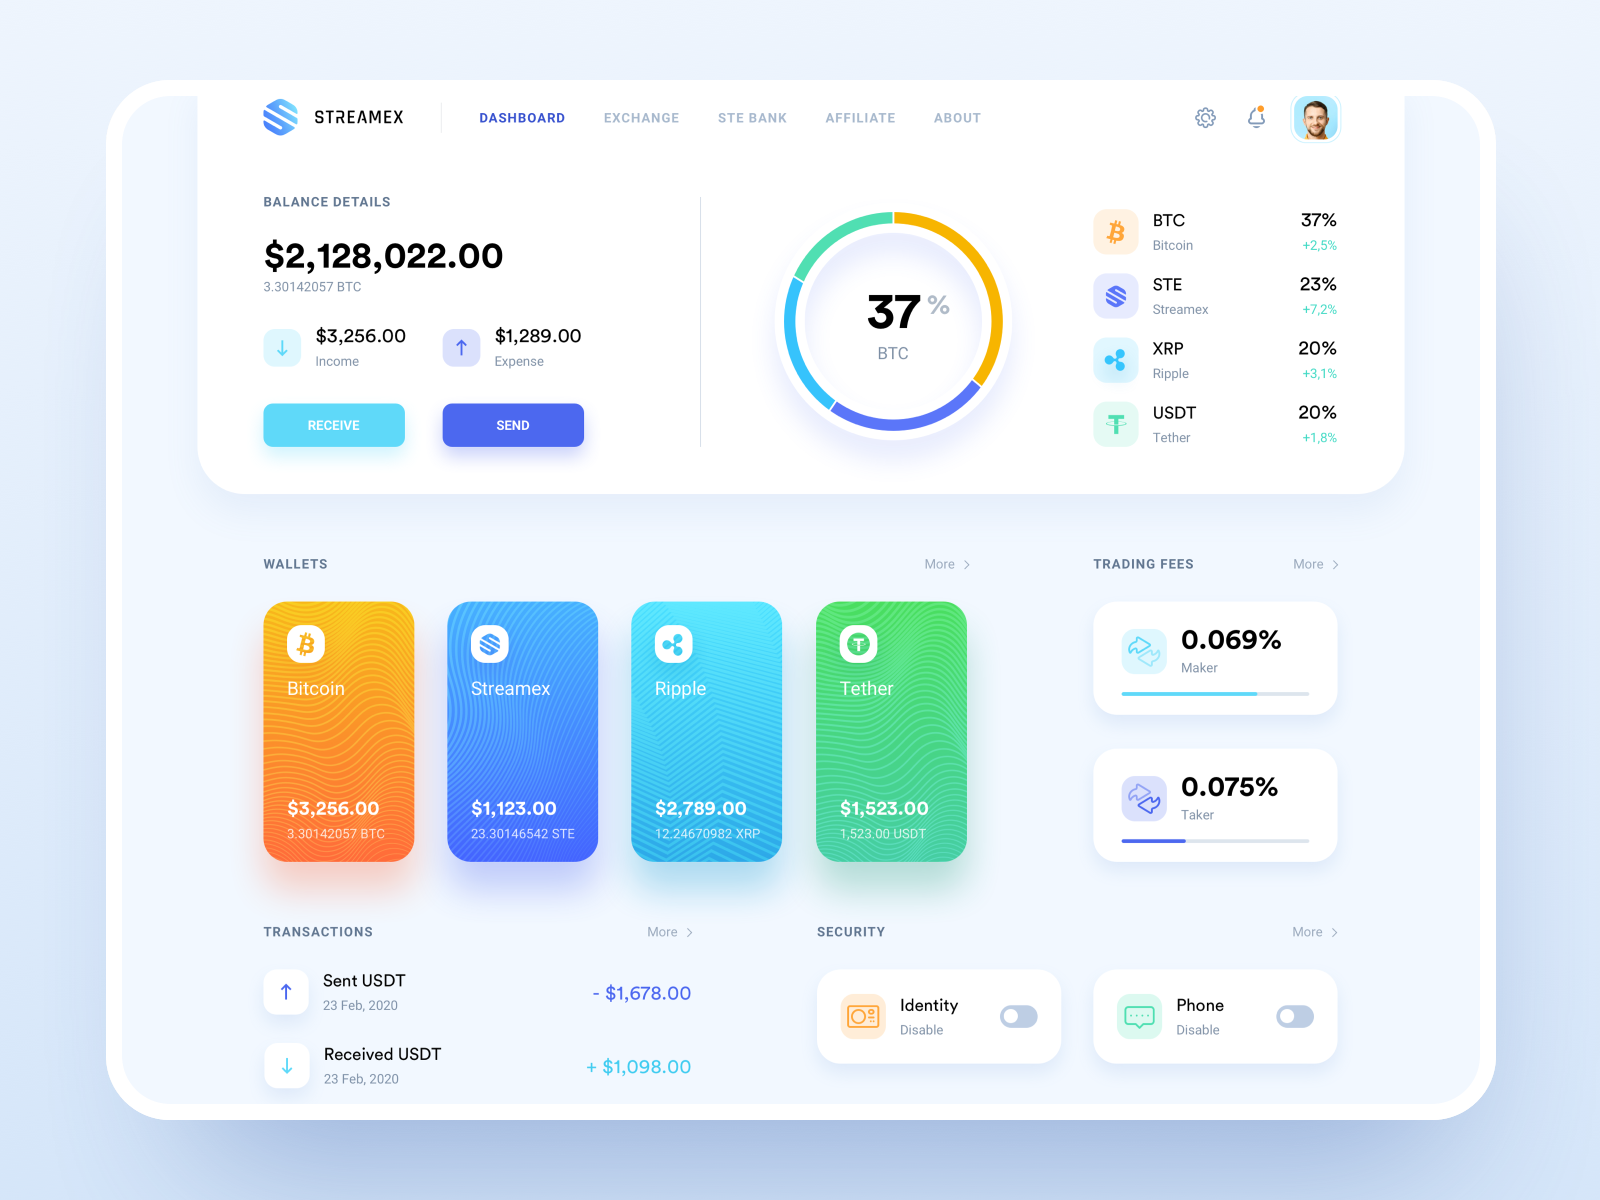
让程序员设计B端界面,好比武大郎招聘:向我看齐。不忍直视!
hello,我是大美B端工场,B端系统的要求越来越高了,很多公司还让程序员负责页面,页面搞的没法看,也怪不得程序员。程序员来搞页面,那还不是武大郎招聘——向我看齐,以我的标准为标准吗?…...
使用python构建Android,探索跨平台应用开发Kivy框架
使用python构建Android,探索跨平台应用开发Kivy框架 1. 介绍Kivy框架 Kivy是什么? Kivy是一个开源的Python跨平台应用程序开发框架,旨在帮助开发者快速构建创新的、可扩展的移动应用和多点触控应用。Kivy采用MIT许可证,允许开发…...
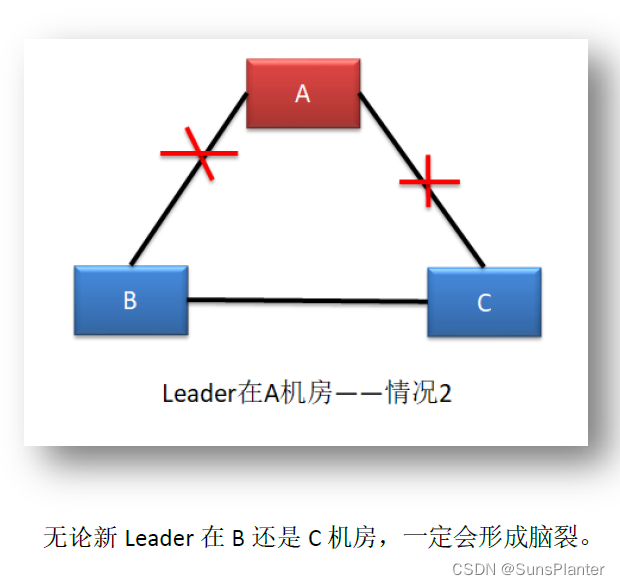
08 Redis之集群的搭建和复制原理+哨兵机制+CAP定理+Raft算法
5 Redis 集群 2.8版本之前, Redis采用主从集群模式. 实现了数据备份和读写分离 2.8版本之后, Redis采用Sentinel哨兵集群模式 , 实现了集群的高可用 5.1 主从集群搭建 首先, 基本所有系统 , “读” 的压力都大于 “写” 的压力 Redis 的主从集群是一个“一主多从”的读写分…...
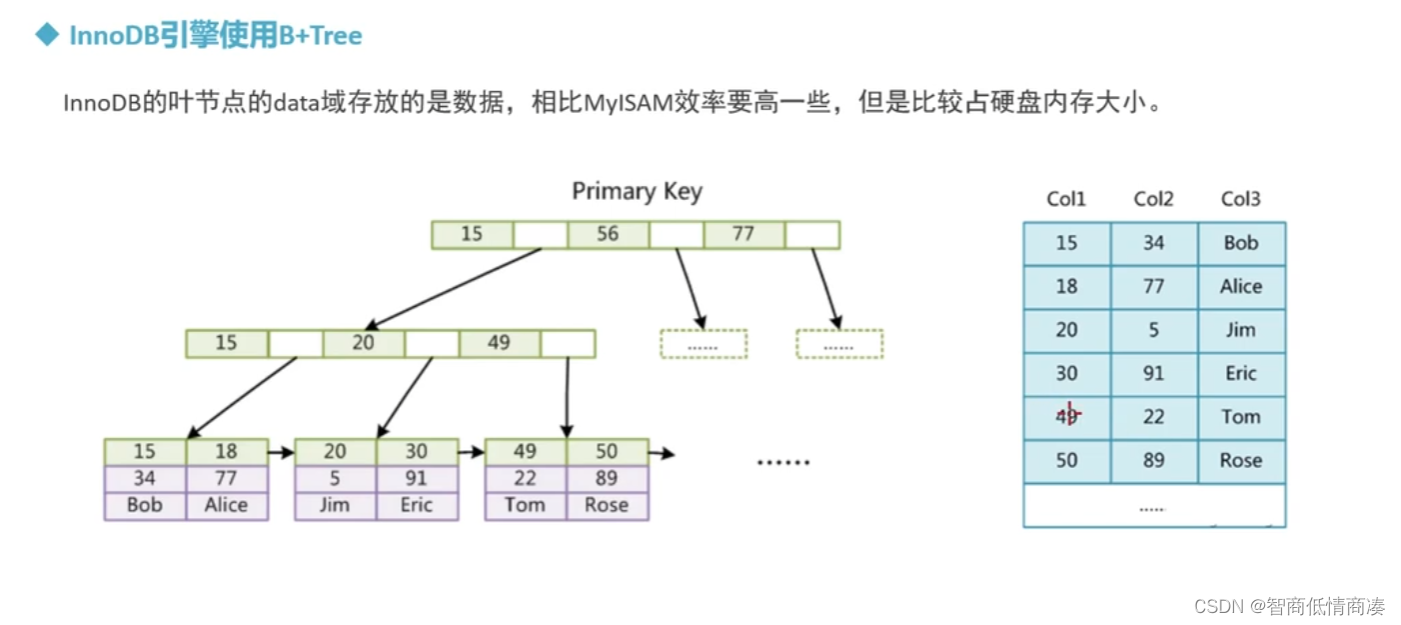
*MYSQL--索引--内部原理
MYSQL的索引根据功能,主要有三大类型: 1.HASH索引 2.二叉树 3.BTREE索引 一:HASH索引 1.内部原理: 在设置了某列为索引列之后,并且开始或者将要在相应索引列创建数据的时候,系统通过某种算法 F(X) 自动计算出来一个十六进制的哈希值,这个哈希值能够对应相应的字段值 所以…...

docker安装kafka和kafka-console-ui
3、安装kafka https://blog.csdn.net/m0_64210833/article/details/134199061 kafka依赖Zookeeper,当然也可以用内置的kraft。 安装前提条件 1.安装Zookeeper 1.1运行ZooKeeper容器 2.运行Kafka容器 2.1启动Kafka容器 3.验证 3.1进入Kafka容器 3.2查看容器状态 3.3查…...
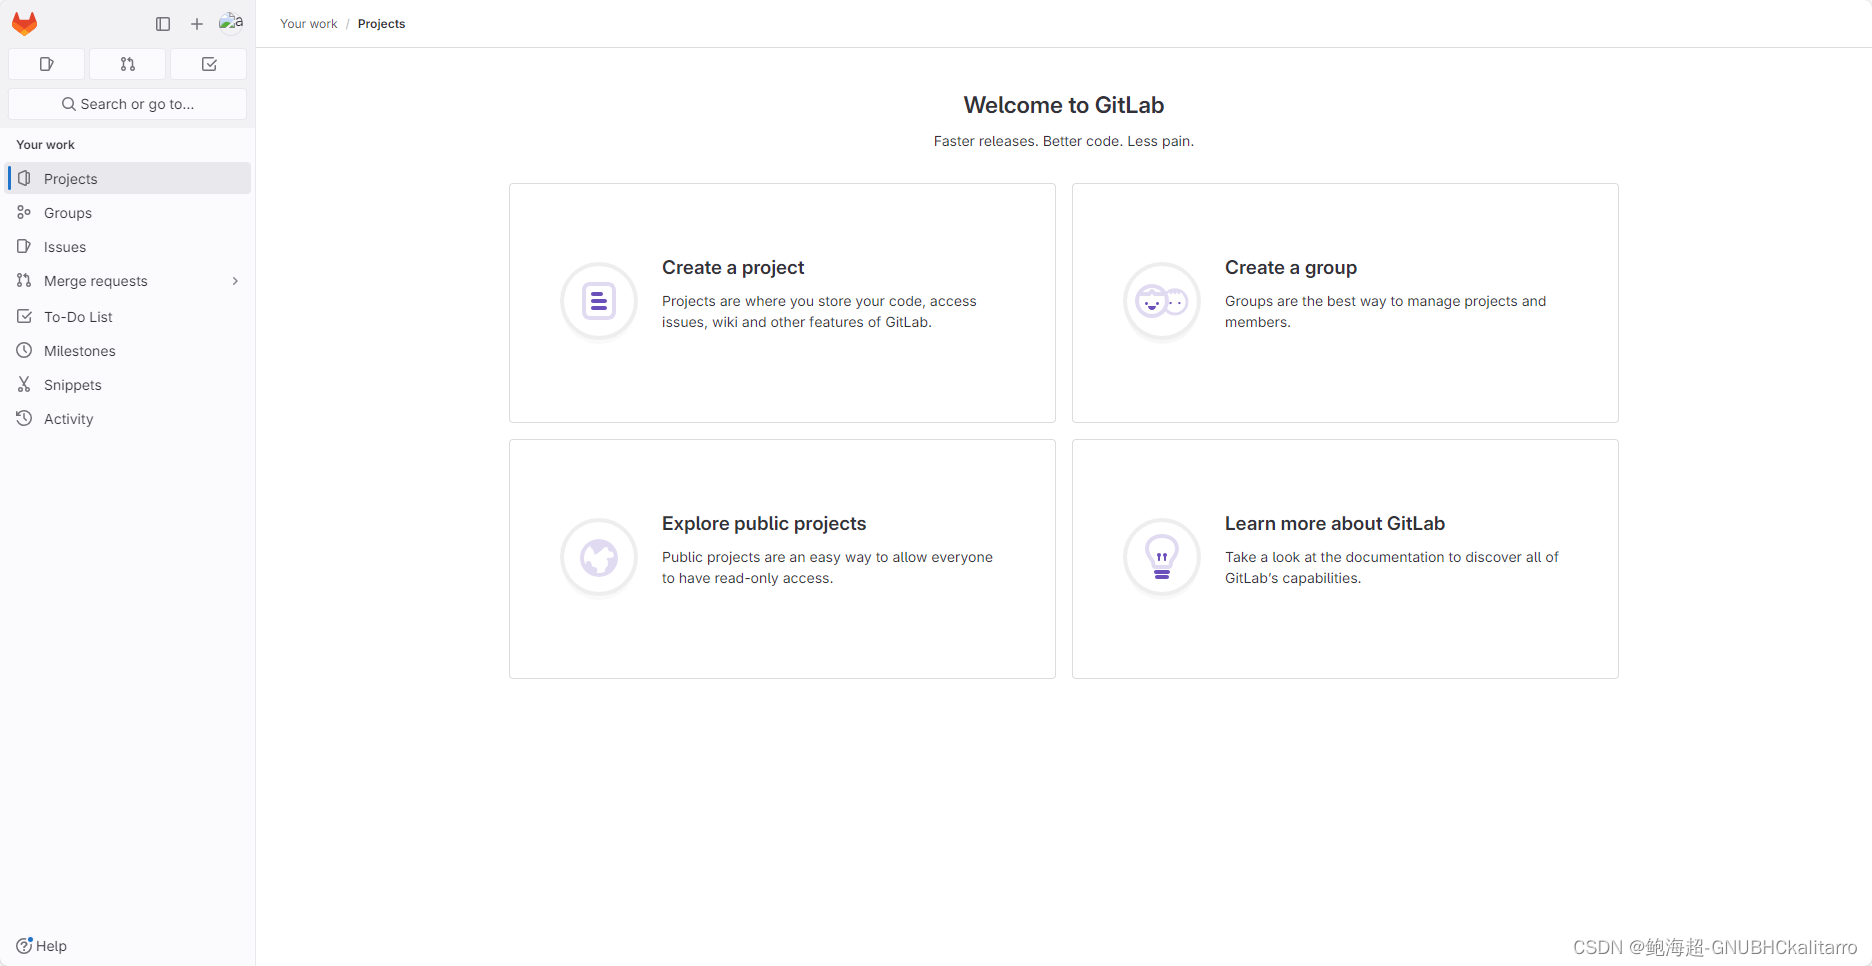
Linux:gitlab创建组,创建用户,创建项目
创建组和项目 让后可以在组里创建一个个仓库 创建成员 我创建个成员再把他分配进这个组里 进入管理员 密码等会我们创建完用户再去配置密码 Regular是普通的用户,只可以正常去访问指定规则的项目 而下面的administrator就是管理员,可以随便进项目&…...
相机选型介绍
摄影测量中,相机是非常重要的角色,合适的相机产出合适的图像,得到合适的重建精度,这是相机的重要性。 您也许第一反应是,摄影测量所需的理想相机,是有着超高分辨率的相机,但事实可能并非如此&a…...

SQL创建数据库
SQL,全称结构化查询语言(Structured Query Language),是一种用于管理关系型数据库的标准语言。通过 SQL,我们可以创建、查询、更新和删除数据库中的数据。今天,我们将学习使用SQL创建数据库。本文的目标是让读者了解如何使用SQL创…...
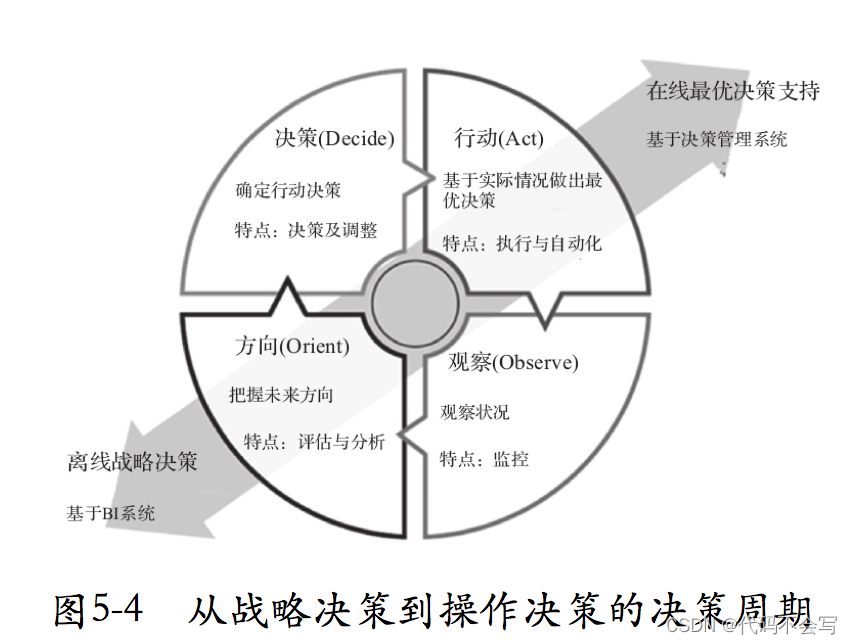
读书笔记-增强型分析:AI驱动的数据分析、业务决策与案例实践
目录 前言 运用人工智能技术,可以使人类社会变得更美好。人们总是期待产品更适合、服务更贴心、生活更便利。在实践中,技术给企业赋能,企业通过优质的产品和服务满足社会,提升人类福祉。很多金融企业已经开始尝试向潜在客户推送…...
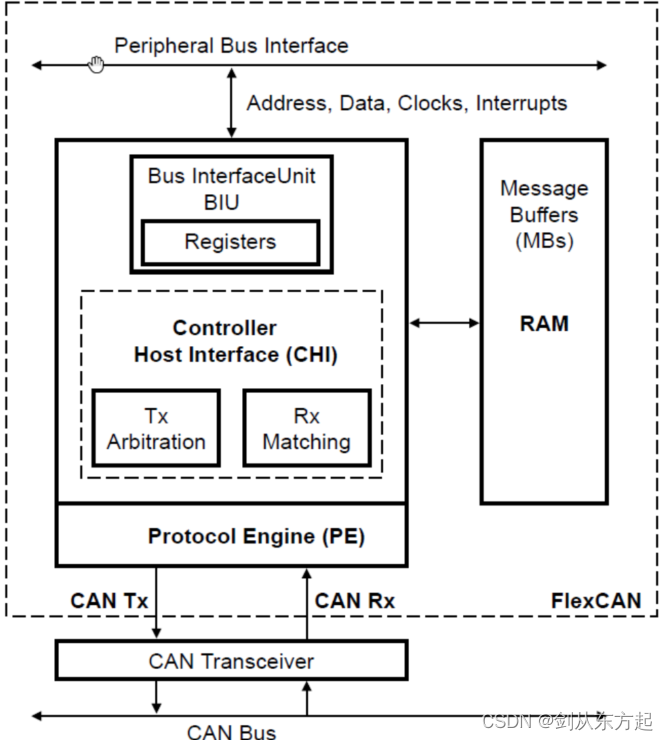
NXP实战笔记(十):S32K3xx基于RTD-SDK在S32DS上配置CAN通信
目录 1、概述 2、SDK配置 2.1、配置目标 2.2、CAN配置 3、代码实现 4、测试结果 1、概述 S32K3xx的FlexCan与之前的S32K1xx很相似,Can的中断掩码寄存器(IMASK3)与中断标志位寄存器(IFLAG3)依赖于邮箱数。 FlexCan配置实例如下 FlexCan的整体图示如下 Protocol Engine…...

纳斯达克大屏-投放需要知道的几个条件-大舍传媒
引言 随着移动互联网的快速发展,数字广告媒体广告越来越受到企业的关注。纳斯达克大屏作为全球最大的数字媒体广告投放平台之一,拥有广泛的受众和优质的媒体资源,吸引了众多企业的眼球。要想在纳斯达克大屏上投放广告,企业需要了…...
python-可视化篇-简单-条形图输出主要省份GDP排名情况
条形图输出主要省份GDP排名情况 代码 gdp广东:97277.77:107671.07 江苏:92595.40:99631.52 山东:76469.70:71067.5 浙江:56197.00:62353 河南:48055.90:54259.2 四川:40678.10:46615.82 湖北:39366.60:45828.31 湖南:36425.78:39752.12 河北:36010.30:35104.5 福建:35804.04:…...

Sora - 探索AI视频模型的无限可能-官方报告解读与思考
一、引言 最近SORA火爆刷屏,我也忍不住找来官方报告分析了一下,本文将深入探讨OpenAI最新发布的Sora模型。Sora模型不仅仅是一个视频生成器,它代表了一种全新的数据驱动物理引擎,能够在虚拟世界中模拟现实世界的复杂现象。本文将重…...

出门在外也能用!OpenAI 将 Codex 接入 ChatGPT 移动端
曾经在企业办公室工作过的人,可能都见过这样的场景:同事们把笔记本电脑托在手臂上,从一个会议室走到另一个会议室。倒也不是非要在走廊、电梯或楼道里处理邮件,只是不想合上盖子然后再等电脑重启。看似有些滑稽,但又不…...

树莓派5本地大模型实时分析SEN6x环境传感器数据实战
1. 项目概述:当环境传感器遇上本地大模型在物联网和边缘计算领域,我们早已习惯了这样的工作流:传感器采集数据,微控制器或单板计算机(比如树莓派)负责收集和上传,最终的数据分析和洞察则交给云端…...
)
告别U盘!用PXE网络批量装UOS,一台电脑搞定所有(附Arm/Mips/X86全架构配置)
告别U盘!用PXE网络批量装UOS,一台电脑搞定所有(附Arm/Mips/X86全架构配置) 在国产化替代的大背景下,UOS操作系统凭借其出色的兼容性和安全性,正被越来越多的企业和机构采用。然而,当面对数十台甚…...

AI教材写作必备:低查重工具,助力高效生成专业教材!
选择 AI 教材编写工具的困境与解决方案 在准备教材之前,选择合适的工具就像进入了一个“纠结的大迷宫”!使用办公软件确实方便,但功能往往太过基础,搭建框架和调整格式都得手动搞定;而如果选择专业的 AI 教材编写工具…...

AI技能开发框架实战:从标准化契约到主流AI工具集成
1. 项目概述与核心价值最近在GitHub上看到一个挺有意思的项目,叫Renol1/skill-creator-pro。光看名字,你可能会觉得这又是一个“技能创建器”,但仔细研究它的代码和设计思路,你会发现它远不止于此。这个项目本质上是一个面向开发者…...

pgwatch2监控指标详解:从基础性能到高级洞察
pgwatch2监控指标详解:从基础性能到高级洞察 【免费下载链接】pgwatch2 PostgreSQL metrics monitor/dashboard 项目地址: https://gitcode.com/gh_mirrors/pg/pgwatch2 pgwatch2是一款功能强大的PostgreSQL metrics monitor/dashboard工具,它能够…...

小红书内容采集神器:XHS-Downloader免费开源工具完全指南
小红书内容采集神器:XHS-Downloader免费开源工具完全指南 【免费下载链接】XHS-Downloader 小红书(XiaoHongShu、RedNote)链接提取/作品采集工具:提取账号发布、收藏、点赞、专辑作品链接;提取搜索结果作品、用户链接&…...

从协议到实践:国密TLCP协议深度解析与Nginx国密化改造实战
1. 国密TLCP协议的前世今生 第一次接触国密TLCP协议是在2018年参与某金融机构的安全改造项目。当时客户明确提出要使用国产密码算法,但在实际部署过程中发现,现有的国际标准SSL/TLS协议对国密算法支持非常有限。这就是TLCP协议诞生的背景 - 为了解决国产…...

数字孪生-三维重建-透明建筑-以智能管控为价值
透明建筑的核心透明建筑,本质上不是 “玻璃造房子”,而是以三维重构为骨架、以空间连续为逻辑、以全域可视为目标、以智能管控为价值的新一代数字孪生空间形态。它的核心可以浓缩为四句话:1. 空间可视核心:打破物理遮挡࿰…...

c++ 端口扫描程序实现案例
第一、原理端口扫描的原理很简单,就是建立socket通信,切换不通端口,通过connect函数,如果成功则代表端口开发者,否则端口关闭。所有需要多socket程序熟悉,本内容是在window环境下的第二、单线程实现方式123…...