Linux运维_Bash脚本_构建安装Systemd-250
Linux运维_Bash脚本_构建安装Systemd-250
Bash (Bourne Again Shell) 是一个解释器,负责处理 Unix 系统命令行上的命令。它是由 Brian Fox 编写的免费软件,并于 1989 年发布的免费软件,作为 Sh (Bourne Shell) 的替代品。
您可以在 Linux 和 MacOS 机器上使用 Bash,甚至可以通过适用于 Linux 的 Windows 子系统在 Windows 10 机器上使用。
使用方法
- 下载源码包:
libcap-2.68.tar.xz
MarkupSafe-1.1.1.tar.gz
Jinja2-2.9.6.tar.gz
automake-1.16.tar.gz (Maybe Not Necessary)
util-linux-2.39.3.tar.xz
systemd-250.tar.gz
- 放于指定路径:
这里 Bash Shell 脚本的全局变量 STORAGE 指定的存放源码包的路径 /home/goufeng 可进行修改。
- 执行 Bash Shell 脚本:
输入 /[路径名]/[脚本名].sh 即可进行自动编译部署,过程中提示输入 (y/n) 输入 y 则进行下一步,这样分阶段确认的原因是为了确保能够看到上一个源码编译结果中可能的错误和提示。
完整脚本
#! /bin/bash
# Create By GF 2024-03-15 12:55# --------------------------------------------------
# Install First:
# * GNU-Tools (Contains: pkg-config, m4, autoconf, automake, libtool, gettext, flex, bison, libiconv, make)
# * CMake >= 3.14.0 (Maybe Not Necessary)
# * Python == 3.x.x
# * Meson
# * Ninja# ------------------- Dependency -------------------
# Need File: libcap-2.68.tar.xz
# --------------------- Jinja2 ---------------------
# Need File: MarkupSafe-1.1.1.tar.gz
# Need File: Jinja2-2.9.6.tar.gz
# ------------------- util-linux -------------------
# Need File: automake-1.16.tar.gz (Maybe Not Necessary)
# Need File: util-linux-2.39.3.tar.xz
# ----------------- Systemd - 250 ------------------
# Need File: systemd-250.tar.gz# ##################################################
STORAGE=/home/goufeng# ############################################ Dependency ############################################# Function: 制作安装(Make Install) libcap-2.68
# ##################################################
function Make_Install_libcap_2_68() {if [[ ! -d "/opt/libcap-2.68" ]]; thenlocal VERIFYlocal STEP_UNZIPPED=0local STEP_MADE=0local STEP_INSTALLED=0local STEP_COPIED=0# ------------------------------------------echo "[Confirm] Make and Install ( libcap-2.68 )? (y/n)"# ..........................................read VERIFY# ..........................................if [[ $VERIFY != "y" ]]; then exit 1; fi# ------------------------------------------tar -Jxvf $STORAGE/libcap-2.68.tar.xz && STEP_UNZIPPED=1# ------------------------------------------cd $STORAGE/libcap-2.68 && make && STEP_MADE=1# ------------------------------------------# default installs the library libcap.XX.Y in /lib[64]/# the binaries in /sbin/# the header files in /usr/include# the {libcap,libpsx}.pc files in /usr/lib[64]/pkgconfig# the Go packages (if built) under /usr/share/gocode/src# ..........................................# Skip # cd $STORAGE/libcap-2.68 && make install && STEP_INSTALLED=1# ------------------------------------------if [[ $STEP_MADE == 1 ]]; thenif [[ ! -d "/opt/libcap-2.68" ]]; then mkdir /opt/libcap-2.68; fiif [[ ! -d "/opt/libcap-2.68/include" ]]; then mkdir /opt/libcap-2.68/include; fiif [[ ! -d "/opt/libcap-2.68/lib" ]]; then mkdir /opt/libcap-2.68/lib; fiif [[ ! -d "/opt/libcap-2.68/lib/pkgconfig" ]]; then mkdir /opt/libcap-2.68/lib/pkgconfig; fi# ......................................rsync -av $STORAGE/libcap-2.68/libcap/include/ /opt/libcap-2.68/include/# ......................................rm -f /opt/libcap-2.68/include/sys/psx_syscall.h && \cp -vf $STORAGE/libcap-2.68/psx/psx_syscall.h /opt/libcap-2.68/include/sys/# ......................................cp -vf $STORAGE/libcap-2.68/libcap/libcap.a       /opt/libcap-2.68/lib/cp -vf $STORAGE/libcap-2.68/libcap/libcap.so      /opt/libcap-2.68/lib/cp -vf $STORAGE/libcap-2.68/libcap/libcap.so.2    /opt/libcap-2.68/lib/cp -vf $STORAGE/libcap-2.68/libcap/libcap.so.2.68 /opt/libcap-2.68/lib/cp -vf $STORAGE/libcap-2.68/libcap/libpsx.a       /opt/libcap-2.68/lib/cp -vf $STORAGE/libcap-2.68/libcap/libpsx.so      /opt/libcap-2.68/lib/cp -vf $STORAGE/libcap-2.68/libcap/libpsx.so.2    /opt/libcap-2.68/lib/cp -vf $STORAGE/libcap-2.68/libcap/libpsx.so.2.68 /opt/libcap-2.68/lib/# ......................................cp -vf $STORAGE/libcap-2.68/libcap/libcap.pc /opt/libcap-2.68/lib/pkgconfig/cp -vf $STORAGE/libcap-2.68/libcap/libpsx.pc /opt/libcap-2.68/lib/pkgconfig/# ......................................sed -i "s%prefix\=/usr%prefix\=/opt/libcap-2.68%" /opt/libcap-2.68/lib/pkgconfig/libcap.pcsed -i "s%libdir\=/lib64%libdir\=\$\{prefix\}/lib%" /opt/libcap-2.68/lib/pkgconfig/libcap.pcsed -i "s%includedir\=/usr/include%includedir\=\$\{prefix\}/include%" /opt/libcap-2.68/lib/pkgconfig/libcap.pc# ......................................sed -i "s%prefix\=/usr%prefix\=/opt/libcap-2.68%" /opt/libcap-2.68/lib/pkgconfig/libpsx.pcsed -i "s%libdir\=/lib64%libdir\=\$\{prefix\}/lib%" /opt/libcap-2.68/lib/pkgconfig/libpsx.pcsed -i "s%includedir\=/usr/include%includedir\=\$\{prefix\}/include%" /opt/libcap-2.68/lib/pkgconfig/libpsx.pc# ......................................STEP_COPIED=1fi# ------------------------------------------if [[ $STEP_COPIED == 1 ]]; thenif [[ ! -d "/opt/lib" ]]; then mkdir /opt/lib; fiif [[ ! -d "/opt/lib/pkgconfig" ]]; then mkdir /opt/lib/pkgconfig; fi# ......................................# Skip # rsync -av /opt/libcap-2.68/include/ /usr/local/include/# ......................................# Skip # rsync -av /opt/libcap-2.68/lib/ /usr/local/lib/# ......................................cp -vf /opt/libcap-2.68/lib/pkgconfig/libcap.pc /opt/lib/pkgconfig/cp -vf /opt/libcap-2.68/lib/pkgconfig/libpsx.pc /opt/lib/pkgconfig/fi# ------------------------------------------cd $STORAGE && rm -rf $STORAGE/libcap-2.68 && return 0elseecho "[Caution] Path: ( /opt/libcap-2.68 ) Already Exists."# ------------------------------------------return 0fi
}# ############################################## Jinja2 ############################################### Function: 构建安装(Build Install) MarkupSafe-1.1.1 (by Python3)
# ##################################################
function Build_Install_MarkupSafe_1_1_1_by_Python3() {# 使用 expr index "$string" "$substring" 来判断字符串 $string 中是否包含子字符串 $substring。# Use the expr index "$string" and "$substring" to determine whether the string $string contains a substring $substring.# ..............................................# 如果子字符串存在, 则返回子字符串在原字符串中的位置 (从 1 开始), 否则返回 0。# If the substring exists, return the position of the substring in the original string (starting from 1), otherwise return 0.local EXISTS_LINE=$(pip3 list | grep "MarkupSafe")local EXISTS_NAME=$(expr index "$EXISTS_LINE" "MarkupSafe")local EXISTS_VERSION=$(expr index "$EXISTS_LINE" "1.1.1")if [[ $EXISTS_NAME == 0 && $EXISTS_VERSION == 0 ]]; thenlocal VERIFYlocal STEP_UNZIPPED=0local STEP_BUILDED=0local STEP_INSTALLED=0# ------------------------------------------read -p "[Confirm] Build and Install ( MarkupSafe-1.1.1 )? (y/n)>" VERIFYif [[ "$VERIFY" != "y" ]]; then exit 1; fi# ------------------------------------------tar -zxvf $STORAGE/MarkupSafe-1.1.1.tar.gz && STEP_UNZIPPED=1# ------------------------------------------cd $STORAGE/MarkupSafe-1.1.1 && python3 setup.py build && STEP_BUILDED=1# ------------------------------------------cd $STORAGE/MarkupSafe-1.1.1 && python3 setup.py install && STEP_INSTALLED=1# ------------------------------------------cd $STORAGE && rm -rf $STORAGE/MarkupSafe-1.1.1 && return 0elseecho "[Caution] Python Package: ( MarkupSafe-1.1.1 ) Already Exists."# ------------------------------------------return 0fi
}# Function: 构建安装(Build Install) Jinja2-2.9.6 (by Python3)
# ##################################################
function Build_Install_Jinja2_2_9_6_by_Python3() {# 使用 expr index "$string" "$substring" 来判断字符串 $string 中是否包含子字符串 $substring。# Use the expr index "$string" and "$substring" to determine whether the string $string contains a substring $substring.# ..............................................# 如果子字符串存在, 则返回子字符串在原字符串中的位置 (从 1 开始), 否则返回 0。# If the substring exists, return the position of the substring in the original string (starting from 1), otherwise return 0.local EXISTS_LINE=$(pip3 list | grep "Jinja2")local EXISTS_NAME=$(expr index "$EXISTS_LINE" "Jinja2")local EXISTS_VERSION=$(expr index "$EXISTS_LINE" "2.9.6")if [[ $EXISTS_NAME == 0 && $EXISTS_VERSION == 0 ]]; thenlocal VERIFYlocal STEP_UNZIPPED=0local STEP_BUILDED=0local STEP_INSTALLED=0# ------------------------------------------read -p "[Confirm] Build and Install ( Jinja2-2.9.6 )? (y/n)>" VERIFYif [[ "$VERIFY" != "y" ]]; then exit 1; fi# ------------------------------------------tar -zxvf $STORAGE/Jinja2-2.9.6.tar.gz && STEP_UNZIPPED=1# ------------------------------------------cd $STORAGE/Jinja2-2.9.6 && python3 setup.py build && STEP_BUILDED=1# ------------------------------------------cd $STORAGE/Jinja2-2.9.6 && python3 setup.py install && STEP_INSTALLED=1# ------------------------------------------cd $STORAGE && rm -rf $STORAGE/Jinja2-2.9.6 && return 0elseecho "[Caution] Python Program: ( Jinja2-2.9.6 ) Already Exists."# ------------------------------------------return 0fi
}# ############################################ util-linux ############################################# Function: 编译安装(Compile Install) automake-1.16
# ##################################################
function Compile_Install_automake_1_16() {if [[ ! -d "/opt/automake-1.16" ]]; thenlocal VERIFYlocal STEP_UNZIPPED=0local STEP_CONFIGURED=0local STEP_INSTALLED=0# ------------------------------------------read -p "[Confirm] Compile and Install ( automake-1.16 )? (y/n)>" VERIFYif [[ "$VERIFY" != "y" ]]; then exit 1; fi# ------------------------------------------tar -zxvf automake-1.16.tar.gz && STEP_UNZIPPED=1# ------------------------------------------cd $STORAGE/automake-1.16 && ./configure --prefix=/opt/automake-1.16 && STEP_CONFIGURED=1# ------------------------------------------make && make install && STEP_INSTALLED=1# ------------------------------------------if [[ $STEP_INSTALLED == 1 ]]; thenln -sf /opt/automake-1.16/bin/aclocal       /usr/local/bin/ln -sf /opt/automake-1.16/bin/aclocal-1.16  /usr/local/bin/ln -sf /opt/automake-1.16/bin/automake      /usr/local/bin/ln -sf /opt/automake-1.16/bin/automake-1.16 /usr/local/bin/fi# ..........................................if [[ $STEP_INSTALLED == 1 && -d "/opt/libtool-2.4.6" ]]; thencp -vf /opt/libtool-2.4.6/share/aclocal/*.m4 /opt/automake-1.16/share/aclocal/fi# ------------------------------------------cd $STORAGE && rm -rf $STORAGE/automake-1.16 && return 0elseecho "[Caution] Path: ( /opt/automake-1.16 ) Already Exists."# ------------------------------------------return 0fi
}# Function: 编译安装(Compile Install) util-linux-2.39.3
# ##################################################
function Compile_Install_util_linux_2_39_3() {# util-linux-2.39.3 Provide: blkid           (Sys Binary File)# util-linux-2.39.3 Provide: fdisk           (Sys Binary File)# util-linux-2.39.3 Provide: mount           (Binary File)# util-linux-2.39.3 Provide: uuidd           (Sys Binary File)# util-linux-2.39.3 Provide: libblkid.a      (Static Libraries)# util-linux-2.39.3 Provide: libblkid.so     (Shared Libraries)# util-linux-2.39.3 Provide: libfdisk.a      (Static Libraries)# util-linux-2.39.3 Provide: libfdisk.so     (Shared Libraries)# util-linux-2.39.3 Provide: libmount.a      (Static Libraries)# util-linux-2.39.3 Provide: libmount.so     (Shared Libraries)# util-linux-2.39.3 Provide: libsmartcols.a  (Static Libraries)# util-linux-2.39.3 Provide: libsmartcols.so (Shared Libraries)# util-linux-2.39.3 Provide: libuuid.a       (Static Libraries)# util-linux-2.39.3 Provide: libuuid.so      (Shared Libraries)if [[ ! -d "/opt/util-linux-2.39.3" ]]; thenlocal VERIFYlocal STEP_UNZIPPED=0local STEP_CONFIGURED=0local STEP_INSTALLED=0# ------------------------------------------read -p "[Confirm] Compile and Install ( util-linux-2.39.3 )? (y/n)>" VERIFYif [[ "$VERIFY" != "y" ]]; then exit 1; fi# ------------------------------------------tar -Jxvf $STORAGE/util-linux-2.39.3.tar.xz && STEP_UNZIPPED=1# ------------------------------------------# First, disable a problematic test:# 首先, 禁用有问题的测试:#     sed -i '/test_mkfds/s/^/#/' tests/helpers/Makemodule.am# Skip # sed -i '/test_mkfds/s/^/#/' $STORAGE/util-linux-2.39.3/tests/helpers/Makemodule.am# ------------------------------------------# 1. Installation of Util-linux:# #     ./configure --bindir=/usr/bin    \#                 --libdir=/usr/lib    \#                 --runstatedir=/run   \#                 --sbindir=/usr/sbin  \#                 --disable-chfn-chsh  \#                 --disable-login      \#                 --disable-nologin    \#                 --disable-su         \#                 --disable-setpriv    \#                 --disable-runuser    \#                 --disable-pylibmount \#                 --disable-static     \#                 --without-python     \#                 --without-systemd    \#                 --without-systemdsystemunitdir        \#                 ADJTIME_PATH=/var/lib/hwclock/adjtime \#                 --docdir=/usr/share/doc/util-linux-2.39.3#     The --disable and --without options prevent warnings about building components that either require packages not in LFS, or are inconsistent with programs installed by other packages.#     --disable 和 --without 选项可防止有关构建组件的警告, 这些组件要么需要不在 LFS 中的程序包, 要么与其他程序包安装的程序不一致。# ..........................................# 2. Installation of Util-linux - 32-bit:#     Move a tool out of the way which is optionally used by configure but will report invalid pathes for multilib builds.#     将一个工具移到可供 configure 选择使用的位置, 但该工具将报告多分支生成的无效路径。#     #         mv /usr/bin/ncursesw6-config{,.tmp}# #     CC="gcc -m32" \#     ./configure ADJTIME_PATH=/var/lib/hwclock/adjtime   \#                 --host=i686-pc-linux-gnu \#                 --libdir=/usr/lib32      \#                 --docdir=/usr/share/doc/util-linux-2.39.3 \#                 --disable-chfn-chsh      \#                 --disable-login          \#                 --disable-nologin        \#                 --disable-su             \#                 --disable-setpriv        \#                 --disable-runuser        \#                 --disable-pylibmount     \#                 --disable-static         \#                 --without-python         \#                 --without-systemd        \#                 --without-systemdsystemunitdir#     Restore the tool previously moved away:#     恢复以前移走的工具:#     #         mv /usr/bin/ncursesw6-config{.tmp,}#     After "make", install the package:#     #         make DESTDIR=$PWD/DESTDIR install#         cp -Rv DESTDIR/usr/lib32/* /usr/lib32#         rm -rf DESTDIR# ..........................................# 3. Installation of Util-linux - x32-bit#     Move a tool out of the way which is optionally used by configure but will report invalid pathes for multilib builds.#     将一个工具移到可供 configure 选择使用的位置, 但该工具将报告多分支生成的无效路径。#     #         mv /usr/bin/ncursesw6-config{,.tmp}# #     CC="gcc -mx32" \#     ./configure ADJTIME_PATH=/var/lib/hwclock/adjtime   \#                 --host=x86_64-pc-linux-gnux32 \#                 --libdir=/usr/libx32 \#                 --docdir=/usr/share/doc/util-linux-2.39.3 \#                 --disable-chfn-chsh  \#                 --disable-login      \#                 --disable-nologin    \#                 --disable-su         \#                 --disable-setpriv    \#                 --disable-runuser    \#                 --disable-pylibmount \#                 --disable-static     \#                 --without-python     \#                 --without-systemd    \#                 --without-systemdsystemunitdir#     Restore the tool previously moved away:#     恢复以前移走的工具:#     #         mv /usr/bin/ncursesw6-config{.tmp,}#     After "make", install the package:#     #         make DESTDIR=$PWD/DESTDIR install#         cp -Rv DESTDIR/usr/libx32/* /usr/libx32#         rm -rf DESTDIR# ..........................................cd $STORAGE/util-linux-2.39.3 && ./configure --prefix=/opt/util-linux-2.39.3 && STEP_CONFIGURED=1# ------------------------------------------# If desired, run the test suite as a non-root user:# 如果需要, 请以非 root 用户身份运行测试套件:#     Warning#     Running the test suite as the root user can be harmful to your system.#     To run it, the CONFIG_SCSI_DEBUG option for the kernel must be available in the currently running system and must be built as a module.#     Building it into the kernel will prevent booting. For complete coverage, other BLFS packages must be installed.#     If desired, this test can be run by booting into the completed LFS system and running:#     以 root 用户身份运行测试套件可能会对系统有害。#     要运行它, 内核的 CONFIG_SCSI_DEBUG 选项必须在当前运行的系统中可用, 并且必须作为模块构建。#     将其构建到内核中会阻止启动。为了实现完全覆盖, 必须安装其他 BLFS 软件包。#     如果需要, 可以通过引导到完整的 LFS 系统并运行以下程序来运行此测试:# #         bash tests/run.sh --srcdir=$PWD --builddir=$PWD# # chown -R tester .# su tester -c "make -k check"## The hardlink tests will fail if the host's kernel does not have the option CONFIG_CRYPTO_USER_API_HASH enabled or does not have any options providing a SHA256 implementation (for example, CONFIG_CRYPTO_SHA256, or CONFIG_CRYPTO_SHA256_SSSE3 if the CPU supports Supplemental SSE3) enabled.# In addition, two sub-tests from misc: mbsencode and one sub-test from script: replay are known to fail.# 如果主机内核未启用选项 CONFIG_CRYPTO_USER_API_HASH 或未启用任何提供 SHA256 实现的选项 (例如, 如果 CPU 支持补充 SSE3, 则为 CONFIG_CRYPTO_SHA256 或 CONFIG_CRYPTO_SHA256_SSSE3), 则硬链接测试将失败。# 此外, 来自 misc:mbsencode 的两个子测试和来自 script:replay 的一个子测试都失败了。make && make install && STEP_INSTALLED=1# ------------------------------------------if [[ $STEP_INSTALLED == 1 ]]; then# Skip # if [[ ! -d "/usr/local/sbin" ]]; then mkdir /usr/local/sbin; fi# ......................................if [[ ! -d "/opt/lib" ]]; then mkdir /opt/lib; fiif [[ ! -d "/opt/lib/pkgconfig" ]]; then mkdir /opt/lib/pkgconfig; fi# ......................................# Skip # ln -sf /opt/util-linux-2.39.3/bin/* /usr/local/bin/# ......................................# Skip # ln -sf /opt/util-linux-2.39.3/sbin/* /usr/local/sbin/# ......................................# Skip # rsync -av /opt/util-linux-2.39.3/include/ /usr/local/include/# ......................................# Skip # rsync -av /opt/util-linux-2.39.3/lib/ /usr/local/lib/# ......................................cp -f /opt/util-linux-2.39.3/lib/pkgconfig/*.pc /opt/lib/pkgconfig/fi# ------------------------------------------cd $STORAGE && rm -rf $STORAGE/util-linux-2.39.3 && return 0elseecho "[Caution] Path: ( /opt/util-linux-2.39.3 ) Already Exists."# ------------------------------------------return 0fi
}# ########################################## Systemd - 250 ############################################ Function: 构建安装(Build Install) Systemd-250
# ##################################################
function Build_Install_Systemd_250() {# Recommended#     Linux-PAM is not strictly required to build systemd, but the main reason to rebuild systemd in BLFS (it's already built in LFS anyway) is for the systemd-logind daemon and the pam_systemd.so PAM module.#     Linux-PAM is required for them. All packages in BLFS book with a dependency on systemd expects it has been rebuilt with Linux-PAM.# 推荐#     构建 systemd 并不严格要求 Linux-PAM, 但在 BLFS 中重建 systemd (无论如何, 它已经在LFS中构建) 的主要原因是 systemd-logind 守护进程和 PAM_systemd.so PAM 模块。#     它们需要 Linux PAM。BLFS 书中所有依赖 systemd 的包都希望它已经用 Linux-PAM 重新构建。# ..............................................# Configuring systemd#     The /etc/pam.d/system-session file needs to be modified and a new file needs to be created in order for systemd-logind to work correctly. Run the following commands as the root user:#     #         grep 'pam_systemd' /etc/pam.d/system-session ||#         cat >> /etc/pam.d/system-session << "EOF"#         # Begin Systemd addition#         #         session  required    pam_loginuid.so#         session  optional    pam_systemd.so#         #         # End Systemd addition#         EOF#         #         cat > /etc/pam.d/systemd-user << "EOF"#         # Begin /etc/pam.d/systemd-user#         #         account  required    pam_access.so#         account  include     system-account#         #         session  required    pam_env.so#         session  required    pam_limits.so#         session  required    pam_loginuid.so#         session  optional    pam_keyinit.so force revoke#         session  optional    pam_systemd.so#         #         auth     required    pam_deny.so#         password required    pam_deny.so#         #         # End /etc/pam.d/systemd-user#         EOF# ..............................................# Important#     Now ensure Shadow-4.14.5 has been already rebuilt with Linux-PAM-1.6.0 support first, then logout, and login again.#     This ensures the running login session registered with systemd-logind and a per-user systemd instance running for each user owning a login session.#     Many BLFS packages listing Systemd as a dependency needs the systemd-logind integration and/or a running per-user systemd instance.# 特别重要#    现在, 请先确保 Shadow-4.14.5 已经重建并支持 Linux-PAM-1.6.0, 然后注销并再次登录。#    这确保了使用 systemd-logind 注册的正在运行的登录会话, 以及为每个拥有登录会话的用户运行的每个用户的 systemd 实例。#    许多将 Systemd 列为依赖项的 BLFS 包需要 systemd-logind 集成 和/或 按用户运行的 Systemd 实例。# ..............................................# Warning#     If upgrading from a previous version of systemd and an initrd is used for system boot, you should generate a new initrd before rebooting the system.# 警告#     如果从以前版本的 systemd 升级并使用 initrd 进行系统引导, 则应在重新启动系统之前生成新的 initrd。if [[ ! -d "/opt/sandbox-systemd/systemd-250" ]]; thenlocal VERIFYlocal STEP_UNZIPPED=0local STEP_BUILDED=0local STEP_INSTALLED=0# ------------------------------------------read -p "[Confirm] Build and Install ( systemd-250 )? (y/n)>" VERIFYif [[ "$VERIFY" != "y" ]]; then exit 1; fi# ------------------------------------------tar -zxvf $STORAGE/systemd-250.tar.gz && STEP_UNZIPPED=1# ------------------------------------------if [[ $STEP_UNZIPPED == 1 ]]; then# Remove two unneeded groups, render and sgx, from the default udev rules:# 从默认 udev 规则中删除两个不需要的组件 render 和 sgx:#     sed -i -e 's/GROUP="render"/GROUP="video"/' \#            -e 's/GROUP="sgx", //' rules.d/50-udev-default.rules.in# ......................................sed -i "143s/MOUNT_ATTR_RDONLY/MOUNT_ATTR_IDMAP/" $STORAGE/systemd-250/src/shared/mount-util.csed -i "146s/MOUNT_ATTR_NOSUID/MOUNT_ATTR_IDMAP/" $STORAGE/systemd-250/src/shared/mount-util.csed -i "149s/MOUNT_ATTR_NODEV/MOUNT_ATTR_IDMAP/" $STORAGE/systemd-250/src/shared/mount-util.csed -i "152s/MOUNT_ATTR_NOEXEC/MOUNT_ATTR_IDMAP/" $STORAGE/systemd-250/src/shared/mount-util.cfi# ------------------------------------------# Default Build Options:#     meson setup ..                \#           --prefix=/usr           \#           --buildtype=release     \#           -Ddefault-dnssec=no     \#           -Dfirstboot=false       \#           -Dinstall-tests=false   \#           -Dldconfig=false        \#           -Dman=auto              \#           -Dsysusers=false        \#           -Drpmmacrosdir=no       \#           -Dhomed=false           \#           -Duserdb=false          \#           -Dmode=release          \#           -Dpam=false             \#           -Dpamconfdir=/etc/pam.d \#           -Ddev-kvm-mode=0660     \#           -Dnobody-group=nogroup  \#           -Ddocdir=/usr/share/doc/systemd-250# ..........................................# *  Option: --buildtype=release: Specify a buildtype suitable for stable releases of the package, as the default may produce unoptimized binaries.# ..........................................# *  Option: --prefix=/usr: Installation prefix. The installation prefix must be below the root prefix.#                           安装的前缀(路径)。安装前缀(路径)必须在根目录前缀(路径)之下。# ..........................................# *  Option: -Dmode=developer: autoenable features suitable for systemd development/release builds (default 'developer').#                             适用于 systemd development/release 版本的 autoenable 功能 (默认 "developer")。# ..........................................# *  Option: -Dpamconfdir=/etc/pam.d: Forces the PAM files to be installed in /etc/pam.d rather than /usr/lib/pam.d.# ..........................................# *  Option: -Drootprefix=/: override the root prefix [default '/' if split-usr and '/usr' otherwise]. The installation prefix must be below the root prefix.#                            覆盖根目录前缀(路径)[如果系统是 split-usr 则默认为 "/", 否则为 "/usr"]。安装前缀(路径)必须在根目录前缀(路径)之下。# ..........................................# *  Option: -Duserdb=false: Removes a daemon that does not offer any use under a BLFS configuration. If you wish to enable the userdbd daemon, replace "false" with "true" in the above meson command.# ..........................................# *  Option: -Dhomed=false: Removes a daemon that does not offer any use under a traditional BLFS configuration, especially using accounts created with useradd.#                           To enable systemd-homed, first ensure that you have cryptsetup-2.7.0 and libpwquality-1.4.5 installed, and then change "false" to "true" in the above meson setup command.#                           删除在传统BLFS配置下不提供任何用途的守护程序, 尤其是使用使用 useradd 创建的帐户。#                           要启用 systemd-homed, 首先确保安装了 cryptsetup-2.7.0 和 libpwquality-1.4.5, 然后在上述介子设置命令中将 "false" 更改为 "true"。# ..........................................# * Attention:#   此处安装 Systemd 时, 为了不影响系统原有的 Systemd 环境, 采用隔离安装。根目录设置 -Drootprefix=/opt/sandbox-systemd, Systemd 安装目录设置 --prefix=/opt/sandbox-systemd/systemd-250。cd $STORAGE/systemd-250 && meson build/ --prefix=/opt/sandbox-system/opt/systemd-250 \--pkg-config-path=/opt/lib/pkgconfig \-Drootprefix=/opt/sandbox-system \-Dmode=release && \STEP_BUILDED=1# ------------------------------------------# * Problem: ../src/shared/mount-util.c:143:22: error: ‘MOUNT_ATTR_RDONLY’ undeclared (first use in this function); did you mean ‘MOUNT_ATTR_IDMAP’?#                             f |= MOUNT_ATTR_RDONLY;#                                  ^~~~~~~~~~~~~~~~~#                                  MOUNT_ATTR_IDMAP#            ../src/shared/mount-util.c:143:22: note: each undeclared identifier is reported only once for each function it appears in#            ../src/shared/mount-util.c:146:22: error: ‘MOUNT_ATTR_NOSUID’ undeclared (first use in this function); did you mean ‘MOUNT_ATTR_RDONLY’?#                             f |= MOUNT_ATTR_NOSUID;#                                  ^~~~~~~~~~~~~~~~~#                                  MOUNT_ATTR_RDONLY#            ../src/shared/mount-util.c:149:22: error: ‘MOUNT_ATTR_NODEV’ undeclared (first use in this function); did you mean ‘MOUNT_ATTR_NOSUID’?#                             f |= MOUNT_ATTR_NODEV;#                                  ^~~~~~~~~~~~~~~~#                                  MOUNT_ATTR_NOSUID#            ../src/shared/mount-util.c:152:22: error: ‘MOUNT_ATTR_NOEXEC’ undeclared (first use in this function); did you mean ‘MOUNT_ATTR_NODEV’?#                             f |= MOUNT_ATTR_NOEXEC;#                                  ^~~~~~~~~~~~~~~~~#                                  MOUNT_ATTR_NODEV#            [338/1802] Compiling C object src/shared/libsystemd-shared-250.a.p/mount-setup.c.o#            ninja: build stopped: subcommand failed.#   - Solve: 按照提示修改:#                MOUNT_ATTR_RDONLY 改为: MOUNT_ATTR_IDMAP#                MOUNT_ATTR_NOSUID 改为: MOUNT_ATTR_IDMAP#                MOUNT_ATTR_NODEV  改为: MOUNT_ATTR_IDMAP#                MOUNT_ATTR_NOEXEC 改为: MOUNT_ATTR_IDMAPcd $STORAGE/systemd-250 && ninja -C build/ install && STEP_INSTALLED=1# ------------------------------------------# After configured, As the root user, replace the running systemd manager (the init process) with the systemd executable newly built and installed:# 配置完成后, 作为 root 用户, 用新构建和安装的 systemd 可执行文件替换正在运行的 systemd 管理器 (init进程):#    systemctl daemon-reexec# ------------------------------------------if [[ $STEP_INSTALLED == 1 ]]; then# ......................................# Regular synchronization file path.if [[ ! -d "/opt/lib" ]]; then mkdir /opt/lib; fiif [[ ! -d "/opt/lib/pkgconfig" ]]; then mkdir /opt/lib/pkgconfig; fi# ......................................# Skip # ln -sf /opt/sandbox-system/opt/systemd-250/bin/* /usr/local/bin/# ......................................# Skip # rsync -av /opt/sandbox-system/opt/systemd-250/include/ /usr/local/include/# ......................................# Skip # rsync -av /opt/sandbox-system/opt/systemd-250/lib/ /usr/local/lib/# ......................................cp -f /opt/sandbox-system/opt/systemd-250/lib/pkgconfig/libsystemd.pc /opt/lib/pkgconfig/# Skip # cp -f /opt/sandbox-system/opt/systemd-250/lib/pkgconfig/libudev.pc /opt/lib/pkgconfig/# ......................................# Sandbox system synchronization file path.if [[ ! -d "/opt/sandbox-system/lib" ]]; then mkdir /opt/sandbox-system/lib; fiif [[ ! -d "/opt/sandbox-system/lib/pkgconfig" ]]; then mkdir /opt/sandbox-system/lib/pkgconfig; fi# ......................................cp -f /opt/sandbox-system/opt/systemd-250/lib/pkgconfig/libsystemd.pc /opt/sandbox-system/lib/pkgconfig/# Skip # cp -f /opt/sandbox-system/opt/systemd-250/lib/pkgconfig/libudev.pc /opt/sandbox-system/lib/pkgconfig/fi# ------------------------------------------cd $STORAGE && rm -rf $STORAGE/systemd-250 && return 0elseecho "[Caution] Path: ( /opt/sandbox-systemd/systemd-250 ) Already Exists."# ------------------------------------------return 0fi
}function main() {# ----------- Compilation Environment ----------# 编译 Systemd 时需要引入 libcap 的 include 头文件。# >>>>>>>>>>>>>>>>>>>>>>> PCRE2 的 include 头文件。export C_INCLUDE_PATH=/opt/libcap-2.68/include:/opt/pcre2-10.43/includeexport CPLUS_INCLUDE_PATH=/opt/libcap-2.68/include:/opt/pcre2-10.43/include# ..............................................# 编译 Systemd 时需要引入 PCRE2 的 lib 库文件。export LIBRARY_PATH=/opt/pcre2-10.43/libexport LD_LIBRARY_PATH=/opt/pcre2-10.43/lib# ----------------- Dependency -----------------Make_Install_libcap_2_68# ------------------- Jinja2 -------------------Build_Install_MarkupSafe_1_1_1_by_Python3Build_Install_Jinja2_2_9_6_by_Python3# ----------------- util-linux -----------------Compile_Install_automake_1_16Compile_Install_util_linux_2_39_3# --------------- Systemd - 250 ----------------Build_Install_Systemd_250
}main
总结
以上就是关于 Linux运维 Bash脚本 构建安装Systemd-250 的全部内容。
更多内容可以访问我的代码仓库:
https://gitee.com/goufeng928/public
https://github.com/goufeng928/public
相关文章:

Linux运维_Bash脚本_构建安装Systemd-250
Linux运维_Bash脚本_构建安装Systemd-250 Bash (Bourne Again Shell) 是一个解释器,负责处理 Unix 系统命令行上的命令。它是由 Brian Fox 编写的免费软件,并于 1989 年发布的免费软件,作为 Sh (Bourne Shell) 的替代品。 您可以在 Linux 和…...

中国城市统计年鉴、中国县域统计年鉴、中国财政统计年鉴、中国税务统计年鉴、中国科技统计年鉴、中国卫生统计年鉴
统计年鉴是指以统计图表和分析说明为主,通过高度密集的统计数据来全面、系统、连续地记录年度经济、社会等各方面发展情况的大型工具书来获取统计数据资料。 统计年鉴是进行各项经济、社会研究的必要前提。而借助于统计年鉴,则是研究者常用的途径。目前国…...
C++:继承:面向对象编程的重要特性
(❁◡❁)(●◡●)╰(*▽*)╯(*/ω\*)(^///^)(❁◡❁)(❁◡❁)(●◡●)╰(*▽*)╯(*/ω\*)(❁◡❁)(●’◡’●)╰(▽)╯(/ω\)(///) C:继承:面向对象编程的重要特性 前言**继承**1.继承的概念及定义1.1继承的概念1.2继…...
oneMKL--FFT 基本使用
oneMKL–FFT 基本使用 本人基于官方文档的摘录与理解 oneMKL--FFT基本使用 oneMKL--FFT 基本使用1. Both FFT and Cluster FFT functions compute an FFT in five steps2 Computing an FFT2.1 缺省值2.2 Fourier Transform Funcions Code Examples2.2.1 One_dimentional In-p…...

软件测试工程师面试汇总Linux篇
Linux 命令篇 cd:切换目录 cd / #进入到系统根目录 cd . #进入到当前目录 cd .. #返回上层目录 cd /tmp #进入指定目录/tmp cd ~ #进入当前用户的家目录 2ls:列出当前目录的所有文件、文件夹(目录)信息; -l 列出目录或…...

【python】使用代理IP爬取猫眼电影专业评分数据
前言 我们为什么需要使用IP代理服务? 在编写爬虫程序的过程中,IP封锁无疑是一个常见且棘手的问题。尽管网络上存在大量的免费IP代理网站,但其质量往往参差不齐,令人堪忧。许多代理IP的延迟过高,严重影响了爬虫的工作…...
和结构体(struct)的异同)
C/C++中枚举(enum)和结构体(struct)的异同
一、枚举 enum 1.普通枚举,枚举在C中使用比C使用简单 C语言: enum Color {red,green,blue }; enum Color c red;C语言 enum Color {red,green,blue }; Color c red;C认为这种枚举方式会污染名字,即:枚举使用的名字,在同一个作…...
【数据可视化】使用Python + Gephi,构建中医方剂关系网络图!
代码和示例数据下载 前言 在这篇文章中,我们将会可视化 《七版方剂学》 的药材的关系,我们将使用Python制作节点和边的数据,然后在Gephi中绘制出方剂的网络图。 Gephi是一个专门用于构建网络图的工具,只要你能提供节点和边的数…...

部署prometheus+Grafana可视化仪表盘监控服务
一、部署prometheus及监控仪表盘 简介 Prometheus是开源监控报警系统和时序列数据库(TSDB)。 Prometheus的基本原理是通过HTTP协议周期性抓取被监控组件的状态,任意组件只要提供对应的HTTP接口就可以接入监控,输出被监控组件信息的HTTP接口被叫做expo…...

python中的类与对象
前言 在Python中,类是一种用于创建新类型对象的结构,它允许我们将数据和功能(属性和方法)封装到一个单独的逻辑单元中。类可以被看作是创建对象(实例)的蓝图或模板。类(Class)和对象…...
sentry-cli - error: Failed to load .sentryclirc file from project path
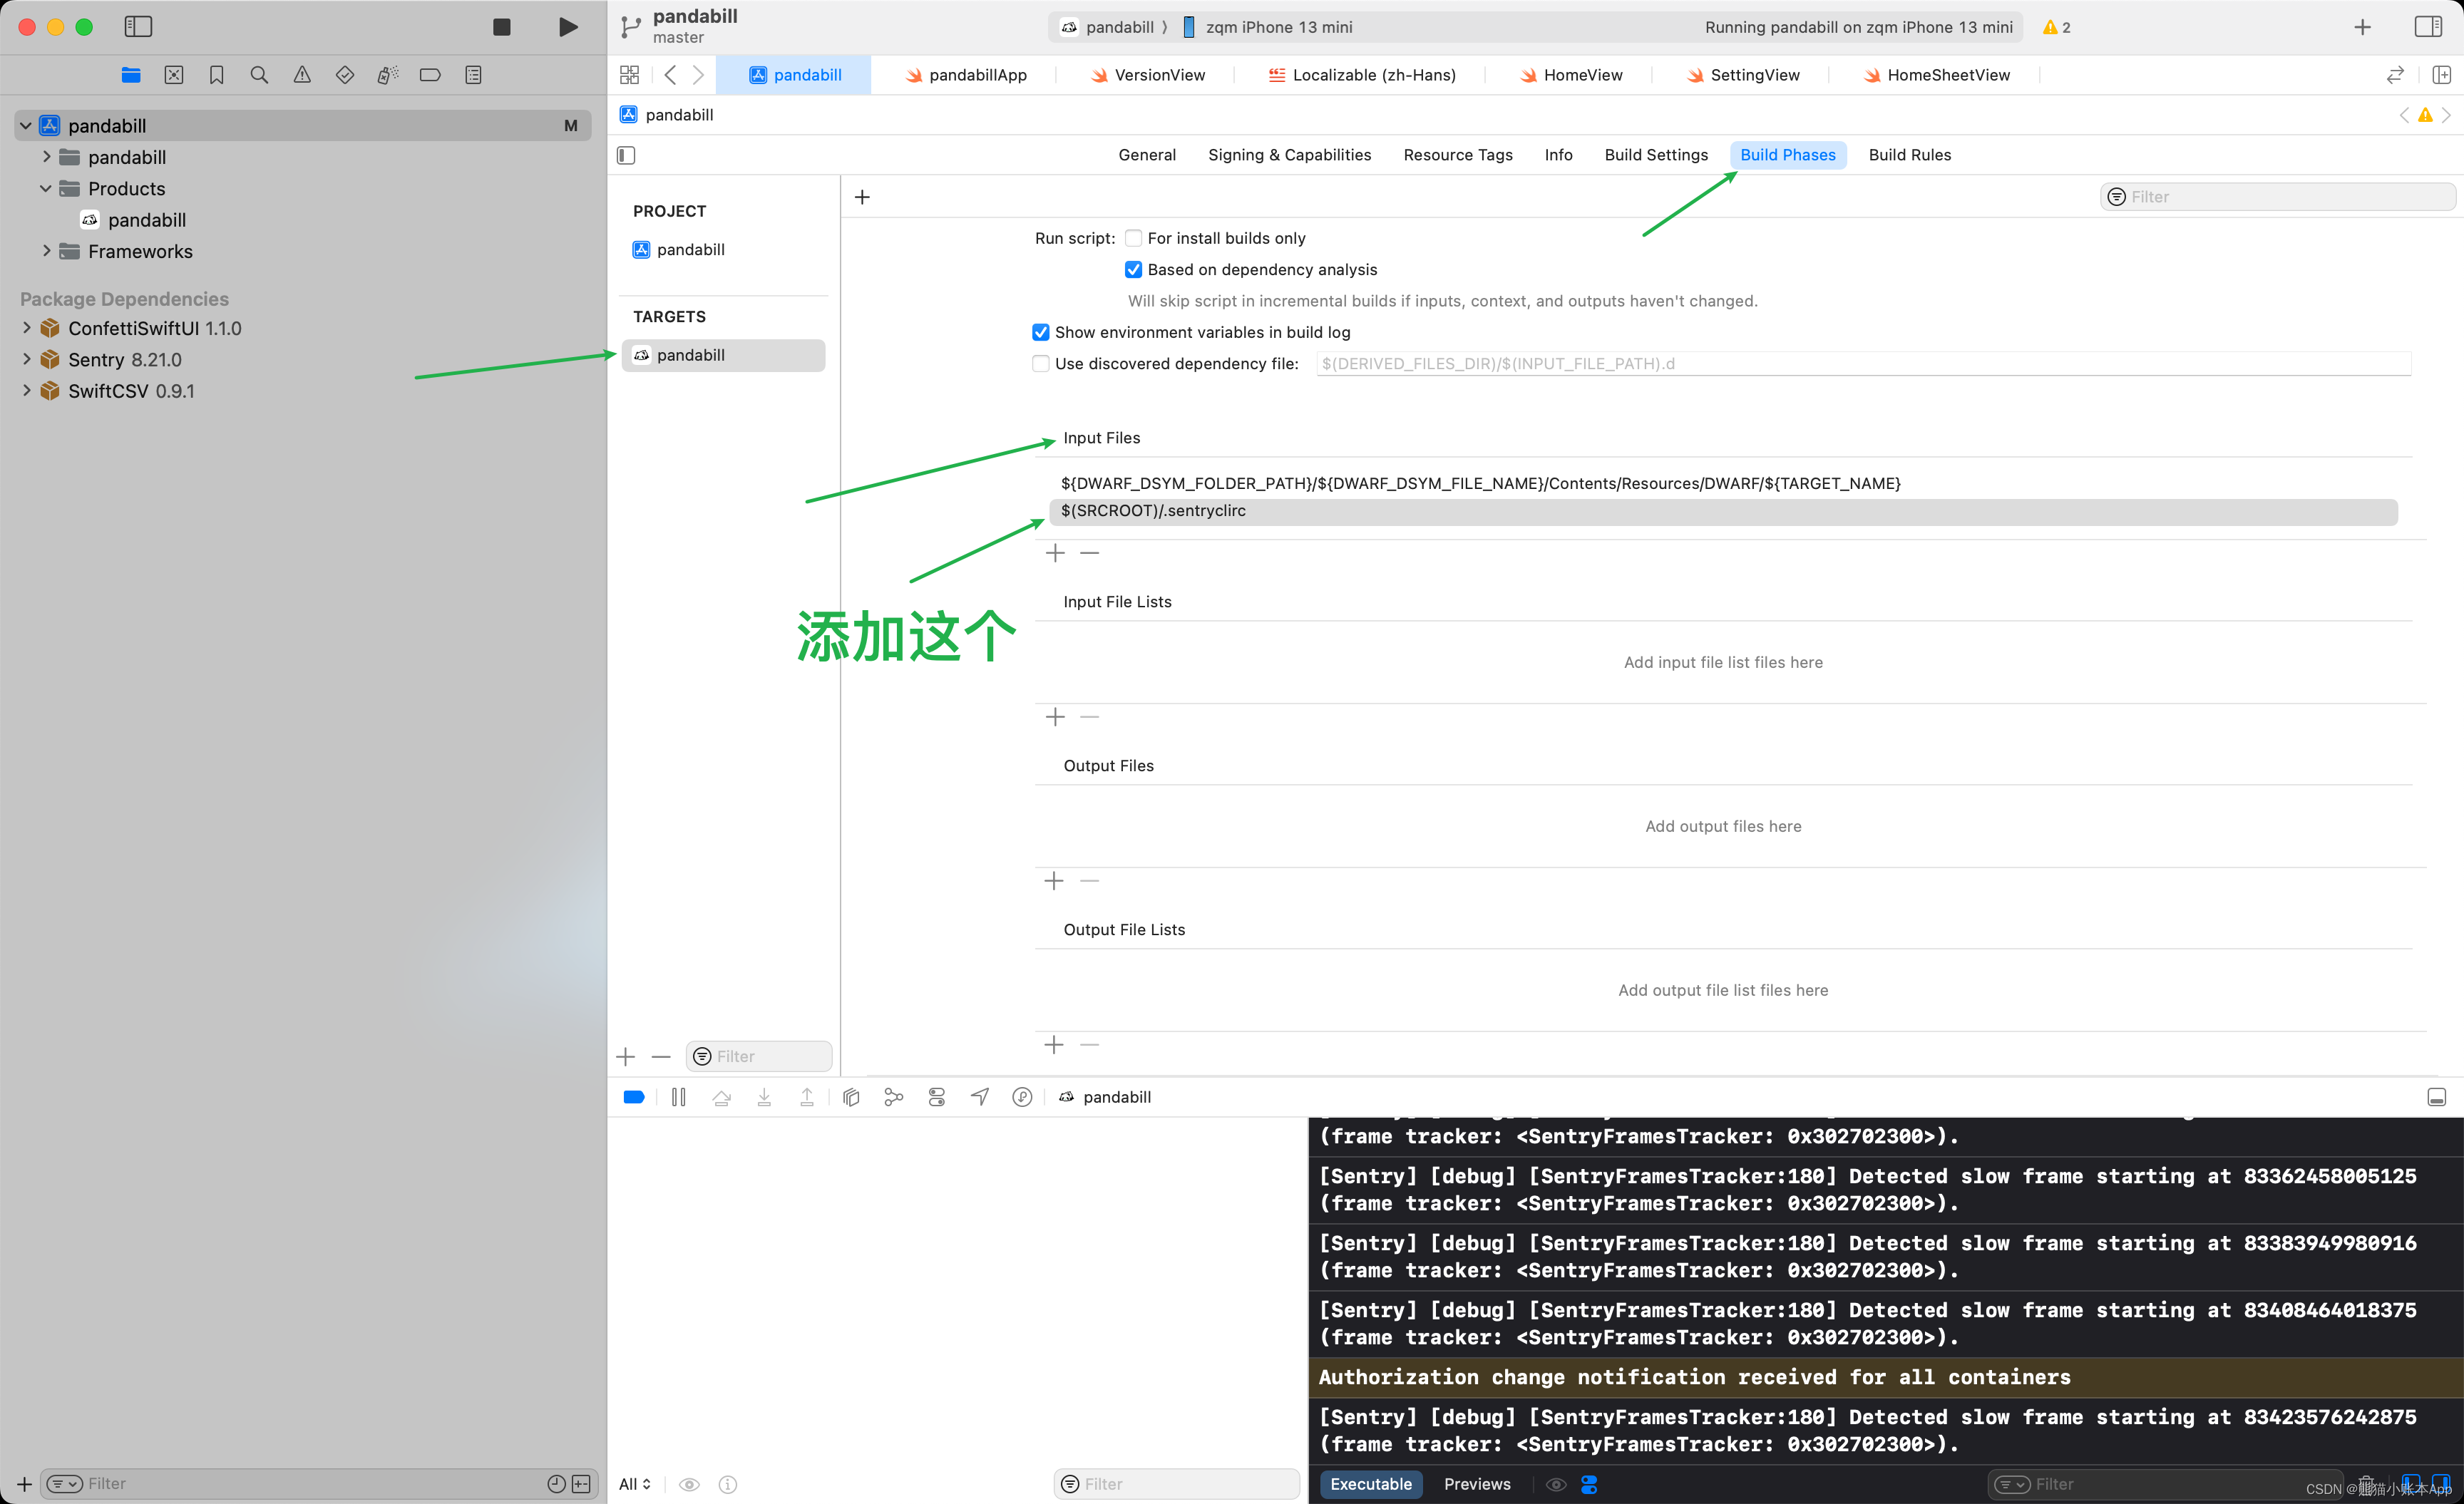
Xcode 15.2 warning sentry-cli - error: Failed to load .sentryclirc file from project path (/Users/zhuhongwei/Desktop/pandabill/.sentryclirc)推荐一下刚上线的 App 熊猫小账本,里面有用到这篇博客讲的内容 熊猫小账本 一个简洁的记账 App,用于…...
回归预测 | Matlab实现SO-BP蛇算法优化BP神经网络多变量回归预测
回归预测 | Matlab实现SO-BP蛇算法优化BP神经网络多变量回归预测 目录 回归预测 | Matlab实现SO-BP蛇算法优化BP神经网络多变量回归预测预测效果基本描述程序设计参考资料 预测效果 基本描述 1.Matlab实现SO-BP蛇算法优化BP神经网络多变量回归预测(完整源码和数据) …...

如何添加 Android Native 系统服务
如何添加 Android Native 系统服务 工作学习过程中,我们可能需要去阅读不同类型的 Native 系统服务,也有可能会自己去完成一个 Native 系统服务。无论哪种情况都需要我们了解基本的 Native 如何去添加。就像我们写 Android App 得先了解一下四大组件才行…...

【力扣】189.轮转数组
题目描述 给定一个整数数组 nums,将数组中的元素向右轮转 k 个位置,其中 k 是非负数。 示例 1: 输入: nums [1,2,3,4,5,6,7], k 3 输出: [5,6,7,1,2,3,4] 解释: 向右轮转 1 步: [7,1,2,3,4,5,6] 向右轮转 2 步: [6,7,1,2,3,4,5] 向右轮转 3 步: [5,6…...
C语言字符函数和字符串函数详解
Hello, 大家好,我是一代,今天给大家带来有关字符函数和字符串函数的有关知识 所属专栏:C语言 创作不易,望得到各位佬们的互三呦 一.字符函数 在C语言中有一些函数是专门为字符设计的,这些函数的使用都需要包含一个头文…...
【CKA模拟题】查询消耗CPU最多的Pod
题干 For this question, please set this context (In exam, diff cluster name) 对于此问题,请设置此上下文(在考试中,diff 集群名称) kubectl config use-context kubernetes-adminkubernetesFind the pod that consumes the …...
网络简略总结
目录 一、三次握手 四次挥手 1、三次握手:为了建立长链接进行交互即建立一个会话,使用http/https协议 2、四次挥手是一个断开连接释放服务器资源的过程 3、如果已经建立了连接,但是客户端突然出现故障了怎么办? 4、谁可以中断连接?客户端还是服务端还是都可以? 5、…...

如何处理错误情况
处理错误情况是确保自动窗帘系统稳定运行的重要一环。在编写代码时,你需要考虑可能发生的各种错误情况,并编写相应的错误处理代码。下面是一些处理错误情况的常见方法: (1)错误检测: 首先,你需要能够检测到错误的发生。…...

【Greenhills】MULTI IDE-GHS最新版本Compiler 23.5.4的兼容性问题
【更多软件使用问题请点击亿道电子官方网站查询】 1、 文档目标 关于GHS推出的最新编译器版本 Compiler 2023.5.4在GHS以前版本的MULTI IDE上面能否使用的问题 2、 问题场景 针对于,客户使用MULTI IDE 8.1.4以前的IDE版本,想要搭载使用最新版本的编译器…...

用连续自然数之和来表达整数 - 华为OD统一考试(C卷)
OD统一考试(C卷) 分值: 100分 题解: Java / Python / C++ 题目描述 一个整数可以由连续的自然数之和来表示。给定一个整数,计算该整数有几种连续自然数之和的表达式,且打印出每种表达式。 输入描述 一个目标整数T (1 <=T<= 1000) 输出描述 该整数的所有表达式…...

DISMTools企业部署:在组织中大规模应用的最佳实践
DISMTools企业部署:在组织中大规模应用的最佳实践 【免费下载链接】DISMTools The connected place for Windows system administration 项目地址: https://gitcode.com/GitHub_Trending/di/DISMTools DISMTools是一款专为Windows系统管理设计的连接平台&…...
)
从STM32迁移到普冉PY32F003:UART代码移植保姆级教程(附HAL库对比)
从STM32到普冉PY32F003的UART代码迁移实战指南 1. 国产MCU替代浪潮下的技术选择 近年来,半导体行业的供应链波动促使更多工程师将目光投向国产MCU解决方案。普冉PY32F003系列作为Cortex-M0内核的代表产品,以48MHz主频、64KB Flash和8KB RAM的配置&#x…...

从理论推导到代码实现:手把手教你用Python/Numpy写出守恒形式的NS方程求解器
从理论推导到代码实现:手把手教你用Python/Numpy写出守恒形式的NS方程求解器计算流体力学(CFD)的魅力在于它将抽象的数学方程转化为可执行的代码,让流体运动的奥秘在计算机中重现。对于已经掌握流体力学理论的中高级学习者来说&am…...

番茄小说下载器终极指南:三步构建你的离线阅读自由王国
番茄小说下载器终极指南:三步构建你的离线阅读自由王国 【免费下载链接】Tomato-Novel-Downloader 番茄小说下载器不精简版 项目地址: https://gitcode.com/gh_mirrors/to/Tomato-Novel-Downloader 你是否曾在地铁里读到精彩章节时突然断网?是否在…...

6款高效降AI率工具 改写实力出众
写论文时反复检测出的AI痕迹总让你提心吊胆?别担心,这里整理了6款真正好用的论文降AI率工具,堪称应对AI生成特征的“得力助手”。它们能有效识别并消除AI生成的痕迹,改写能力出众,帮你快速降低查重率,顺利通…...

开启Python GUI开发新纪元:Tkinter Designer可视化界面自动化生成终极指南
开启Python GUI开发新纪元:Tkinter Designer可视化界面自动化生成终极指南 【免费下载链接】Tkinter-Designer An easy and fast way to create a Python GUI 🐍 项目地址: https://gitcode.com/gh_mirrors/tk/Tkinter-Designer 在Python GUI开发…...

告别元素变动导致的报错:探索自动化测试脚本的 AI“自愈”能力
前言:一个所有测试人都经历过的噩梦 周三晚上十一点,CI/CD流水线再次亮起红灯。 你打开日志,满屏的NoSuchElementException扑面而来。仔细一看——前端团队在昨天的版本中重构了登录页面的DOM结构,原本的#login-btn变成了#signin-button-v2,30个测试用例因此全军覆没。 …...

WarcraftHelper终极指南:魔兽争霸3兼容性问题一站式解决方案
WarcraftHelper终极指南:魔兽争霸3兼容性问题一站式解决方案 【免费下载链接】WarcraftHelper Warcraft III Helper , support 1.20e, 1.24e, 1.26a, 1.27a, 1.27b 项目地址: https://gitcode.com/gh_mirrors/wa/WarcraftHelper 还在为《魔兽争霸3》在现代电…...

PCL 法向量夹角剔除错误匹配点对【2026最新版】
目录 一、 算法简介 1、主要函数 2、参考文献 二、 代码实现 三、 结果展示 四、 参考链接 博客长期更新,本文最新更新时间为:2026年5月24日。代码在PCL1.15.1中测试通过 一、 算法简介 在三维点云配准中,对应点(correspondence)的准确性直接决定了配准算法的精度和鲁棒性…...

Keil µVision反汇编窗口内容导出方案与调试技巧
1. 问题背景与需求解析在嵌入式开发过程中,调试环节往往占据大量时间。Keil Vision作为业界广泛使用的集成开发环境(IDE),其调试器功能强大但某些细节功能仍有提升空间。最近我在使用C251架构开发汽车电子控制单元时,就遇到了一个看似简单却影…...