SpringBoot(整合MyBatis + MyBatis-Plus + MyBatisX插件使用)
文章目录
- 1.整合MyBatis
- 1.需求分析
- 2.数据库表设计
- 3.数据库环境配置
- 1.新建maven项目
- 2.pom.xml 引入依赖
- 3.application.yml 配置数据源
- 4.Application.java 编写启动类
- 5.测试
- 6.配置类切换druid数据源
- 7.测试数据源是否成功切换
- 4.Mybatis基础配置
- 1.编写映射表的bean
- 2.MonsterMapper.java 编写mapper接口
- 3.MonsterMapper.xml 编写mapper.xml实现mapper接口
- 4.application.yml 扫描mapper.xml配置文件的位置
- 5.测试
- 5.MyBatis高级配置
- 1.方式一:在application.yml中配置mybatis.config-location指定mybatis-config.xml配置文件的位置
- 2.方式二:直接在application.yml中配置
- 6.继续编写Service层和Controller层
- 1.MonsterService.java
- 2.MonsterServiceImpl.java
- 3.测试
- 4.MonsterController.java
- 5.测试
- 6.解决时间问题
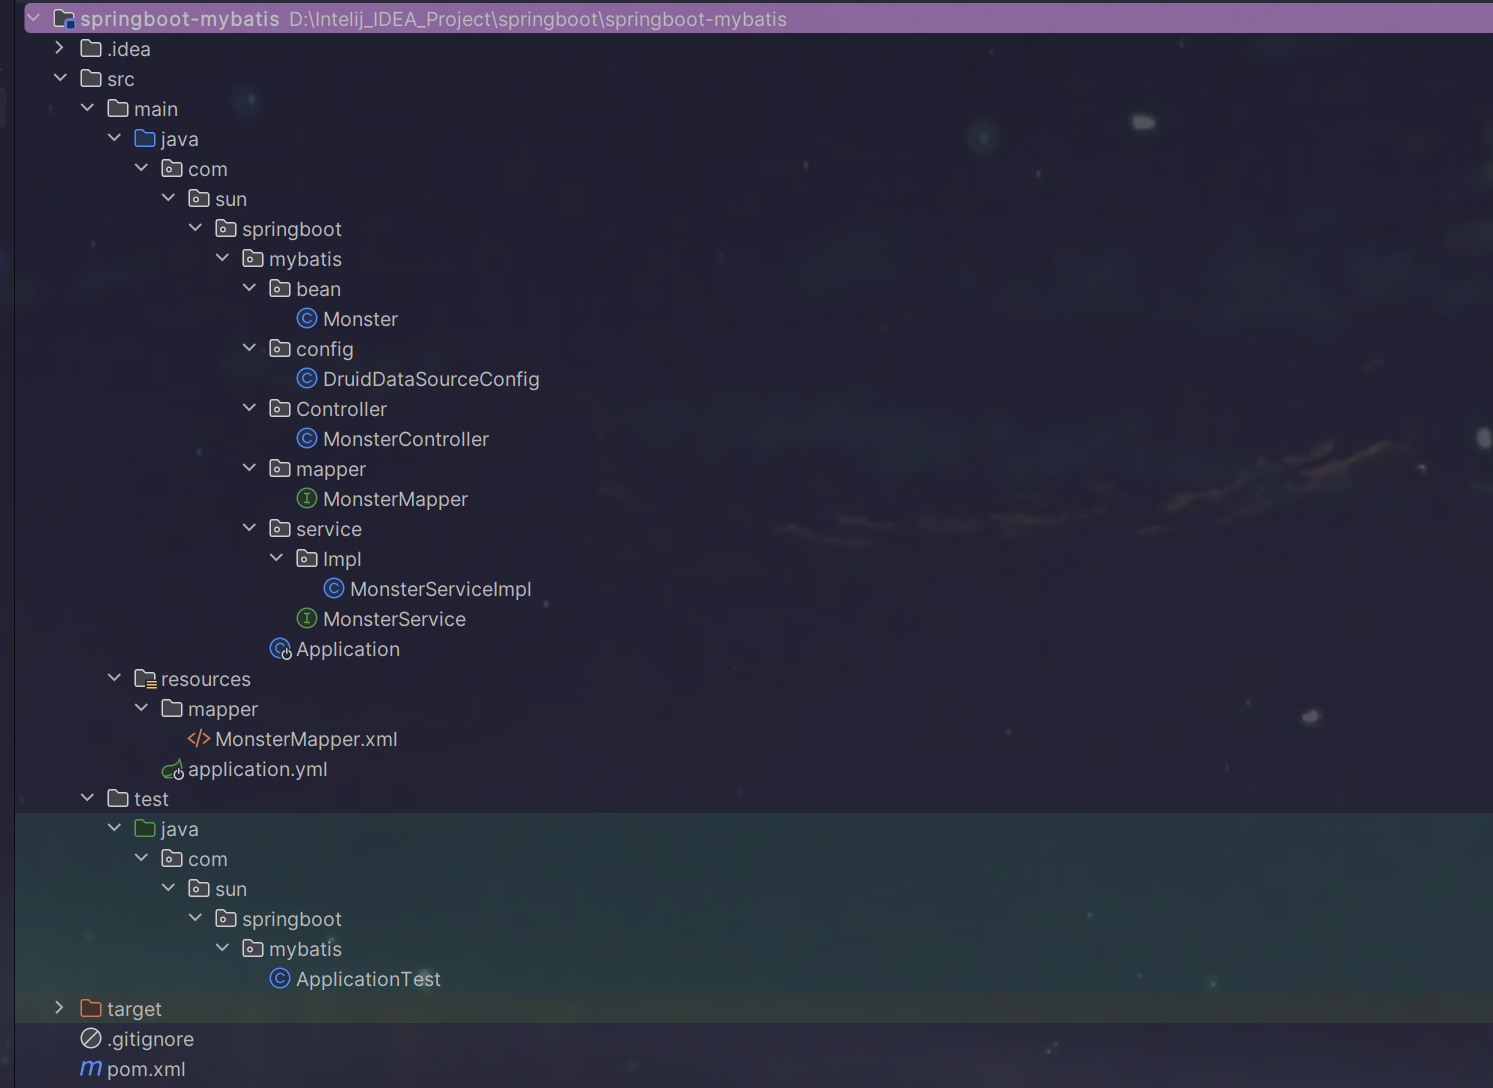
- 7.完整文件目录
- 2.整合MyBatis-Plus
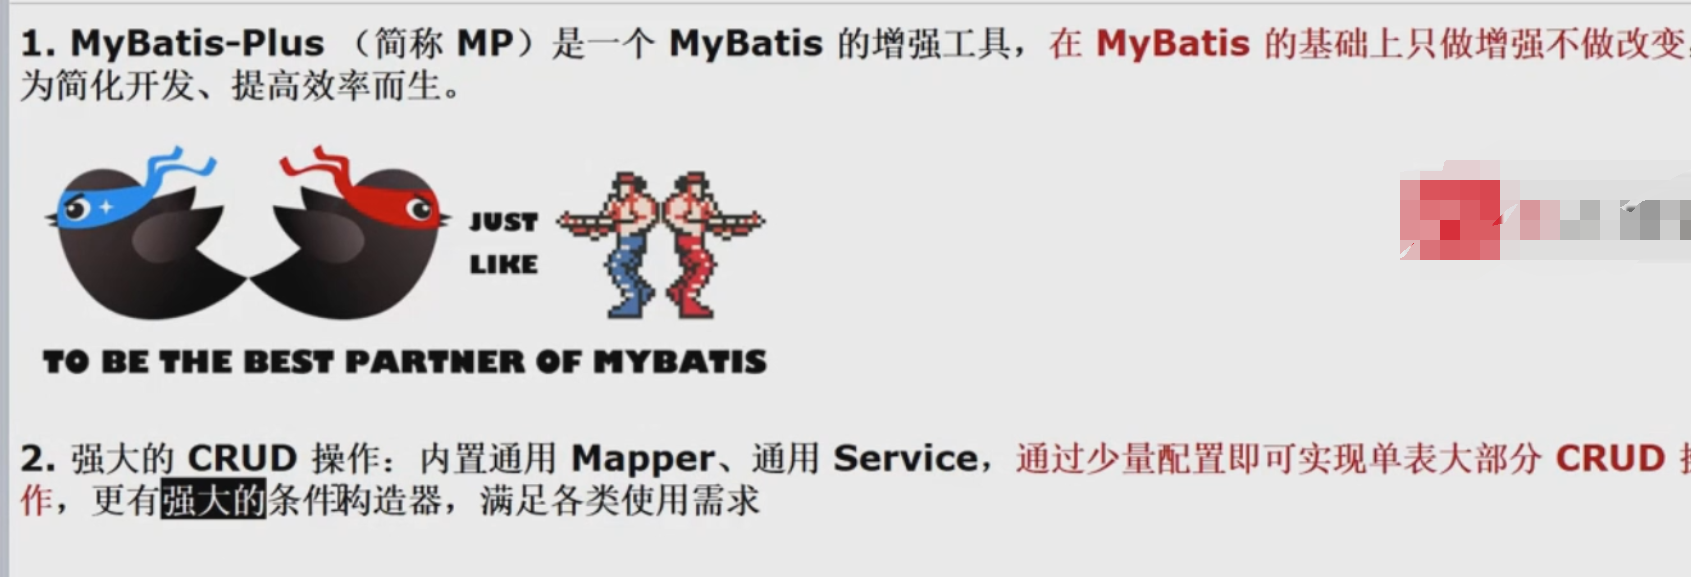
- 1.MyBatis-Plus基本介绍
- 2.数据库表设计
- 3.数据库环境配置
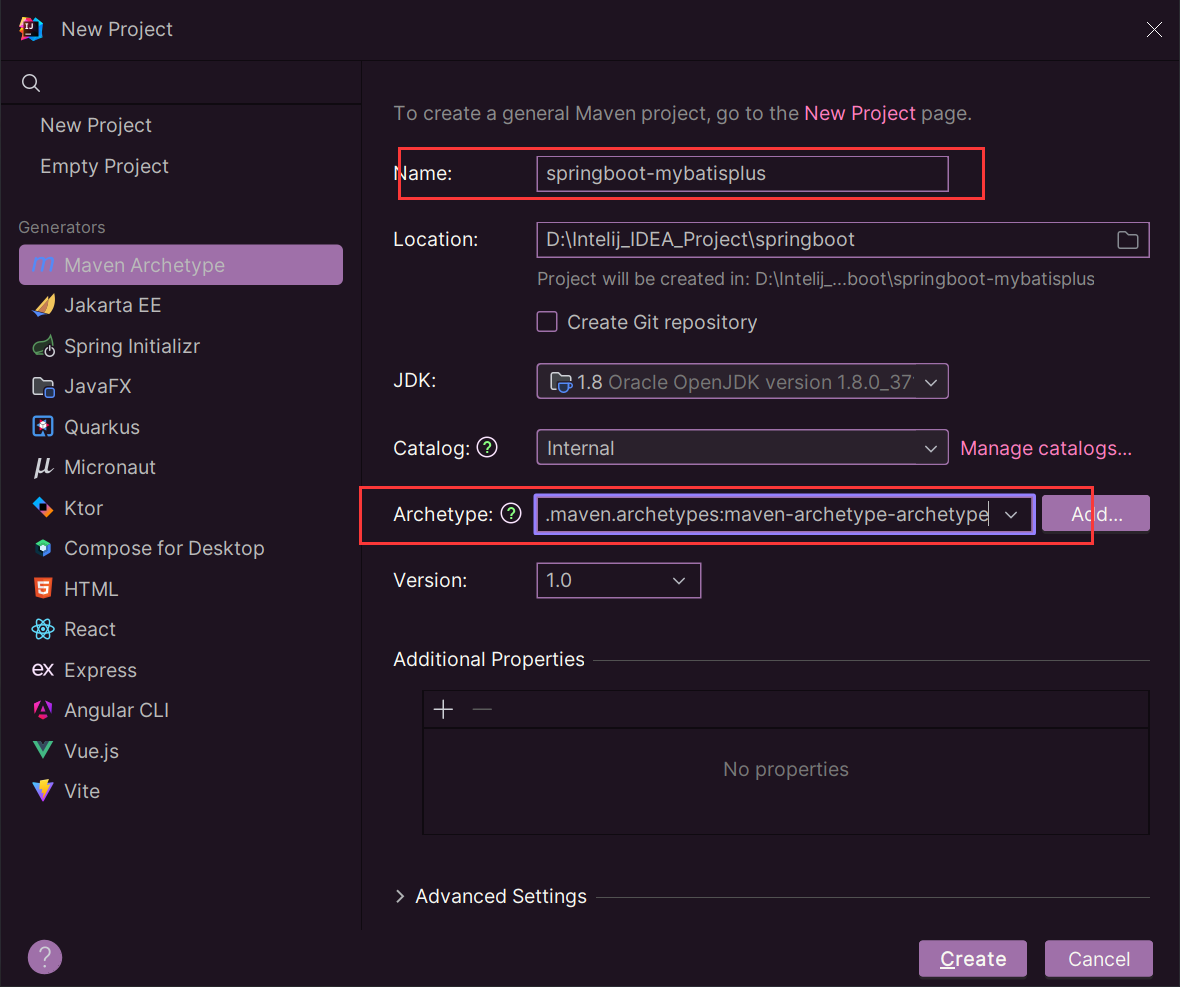
- 1.创建maven项目
- 2.pom.xml 导入依赖
- 3.application.yml 配置数据源
- 4.DruidDataSourceConfig.java 配置类切换druid数据源
- 5.编写启动类Application.java,测试运行
- 4.MyBatis-Plus基础配置
- 1.编写映射表的bean
- 2.MonsterMapper.java 编写Mapper接口
- 3.测试接口方法使用
- 5.MyBatis-Plus高级配置
- application.yml 进行配置
- 6.继续编写Service层和Controller层
- 1.MonsterService.java
- 2.MonsterServiceImpl.java
- 3.测试
- 4.细节说明
- 5.MonsterController.java
- 7.细节说明
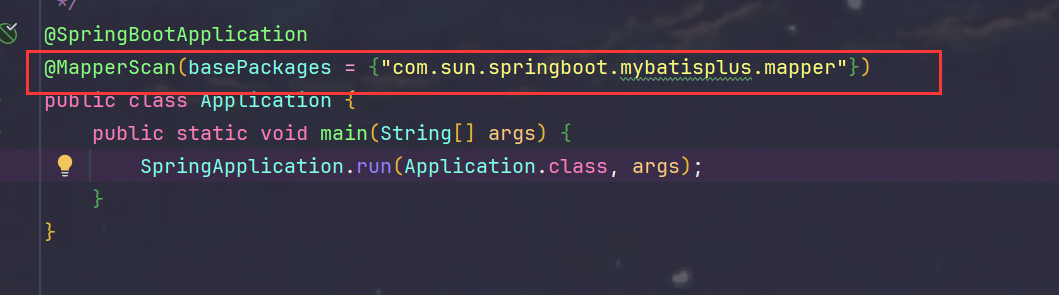
- 1.@MapperScan 扫描包下的所有Mapper
- 启动类配置注解
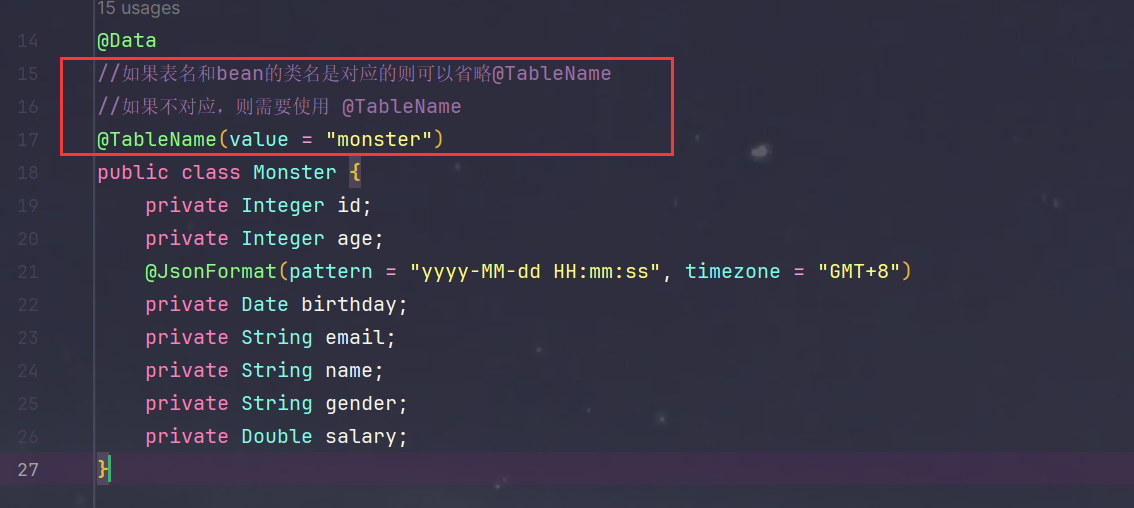
- 2.@TableName bean的类名与表名不一致时使用
- image-20240317200951971
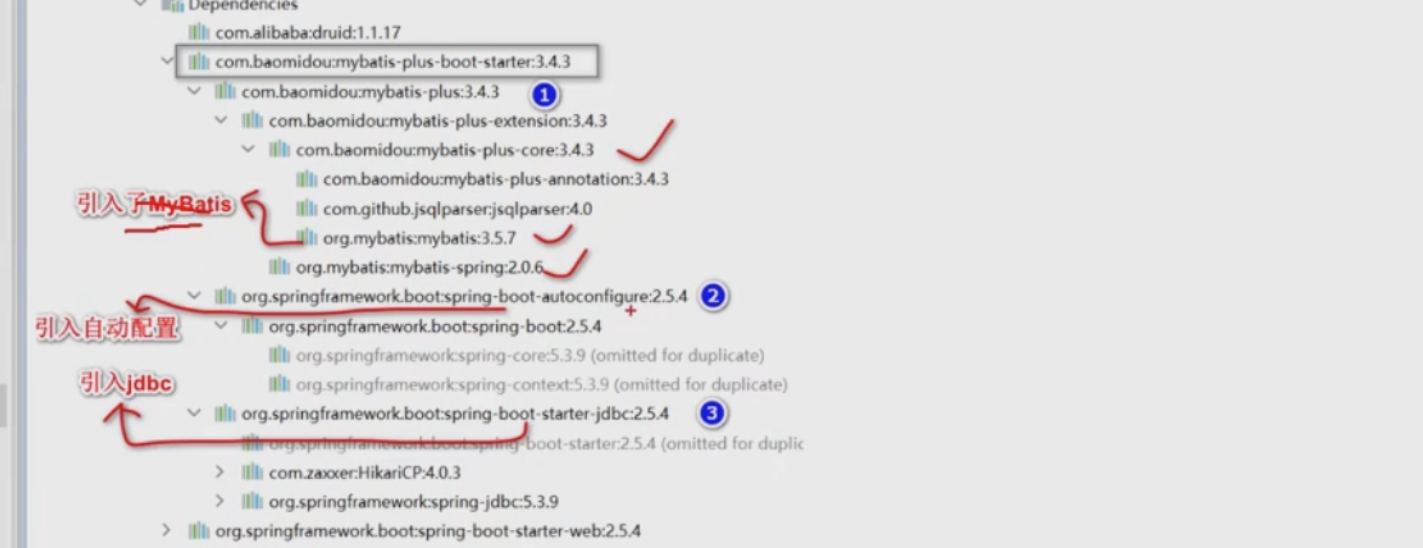
- 3.MyBatis引入了哪些依赖
- 8.MyBatisX快速开发
- 1.安装插件
- 2.使用方式
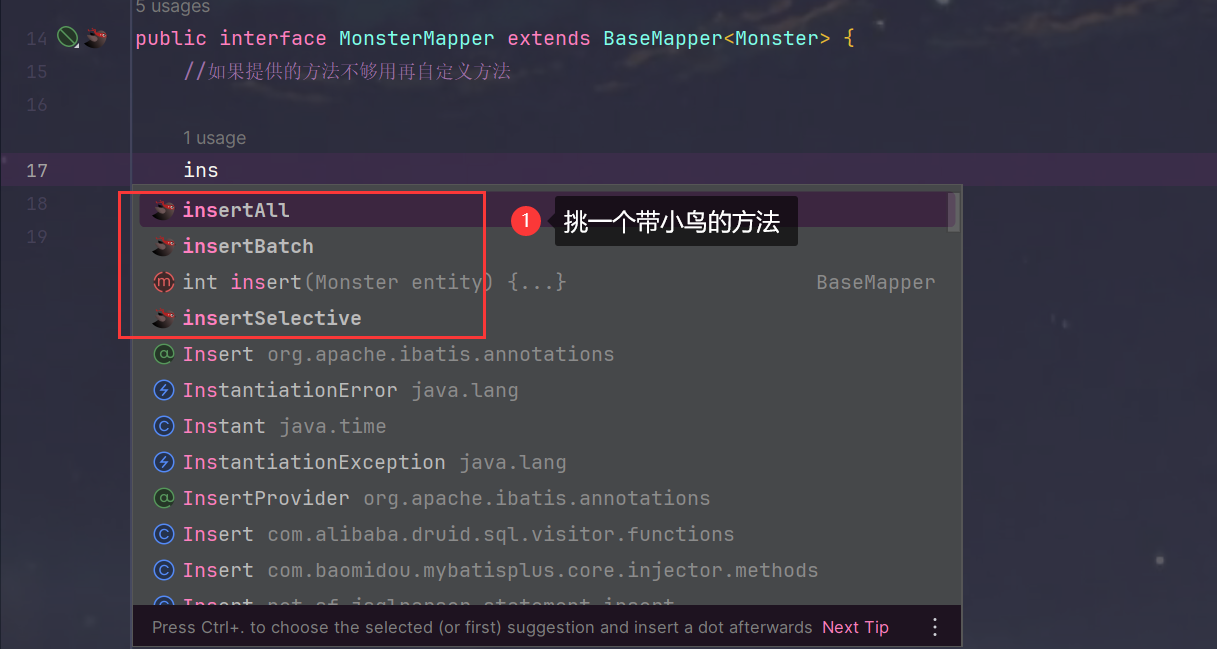
- 1.挑一个带小鸟的方法
- 2.直接alt + Enter
- 3.生成sql语句
- 4.查看生成的方法
- 5.点击左边的小鸟就可以直接跳转到指定方法或者xml
- 9.完整文件目录
- 10.MyBatis-Plus小结
1.整合MyBatis
1.需求分析
2.数据库表设计
CREATE DATABASE `springboot_mybatis`;use `springboot_mybatis`;CREATE TABLE `monster` (`id` INT NOT NULL AUTO_INCREMENT,`age` INT NOT NULL, `birthday` DATE DEFAULT NULL, `email` VARCHAR(255) DEFAULT NULL,`gender` char(1) DEFAULT NULL,`name` VARCHAR(255) DEFAULT NULL, `salary` DOUBLE NOT NULL,PRIMARY KEY (`id`)
);SELECT * FROM `monster`;insert into monster values(null, 20, '2000-11-11', 'nmw@sohu.com', '男', '牛魔王', 5000.88);
insert into monster values(null, 10, '2011-11-11', 'bgj@sohu.com', '女', '白骨精', 2000.00);
3.数据库环境配置
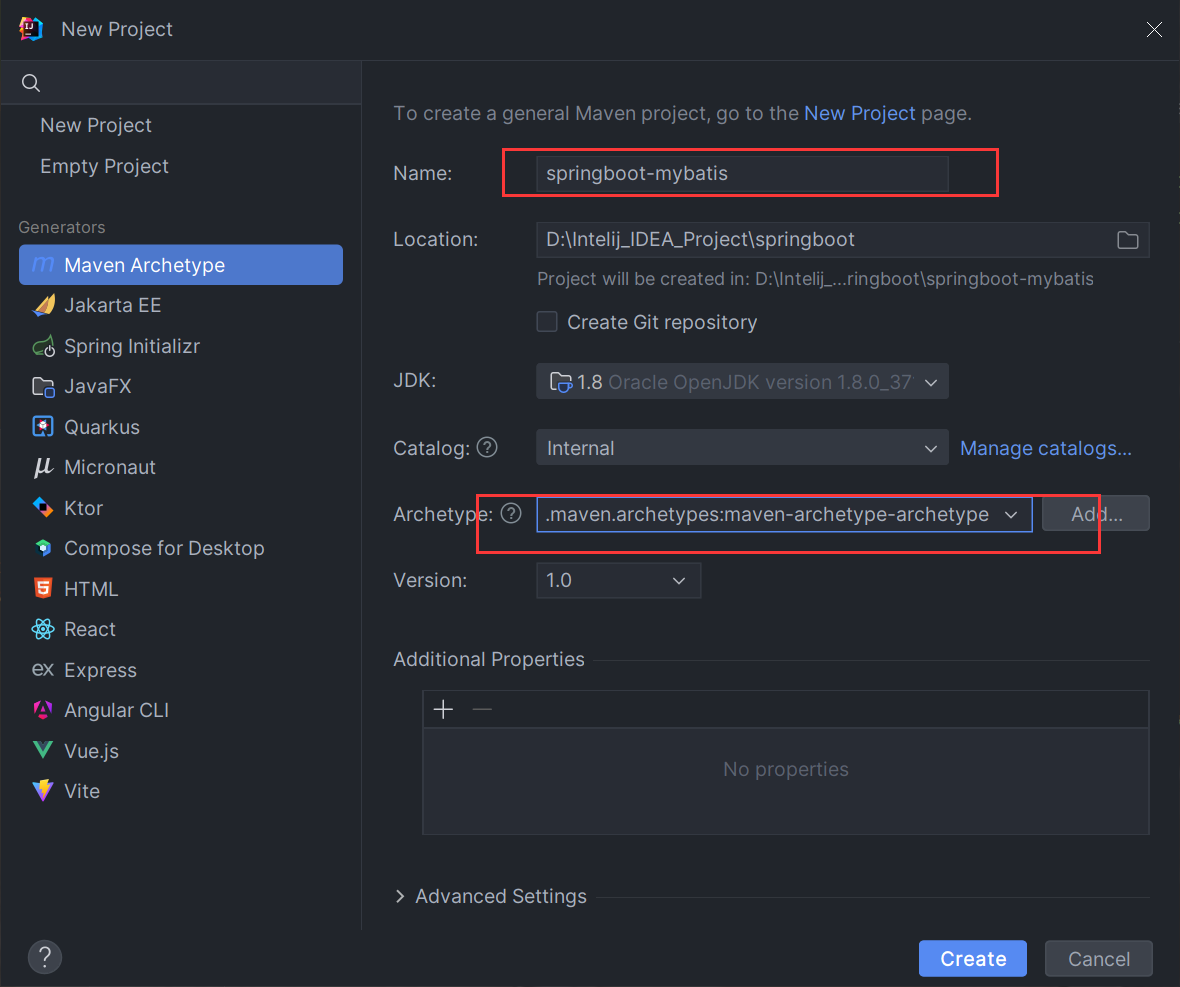
1.新建maven项目
2.pom.xml 引入依赖
<!--导入springboot父工程--><parent><artifactId>spring-boot-starter-parent</artifactId><groupId>org.springframework.boot</groupId><version>2.5.3</version></parent><!--引入相关依赖--><dependencies><!--常规依赖--><!--web场景启动器--><dependency><groupId>org.springframework.boot</groupId><artifactId>spring-boot-starter-web</artifactId></dependency><!--lombok--><dependency><groupId>org.projectlombok</groupId><artifactId>lombok</artifactId><optional>true</optional></dependency><!--引入测试场景启动器--><dependency><groupId>org.springframework.boot</groupId><artifactId>spring-boot-starter-test</artifactId><scope>test</scope></dependency><!--配置处理器--><dependency><groupId>org.springframework.boot</groupId><artifactId>spring-boot-configuration-processor</artifactId><optional>true</optional></dependency><!--数据库配置--><!--引入data-jdbc数据源--><dependency><groupId>org.springframework.boot</groupId><artifactId>spring-boot-starter-data-jdbc</artifactId></dependency><!--mysql依赖使用版本仲裁--><dependency><groupId>mysql</groupId><artifactId>mysql-connector-java</artifactId><scope>runtime</scope></dependency><!-- 引入 druid 依赖 --><dependency><groupId>com.alibaba</groupId><artifactId>druid</artifactId><version>1.1.17</version></dependency><!--MyBatis场景启动器--><dependency><groupId>org.mybatis.spring.boot</groupId><artifactId>mybatis-spring-boot-starter</artifactId><version>2.2.2</version></dependency></dependencies>
3.application.yml 配置数据源
- 数据库名
- 用户名
- 密码
- 驱动是mysql8的(因为上面使用了版本仲裁)
server:port: 8080
spring:datasource: #配置数据源url: jdbc:mysql://localhost:3306/springboot_mybatis?useSSL=false&useUnicode=true&characterEncoding=UTF-8username: rootpassword: rootdriver-class-name: com.mysql.cj.jdbc.Driver
4.Application.java 编写启动类
package com.sun.springboot.mybatis;import org.springframework.boot.SpringApplication;
import org.springframework.boot.autoconfigure.SpringBootApplication;/*** @author 孙显圣* @version 1.0*/
@SpringBootApplication
public class Application {public static void main(String[] args) {SpringApplication.run(Application.class, args);}
}
5.测试
package com.sun.springboot.mybatis;import org.junit.jupiter.api.Test;
import org.springframework.boot.test.context.SpringBootTest;
import org.springframework.jdbc.core.JdbcTemplate;import javax.annotation.Resource;/*** @author 孙显圣* @version 1.0*/
@SpringBootTest
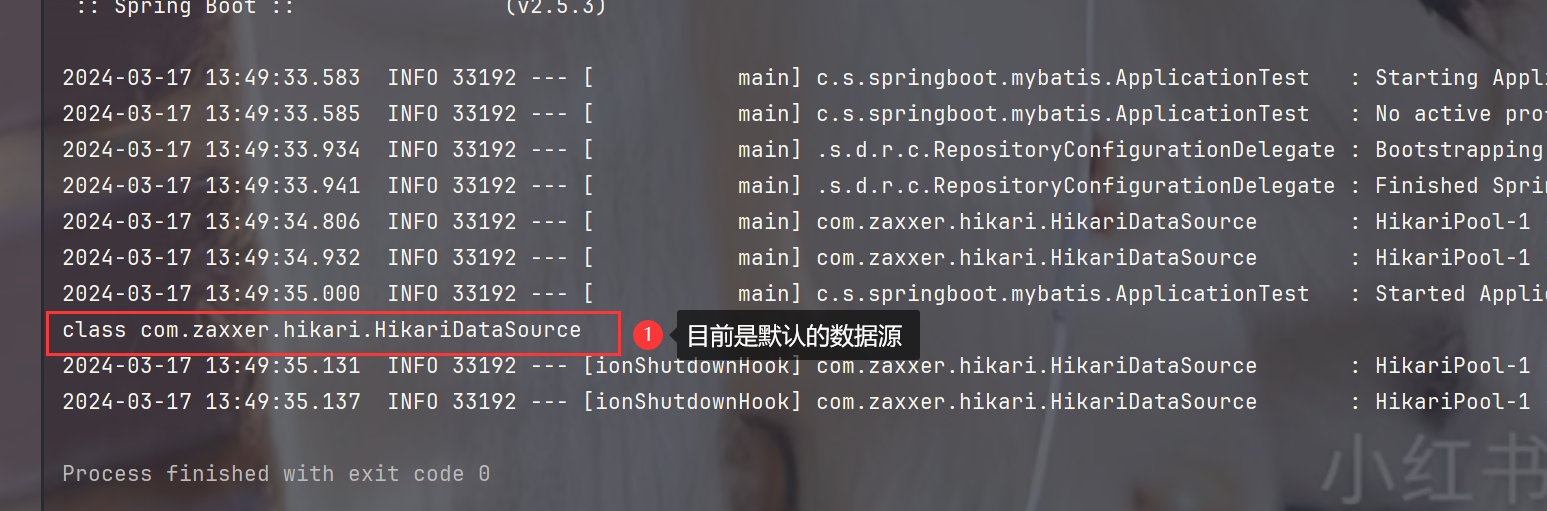
public class ApplicationTest {//依赖注入@Resourceprivate JdbcTemplate jdbcTemplate;@Testpublic void t1() {//查看目前数据源System.out.println(jdbcTemplate.getDataSource().getClass());}
}
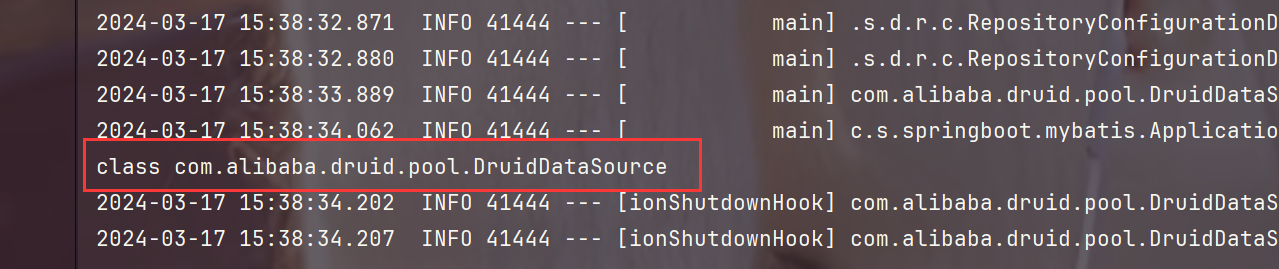
6.配置类切换druid数据源
package com.sun.springboot.mybatis.config;import com.alibaba.druid.pool.DruidDataSource;
import com.alibaba.druid.support.http.StatViewServlet;
import com.alibaba.druid.support.http.WebStatFilter;
import org.springframework.boot.context.properties.ConfigurationProperties;
import org.springframework.boot.web.servlet.FilterRegistrationBean;
import org.springframework.boot.web.servlet.ServletRegistrationBean;
import org.springframework.context.annotation.Bean;
import org.springframework.context.annotation.Configuration;import javax.sql.DataSource;
import java.sql.SQLException;
import java.util.Arrays;/*** @author 孙显圣* @version 1.0*/
@Configuration
public class DruidDataSourceConfig {//注入一个德鲁伊数据源@ConfigurationProperties("spring.datasource") //读取yaml配置文件的参数,获取数据源配置@Beanpublic DataSource dataSource() throws SQLException {DruidDataSource druidDataSource = new DruidDataSource();druidDataSource.setFilters("stat, wall"); //开启sql监控return druidDataSource;}//配置德鲁伊监控sql功能@Beanpublic ServletRegistrationBean statViewServlet() {StatViewServlet statViewServlet = new StatViewServlet();ServletRegistrationBean<StatViewServlet> registrationBean =new ServletRegistrationBean<>(statViewServlet, "/druid/*");//配置登录监控页面用户名和密码registrationBean.addInitParameter("loginUsername", "root");registrationBean.addInitParameter("loginPassword", "root");return registrationBean;}//配置webStatFilter@Beanpublic FilterRegistrationBean webStatFilter() {WebStatFilter webStatFilter = new WebStatFilter();FilterRegistrationBean<WebStatFilter> filterRegistrationBean =new FilterRegistrationBean<>(webStatFilter);//默认对所有 URL 请求监控filterRegistrationBean.setUrlPatterns(Arrays.asList("/*"));//排除 URLfilterRegistrationBean.addInitParameter("exclusions", "*.js,*.gif,*.jpg,*.png,*.css,*.ico,/druid/*");return filterRegistrationBean;}
}
7.测试数据源是否成功切换
package com.sun.springboot.mybatis;import org.junit.jupiter.api.Test;
import org.springframework.boot.test.context.SpringBootTest;
import org.springframework.jdbc.core.JdbcTemplate;import javax.annotation.Resource;/*** @author 孙显圣* @version 1.0*/
@SpringBootTest
public class ApplicationTest {//依赖注入@Resourceprivate JdbcTemplate jdbcTemplate;@Testpublic void t1() {//查看目前数据源System.out.println(jdbcTemplate.getDataSource().getClass());}
}
4.Mybatis基础配置
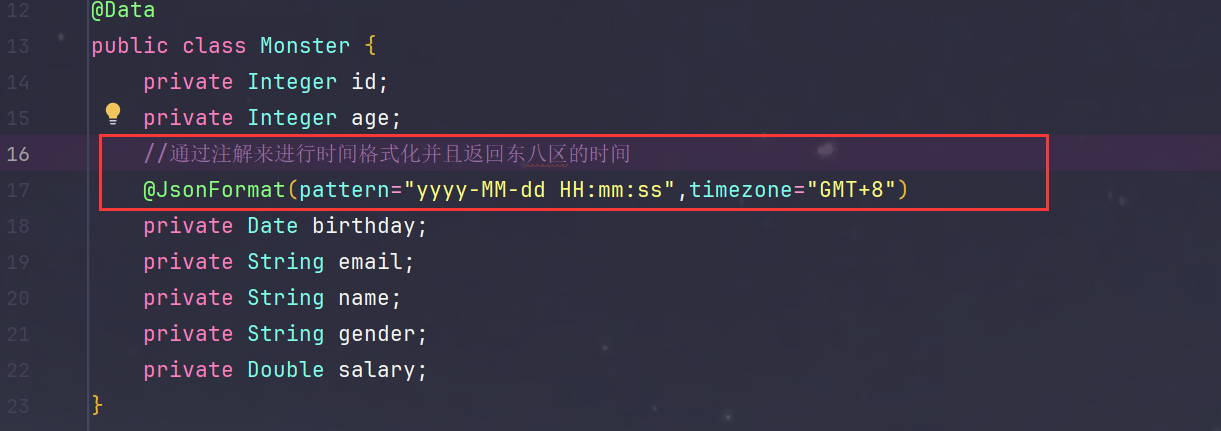
1.编写映射表的bean
package com.sun.springboot.mybatis.bean;import com.fasterxml.jackson.annotation.JsonFormat;
import lombok.Data;import java.util.Date;/*** @author 孙显圣* @version 1.0*/
@Data
public class Monster {private Integer id;private Integer age;@JsonFormat(pattern="yyyy-MM-dd HH:mm:ss",timezone="GMT+8")private Date birthday;private String email;private String name;private String gender;private Double salary;
}
2.MonsterMapper.java 编写mapper接口
- 使用注解注入容器
package com.sun.springboot.mybatis.mapper;import com.sun.springboot.mybatis.bean.Monster;
import org.apache.ibatis.annotations.Mapper;/*** @author 孙显圣* @version 1.0*/
@Mapper //将接口注入容器
public interface MonsterMapper {public Monster getMonsterById(Integer id);
}
3.MonsterMapper.xml 编写mapper.xml实现mapper接口
- 使用namespace指定要实现的接口
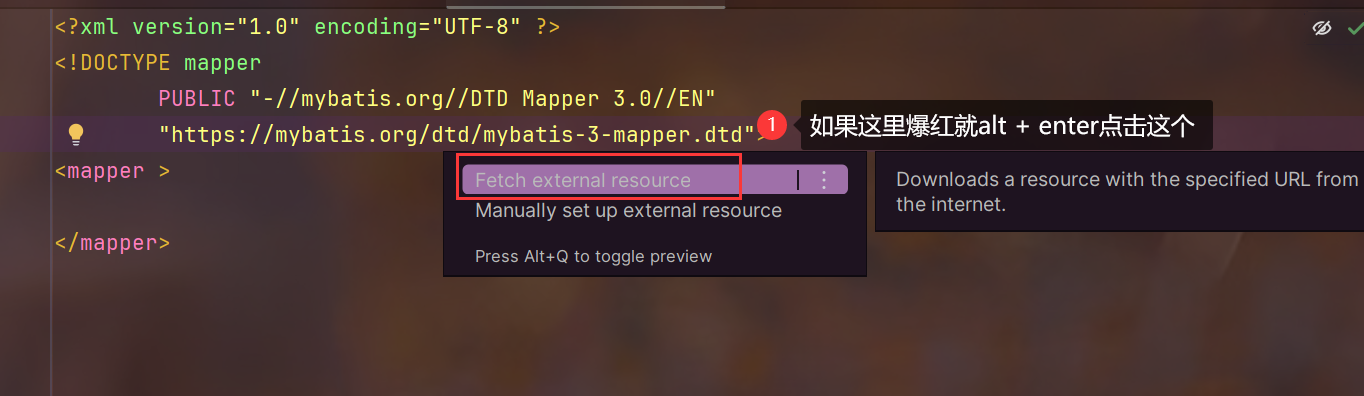
<?xml version="1.0" encoding="UTF-8" ?>
<!DOCTYPE mapperPUBLIC "-//mybatis.org//DTD Mapper 3.0//EN""https://mybatis.org/dtd/mybatis-3-mapper.dtd">
<!--指定要实现的接口-->
<mapper namespace="com.sun.springboot.mybatis.mapper.MonsterMapper"><select id="getMonsterById" resultType="com.sun.springboot.mybatis.bean.Monster" parameterType="Integer">select * from monster where id = #{id}</select>
</mapper>
4.application.yml 扫描mapper.xml配置文件的位置
- 扫描类路径下mapper文件夹下的所有文件
mybatis:#指定要扫描的mapper.xmlmapper-locations: classpath:mapper/*.xml
5.测试
package com.sun.springboot.mybatis;import com.sun.springboot.mybatis.bean.Monster;
import com.sun.springboot.mybatis.mapper.MonsterMapper;
import org.junit.jupiter.api.Test;
import org.springframework.boot.test.context.SpringBootTest;
import org.springframework.jdbc.core.JdbcTemplate;import javax.annotation.Resource;/*** @author 孙显圣* @version 1.0*/
@SpringBootTest
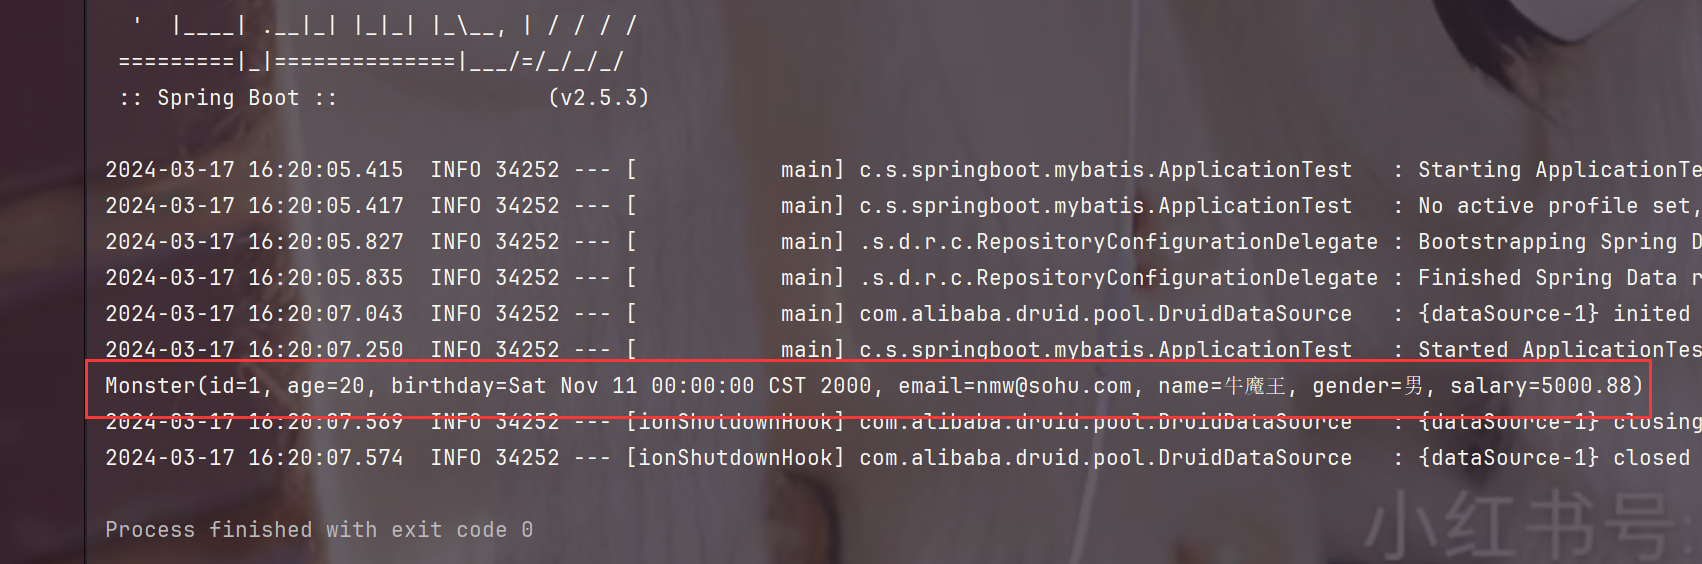
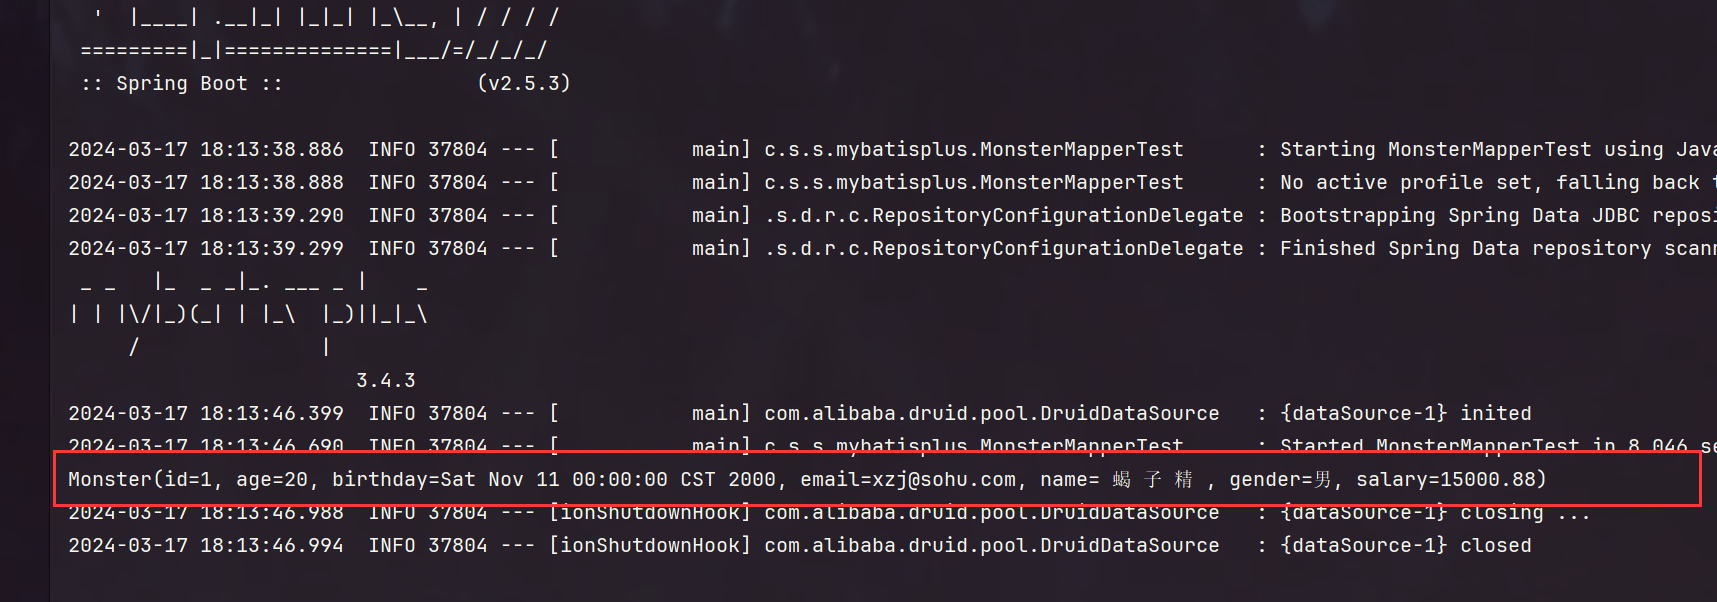
public class ApplicationTest {//依赖注入@Resourceprivate JdbcTemplate jdbcTemplate;//注意这里注入的是MonsterMapper的代理对象@Resourceprivate MonsterMapper monsterMapper;@Testpublic void t1() {//查看目前数据源System.out.println(jdbcTemplate.getDataSource().getClass());}@Testpublic void t2() {//测试mybatisMonster monsterById = monsterMapper.getMonsterById(1);System.out.println(monsterById);}
}
5.MyBatis高级配置
1.方式一:在application.yml中配置mybatis.config-location指定mybatis-config.xml配置文件的位置
2.方式二:直接在application.yml中配置
mybatis:#指定要扫描的mapper.xmlmapper-locations: classpath:mapper/*.xml#配置类型别名包,这样只要在这个包下的类型都可以简写type-aliases-package: com/sun/springboot/mybatis/bean#输出日志configuration:log-impl: org.apache.ibatis.logging.stdout.StdOutImpl
6.继续编写Service层和Controller层
1.MonsterService.java
package com.sun.springboot.mybatis.service;import com.sun.springboot.mybatis.bean.Monster;/*** @author 孙显圣* @version 1.0*/
public interface MonsterService {public Monster getMonsterById(Integer id);
}
2.MonsterServiceImpl.java
package com.sun.springboot.mybatis.service.Impl;import com.sun.springboot.mybatis.bean.Monster;
import com.sun.springboot.mybatis.mapper.MonsterMapper;
import com.sun.springboot.mybatis.service.MonsterService;
import org.springframework.stereotype.Service;import javax.annotation.Resource;/*** @author 孙显圣* @version 1.0*/
@Service
public class MonsterServiceImpl implements MonsterService {@Resourceprivate MonsterMapper monsterMapper; //返回代理对象@Overridepublic Monster getMonsterById(Integer id) {return monsterMapper.getMonsterById(id);}
}
3.测试
package com.sun.springboot.mybatis;import com.sun.springboot.mybatis.bean.Monster;
import com.sun.springboot.mybatis.mapper.MonsterMapper;
import com.sun.springboot.mybatis.service.MonsterService;
import org.junit.jupiter.api.Test;
import org.springframework.boot.test.context.SpringBootTest;
import org.springframework.jdbc.core.JdbcTemplate;import javax.annotation.Resource;/*** @author 孙显圣* @version 1.0*/
@SpringBootTest
public class ApplicationTest {//依赖注入@Resourceprivate MonsterService monsterService;@Testpublic void getMonsterById() {Monster monsterById = monsterService.getMonsterById(1);System.out.println(monsterById);}
}
4.MonsterController.java
package com.sun.springboot.mybatis.Controller;import com.sun.springboot.mybatis.bean.Monster;
import com.sun.springboot.mybatis.service.MonsterService;
import org.springframework.stereotype.Controller;
import org.springframework.web.bind.annotation.GetMapping;
import org.springframework.web.bind.annotation.PathVariable;
import org.springframework.web.bind.annotation.ResponseBody;import javax.annotation.Resource;/*** @author 孙显圣* @version 1.0*/
@Controller
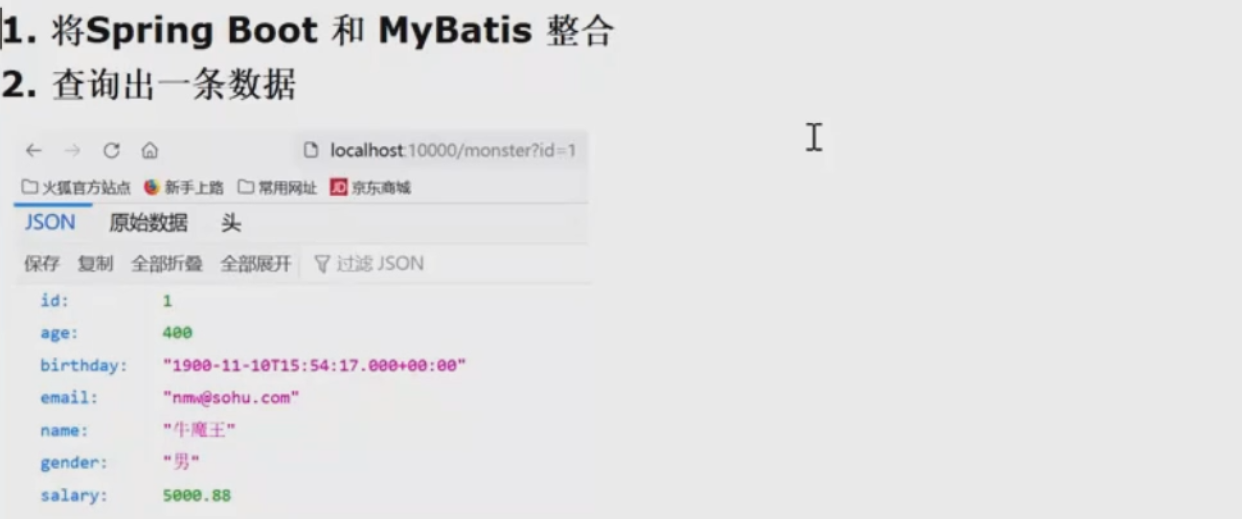
public class MonsterController {@Resourceprivate MonsterService monsterService;@GetMapping("/getMonster/{id}") //路径参数的请求@ResponseBody //响应一个jsonpublic Monster getMonsterById(@PathVariable("id") Integer id) {Monster monsterById = monsterService.getMonsterById(id);return monsterById;}
}5.测试
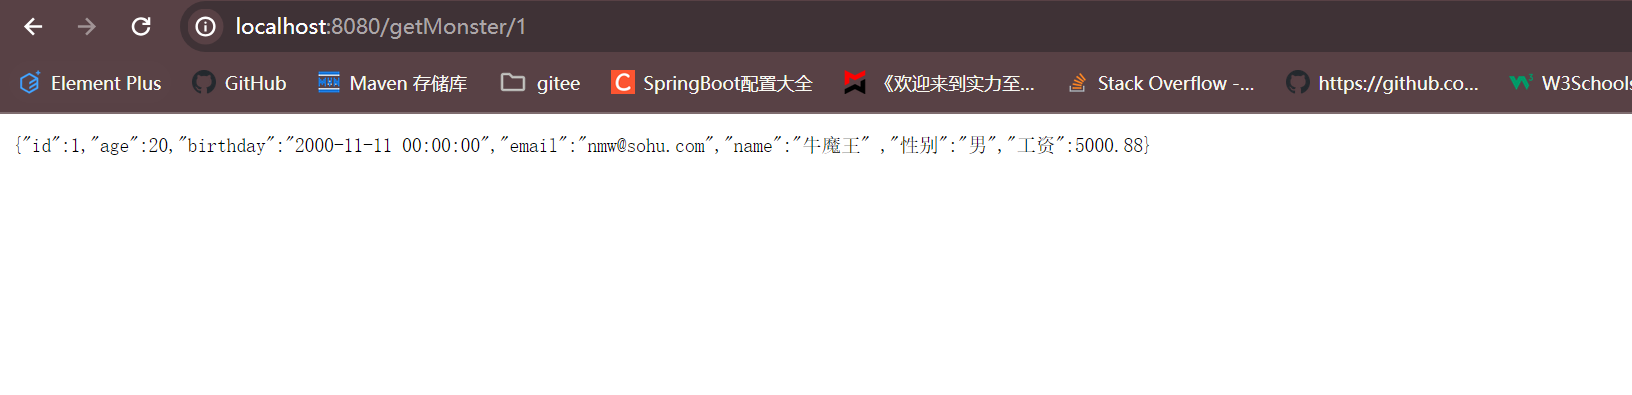
6.解决时间问题
7.完整文件目录
2.整合MyBatis-Plus
1.MyBatis-Plus基本介绍
2.数据库表设计
CREATE DATABASE `springboot_mybatisplus`;USE `springboot_mybatisplus`;CREATE TABLE `monster` (
`id` INT NOT NULL AUTO_INCREMENT,
`age` INT NOT NULL,
`birthday` DATE DEFAULT NULL,
`email` VARCHAR(255) DEFAULT NULL,
`gender` CHAR(1) DEFAULT NULL,
`name` VARCHAR(255) DEFAULT NULL,
`salary` DOUBLE NOT NULL,
PRIMARY KEY (`id`)
);
SELECT * FROM `monster`;
INSERT INTO monster VALUES(NULL, 20, '2000-11-11', 'xzj@sohu.com', '男', ' 蝎 子 精 ',
15000.88);
INSERT INTO monster VALUES(NULL, 10, '2011-11-11', 'ytj@sohu.com', '女', ' 玉 兔 精 ',
18000.88);
3.数据库环境配置
1.创建maven项目
2.pom.xml 导入依赖
<!--导入springboot父工程--><parent><artifactId>spring-boot-starter-parent</artifactId><groupId>org.springframework.boot</groupId><version>2.5.3</version></parent><!--引入相关依赖--><dependencies><!--常规依赖--><!--web场景启动器--><dependency><groupId>org.springframework.boot</groupId><artifactId>spring-boot-starter-web</artifactId></dependency><!--lombok--><dependency><groupId>org.projectlombok</groupId><artifactId>lombok</artifactId><optional>true</optional></dependency><!--引入测试场景启动器--><dependency><groupId>org.springframework.boot</groupId><artifactId>spring-boot-starter-test</artifactId><scope>test</scope></dependency><!--配置处理器--><dependency><groupId>org.springframework.boot</groupId><artifactId>spring-boot-configuration-processor</artifactId><optional>true</optional></dependency><!--数据库配置--><!--mysql依赖使用版本仲裁--><dependency><groupId>mysql</groupId><artifactId>mysql-connector-java</artifactId><scope>runtime</scope></dependency><!-- 引入 druid 依赖 --><dependency><groupId>com.alibaba</groupId><artifactId>druid</artifactId><version>1.1.17</version></dependency><!--引入MyBatis-Plus场景启动器,会自动引入jdbc和MyBatis--><dependency><groupId>com.baomidou</groupId><artifactId>mybatis-plus-boot-starter</artifactId><version>3.4.3</version></dependency></dependencies>
3.application.yml 配置数据源
- 数据库名称
- 用户名
- 密码
server:port: 8080
spring:datasource:driver-class-name: com.mysql.cj.jdbc.Driverurl: jdbc:mysql://localhost:3306/springboot_mybatisplus?useSSL=false&useUnicode=true&characterEncoding=UTF-8username: rootpassword: root
4.DruidDataSourceConfig.java 配置类切换druid数据源
package com.sun.springboot.mybatisplus.config;import com.alibaba.druid.pool.DruidDataSource;
import com.alibaba.druid.support.http.StatViewServlet;
import com.alibaba.druid.support.http.WebStatFilter;
import org.springframework.boot.context.properties.ConfigurationProperties;
import org.springframework.boot.web.servlet.FilterRegistrationBean;
import org.springframework.boot.web.servlet.ServletRegistrationBean;
import org.springframework.context.annotation.Bean;
import org.springframework.context.annotation.Configuration;import javax.sql.DataSource;
import java.sql.SQLException;
import java.util.Arrays;/*** @author 孙显圣* @version 1.0*/
@Configuration
public class DruidDataSourceConfig {//注入一个德鲁伊数据源@ConfigurationProperties("spring.datasource") //读取yaml配置文件的参数,获取数据源配置@Beanpublic DataSource dataSource() throws SQLException {DruidDataSource druidDataSource = new DruidDataSource();druidDataSource.setFilters("stat, wall"); //开启sql监控return druidDataSource;}//配置德鲁伊监控sql功能@Beanpublic ServletRegistrationBean statViewServlet() {StatViewServlet statViewServlet = new StatViewServlet();ServletRegistrationBean<StatViewServlet> registrationBean =new ServletRegistrationBean<>(statViewServlet, "/druid/*");//配置登录监控页面用户名和密码registrationBean.addInitParameter("loginUsername", "root");registrationBean.addInitParameter("loginPassword", "root");return registrationBean;}//配置webStatFilter@Beanpublic FilterRegistrationBean webStatFilter() {WebStatFilter webStatFilter = new WebStatFilter();FilterRegistrationBean<WebStatFilter> filterRegistrationBean =new FilterRegistrationBean<>(webStatFilter);//默认对所有 URL 请求监控filterRegistrationBean.setUrlPatterns(Arrays.asList("/*"));//排除 URLfilterRegistrationBean.addInitParameter("exclusions", "*.js,*.gif,*.jpg,*.png,*.css,*.ico,/druid/*");return filterRegistrationBean;}
}
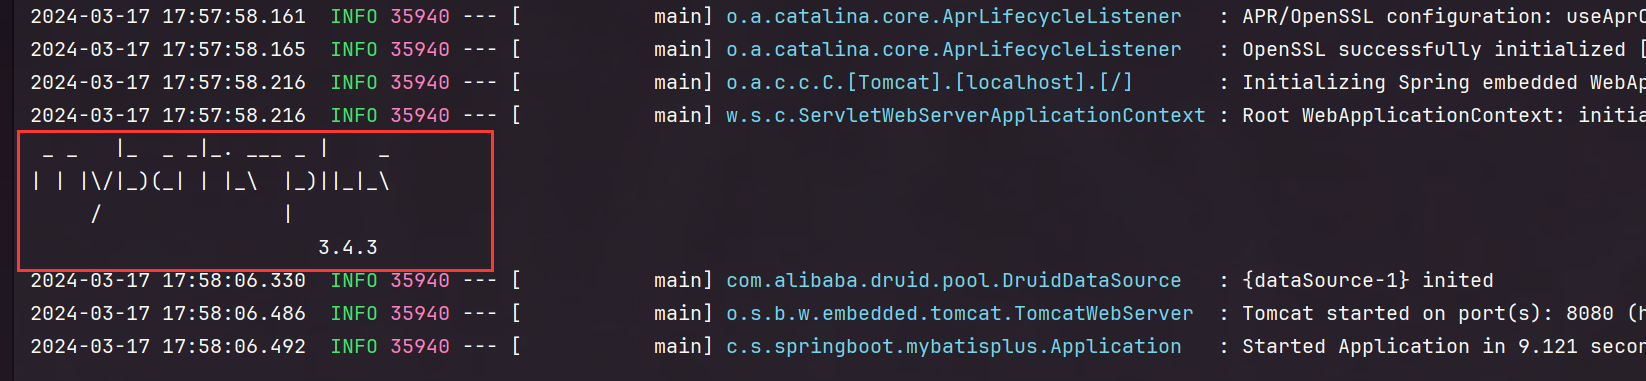
5.编写启动类Application.java,测试运行
package com.sun.springboot.mybatisplus;import org.springframework.boot.SpringApplication;
import org.springframework.boot.autoconfigure.SpringBootApplication;/*** @author 孙显圣* @version 1.0*/
@SpringBootApplication
public class Application {public static void main(String[] args) {SpringApplication.run(Application.class, args);}
}
4.MyBatis-Plus基础配置
1.编写映射表的bean
package com.sun.springboot.mybatisplus.bean;import com.fasterxml.jackson.annotation.JsonFormat;
import lombok.Data;import java.util.Date;/*** @author 孙显圣* @version 1.0*/
@Data
public class Monster {private Integer id;private Integer age;@JsonFormat(pattern = "yyyy-MM-dd HH:mm:ss", timezone = "GMT+8")private Date birthday;private String email;private String name;private String gender;private Double salary;
}
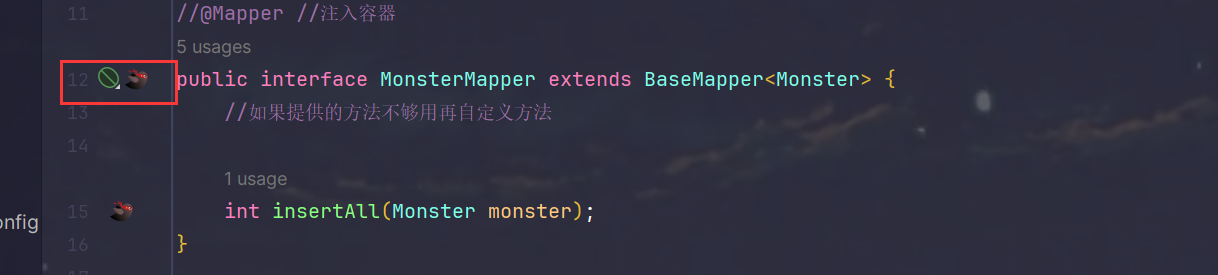
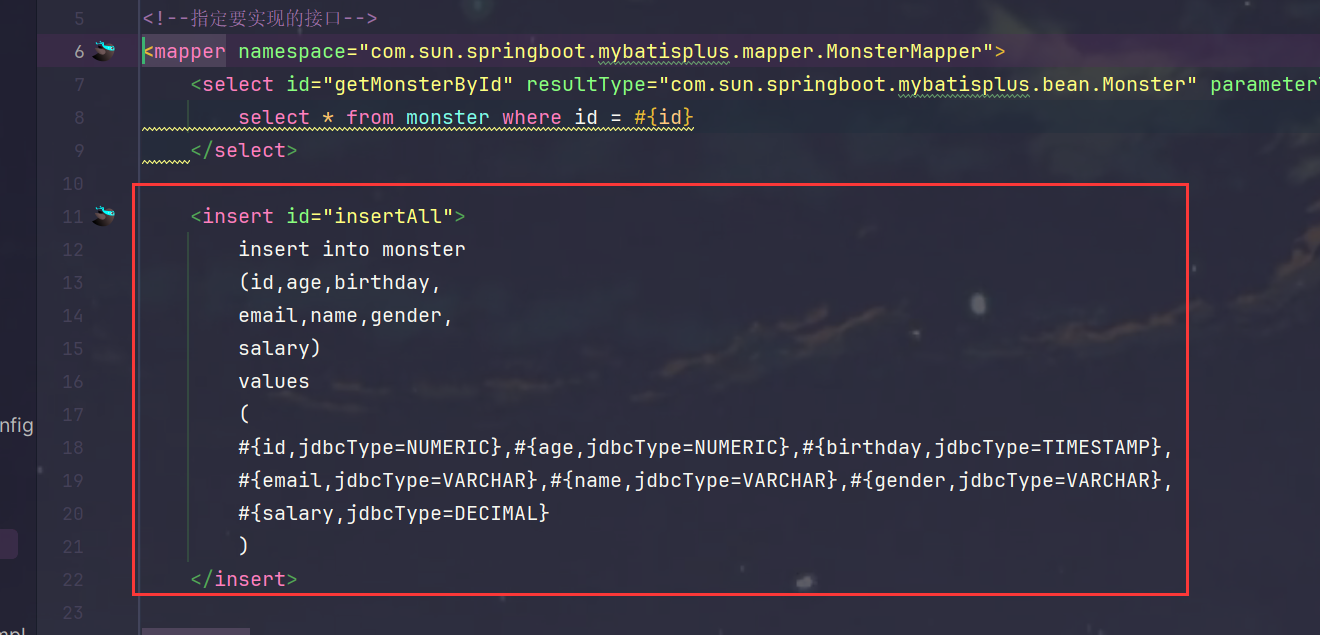
2.MonsterMapper.java 编写Mapper接口
package com.sun.springboot.mybatisplus.mapper;import com.baomidou.mybatisplus.core.mapper.BaseMapper;
import com.sun.springboot.mybatisplus.bean.Monster;
import org.apache.ibatis.annotations.Mapper;/*** @author 孙显圣* @version 1.0*/
//直接继承BaseMapper接口
@Mapper //注入容器
public interface MonsterMapper extends BaseMapper<Monster> {//如果提供的方法不够用再自定义方法
}
3.测试接口方法使用
package com.sun.springboot.mybatisplus;import com.sun.springboot.mybatisplus.bean.Monster;
import com.sun.springboot.mybatisplus.mapper.MonsterMapper;
import org.junit.jupiter.api.Test;
import org.springframework.boot.test.context.SpringBootTest;import javax.annotation.Resource;/*** @author 孙显圣* @version 1.0*/
@SpringBootTest
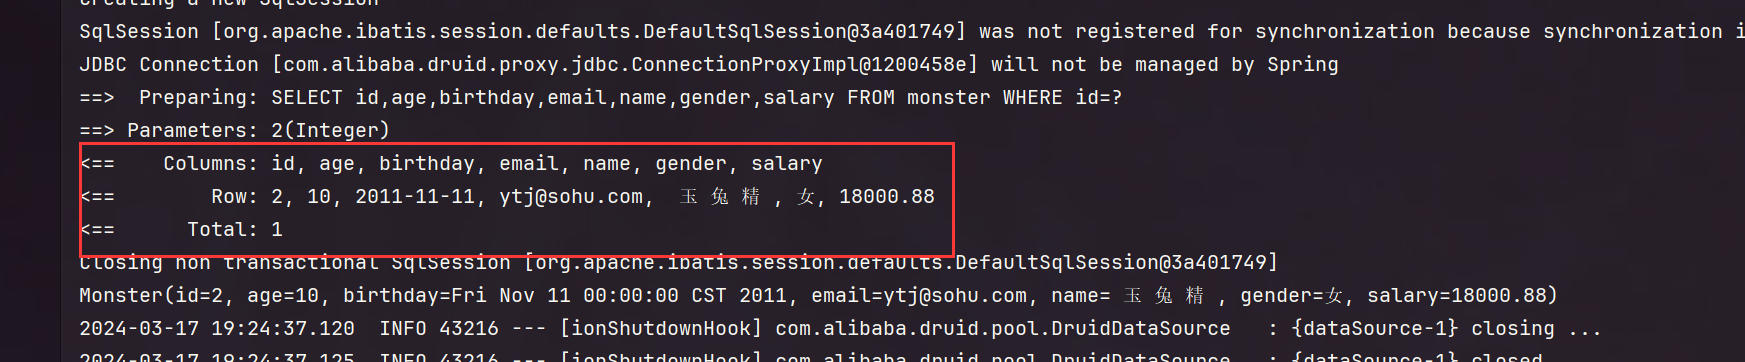
public class MonsterMapperTest {//注入针对Mapper接口的代理对象@Resourceprivate MonsterMapper monsterMapper;@Testpublic void t1() {Monster monster = monsterMapper.selectById(1);System.out.println(monster);}
}
5.MyBatis-Plus高级配置
application.yml 进行配置
#进行mybatis-plus配置
mybatis-plus:configuration:log-impl: org.apache.ibatis.logging.stdout.StdOutImpl
6.继续编写Service层和Controller层
1.MonsterService.java
package com.sun.springboot.mybatisplus.service.Impl;import com.baomidou.mybatisplus.extension.service.impl.ServiceImpl;
import com.sun.springboot.mybatisplus.bean.Monster;
import com.sun.springboot.mybatisplus.mapper.MonsterMapper;
import com.sun.springboot.mybatisplus.service.MonsterService;
import org.springframework.stereotype.Service;/*** 这里* @author 孙显圣* @version 1.0*/
@Service
public class MonsterServiceImpl extends ServiceImpl<MonsterMapper, Monster> implements MonsterService {//自定义方法实现
}
2.MonsterServiceImpl.java
package com.sun.springboot.mybatisplus.service.Impl;import com.baomidou.mybatisplus.extension.service.impl.ServiceImpl;
import com.sun.springboot.mybatisplus.bean.Monster;
import com.sun.springboot.mybatisplus.mapper.MonsterMapper;
import com.sun.springboot.mybatisplus.service.MonsterService;
import org.springframework.stereotype.Service;/*** 这里* @author 孙显圣* @version 1.0*/
@Service
public class MonsterServiceImpl extends ServiceImpl<MonsterMapper, Monster> implements MonsterService {//自定义方法实现
}
3.测试
package com.sun.springboot.mybatisplus;import com.sun.springboot.mybatisplus.bean.Monster;
import com.sun.springboot.mybatisplus.mapper.MonsterMapper;
import com.sun.springboot.mybatisplus.service.MonsterService;
import org.junit.jupiter.api.Test;
import org.springframework.boot.test.context.SpringBootTest;import javax.annotation.Resource;/*** @author 孙显圣* @version 1.0*/
@SpringBootTest
public class MonsterServiceTest {@Resourceprivate MonsterService monsterService;@Testpublic void t1() {Monster byId = monsterService.getById(2);System.out.println(byId);}
}
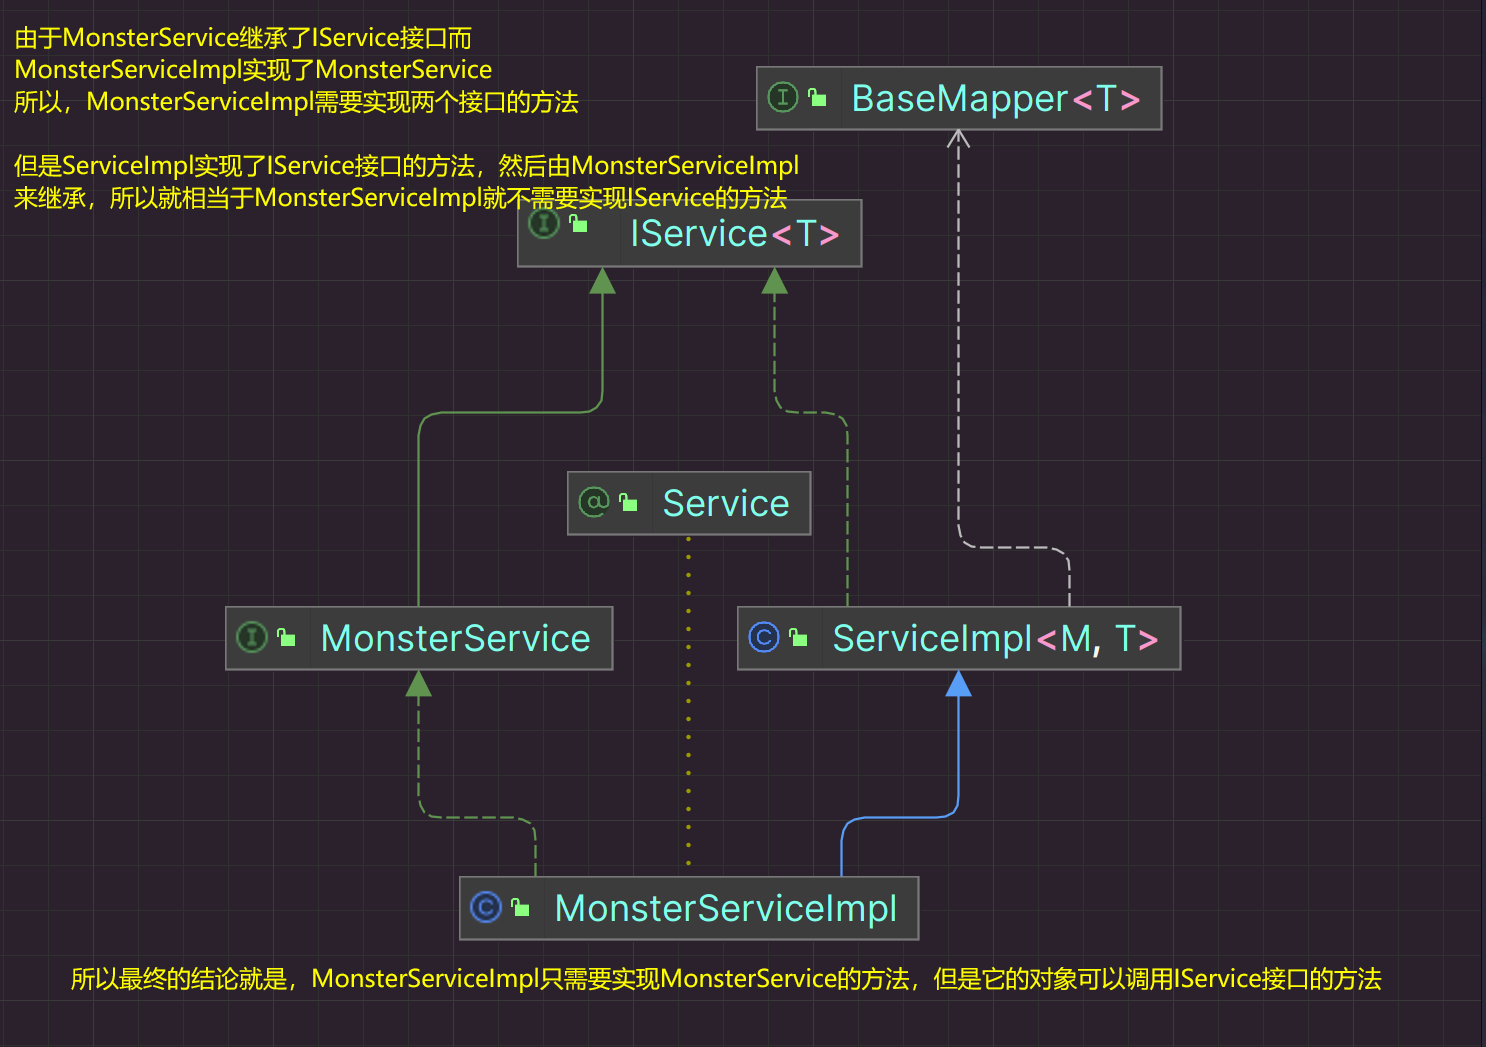
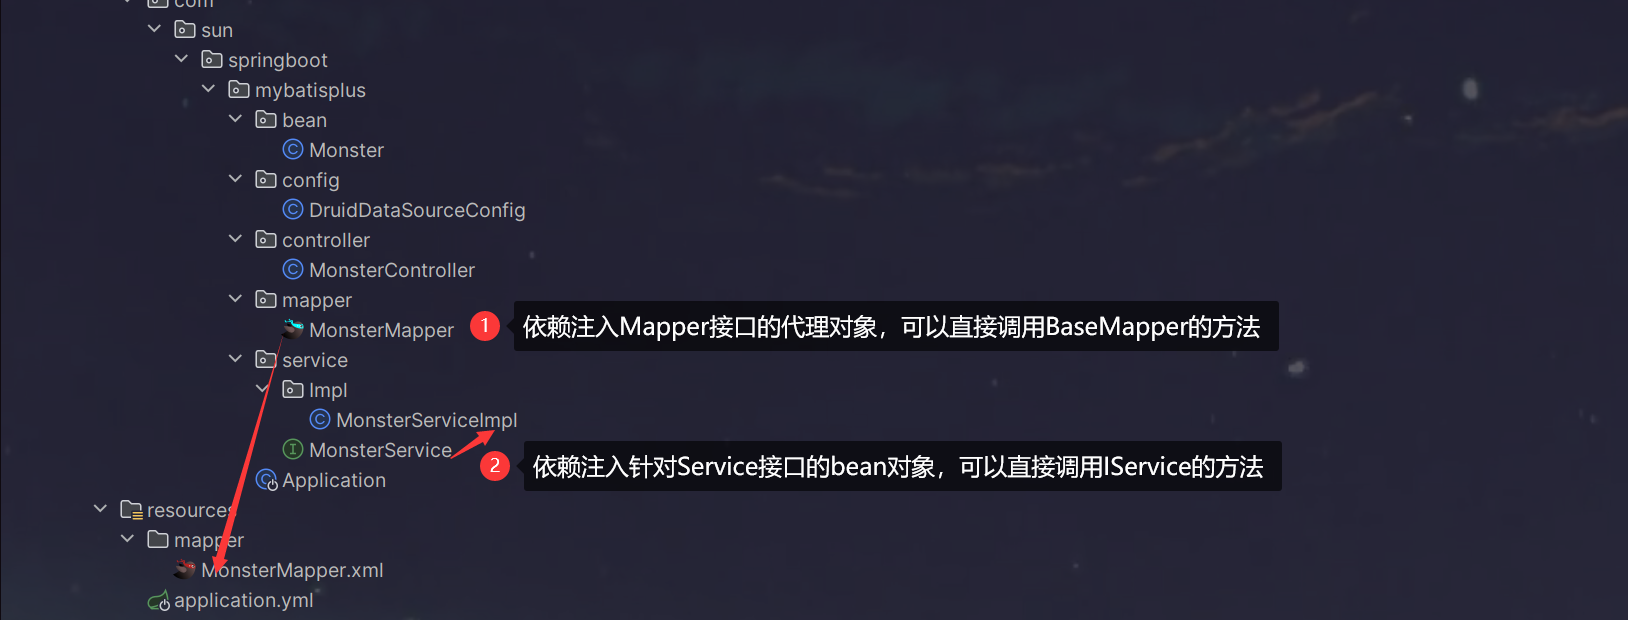
4.细节说明
- 简单来说就是MonsterServiceImpl只需要实现MonsterService接口的方法
- 可以调用IService接口的方法,也可以调用MonsterService接口的方法
5.MonsterController.java
package com.sun.springboot.mybatisplus.controller;import com.sun.springboot.mybatisplus.bean.Monster;
import com.sun.springboot.mybatisplus.service.MonsterService;
import org.springframework.stereotype.Controller;
import org.springframework.web.bind.annotation.GetMapping;
import org.springframework.web.bind.annotation.PathVariable;
import org.springframework.web.bind.annotation.ResponseBody;import javax.annotation.Resource;/*** @author 孙显圣* @version 1.0*/
@Controller
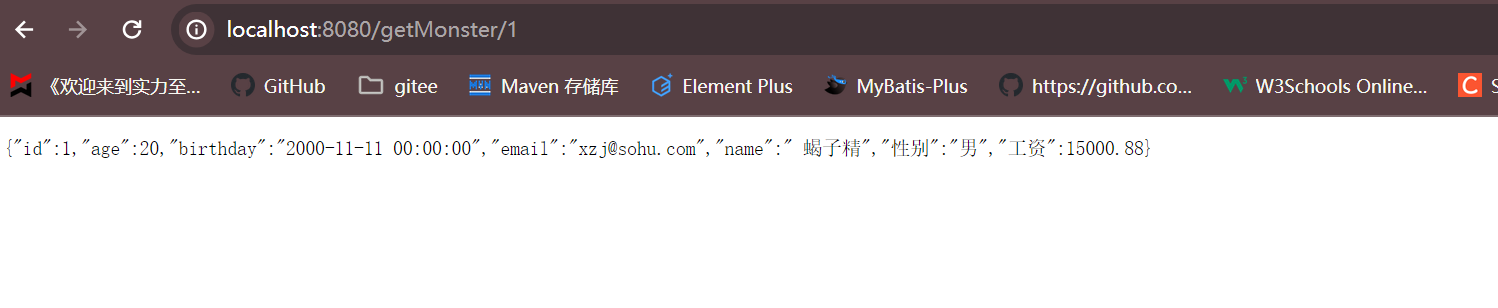
public class MonsterController {@Resource//注入的是MonsterServiceImpl的bean对象,可以直接调用IService接口的方法private MonsterService monsterService;@GetMapping("/getMonster/{id}")@ResponseBodypublic Monster getMonsterById(@PathVariable("id") Integer id) {Monster byId = monsterService.getById(id);return byId;}
}
7.细节说明
1.@MapperScan 扫描包下的所有Mapper
启动类配置注解
2.@TableName bean的类名与表名不一致时使用
3.MyBatis引入了哪些依赖
8.MyBatisX快速开发
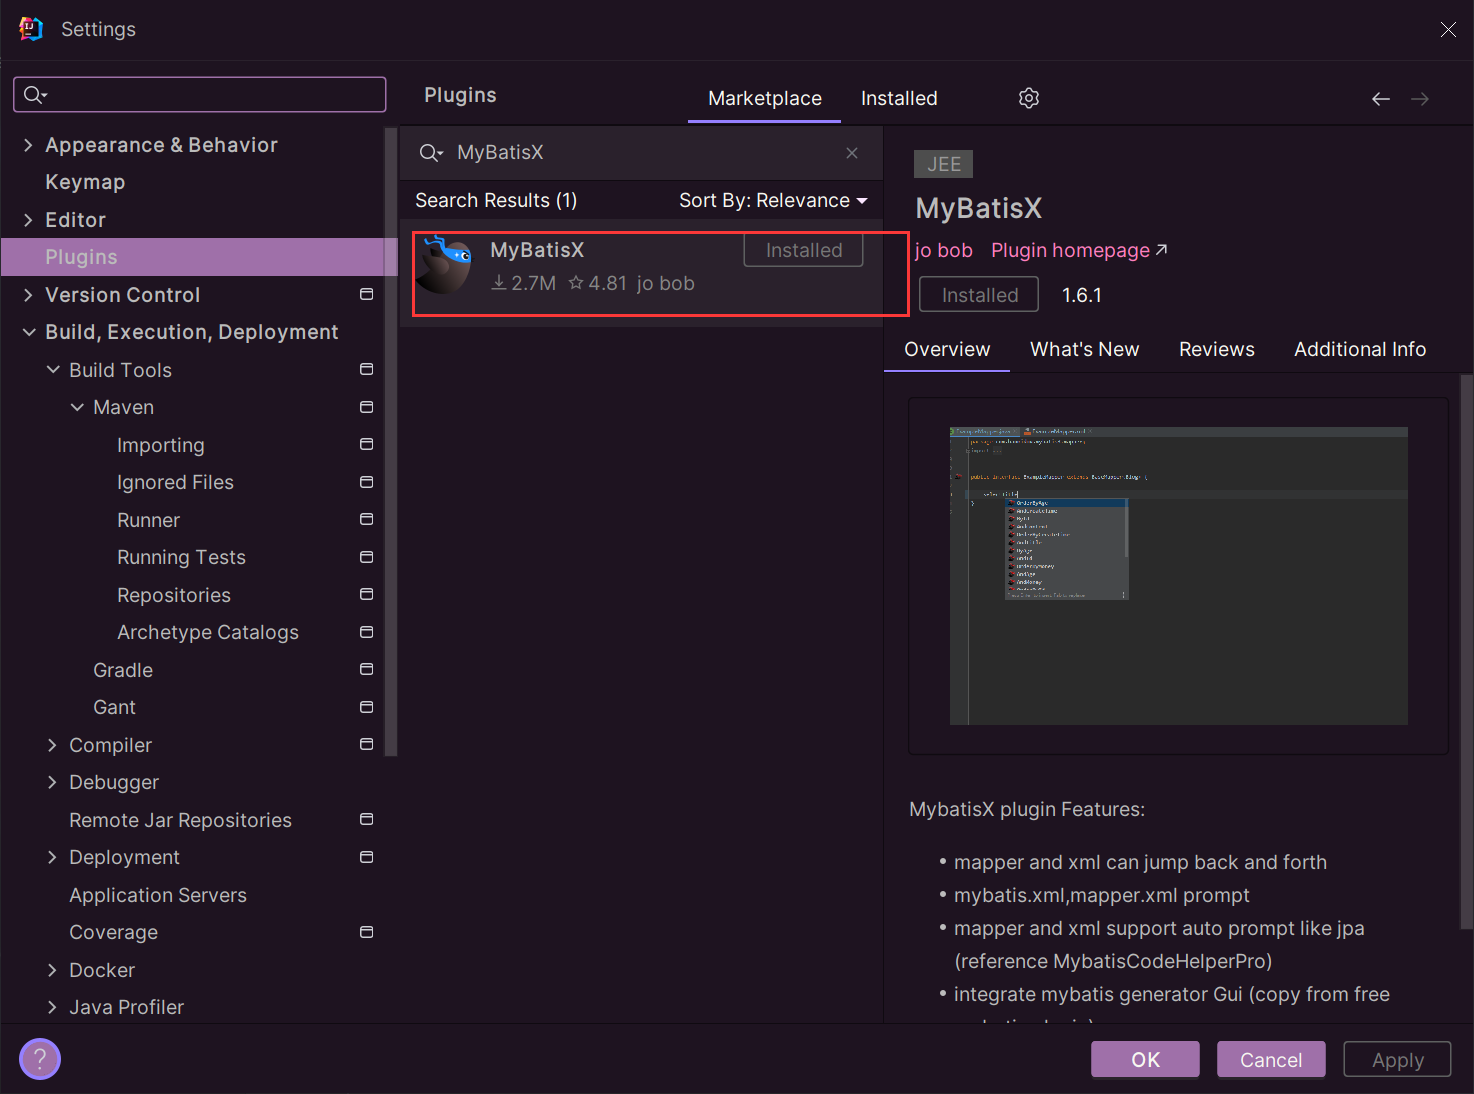
1.安装插件
2.使用方式
1.挑一个带小鸟的方法
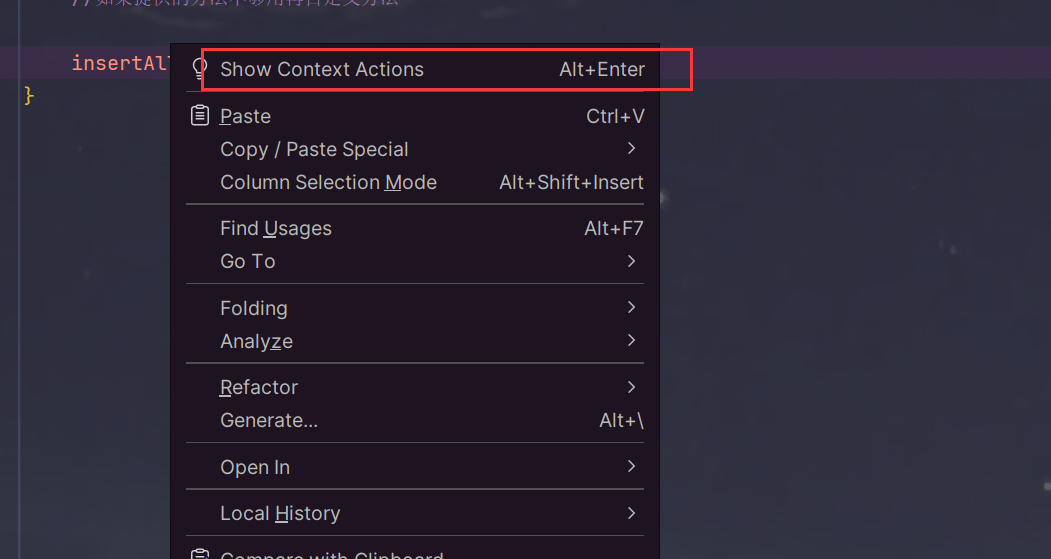
2.直接alt + Enter
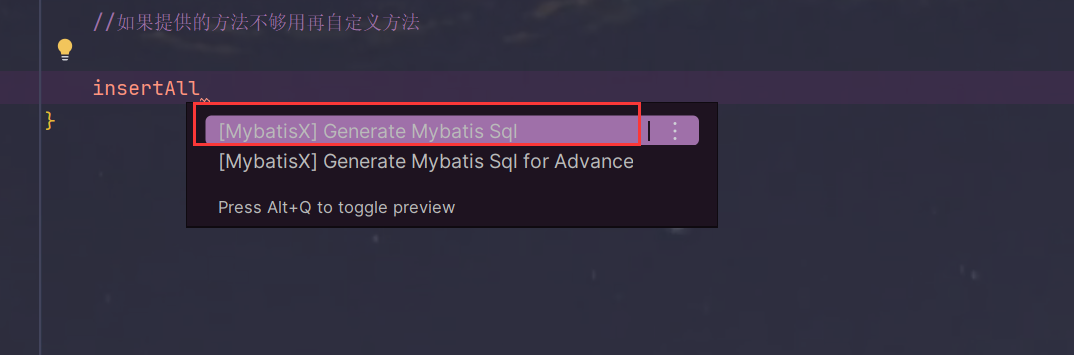
3.生成sql语句
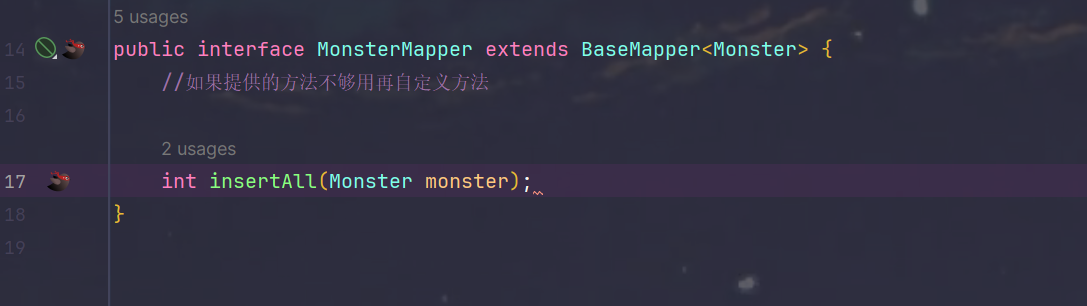
4.查看生成的方法
5.点击左边的小鸟就可以直接跳转到指定方法或者xml
9.完整文件目录

10.MyBatis-Plus小结
相关文章:
SpringBoot(整合MyBatis + MyBatis-Plus + MyBatisX插件使用)
文章目录 1.整合MyBatis1.需求分析2.数据库表设计3.数据库环境配置1.新建maven项目2.pom.xml 引入依赖3.application.yml 配置数据源4.Application.java 编写启动类5.测试6.配置类切换druid数据源7.测试数据源是否成功切换 4.Mybatis基础配置1.编写映射表的bean2.MonsterMapper…...
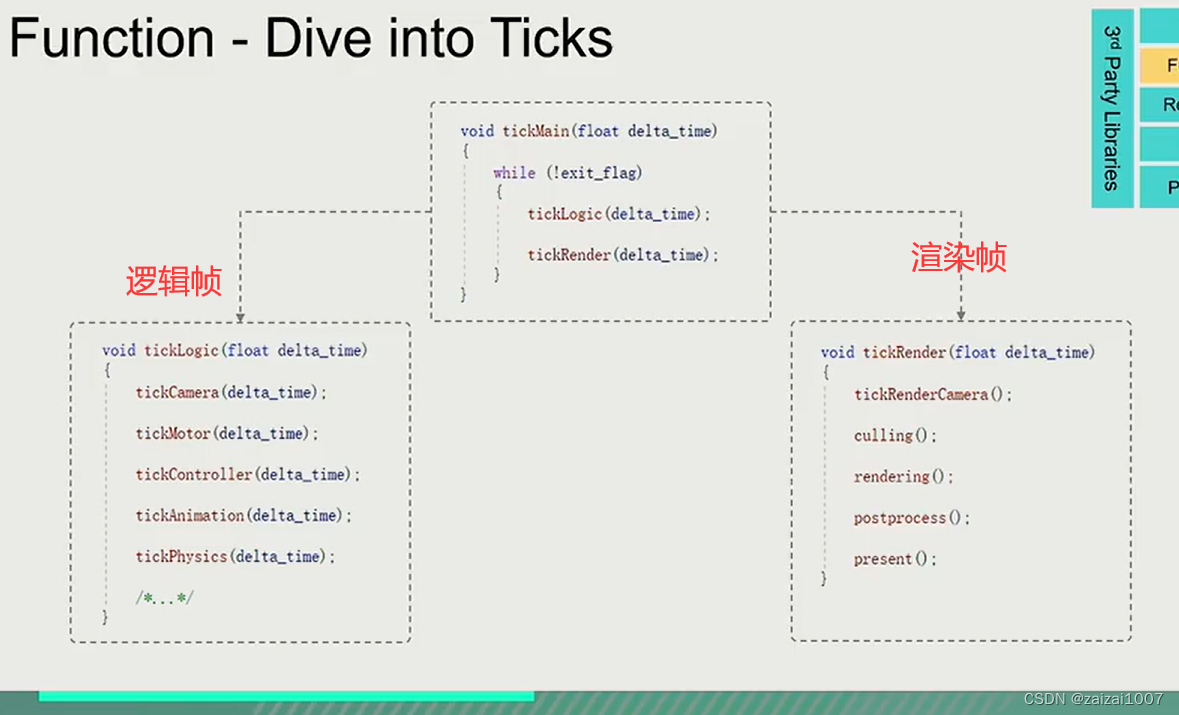
GAMES104-现代游戏引擎 1
主要学习重点还是面向就业,重点复习八股和算法 每天早上八点到九点用来学习这个课程 持续更新中... 第一节 游戏引擎导论 第二节 引擎架构分层 引擎是分层架构的 编辑器功能层资源层核心层平台层 越底层的代码越稳定越坚固,越上层的代码越灵活越开…...

idea 开发serlvet篮球秩序册管理系统idea开发mysql数据库web结构计算机java编程layUI框架开发
一、源码特点 idea开发 java servlet 篮球秩序册管理系统是一套完善的web设计系统mysql数据库 系统采用serlvetdaobean mvc 模式开发,对理解JSP java编程开发语言有帮助,系统具有完整的源代码和数据库,系统主要采用B/S模式开发。 servlet 篮…...

【深度学习】NestedTensors
文章目录 NestedTensorsWhy NestedTensor初始化 NestedTensorNestedTensor 操作reshape转置查看维度其他 NestedTensors DETR 中常见的数据格式为 NestedTensors,那么什么是 NestedTensors 呢? NestedTensor,包括 tensor 和 mask 两个成员&a…...

【网络】负载均衡
OSI模型每一层的负载均衡 在OSI模型中,每一层的负载均衡具体如下: 1. 第二层(数据链路层):数据链路层的负载均衡通常涉及对MAC地址的操作。在这一层,可以使用虚拟MAC地址技术,外部设备对虚拟MA…...

dataGridView 绑定List 显示内容不刷新
绑定后,原list值变动,显示内容会刷新 绑定后,list新添加的值时不会显示到界面,需要重新绑定list 微软的Bug 参考代码 public class Student{public string Name { get; set; }}List<Student> list new List<Student>();private void Form2_Load(object sender,…...

VR历史建筑漫游介绍|虚拟现实体验店|VR设备购买
VR历史建筑漫游是一种利用虚拟现实技术,让用户可以身临其境地参观和探索历史建筑的体验。通过VR头显和相关设备,用户可以在虚拟环境中自由移动和互动,感受历史建筑的真实氛围和文化内涵。 在VR历史建筑漫游中,您可以选择不同的历史…...

Linux查看硬件型号详细信息
1.查看CPU (1)使用cat /proc/cpuinfo或lscpu (2)使用dmidecode -i processor Dmidecode 这款软件允许你在 Linux 系统下获取有关硬件方面的信息。Dmidecode 遵循 SMBIOS/DMI 标准,其输出的信息包括 BIOS、系统、主板、…...
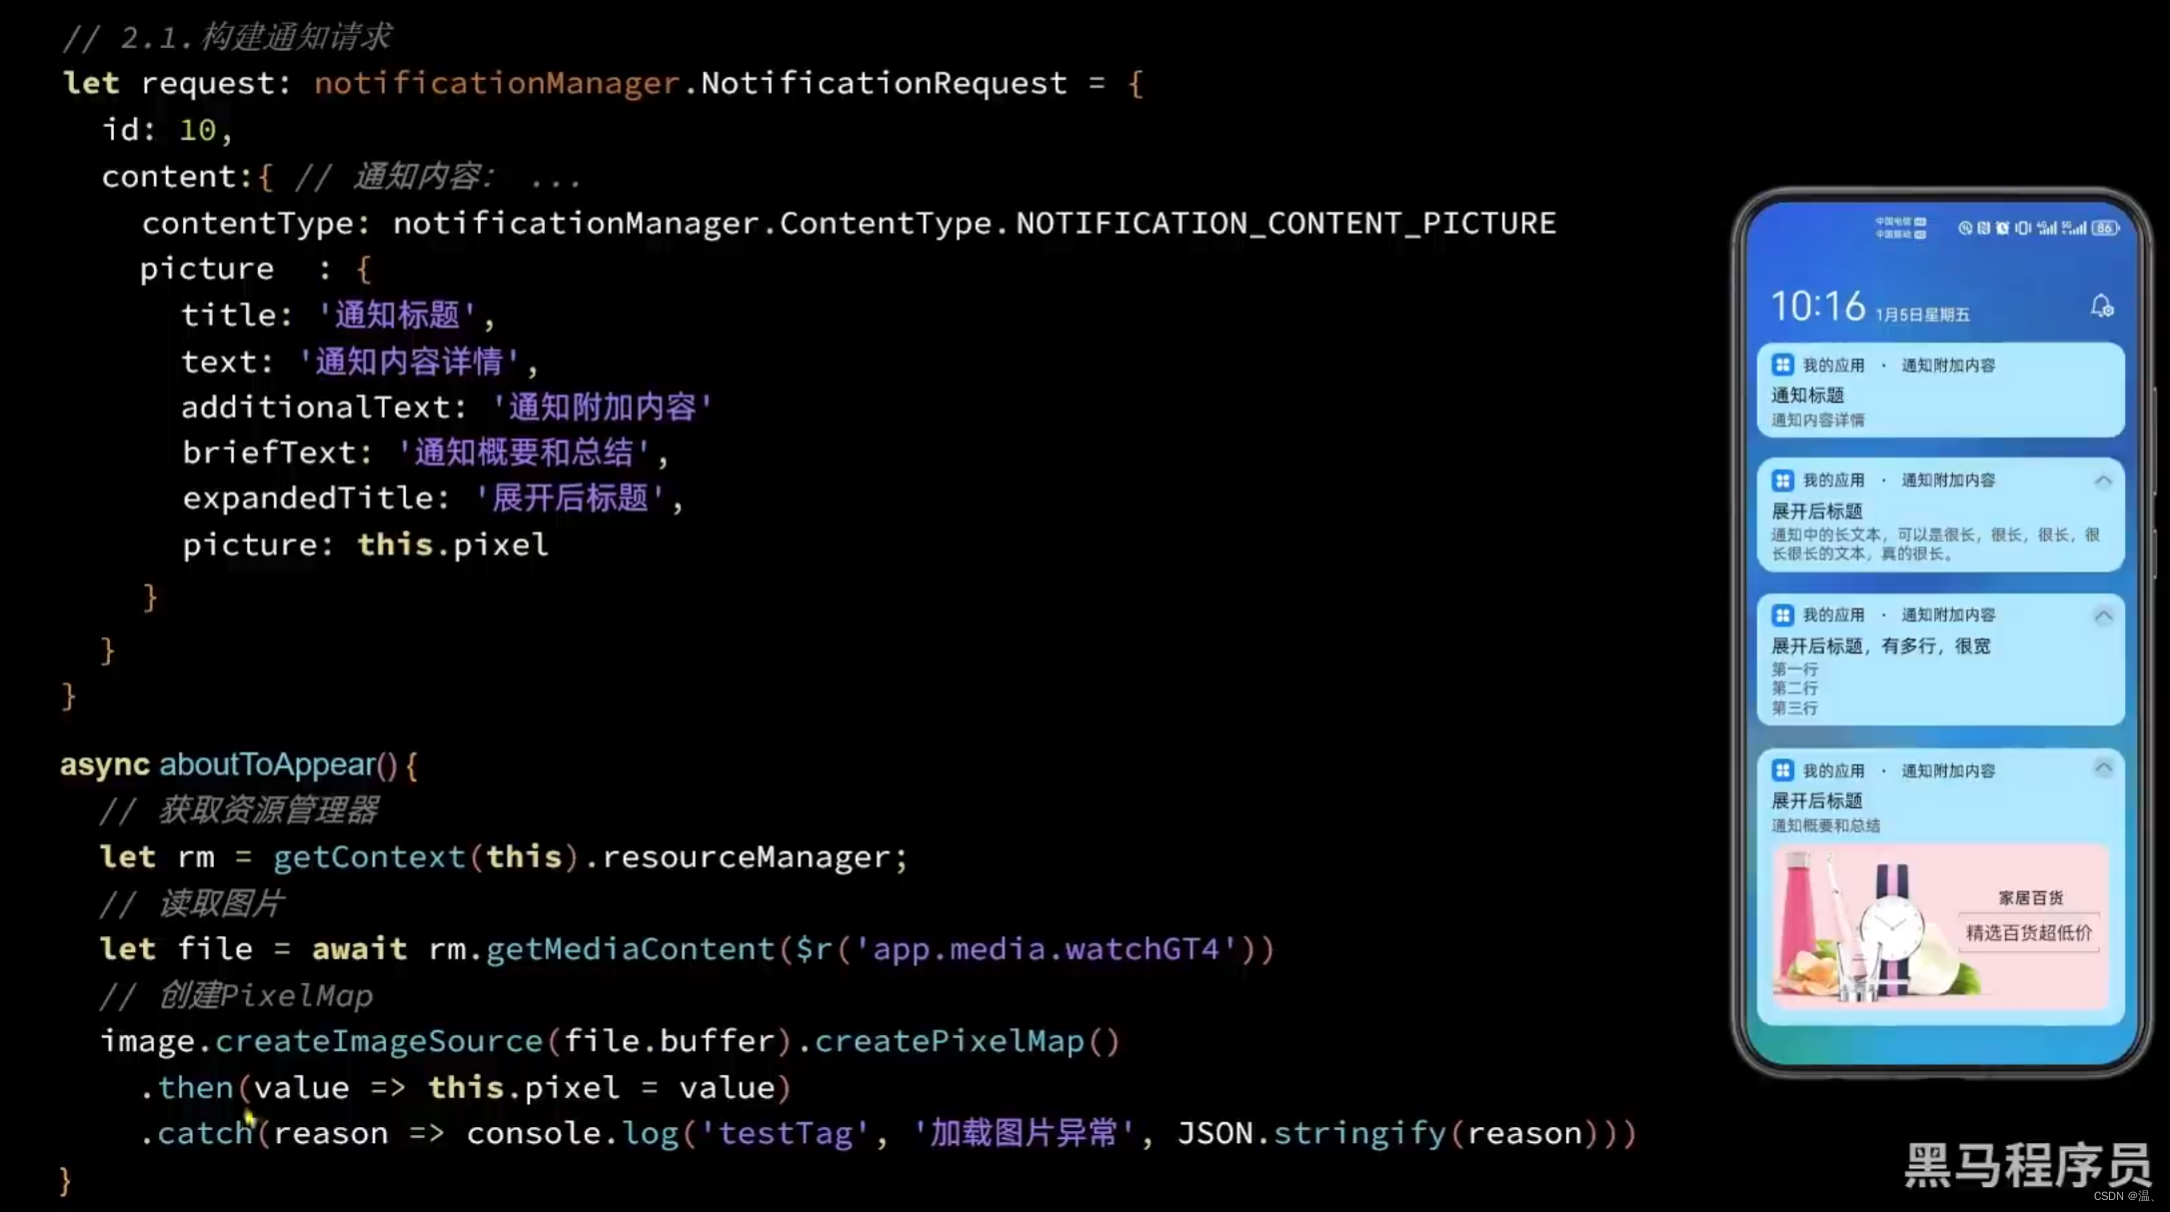
【鸿蒙HarmonyOS开发笔记】通知模块之发布基础类型通知,内含如何将图片变成PixelMap对象
通知简介 应用可以通过通知接口发送通知消息,终端用户可以通过通知栏查看通知内容,也可以点击通知来打开应用。 通知常见的使用场景: 显示接收到的短消息、即时消息等。 显示应用的推送消息,如广告、版本更新等。 显示当前正…...

外包干了1个月,技术明显进步。。。
我是一名大专生,自19年通过校招进入湖南某软件公司以来,便扎根于功能测试岗位,一晃便是近四年的光阴。今年8月,我如梦初醒,意识到长时间待在舒适的环境中,已让我变得不思进取,技术停滞不前。更令…...

鸿蒙开发实战:【Faultloggerd部件】
theme: z-blue 简介 Faultloggerd部件是OpenHarmony中C/C运行时崩溃临时日志的生成及管理模块。面向基于 Rust 开发的部件,Faultloggerd 提供了Rust Panic故障日志生成能力。系统开发者可以在预设的路径下找到故障日志,定位相关问题。 架构 Native In…...
蓝桥杯刷题|03普及-真题
[蓝桥杯 2017 省 B] k 倍区间 题目描述 给定一个长度为 N 的数列,,,⋯,如果其中一段连续的子序列 ,,⋯ (i≤j) 之和是 K 的倍数,我们就称这个区间 [i,j] 是 K 倍区间。 你能求出数列中总共有多少个 K 倍区间吗? 输入格式 …...

【动态三维重建】Deformable 3D Gaussians 可变形3D GS用于单目动态场景重建(CVPR 2024)
主页:https://ingra14m.github.io/Deformable-Gaussians/ 代码:https://github.com/ingra14m/Deformable-3D-Gaussians 论文:https://arxiv.org/abs/2309.13101 文章目录 摘要一、前言二、相关工作2.1 动态场景的神经渲染2.2 神经渲染加速 三…...
智能驾驶域控制器行业介绍
汽车智能驾驶功能持续高速渗透,带来智能驾驶域控制器市场空间快速增 长。智驾域控制器是智能驾驶决策环节的重要零部件,主要功能为处理感知 信息、进行规划决策等。其核心部件主要为计算芯片,英伟达、地平线等芯 片厂商市场地位突出。随着消费…...

[数据集][目标检测]焊接件表面缺陷检测数据集VOC+YOLO格式2292张10类别
数据集格式:Pascal VOC格式YOLO格式(不包含分割路径的txt文件,仅仅包含jpg图片以及对应的VOC格式xml文件和yolo格式txt文件) 图片数量(jpg文件个数):2292 标注数量(xml文件个数):2292 标注数量(txt文件个数):2292 标注…...

微信小程序的页面制作---常用组件及其属性
微信小程序里的组件就是html里的标签,但其组件都自带UI风格和特定的功能效果 一、常用组件 view(视图容器)、text(文本)、button(按钮)、image(图片)、form(…...

什么样的网站不适合使用WordPress?
WordPress作为全球应用最广泛的CMS系统,很好很强大,被从多的网站使用。但是,也不是所有的网站。下面简站WP小编从自己多年WordPress建站经验的角度,给大家讲讲,有哪些网站不适合使用WordPress搭建。 1、功能特别多的功…...
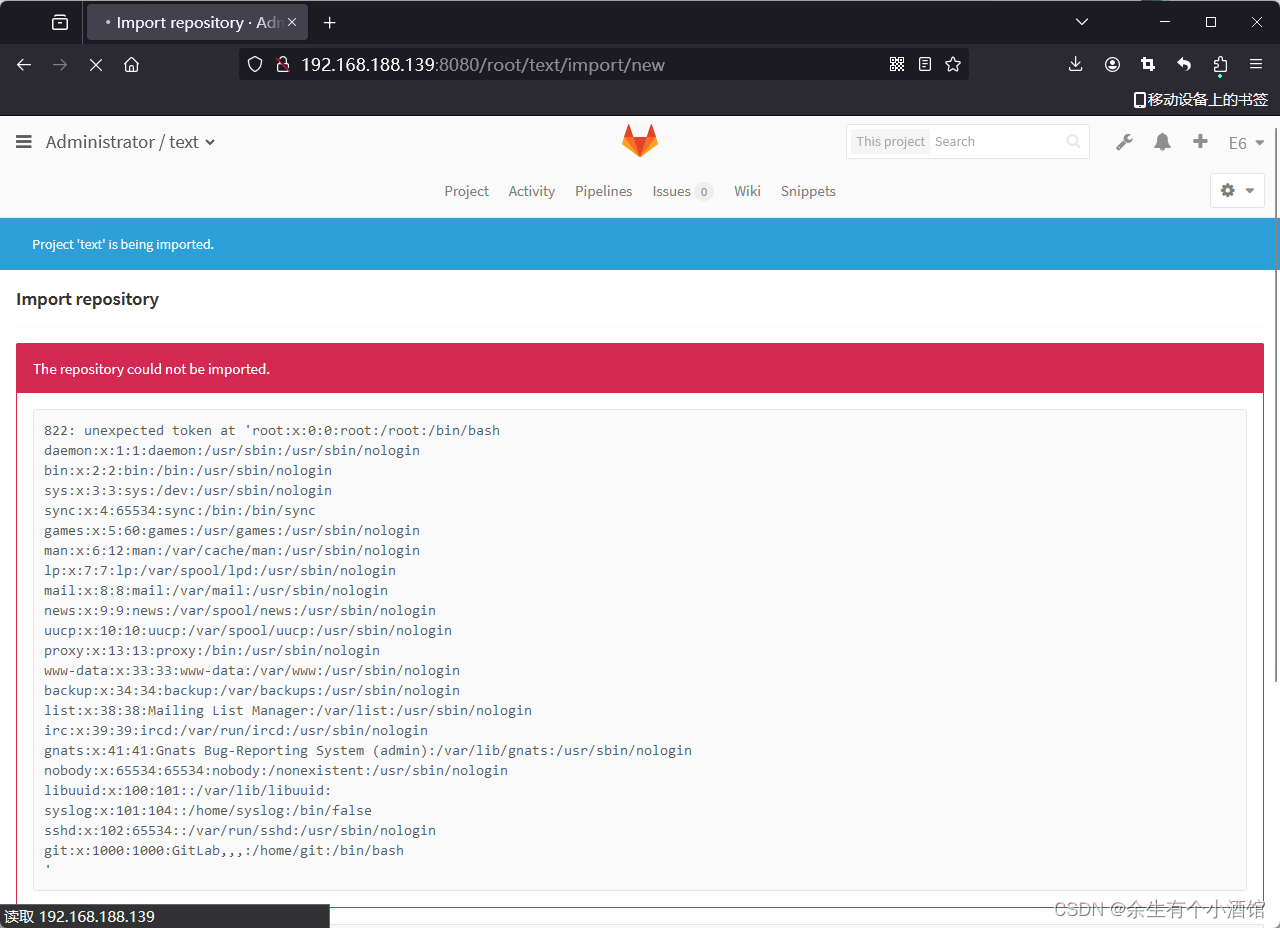
vulhub中GitLab 任意文件读取漏洞复现(CVE-2016-9086)
GitLab是一款Ruby开发的Git项目管理平台。在8.9版本后添加的“导出、导入项目”功能,因为没有处理好压缩包中的软连接,已登录用户可以利用这个功能读取服务器上的任意文件。 环境运行后,访问http://your-ip:8080即可查看GitLab主页࿰…...

【爬虫】web自动化和接口自动化
专栏文章索引:爬虫 目录 一、介绍 二、推荐 1.接口自动化 2.Web自动化 一、介绍 爬虫技术一般可以分为两种类型:接口自动化和web自动化。下面是它们的简要介绍: 1.接口自动化 接口自动化技术的主要目的是通过模拟HTTP请求来实现自动化…...

哔哩哔哩后端Java一面
前言 作者:晓宜 个人简介:互联网大厂Java准入职,阿里云专家博主,csdn后端优质创作者,算法爱好者 最近各大公司的春招和实习招聘都开始了,这里分享下去年面试B站的的一些问题,希望对大家有所帮助…...

避坑指南:STM32 DAC输出缓冲到底开不开?实测对比0V精度与驱动能力
STM32 DAC输出缓冲配置实战:精度与驱动能力的深度权衡 在嵌入式系统设计中,数字模拟转换器(DAC)的性能直接影响着模拟信号输出的质量。许多工程师在使用STM32的DAC功能时,往往忽略了一个关键配置项——输出缓冲&#x…...

【逆向工程】从源码编译到实战:定制Unity 2022 Mono调试DLL的完整避坑指南
1. 为什么需要定制可调试的Mono DLL 逆向分析Unity游戏时,最让人头疼的就是遇到新版Unity引擎编译的游戏。官方dnSpy-Unity-mono仓库提供的可调试DLL通常只覆盖到2019版本,而2020之后的版本就需要我们自己动手编译了。这就像给你一把锁却没有钥匙&#x…...

除了ST-Link,J-Link怎么给STM32解锁?再聊聊SRAM调试这个‘曲线救国’的骚操作
解锁STM32的多元方案:从J-Link操作到SRAM调试的黑科技 最近在调试STM32时遇到Flash Timeout报错?别急着找ST-Link,其实J-Link同样能胜任解锁任务。更妙的是,我们还可以利用SRAM调试这个鲜为人知的技巧来"曲线救国"。本文…...

nSkinz皮肤修改器:如何在CS:GO中免费自定义武器外观的完整指南
nSkinz皮肤修改器:如何在CS:GO中免费自定义武器外观的完整指南 【免费下载链接】nSkinz Skin changer for CS:GO 项目地址: https://gitcode.com/gh_mirrors/ns/nSkinz 你是否想在CS:GO中体验各种炫酷的武器皮肤,但又不想花费大量金钱?…...

AnimateDiff文生视频优化技巧:提升生成质量,让动态效果更自然
AnimateDiff文生视频优化技巧:提升生成质量,让动态效果更自然 1. 引言:为什么需要优化AnimateDiff生成效果 AnimateDiff作为基于Stable Diffusion的视频生成工具,能够直接将文字描述转化为动态视频。但在实际使用中,…...

威纶通TK6071iQ触摸屏宏指令实战:手把手教你搞定Modbus温湿度传感器数据转换
威纶通TK6071iQ触摸屏宏指令实战:手把手教你搞定Modbus温湿度传感器数据转换 在工业自动化领域,威纶通TK6071iQ触摸屏因其稳定性和易用性广受青睐。但当它与Modbus温湿度传感器配合使用时,许多工程师都会遇到一个棘手问题——如何将传感器返回…...

5分钟极速拯救:m4s视频转换工具让你的B站缓存重获新生
5分钟极速拯救:m4s视频转换工具让你的B站缓存重获新生 【免费下载链接】m4s-converter 一个跨平台小工具,将bilibili缓存的m4s格式音视频文件合并成mp4 项目地址: https://gitcode.com/gh_mirrors/m4/m4s-converter 你是否曾眼睁睁看着B站收藏的视…...

SVG路径编辑器终极指南:3分钟掌握可视化SVG路径编辑技巧
SVG路径编辑器终极指南:3分钟掌握可视化SVG路径编辑技巧 【免费下载链接】svg-path-editor Online editor to create and manipulate SVG paths 项目地址: https://gitcode.com/gh_mirrors/sv/svg-path-editor SVG路径编辑器是一款功能强大的在线SVG路径编辑…...

TrollInstallerX终极指南:3分钟在iOS 14-16.6.1上安装TrollStore的完整教程
TrollInstallerX终极指南:3分钟在iOS 14-16.6.1上安装TrollStore的完整教程 【免费下载链接】TrollInstallerX A TrollStore installer for iOS 14.0 - 16.6.1 项目地址: https://gitcode.com/gh_mirrors/tr/TrollInstallerX 你是否还在为iOS设备上无法自由安…...

小白也能玩转电影特效:ANIMATEDIFF PRO快速制作慢动作诗意镜头
小白也能玩转电影特效:ANIMATEDIFF PRO快速制作慢动作诗意镜头 1. 为什么选择ANIMATEDIFF PRO制作电影特效? 1.1 传统电影特效制作的门槛 过去想要制作专业级的电影特效,你需要面对三重障碍: 硬件门槛:需要价值数万…...