SpringBoot3整合Elasticsearch8.x之全面保姆级教程
整合ES
环境准备
- 安装配置
ES:https://blog.csdn.net/qq_50864152/article/details/136724528 - 安装配置
Kibana:https://blog.csdn.net/qq_50864152/article/details/136727707 - 新建项目:新建名为
web的SpringBoot3项目
elasticsearch-java
公共配置
- 介绍:一个开源的高扩展的分布式全文检索引擎,可以近乎实时的存储 和检索数据
- 依赖:
web模块引入elasticsearch-java依赖---但其版本必须与你下载的ES的版本一致
<!-- 若不存在Spring Data ES的某个版本支持你下的ES版本,则使用  -->
<!-- ES 官方提供的在JAVA环境使用的依赖 -->
<dependency><groupId>co.elastic.clients</groupId><artifactId>elasticsearch-java</artifactId><version>8.11.1</version>
</dependency><!-- 和第一个依赖是一起的,为了解决springboot项目的兼容性问题  -->
<dependency><groupId>com.fasterxml.jackson.core</groupId><artifactId>jackson-databind</artifactId>
</dependency>
- 配置:
web模块dev目录application-dal添加
使用
open+@Value("${elasticsearch.open}")的方式不能放到Nacos配置中心
# elasticsearch配置
elasticsearch:# 自定义属性---设置是否开启ES,false表不开窍ESopen: true# es集群名称,如果下载es设置了集群名称,则使用配置的集群名称clusterName: eshosts: 127.0.0.1:9200# es 请求方式scheme: http# es 连接超时时间connectTimeOut: 1000# es socket 连接超时时间socketTimeOut: 30000# es 请求超时时间connectionRequestTimeOut: 500# es 最大连接数maxConnectNum: 100# es 每个路由的最大连接数maxConnectNumPerRoute: 100
- 配置:
web模块config包下新建ElasticSearchConfig类
package cn.bytewisehub.pai.web.config;import co.elastic.clients.elasticsearch.ElasticsearchClient;
import co.elastic.clients.json.jackson.JacksonJsonpMapper;
import co.elastic.clients.transport.ElasticsearchTransport;
import co.elastic.clients.transport.rest_client.RestClientTransport;
import lombok.Data;
import lombok.extern.slf4j.Slf4j;
import org.apache.http.HttpHost;
import org.apache.http.auth.AuthScope;
import org.apache.http.auth.UsernamePasswordCredentials;
import org.apache.http.client.CredentialsProvider;
import org.apache.http.impl.client.BasicCredentialsProvider;
import org.elasticsearch.client.RestClient;
import org.elasticsearch.client.RestClientBuilder;
import org.springframework.boot.context.properties.ConfigurationProperties;
import org.springframework.context.annotation.Bean;
import org.springframework.context.annotation.Configuration;@Slf4j
@Data
@Configuration
@ConfigurationProperties(prefix = "elasticsearch")
public class ElasticSearchConfig {// 是否开启ESprivate Boolean open;// es 集群host ip 地址private String hosts;// es用户名private String userName;// es密码private String password;// es 请求方式private String scheme;// es集群名称private String clusterName;// es 连接超时时间private int connectTimeOut;// es socket 连接超时时间private int socketTimeOut;// es 请求超时时间private int connectionRequestTimeOut;// es 最大连接数private int maxConnectNum;// es 每个路由的最大连接数private int maxConnectNumPerRoute;// es api keyprivate String apiKey;public RestClientBuilder creatBaseConfBuilder(String scheme){// 1. 单节点ES Host获取String host = hosts.split(":")[0];String port = hosts.split(":")[1];// The value of the schemes attribute used by noSafeRestClient() is http// but The value of the schemes attribute used by safeRestClient() is httpsHttpHost httpHost = new HttpHost(host, Integer.parseInt(port),scheme);// 2. 创建构建器对象//RestClientBuilder: ES客户端库的构建器接口,用于构建RestClient实例;允许你配置与Elasticsearch集群的连接,设置请求超时,设置身份验证,配置代理等RestClientBuilder builder = RestClient.builder(httpHost);// 连接延时配置builder.setRequestConfigCallback(requestConfigBuilder -> {requestConfigBuilder.setConnectTimeout(connectTimeOut);requestConfigBuilder.setSocketTimeout(socketTimeOut);requestConfigBuilder.setConnectionRequestTimeout(connectionRequestTimeOut);return requestConfigBuilder;});// 3. HttpClient 连接数配置builder.setHttpClientConfigCallback(httpClientBuilder -> {httpClientBuilder.setMaxConnTotal(maxConnectNum);httpClientBuilder.setMaxConnPerRoute(maxConnectNumPerRoute);return httpClientBuilder;});return builder;}
}
- 测试:
web模块test目录下新建ElasticSearchTest类
@Slf4j
@SpringBootTest
public class ElasticSearchTest {@Value("${elasticsearch.open}")// 是否开启ES,默认开启String open = "true";
}
直接连接ES
- 设置:
ESElasticsearch.yml的xpack.security.enabled属性设置为false
xpack.security.enabled:
● 默认true:必须使用账号连接ES
● 若为false:必须使用http://localhost:9200/访问ES服务+启动Kibana服务会失败+不需要使用账号连接,但必须使用HTTP连接
- 添加:
ElasticSearchConfig类添加下列方法
/**
* @function: 创建使用http连接来直接连接ES服务器的客户端
* 如果@Bean没有指定bean的名称,那么这个bean的名称就是方法名
*/
@Bean(name = "directConnectionESClient")
public ElasticsearchClient directConnectionESClient(){RestClientBuilder builder = creatBaseConfBuilder((scheme == "http")?"http":"http");//Create the transport with a Jackson mapperElasticsearchTransport transport = new RestClientTransport(builder.build(), new JacksonJsonpMapper());//And create the API clientElasticsearchClient esClient = new ElasticsearchClient(transport);return esClient;
};
- 添加:
ElasticSearchTest类中添加下列代码---索引名必须小写 - 运行:设置跳过测试
--->手动运行/不跳过--->直接install,但不运行测试
@Resource(name = "directConnectionESClient")
ElasticsearchClient directConnectionESClient;@Test
public void directConnectionTest() throws IOException {if (open.equals("true")) {//创建索引CreateIndexResponse response = directConnectionESClient.indices().create(c -> c.index("direct_connection_index"));log.info(response.toString());
}
else{log.info("es is closed");
}
}
账号密码连接ES
- 设置:
ESElasticsearch.yml的xpack.security.enabled属性使用默认值+xpack.security.http.ssl.enabled设置为false
注意:若
xpack.security.enabled属性为false,则xpack.security.http.ssl.enabled属性不生效,即相当于设置为false;所有以xpack开头的属性都不会生效
ESElasticsearch.yml的xpack.security.http.ssl.enabled:
● 默认true:必须使用https://localhost:9200/访问ES服务+启动Kibana服务会成功+需要使用账号连接+必须使用HTTPS连接
● 若为false:必须使用http://localhost:9200/访问ES服务+启动Kibana服务会失败+需要使用账号连接,但必须使用HTTP连接
- 配置:
dev目录application-dal中添加下列配置
# elasticsearch配置
elasticsearch:userName:  #自己的账号名password:  #自己的密码
- 添加:
ElasticSearchTest类中添加下列代码---索引名必须小写+不能有空格 - 运行:设置跳过测试
--->手动运行/不跳过--->直接install,但不运行测试
@Resource(name = "accountConnectionESClient")
ElasticsearchClient accountConnectionESClient;@Test
public void accountConnectionTest() throws IOException {if (open.equals("true")) {//创建索引CreateIndexResponse response = accountConnectionESClient.indices().create(c -> c.index("account_connection_index"));log.info(response.toString());
}
else{log.info("es is closed");
}
}
证书账号连接ES
- 设置:
ESElasticsearch.yml的xpack.security.enabled和xpack.security.http.ssl.enabled配置项使用默认值
设置为
true后,ES就走https,若scheme为http,则报UnrecognizedSSLmessage错误
- 配置:将
dev目录application-dal中elasticsearch.scheme配置项改成https - 证书添加:终端输入
keytool -importcert -alias es_https_ca -keystore "D:\computelTool\Java\JDK\JDK21\lib\security\cacerts" -file "D:\computelTool\database\elasticsearch8111\config\certs\http_ca.crt"
keytool -delete -alias es_https_ca -keystore "D:\computelTool\Java\JDK\JDK21\lib\security\cacerts"---与上面的命令相反
- 拷贝:将
ESconfig目录下certs目录下的http_ca.crt文件拷贝到web模块resource目录 - 添加:
ElasticSearchConfig类添加下列方法
/**
* @function: 创建用于安全连接(证书 + 账号)ES服务器的客户端
* 如果@Bean没有指定bean的名称,那么这个bean的名称就是方法名
*/
@Bean(name = "accountAndCertificateConnectionESClient")
public ElasticsearchClient accountAndCertificateConnectionESClient() {RestClientBuilder builder = creatBaseConfBuilder( (scheme == "https")?"https":"https");// 1.账号密码的配置//CredentialsProvider: 用于提供 HTTP 身份验证凭据的接口; 允许你配置用户名和密码,以便在与服务器建立连接时进行身份验证CredentialsProvider credentialsProvider = new BasicCredentialsProvider();credentialsProvider.setCredentials(AuthScope.ANY, new UsernamePasswordCredentials(userName, password));// 2.设置自签证书,并且还包含了账号密码builder.setHttpClientConfigCallback(httpAsyncClientBuilder -> httpAsyncClientBuilder.setSSLContext(buildSSLContext()).setSSLHostnameVerifier(NoopHostnameVerifier.INSTANCE).setDefaultCredentialsProvider(credentialsProvider));RestClientTransport transport = new RestClientTransport(builder.build(), new JacksonJsonpMapper());//And create the API clientElasticsearchClient esClient = new ElasticsearchClient(transport);return esClient;
}private static SSLContext buildSSLContext() {// 读取http_ca.crt证书ClassPathResource resource = new ClassPathResource("http_ca.crt");SSLContext sslContext = null;try {// 证书工厂CertificateFactory factory = CertificateFactory.getInstance("X.509");Certificate trustedCa;try (InputStream is = resource.getInputStream()) {trustedCa = factory.generateCertificate(is);}// 密钥库KeyStore trustStore = KeyStore.getInstance("pkcs12");trustStore.load(null, "liuxiansheng".toCharArray());trustStore.setCertificateEntry("ca", trustedCa);SSLContextBuilder sslContextBuilder = SSLContexts.custom().loadTrustMaterial(trustStore, null);sslContext = sslContextBuilder.build();} catch (CertificateException | IOException | KeyStoreException | NoSuchAlgorithmException |KeyManagementException e) {log.error("ES连接认证失败", e);}return sslContext;
}- 测试:
ElasticSearchTest类添加
@Resource(name = "accountAndCertificateConnectionESClient")
ElasticsearchClient accountAndCertificateConnectionESClient;@Test
public void  accountAndCertificateConnectionTest() throws IOException {if (open.equals("true")) {//创建索引CreateIndexResponse response =  accountAndCertificateConnectionESClient.indices().create(c -> c.index("account_and_certificate_connection_index"));log.info(response.toString());System.out.println(response.toString());
}
else{log.info("es is closed");
}
}
Spring Data ES
公共配置
- 依赖:
web模块引入该依赖---但其版本必须与你下载的ES的版本一致
版本:点击
https://spring.io/projects/spring-data-elasticsearch#learn,点击GA版本的Reference Doc,点击version查看Spring Data ES与ES版本的支持关系
参考:
https://www.yuque.com/itwanger/vn4p17/wslq2t/https://blog.csdn.net/qq_40885085/article/details/105023026
<!-- 若存在Spring Data ES的某个版本支持你下的ES版本,则使用  -->
<!-- Spring官方在ES官方提供的JAVA环境使用的依赖的基础上做了封装 -->
<dependency><groupId>org.springframework.boot</groupId><artifactId>spring-boot-starter-data-elasticsearch</artifactId>
</dependency><!-- ESTestEntity用到 -->
<dependency><groupId>jakarta.servlet</groupId><artifactId>jakarta.servlet-api</artifactId><version>6.0.0</version><scope>provided</scope>
</dependency><!-- ESTestEntity用到 -->
<dependency><groupId>org.projectlombok</groupId><artifactId>lombok</artifactId><scope>provided</scope><!--provided:指定该依赖项在编译时是必需的,才会生效, 但在运行时不需要,也不会生效--><!--这样 Lombok 会在编译期静悄悄地将带 Lombok 注解的源码文件正确编译为完整的 class 文件 -->
</dependency>
- 新建:
web模块TestEntity目录新建ESTestEntity
@Data
@EqualsAndHashCode(callSuper = false)
@Document(indexName = "test")
public class ESTestEntity implements Serializable {private static final long serialVersionUID = 1L;@Idprivate Long id;@Field(type = FieldType.Text, analyzer = "ik_max_word")private String content;private String title;private String excerpt;
}
- 新建:
web模块TestRepository包下新建ESTestRepository接口
import cn.bytewisehub.pai.web.TestEntity.ESTestEntity;
import org.springframework.data.domain.Page;
import org.springframework.data.domain.Pageable;
import org.springframework.data.elasticsearch.repository.ElasticsearchRepository;public interface ESTestRepository extends ElasticsearchRepository<ESTestEntity, Long> {
}
直接连接ES
- 配置:
ESElasticsearch.yml的xpack.security.enabled属性设置为false
xpack.security.enabled:
● 默认true:必须使用账号连接ES
● 若为false:必须使用http://localhost:9200/访问ES服务+启动Kibana服务会失败+不需要使用账号连接,但必须使用HTTP连接
- 配置:
web模块dev目录application-dal添加
spring:elasticsearch:uris:- http://127.0.0.1:9200
- 新建:
web模块test目录新建ElasticsearchTemplateTest
import cn.bytewisehub.pai.web.TestEntity.ESTestEntity;
import cn.bytewisehub.pai.web.TestRepository.ESTestRepository;
import org.junit.jupiter.api.Test;
import org.springframework.beans.factory.annotation.Autowired;
import org.springframework.boot.test.context.SpringBootTest;
import org.springframework.data.elasticsearch.client.elc.ElasticsearchTemplate;@SpringBootTest
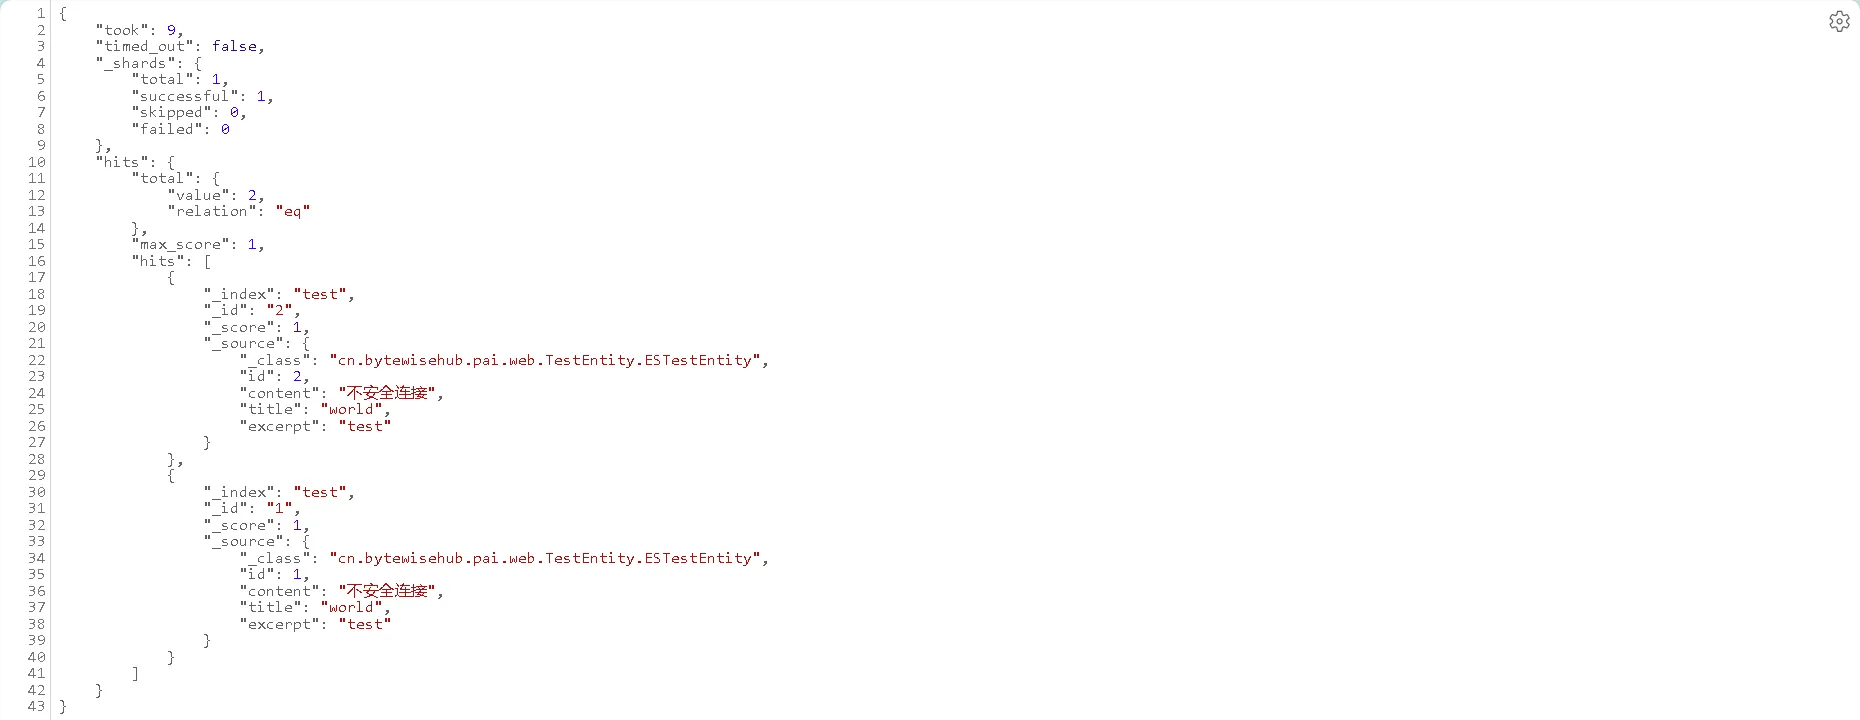
public class ElasticsearchTemplateTest {@AutowiredESTestRepository esTestRepository;@AutowiredElasticsearchTemplate elasticsearchTemplate;@Testvoid save() {ESTestEntity esTestEntity = new ESTestEntity();esTestEntity.setId(1L);esTestEntity.setContent("不安全连接");esTestEntity.setTitle("world");esTestEntity.setExcerpt("test");System.out.println(elasticsearchTemplate.save(esTestEntity));}@Testvoid insert() {ESTestEntity esTestEntity = new ESTestEntity();esTestEntity.setId(2L);esTestEntity.setContent("不安全连接");esTestEntity.setTitle("world");esTestEntity.setExcerpt("test");System.out.println(esTestRepository.save(esTestEntity));}
}
- 访问:点击
http://localhost:9200/test/_search---查询索引库test
HTTP连接ES
- 配置:
ESElasticsearch.yml的xpack.security.enabled属性使用默认值+xpack.security.http.ssl.enabled设置为false
ESElasticsearch.yml的xpack.security.http.ssl.enabled:
● 默认true:必须使用https://localhost:9200/访问ES服务+启动Kibana服务会成功+需要使用账号连接+必须使用HTTPS连接
● 若为false:必须使用http://localhost:9200/访问ES服务+启动Kibana服务会失败+需要使用账号连接,但必须使用HTTP连接
- 配置:
web模块dev目录application-dal添加
spring:elasticsearch:uris:- http://127.0.0.1:9200username: # 账号用户名password: #账号密码
- 修改:
web模块test目录下ElasticsearchTemplateTest修改成这样,其他参见直接连接
import cn.bytewisehub.pai.web.TestEntity.ESTestEntity;
import cn.bytewisehub.pai.web.TestRepository.ESTestRepository;
import org.junit.jupiter.api.Test;
import org.springframework.beans.factory.annotation.Autowired;
import org.springframework.boot.test.context.SpringBootTest;
import org.springframework.data.elasticsearch.client.elc.ElasticsearchTemplate;@SpringBootTest
public class ElasticsearchTemplateTest {@AutowiredESTestRepository esTestRepository;@AutowiredElasticsearchTemplate elasticsearchTemplate;@Testvoid save() {ESTestEntity esTestEntity = new ESTestEntity();esTestEntity.setId(1L);esTestEntity.setContent("不安全连接");esTestEntity.setTitle("world");esTestEntity.setExcerpt("test");System.out.println(elasticsearchTemplate.save(esTestEntity));}@Testvoid insert() {ESTestEntity esTestEntity = new ESTestEntity();esTestEntity.setId(2L);esTestEntity.setContent("不安全连接");esTestEntity.setTitle("world");esTestEntity.setExcerpt("test");System.out.println(esTestRepository.save(esTestEntity));}
}
- 访问:点击
http://localhost:9200/test/_search---查询索引库test
HTTPS连接ES
- 配置:
ESElasticsearch.yml的xpack.security.enabled和xpack.security.http.ssl.enabled属性使用默认值 - 配置:
web模块dev目录application-dal添加
spring:elasticsearch:uris:- https://127.0.0.1:9200username: # 账号用户名password: #账号密码
- 修改:
web模块test目录下ElasticsearchTemplateTest修改成这样,其他参见直接连接
import cn.bytewisehub.pai.web.TestEntity.ESTestEntity;
import cn.bytewisehub.pai.web.TestRepository.ESTestRepository;
import org.junit.jupiter.api.Test;
import org.springframework.beans.factory.annotation.Autowired;
import org.springframework.boot.test.context.SpringBootTest;
import org.springframework.data.elasticsearch.client.elc.ElasticsearchTemplate;@SpringBootTest
public class ElasticsearchTemplateTest {@AutowiredESTestRepository esTestRepository;@AutowiredElasticsearchTemplate elasticsearchTemplate;@Testvoid save() {ESTestEntity esTestEntity = new ESTestEntity();esTestEntity.setId(1L);esTestEntity.setContent("不安全连接");esTestEntity.setTitle("world");esTestEntity.setExcerpt("test");System.out.println(elasticsearchTemplate.save(esTestEntity));}@Testvoid insert() {ESTestEntity esTestEntity = new ESTestEntity();esTestEntity.setId(2L);esTestEntity.setContent("不安全连接");esTestEntity.setTitle("world");esTestEntity.setExcerpt("test");System.out.println(esTestRepository.save(esTestEntity));}
}
- 访问:点击
http://localhost:9200/test/_search---查询索引库test
相关文章:
SpringBoot3整合Elasticsearch8.x之全面保姆级教程
整合ES 环境准备 安装配置ES:https://blog.csdn.net/qq_50864152/article/details/136724528安装配置Kibana:https://blog.csdn.net/qq_50864152/article/details/136727707新建项目:新建名为web的SpringBoot3项目 elasticsearch-java 公…...
微信小程序云开发教程——墨刀原型工具入门(表单组件)
引言 作为一个小白,小北要怎么在短时间内快速学会微信小程序原型设计? “时间紧,任务重”,这意味着学习时必须把握微信小程序原型设计中的重点、难点,而非面面俱到。 要在短时间内理解、掌握一个工具的使用…...

JMeter 批量接口测试
一、背景 最近在进行某中台的接口测试准备,发现接口数量非常多,有6、70个,而且每个接口都有大量的参数并且需要进行各种参数验证来测试接口是否能够正确返回响应值。想了几种方案后,决定尝试使用JMeter的csv读取来实现批量的接口…...

软件游戏缺失unityplayer.dll怎么办,教程5种解决方法
unityplayer.dll是Unity游戏引擎的重要动态链接库文件,它的缺失将直接导致基于该引擎开发的游戏无法正常启动或运行。玩家可能会在尝试打开游戏会提示诸如“找不到unityplayer.dll”或“dll文件丢失”的错误提示,从而无法体验游戏内容。这个问题通常是由…...
Redis相关操作大全一篇全搞定
Redis是单线程吗? Redis 的单线程主要是指 Redis 的网络 10 和键值对读写是由一个线程来完成的,这也是 Redis 对外提供键值存储服务的主要流程。但Redis 的其他功能,比如持久化、异步删除、集群数据同步等,其实是由额外的线程执行的。 Redi…...

排序算法:归并排序(递归)
文章目录 一、归并排序的思路二、代码编写 先赞后看,养成习惯!!!^ _ ^<3 ❤️ ❤️ ❤️ 码字不易,大家的支持就是我坚持下去的动力。点赞后不要忘了关注我哦! 所属专栏:排序算法 一、归并排序的思路 单…...

武汉星起航领航中国跨境电商,助推全球贸易新篇章
在全球经济一体化的浪潮中,跨境电商以其独特的优势成为推动国际贸易增长的重要引擎。作为中国跨境电商行业的领军者,武汉星起航电子商务有限公司以其卓越的能力和经验,正积极推动中国跨境电商走向世界,书写全球贸易的新篇章。 自…...

七、Java中SpringBoot组件集成接入【Minio文件服务器】
七、Java中SpringBoot组件集成接入【Minio文件服务器】 1.Minio介绍2.搭建Minio服务2.1Windows部署2.2Linux部署2.3docker部署 3.Minio可视化操作4.SpringBoot接入Minio1.添加maven依赖2.yaml配置文件3.配置类4.工具类5.控制类 5.常见问题6.其他参考文章 1.Minio介绍 对象存储…...

使用Pygame做一个乒乓球游戏
项目介绍 使用Pygame做一个乒乓球游戏。左侧为电脑,右侧为玩家。 视频地址-YT 视频搬运-B站 视频教程约90分钟。 代码地址 环境:需要pygame库,可用pip安装:pip install pygame 1. 基础版本 首先进行一些初始化,初始…...
力扣---完全平方数
思路: 还是比较好想的,g[i]定义为和为 i 的完全平方数的最少数量。那么递推关系式是g[i]min(g[i-1],g[i-4],g[i-9],...)1,数组初始化是g[0]0,g[1]1。注意这里要对g[0]初始化,(举个例子)因为在遍历到g[4]时&…...

接口测试、postman、测试点提取【主】
接口测试是测试系统组件间接口的一种测试 接口测试主要用于检测外部系统与系统之间以及内部各个子系统之间的交互点 测试的重点是要检查数据的交换,传递和控制管理过程,以及系统间的相互逻辑依赖关系 文章目录 HTTP接口 & Web Service接口RESTful接口…...
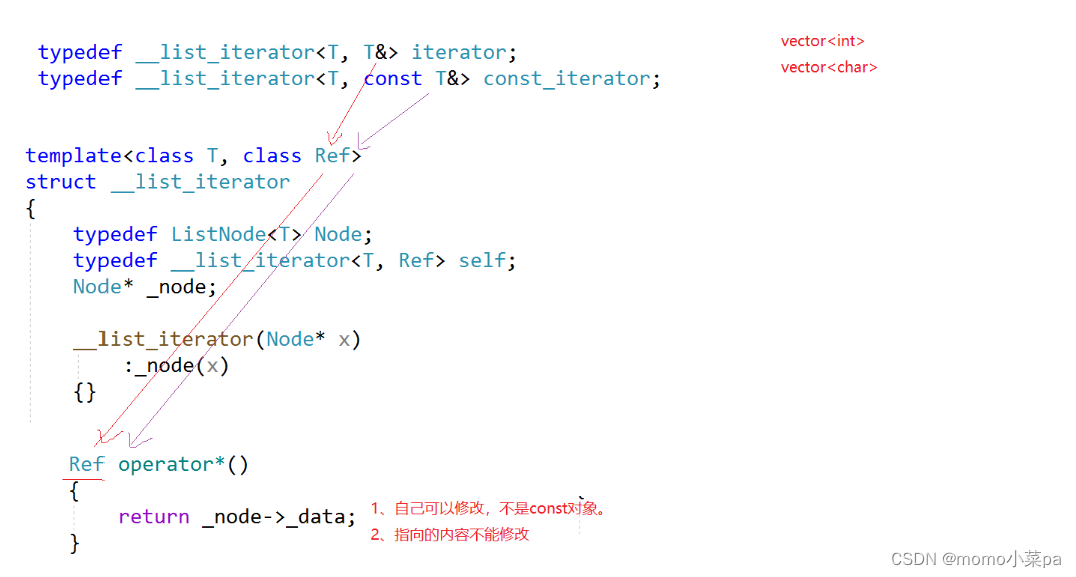
C++ list详解及模拟实现
目录 本节目标 1. list的介绍及使用 1.2 list的使用 2.list的模拟实现 1.对list进行初步的实现 2.头插和任意位置的插入 3.pos节点的删除,头删,尾删 4.销毁list和析构函数 5.const迭代器 6.拷贝构造和赋值操作 3.完整代码 本节目标 1. list的…...
【tls招新web部分题解】
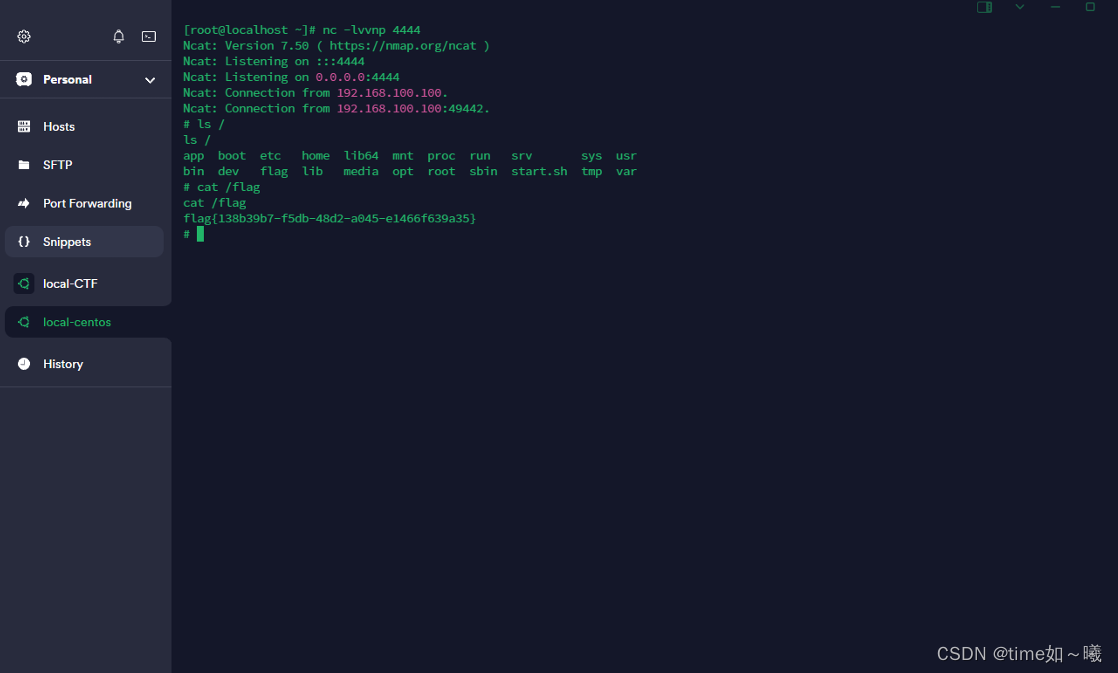
emowebshell (php7.4.21版本漏洞) 非预期 题目提示webshell,就直接尝试一下常见的后门命名的规则 如 shell.php这里运气比较好,可以直接shell.php就出来 要是不想这样尝试的话,也可以直接dirsearch进行目录爆破 然后在phpinfo中直接搜素c…...

力扣热门算法题 52. N 皇后 II,53. 最大子数组和,54. 螺旋矩阵
52. N 皇后 II,53. 最大子数组和,54. 螺旋矩阵,每题做详细思路梳理,配套Python&Java双语代码, 2024.03.20 可通过leetcode所有测试用例。 目录 52. N 皇后 II 解题思路 完整代码 Python Java 53. 最大子数组…...

【OpenVINO】解决OpenVINO在GPU推理中报错的方法
1. 问题描述 使用OpenVINO进行深度学习推理时,通常会借助GPU以提升计算速度。然而,有时候运行程序时候会出现如下错误: <kernel>:8153:2: error: expected identifier or (unroll_for (int i 0; i < TILE_SIZE; i) {^ <kernel…...

AES加密的中文乱码与Java默认编码
0. 背景 win11环境下 java8 idea 开发的项目接口有加密需求,暂时使用AES完成,AES工具类代码如下 public static String aesEncrypt(String content, String key) throws Exception {//指定加密算法Cipher cipher Cipher.getInstance("AES");//创建加密规则&#…...
浏览器和服务器)
Node.js笔记 (二)浏览器和服务器
Ajax Ajax是什么 全称:Asynchronous Javascript And Xml. 用javascript执行异步网络请求,可以说是定义了一种编程行为/习惯。 通信双方:浏览器 和 服务器 特点:异步,所以可以在异步请求服务器,在不刷新页…...

面试经典-32-判断子序列
题目 给定字符串 s 和 t ,判断 s 是否为 t 的子序列。 字符串的一个子序列是原始字符串删除一些(也可以不删除)字符而不改变剩余字符相对位置形成的新字符串。(例如,"ace"是"abcde"的一个子序列…...

windows使用知识
提示:文章写完后,目录可以自动生成,如何生成可参考右边的帮助文档 文章目录 前言windows使用知识 一、cmd鼠标选中后,程序不运行的解决方案总结 前言 提示:这里可以添加本文要记录的大概内容: windows使用…...

用python如何实现智能合约?如何使用remix编写solidity智能合约并部署上链
目录 用python如何实现智能合约? 直接展示下成功界面 下面分步骤说: remix代码 python链接remix代码...
 显卡排行榜 天梯图)
top50 BF16算力(TFLOPS) 显卡排行榜 天梯图
排名显卡型号BF16算力(TFLOPS)售价(元)单TFLOPS价格(元)1B200(SXM)45002200000488.892H200(SXM)19801200000606.063MI300X1307750000573.834H100 SXM519501100000564.105RTX PRO 6000 Blackwell1150780000678.266H100 PCIe 80GB1560850000544.877RTX 50906803400050.008A100 80…...

诚信标签工厂端解决方案 适配俄标 CRPT 体系一体化技术方案
俄罗斯诚实标签依托 CRPT 体系执行强制管控,各类出口货品必须完成 Data Matrix 编码采集、格式转换、多层包装数据绑定,数据合规后方可通关流通。美妆食品、日化建材、玩具五金等品类包装形态差异较大,人工采集方式普遍存在识别精度不足、批量…...

网易云音乐NCM转MP3终极指南:ncmdump工具完整使用教程
网易云音乐NCM转MP3终极指南:ncmdump工具完整使用教程 【免费下载链接】ncmdump 项目地址: https://gitcode.com/gh_mirrors/ncmd/ncmdump 你是否曾经从网易云音乐下载了心爱的歌曲,却发现只能在特定播放器上收听?NCM格式的限制让音乐…...

从多路复用到三维光阵:Arduino驱动8x8x8 LED立方体全解析
1. 项目概述:用Arduino点亮一个三维世界几年前,我第一次在创客展上看到一个8x8x8的LED立方体,那种由数百个光点构成的、在三维空间中流动的动画效果,瞬间就把我吸引住了。它不像普通的平面LED屏,而是真正有“深度”的光…...

关联规则挖掘在Calabi-Yau流形Hodge数分析中的应用与复现
1. 项目概述:当数据挖掘遇见高维几何在理论物理和代数几何的交叉领域,Calabi-Yau流形一直扮演着核心角色。这些具有特殊拓扑结构的空间,不仅是弦理论中额外维度紧化的关键候选者,其本身丰富的数学性质也吸引着无数研究者。然而&am…...

Sora 2 MOV导出画质崩坏真相:HDR10元数据丢失、BT.2020色域截断、帧率标志位误写——3大隐性缺陷紧急修复方案
更多请点击: https://intelliparadigm.com 第一章:Sora 2 MOV导出画质崩坏的系统性认知 Sora 2 在生成高保真视频后,导出为 MOV 格式时频繁出现色度抽样失真、动态范围压缩、帧间伪影加剧等现象,其本质并非单一环节失效ÿ…...
)
Postgresql基础实践教程(九)
⭐️⭐️⭐️⭐️⭐️ 完整数据详见 练习数据免费 ⭐️⭐️⭐️⭐️⭐️ 七十二、WITH查询(公用表表达式CTE) 1. SELECT 中的 WITH 2. 递归查询 3. 公用表表达式的物化 4. WITH中的数据修改语句 WITH提供了一种在主查询中写辅助语句的方法。这些语…...

JWT弱密钥爆破实战:从HS256签名原理到CTF权限提升
1. 这不是密码学考试,而是一场“密钥猜谜”实战JWT(JSON Web Token)在现代Web系统中早已不是可选项,而是默认配置。登录成功后返回一串形如eyJhbGciOiJIUzI1NiIsInR5cCI6IkpXVCJ9.eyJ1c2VyX2lkIjoxMjMsIm5hbWUiOiLnlKjliYkiLCJpYX…...

如何快速定制Office界面:终极开源工具使用指南
如何快速定制Office界面:终极开源工具使用指南 【免费下载链接】office-ribbonx-editor An overhauled fork of the original Custom UI Editor for Microsoft Office, built with WPF 项目地址: https://gitcode.com/gh_mirrors/of/office-ribbonx-editor O…...
)
DeepSeek安全测试辅助Prompt工程白皮书(含17个CVE靶场验证指令模板)
更多请点击: https://intelliparadigm.com 第一章:DeepSeek安全测试辅助 DeepSeek系列大模型在代码生成、漏洞模式识别与安全上下文理解方面展现出独特优势,可作为安全测试工程师的智能协作者。其对OWASP Top 10、CWE分类体系及常见PoC结构具…...