分享react+three.js展示温湿度采集终端
前言
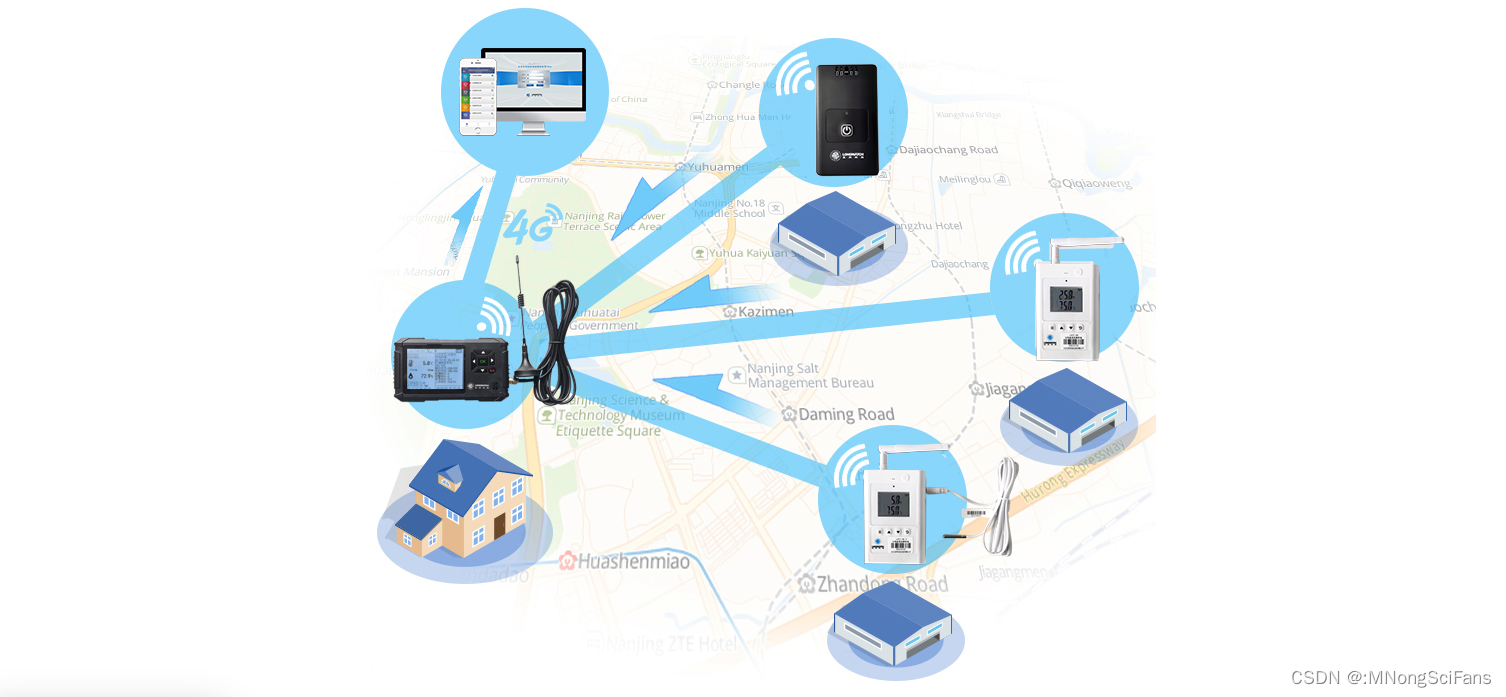
气象站将采集到的相关气象数据通过GPRS/3G/4G无线网络发送到气象站监测中心,摆脱了地理空间的限制。
前端:气象站主机将采集好的气象数据存储到本地,通过RS485等线路与GPRS/3G/4G无线设备相连。
通信:GPRS/3G/4G无线设备通过互联网与物联网云平台相连,气象站有计划的将收集到的气象信息通过无线设备发送到监控数据中心。
后台:气象监控中心通过互联网实现了对前端所有的自动气象站数据的采集和整合。
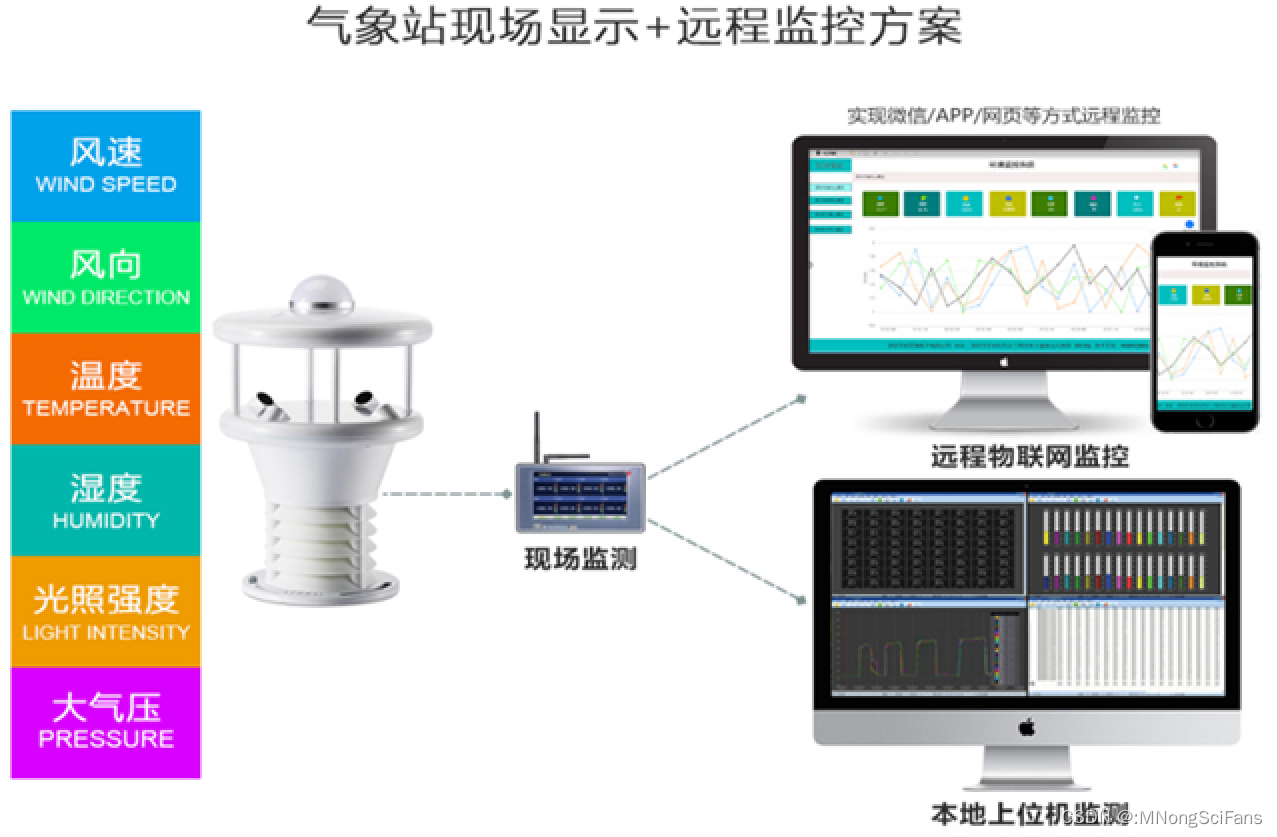
1、摆脱了地理空间的限制,可以在有无线信号的任何地方架设自动气象站点。
2、高规格工业级无线通信设备,有力的保证了气象数据的稳定可靠。
3、体积小巧、安装方便,使得现场安装调试人员轻松高效。
4、费用低廉,降低了运用成本。
温度、湿度等环境数据整合,趋势模拟。
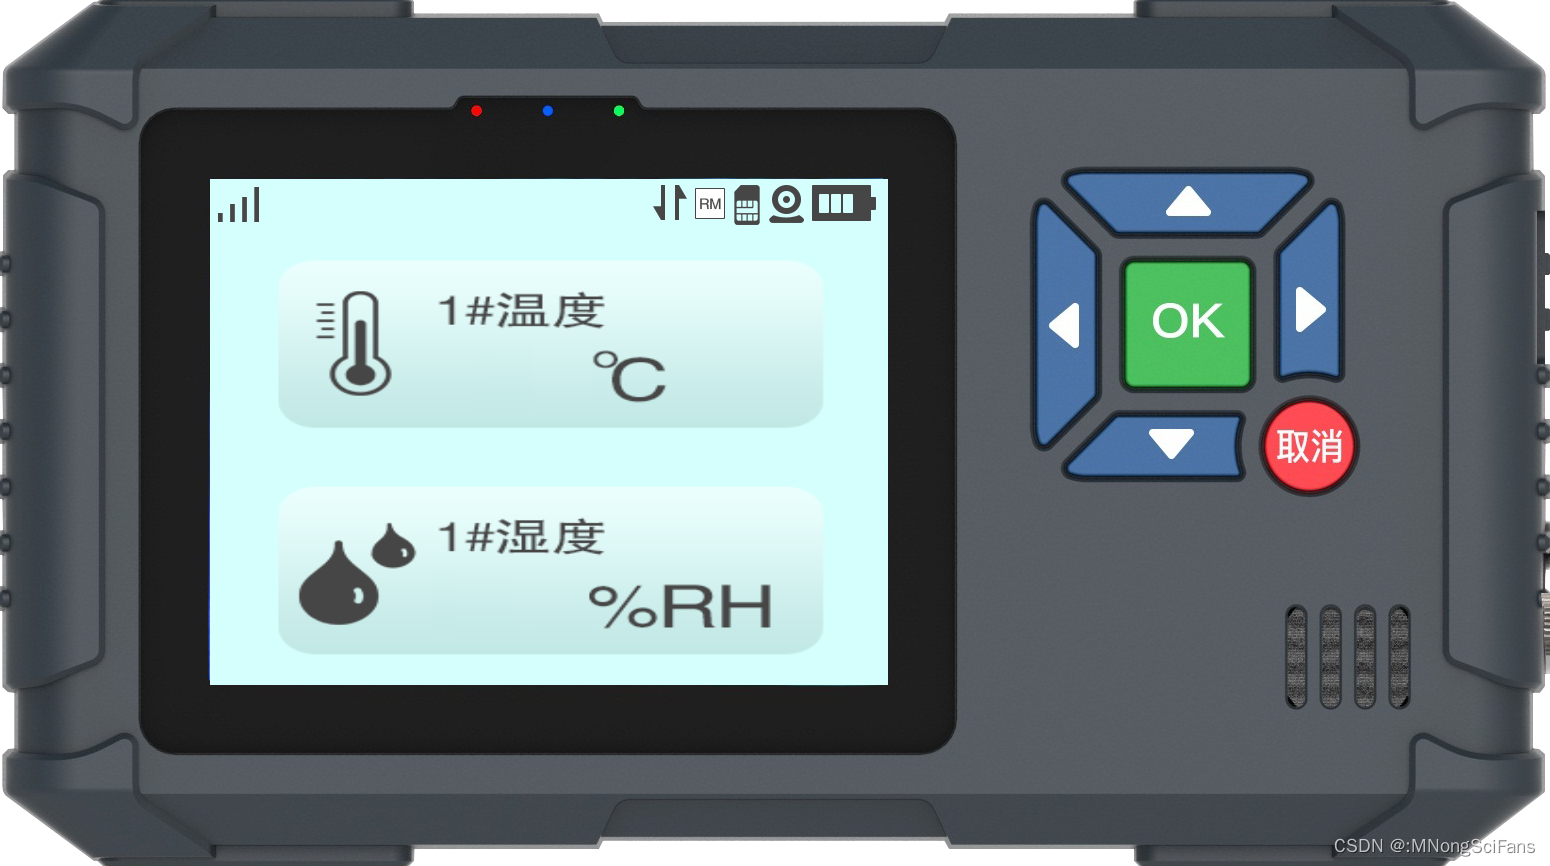
温湿度采集终端

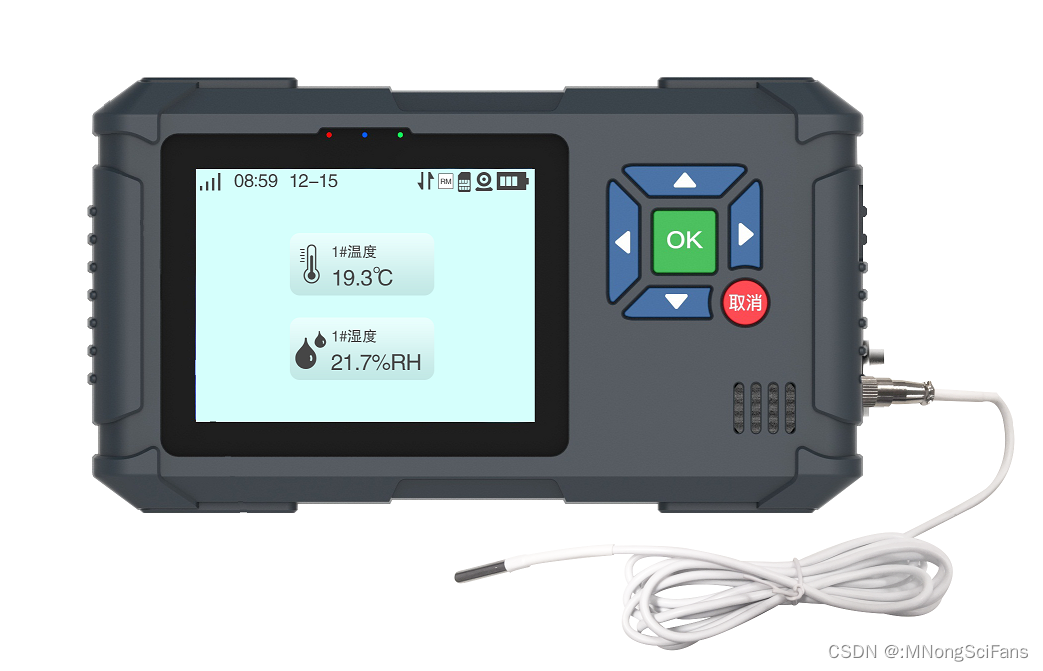

Pt100 就是说它的阻值在 0 度时为 100 欧姆, PT100 温度传感器。是一种以铂(Pt) 作成的电阻式温度传感器,属于正电阻系数, 其电阻和温度变化的关系式如下: R=Ro(1+α T)。广泛应用于实验室及工业环境。
技术参数
存储温度:-10 ~ +55 °C、湿度 0~85%RH
测量精度:温度: ±0.5°C ~ ±0.7°C
显示分辨率: 0.1 C
记录时间间隔:2秒~24小时
存储:数据存储量 65000组数据
电池电量:电池类型 1颗 2600mA 18650锂电池
电池寿命:3 年(测量速率在10秒/刷新 300秒/记录)
尺寸:135mm×125mm×36mm
材料/外壳: ABS工程塑料
PLC版


web简版
react+three.js,无三维建模软件,web三维展现温湿度采集器


应用程序的模块化理念,使用模块来构建你的代码。通过将实现隐藏在一个简单的接口后面,您可以使您的应用程序万无一失且易于使用。它只做它应该做的,没有别的。 通过隐藏实现,我们对使用我们代码的人实施了良好的编码风格。您可以访问的实现越多,它就越有可能成为您以后必须处理的复杂的半生不熟的“修复”。创建3D场景时,唯一的限制是您的想象力 - 以及您的技术知识深度。要点是如何描述3D空间的坐标系和用于在坐标系内移动对象。场景图是一种用于描述构成我们场景的对象层次结构的结构,向量是用于描述3D空间中的位置(以及许多其他事物) ,还有不少于两种描述旋转的方式:欧拉角Euler angles和四元数quaternions。

依赖
"react": "^18.2.0",
"three": "^0.162.0",
app.tsx
import React, { useEffect, useRef, useState } from 'react'
import './App.css';
import { World } from './World/World.js';interface appProps {style?: Record<string, unknown>;[key: string]: unknown;
}function App(props: appProps) {const { style, ...pros} = props;const renderRef = useRef(null);let  world: World;useEffect(() => {// eslint-disable-next-line @typescript-eslint/strict-boolean-expressionsif (renderRef && renderRef.current) {// Get a reference to the container element//const container = document.querySelector('#scene-container');//const container = document.getElementById('scene-container')// 1. Create an instance of the World app//world = new World(container);world = new World(renderRef.current);// 2. Render the scene// start the animation loopworld.start();}const timer = setInterval(() => {if(isAutoRotate){world.start();world.tick();}else{world.stop();}}, 1);return () => {cancelAnimationFrame(1);clearInterval(timer);};}, [renderRef])return (<div className="App"><header className="header"></header><main><div id="scene-container" ref={renderRef} style={{ position: 'relative', width: '100%', height: 'calc( 100vh - 100px )', ...style }} {...pros}></div></main><footer style={ { background: 'skyblue', height: '30px' }}></footer></div>)
}export default App;
world.js
/* eslint-disable no-undef */
/* eslint-disable @typescript-eslint/strict-boolean-expressions */
/** @Date: 2024-03-21 14:57:52* @LastEditors: david* @LastEditTime: 2024-03-21 17:04:01* @FilePath: .\src\components\World.js* @Description: 创建三维场景单例*/
import { createCamera } from '../components/camera.js';
import { createCube } from '../components/cube.js';
import { createScene } from '../components/scene.js';
import { createControls } from '../components/controls.js';
import { createLights } from '../components/lights.js';import { createRenderer } from '../systems/renderer.js';
import { Resizer } from '../systems/Resizer.js';
import { Loop } from '../systems/Loop.js';// These variables are module-scoped: we cannot access them
// from outside the module 将相机、渲染器和场景创建为模块作用域变量
let camera;
let scene;
let light;
let renderer;
let controls;
let loop;
// 温湿度采集器
import { changeMaterial, updateData } from '../components/canvasTexture.js'/*** @description: 初始化三维场景 容器* @param {string} container - 三维场景挂载的div容器* @return {*}*/
class World {// 1. Create an instance of the World appconstructor(container) {// 首次使用构造器实例if (!(World.instance instanceof World)) {// 初始化相机camera = createCamera();// 初始化场景scene = createScene();// 初始化灯光light = createLights({directionX: 30,directionY: 10,directionZ: 0.5});model.scene.add(...light);// 初始化渲染器renderer = createRenderer();renderer.setSize(container.clientWidth, container.clientHeight);// Type: Element | Stringcontainer.appendChild(renderer.domElement);// container.innerHTML = null;loop = new Loop(camera, model.scene, renderer);// 初始化控制器controls = createControls(camera,renderer)//loop.updatables.push(controls);// 添加模型const cube = createCube();scene.add(cube);const  collectorCube = changeMaterial();// async await Promise resole reject Promise.all 解决异步加载模型和贴图collectorCube.then((res) => {scene.add(res);//loop.updatables.push(res);}).catch(err => {console.log('温湿度采集器添加失败:'+err)})// stop the cube's animationloop.updatables.push(cube);controls.addEventListener('change', () => {this.render();});const resizer = new Resizer(container, camera, renderer);resizer.onResize = () => {this.render();};this.render();this.animate();// 将this挂载到World这个类的instance属性上World.instance = this}return World.instance}// 2. Render the scenerender() {// draw a single frameif ((Boolean(renderer)) && (Boolean(scene)) && (Boolean(camera))) {renderer.render(scene, camera);}}animate(){try{// eslint-disable-next-line no-undef//requestAnimationFrame(this.animate);requestAnimationFrame(this.animate.bind(this));TWEEN.update();//更新控制器this.render()} catch (error) {// eslint-disable-next-line @typescript-eslint/strict-boolean-expressionsconsole.log(`Failed to add world imagery: ${error}`);}// eslint-disable-next-line @typescript-eslint/strict-boolean-expressionsif (controls) {controls.update();}}
}export { World };
camera.js
import { PerspectiveCamera, MathUtils } from 'three';function createCamera() {const camera = new PerspectiveCamera(45, // fov = Field Of View1, // aspect ratio (dummy value)0.1, // near clipping plane10000, // far clipping plane);// move the camera back so we can view the scene// camera.position.set(0, 0, 30);const layoutWidth = 25;const angle = camera.fov / 2;  // 夹角const rad = MathUtils.degToRad(angle);  // 转为弧度值const cameraZ = layoutWidth / 2 / Math.tan(rad);// 调整相机的 Z 轴位置,使桌台元素完整显示到场景camera.position.set(0, 15, cameraZ);return camera;
}export { createCamera };
scene.js
import { Color, Scene, Fog } from 'three';function createScene() {const scene = new Scene();scene.background = new Color(0xe6f4ff);scene.fog = new Fog( 0xa0a0a0, 5, 250 );return scene;
}export { createScene };
controls.js
import { OrbitControls } from "three/examples/jsm/controls/OrbitControls";
function createControls ( Camera, renderer ) {// 轨道控制器const controls  = new OrbitControls(Camera, renderer.domElement);//设置控制器的中心点controls.target.set(0, 10, 0);const distanceZ = Camera.position.z;// 如果使用animate方法时,将此函数删除//controls.addEventListener( 'change', render );// 使动画循环使用时阻尼或自转 意思是否有惯性controls.enableDamping = false;//动态阻尼系数 就是鼠标拖拽旋转灵敏度// 阻尼系数controls.dampingFactor = 0.1;controls.minPolarAngle = Math.PI / 12;controls.maxPolarAngle = (Math.PI * 19) / 40;//是否可以缩放controls.enableZoom = true;//是否自动旋转controls.autoRotate = true;controls.autoRotateSpeed = 0.5;//设置相机距离原点的最远距离//controls.minDistance = 10;//设置相机距离原点的最远距离//controls.maxDistance = 200;controls.minDistance = distanceZ / 10;  // 相机离目标点的最小距离(放大)controls.maxDistance = distanceZ * 10;  // 相机离目标点的最大距离(缩小)//是否开启右键拖拽controls.enablePan = true;controls.tick = () => controls.update();return controls;
}export { createControls };
lights.js
import { HemisphereLight, AmbientLight, DirectionalLight, DirectionalLightHelper, SpotLight, SpotLightHelper } from 'three';function createLights({ directionX, directionY, directionZ }) {const hemisphere = new HemisphereLight(0xffffff, 0xffffff, 0.6);// move the light right, up, and towards ushemisphere.position.set(10, 10, 10);const ambient = new AmbientLight(0xffffff, 1); // 环境光const spot = new SpotLight(0xfdf4d5);spot.position.set(5, directionY * 4, 0);spot.angle = Math.PI / 2;spot.power = 2000;// eslint-disable-next-line @typescript-eslint/no-unused-varsconst spotLightHelper = new SpotLightHelper(spot, 0x00f);const direct = new DirectionalLight(0xffffff, 3); // 平行光direct.position.set(-directionX / 3, directionY * 4, directionZ * 1.5);direct.castShadow = true;direct.shadow.camera.left = -directionX;direct.shadow.camera.right = directionX;direct.shadow.camera.top = directionZ;direct.shadow.camera.bottom = -directionZ;// eslint-disable-next-line @typescript-eslint/no-unused-varsconst directLightHelper = new DirectionalLightHelper(direct, 1, 0xf00);return [hemisphere, ambient, spot, direct];}export { createLights };cube.js
import { BoxGeometry, Mesh, //MeshBasicMaterial, MeshStandardMaterial, MathUtils  } from 'three';
function createCube() {// create a geometryconst geometry = new BoxGeometry(1, 1, 1);// create a default (white) Basic material// const material = new MeshBasicMaterial();// Switch the old "basic" material to// a physically correct "standard" materialconst spec = {color: 'purple',}const material = new MeshStandardMaterial(spec);// create a Mesh containing the geometry and materialconst cube = new Mesh(geometry, material);cube.position.set(0, 10, 0);// cube.rotation.set(-0.5, -0.1, 0.8);const radiansPerSecond = MathUtils.degToRad(30);// this method will be called once per framecube.tick = (delta) => {// increase the cube's rotation each framecube.rotation.z += radiansPerSecond * delta;cube.rotation.x += radiansPerSecond * delta;cube.rotation.y += radiansPerSecond * delta;};return cube;
}export { createCube };
loop.js
import { Clock } from "three";
const clock = new Clock();class Loop {constructor(camera, scene, renderer) {this.camera = camera;this.scene = scene;this.renderer = renderer;// somewhere in the Loop class:this.updatables = []}start() {this.renderer.setAnimationLoop(() => {// tell every animated object to tick forward one frame// this.tick();// render a framethis.renderer.render(this.scene, this.camera);});}stop() {this.renderer.setAnimationLoop(null);}tick(){// only call the getDelta function once per frame!const delta = clock.getDelta();// console.log(//   `The last frame rendered in ${delta * 1000} milliseconds`,// );// eslint-disable-next-line @typescript-eslint/strict-boolean-expressionsif(this.updatables.length){for (const object of this.updatables) {if(typeof object.tick == 'function'){object.tick(delta);}}}}
}export { Loop };
renderer.js
import { WebGLRenderer, PCFSoftShadowMap } from 'three';function createRenderer() {const renderer = new WebGLRenderer({ alpha: true, // 透明度antialias: true // 开启抗锯齿});// turn on the physically correct lighting modelrenderer.physicallyCorrectLights = true;renderer.shadowMap.enabled = true;renderer.shadowMap.type = PCFSoftShadowMap;renderer.setClearColor('#f8f8f6', 1);// eslint-disable-next-line no-undefrenderer.setPixelRatio(window.devicePixelRatio);return renderer;
}export { createRenderer };
resizer.js
const setSize = (container, camera, renderer) => {// Set the camera's aspect ratiocamera.aspect = container.clientWidth / container.clientHeight;// update the camera's frustumcamera.updateProjectionMatrix();// update the size of the renderer AND the canvasrenderer.setSize(container.clientWidth, container.clientHeight);// set the pixel ratio (for mobile devices)// eslint-disable-next-line no-undefrenderer.setPixelRatio(window.devicePixelRatio);
};class Resizer {constructor(container, camera, renderer) {// set initial size on loadsetSize(container, camera, renderer);// eslint-disable-next-line no-undefwindow.addEventListener("resize", () => {// set the size again if a resize occurssetSize(container, camera, renderer);// perform any custom actionsthis.onResize();});}// 空方法, 我们可以从Resizer类的外部自定义。// eslint-disable-next-line @typescript-eslint/no-empty-functiononResize() {}}export { Resizer };
canvasTexture.js
/* eslint-disable no-undef */
/* eslint-disable @typescript-eslint/strict-boolean-expressions */
import { CanvasTexture, MeshLambertMaterial, BoxGeometry, Mesh,    } from 'three';
import moment from 'moment';
import collectorImg from '../assets/images/collector.png';
const meshcolor = 0xa1a5a9;
let cube;
let timeNow = new Date().valueOf();
let time = { hum: 40.0, tep: 20.0 };// 方法二:放大画布之后,需要把每一个绘制的 api 都乘以 dpr
// * 这样一来使用的时候就会很麻烦,所以我们需要把所有的绘制操作进行统一封装
// 可以参考这个库:https://github.com/jondavidjohn/hidpi-canvas-polyfill,不过这个库也不是所有 api 都覆盖
const adaptDPR = (canvas)=> { // 在初始化 canvas 的时候就要调用该方法const context = canvas.getContext('2d');const devicePixelRatio = window.devicePixelRatio || 1;const backingStoreRatio = context.webkitBackingStorePixelRatio ||context.mozBackingStorePixelRatio ||context.msBackingStorePixelRatio ||context.oBackingStorePixelRatio ||context.backingStorePixelRatio || 1;const ratiodpr = devicePixelRatio / backingStoreRatio;const { width, height } = canvas;// 重新设置 canvas 自身宽高大小和 css 大小。放大 canvas;css 保持不变,因为我们需要那么多的点// upscale the canvas if the two ratios don't matchif (devicePixelRatio !== backingStoreRatio) {canvas.width = width * ratiodpr;canvas.height = height * ratiodpr;canvas.style.width = width + 'px';canvas.style.height = height + 'px';// 注意这里没有用 scale// now scale the context to counter// the fact that we've manually scaled// our canvas element 通过backing store的像素比例和设备像素比(dpr)来控制你的图片和canvas是保证图片质量和清晰的保证。context.scale(ratiodpr, ratiodpr);}
}
// 每个涉及绘制的 api 时都乘以 dpr
// 获取带数据的canvas
const getTextCanvas = async ({ tep, hum }) => {const time = moment().format('HH:mm:ss');const width = 310, height = 173;const canvas = document.createElement('canvas');canvas.width = width;canvas.height = height;adaptDPR(canvas);const ctx = canvas.getContext('2d');return new Promise((resole) => {if (ctx) {const img = new Image();img.src = collectorImg;//图片加载完后,将其显示在canvas中img.onload = () => {ctx.drawImage(img, 0, 0, width, height);ctx.font = 18 + 'px " bold';ctx.fillStyle = '#333';ctx.textAlign = 'center';ctx.textBaseline = 'middle';// 实时温度ctx.fillText(tep, width * 0.33, height * 0.44);// 实时湿度ctx.fillText(hum, width * 0.33, height * 0.70);// 数据采集时间ctx.font = 10 + 'px " bold';ctx.fillText(time, width * 0.24 , height * 0.245);resole(canvas);};}});
}// 改变材质种类
const changeMaterial = async () => {const canvas = await getTextCanvas({ hum: 40, tep: 20 });if (canvas) {const texture = new CanvasTexture(canvas);const materials = [new MeshLambertMaterial({ color: meshcolor, opacity: 1, transparent: true }),new MeshLambertMaterial({ color: meshcolor, opacity: 1, transparent: true }),new MeshLambertMaterial({ color: meshcolor, opacity: 1, transparent: true }),new MeshLambertMaterial({ color: meshcolor, opacity: 1, transparent: true }),new MeshLambertMaterial({color: meshcolor,opacity: 1,transparent: true,map: texture,}),new MeshLambertMaterial({ color: meshcolor, opacity: 1, transparent: true }),];const geometry = new BoxGeometry(8.404, 6.16, 1);cube = new Mesh(geometry, materials);cube.position.set(0, 15, 0);//scene.add(cube);return cube;}
}const updateData = async () => {if (new Date().valueOf() - timeNow > 500) {timeNow = new Date().valueOf();changeValues();}const canvas = await getTextCanvas(time);if (canvas && cube) {cube.material[4].map = new CanvasTexture(canvas);cube.material.map.needsUpdate = true;}
}// 更新time数据
const changeValues = () => {const hum = parseFloat((39 + Math.random() * 10).toFixed(1));const tep = parseFloat((19 + Math.random() * 5).toFixed(1));setTime({ hum: hum, tep: tep})
}const setTime = (date)=>{time = date
}export {changeMaterial,updateData
}
采集器正面贴图,空出需要动态渲染的时间、温度、湿度,采集器用用最简单的长方形盒子代替。
index.tsx
import React from 'react';
import ReactDOM from 'react-dom/client';
import './index.css';
import App from './App';const root = ReactDOM.createRoot(document.getElementById('root') as HTMLElement
);root.render(<React.StrictMode><App /></React.StrictMode>
);
index.html
<!DOCTYPE html>
<html lang="zh-CN"><head><meta charset="utf-8" /><meta name="viewport" content="width=device-width, initial-scale=1" /><meta name="theme-color" content="#000000" /><meta http-equiv="X-UA-Compatible" content="IE=edge"><meta name="renderer" content="webkit"><meta name="force-rendering" content="webkit"><meta name="google-site-verification" content="FTeR0c8arOPKh8c5DYh_9uu98_zJbaWw53J-Sch9MTg"><meta data-rh="true" name="keywords" content="React three.js World示例"><meta data-rh="true" name="description" content="React three.js World示例"><meta data-rh="true" property="og:title" content="React three.js World示例"><link rel="icon" href="./favicon.ico"><title>React three.js World示例</title></head><body><div id="root"></div></body>
</html>
相关文章:
分享react+three.js展示温湿度采集终端
前言 气象站将采集到的相关气象数据通过GPRS/3G/4G无线网络发送到气象站监测中心,摆脱了地理空间的限制。 前端:气象站主机将采集好的气象数据存储到本地,通过RS485等线路与GPRS/3G/4G无线设备相连。 通信:GPRS/3G/4G无线设备通…...
易宝OA ExecuteSqlForDataSet SQL注入漏洞复现
0x01 产品简介 易宝OA系统是一种专门为企业和机构的日常办公工作提供服务的综合性软件平台,具有信息管理、 流程管理 、知识管理(档案和业务管理)、协同办公等多种功能。 0x02 漏洞概述 易宝OA ExecuteSqlForDataSet接口处存在SQL注入漏洞,未经身份认证的攻击者可以通过…...

C++语言学习(二)——⭐缺省参数、函数重载、引用
1.⭐缺省参数 (1)缺省参数概念 缺省参数是声明或定义函数时为函数的参数指定一个缺省值。在调用该函数时,如果没有指定实参则采用该形参的缺省值,否则使用指定的实参。 void Func(int a 0) {cout<<a<<endl; } int…...
qt通过setProperty设置样式表笔记
在一个pushbutton里面嵌套两个label即可,左侧放置图片label,右侧放置文字label,就如上图所示; 但是这时的hover,press的伪状态是没有办法“传递”给里面的控件的,对btn的伪状态样式表的设置,是不…...
)
Sora文本生成视频(附免费的专属提示词)
sora-时髦女郎 bike_1 Sara-潮汐波浪 Sora是一个由OpenAI出品的文本生成视频工具,已官方发布了生成视频的样式,视频的提示词是:A时髦的女人走在充满温暖霓虹灯的东京街道上动画城市标牌。她穿着黑色皮夹克、红色长裙和黑色靴子,拎着黑色钱包。她穿着太阳镜和红色唇膏。她走…...
Flask Python:数据库多条件查询,flask中模型关联
前言 在上一篇Flask Python:模糊查询filter和filter_by,数据库多条件查询中,已经分享了几种常用的数据库操作,这次就来看看模型的关联关系是怎么定义的,先说基础的关联哈。在分享之前,先分享官方文档,点击查看 从文档…...

Spring Security 实现后台切换用户
Spring Security version 后端代码: /*** author Jerry* date 2024-03-28 17:47* spring security 切换账号*/RestController RequiredArgsConstructor RequestMapping("api/admin") public class AccountSwitchController {private final UserDetailsSe…...
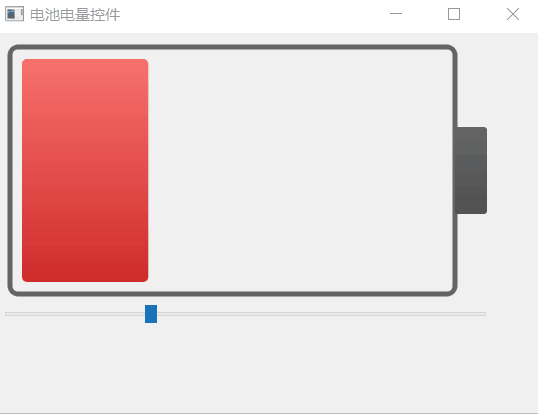
《QT实用小工具·一》电池电量组件
1、概述 项目源码放在文章末尾 本项目实现了一个电池电量控件,包含如下功能: 可设置电池电量,动态切换电池电量变化。可设置电池电量警戒值。可设置电池电量正常颜色和报警颜色。可设置边框渐变颜色。可设置电量变化时每次移动的步长。可设置…...
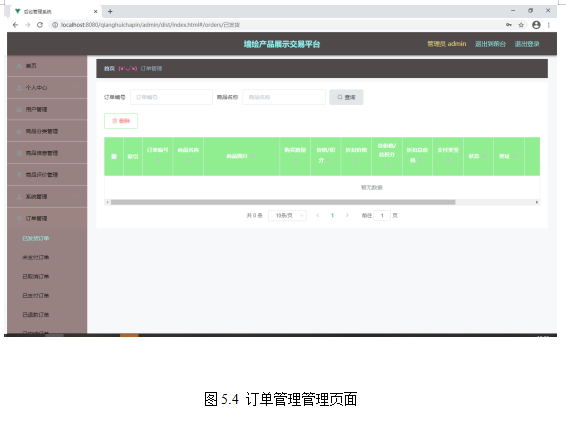
基于springboot实现墙绘产品展示交易平台管理系统项目【项目源码+论文说明】计算机毕业设计
基于springboot实现墙绘产品展示交易平台管理系统演示 摘要 现代经济快节奏发展以及不断完善升级的信息化技术,让传统数据信息的管理升级为软件存储,归纳,集中处理数据信息的管理方式。本墙绘产品展示交易平台就是在这样的大环境下诞生&…...

主流公链文章整理
主流公链文章整理 分类文章地址🍉BTC什么是比特币🥭BTCBTC网络是如何运行的🍑BTC一文搞懂BTC私钥,公钥,地址🥕ETH什么是以太坊🌶️基础知识BTC网络 vs ETH网络🥜CosmosCosmos介绍&a…...
css3之3D转换transform
css3之3D转换 一.特点二.坐标系三.3D移动(translate3d)1.概念2.透视(perpective)(近大远小)(写在父盒子上) 四.3D旋转(rotate3d)1.概念2.左手准则3.呈现(transfrom-style)(写父级盒子…...
SpringBoot -- 外部化配置
我们如果要对普通程序的jar包更改配置,那么我们需要对jar包解压,并在其中的配置文件中更改配置参数,然后再打包并重新运行。可以看到过程比较繁琐,SpringBoot也注意到了这个问题,其可以通过外部配置文件更新配置。 我…...

优酷动漫顶梁柱!神话大乱炖的修仙番为何火爆?
优酷动漫新晋顶梁柱,实时超160万在追的修仙番长啥样? 由优酷动漫联合玄机科技打造的《师兄啊师兄》俨然成为了国漫界一颗璀璨的新星。自去年开播以来热度口碑双丰收,今年在播的第二季人气更是节节攀升,稳坐优酷动漫榜第一把交椅。…...

每日一题:C语言经典例题之判断实数相等
题目: 从键盘输入两个正实数,位数不超过200,试判断这两个实数是否完全相等。注意输入的实数整数部分可能有前导0,小数部分可能有末尾0。 输入 输入两个正实数a和b。 输出 如果两个实数相等,则输出Yes,…...
【算法每日一练]-数论(保姆级教程 篇1 埃氏筛,欧拉筛)
目录 保证给你讲透讲懂 第一种:埃氏筛法 第二种:欧拉筛法 题目:质数率 题目:不喜欢的数 思路: 问题:1~n 中筛选出所有素数(质数) 有两种经典的时间复杂度较低的筛法࿰…...
【剑指offr--C/C++】JZ59 滑动窗口的最大值
一、题目 二、思路及代码 暴力解法是依次往后滑动一位,然后比较窗口内的值。 我这里考虑:窗口每次往后移动一位,那么如果当前窗口的最大值max在窗口内部,那么再滑动到下一个窗口的时候,窗口内只有最新进来的一个元素没…...

RabbitMQ Tutorial
参考API : Overview (RabbitMQ Java Client 5.20.0 API) 参考文档: RabbitMQ: One broker to queue them all | RabbitMQ 目录 结构 Hello World consumer producer 创建连接API解析 创建连接工厂 生产者生产消息 消费者消费消息 队列声明 工作队列Work Queues 公平…...
如何对Webpack进行优化
目录 1.优化-提取css代码 1.1. 插件 mini-css-extract-plugin 1.2. 步骤: 1.3. 注意 1.4. 好处 1.5. 练习 2. 优化-css代码提取后压缩 2.1. 问题引入 2.2. 解决 2.3. 步骤 3. Webpack打包less代码 3.1. 加载器 less-loader 3.2. 步骤 3.3. 注意…...
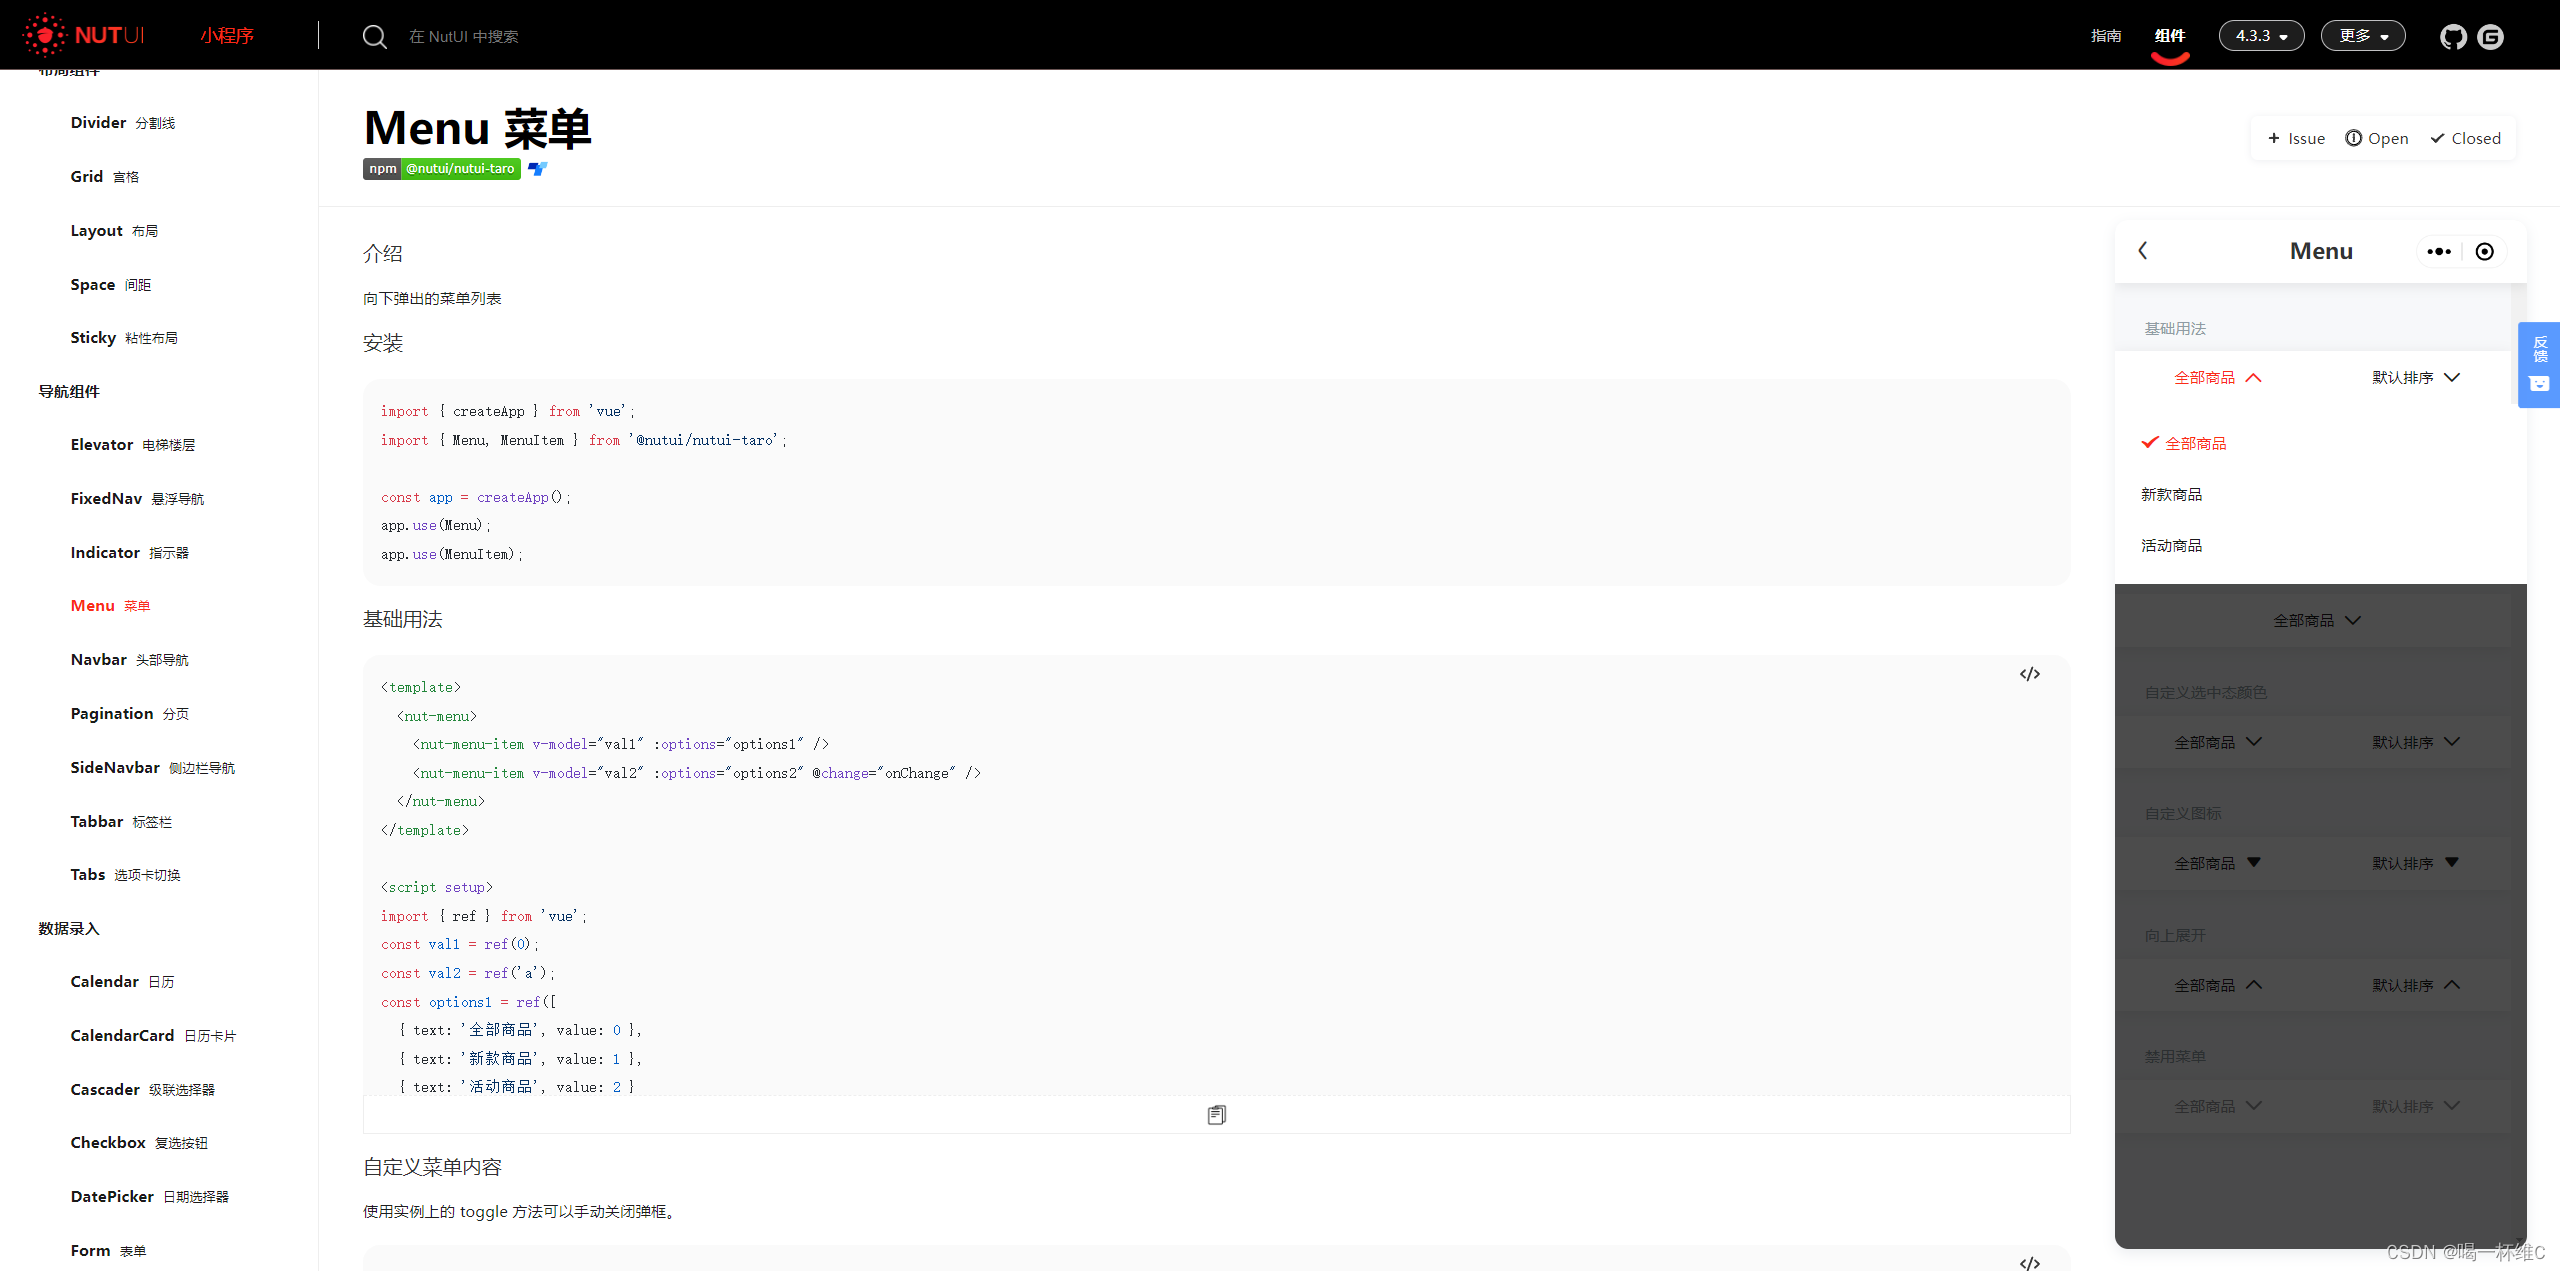
nut-ui中的menu 菜单组件的二次封装
这个菜单组件 一般可以直接用到项目里 如果复用性不强的话 直接使用 但是有一个问题 如果很多地方都需要用到这个组件 我们可以把这个组件二次封装一下 <template><div class"cinema-search-filter-component"><nut-menu><template #icon>&…...
序列)
python笔记(11)序列
Python中的“序列”是一个广义术语,用于描述一种特定的数据结构,它具备以下共同特征: 有序性:序列中的元素按照特定的顺序排列,每个元素在序列中都有一个确定的位置,即索引。 索引访问:通过索引…...

GitHub中文化插件完整指南:3分钟让GitHub界面变中文的终极方案
GitHub中文化插件完整指南:3分钟让GitHub界面变中文的终极方案 【免费下载链接】github-chinese GitHub 汉化插件,GitHub 中文化界面。 (GitHub Translation To Chinese) 项目地址: https://gitcode.com/gh_mirrors/gi/github-chinese 还在为GitH…...

使用Curxy代理连接Cursor编辑器与本地Ollama大模型
1. 项目概述:为什么我们需要一个本地AI代理 如果你和我一样,是个重度依赖Cursor这类AI驱动的代码编辑器来提高生产力的开发者,那你肯定遇到过这个痛点:想用自己本地部署的、性能强大的Ollama模型,却发现Cursor编辑器死…...

LaTeX公式一键转Word:告别繁琐复制,提升学术写作效率
LaTeX公式一键转Word:告别繁琐复制,提升学术写作效率 【免费下载链接】LaTeX2Word-Equation Copy LaTeX Equations as Word Equations, a Chrome Extension 项目地址: https://gitcode.com/gh_mirrors/la/LaTeX2Word-Equation 还在为将网页上的数…...

ViGEmBus虚拟游戏控制器驱动终极指南:Windows内核级游戏手柄模拟深度解析
ViGEmBus虚拟游戏控制器驱动终极指南:Windows内核级游戏手柄模拟深度解析 【免费下载链接】ViGEmBus Windows kernel-mode driver emulating well-known USB game controllers. 项目地址: https://gitcode.com/gh_mirrors/vi/ViGEmBus 在Windows游戏开发与输…...

从 CDS 到服务契约,读懂 ABAP Cloud 的 Model-Driven Architecture
很多做 RAP 的同学,在 ADT 里第一次同时创建 CDS view entity、behavior definition、service definition、service binding 的时候,直觉往往是,为什么对象一下子变这么多。等项目真正推进到发票、销售订单、主数据维护、审批动作、事件集成这些场景,就会慢慢体会到,这套做…...

历史周期律的动力学本质:集体意识场视角下的文明演进规律
引言 历史周期律——王朝兴替、文明盛衰、社会变革的波浪式重复——是人类文明最令人困惑又最无法回避的现象。从司马迁的“天下大势,分久必合,合久必分”,到汤因比的文明挑战-回应理论,无数先贤试图揭示这一规律的底层逻辑。然而…...

[Deep Agents:LangChain的Agent Harness-07]利用PatchToolCallsMiddleware修复错乱的消息结构
作为LLM提示词的一个重要组成部分,表示对话历史的消息列表在结构上有一个基本的要求:如果LLM返回的AIMessage包含ToolCall对象,那么Agent会期望每个ToolCall对象都有对应的ToolMessage。但是Agent在执行过程会因为一些异常导致LLM返回的AIMes…...

独立开发者如何用AI验证创业点子:15分钟完成市场分析与风险评估
1. 项目概述:一个为独立开发者打造的AI创业点子验证伙伴如果你和我一样,是个喜欢自己动手鼓捣点东西的独立开发者,那你肯定也经历过这个阶段:脑子里冒出一个自认为绝妙的点子,兴奋地花上几周甚至几个月把它做出来&…...

终极django-htmx性能优化指南:如何减少网络请求并提升用户体验 [特殊字符]
终极django-htmx性能优化指南:如何减少网络请求并提升用户体验 🚀 【免费下载链接】django-htmx Extensions for using Django with htmx. 项目地址: https://gitcode.com/gh_mirrors/dj/django-htmx django-htmx是连接Django框架与现代前端交互库…...
)
奇点大会「隐形议程」住宿推荐:主办方未公布的3家闭门交流友好型酒店(含私密会议室共享权限与静音舱预约入口)
更多请点击: https://intelliparadigm.com 第一章:奇点智能技术大会周边酒店推荐 参会者抵达主办城市后,便捷、稳定且具备基础协作设施的住宿环境至关重要。以下推荐均基于步行至主会场(国家人工智能创新中心)≤15分钟…...