一、next-auth 身份验证凭据-使用电子邮件和密码注册登录
一、next-auth 身份验证凭据-使用电子邮件和密码注册登录
文章目录
- 一、next-auth 身份验证凭据-使用电子邮件和密码注册登录
- 一、前言
- 二、前置准备
- 1、环境配置
- 2、相关库安装
- (1)vercel 配置
- (2)Yarn 包管理配置
- 3、next项目初始化与创建
- 三、具体实现
- 1、github 仓库创建与链接
- 2、Vercel项目链接Vercel账户并部署
- (1)项目上传vercel
- (2)项目创建并链接postgre 数据库
- (3)本地化项目链接数据库准备
- 3、登录页面与注册页面的前端
- (1)登录页面
- (1)注册页面
- (1)register 页面
- 四、数据库交互
- 1、数据库创建
- 2、vercel项目链接数据库并插入
- (1)vercel postgre准备
- (2) 项目注册并写sql插入数据库
- (3) 项目查询sql数据库并登录
- 五、状态增加
- 1、查询到登录之后登录自动跳转状态增加
- 2、登出与登录状态转换
- 3、重定向
- 4、root保护
- 5、root保护登录页面转为自定义登录页面
一、前言
近些时间需要在next 里面加入登录注册的功能遂整理了一下学习视频:
Next auth 身份验证凭据 - 使用电子邮件和密码注册和登录(NextJS app 路由)
二、前置准备
1、环境配置
-
Vscode
-
node环境配置
-
vercel 账户注册
-
github账户注册
2、相关库安装
(1)vercel 配置
- npm i -g vercel //安装vercel CLI
(2)Yarn 包管理配置
- npm i -g yarn //安装yarn
3、next项目初始化与创建
- yarn create next-app
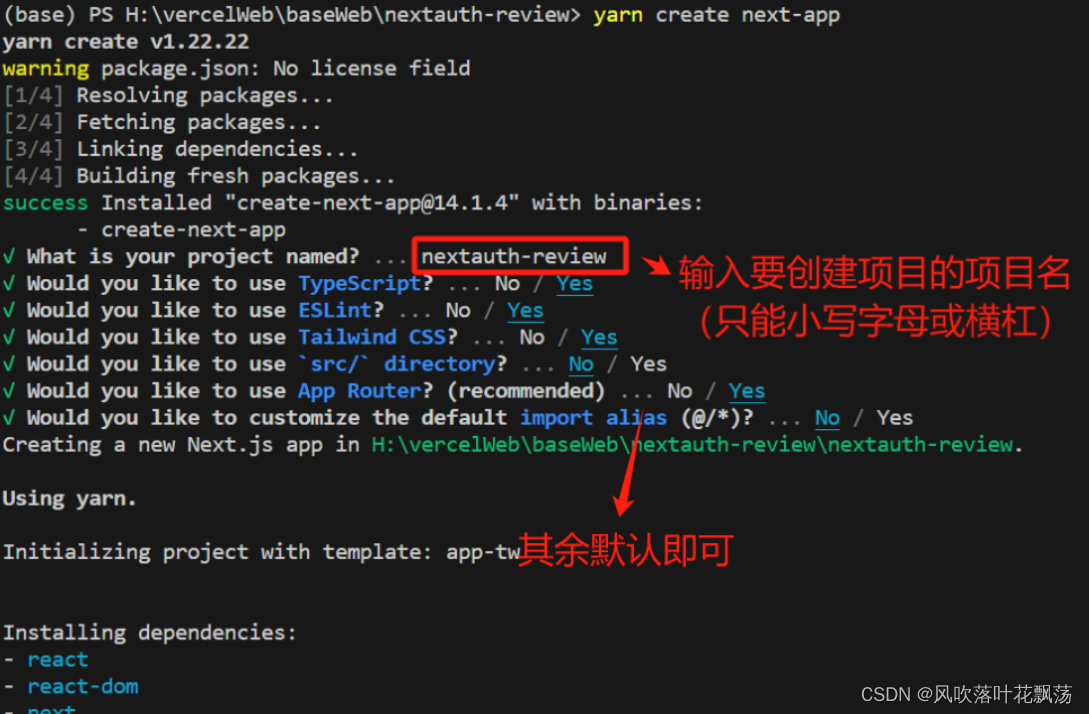
-
cd nextauth-review (这里面放你写的项目名)
-
yarn dev //运行程序,在http://localhost:3000可以查看next项目的项目名
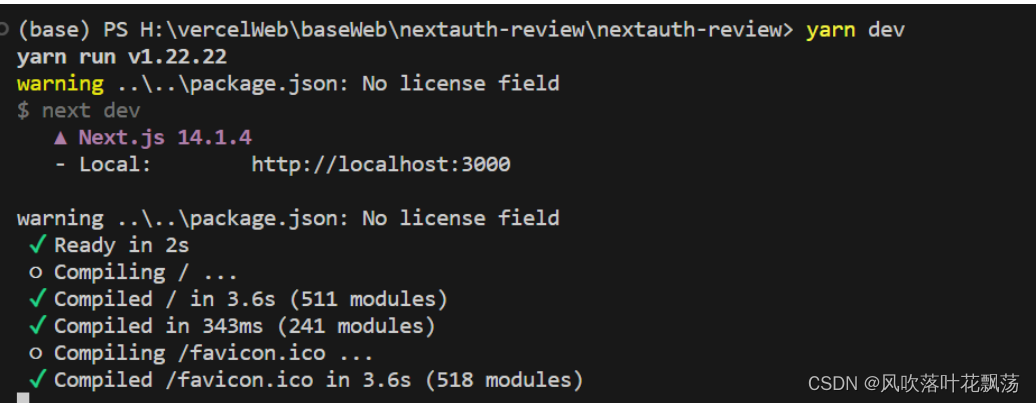
到这里我们就基本完成了前置的准备工作,下面继续。
三、具体实现
1、github 仓库创建与链接
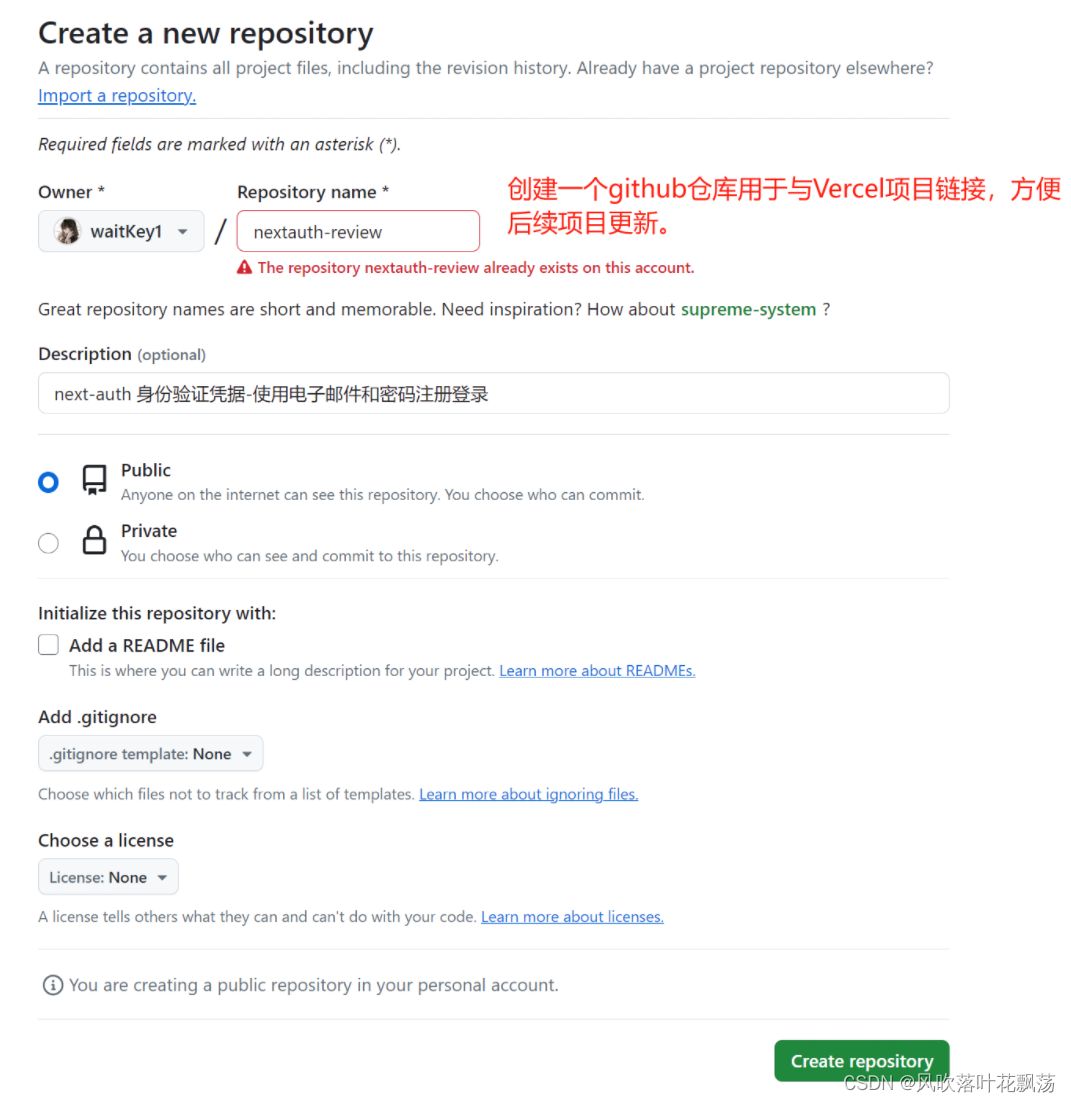
将新建的项目上传github

2、Vercel项目链接Vercel账户并部署
(1)项目上传vercel
-
vercel login //vercel 登录
-
Vercel //链接与上传
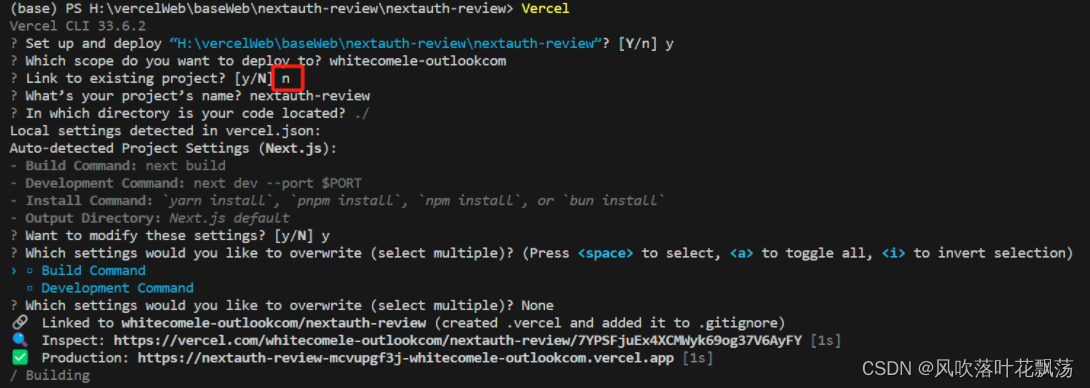
第三行输入n。最开始的时候不连接vercel项目。
注:后续如果项目更新了,要推送到vercel部署,可以通过输入vercel ,然后在第三行输入y,并输入第一步创建的项目名。
(2)项目创建并链接postgre 数据库
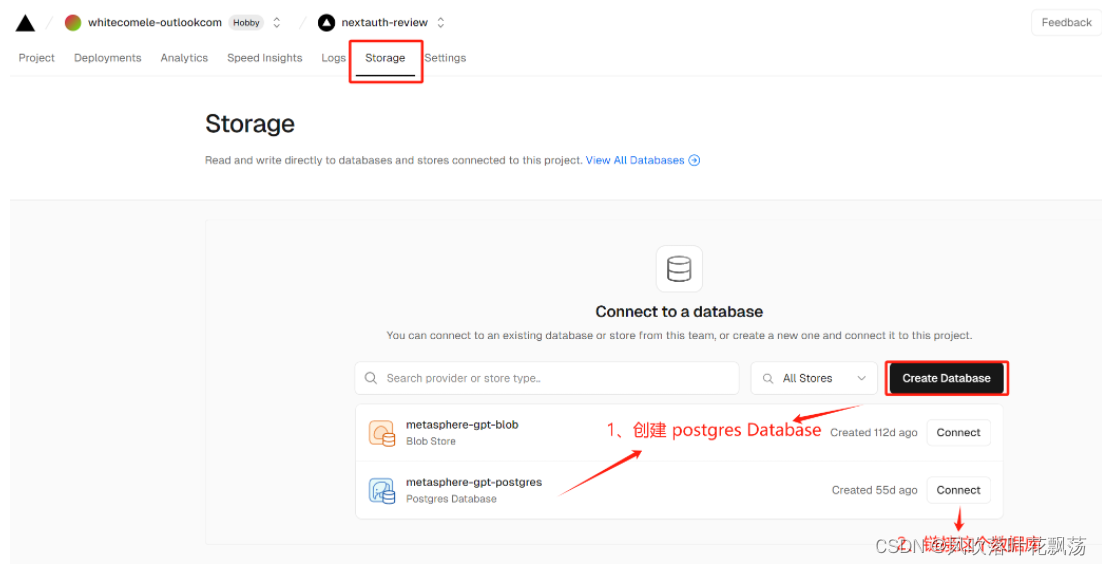
(3)本地化项目链接数据库准备
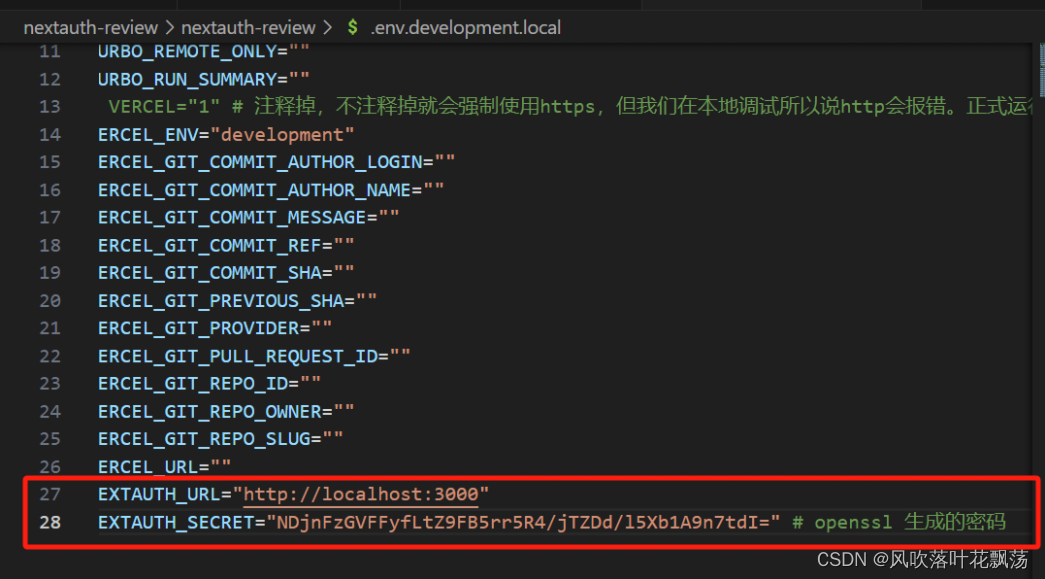
- vercel env pull .env.development.local

注释掉VERCEL,不注释掉就会强制使用https,但我们在本地调试所以说http会报错。正式运行再取消注释。
- openssl rand -base64 32 ,生成32位密码,并修改.env.development.local如下:
-
yarn add @types/bcrypt 安装加密工具bcrypt
-
yarn add @vercel/postgres 安装vercel postgres
-
yarn add next-auth 安装next-auth
到这里该项目的数据库就配置好了,下面我们开始页面开发。
3、登录页面与注册页面的前端
(1)登录页面
新建login文件夹,并在其中新建page.tsx下面是具体的内容
export default function LoginPage(){return (<form className="flex flex-col gap-2 mx-auto max-w-md mt-10"><input name='email' className ="border border-black text-black" type="email" /><input name='password' className ="border border-black text-black" type="password" /><button type="submit">Login</button></form>)
}
(1)注册页面
新建register文件夹,并在其中新建page.tsx下面是具体的内容
export default function LoginPage(){return (<form className="flex flex-col gap-2 mx-auto max-w-md mt-10"><input name='email' className ="border border-black text-black" type="email" /><input name='password' className ="border border-black text-black" type="password" /><button type="submit">Register</button></form>)
}
到这里前端就差不多了,大家可以在http://localhost:3000/login 和http://localhost:3000/register看到你写的页面
nextAuth的官方文档:https://next-auth.js.org/providers/credentials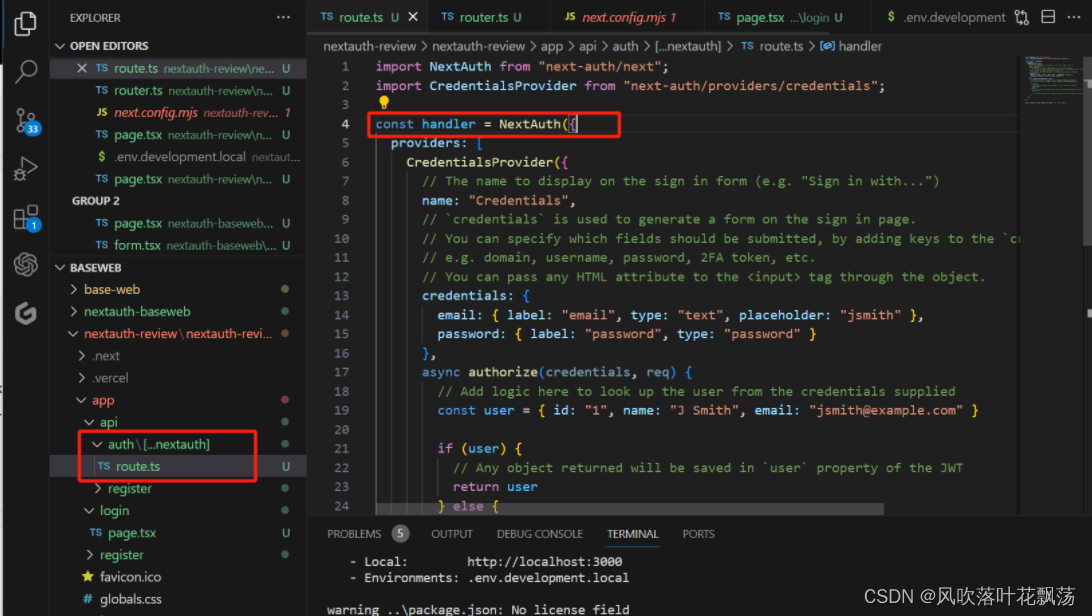
基本就是用来nextAuth 官方文档中的credentials 字段,结尾加上export {handler as GET, handler as POST}; 就差不多了。
类似如下:
api/auth/[…nextauth]/route.ts
import NextAuth from "next-auth/next";
import CredentialsProvider from "next-auth/providers/credentials";
const handler =NextAuth({providers: [CredentialsProvider({credentials: {email: {  },password: { }},async authorize(credentials, req) {// Add logic here to look up the user from the credentials suppliedconst user = { id: "1", name: "J Smith", email: "jsmith@example.com" }if (user) {// Any object returned will be saved in `user` property of the JWTreturn user} else {// If you return null then an error will be displayed advising the user to check their details.return null// You can also Reject this callback with an Error thus the user will be sent to the error page with the error message as a query parameter}}})]
})export {handler as GET, handler as POST};
api/auth/register/route.ts
import { NextResponse } from "next/server";export  async function POST(request : Request){try{const {email,password} = await request.json();console.log({email,password});}catch(e){console.log({e});}return NextResponse.json({message:"success"});
}
(1)register 页面
register\page.tsx
import { log } from "console";
import { FormEvent } from "react"export default function LoginPage(){const handleSubmit= async (e:FormEvent<HTMLFormElement>)=>{e.preventDefault();const formData = new FormData(e.currentTarget);const response = await fetch(`/api/auth/register`,{method:"POST",body:JSON.stringify({email:formData.get('email'),password:formData.get('password'),}),})console.log({response});}return (<form onSubmit ={ handleSubmit}className="flex flex-col gap-2 mx-auto max-w-md mt-10"><input name='email' className ="border border-black text-black" type="email" /><input name='password' className ="border border-black text-black" type="password" /><button type="submit">register</button></form>)
}
运行报错:
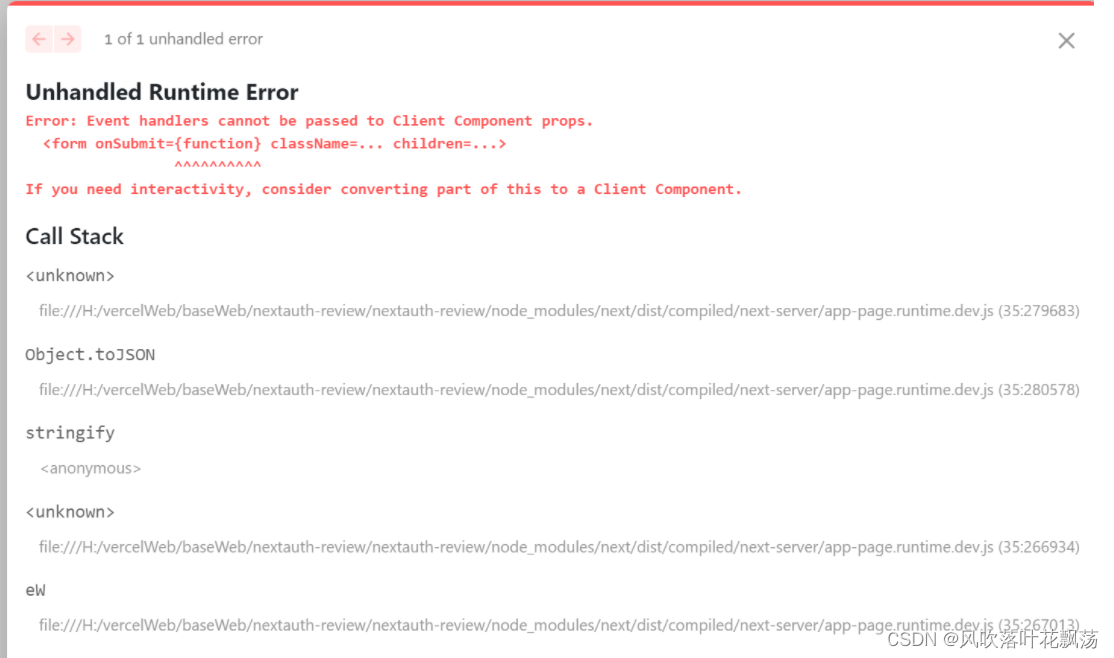
注:错误原因:需要把组件写到客户端部分,不能直接写进去Page.tsx
修改如下:
register/form.tsx
'use client'
import { FormEvent } from "react"export default function Form(){const handleSubmit = async (e:FormEvent<HTMLFormElement>) =>{e.preventDefault();const formData = new FormData(e.currentTarget);console.log(formData.get('email'),formData.get('password'));const response = await fetch(`/api/auth/register`,{method:'POST',body:JSON.stringify({email:formData.get('email'),password:formData.get('password')}),});console.log({response});};return(<form onSubmit={handleSubmit} className="flex flex-col gap-2 mx-auto max-w-md mt-10"><input name='email' className ="border border-black text-black" type="email" /><input name='password' className ="border border-black text-black" type="password" /><button type="submit">Resgiter</button></form>)
}
register/page.tsx
import Form from './form'export default async function RegisterPage(){return <Form />;}
到现在运行yarn dev 并到 http://localhost:3001/register 页面输入账户和密码,点击登录调用接口:fetch(/api/auth/register)然后打印{ email: ‘123@123’, password: ‘123’ }
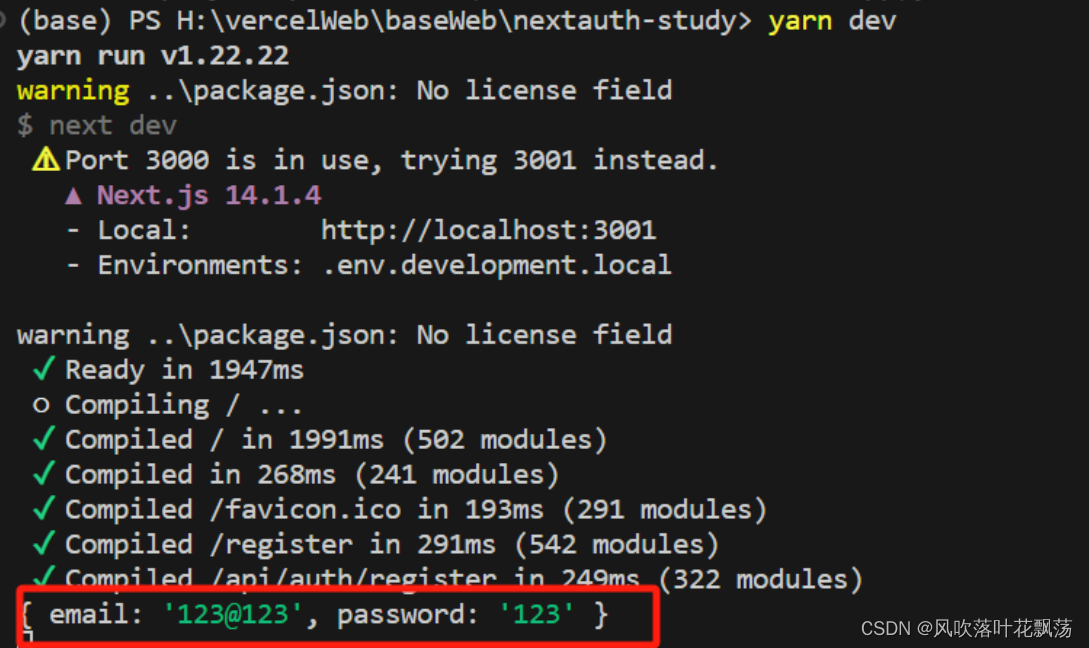
到这里就完成简单的前后端编写,下面进入数据库交互部分。
四、数据库交互
1、数据库创建
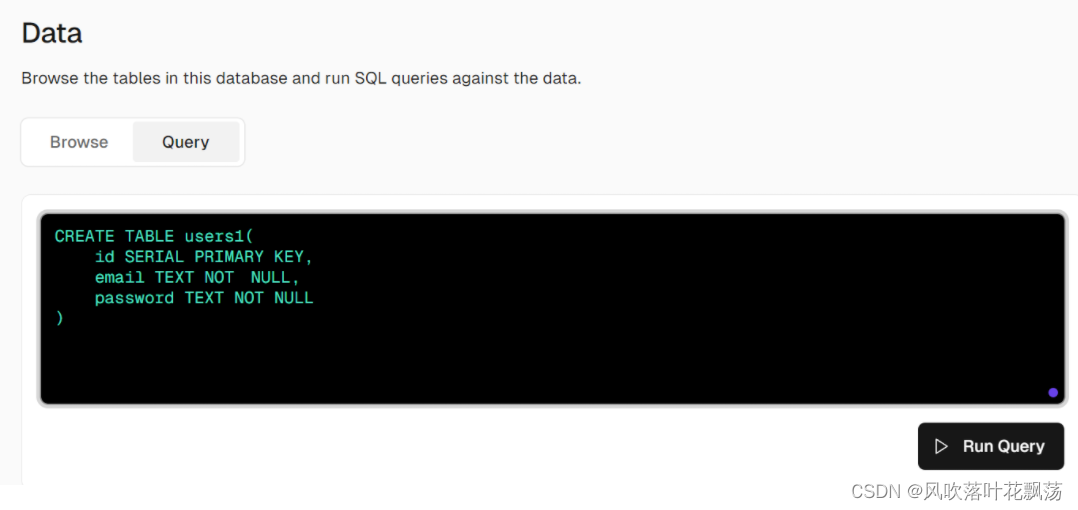
依据需求创建表单users1 如上,一共有两个属性email 和password
2、vercel项目链接数据库并插入
确保Browse页面确实能查到这个新建的数据库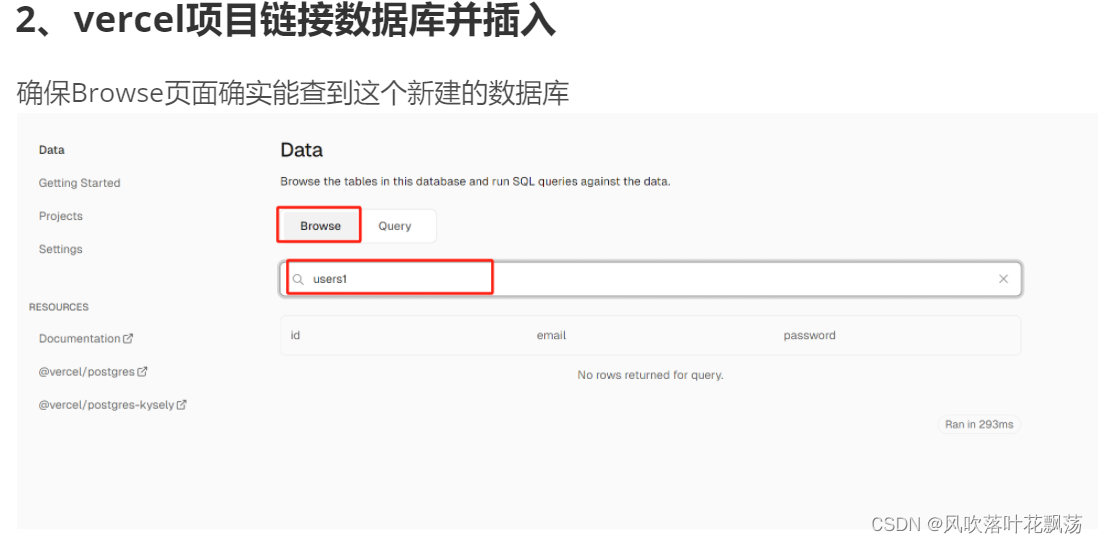
(1)vercel postgre准备
yarn add @vercel/postgres
(2) 项目注册并写sql插入数据库
将API/auth/register/route.ts 的内容修改如下即可实现针对数据库的插入
import { NextResponse } from "next/server";
import {hash} from 'bcrypt'
import {sql} from '@vercel/postgres'
export  async function POST(request : Request){try{const {email,password} = await request.json();console.log({email,password});const hashedPassword = await hash(password,10); //将密码hash加密到10位const response = await sql`INSERT INTO users1 (email,password) VALUES (${email},${password})`;//${参数} 参数化查询}catch(e){console.log({e});}return NextResponse.json({message:"success"});
}
前端页面register\form.tsx 如下,page.tsx 不变
'use client'
import { signIn } from "next-auth/react";
import { FormEvent } from "react"export default function LoginForm() {const handleSubmit = async (e:FormEvent<HTMLFormElement>) =>{e.preventDefault();const formData = new FormData(e.currentTarget);signIn('credentials',{  //nextauth 登录模块email:formData.get('email'),password:formData.get('password'),redirect:false});};return(<form onSubmit={handleSubmit} className="flex flex-col gap-2 mx-auto max-w-md mt-10"><input name='email' className ="border border-black text-black" type="email" /><input name='password' className ="border border-black text-black" type="password" /><button type="submit">Login</button></form>)
}
测试的时候可以发现可以显示登录信息了
问题:发现邮箱有时候同邮箱有多个,所以需要当相同的时候就不添加而是修改
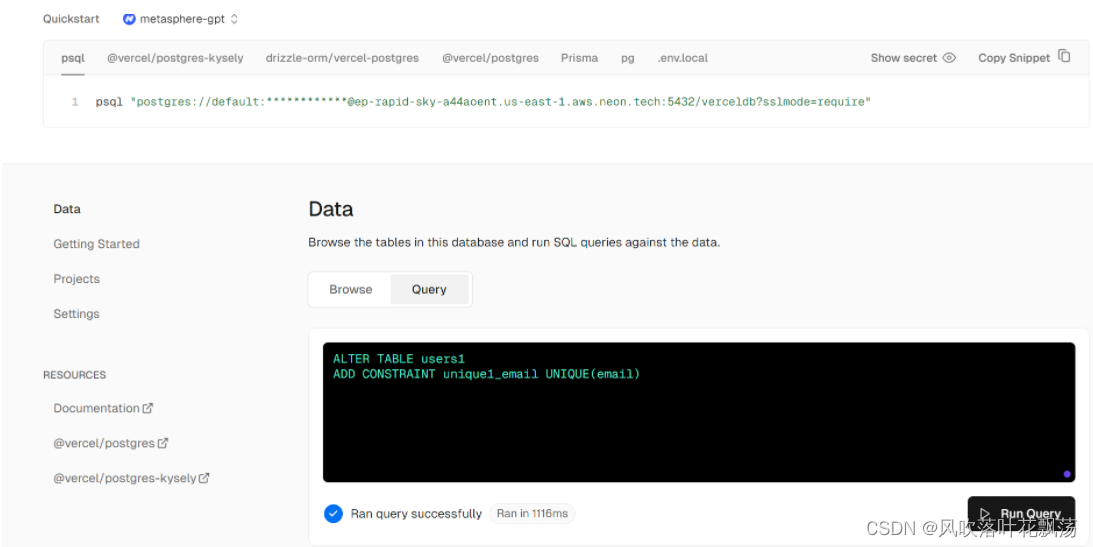
在数据库中限制让email唯一
(3) 项目查询sql数据库并登录
将API/auth/[…nextauth]/route.ts 的内容修改如下即可实现针对数据库的插入
import { sql } from "@vercel/postgres";
import { compare } from "bcrypt";
import NextAuth from "next-auth/next";
import CredentialsProvider from "next-auth/providers/credentials";
const handler =NextAuth({session:{strategy:'jwt'},providers: [CredentialsProvider({credentials: {email: {  },password: { }},async authorize(credentials, req) {const response = await sql`SELECT * FROM users1 WHERE email=${credentials?.email}`;const user = response.rows[0];const passwordCorrect = await compare(credentials?.password ||'',user.password);const passworduser=user.passwordconst passwordcre=credentials?.passwordconsole.log({passwordCorrect},{passwordcre},{passworduser});if (passwordCorrect){return {id:user.id,email:user.email}}//console.log({credentials}); //打印credentials信息return null}})]
})export {handler as GET, handler as POST};
前端页面login\form.tsx 如下,page.tsx 不变
'use client'
import { signIn } from "next-auth/react";
import { FormEvent } from "react"export default function LoginForm() {const handleSubmit = async (e:FormEvent<HTMLFormElement>) =>{e.preventDefault();const formData = new FormData(e.currentTarget);const response= await signIn('credentials',{  //nextauth 登录模块email:formData.get('email'),password:formData.get('password'),redirect:false});console.log({response});};return(<form onSubmit={handleSubmit} className="flex flex-col gap-2 mx-auto max-w-md mt-10"><input name='email' className ="border border-black text-black" type="email" /><input name='password' className ="border border-black text-black" type="password" /><button type="submit">Login</button></form>)
}
这时候就可以写入数据库了
五、状态增加
1、查询到登录之后登录自动跳转状态增加
解析:
如果查询到登录模块,没有返回error。则自动导航到‘/’目录同时刷新。
核心修改:
export default function LoginForm() {const router=useRouter();const handleSubmit = async (e:FormEvent<HTMLFormElement>) =>{e.preventDefault();const formData = new FormData(e.currentTarget);const response= await signIn('credentials',{ //nextauth 登录模块email:formData.get('email'),password:formData.get('password'),redirect:false});console.log({response});if(!response?.error){ //没有返回errorrouter.push('/'); //跳转到‘/’router.refresh(); //刷新缓存}};
login/form.tsx全部内容如下
'use client'
import { signIn } from "next-auth/react";
import { useRouter } from "next/navigation";
import { FormEvent } from "react"export default function LoginForm() {const router=useRouter();const handleSubmit = async (e:FormEvent<HTMLFormElement>) =>{e.preventDefault();const formData = new FormData(e.currentTarget);const response= await signIn('credentials',{  //nextauth 登录模块email:formData.get('email'),password:formData.get('password'),redirect:false});console.log({response});if(!response?.error){router.push('/');router.refresh();}};return(<form onSubmit={handleSubmit} className="flex flex-col gap-2 mx-auto max-w-md mt-10"><input name='email' className ="border border-black text-black" type="email" /><input name='password' className ="border border-black text-black" type="password" /><button type="submit">Login</button></form>)
}
2、登出与登录状态转换
登录之后,登出
登出之后,登录,并自动跳转到首页
功能解析
在全部页面都需要有这个跳转。
1、在app首页的layout.tsx页面进行编写。
2、自动跳转用next
该功能核心修改是增加:
<nav>{!!session &&<Logout />}{!session &&<Link href='/login'>Login</Link>}</nav>
文件全部代码如下:
layout.tsx
mport type { Metadata } from "next";
import { Inter } from "next/font/google";
import "./globals.css";
import { getServerSession } from "next-auth";
import Link from "next/link";
import Logout from "./logout";const inter = Inter({ subsets: ["latin"] });export const metadata: Metadata = {title: "Create Next App",description: "Generated by create next app",
};export default async function RootLayout({children,
}: Readonly<{children: React.ReactNode;
}>) {const session = await getServerSession();return (<html lang="en"><body className={inter.className}><nav>{!!session &&<Logout />}{!session &&<Link href='/login'>Login</Link>}</nav>{children}</body></html>);
}
由于这个里面也涉及到后端,所以需要重新编写一个的客户端API进行处理,在同目录编写
logout.tsx
'use client'import { signOut } from "next-auth/react"
export default function Logout(){return (<span onClick={() => {signOut();}}>Logout</span>)
}
到这里,登出与登录按钮增加完毕
3、重定向
当你登录后不想再返回登录页面可以参考以下的操作。
其他的网址也可以这么操作。
import { getServerSession } from "next-auth";
import Form from "./form";
import { redirect } from "next/navigation";export default async function LoginPage(){const session =await getServerSession();if(session){redirect("/")}return <Form />
}
4、root保护
一些页面需要你登录之后才能访问,在这里面我们借助中间件实现这个操作
在项目主目前增加中间件
middleware.ts
export {default } from 'next-auth/middleware'export const conifg ={matcher:['/dashboard']} //加入你要登录保护的地址
这样子,这个功能就实现完毕了。
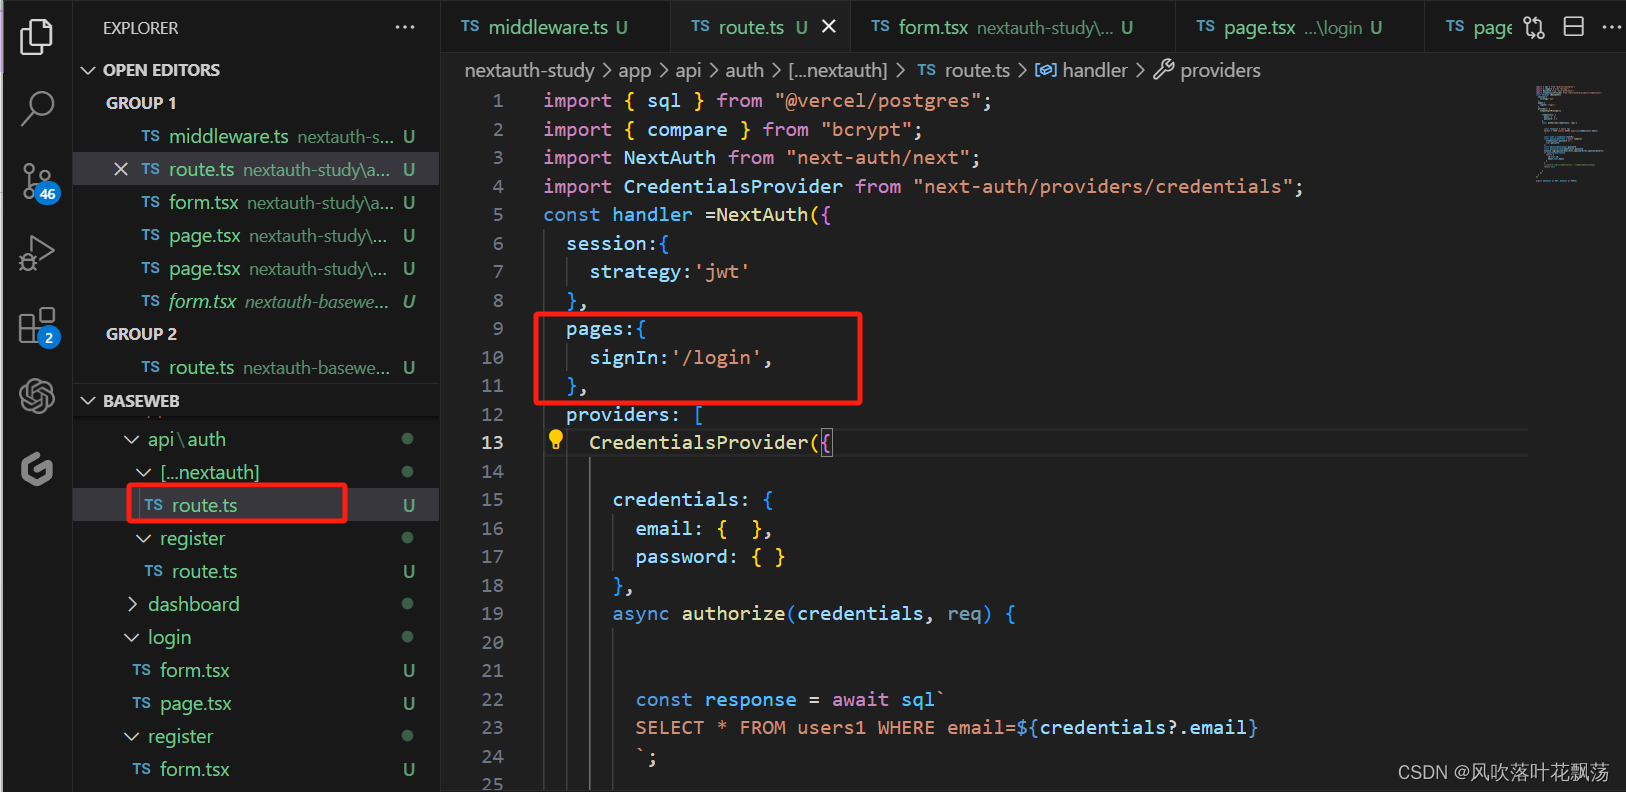
5、root保护登录页面转为自定义登录页面
在nextauth 的route页面增加signin路径
pages:{
signIn:‘/login’,
},
相关文章:
一、next-auth 身份验证凭据-使用电子邮件和密码注册登录
一、next-auth 身份验证凭据-使用电子邮件和密码注册登录 文章目录 一、next-auth 身份验证凭据-使用电子邮件和密码注册登录一、前言二、前置准备1、环境配置2、相关库安装(1)vercel 配置(2)Yarn 包管理配置 3、next项目初始化与…...

2.SpringBoot利用Thymeleaf实现页面的展示
什么是Thymeleaf? Thymeleaf是一个现代服务器端Java模板引擎,适用于Web和独立环境,能够处理HTML,XML,JavaScript,CSS甚至纯文本。 Thymeleaf的主要目标是提供一种优雅且高度可维护的模板创建方式。为实现这…...

devtool: ‘source-map‘ 和 devtool: ‘#source-map‘的区别
devtool: ‘source-map’ 和 devtool: ‘#source-map’ 之间的区别主要在于前面的#字符。 从Webpack 4开始,就废弃了在devtool选项前加#的用法。 devtool: ‘source-map’ 选项意味着Webpack在构建过程中会生成独立的完整的source map文件。对于测试环境很有用&…...

Flutter Boost 3
社区的 issue 没有收敛的趋势。 设计过于复杂,概念太多。这让一个新手看 FlutterBoost 的代码很吃力。 这些问题促使我们重新梳理设计,为了彻底解决这些顽固的问题,我们做一次大升级,我们把这次升级命名为 FlutterBoost 3.0&am…...

ElementUI响应式Layout布局xs,sm,md,lg,xl
响应式布局 参照了 Bootstrap 的 响应式设计,预设了五个响应尺寸:xs、sm、md、lg 和 xl。 <el-row :gutter"10"><el-col :xs"8" :sm"6" :md"4" :lg"3" :xl"1"><div class…...

机器学习——典型的卷积神经网络
机器学习——典型的卷积神经网络 卷积神经网络(Convolutional Neural Networks,CNNs)是一类在图像处理领域应用广泛的深度学习模型。它通过卷积操作和池化操作来提取图像的特征,并通过全连接层来进行分类或回归任务。在本文中&am…...

速通数据结构与算法第四站 双链表
系列文章目录 速通数据结构与算法系列 1 速通数据结构与算法第一站 复杂度 http://t.csdnimg.cn/sxEGF 2 速通数据结构与算法第二站 顺序表 http://t.csdnimg.cn/WVyDb 3 速通数据结构与算法第三站 单链表 http://t.csdnimg.cn/cDpcC 感谢佬们…...
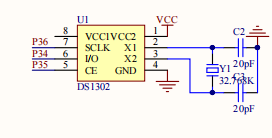
51单片机学习笔记12 SPI接口 使用1302时钟
51单片机学习笔记12 SPI接口 使用1302时钟 一、DS1302简介1. 功能特性2. 涓流充电3. 接口介绍时钟数据和控制线:电源线:备用电池连接: 二、寄存器介绍1. 控制寄存器2. 时间寄存器3. 日历/时钟寄存器 三、BCD码介绍四、DS1302时序1. 读时序2. …...

php编辑器 ide 主流编辑器的优缺点。phpstorm vscode atom 三者对比
编辑器PhpStormvscodeAtom是否收费收费,有30天试用期免费免费内存占用Java平台,一个进程1G多内存占用好几个进程,合起来1G上下/基本功能都具备,有的功能需要装插件都具备,有的功能需要装插件都具备,有的功能…...

【动手学深度学习】深入浅出深度学习之RMSProp算法的设计与实现
目录 🌞一、实验目的 🌞二、实验准备 🌞三、实验内容 🌼1. 认识RMSProp算法 🌼2. 在optimizer_compare_naive.py中加入RMSProp 🌼3. 在optimizer_compare_mnist.py中加入RMSProp 🌼4. 问…...

大转盘抽奖小程序源码
源码介绍 大转盘抽奖小程序源码,测试依旧可用,无BUG,跑马灯旋转效果,非常酷炫。 小程序核心代码参考 //index.js //获取应用实例 var app getApp() Page({data: {circleList: [],//圆点数组awardList: [],//奖品数组colorCirc…...
)
数据结构(无图版)
数据结构与算法(无图版,C语言实现) 1、绪论 1.1、数据结构的研究内容 一般应用步骤:分析问题,提取操作对象,分析操作对象之间的关系,建立数学模型。 1.2、基本概念和术语 数据:…...

软件测试中的顶级测试覆盖率技术
根据 CISQ 报告,劣质软件每年给美国公司造成约2.08 万亿美元的损失。虽然软件工具是企业和行业领域的必需品,但它们也容易出现严重错误和性能问题。人类手动测试不再足以检测和消除软件错误。 因此,产品或软件开发公司必须转向自动化测试&am…...

vscode使用技巧
常用快捷键 代码格式 Windows系统。格式化代码的快捷键是“ShiftAltF” Mac系统。格式化代码的快捷键是“ShiftOptionF” Ubuntu系统。格式化代码的快捷键是“CtrlShiftI”配置缩进 点击左上角的“文件”菜单,然后选择“首选项”>“设置”,或者使用…...
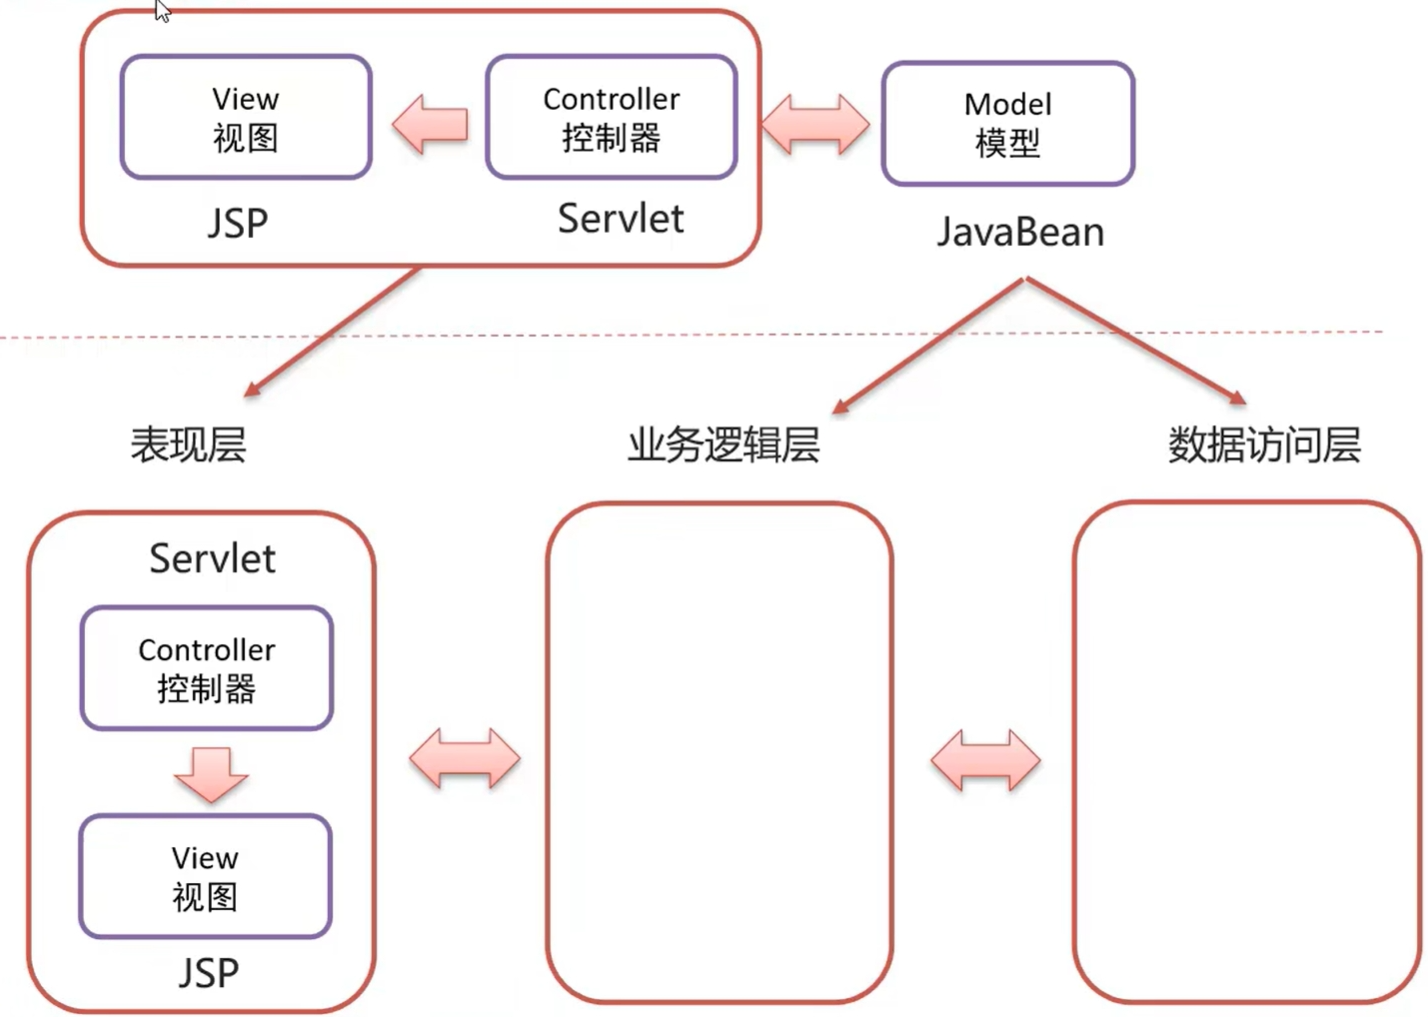
JSP
概念:Java Server Pages,Java服务端页面 一种动态的网页技术,其中既可以定义HTML、JS、CSS等静态内容,还可以定义Java代码的动态内容 JSP HTML Java 快速入门 注:Tomcat中已经有了JSP的jar包,因此我们…...
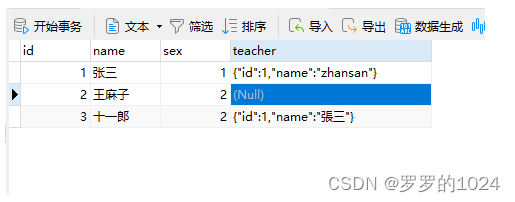
Mybatis--TypeHandler使用手册
TypeHandler使用手册 场景:想保存user时 teacher自动转String ,不想每次保存都要手动去转String;从DB查询出来时,也要自动帮我们转换成Java对象 Teacher Data public class User {private Integer id;private String name;priva…...
网络编程(TCP、UDP)
文章目录 一、概念1.1 什么是网络编程1.2 网络编程中的基本知识 二、Socket套接字2.1 概念及分类2.2 TCP VS UDP2.3 通信模型2.4 接口方法UDP数据报套接字编程TCP流套接字编程 三、代码示例3.1 注意点3.2 回显服务器基于UDP基于TCP 一、概念 首先介绍了什么是网络编程ÿ…...

Python快速入门系列-7(Python Web开发与框架介绍)
第七章:Python Web开发与框架介绍 7.1 Flask与Django简介7.1.1 Flask框架Flask的特点Flask的安装一个简单的Flask应用示例7.1.2 Django框架Django的特点Django的安装一个简单的Django应用示例7.2 前后端交互与数据传输7.2.1 前后端交互7.2.2 数据传输格式7.2.3 示例:使用Flas…...

最长对称子串
对给定的字符串,本题要求你输出最长对称子串的长度。例如,给定Is PAT&TAP symmetric?,最长对称子串为s PAT&TAP s,于是你应该输出11。 输入格式: 输入在一行中给出长度不超过1000的非空字符串。 输出格式&…...
【大模型】大模型 CPU 推理之 llama.cpp
【大模型】大模型 CPU 推理之 llama.cpp llama.cpp安装llama.cppMemory/Disk RequirementsQuantization测试推理下载模型测试 参考 llama.cpp 描述 The main goal of llama.cpp is to enable LLM inference with minimal setup and state-of-the-art performance on a wide var…...

Unity-Editor-Toolbox 上下文菜单操作:复制粘贴组件的简单方法
Unity-Editor-Toolbox 上下文菜单操作:复制粘贴组件的简单方法 【免费下载链接】Unity-Editor-Toolbox Tools, custom attributes, drawers, hierarchy overlay, and other extensions for the Unity Editor. 项目地址: https://gitcode.com/gh_mirrors/un/Unity-…...

【C++笔记】-- 七种排序流食般讲解
1.排序的概念:所谓的排序就是对于一组记录,按照某个或者某些关键字,递增或递减的排序这些记录。2.排序的分类:此文章将会介绍四类排序。一、插入排序:直接插入排序、希尔排序。二、选择排序:选择排序、堆排…...

Browserwing:浏览器内自动化脚本平台的设计、实现与应用
1. 项目概述:一个浏览器内的“翅膀”如果你和我一样,经常需要在浏览器里处理一些重复、繁琐的任务,比如批量下载网页上的图片、定时刷新页面抓取数据、或者自动填写表单,那你肯定想过:要是浏览器自己能“飞”起来&…...
的基本原理与特性分析)
深入了解场效应管(FET)的基本原理与特性分析
场效应管(FET)基础概念场效应管(Field Effect Transistor, FET)是一种通过电场效应控制电流的半导体器件,属于电压控制型器件。其核心特点包括高输入阻抗、低驱动功耗和单极型载流子传导(仅多数载流子参与导…...

基于GPT的AI代码审查:GitHub Action自动化部署与实战指南
1. 项目概述:当AI成为你的代码审查搭档 在团队协作开发中,代码审查(Code Review)是保证代码质量、统一编码风格、传播知识的关键环节。但现实往往是,资深同事忙得脚不沾地,新人的PR(Pull Reque…...

百度网盘下载加速解决方案:3步获取真实下载链接实现高速下载
百度网盘下载加速解决方案:3步获取真实下载链接实现高速下载 【免费下载链接】baidu-wangpan-parse 获取百度网盘分享文件的下载地址 项目地址: https://gitcode.com/gh_mirrors/ba/baidu-wangpan-parse 对于技术爱好者和开发者来说,百度网盘下载…...

kasetto:用SQL思维操作本地CSV/JSON文件的命令行利器
1. 项目概述:一个被低估的本地化数据管理利器如果你经常需要在本地处理一些结构化的数据,比如从网页上抓取的信息、日常记账的记录、项目进度的跟踪,或者只是想把一些零散的笔记整理成表格,你可能会面临一个选择:是用E…...

Anthropic研究院议程:不止做AI大模型,更要定义AI时代的全球规则
当大模型竞赛进入白热化,多数科技公司都在比拼参数、速度、模型能力时,OpenAI竞品Anthropic走出了一条完全不同的路。 近期,Anthropic 正式公布 Anthropic Institute(Anthropic研究院)全新研究议程,不再只埋头做模型研发,而是站在行业顶层视角,深度拆解AI对经济、安全、…...
)
告别明文传输:手把手教你为open62541 OPC UA服务器配置OpenSSL加密(附证书生成避坑指南)
工业物联网安全实战:基于open62541与OpenSSL构建OPC UA加密通信体系 在工业控制系统与物联网设备的数据交互中,明文传输就像在公共场所用明信片传递商业机密。想象一下工厂里的PLC控制器将生产参数以原始文本形式发送到SCADA系统,或者智能传感…...

基于Qlearning强化学习和人工势场融合算法的无人机航迹规划matlab仿真
✅作者简介:热爱科研的Matlab仿真开发者,擅长毕业设计辅导、数学建模、数据处理、程序设计科研仿真。🍎完整代码获取 定制创新 论文复现点击:Matlab科研工作室👇 关注我领取海量matlab电子书和数学建模资料 dz…...