C#仿OutLook的特色窗体设计
目录
1. 资源图片准备
2. 设计流程:
(1)用MenuStrip控件设计菜单栏
(2)用ToolStrip控件设计工具栏
(3)用StatusStrip控件设计状态栏
(4)ImageList组件装载树节点图标
(5)用TreeView控件和ImageList组件设计模型树
3.示例
(1)Form1.cs
(2)Form1.Designer.cs
(3)Resources.Designer.cs
(4)效果图
用MenuStrip控件、ToolStrip控件、StatusStrip控件、TreeView控件、ImageList组件设计模仿OutLook风格的特色窗体。
1. 资源图片准备
设计之前,先准备好资源图片,根据工具栏的按钮数量准备图片,根据模型树里节点的数量准备相应数量的图标文件。
资源图片和图标的加载到项目中的方法,详见本文作者的其他文章:C#手动改变自制窗体的大小-CSDN博客 https://wenchm.blog.csdn.net/article/details/137027140
资源图片和图标要分别加载。
2. 设计流程:
(1)用MenuStrip控件设计菜单栏
通过加载MenuStrip控件,按照提示生成toolStripMenuItem1、toolStripMenuItem2、toolStripMenuItem3。依次修改其Text属性为“打开”、“设置”、“编辑”。
menuStrip1 = new MenuStrip();
toolStripMenuItem1 = new ToolStripMenuItem();
toolStripMenuItem2 = new ToolStripMenuItem();
toolStripMenuItem3 = new ToolStripMenuItem();
//
toolStripMenuItem1.Text = "打开";
//
toolStripMenuItem2.Text = "设置";
//
toolStripMenuItem3.Text = "编辑";
(2)用ToolStrip控件设计工具栏
通过加载ToolStrip控件,按照提示生成toolStripButton1、toolStripButton2、toolStripButton3、toolStripComboBox1。依次修改其Text属性为“打开”、“设置”、“编辑”,依次修改其Image属性为资源文件的“打开1”、“设置1”、“编辑1”。
toolStrip1 = new ToolStrip();
toolStripButton1 = new ToolStripButton();
toolStripButton2 = new ToolStripButton();
toolStripButton3 = new ToolStripButton();
toolStripComboBox1 = new ToolStripComboBox();
//
toolStripButton1.Image = Properties.Resources.打开1;
toolStripButton1.Text = "打开";
//
toolStripButton2.Image = Properties.Resources.设置1;
toolStripButton2.Text = "设置";
//
toolStripButton3.Image = Properties.Resources.编辑1;
toolStripButton3.Text = "编辑";
(3)用StatusStrip控件设计状态栏
通过加载ToolStrip控件,按照提示生成状态标签toolStripStatusLabel1,并修改其Text属性为“操作员***”。
toolStripStatusLabel1.Name = "toolStripStatusLabel1";toolStripStatusLabel1.Text = "操作员***";(4)ImageList组件装载树节点图标
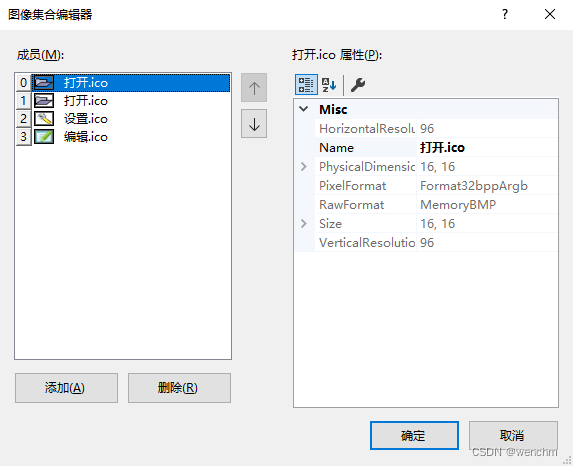
通过加载ImageList组件装在项目需要的图标,生成文件文件imageList1,鼠标点中该组件,右侧属性,选择图像开始装在图片,图片按Tag自动索引。或者鼠标点中该组件,该组件的右上角显示实心的箭头,点击箭头,开始选择图片,这里为根节点、子节点选择项目准备好的图标文件。
(5)用TreeView控件和ImageList组件设计模型树
通过加载TreeView控件为项目创建模型树,鼠标点中TreeView控件,在该空间的右上角出现一个箭头,点击箭头,为该控件装载图标文件imageList1。或者鼠标点中TreeView控件,右侧属性,修改其Image属性为imageList1。然后,选择“编辑节点”,为项目创建根节点和各个子节点。给节点更名和配图。

3.示例
(1)Form1.cs
// Form1.cs
namespace _175
{public partial class Form1 : Form{public Form1(){InitializeComponent();}}
}
(2)Form1.Designer.cs
// 仿OutLook的特色窗体
namespace _175
{partial class Form1{/// <summary>///  Required designer variable./// </summary>private System.ComponentModel.IContainer components = null;/// <summary>///  Clean up any resources being used./// </summary>/// <param name="disposing">true if managed resources should be disposed; otherwise, false.</param>protected override void Dispose(bool disposing){if (disposing && (components != null)){components.Dispose();}base.Dispose(disposing);}#region Windows Form Designer generated code/// <summary>///  Required method for Designer support - do not modify///  the contents of this method with the code editor./// </summary>private void InitializeComponent(){components = new System.ComponentModel.Container();System.ComponentModel.ComponentResourceManager resources = new System.ComponentModel.ComponentResourceManager(typeof(Form1));TreeNode treeNode1 = new TreeNode("打开");TreeNode treeNode2 = new TreeNode("设置");TreeNode treeNode3 = new TreeNode("编辑");TreeNode treeNode4 = new TreeNode("菜单项", new TreeNode[] { treeNode1, treeNode2, treeNode3 });menuStrip1 = new MenuStrip();toolStripMenuItem1 = new ToolStripMenuItem();toolStripMenuItem2 = new ToolStripMenuItem();toolStripMenuItem3 = new ToolStripMenuItem();toolStrip1 = new ToolStrip();toolStripButton1 = new ToolStripButton();toolStripButton2 = new ToolStripButton();toolStripButton3 = new ToolStripButton();toolStripComboBox1 = new ToolStripComboBox();statusStrip1 = new StatusStrip();toolStripStatusLabel1 = new ToolStripStatusLabel();imageList1 = new ImageList(components);treeView1 = new TreeView();menuStrip1.SuspendLayout();toolStrip1.SuspendLayout();statusStrip1.SuspendLayout();SuspendLayout();// // menuStrip1// menuStrip1.Items.AddRange(new ToolStripItem[] { toolStripMenuItem1, toolStripMenuItem2, toolStripMenuItem3 });menuStrip1.Location = new Point(0, 0);menuStrip1.Name = "menuStrip1";menuStrip1.Size = new Size(309, 25);menuStrip1.TabIndex = 0;menuStrip1.Text = "menuStrip1";// // toolStripMenuItem1// toolStripMenuItem1.Name = "toolStripMenuItem1";toolStripMenuItem1.Size = new Size(44, 21);toolStripMenuItem1.Text = "打开";// // toolStripMenuItem2// toolStripMenuItem2.Name = "toolStripMenuItem2";toolStripMenuItem2.Size = new Size(44, 21);toolStripMenuItem2.Text = "设置";// // toolStripMenuItem3// toolStripMenuItem3.Name = "toolStripMenuItem3";toolStripMenuItem3.Size = new Size(44, 21);toolStripMenuItem3.Text = "编辑";// // toolStrip1// toolStrip1.Items.AddRange(new ToolStripItem[] { toolStripButton1, toolStripButton2, toolStripButton3, toolStripComboBox1 });toolStrip1.Location = new Point(0, 25);toolStrip1.Name = "toolStrip1";toolStrip1.Size = new Size(309, 25);toolStrip1.TabIndex = 1;toolStrip1.Text = "toolStrip1";// // toolStripButton1// toolStripButton1.Image = Properties.Resources.打开1;toolStripButton1.ImageTransparentColor = Color.Magenta;toolStripButton1.Name = "toolStripButton1";toolStripButton1.Size = new Size(52, 22);toolStripButton1.Text = "打开";// // toolStripButton2// toolStripButton2.Image = Properties.Resources.设置1;toolStripButton2.ImageTransparentColor = Color.Magenta;toolStripButton2.Name = "toolStripButton2";toolStripButton2.Size = new Size(52, 22);toolStripButton2.Text = "设置";// // toolStripButton3// toolStripButton3.Image = Properties.Resources.编辑1;toolStripButton3.ImageTransparentColor = Color.Magenta;toolStripButton3.Name = "toolStripButton3";toolStripButton3.Size = new Size(52, 22);toolStripButton3.Text = "编辑";// // toolStripComboBox1// toolStripComboBox1.Name = "toolStripComboBox1";toolStripComboBox1.Size = new Size(121, 25);// // statusStrip1// statusStrip1.Items.AddRange(new ToolStripItem[] { toolStripStatusLabel1 });statusStrip1.Location = new Point(0, 169);statusStrip1.Name = "statusStrip1";statusStrip1.Size = new Size(309, 22);statusStrip1.TabIndex = 2;statusStrip1.Text = "statusStrip1";// // toolStripStatusLabel1// toolStripStatusLabel1.Name = "toolStripStatusLabel1";toolStripStatusLabel1.Size = new Size(59, 17);toolStripStatusLabel1.Text = "操作员***";// // imageList1// imageList1.ColorDepth = ColorDepth.Depth32Bit;imageList1.ImageStream = (ImageListStreamer)resources.GetObject("imageList1.ImageStream");imageList1.TransparentColor = Color.Transparent;imageList1.Images.SetKeyName(0, "打开.ico");imageList1.Images.SetKeyName(1, "打开.ico");imageList1.Images.SetKeyName(2, "设置.ico");imageList1.Images.SetKeyName(3, "编辑.ico");// // treeView1// treeView1.ImageIndex = 0;treeView1.ImageList = imageList1;treeView1.Location = new Point(2, 52);treeView1.Name = "treeView1";treeNode1.ImageIndex = 1;treeNode1.Name = "节点1";treeNode1.Text = "打开";treeNode2.ImageIndex = 2;treeNode2.Name = "节点2";treeNode2.Text = "设置";treeNode3.ImageIndex = 3;treeNode3.Name = "节点3";treeNode3.Text = "编辑";treeNode4.ImageIndex = 0;treeNode4.Name = "节点0";treeNode4.Text = "菜单项";treeView1.Nodes.AddRange(new TreeNode[] { treeNode4 });treeView1.SelectedImageIndex = 0;treeView1.Size = new Size(307, 114);treeView1.TabIndex = 3;// // Form1// AutoScaleDimensions = new SizeF(7F, 17F);AutoScaleMode = AutoScaleMode.Font;ClientSize = new Size(309, 191);Controls.Add(treeView1);Controls.Add(statusStrip1);Controls.Add(toolStrip1);Controls.Add(menuStrip1);FormBorderStyle = FormBorderStyle.Fixed3D;MainMenuStrip = menuStrip1;Name = "Form1";StartPosition = FormStartPosition.CenterScreen;Text = "Form1";menuStrip1.ResumeLayout(false);menuStrip1.PerformLayout();toolStrip1.ResumeLayout(false);toolStrip1.PerformLayout();statusStrip1.ResumeLayout(false);statusStrip1.PerformLayout();ResumeLayout(false);PerformLayout();}#endregionprivate MenuStrip menuStrip1;private ToolStrip toolStrip1;private StatusStrip statusStrip1;private ImageList imageList1;private TreeView treeView1;private ToolStripMenuItem toolStripMenuItem1;private ToolStripMenuItem toolStripMenuItem2;private ToolStripMenuItem toolStripMenuItem3;private ToolStripButton toolStripButton1;private ToolStripButton toolStripButton2;private ToolStripButton toolStripButton3;private ToolStripStatusLabel toolStripStatusLabel1;private ToolStripComboBox toolStripComboBox1;}
}
(3)Resources.Designer.cs
//------------------------------------------------------------------------------
// <auto-generated>
//     此代码由工具生成。
//     运行时版本:4.0.30319.42000
//
//     对此文件的更改可能会导致不正确的行为,并且如果
//     重新生成代码,这些更改将会丢失。
// </auto-generated>
//------------------------------------------------------------------------------namespace _175.Properties {using System;/// <summary>///   一个强类型的资源类,用于查找本地化的字符串等。/// </summary>// 此类是由 StronglyTypedResourceBuilder// 类通过类似于 ResGen 或 Visual Studio 的工具自动生成的。// 若要添加或移除成员,请编辑 .ResX 文件,然后重新运行 ResGen// (以 /str 作为命令选项),或重新生成 VS 项目。[global::System.CodeDom.Compiler.GeneratedCodeAttribute("System.Resources.Tools.StronglyTypedResourceBuilder", "17.0.0.0")][global::System.Diagnostics.DebuggerNonUserCodeAttribute()][global::System.Runtime.CompilerServices.CompilerGeneratedAttribute()]internal class Resources {private static global::System.Resources.ResourceManager resourceMan;private static global::System.Globalization.CultureInfo resourceCulture;[global::System.Diagnostics.CodeAnalysis.SuppressMessageAttribute("Microsoft.Performance", "CA1811:AvoidUncalledPrivateCode")]internal Resources() {}/// <summary>///   返回此类使用的缓存的 ResourceManager 实例。/// </summary>[global::System.ComponentModel.EditorBrowsableAttribute(global::System.ComponentModel.EditorBrowsableState.Advanced)]internal static global::System.Resources.ResourceManager ResourceManager {get {if (object.ReferenceEquals(resourceMan, null)) {global::System.Resources.ResourceManager temp = new global::System.Resources.ResourceManager("_175.Properties.Resources", typeof(Resources).Assembly);resourceMan = temp;}return resourceMan;}}/// <summary>///   重写当前线程的 CurrentUICulture 属性,对///   使用此强类型资源类的所有资源查找执行重写。/// </summary>[global::System.ComponentModel.EditorBrowsableAttribute(global::System.ComponentModel.EditorBrowsableState.Advanced)]internal static global::System.Globalization.CultureInfo Culture {get {return resourceCulture;}set {resourceCulture = value;}}/// <summary>///   查找类似于 (图标) 的 System.Drawing.Icon 类型的本地化资源。/// </summary>internal static System.Drawing.Icon 打开 {get {object obj = ResourceManager.GetObject("打开", resourceCulture);return ((System.Drawing.Icon)(obj));}}internal static System.Drawing.Bitmap 打开1{get{object obj = ResourceManager.GetObject("打开1", resourceCulture);return ((System.Drawing.Bitmap)(obj));}}/// <summary>///   查找类似于 (图标) 的 System.Drawing.Icon 类型的本地化资源。/// </summary>internal static System.Drawing.Icon 编辑 {get {object obj = ResourceManager.GetObject("编辑", resourceCulture);return ((System.Drawing.Icon)(obj));}}internal static System.Drawing.Bitmap 编辑1{get{object obj = ResourceManager.GetObject("编辑1", resourceCulture);return ((System.Drawing.Bitmap)(obj));}}/// <summary>///   查找类似于 (图标) 的 System.Drawing.Icon 类型的本地化资源。/// </summary>internal static System.Drawing.Icon 设置 {get {object obj = ResourceManager.GetObject("设置", resourceCulture);return ((System.Drawing.Icon)(obj));}}internal static System.Drawing.Bitmap 设置1{get{object obj = ResourceManager.GetObject("设置1", resourceCulture);return ((System.Drawing.Bitmap)(obj));}}}
}
(4)效果图

相关文章:
C#仿OutLook的特色窗体设计
目录 1. 资源图片准备 2. 设计流程: (1)用MenuStrip控件设计菜单栏 (2)用ToolStrip控件设计工具栏 (3)用StatusStrip控件设计状态栏 (4)ImageList组件装载树节点图…...
Jmeter的使用
Jmeter的使用 1.Jmeter简介 以下内容来自Jmeter中文网http://www.jmeter.com.cn/jieshao,很好的解释了Jmeter的作用: Apache JMeter是Apache组织开发的基于Java的压力测试工具。用于对软件做压力测试,它最初被设计用于Web应用测试…...
)
【蓝桥杯第十届省赛B】(部分详解)
特别数的和 #include <iostream> #include <string> using LLlong long; using namespace std;int main() {LL n;cin >> n;LL cnt 0;for (LL i 1; i < n; i) {string s to_string(i);for (LL j 0; j < s.size(); j) {if (s[j] 2 || s[j] 0 || s…...

计算机研究生规划
一、计算机研究生技术栈 两条腿走路: 左侧工程实践能力:要掌握python编程语言,它和机器学习、神经网络(这两门几乎是必须掌握的技能)的学习有很大关系 右侧学术创新能力 二、编程语言能力提升 左边基础,右边教你写…...

针孔相机、鱼眼相机、全景相机
先进性简述,后续慢慢会补充1. 针孔相机: 针孔相机是一种基于针孔成像原理的传统相机,它使用一个非常小的孔径(即“针孔”)来限制光线进入相机的方式。 这种相机通常具有简单的结构,由一个孔径较小的光学元…...

HTML5+CSS3+JS小实例:圣诞按钮
实例:圣诞按钮 技术栈:HTML+CSS+JS 效果: 源码: 【HTML】 <!DOCTYPE html> <html lang="zh-CN"><head><meta charset="UTF-8"><meta name="viewport" content="width=device-width, initial-scale=1.0&…...

【深度学习基础】
打基础日常记录 CNN基础知识1. 感知机2. DNN 深度神经网络(全连接神经网络)DNN 与感知机的区别DNN特点,全连接神经网络DNN前向传播和反向传播 3. CNN结构【提取特征分类】4. CNN应用于文本 RNN基础1. RNN的本质 词向量模型word2Vec1. 自然语言…...

银行业架构网络BIAN (Banking IndustryArchitecture Network)详细介绍
BIAN ( The Banking Industry Architecture Network) 是一个业界多方协作的非营利性组织,由全球领先银行、技术提供商、顾问和学者组成,定义了一个用以简化和标准化核心银行体系结构的银行技术框架。这一框架基于面向服务的架构 (SOA) 原则,银…...
[尚硅谷 flink] 基于时间的合流——双流联结(Join)
文章目录 8.1 窗口联结(Window Join)8.2 **间隔联结(Interval Join)** 8.1 窗口联结(Window Join) Flink为基于一段时间的双流合并专门提供了一个窗口联结算子,可以定义时间窗口,并…...

怎样恢复已删除的照片?教你3个方法,一键恢复!
很多人喜欢以拍照的形式记录生活,手机里的照片就很容易堆积成山,但当内存不够用时就不得不选择删除。可是这些美好的照片始终是很多人心中抹不去的记忆,那么该怎样恢复已删除的照片呢?下面几招,教你一键恢复࿰…...
植物糖基转移酶数据库-23年-地表最强系列-文献精读-6
pUGTdb: A comprehensive database of plant UDP-dependent glycosyltransferases pUGTdb:植物UDP依赖糖基转移酶的全面数据库 一篇关于植物糖基转移数据库的综述,地表最强,总结的最全面的版本之一,各位看官有推荐请留言评论区~…...
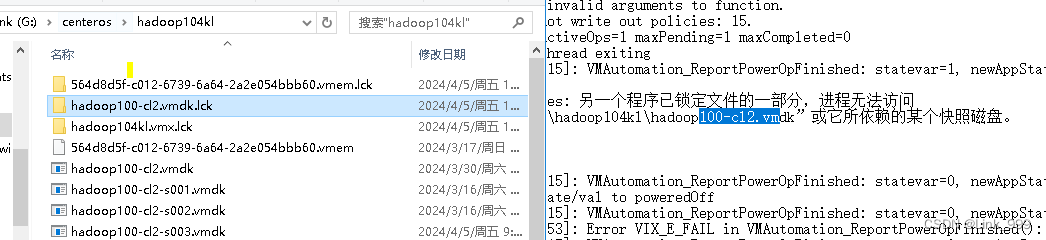
虚拟机打不开
问题 另一个程序已锁定文件的一部分,进程无法访问 打不开磁盘“G:\centeros\hadoop104kl\hadoop100-cl2.vmdk”或它所依赖的某个快照磁盘。 模块“Disk”启动失败。 未能启动虚拟机。 原因 前一次非正常关闭虚拟机导致.lck 文件是VMWare软件的一种磁盘锁文件&…...
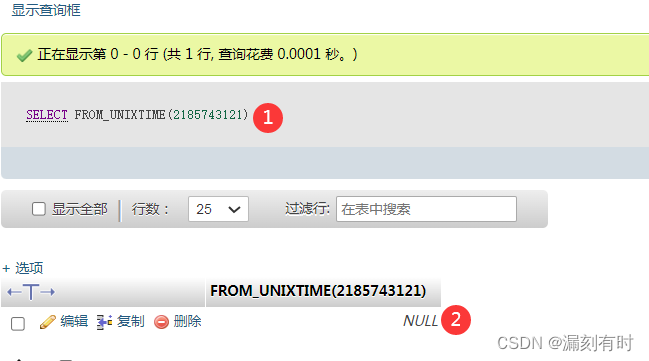
MySQL数据库版本为5.5.62,时间戳超出2038年1月19日的解决方案
MySQL数据库版本是 5.5.62,已设置字段的类型为BIGINT,使用FROM_UNIXTIME()函数来转换时间戳,返回NULL。 SELECT FROM_UNIXTIME(1617970800)SELECT FROM_UNIXTIME(2185743121)MySQL数据库版本为5.5.62,已设置字段的类型为BIGINT&a…...
 详解)
C++20 semaphore(信号量) 详解
头文件在C20中是并发库技术规范(Technical Specification, TS)的一部分。信号量是同步原语,帮助控制多线程程序中对共享资源的访问。头文件提供了标准C方式来使用信号量。 使用环境 Windows:VS中打开项目属性,修改C语…...

【简单讲解下Lisp的学习历程】
🎥博主:程序员不想YY啊 💫CSDN优质创作者,CSDN实力新星,CSDN博客专家 🤗点赞🎈收藏⭐再看💫养成习惯 ✨希望本文对您有所裨益,如有不足之处,欢迎在评论区提出…...
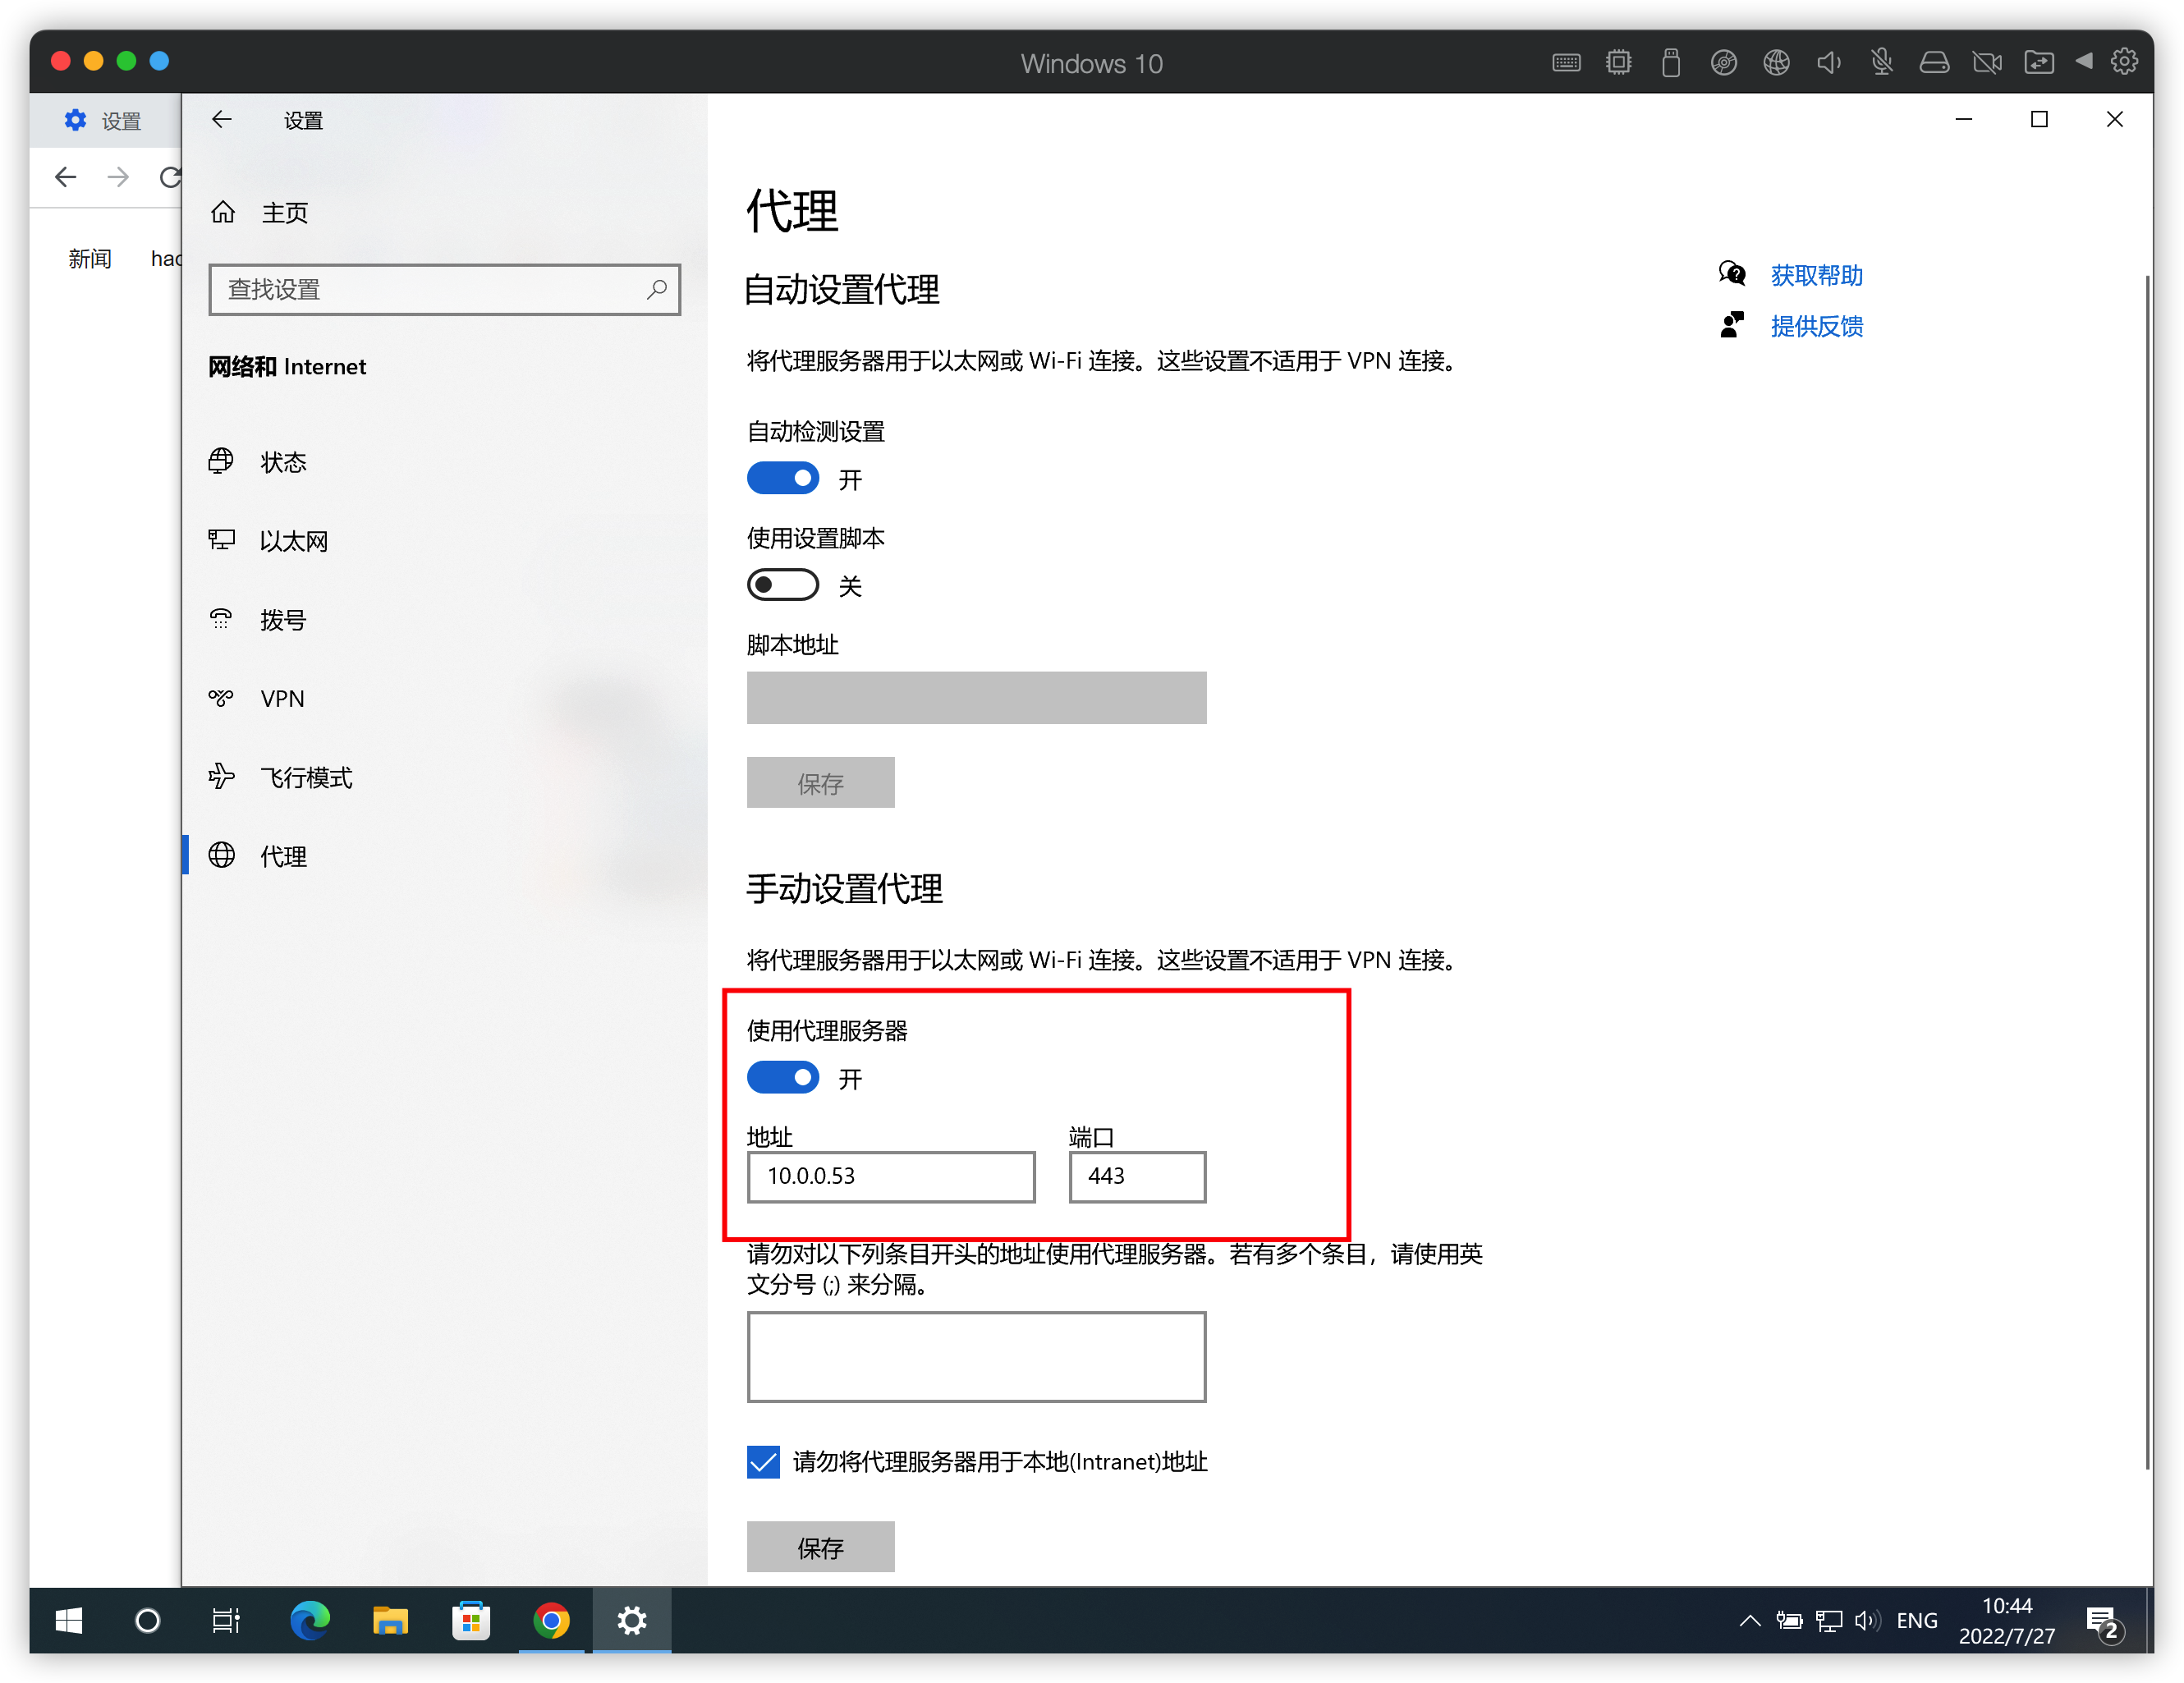
构建高效网络:深入理解正向与反向代理的作用与配置
正向代理 如果把局域网外的互联网环境想象成一个巨大的资源库,则局域网中的客户端要访问互联网则需要通过代理服务器来访问,这种代理成为正向代理。 示例: 用户想要访问 https://chensir.ink (目标服务器)࿰…...
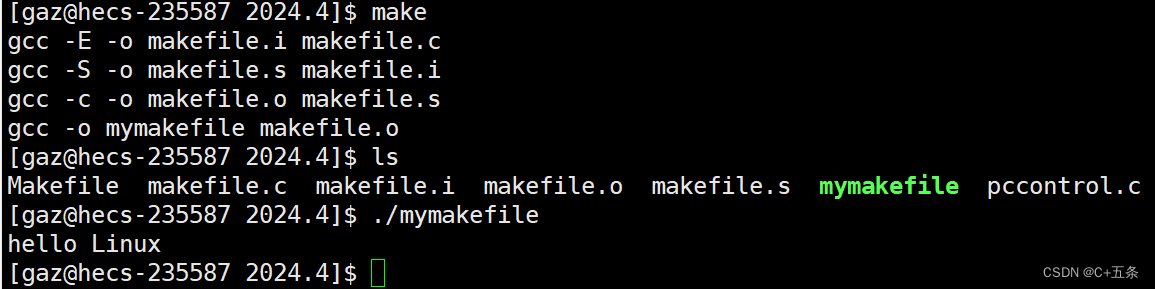
Linux:make/makefile的使用
一、什么是makefile/make 会不会写makefile,从一个侧面说明了一个人是否具备完成大型工程的能力 一个工程中的源文件不计数,其按类型、功能、模块分别放在若干个目录中,makefile定义了一系列的 规则来指定,哪些文件需要先编译&am…...
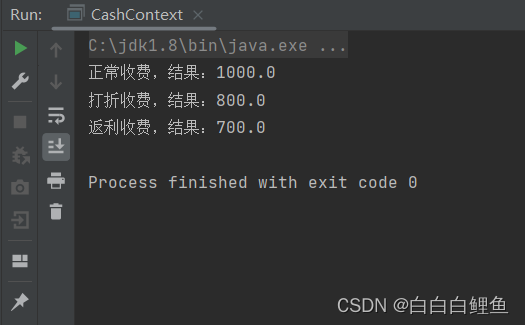
Java设计模式—策略模式(商场打折)
策略这个词应该怎么理解,打个比方说,我们出门的时候会选择不同的出行方式,比如骑自行车、坐公交、坐火车、坐飞机、坐火箭等等,这些出行方式,每一种都是一个策略。 再比如我们去逛商场,商场现在正在搞活动&…...

FOR循环
oracle从入门到总裁:https://blog.csdn.net/weixin_67859959/article/details/135209645 前面两种循环都要根据条件是否成立而确定循环体的执行,具体循环体执行多少次事先并不知道。 FOR 循环可以控制循环执行的次数,由循环变量控制循环体的…...

C++: 命名空间/C++输入输出/缺省参数/函数重载/引用/内联函数
进入C以后,就翻开了新的篇章。C支持C语言的使用。事实上,C是创建者在发现C语言中有很多不好用的地方(在后续学习中会明显看到)后,在C语言基础上又加入了许多语法,于是就成了C。 1.命名空间 来源ÿ…...
:同步实现缺陷判定的高鲁棒性与高准确率)
TVA深度解析(15):同步实现缺陷判定的高鲁棒性与高准确率
在AI视觉智能体与物理世界交互的宏大图景中,视觉系统不仅是智能体感知环境的“眼睛”,更是其执行决策的“导航仪”。无论上层的认知推理多么精妙,底层的感知若是不稳,一切智能都将成为空中楼阁。因此,AI智能体视觉检测…...

Axure RP本地化技术指南:从英文界面到全中文工作流
Axure RP本地化技术指南:从英文界面到全中文工作流 【免费下载链接】axure-cn Chinese language file for Axure RP. Axure RP 简体中文语言包。支持 Axure 11、10、9。不定期更新。 项目地址: https://gitcode.com/gh_mirrors/ax/axure-cn 诊断界面本地化痛…...

AI辅助开发新范式:描述需求,快马AI自动生成免安装的免费应用
AI辅助开发新范式:描述需求,快马AI自动生成免安装的免费应用 最近想做一个天气查询小工具,但自己从头写代码太费时间。听说InsCode(快马)平台的AI辅助开发功能很强大,就尝试用它来生成这个项目。整个过程让我很惊喜,完…...

ADS124S08高精度数据采集系统实战:从寄存器配置到SPI驱动解析
1. ADS124S08核心功能与工业场景适配 ADS124S08这颗24位Δ-Σ ADC芯片在工业现场堪称"信号放大镜",特别适合处理微弱的传感器信号。我去年在开发热电偶温度监测系统时,实测发现它128倍PGA增益下能稳定捕捉到0.15μV的电压变化,这相…...

2025届必备的六大降重复率工具解析与推荐
Ai论文网站排名(开题报告、文献综述、降aigc率、降重综合对比) TOP1. 千笔AI TOP2. aipasspaper TOP3. 清北论文 TOP4. 豆包 TOP5. kimi TOP6. deepseek 在人工智能技术以迅猛之势发展的当下,AI辅助毕业论文写作已然成为学术研究范畴里…...

【C++第二十六章】特殊类设计
前言 🚀“特殊类设计”这一章看起来内容不多,但背后其实在讨论一个很典型、也很有代表性的 C 设计问题:类到底能不能限制对象的创建位置,能不能强制某个对象只能在堆上创建,或者只能在栈上创建。 这不是语法技巧题&…...

RMSNorm:深度学习归一化技术的革新与实践
1. 从LayerNorm到RMSNorm:归一化技术的进化之路 第一次在Transformer模型里看到RMSNorm这个名词时,我正对着训练日志里暴涨的GPU内存使用率发愁。作为LayerNorm的"轻量版"替代品,RMSNorm用一行数学公式就解决了困扰我多时的显存问题…...

BIOS 里 UEFI 呈灰色改不了?一招调整硬盘模式,轻松解锁引导设置
装系统或调试电脑时,不少人会遇到 BIOS 中 UEFI 引导模式呈灰色、无法切换为传统 Legacy 模式的问题,即便关闭了安全启动、恢复 OS 默认值,依旧无法修改,导致没法按需求选择引导方式,装系统、调试硬件的操作直接卡壳。…...

基于51单片机的智能鱼缸设计:STC12C5A60S2为核心的多功能控制系统
基于51单片机的智能鱼缸设计。 有原理图,程序,原文 才用STC12C5A60S2,最新款国产51单片机。 本系统设计的主要是基于单片机为核心,设计一款集温度检测、恒温控制、步进电机控制、继电器控制、矩阵键盘设计于一身的智能鱼缸控制系统…...

NCM文件解密工具:三步解锁网易云音乐加密音频
NCM文件解密工具:三步解锁网易云音乐加密音频 【免费下载链接】ncmdump 项目地址: https://gitcode.com/gh_mirrors/ncmd/ncmdump 还在为网易云音乐下载的歌曲无法在其他播放器上播放而烦恼吗?你是否遇到过精心收藏的音乐只能在特定软件中聆听的…...