34. UE5 RPG实现鼠标点击移动
在前面,我们实现过使用键盘按键wasd去实现控制角色的移动,现在,我们实现了InputAction按键触发,后面,实现一下通过鼠标点击地面实现角色移动。
我们将实现两种效果的切换,如果你点击地面快速松开,角色将自动寻路到目标为止。如果你按住鼠标不放,角色将自动朝向鼠标所指向的位置移动。接下来,我们实现它吧!
首先在PlayerController(玩家控制器类)里面增加一些参数,用来记录一些信息,主要对应的是查询鼠标悬停的目标是否有敌人,按下的时间,以及自动寻路的参数。
FVector CachedDestination = FVector::ZeroVector; //存储鼠标点击的位置float FollowTime = 0.f; // 用于查看按住了多久bool bAutoRunning = false; //当前是否自动移动bool bTargeting = false; //当前鼠标是否选中敌人UPROPERTY(EditDefaultsOnly)float ShortPressThreshold = 0.3f; //定义鼠标悬停多长时间内算点击事件UPROPERTY(EditDefaultsOnly)float AutoRunAcceptanceRadius = 50.f; //当角色和目标距离在此半径内时,将关闭自动寻路UPROPERTY(VisibleAnywhere)TObjectPtr<USplineComponent> Spline; //自动寻路时生成的样条线
在PlayerController构造函数,将Spline初始化
Spline = CreateDefaultSubobject<USplineComponent>("Spline");
我们之前在鼠标事件里面追踪鼠标悬停并给敌人描边的效果,能够获取到敌人

接下来就是在鼠标按下,悬停,抬起三个事件中去实现逻辑,我们之前在里面实现了对技能的触发
后面,我们将点击移动的功能融入进去。
实现长按角色跟随鼠标移动
首先,在鼠标按下事件中,判断传入的Tag是否为鼠标左键事件,在内部判断点击的是否为敌人,如果不是敌人,那就是地面,如果ThisActor有值,那就是点击到了敌人。
bTargeting为记录当前按下时,是否选中了敌人。
bAutoRunning 为是否自动寻路中,在鼠标按下,将自动关闭此项,在鼠标抬起时再重新计算是否需要自动移动。
FollowTime用于统计按下时间,来去顶当前操作为点击还是长按。
void APlayerControllerBase::AbilityInputTagPressed(const FGameplayTag InputTag)
{if(InputTag.MatchesTagExact(FMyGameplayTags::Get().InputTag_LMB)){bTargeting = ThisActor != nullptr; //ThisActor为鼠标悬停在敌人身上才会有值bAutoRunning = false;FollowTime = 0.f; //重置统计的时间}
}
接下来在鼠标悬停事件中,我们将实现角色跟随鼠标移动逻辑。
我们先实现之前的触发技能的逻辑,这里只需要判断一下是否鼠标左键的事件,如果是,将执行内部逻辑,不再运行后面的逻辑。
void APlayerControllerBase::AbilityInputTagHold(const FGameplayTag InputTag)
{if(!InputTag.MatchesTagExact(FMyGameplayTags::Get().InputTag_LMB)){if(GetASC()){GetASC()->AbilityInputTagHold(InputTag);}return;}
后面逻辑,我们先对bTargeting 进行布尔判断,如果它的值为true,证明点中了敌人,要执行攻击敌人逻辑,这个我们后面再实现
在另外的分支就是没有选中敌人,我们可以执行鼠标悬停角色跟随逻辑。
首先对悬停时间进行统计,如果悬停时间过短,我们后面将在鼠标抬起事件中去实现角色自动寻路功能。
FollowTime += GetWorld()->GetDeltaSeconds(); //统计悬停时间来判断是否为点击
接着,我们通过GetHitResultUnderCursor函数去获取鼠标拾取的位置
参数说明
-
ECollisionChannel TraceChannel:这个参数决定了射线将与哪些类型的物体碰撞。例如,你可以设置射线只与静态网格体(ECC_StaticMesh)或角色(ECC_Pawn)等碰撞。
-
bool bTraceComplex:这个布尔值决定了射线是否应该与复杂碰撞体(比如带有多边形碰撞体的网格体)进行碰撞检测。如果设置为 true,射线将与复杂碰撞体碰撞;如果设置为 false,则只会与简单的碰撞体(比如球体或盒体)碰撞。
-
FHitResult& HitResult:这是一个引用参数,用于返回射线与场景中的物体碰撞的结果。如果射线没有碰撞到任何物体,这个参数将不会被修改。
将拾取到的位置缓存到变量内
FHitResult Hit;if(GetHitResultUnderCursor(ECC_Visibility, false, Hit)){CachedDestination = Hit.ImpactPoint;}
有了目标位置后,我们通过目标位置减去角色所在位置,就可以得到一个朝向,GetSafeNormal()为归一化向量,然后使用AddMovementInput去移动角色
if(APawn* ControlledPawn = GetPawn()){const FVector WorldDirection = (CachedDestination - ControlledPawn->GetActorLocation()).GetSafeNormal();ControlledPawn->AddMovementInput(WorldDirection);}
实现自动寻路
如果鼠标按下抬起的时间间隔比较小,我们将其定义为鼠标点击事件,并将执行自动寻路逻辑。这些内容我们将在鼠标抬起时的函数中进行实现。
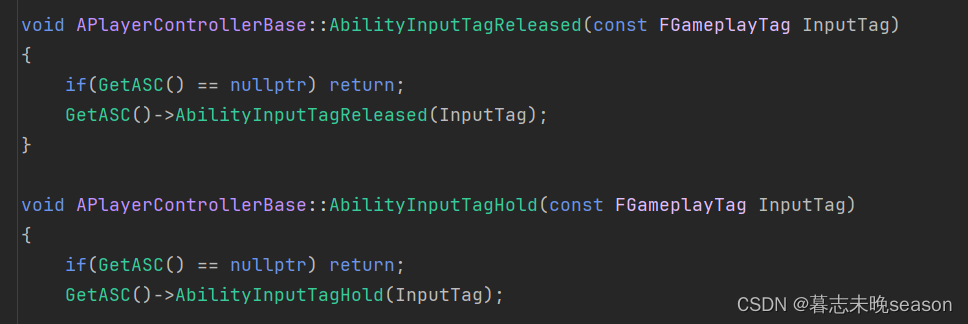
在实现此逻辑之前,我们先将之前实现的技能函数实现,之前实现主要是一个触发技能鼠标抬起的回调,现在还未实现内容。
我们先判断传入的tag如果不是鼠标左键的tag,将执行此逻辑。
void APlayerControllerBase::AbilityInputTagReleased(const FGameplayTag InputTag)
{if(!InputTag.MatchesTagExact(FMyGameplayTags::Get().InputTag_LMB)){if(GetASC()){GetASC()->AbilityInputTagReleased(InputTag);}return;}
}
接着还要判断是否选中了敌人,选中敌人的话执行技能逻辑。
if(bTargeting){if(GetASC()){GetASC()->AbilityInputTagReleased(InputTag);}}else...
在else里面,我们就可以正式去实现自动寻路的功能了
首先判断一下,当前抬起时是否能够触发点击事件,ShortPressThreshold的值是我们可以自定义的,比如按下到抬起如果小于0.3s,我们将其定义为点击,那它的值我们就定义为0.3,FollowTime是在按下后,在Hold状态的间隔时间持续添加,来实现对按
if(FollowTime <= ShortPressThreshold)
接着我们去通过内置的插件去拾取自动寻路的路线,这个使用的UE引擎的方法,它需要三个值,当前世界上下文中的对象(传入自身即可),起始点,结束点,查询的到将返回一个UNavigationPath
if(UNavigationPath* NavPath = UNavigationSystemV1::FindPathToLocationSynchronously(this, ControlledPawn->GetActorLocation(), CachedDestination))
要使用寻路函数需要对应的模块,我们在官网看到它需要NavigationSystem模块
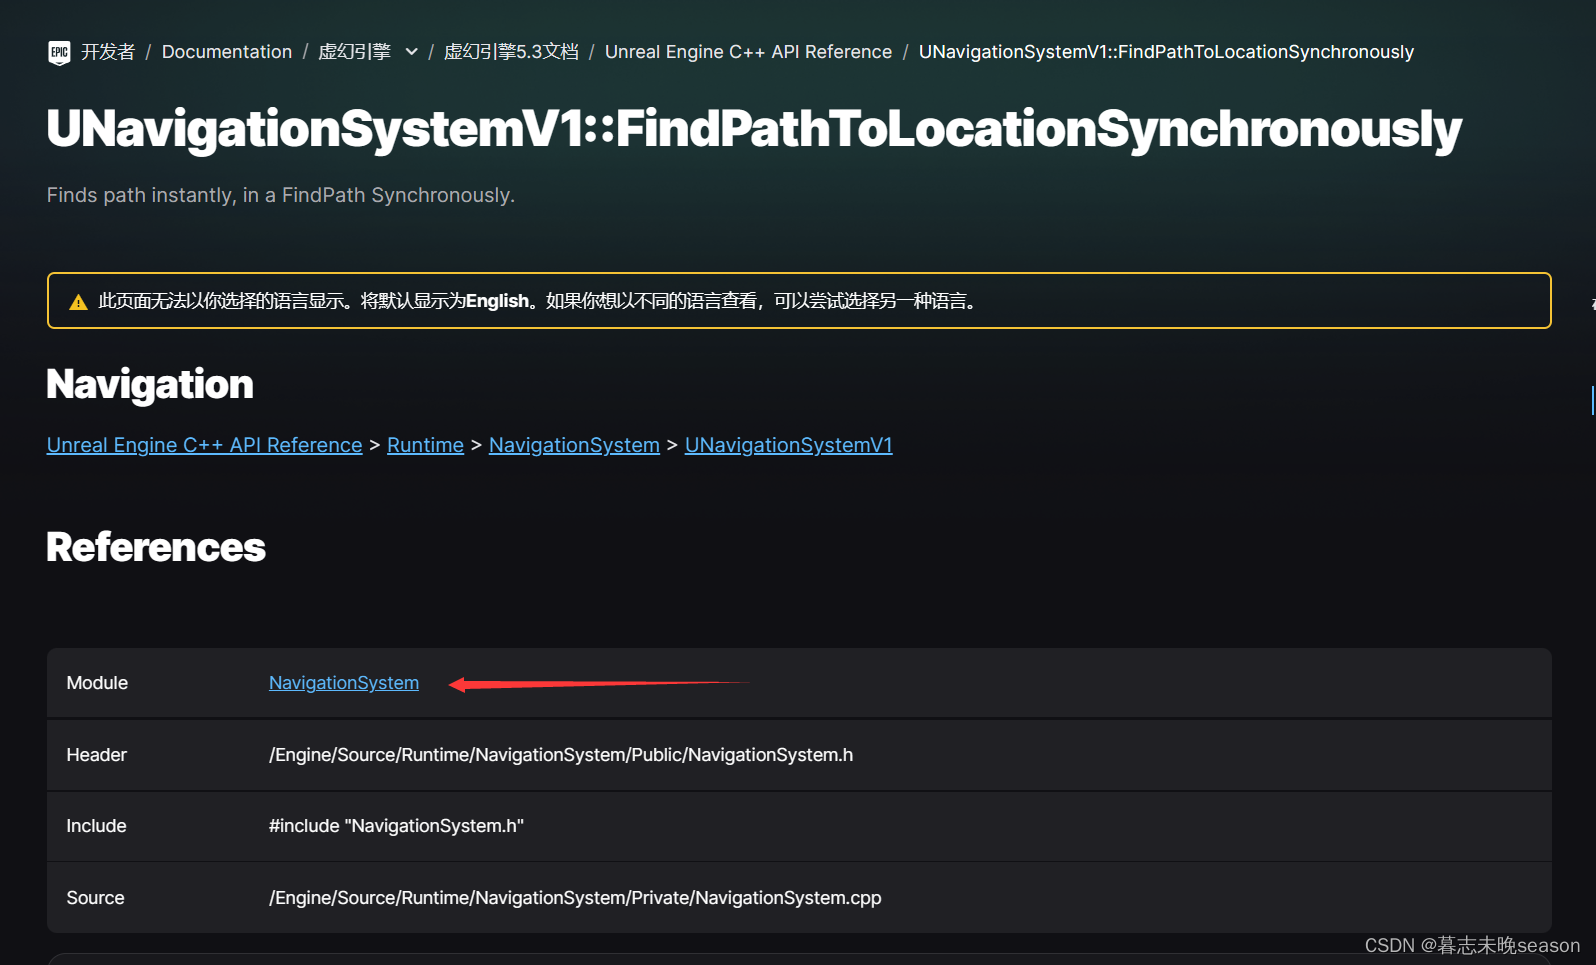
要使用此模块,我们需要在Build.cs里面将NavigationSystem加入,然后编译的时候将会将此模块自动编入
PrivateDependencyModuleNames.AddRange(new string[] { "GameplayTags", "GameplayTasks", "NavigationSystem" });
如果能够查询的到,我们首先将样条属性内的内容先清除
Spline->ClearSplinePoints(); //清除样条内现有的点
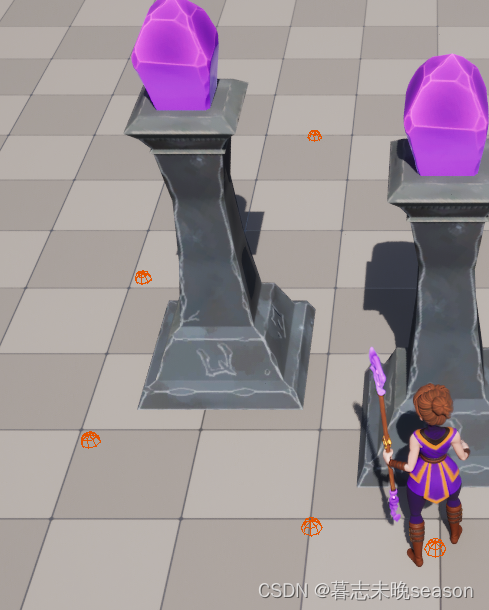
然后for循环找到路径里面的点,添加到样条中,为了防止错误,我们使用DrawDebugSphere函数在场景中debug测试。
for(const FVector& PointLoc : NavPath->PathPoints)
{Spline->AddSplinePoint(PointLoc, ESplineCoordinateSpace::World); //将新的位置添加到样条曲线中DrawDebugSphere(GetWorld(), PointLoc, 8.f, 8, FColor::Orange, false, 5.f); //点击后debug调试
}
添加完成后,我们还需要将记录在自动寻路状态的变量设置为true,在帧更新中,我们将通过这个变量进行角色移动
bAutoRunning = true; //设置当前正常自动寻路状态,将在tick中更新位置
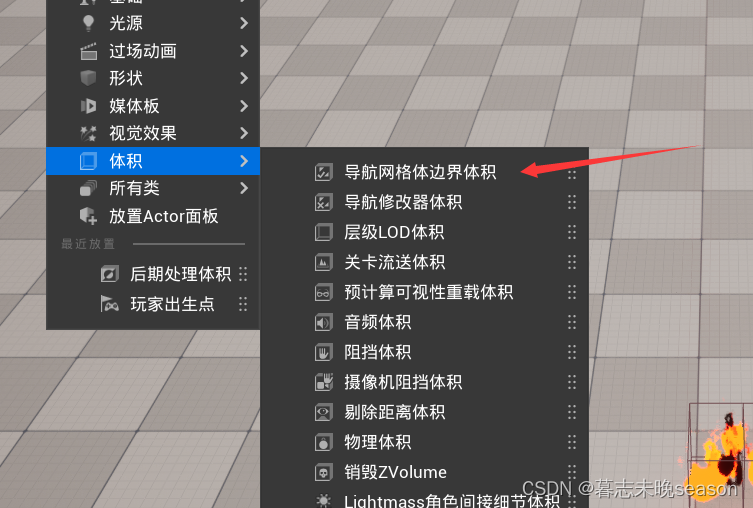
接着可以编译测试是否能够实现在场景获取到路径点,我们要测试导航功能,需要在场景里面设置导航体积,只有在导航体积内,才能够触发此功能,先在场景添加一个此体积。
按快捷键P,可以显示可导航区域,我们可以调整体积范围来实现可导航范围。
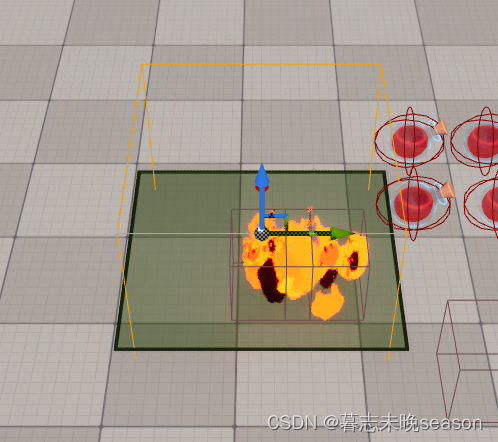
顺便加几个遮挡物,导航体积会自动计算,将其可移动范围剔除掉。
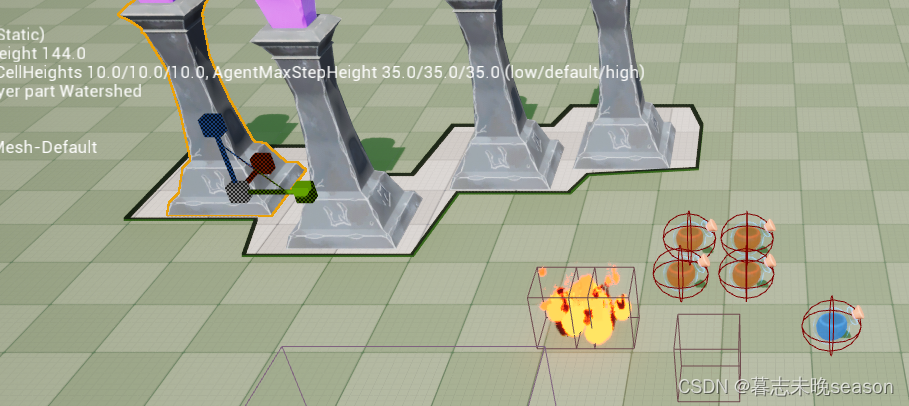
然后测试点击地面,会发现生成了对应的点的位置
在帧循环实现自动移动
现在自动寻路的路径有了,我们要实现角色的自动移动,那么,需要在帧循环里面实现。
//帧更新
void APlayerControllerBase::PlayerTick(float DeltaTime)
{Super::PlayerTick(DeltaTime);//鼠标位置追踪是否悬停在敌人身上CursorTrace();}
首先我们获取并判断一下Pawn是否存在
if(APawn* ControlledPawn = GetPawn())
由于无法确保角色位置和样条曲线百分之百重合在一块,所以我们先获取一下角色距离样条最近的位置
const FVector LocationOnSpline = Spline->FindLocationClosestToWorldLocation(ControlledPawn->GetActorLocation(), ESplineCoordinateSpace::World);
然后通过此位置去获取在样条上的方向
const FVector Direction = Spline->FindDirectionClosestToWorldLocation(LocationOnSpline, ESplineCoordinateSpace::World);
让角色通过此方向去移动
ControlledPawn->AddMovementInput(Direction);
我们还需要在角色移动到终点时,设置它停止寻路,所以,我们还需要查询当前角色所在位置和终点位置的距离,如果小于我们设置的AutoRunAcceptanceRadius距离内,我们将停止自动寻路。
const float DistanceToDestination = (LocationOnSpline - CachedDestination).Length();
if(DistanceToDestination <= AutoRunAcceptanceRadius)
{bAutoRunning = false;
}
ps:这里还有一个问题,就是如果你点击位置为自动寻路无法到达的位置,导航还是会生成一条路径,但是我们无法达到最终点,这样无法停止自动寻路。所以,我们需要在鼠标抬起时,将路径的终点设置给CachedDestination,这也是自动寻路的最终点。
我们获取数组中的最后一个点,按照索引来算,就是数组的长度-1
CachedDestination = NavPath->PathPoints[NavPath->PathPoints.Num() - 1];
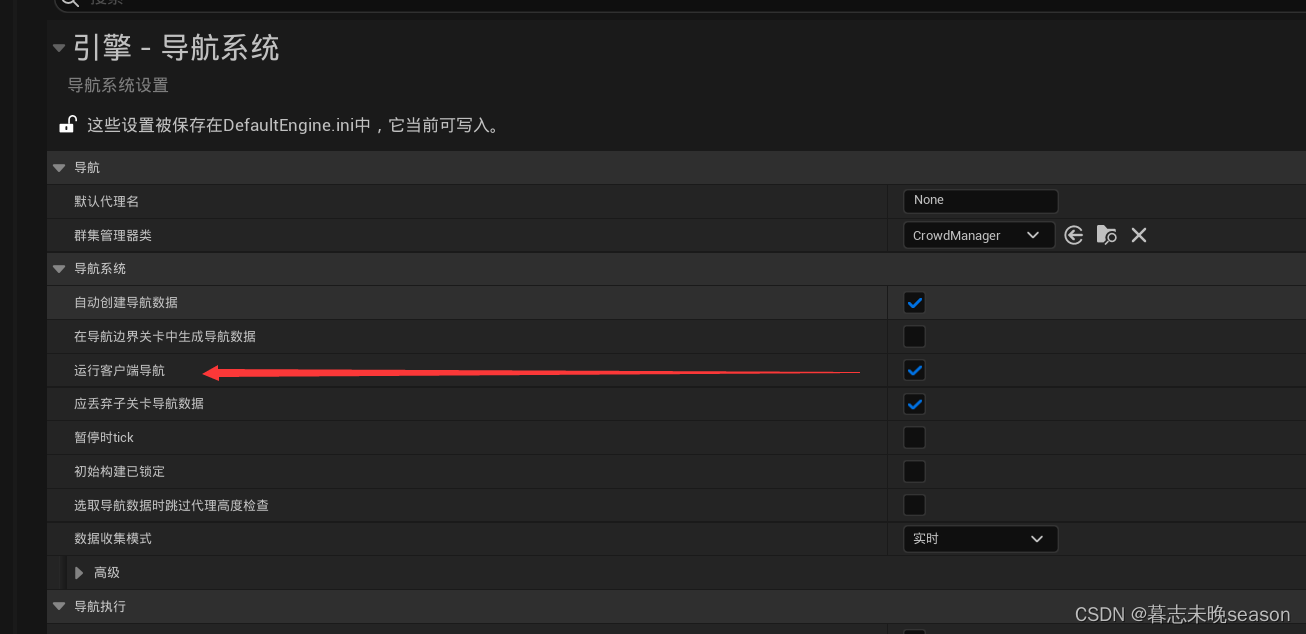
如果需要服务器,我们需要在导航系统设置运行客户端导航,这样,会在所有的客户端生成导航体积。
如果我们需要点击到柱子后面的地面,而不是忘柱子那里移动,我们需要修改柱子的碰撞预设为自定义

我们鼠标拾取地面位置是通过Visibility去拾取的,那么,将此相应通道关闭。

接下来,我们就可以测试了,查看是否有bug。
下面列出来PlayerController的完整代码
// 版权归暮志未晚所有。#pragma once#include "CoreMinimal.h"
#include "GameFramework/PlayerController.h"
#include "GameplayTagContainer.h"
#include "PlayerControllerBase.generated.h"class USplineComponent;
class UInputConfig;
class UInputMappingContext;
class UInputAction;
struct FInputActionValue;
class IEnemyInterface;
class UAbilitySystemComponentBase;/*** 玩家控制器*/
UCLASS()
class AURA_API APlayerControllerBase : public APlayerController
{GENERATED_BODY()public:APlayerControllerBase();virtual void PlayerTick(float DeltaTime) override;protected:virtual void BeginPlay() override; //游戏开始时触发virtual void SetupInputComponent() override; //在生成输入组件时触发private:UPROPERTY(EditAnywhere, Category="Input")TObjectPtr<UInputMappingContext> CharacterContext;UPROPERTY(EditAnywhere, Category="Input")TObjectPtr<UInputAction> MoveAction;void Move(const struct FInputActionValue& InputActionValue);void CursorTrace(); //鼠标位置追踪拾取IEnemyInterface* LastActor; //上一帧拾取到的接口指针IEnemyInterface* ThisActor; //这一帧拾取到的接口指针void AbilityInputTagPressed(FGameplayTag InputTag);void AbilityInputTagReleased(FGameplayTag InputTag);void AbilityInputTagHold(FGameplayTag InputTag);UPROPERTY(EditDefaultsOnly, Category="Input")TObjectPtr<UInputConfig> InputConfig;UPROPERTY()TObjectPtr<UAbilitySystemComponentBase> AbilitySystemComponentBase;UAbilitySystemComponentBase* GetASC();FVector CachedDestination = FVector::ZeroVector; //存储鼠标点击的位置float FollowTime = 0.f; // 用于查看按住了多久bool bAutoRunning = false; //当前是否自动移动bool bTargeting = false; //当前鼠标是否选中敌人UPROPERTY(EditDefaultsOnly)float ShortPressThreshold = 0.3f; //定义鼠标悬停多长时间内算点击事件UPROPERTY(EditDefaultsOnly)float AutoRunAcceptanceRadius = 50.f; //当角色和目标距离在此半径内时,将关闭自动寻路UPROPERTY(VisibleAnywhere)TObjectPtr<USplineComponent> Spline; //自动寻路时生成的样条线void AutoRun();
};
// 版权归暮志未晚所有。#include "Player/PlayerControllerBase.h"#include "AbilitySystemBlueprintLibrary.h"
#include "EnhancedInputSubsystems.h"
#include "MyGameplayTags.h"
#include "NavigationPath.h"
#include "NavigationSystem.h"
#include "AbilitySystem/AbilitySystemComponentBase.h"
#include "Components/SplineComponent.h"
#include "Input/InputComponentBase.h"
#include "Interaction/EnemyInterface.h"APlayerControllerBase::APlayerControllerBase()
{bReplicates = true; //是否将数据传送服务器更新LastActor = nullptr;ThisActor = nullptr;Spline = CreateDefaultSubobject<USplineComponent>("Spline");
}//帧更新
void APlayerControllerBase::PlayerTick(float DeltaTime)
{Super::PlayerTick(DeltaTime);//鼠标位置追踪是否悬停在敌人身上CursorTrace();//自动寻路AutoRun();
}void APlayerControllerBase::AutoRun()
{if(!bAutoRunning) return;if(APawn* ControlledPawn = GetPawn()){//找到距离样条最近的位置const FVector LocationOnSpline = Spline->FindLocationClosestToWorldLocation(ControlledPawn->GetActorLocation(), ESplineCoordinateSpace::World);//获取这个位置在样条上的方向const FVector Direction = Spline->FindDirectionClosestToWorldLocation(LocationOnSpline, ESplineCoordinateSpace::World);ControlledPawn->AddMovementInput(Direction);const float DistanceToDestination = (LocationOnSpline - CachedDestination).Length();if(DistanceToDestination <= AutoRunAcceptanceRadius){bAutoRunning = false;}}
}//鼠标位置追踪
void APlayerControllerBase::CursorTrace()
{FHitResult CursorHit;GetHitResultUnderCursor(ECC_Visibility, false, CursorHit); //获取可视的鼠标命中结果if(!CursorHit.bBlockingHit) return; //如果未命中直接返回LastActor = ThisActor;ThisActor = Cast<IEnemyInterface>(CursorHit.GetActor());/*** 射线拾取后,会出现的几种情况* 1. LastActor is null ThisActor is null 不需要任何操作* 2. LastActor is null ThisActor is valid 高亮ThisActor* 3. LastActor is valid ThisActor is null 取消高亮LastActor* 4. LastActor is valid ThisActor is valid LastActor != ThisActor 取消高亮LastActor 高亮ThisActor* 5. LastActor is valid ThisActor is valid LastActor == ThisActor 不需要任何操作*/if(LastActor == nullptr){if(ThisActor != nullptr){//case 2ThisActor->HighlightActor();} // else case 1}else{if(ThisActor == nullptr){//case 3LastActor->UnHighlightActor();}else{if(LastActor != ThisActor){//case 4LastActor->UnHighlightActor();ThisActor->HighlightActor();} //else case 5}}}void APlayerControllerBase::AbilityInputTagPressed(const FGameplayTag InputTag)
{if(InputTag.MatchesTagExact(FMyGameplayTags::Get().InputTag_LMB)){bTargeting = ThisActor != nullptr; //ThisActor为鼠标悬停在敌人身上才会有值bAutoRunning = false;FollowTime = 0.f; //重置统计的时间}
}void APlayerControllerBase::AbilityInputTagReleased(const FGameplayTag InputTag)
{if(!InputTag.MatchesTagExact(FMyGameplayTags::Get().InputTag_LMB)){if(GetASC()){GetASC()->AbilityInputTagReleased(InputTag);}return;}if(bTargeting){if(GetASC()){GetASC()->AbilityInputTagReleased(InputTag);}}else{const APawn* ControlledPawn = GetPawn();if(FollowTime <= ShortPressThreshold && ControlledPawn){if(UNavigationPath* NavPath = UNavigationSystemV1::FindPathToLocationSynchronously(this, ControlledPawn->GetActorLocation(), CachedDestination)){Spline->ClearSplinePoints(); //清除样条内现有的点for(const FVector& PointLoc : NavPath->PathPoints){Spline->AddSplinePoint(PointLoc, ESplineCoordinateSpace::World); //将新的位置添加到样条曲线中// DrawDebugSphere(GetWorld(), PointLoc, 8.f, 8, FColor::Orange, false, 5.f); //点击后debug调试}//自动寻路将最终目的地设置为导航的终点,方便停止导航CachedDestination = NavPath->PathPoints[NavPath->PathPoints.Num() - 1];bAutoRunning = true; //设置当前正常自动寻路状态,将在tick中更新位置}}}
}void APlayerControllerBase::AbilityInputTagHold(const FGameplayTag InputTag)
{if(!InputTag.MatchesTagExact(FMyGameplayTags::Get().InputTag_LMB)){if(GetASC()){GetASC()->AbilityInputTagHold(InputTag);}return;}if(bTargeting){if(GetASC()){//点击敌人目标,将攻击敌人GetASC()->AbilityInputTagHold(InputTag);}}else{FollowTime += GetWorld()->GetDeltaSeconds(); //统计悬停时间来判断是否为点击FHitResult Hit;if(GetHitResultUnderCursor(ECC_Visibility, false, Hit)){CachedDestination = Hit.ImpactPoint;}if(APawn* ControlledPawn = GetPawn()){const FVector WorldDirection = (CachedDestination - ControlledPawn->GetActorLocation()).GetSafeNormal();ControlledPawn->AddMovementInput(WorldDirection);}}
}UAbilitySystemComponentBase* APlayerControllerBase::GetASC()
{if(AbilitySystemComponentBase == nullptr){AbilitySystemComponentBase = Cast<UAbilitySystemComponentBase>(UAbilitySystemBlueprintLibrary::GetAbilitySystemComponent(GetPawn()));}return AbilitySystemComponentBase;
}void APlayerControllerBase::BeginPlay()
{Super::BeginPlay();check(CharacterContext); //判断是否存在//从本地角色身上获取到它的子系统UEnhancedInputLocalPlayerSubsystem* Subsystem = ULocalPlayer::GetSubsystem<UEnhancedInputLocalPlayerSubsystem>(GetLocalPlayer());// check(Subsystem); //检查子系统是否存在 不存在会打断if(Subsystem){//将自定义的操作映射上下文添加到子系统中Subsystem->AddMappingContext(CharacterContext, 0); //可以存在多个操作映射,根据优先级触发}bShowMouseCursor = true; //游戏中是否显示鼠标光标DefaultMouseCursor = EMouseCursor::Default; //鼠标光标的样式FInputModeGameAndUI InputModeData;InputModeData.SetLockMouseToViewportBehavior(EMouseLockMode::DoNotLock); //将鼠标锁定在视口内InputModeData.SetHideCursorDuringCapture(false); //鼠标被捕获时是否隐藏SetInputMode(InputModeData); //设置给控制器
}void APlayerControllerBase::SetupInputComponent()
{Super::SetupInputComponent();UInputComponentBase* EnhancedInputComponent = CastChecked<UInputComponentBase>(InputComponent); //获取到增强输入组件EnhancedInputComponent->BindAction(MoveAction, ETriggerEvent::Triggered, this, &APlayerControllerBase::Move); //绑定移动事件EnhancedInputComponent->BindAbilityAction(InputConfig, this, &ThisClass::AbilityInputTagPressed,&ThisClass::AbilityInputTagReleased, &ThisClass::AbilityInputTagHold);
}void APlayerControllerBase::Move(const FInputActionValue& InputActionValue)
{const FVector2D InputAxisVector = InputActionValue.Get<FVector2D>(); //获取输入操作的2维向量值const FRotator Rotation = GetControlRotation(); //获取控制器旋转const FRotator YawRotation(0.f, Rotation.Yaw, 0.f); //通过控制器的垂直朝向创建一个旋转值,忽略上下朝向和左右朝向const FVector ForwardDirection = FRotationMatrix(YawRotation).GetUnitAxis(EAxis::X); //获取世界坐标系下向前的值,-1到1const FVector RightDirection = FRotationMatrix(YawRotation).GetUnitAxis(EAxis::Y); //获取世界坐标系下向右的值,-1到1if(APawn* ControlledPawn = GetPawn<APawn>()){ControlledPawn->AddMovementInput(ForwardDirection, InputAxisVector.Y);ControlledPawn->AddMovementInput(RightDirection, InputAxisVector.X);}
}代码整理
上面的代码有很多可以优化的点,我们一步一步优化,让代码看起来更清晰,能节省性能的也将性能节省下来。
首先能优化的点就是鼠标位置拾取,这个是比较耗性能的点,需要在鼠标位置发射一条射线,然后和场景内可交互的模型进行碰撞检测,我们在代码里面使用两次,一次是实现悬停让敌人高亮的效果。另一次是鼠标悬停,角色跟随鼠标拾取位置移动时。这两个拾取,我们其实只需要拾取一次,增加一个类的成员变量,悬停里面去判断结果。
添加一个成员变量
FHitResult CursorHit; //鼠标拾取结果,可以复用
直接在CursorTrace函数里面获取,把局部的变量删除。
GetHitResultUnderCursor(ECC_Visibility, false, CursorHit); //获取可视的鼠标命中结果
在鼠标悬停事件中,直接使用它的结果即可
if(CursorHit.bBlockingHit)
{CachedDestination = CursorHit.ImpactPoint;
}
优化第二项,鼠标位置追踪函数里面,我们写了很长的逻辑,而且重复的判断很多,接下来,我们将优化这里。
//鼠标位置追踪
void APlayerControllerBase::CursorTrace()
{GetHitResultUnderCursor(ECC_Visibility, false, CursorHit); //获取可视的鼠标命中结果if(!CursorHit.bBlockingHit) return; //如果未命中直接返回LastActor = ThisActor;ThisActor = Cast<IEnemyInterface>(CursorHit.GetActor());/*** 射线拾取后,会出现的几种情况* 1. LastActor is null   ThisActor is null 不需要任何操作* 2. LastActor is null   ThisActor is valid 高亮ThisActor* 3. LastActor is valid   ThisActor is null 取消高亮LastActor* 4. LastActor is valid   ThisActor is valid LastActor != ThisActor 取消高亮LastActor 高亮ThisActor* 5. LastActor is valid   ThisActor is valid LastActor == ThisActor 不需要任何操作*/if(LastActor == nullptr){if(ThisActor != nullptr){//case 2ThisActor->HighlightActor();} // else case 1}else{if(ThisActor == nullptr){//case 3LastActor->UnHighlightActor();}else{if(LastActor != ThisActor){//case 4LastActor->UnHighlightActor();ThisActor->HighlightActor();} //else case 5}}}
修改完成后,如下,我们只需要在两个指针不同的时候,进行处理即可,然后判断当前变量指针是否存在,存在再调用对应的函数即可。
//鼠标位置追踪
void APlayerControllerBase::CursorTrace()
{GetHitResultUnderCursor(ECC_Visibility, false, CursorHit); //获取可视的鼠标命中结果if(!CursorHit.bBlockingHit) return; //如果未命中直接返回LastActor = ThisActor;ThisActor = Cast<IEnemyInterface>(CursorHit.GetActor());if(ThisActor != LastActor){if(ThisActor) ThisActor->HighlightActor();if(LastActor) LastActor->UnHighlightActor();}}
修改完成后的代码:
// 版权归暮志未晚所有。#pragma once#include "CoreMinimal.h"
#include "GameFramework/PlayerController.h"
#include "GameplayTagContainer.h"
#include "PlayerControllerBase.generated.h"class USplineComponent;
class UInputConfig;
class UInputMappingContext;
class UInputAction;
struct FInputActionValue;
class IEnemyInterface;
class UAbilitySystemComponentBase;/*** 玩家控制器*/
UCLASS()
class AURA_API APlayerControllerBase : public APlayerController
{GENERATED_BODY()public:APlayerControllerBase();virtual void PlayerTick(float DeltaTime) override;protected:virtual void BeginPlay() override; //游戏开始时触发virtual void SetupInputComponent() override; //在生成输入组件时触发private:UPROPERTY(EditAnywhere, Category="Input")TObjectPtr<UInputMappingContext> CharacterContext;UPROPERTY(EditAnywhere, Category="Input")TObjectPtr<UInputAction> MoveAction;void Move(const struct FInputActionValue& InputActionValue);void CursorTrace(); //鼠标位置追踪拾取IEnemyInterface* LastActor; //上一帧拾取到的接口指针IEnemyInterface* ThisActor; //这一帧拾取到的接口指针FHitResult CursorHit; //鼠标拾取结果,可以复用void AbilityInputTagPressed(FGameplayTag InputTag);void AbilityInputTagReleased(FGameplayTag InputTag);void AbilityInputTagHold(FGameplayTag InputTag);UPROPERTY(EditDefaultsOnly, Category="Input")TObjectPtr<UInputConfig> InputConfig;UPROPERTY()TObjectPtr<UAbilitySystemComponentBase> AbilitySystemComponentBase;UAbilitySystemComponentBase* GetASC();FVector CachedDestination = FVector::ZeroVector; //存储鼠标点击的位置float FollowTime = 0.f; // 用于查看按住了多久bool bAutoRunning = false; //当前是否自动移动bool bTargeting = false; //当前鼠标是否选中敌人UPROPERTY(EditDefaultsOnly)float ShortPressThreshold = 0.3f; //定义鼠标悬停多长时间内算点击事件UPROPERTY(EditDefaultsOnly)float AutoRunAcceptanceRadius = 50.f; //当角色和目标距离在此半径内时,将关闭自动寻路UPROPERTY(VisibleAnywhere)TObjectPtr<USplineComponent> Spline; //自动寻路时生成的样条线void AutoRun();
};
// 版权归暮志未晚所有。#include "Player/PlayerControllerBase.h"#include "AbilitySystemBlueprintLibrary.h"
#include "EnhancedInputSubsystems.h"
#include "MyGameplayTags.h"
#include "NavigationPath.h"
#include "NavigationSystem.h"
#include "AbilitySystem/AbilitySystemComponentBase.h"
#include "Components/SplineComponent.h"
#include "Input/InputComponentBase.h"
#include "Interaction/EnemyInterface.h"APlayerControllerBase::APlayerControllerBase()
{bReplicates = true; //是否将数据传送服务器更新LastActor = nullptr;ThisActor = nullptr;Spline = CreateDefaultSubobject<USplineComponent>("Spline");
}//帧更新
void APlayerControllerBase::PlayerTick(float DeltaTime)
{Super::PlayerTick(DeltaTime);//鼠标位置追踪是否悬停在敌人身上CursorTrace();//自动寻路AutoRun();
}void APlayerControllerBase::AutoRun()
{if(!bAutoRunning) return;if(APawn* ControlledPawn = GetPawn()){//找到距离样条最近的位置const FVector LocationOnSpline = Spline->FindLocationClosestToWorldLocation(ControlledPawn->GetActorLocation(), ESplineCoordinateSpace::World);//获取这个位置在样条上的方向const FVector Direction = Spline->FindDirectionClosestToWorldLocation(LocationOnSpline, ESplineCoordinateSpace::World);ControlledPawn->AddMovementInput(Direction);const float DistanceToDestination = (LocationOnSpline - CachedDestination).Length();if(DistanceToDestination <= AutoRunAcceptanceRadius){bAutoRunning = false;}}
}//鼠标位置追踪
void APlayerControllerBase::CursorTrace()
{GetHitResultUnderCursor(ECC_Visibility, false, CursorHit); //获取可视的鼠标命中结果if(!CursorHit.bBlockingHit) return; //如果未命中直接返回LastActor = ThisActor;ThisActor = Cast<IEnemyInterface>(CursorHit.GetActor());if(ThisActor != LastActor){if(ThisActor) ThisActor->HighlightActor();if(LastActor) LastActor->UnHighlightActor();}}void APlayerControllerBase::AbilityInputTagPressed(const FGameplayTag InputTag)
{if(InputTag.MatchesTagExact(FMyGameplayTags::Get().InputTag_LMB)){bTargeting = ThisActor != nullptr; //ThisActor为鼠标悬停在敌人身上才会有值bAutoRunning = false;FollowTime = 0.f; //重置统计的时间}
}void APlayerControllerBase::AbilityInputTagReleased(const FGameplayTag InputTag)
{if(!InputTag.MatchesTagExact(FMyGameplayTags::Get().InputTag_LMB)){if(GetASC()) GetASC()->AbilityInputTagReleased(InputTag);return;}if(bTargeting){if(GetASC()) GetASC()->AbilityInputTagReleased(InputTag);}else{const APawn* ControlledPawn = GetPawn();if(FollowTime <= ShortPressThreshold && ControlledPawn){if(UNavigationPath* NavPath = UNavigationSystemV1::FindPathToLocationSynchronously(this, ControlledPawn->GetActorLocation(), CachedDestination)){Spline->ClearSplinePoints(); //清除样条内现有的点for(const FVector& PointLoc : NavPath->PathPoints){Spline->AddSplinePoint(PointLoc, ESplineCoordinateSpace::World); //将新的位置添加到样条曲线中// DrawDebugSphere(GetWorld(), PointLoc, 8.f, 8, FColor::Orange, false, 5.f); //点击后debug调试}//自动寻路将最终目的地设置为导航的终点,方便停止导航CachedDestination = NavPath->PathPoints[NavPath->PathPoints.Num() - 1];bAutoRunning = true; //设置当前正常自动寻路状态,将在tick中更新位置}}}
}void APlayerControllerBase::AbilityInputTagHold(const FGameplayTag InputTag)
{if(!InputTag.MatchesTagExact(FMyGameplayTags::Get().InputTag_LMB)){if(GetASC()) GetASC()->AbilityInputTagHold(InputTag);return;}if(bTargeting){if(GetASC()) GetASC()->AbilityInputTagHold(InputTag);}else{FollowTime += GetWorld()->GetDeltaSeconds(); //统计悬停时间来判断是否为点击if(CursorHit.bBlockingHit) CachedDestination = CursorHit.ImpactPoint; //获取鼠标拾取位置if(APawn* ControlledPawn = GetPawn()){const FVector WorldDirection = (CachedDestination - ControlledPawn->GetActorLocation()).GetSafeNormal();ControlledPawn->AddMovementInput(WorldDirection);}}
}UAbilitySystemComponentBase* APlayerControllerBase::GetASC()
{if(AbilitySystemComponentBase == nullptr){AbilitySystemComponentBase = Cast<UAbilitySystemComponentBase>(UAbilitySystemBlueprintLibrary::GetAbilitySystemComponent(GetPawn()));}return AbilitySystemComponentBase;
}void APlayerControllerBase::BeginPlay()
{Super::BeginPlay();check(CharacterContext); //判断是否存在//从本地角色身上获取到它的子系统UEnhancedInputLocalPlayerSubsystem* Subsystem = ULocalPlayer::GetSubsystem<UEnhancedInputLocalPlayerSubsystem>(GetLocalPlayer());// check(Subsystem); //检查子系统是否存在 不存在会打断if(Subsystem){//将自定义的操作映射上下文添加到子系统中Subsystem->AddMappingContext(CharacterContext, 0); //可以存在多个操作映射,根据优先级触发}bShowMouseCursor = true; //游戏中是否显示鼠标光标DefaultMouseCursor = EMouseCursor::Default; //鼠标光标的样式FInputModeGameAndUI InputModeData;InputModeData.SetLockMouseToViewportBehavior(EMouseLockMode::DoNotLock); //将鼠标锁定在视口内InputModeData.SetHideCursorDuringCapture(false); //鼠标被捕获时是否隐藏SetInputMode(InputModeData); //设置给控制器
}void APlayerControllerBase::SetupInputComponent()
{Super::SetupInputComponent();UInputComponentBase* EnhancedInputComponent = CastChecked<UInputComponentBase>(InputComponent); //获取到增强输入组件EnhancedInputComponent->BindAction(MoveAction, ETriggerEvent::Triggered, this, &APlayerControllerBase::Move); //绑定移动事件EnhancedInputComponent->BindAbilityAction(InputConfig, this, &ThisClass::AbilityInputTagPressed,&ThisClass::AbilityInputTagReleased, &ThisClass::AbilityInputTagHold);
}void APlayerControllerBase::Move(const FInputActionValue& InputActionValue)
{const FVector2D InputAxisVector = InputActionValue.Get<FVector2D>(); //获取输入操作的2维向量值const FRotator Rotation = GetControlRotation(); //获取控制器旋转const FRotator YawRotation(0.f, Rotation.Yaw, 0.f); //通过控制器的垂直朝向创建一个旋转值,忽略上下朝向和左右朝向const FVector ForwardDirection = FRotationMatrix(YawRotation).GetUnitAxis(EAxis::X); //获取世界坐标系下向前的值,-1到1const FVector RightDirection = FRotationMatrix(YawRotation).GetUnitAxis(EAxis::Y); //获取世界坐标系下向右的值,-1到1if(APawn* ControlledPawn = GetPawn<APawn>()){ControlledPawn->AddMovementInput(ForwardDirection, InputAxisVector.Y);ControlledPawn->AddMovementInput(RightDirection, InputAxisVector.X);}
}处理bug
在ASC里面我们实现了一个EffectApplied的函数,在GE被应用的时候,会触发此函数回调,用于显示被使用的是什么物品。然后在EffectApplied函数中使用自定义委托广播出去,在WidgetController中监听自定义委托。但是,现在OnGameplayEffectAppliedDelegateToSelf无法在客户端运行。
void UAbilitySystemComponentBase::AbilityActorInfoSet()
{OnGameplayEffectAppliedDelegateToSelf.AddUObject(this, &UAbilitySystemComponentBase::EffectApplied);
}
查看源码,这个注释明确告诉我们在服务器运行的
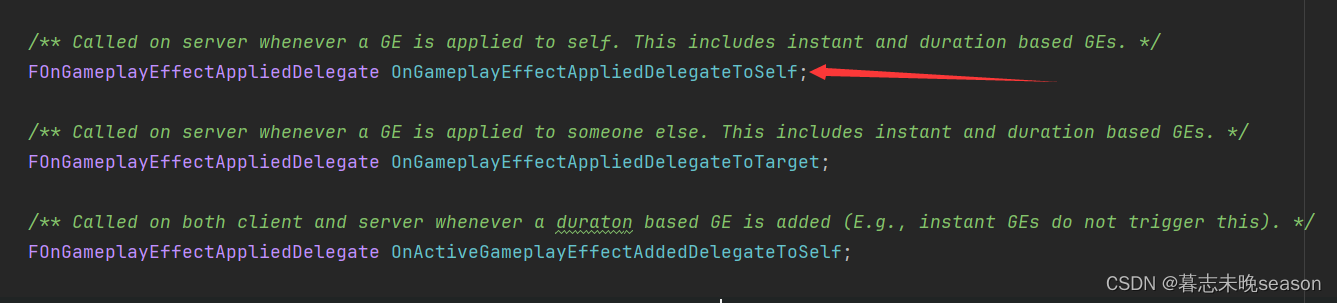
我们现在的解决逻辑是,OnGameplayEffectAppliedDelegateToSelf只在服务器上面运行,在服务器上面触发了EffectApplied,那EffectApplied回调能不能实现在客户端也能运行。方法是可行的
首先,我们需要给EffectApplied函数增加标记,告诉UE它是一个在客户端运行的成员函数,这样,在服务器调用它后,它会被复制到客户端去运行。作为规范,我们需要在客户端运行函数前面加上Client,这样可以明白是一个客户端运行的函数。
//标记Client告诉UE这个函数应该只在客户端运行,设置Reliable表示这个函数调用是可靠的,即它确保数据能够到达客户端UFUNCTION(Client, Reliable)void ClientEffectApplied(UAbilitySystemComponent* AbilitySystemComponent, const FGameplayEffectSpec& EffectSpec, FActiveGameplayEffectHandle ActiveGameplayEffectHandle) const;
接着将回调绑定的名称改掉。
void UAbilitySystemComponentBase::AbilityActorInfoSet()
{OnGameplayEffectAppliedDelegateToSelf.AddUObject(this, &UAbilitySystemComponentBase::ClientEffectApplied);
}
最重要的是,客户端函数的实现需要加上_Implementation后缀,这样就实现了在客户端调用。
void UAbilitySystemComponentBase::ClientEffectApplied_Implementation(UAbilitySystemComponent* AbilitySystemComponent,const FGameplayEffectSpec& EffectSpec, FActiveGameplayEffectHandle ActiveGameplayEffectHandle) const
{// GEngine->AddOnScreenDebugMessage(1, 8.f, FColor::Blue, FString("Effect Applied!"));FGameplayTagContainer TagContainer;EffectSpec.GetAllAssetTags(TagContainer);EffectAssetTags.Broadcast(TagContainer);
}
相关文章:
34. UE5 RPG实现鼠标点击移动
在前面,我们实现过使用键盘按键wasd去实现控制角色的移动,现在,我们实现了InputAction按键触发,后面,实现一下通过鼠标点击地面实现角色移动。 我们将实现两种效果的切换,如果你点击地面快速松开࿰…...
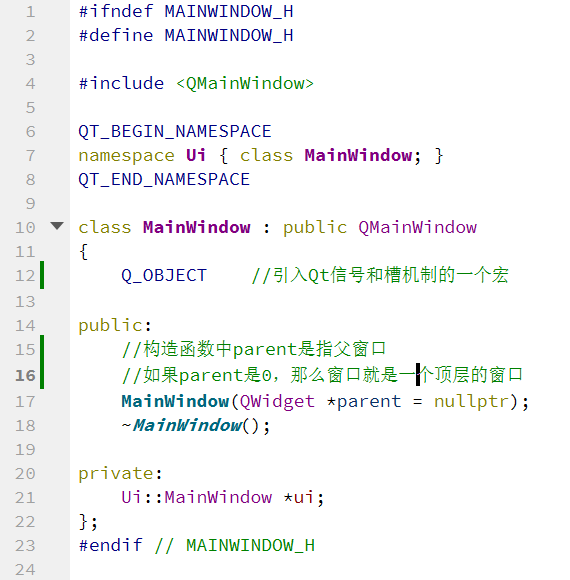
《二》Qt Creator工具介绍与使用
一、关于界面 点击文件--->新建文件或项目会出现如下图: 我们选择第一个 点击下一步下一步: 继续下一步直到结束: 二,具体文件介绍 我们点击pro查看以下 QT core gui第1行 表示使用qt的core和gui库,如果以后…...

20240415金融读报:市场信贷不能过于宽松声音碳领域新增文件
1、市场普遍认为,在经济转型背景下,当前的社会融资规模和信贷增长有助于经济高质量发展,过于宽松并不利于经济发展。(已经有这个声音了,是不是说明我们已经脱离了U型曲线的最低点,在或快接近其后半段的1/2处…...
)
2024年第十五届蓝桥杯研究生组题目总结(Java、Python、C++)
2024年十五届蓝桥杯研究生组 今年的题较去年难度降低了很多,题量也少了2道。 Q1 劲舞团 读文件,找到最长的满足条件的子数组的长度 答案是:9 BufferedReader,fopen,open Q2 召唤数学精灵 找规律,周期…...
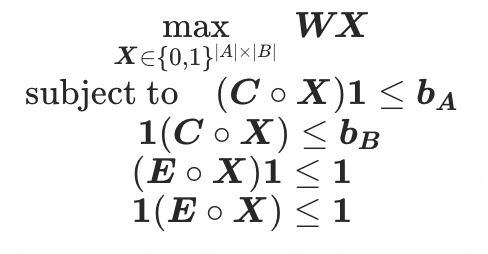
MindOpt APL向量化建模语法的介绍与应用(2)
前言 在数据科学、工程优化和其他科学计算领域中,向量和矩阵的运算是核心组成部分。MAPL作为一种数学规划语言,为这些领域的专业人员提供了强大的工具,通过向量式和矩阵式变量声明以及丰富的内置数学运算支持,大大简化了数学建模…...

深入理解图形处理器(GPU):加速人工智能和大数据计算的引擎
文章目录 1. 什么是GPU?2. GPU的工作原理3. GPU的应用领域4. GPU与CPU的比较参考与推荐 前言: 图形处理器(GPU)不再仅仅是用于图形渲染的硬件设备。如今,GPU已经成为加速人工智能、大数据计算和科学研究的关键引擎。本…...

【Java探索之旅】数组使用 初探JVM内存布局
🎥 屿小夏 : 个人主页 🔥个人专栏 : Java编程秘籍 🌄 莫道桑榆晚,为霞尚满天! 文章目录 📑前言一、数组的使用1.1 元素访问1.2 数组遍历 二、JVM的内存布局🌤️全篇总结 …...
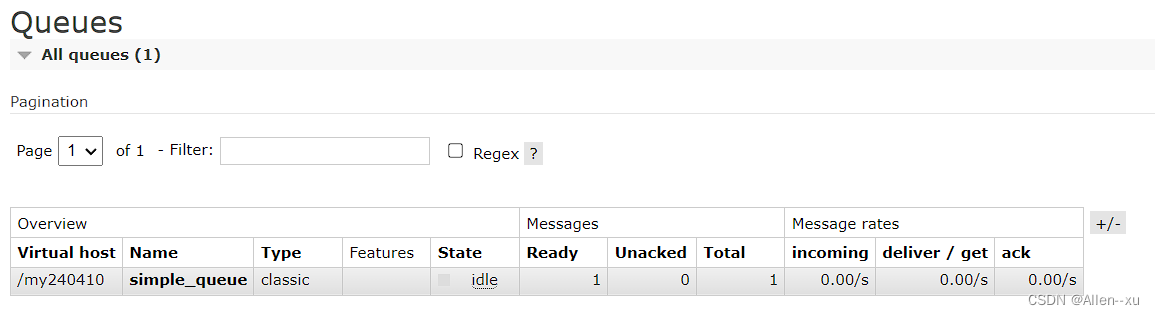
RabbitMQ消息模型之Simple消息模型
simple消息模型 生产者 package com.example.demo02.mq.simple;import com.example.demo02.mq.util.ConnectionUtils; import com.rabbitmq.client.Channel; import com.rabbitmq.client.Connection;import java.io.IOException;/*** author Allen* 4/10/2024 8:07 PM* versi…...
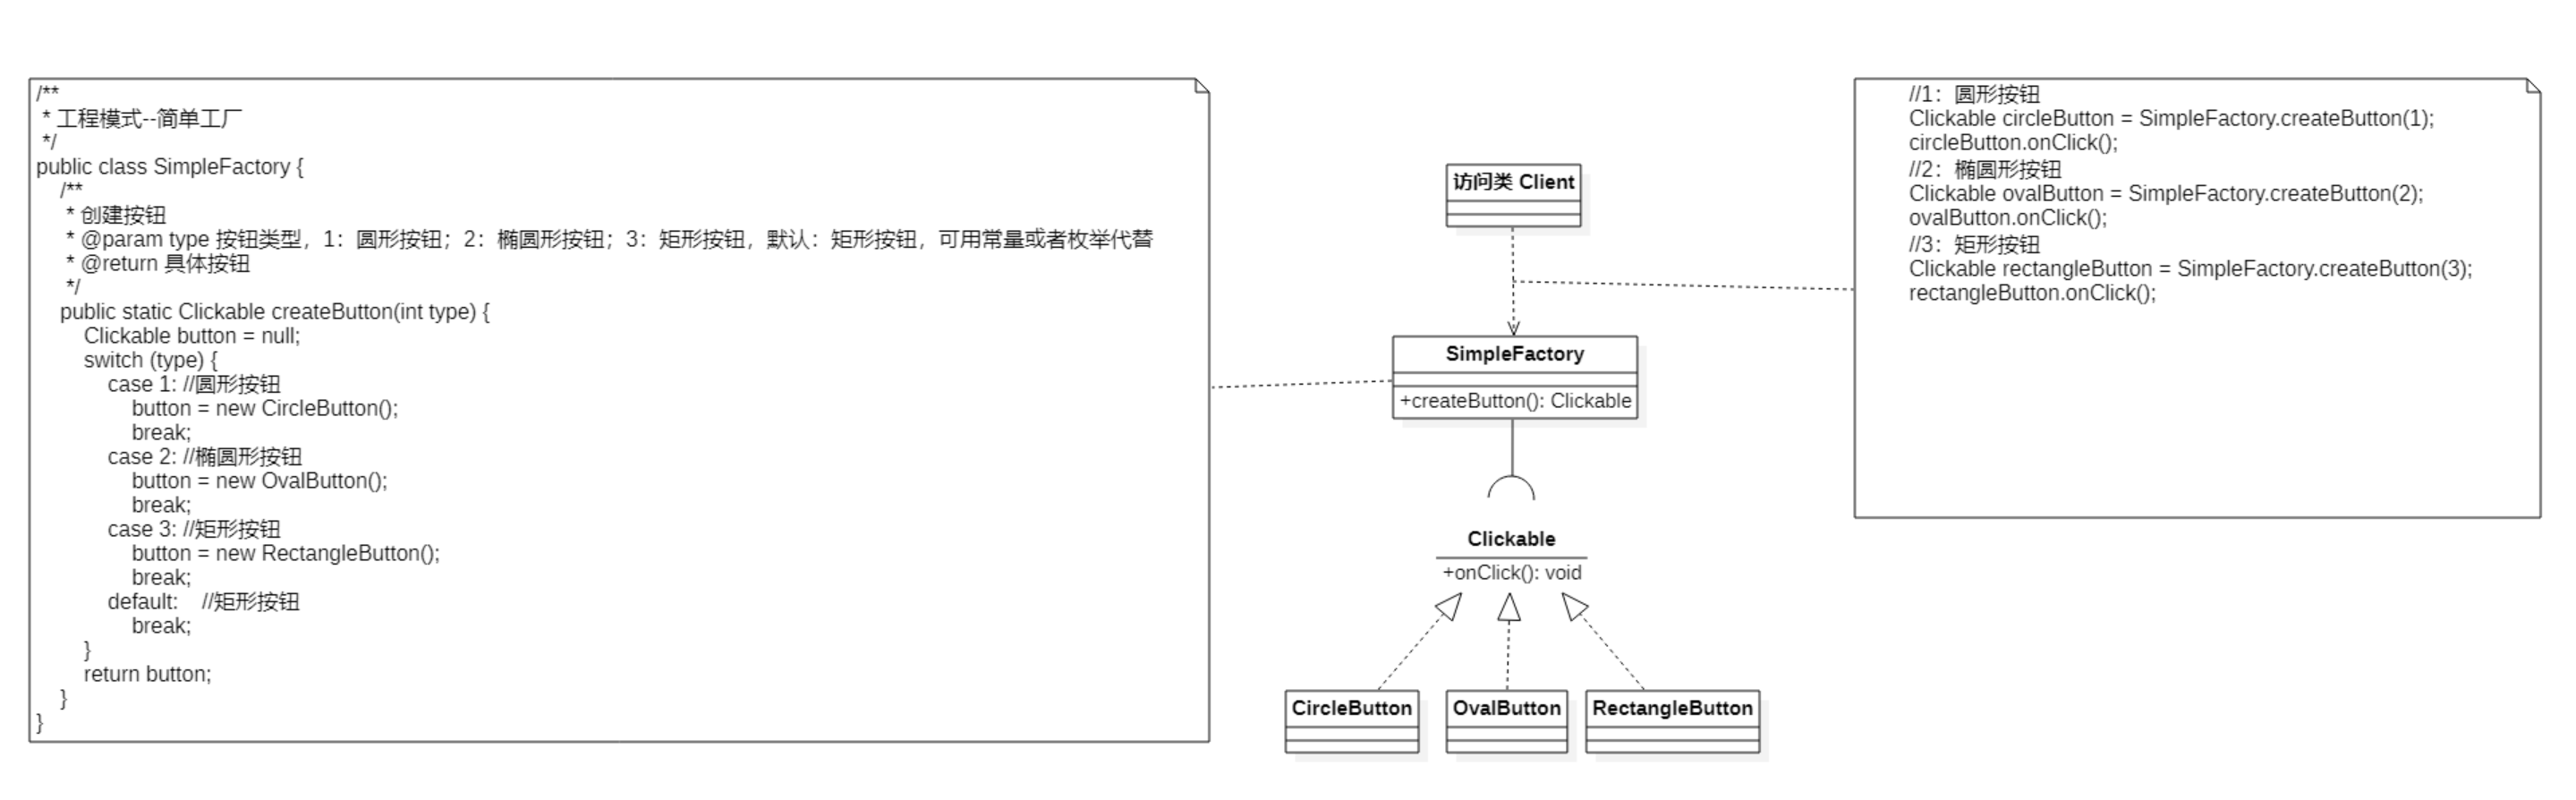
设计模式系列:简单工厂模式
作者持续关注 WPS二次开发专题系列,持续为大家带来更多有价值的WPS二次开发技术细节,如果能够帮助到您,请帮忙来个一键三连,更多问题请联系我(QQ:250325397) 目录 定义 特点 使用场景 优缺点 (1) 优点…...

解决 windows+Ubuntu 时间不同步问题
本文所使用的 Ubuntu 系统版本是 Ubuntu 22.04 ! 如果你的电脑装了 Windows Ubuntu 系统,肯定会遇到时间不同步的问题。那么如何解决呢?参考步骤如下: # 步骤一:进入到 Ubuntu 系统# 步骤二:执行如下三条命令即可 sud…...
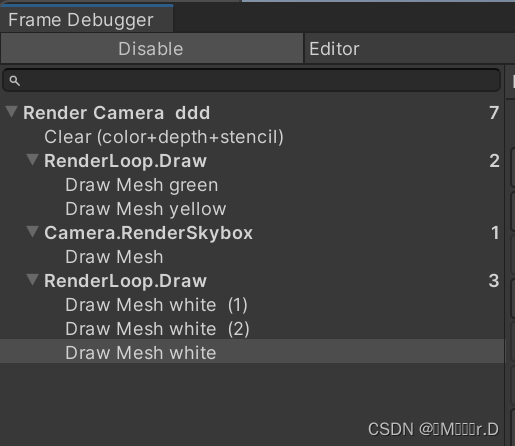
Learn SRP 01
学习链接:Custom Render Pipeline (catlikecoding.com) 使用Unity版本:Unity 2022.3.5f1 1.A new Render Pipeline 1.1Project Setup 创建一个默认的3D项目,项目打开后可以到默认的包管理器删掉所有不需要的包,我们只使用Unit…...
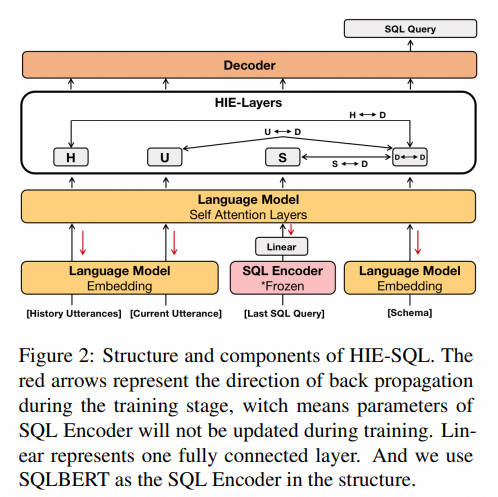
NL2SQL进阶系列(4):ConvAI、DIN-SQL、C3-浙大、DAIL-SQL-阿里等16个业界开源应用实践详解[Text2SQL]
NL2SQL进阶系列(4):ConvAI、DIN-SQL等16个业界开源应用实践详解[Text2SQL] NL2SQL基础系列(1):业界顶尖排行榜、权威测评数据集及LLM大模型(Spider vs BIRD)全面对比优劣分析[Text2SQL、Text2DSL] NL2SQL基础系列(2):…...
Python统计分析库之statsmodels使用详解
概要 Python statsmodels是一个强大的统计分析库,提供了丰富的统计模型和数据处理功能,可用于数据分析、预测建模等多个领域。本文将介绍statsmodels库的安装、特性、基本功能、高级功能、实际应用场景等方面。 安装 安装statsmodels库非常简单,可以使用pip命令进行安装:…...
A Learning-Based Approach for IP Geolocation(2010年)
下载地址:Towards IP geolocation using delay and topology measurements | Proceedings of the 6th ACM SIGCOMM conference on Internet measurement 被引次数:185 Eriksson B, Barford P, Sommers J, et al. A learning-based approach for IP geolocation[C]//Passive …...
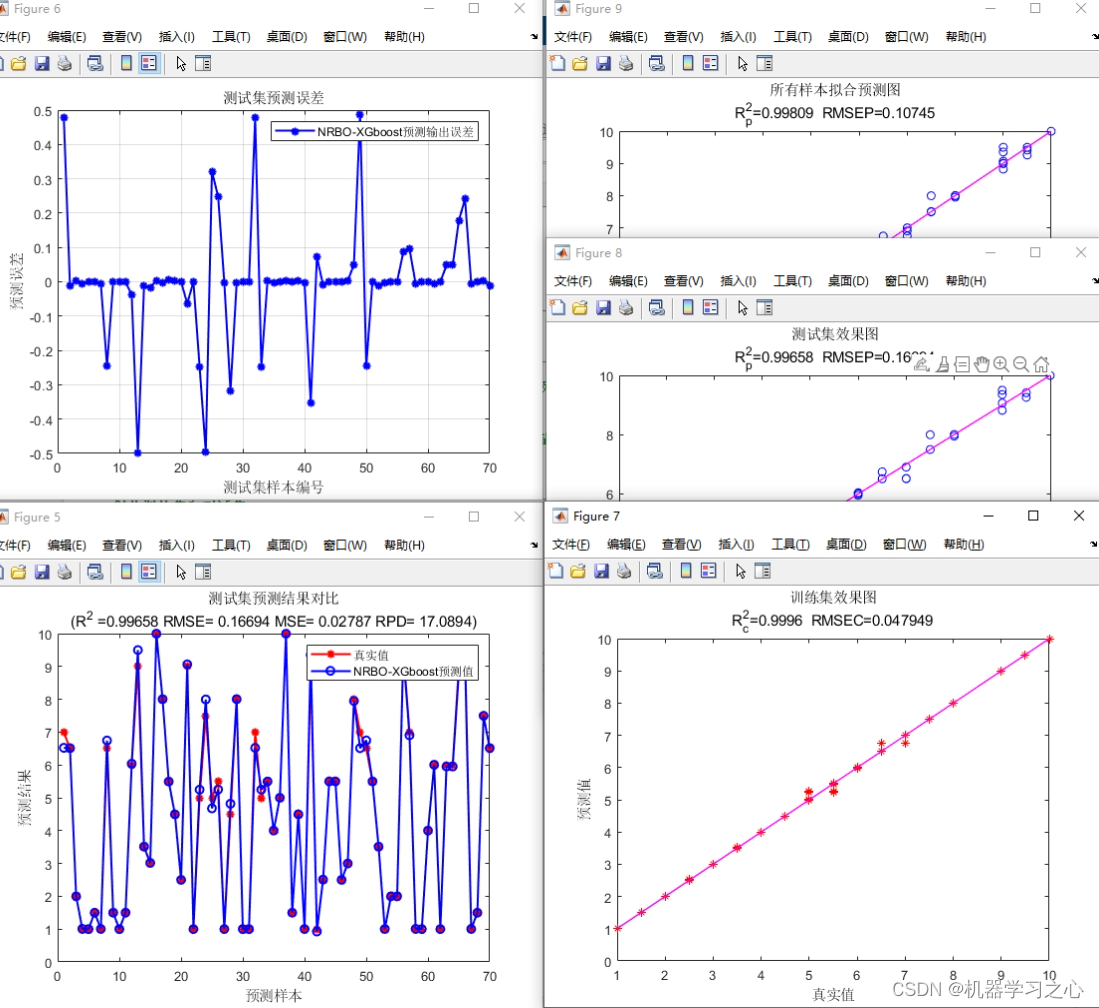
高创新 | [24年新算法]NRBO-XGBoost回归+交叉验证基于牛顿拉夫逊优化算法-XGBoost多变量回归预测
高创新 | [24年新算法]NRBO-XGBoost回归交叉验证基于牛顿拉夫逊优化算法-XGBoost多变量回归预测 目录 高创新 | [24年新算法]NRBO-XGBoost回归交叉验证基于牛顿拉夫逊优化算法-XGBoost多变量回归预测预测效果基本介绍程序设计参考资料 预测效果 基本介绍 1.Matlab实现 [24年新算…...

Web APP设计:将多个相近的机器学习模型融合到一个Web APP中
将多个相近的机器学习模型融合到一个Web APP中 FUSE-ML是一个用于预测腰椎融合术后效果的APP,它可以做出三个不同的结论,分别评价术后的腰痛、腿痛和日常功能是否提高。 这估计是部署了三个机器学习模型在这个APP中,因为一个机器学习模型仅…...

网络爬虫:定义、应用及法律道德考量
网络爬虫技术在当今数据驱动的世界中发挥着重要作用。本文将从网络爬虫的定义和主要功能,其在业界的应用实例,以及涉及的法律和道德问题三个方面进行深入探讨。 1. 爬虫的定义和主要功能 网络爬虫,也称为网页爬虫或蜘蛛,是一种…...
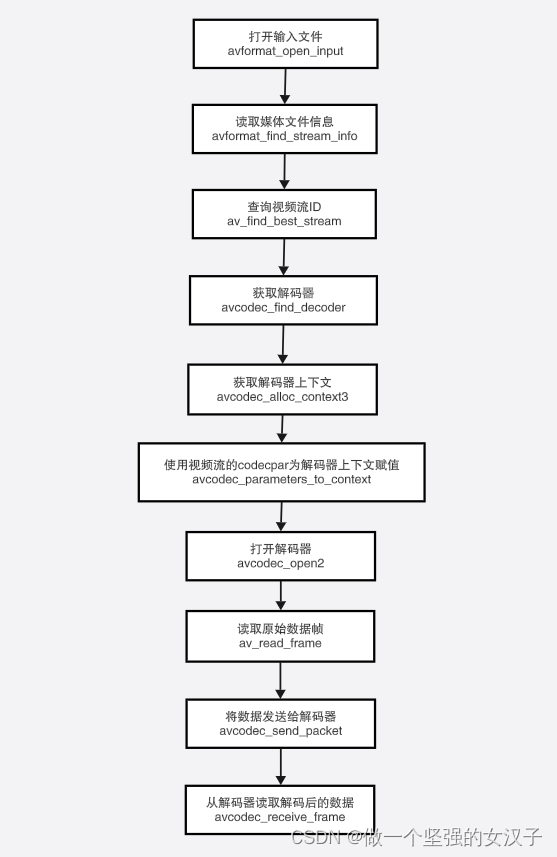
(三)ffmpeg 解码流程以及函数介绍
一、视频解码流程 二、函数介绍 1.avformat_network_init 函数作用: 执行网络库的全局初始化。这是可选的,不再推荐。 此函数仅用于解决旧GnuTLS或OpenSSL库的线程安全问题。如果libavformat链接到这些库的较新版本,或者不使用它们&#…...
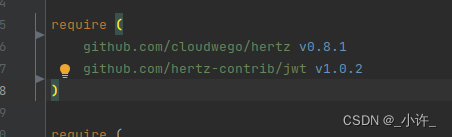
go work模块与go mod包管理是的注意事项
如下图所示目录结构 cmd中是服务的包,显然auth,dbtables,pkg都是为cmd服务的。 首先需要需要将auth,dbtables,pkg定义到go.work中,如下: 在这样在各个单独的go mod管理的模块就可以互相调用了。一般情况下这些都是IDE自动进行的,…...
[100分])
华为OD-C卷-最长子字符串的长度(一)[100分]
题目描述 给你一个字符串 s,首尾相连成一个环形,请你在环中找出 o 字符出现了偶数次最长子字符串的长度。 输入描述 输入是一个小写字母组成的字符串 输出描述 输出是一个整数 备注 1 ≤ s.length ≤ 500000s 只包含小写英文字母用例1 输入 alolobo输出 6说明 最长子字…...

NCM解密工具全解析:突破加密壁垒实现音频自由
NCM解密工具全解析:突破加密壁垒实现音频自由 【免费下载链接】ncmdump 项目地址: https://gitcode.com/gh_mirrors/ncmd/ncmdump 问题剖析:加密格式如何成为数字资产的枷锁? 在数字音乐时代,我们常常面临一个矛盾&#…...

OpenClaw会议纪要助手:Qwen3-14b_int4_awq转写与重点提炼
OpenClaw会议纪要助手:Qwen3-14b_int4_awq转写与重点提炼 1. 为什么需要自动化会议纪要 作为远程工作者,我每周要参加至少15场跨时区会议。过去手动整理纪要时经常遇到三个痛点:一是录音转文字耗时(1小时会议需要2小时整理&…...

【教程4>第12章>第8节】基于FPGA的图像缩放实现——图像横向压缩仿真测试以及MATLAB辅助验证
本课程学习成果预览 目录 1.软件版本 2.图像横向压缩testbench编写 3.仿真测试 4.程序操作视频 欢迎订阅FPGA/MATLAB/Simulink系列教程 《★教程1:matlab入门100例》 《★教程2:fpga入门100例》 《★教程3:simulink入门60例》 《★教程4:FPGA/MATLAB/Simulink联合开发入门与…...
)
从机械臂到无人机:手把手教你用C++实现一个简易PID控制器(附完整代码)
从机械臂到无人机:手把手教你用C实现一个简易PID控制器(附完整代码) 在嵌入式开发和机器人控制领域,PID控制器就像一位不知疲倦的调音师,时刻调整着系统的"音准"。想象一下,当你操控无人机时&am…...
|YOLO目标检测训练数据集)
羊四种行为检测数据集(2000张高质量标注)|YOLO目标检测训练数据集
羊四种行为检测数据集(2000张高质量标注)|YOLO目标检测训练数据集 前言 在智慧养殖与畜牧业数字化转型的背景下,基于计算机视觉的动物行为识别逐渐成为研究与工程应用的热点方向。通过对动物行为的自动检测与分析,可…...

批量新员工入职培训怎么做?行政/销售/技术等5大核心岗位培训重点拆解
年后复工、校招季、业务扩招,一次入职几十上百人,覆盖销售、客服、运维、行政、技术、生产等多个岗位。这是企业培训中非常普遍、甚至是常态的管理场景,尤其在中大型企业、连锁企业、制造型企业、互联网/科技公司里,同时管理多岗位…...

4月3日打卡
20:20开始,学习90分钟...

Buildroot与Qt5的X11VNC集成:解决EGLFS与XCB插件冲突的实践指南
1. 为什么需要X11VNC与Qt5集成? 在嵌入式开发中,远程调试图形界面是个常见需求。想象一下,你的设备可能放在工厂车间或者户外,每次修改代码后都要跑到设备前查看效果,这效率实在太低。X11VNC就像给你的设备装了个"…...

圆波导圆极化天线的设计与仿真:从理论到实践
1. 圆波导圆极化天线的基础原理 圆极化天线在现代无线通信系统中扮演着重要角色,特别是在卫星通信、雷达和5G毫米波应用中。与传统的线极化天线相比,圆极化天线能够有效减少极化失配带来的信号损失,在复杂传播环境中表现更加稳定。 圆波导作为…...

UBANTU安装Duckietown细节操作与错误记录
一,安装 1.虚拟机安装VM,安装UBUNTU系统,按照VMware虚拟机安装Ubuntu教程(超详细)_vmware安装ubuntu-CSDN博客 去操作就可以,绝对详细,而且不坑。 2.个人建议使用搜狗输入法。 3.打开系统文件夹 例如我的叫tuoni&a…...