在redhat7/8平台上部署ELK7.17.18的技术方案
部署环境说明
为节省资源直接使用1台测试机模拟3节点elasticsearch服务集群做部署,在该主机上同时部署了3个elasticsearch实例、1个logstash实例、1个kibana实例、1个filebeat实例。对于生产环境,以上实例服务应该做分布式部署。
ELK-TEST1 192.168.10.11
本方案已通过了以下操作系统环境的验证测试:
- os: rhel 7.9 openssl:1.1.1w
- os: rhel 8.8 openssl:3.1.2
操作系统参数调优与配置
主机名IP映射
cat << EOF >> /etc/hosts
192.168.10.11 node-1
192.168.10.11 node-2
192.168.10.11 node-3
192.168.10.11 ELK-TEST1
EOF
禁用swap
swapoff -a
sed -i '/swap/d' /etc/fstab
调整系统可用资源限制
文件句柄与最大线程并发数量:
cat << EOF > /etc/security/limits.d/usercustom.conf
* soft nofile 65535
* hard nofile 65535
* soft nproc 4096
* hard nproc 4096
* soft fsize unlimited
* hard fsize unlimited
* soft memlock unlimited
* hard memlock unlimited
EOF
虚拟内存及网络连接重连
cat << EOF > /etc/sysctl.d/98-usercustom.conf
vm.max_map_count=262144
net.ipv4.tcp_retries2 = 5
EOFsysctl -p /etc/sysctl.d/98-usercustom.conf
创建es专用的系统用户
useradd elastic
检查或配置系统安全配置
生产网不建议关闭系统防火墙,可以直接对运行ELK服务的主机节点间做网络访问的全部放行配置。
关闭selinux
setenforce 0
sed -i '/SELINUX/s/enforcing/disabled/' /etc/selinux/config
重启系统,以使上面配置全部生效。
部署ELK安装包
将以下4个安装包上传到主机/opt目录下,解压缩:
elasticsearch-7.17.18-linux-x86_64.tar.gz
filebeat-7.17.18-linux-x86_64.tar.gz
kibana-7.17.18-linux-x86_64.tar.gz
logstash-7.17.18-linux-x86_64.tar.gz
cd /opt
tar zxf elasticsearch-7.17.18-linux-x86_64.tar.gz
tar zxf filebeat-7.17.18-linux-x86_64.tar.gz
tar zxf kibana-7.17.18-linux-x86_64.tar.gz
tar zxf logstash-7.17.18-linux-x86_64.tar.gz
mkdir soft
mv *.gz soft
由于我们是使用1个主机来模拟部署一套ELK服务,elasticsearch集群服务需要运行在生产模式下,至少有3个es实例。所以对部署目录做以下调整:
cd /opt
mv elasticsearch-7.17.18/ elastic-node1
cp -r elastic-node1/ elastic-node2
cp -r elastic-node1/ elastic-node3
mv logstash-7.17.18/ logstash
mv kibana-7.17.18-linux-x86_64/ kibana
mv filebeat-7.17.18-linux-x86_64/ filebeat
chown -R elastic.elastic *
最终的/opt部署路径结果如下:
elastic-node1 elastic-node2 elastic-node3 filebeat kibana logstash soft
ELK集群服务的初始化配置
以下所有的配置均是使用elastic普通用户执行!!!
我们这里是把所有服务部署在一个主机上了,所以以下配置命令均在同一个主机上执行。如果你规划的ELK服务集群使用了多个主机节点,请根据每个服务实例实际部署位置选择相应的主机并配置。
制作ELK集群使用的证书密钥
cd /opt/elastic-node1
mkdir makecerts
./bin/elasticsearch-certutil ca --out ./makecerts/elastic-stack-ca.p12 --days 36500  # 签发CA根证书,有效期100年
./bin/elasticsearch-certutil cert --ca ./makecerts/elastic-stack-ca.p12 --out ./makecerts/elastic-certificates.p12 --dns node-1,ELK-TEST1,node-2,node-3 --ip 192.168.10.11 --days 36500  # 记录好以上两个证书的密码信息
/opt/elastic-node1/jdk/bin/keytool -keystore ./makecerts/elastic-stack-ca.p12 -list  # 查看CA证书
/opt/elastic-node1/jdk/bin/keytool -keystore ./makecerts/elastic-certificates.p12 -list  # 查看elasticsearch服务证书
签发其他实例服务使用的证书:
./bin/elasticsearch-certutil cert --ca ./makecerts/elastic-stack-ca.p12 --out ./makecerts/logstash.zip --name logstash --dns node-1,ELK-TEST1,node-2,node-3 --ip 192.168.10.11 --pem --days 36500
./bin/elasticsearch-certutil cert --ca ./makecerts/elastic-stack-ca.p12 --out ./makecerts/kibana.zip --name kibana --dns node-1 --ip 192.168.10.11 --pem --days 36500
./bin/elasticsearch-certutil cert --ca ./makecerts/elastic-stack-ca.p12 --out ./makecerts/filebeat-10.11.zip --name filebeat-10.11 --dns node-1,ELK-TEST1,node-2,node-3 --pem --days 36500 ./bin/elasticsearch-certutil cert --ca ./makecerts/elastic-stack-ca.p12 --out ./makecerts/metricbeat.zip --name metricbeat --dns node-1 --ip 192.168.10.11 --pem --days 36500 openssl pkcs12 -nocerts -nodes -in ./makecerts/elastic-stack-ca.p12 -out ./makecerts/private.pem
openssl pkcs12 -clcerts -nokeys -in ./makecerts/elastic-stack-ca.p12 -out ./makecerts/cacert.pem  # 生成一份pem格式的ca证书文件
openssl x509 -in ./makecerts/cacert.pem -noout -text  # 查看ca pem证书信息
将elasticsearch证书密码保存到keystore、truststore中:
./bin/elasticsearch-keystore create
./bin/elasticsearch-keystore add xpack.security.transport.ssl.keystore.secure_password
./bin/elasticsearch-keystore add xpack.security.transport.ssl.truststore.secure_password
./bin/elasticsearch-keystore add xpack.security.http.ssl.keystore.secure_password
./bin/elasticsearch-keystore add xpack.security.http.ssl.truststore.secure_password
./bin/elasticsearch-keystore list # 浏览keystore密钥库中保存的信息
./bin/elasticsearch-keystore show xpack.security.http.ssl.keystore.secure_password # 查看在密钥库中保存的指定密码信息
解压kibana.zip,logstash.zip,filebeat.zip,并进一步制作适配logstash服务的证书文件:
cd /opt/elastic-node1/makecerts
unzip filebeat-10.11.zip
unzip kibana.zip
unzip logstash.zip
rm -rf *.zip
logstash input插件需要使用pkcs8格式的密钥文件,output elasticsearch插件需要使用truststore密钥库保存pkcs12格式的ca证书:
cd /opt/elastic-node1/makecerts/logstash
openssl pkcs8 -in logstash.key -topk8 -nocrypt -out logstash.p8
/opt/elastic-node1/jdk/bin/keytool -import -file /opt/elastic-node1/makecerts/cacert.pem -keystore truststore.p12 -storepass ueyf36456fh -noprompt -storetype pkcs12
分发各实例需要使用的证书、密钥文件:
cd /opt/elastic-node1/makecerts
cp elastic-certificates.p12 /opt/elastic-node1/config
cp elastic-certificates.p12 /opt/elastic-node2/config
cp elastic-certificates.p12 /opt/elastic-node3/config
cp /opt/elastic-node1/config/elasticsearch.keystore /opt/elastic-node2/config/
cp /opt/elastic-node1/config/elasticsearch.keystore /opt/elastic-node3/config/
cp cacert.pem logstash/*  /opt/logstash/config/
cp cacert.pem kibana/kibana.* /opt/kibana/config/
cp cacert.pem filebeat-10.11/* /opt/filebeat/
注:将makecerts目录打包做好备份,tar zcf makecerts.tgz makecerts/
设置elasticsearch实例配置
设置elasticsearch实例的jvm缓存,请根据实际情况调整:
cat << EOF > /opt/elastic-node1/config/jvm.options.d/jvm-heap.conf
-Xms4g
-Xmx4g
EOFcat << EOF > /opt/elastic-node2/config/jvm.options.d/jvm-heap.conf
-Xms4g
-Xmx4g
EOFcat << EOF > /opt/elastic-node3/config/jvm.options.d/jvm-heap.conf
-Xms4g
-Xmx4g
EOF
在本示例的3个es服务实例的elasticsearch.yml配置中,只有4个参数值有差别,它们是node.name、path.data、path.logs、http.port、transport.port 。如果是使用3个主机节点部署,且每个主机上只运行一个elasticsearch实例时,每个实例间的配置只有node.name、network.host参数值的差别。
cat << EOF > /opt/elastic-node1/config/elasticsearch.yml
cluster.name: elk-application
node.name: node-1
node.master: true
node.data: true
path.data: /opt/elastic-node1/data
path.logs: /opt/elastic-node1/logs
bootstrap.memory_lock: true
network.host: 192.168.10.11
http.port: 9200
transport.port: 9300
discovery.seed_hosts: ["192.168.10.11:9300", "192.168.10.11:9301", "192.168.10.11:9302"]
# cluster.initial_master_nodes参数在第1次启动es服务集群后,需要及时注释掉!
cluster.initial_master_nodes: ["node-1", "node-2", "node-3"]
xpack.security.enabled: true
xpack.security.transport.ssl.enabled: true
xpack.security.transport.ssl.verification_mode: certificate
xpack.security.transport.ssl.keystore.path: ./elastic-certificates.p12
xpack.security.transport.ssl.truststore.path: ./elastic-certificates.p12
xpack.security.http.ssl.enabled: true
xpack.security.http.ssl.keystore.path: ./elastic-certificates.p12
xpack.security.http.ssl.truststore.path: ./elastic-certificates.p12
EOFcat << EOF > /opt/elastic-node2/config/elasticsearch.yml
cluster.name: elk-application
node.name: node-2
node.master: true
node.data: true
path.data: /opt/elastic-node2/data
path.logs: /opt/elastic-node2/logs
bootstrap.memory_lock: true
network.host: 192.168.10.11
http.port: 9201
transport.port: 9301
discovery.seed_hosts: ["192.168.10.11:9300", "192.168.10.11:9301", "192.168.10.11:9302"]
# cluster.initial_master_nodes参数在第1次启动es服务集群后,需要及时注释掉!
cluster.initial_master_nodes: ["node-1", "node-2", "node-3"]
xpack.security.enabled: true
xpack.security.transport.ssl.enabled: true
xpack.security.transport.ssl.verification_mode: certificate
xpack.security.transport.ssl.keystore.path: ./elastic-certificates.p12
xpack.security.transport.ssl.truststore.path: ./elastic-certificates.p12
xpack.security.http.ssl.enabled: true
xpack.security.http.ssl.keystore.path: ./elastic-certificates.p12
xpack.security.http.ssl.truststore.path: ./elastic-certificates.p12
EOFcat << EOF > /opt/elastic-node3/config/elasticsearch.yml
cluster.name: elk-application
node.name: node-3
node.master: true
node.data: true
path.data: /opt/elastic-node3/data
path.logs: /opt/elastic-node3/logs
bootstrap.memory_lock: true
network.host: 192.168.10.11
http.port: 9202
transport.port: 9302
discovery.seed_hosts: ["192.168.10.11:9300", "192.168.10.11:9301", "192.168.10.11:9302"]
# cluster.initial_master_nodes参数在第1次启动es服务集群后,需要及时注释掉!
cluster.initial_master_nodes: ["node-1", "node-2", "node-3"]
xpack.security.enabled: true
xpack.security.transport.ssl.enabled: true
xpack.security.transport.ssl.verification_mode: certificate
xpack.security.transport.ssl.keystore.path: ./elastic-certificates.p12
xpack.security.transport.ssl.truststore.path: ./elastic-certificates.p12
xpack.security.http.ssl.enabled: true
xpack.security.http.ssl.keystore.path: ./elastic-certificates.p12
xpack.security.http.ssl.truststore.path: ./elastic-certificates.p12
EOF
设置logstash服务实例配置
logstash服务配置文件:
cat << EOF > /opt/logstash/config/logstash.yml
node.name: logstash-10-11
xpack.monitoring.enabled: false
xpack.monitoring.elasticsearch.username: logstash_system
xpack.monitoring.elasticsearch.password: hDagwy141d
#xpack.monitoring.elasticsearch.hosts: ["https://node-1:9200", "https://node-2:9201", "https://node-3:9202"]
xpack.monitoring.elasticsearch.hosts: ["https://node-1:9200"]
xpack.monitoring.elasticsearch.ssl.certificate_authority: "/opt/logstash/config/cacert.pem"
xpack.monitoring.elasticsearch.ssl.verification_mode: certificate
EOF
logstash 数据转发配置文件:
cat << EOF > /opt/logstash/config/logstash.conf
input {beats {id => "logstash-10-11"port => 5044ssl => truessl_certificate_authorities => "/opt/logstash/config/cacert.pem"ssl_certificate => "/opt/logstash/config/logstash.crt"ssl_key => "/opt/logstash/config/logstash.p8"ssl_verify_mode => "force_peer"}
}
output {elasticsearch {id => "elk-application"hosts => ["https://node-1:9200", "https://node-2:9201", "https://node-3:9202"]manage_template => truetemplate_overwrite => trueindex => "test-logs-%{+YYYY.MM.dd}"user => "elastic"password => "iwuHBG865"ssl_certificate_verification => truetruststore => "/opt/logstash/config/truststore.p12"truststore_password => "ueyf36456fh"}
}
EOF
设置kibana服务实例配置
cat << EOF > /opt/kibana/config/kibana.yml
server.host: "node-1"
server.publicBaseUrl: "https://192.168.10.11:5601/"
elasticsearch.hosts: ["https://192.168.10.11:9200"]
elasticsearch.username: "kibana_system"
elasticsearch.password: "hfrr53df64"
server.ssl.enabled: true
server.ssl.certificate: /opt/kibana/config/kibana.crt
server.ssl.key: /opt/kibana/config/kibana.key
elasticsearch.ssl.certificateAuthorities: [ "/opt/kibana/config/cacert.pem" ]
elasticsearch.ssl.verificationMode: certificate
xpack.security.encryptionKey: "dfe2435fdsdfg2424wegrcvnjhgfr5678909iju"
xpack.security.sessionTimeout: 1800000
xpack.monitoring.elasticsearch.hosts: [ "https://192.168.10.11:9200" ]
xpack.monitoring.elasticsearch.ssl.certificateAuthorities: config/cacert.pem
EOF
设置filebeat服务配置
filebeat.yml配置文件如下,因有特殊字符无法使用cat命令直接写入文件,请复制下面内容并替换配置文件内容:
filebeat.inputs:
- type: filestreamid: ELK-TEST1-idenabled: truepaths:- /var/log/test-logs/*.log
filebeat.config.modules:path: ${path.config}/modules.d/*.ymlreload.enabled: false
setup.template.settings:index.number_of_shards: 1
output.logstash:hosts: ["node-1:5044"]ssl.certificate_authorities: ["/opt/filebeat/cacert.pem"]ssl.certificate: "/opt/filebeat/filebeat-10.11.crt"ssl.key: "/opt/filebeat/filebeat-10.11.key"
processors:- add_host_metadata:when.not.contains.tags: forwarded- add_cloud_metadata: ~- add_docker_metadata: ~- add_kubernetes_metadata: ~
设置rsyslogd服务配置
很多安全、网络类的设备,仅支持将设备日志转发给syslog服务,所以我们需要配置一个rsyslogd服务,接收这些设备日志。在完成日志落盘后,由filebeat负责采集和存储到ELK平台。
检查/etc/rsyslog.conf文件,启用以下参数:
module(load="imudp") # needs to be done just once
input(type="imudp" port="514")module(load="imtcp") # needs to be done just once
input(type="imtcp" port="514")
注:这里的参数配置方法在rhel7和rhel8上有差别,但区别不大,找到并启用即可。
创建/etc/rsyslog.d/test-logs.conf 配置文件,内容如下:
$template remote-incoming-logs,"/var/log/test-logs/%fromhost-ip%_%$YEAR%.log"
*.* ?remote-incoming-logs
& ~
mkdir -p /var/log/test-logs
systemctl restart rsyslog
systemctl status rsyslog
注意查看rsyslog服务日志、状态。
启动各个服务组件并观察日志
启动elasticsearch服务集群并设置管理账密信息
注:依次启协3个服务实例,每启动一个后,先观察 elk-application.log 日志输出,在前一个实例启动结束后,再启动下一次。
cd /opt/elastic-node1
./bin/elasticsearch -dcd /opt/elastic-node2
./bin/elasticsearch -dcd /opt/elastic-node3
./bin/elasticsearch -d
观察上述服务启动,日志输出和集群显示状态均正常后,及时注释掉elasticsearch.yml文件中的cluster.initial_master_nodes参数!
执行下面命令设置内建管理用户的密码:
./bin/elasticsearch-setup-passwords interactive
注:这里设置的账号密码,需要与前面各种服务的配置文件中会使用的账号、密码信息一致。
2)启动kibana服务
cd /opt/kibana
nohup ./bin/kibana &
注:观察并确认日志输出正常,服务运行正常。
访问https://192.168.10.11:5601,使用上面创建的elastic管理员用户登录。
3)启动logstash服务
cd /opt/logstash
./bin/logstash -f ./config/logstash.conf &
4)启动filebeat服务
使用root用户操作:
cd /opt/filebeat
chown root.root filebeat.yml
./filebeat -e -c filebeat.yml &
注:由于我们的使用场景中,filebeat会采集/var/log下一些系统日志,需要root权限,所以这里有上述的权限调整。
登录kibana控制台配置索引管理信息
登录后,进入Management界面创建一个index pattern
名称为:test-logs-*
在discover界面下,就可以检索到已经采集到的日志数据了。
创建索引生命周期管理策略
名称:test-logs-policy
启用两个生命阶段即可:
- hot phase:管理30天内的索引文件
- cold phase: 管理大于180天的索引文件
创建索引模板
进入Dev tools界面,执行以下命令:
PUT _index_template/test-logs-template?pretty
{"index_patterns" : ["test-logs-*"],"template" : {"settings" : {"index" : {"lifecycle" : {"name" : "test-logs-policy","rollover_alias" : "test-logs"},"number_of_shards" : "1","number_of_replicas" : "2"}},"aliases": {"test-logs": {}}}
}
查看索引模板:
GET _index_template/test-logs-template?pretty
到这里,主要配置内容基本结束。
相关文章:

在redhat7/8平台上部署ELK7.17.18的技术方案
部署环境说明 为节省资源直接使用1台测试机模拟3节点elasticsearch服务集群做部署,在该主机上同时部署了3个elasticsearch实例、1个logstash实例、1个kibana实例、1个filebeat实例。对于生产环境,以上实例服务应该做分布式部署。 ELK-TEST1 192.168.10…...
分享6个好用的ChatGPT)
(Chat For Al,创新Al,汇语Al助手,AiTab新标签,万能助手,LLaVA)分享6个好用的ChatGPT
目录 1、Chat For AI 2、创想AI 3、汇语AL助手...

MySQL-锁篇
文章目录 表级锁和行级锁了解吗?有什么区别?行级锁使用有什么注意事项?InnoDB有哪几类行锁?共享锁和排他锁是什么?意向锁有什么用? 锁是一种常见的并发事务的控制方式 表级锁和行级锁了解吗?有什…...

滤波器笔记(杂乱)
线性相位是时间平移,相位不失真 零、基础知识 1、用相量表示正弦量 https://zhuanlan.zhihu.com/p/345546880 https://www.zhihu.com/question/347763932/answer/1103938667 A s i n ( ω t θ ) ⇔ A e j θ ⇔ A ∠ θ Asin(\omega t\theta) {\Leftrightarrow…...
【ARFoundation自学01】搭建AR框架,检测平面点击位置克隆物体
Unity开发ARFoundation相关应用首先安装ARFoundation包 然后设置XR 1.基础AR场景框架搭建 2.一个基本的点击克隆物体到识别的平面脚本 挂在XROrigin上 脚本AppController 脚本说明书 ## 业务逻辑 AppController 脚本旨在实现一个基本的 AR 应用程序功能:用户通过…...

.Net ajax 接收参数
后端部分代码 一般处理程序 public void ProcessRequest(HttpContext context){context.Response.ContentType "text/plain";string str_index context.Request.Form.AllKeys.Contains("index") ? context.Request.Form["index"].ToString(…...

智能零售:引领购物新时代
智能零售通过整合人工智能、物联网、大数据和机器学习等技术,正在彻底改变传统的购物模式,为消费者和零售商提供前所未有的效率和个性化体验。 智能零售利用消费者数据分析来提供个性化的购物推荐。无论是在线平台或是实体店内,智能系统都能…...

【AIGC】AIGC在虚拟数字人中的应用:塑造未来互动体验的革新力量
🚀 🚀 🚀随着科技的快速发展,AIGC已经成为引领未来的重要力量。其中,AIGC在虚拟数字人领域的应用更是引起了广泛关注。虚拟数字人作为一种先进的数字化表达形式,结合了3D建模、动画技术、人工智能等多种先进…...

电机控制器电路板布局布线参考指导(五)
电机控制器电路板布局布线参考指导(五)大容量电容和旁路电容的放置 1.大容量电容的放置2.电荷泵电容器3.旁路电容/去耦电容的放置3.1 靠近电源3.2 靠近功率器件3.3 靠近开关电流源3.4 靠近电流感测放大器3.5 靠近稳压器 tips:资料主要来自网络…...

Python医院挂号脚本
作者介绍:10年大厂数据\经营分析经验,现任大厂数据部门负责人。 会一些的技术:数据分析、算法、SQL、大数据相关、python 欢迎加入社区:码上找工作 作者专栏每日更新: LeetCode解锁1000题: 打怪升级之旅 python数据分析…...

LabVIEW光学探测器板级检测系统
LabVIEW光学探测器板级检测系统 特种车辆乘员舱的灭火抑爆系统广泛采用光学探测技术来探测火情。光学探测器作为系统的关键部件,其探测灵敏度、响应速度和准确性直接关系到整个系统的运行效率和安全性。然而,光学探测器在长期使用过程中可能会因为灰尘污…...
女上司问我:误删除PG百万条数据,可以闪回吗?
作者:IT邦德 中国DBA联盟(ACDU)成员,10余年DBA工作经验 擅长主流数据Oracle、MySQL、PG、openGauss运维 备份恢复,安装迁移,性能优化、故障应急处理等可提供技术业务: 1.DB故障处理/疑难杂症远程支援 2.Mysql/PG/Oracl…...
HarmonyOS4-数据持久化
轻量级preferences: 关系型数据库: 增删改: 查询语句: 具体详情代码可参与源码: 黑马大佬写的。 harmonyos-lessons: 黑马程序员B站HarmonyOS课程的基础篇代码部分...

深度学习的社交网络:用户行为分析
1.背景介绍 社交网络是当今互联网的一个重要领域,它们为人们提供了一种快速、便捷的方式来与他人交流、分享信息和建立社交关系。社交网络的数据量巨大,包括用户的个人信息、互动记录、内容等。这些数据为企业和组织提供了丰富的信息来源,可以用于用户行为分析、推荐系统、…...
Python 使用 pip 安装 matplotlib 模块(精华版)
pip 安装 matplotlib 模块 1.使用pip安装matplotlib(五步实现):2.使用下载的matplotlib画图: 1.使用pip安装matplotlib(五步实现): 长话短说:本人下载 matplotlib 花了大概三个半小时屡屡碰壁,险些暴走。为了不让新来的小伙伴走我的弯路,特意…...
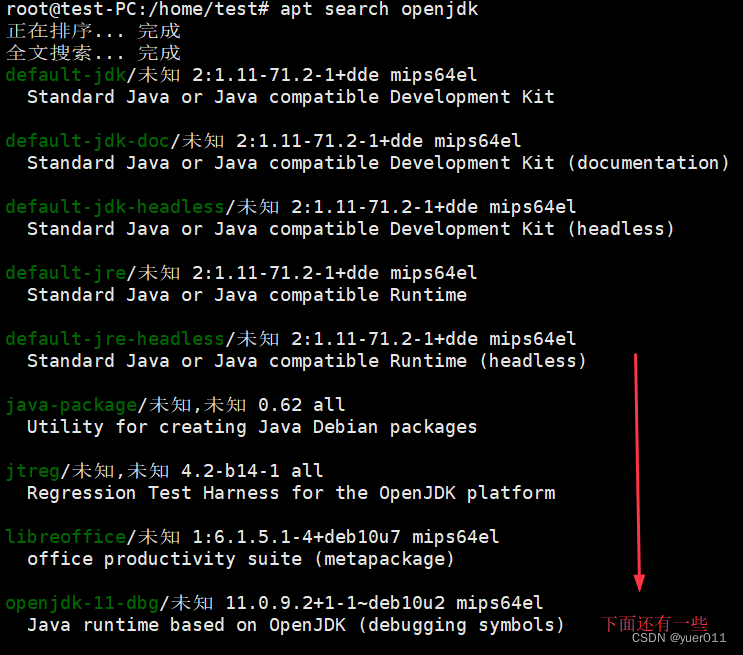
UOS系统-mips架构---Java环境安装
平时都是在windows系统上安装的java环境,今天需要在uos系统安装java1.8的环境,记录一下安装过程。 (以下均在root权限下运行) 一、查找java1.8 jdk版本 apt search openjdkopenjdk-8-jdk/未知,未知 1.8.0.212-2deepin mips64el O…...

Java——二叉树
二叉树 二叉树在Java中是一种重要的数据结构,用于高效地组织和处理具有层级关系的数据。 二叉树的每个节点最多有两个子节点,这两个子节点分别称为左子节点和右子节点。这种结构非常适合于使用递归的方式进行定义和操作。在计算机科学中,二…...

数据仓库—维度建模—事实表设计
事实表 事实表是数据仓库中的核心表,用于记录与业务过程相关的事实信息,是进行数据分析和挖掘的主要数据来源。 在ER模型中抽象出了有实体、关系、属性三种类别,在现实世界中,每一个操作型事件,基本都是发生在实体之间的,伴随着这种操作事件的发生,会产生可度量的值,…...

《系统架构设计师教程(第2版)》第9章-软件可靠性基础知识-05-软件可靠性测试
文章目录 1. 概述2. 定义软件运行剖面2.1 软件的使用行为建模2.2 输入域分层2.3 弧上的概率分配2.4 其他注意点 3. 可靠性测试用例设计4. 可靠性测试的实施4.1 测试前检查4.2 注意点4.2 可靠性测试的难点1)失效判断的主观性2)计算的错误结果不易被发现 4…...

uni-app vue3 setup 如何使用 onShow
在uni-app中,onShow是uni.onAppShow的别名,用于监听当前小程序被用户切换到前台运行时触发。在Vue 3中,你可以通过以下方式使用onShow: 在页面的vue文件中添加onShow方法: javascript <button click“onShow”&g…...
:当TTS调用量突破500万/月,这3个架构断层将触发收入增长断崖)
ElevenLabs商业规模化陷阱(内部白皮书节选):当TTS调用量突破500万/月,这3个架构断层将触发收入增长断崖
更多请点击: https://intelliparadigm.com 第一章:ElevenLabs Growing Business ElevenLabs 已从语音合成初创公司快速演进为全球 AI 语音基础设施的关键提供者,其业务增长体现在 API 调用量年增超 320%、企业客户数突破 12,000 家ÿ…...

无线充电技术解析:从Qi标准到射频远距充电的现状与未来
1. 无线充电的现状与用户困境作为一名长期关注消费电子与网络通信设备的技术博主,我每天打交道最多的就是各种“电老虎”和“充电宝”。Rebecca Day在文章里描述的那个圣诞场景,我简直不能再熟悉了——在一堆新设备的包装盒里翻找线缆,在抽屉…...

OpenClaw微信公众号插件wemp v2:双Agent路由与混合知识库实战
1. 项目概述:一个为OpenClaw设计的微信公众号插件如果你正在寻找一个能够将你的AI助手能力无缝接入微信公众号,实现自动化客服、智能问答甚至更复杂交互的解决方案,那么你找对地方了。wemp(WeChat MP Plugin)正是这样一…...
-论分布式缓存架构设计及其应用)
软考(系统架构师)-论分布式缓存架构设计及其应用
摘要 随着企业协同办公系统用户规模与并发请求量持续增长,作为核心支撑的用户中心系统面临高并发查询、数据库压力过载、通讯录同步缓慢、服务 CPU 与内存频繁告警等性能瓶颈。本人在项目中担任系统架构师,负责用户中心分布式多级缓存架构的选型、设计、…...

基于LLM的Python脚本自我进化:构建AI驱动的代码优化框架
1. 项目概述:当Python脚本学会自我进化几年前,如果有人告诉我,我写的Python脚本能在我喝咖啡的时候自己给自己“打补丁”、优化逻辑,我肯定会觉得这是科幻小说里的情节。但今天,这已经是我日常工作流的一部分。这个项目…...

电容转换技术突破:电源小型化与高效能设计
1. 电源小型化革命:电容转换技术的突破想象一下,当你拆开最新款的智能手表,发现内部电源模块只占用了指甲盖大小的空间;或者当数据中心机架里的服务器,突然腾出了30%的空间用于增加计算单元。这正是德州仪器࿰…...

PCB设计数据管理:挑战、实践与关键技术
1. PCB设计数据管理的核心挑战与行业现状在电子行业快速迭代的今天,印刷电路板(PCB)设计团队面临着前所未有的时间压力。根据行业调研数据,领先企业通过优化数据管理实现了22%的PCB开发时间缩减,而落后企业同期开发时间反而增加了9%。这种差距…...

GTA5线上小助手:终极免费工具完整使用指南,快速提升游戏体验
GTA5线上小助手:终极免费工具完整使用指南,快速提升游戏体验 【免费下载链接】GTA5OnlineTools GTA5线上小助手 项目地址: https://gitcode.com/gh_mirrors/gt/GTA5OnlineTools 想要在《侠盗猎车手5》线上模式中摆脱繁琐操作,享受更流…...
)
从协议到代码:用Python仿真5G NR下行同步全流程(含PBCH解码与MIB解析)
从协议到代码:用Python仿真5G NR下行同步全流程(含PBCH解码与MIB解析) 在通信系统设计中,下行同步是终端接入网络的第一步关键操作。5G新空口(NR)技术引入了更复杂的同步信号结构,这对算法工程师和研究人员提出了更高要…...

DRAM计算内存的电源传输网络优化策略
1. DRAM计算内存中的电源传输网络挑战与优化在数据密集型应用爆炸式增长的今天,传统冯诺依曼架构面临严峻的"内存墙"挑战。计算内存(Compute-in-Memory, CIM)技术通过在内存内部执行计算任务,从根本上改变了数据处理范式…...