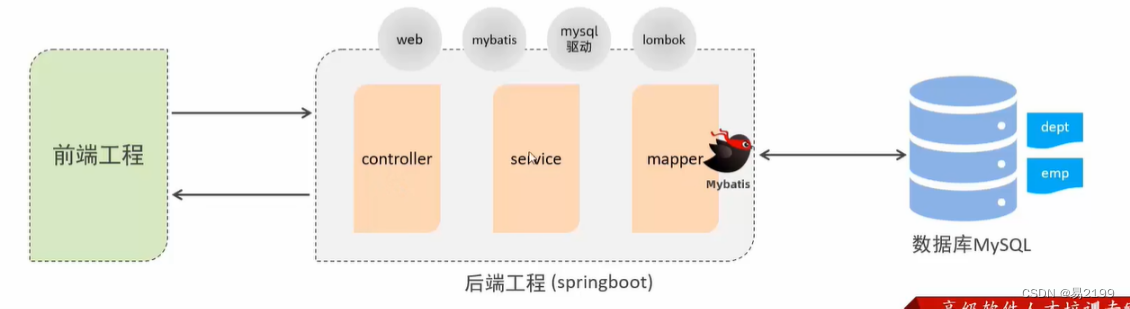
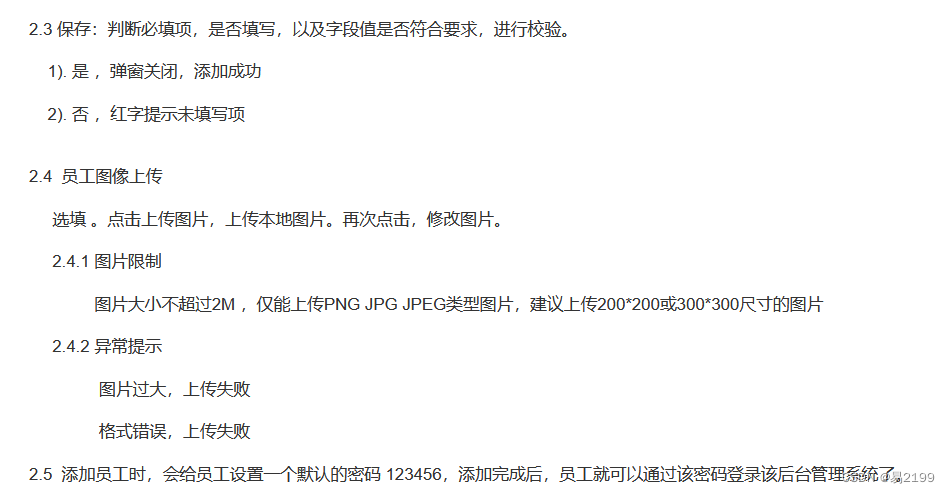
SprintBoot案例-增删改查
黑马程序员JavaWeb开发教程
文章目录
- 一、准备工作
- 1. 准备数据库表
- 1.1 新建数据库mytlias
- 1.2 新建部门表dept
- 1.3 新建员工表emp
- 2. 准备一个Springboot工程
- 2.1 新建一个项目
- 3. 配置文件application.properties中引入mybatis的配置信息,准备对应的实体类
- 3.1 引入mybatis的配置信息
- 3.2 准备对应的实体类
- 4. 准备对应的mapper、service、controller基础结构
- 4.1 创建结构
- 4.2 controller
- 4.3 service
- 4.4 Mapper
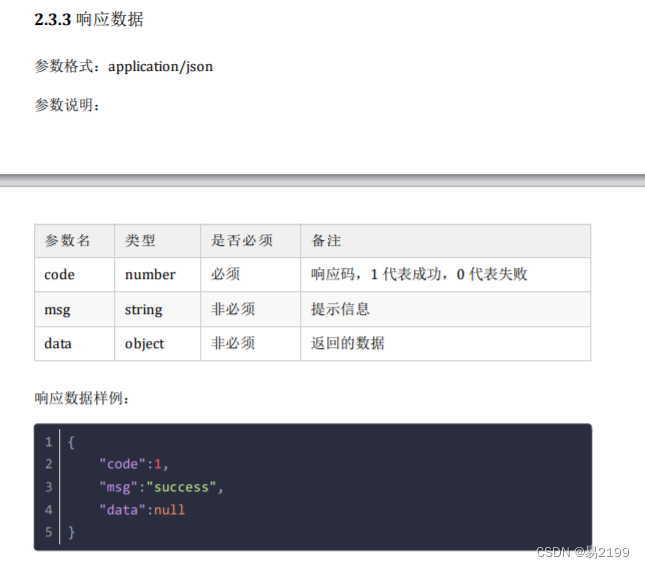
- 5. 统一响应结果
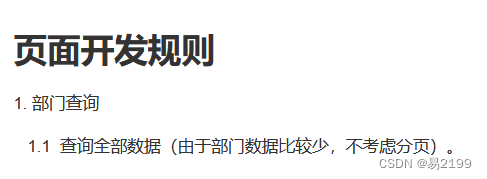
- 二、部门管理-查询
- 1. 需求说明
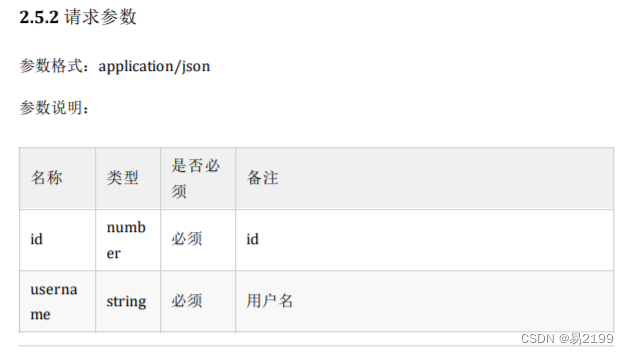
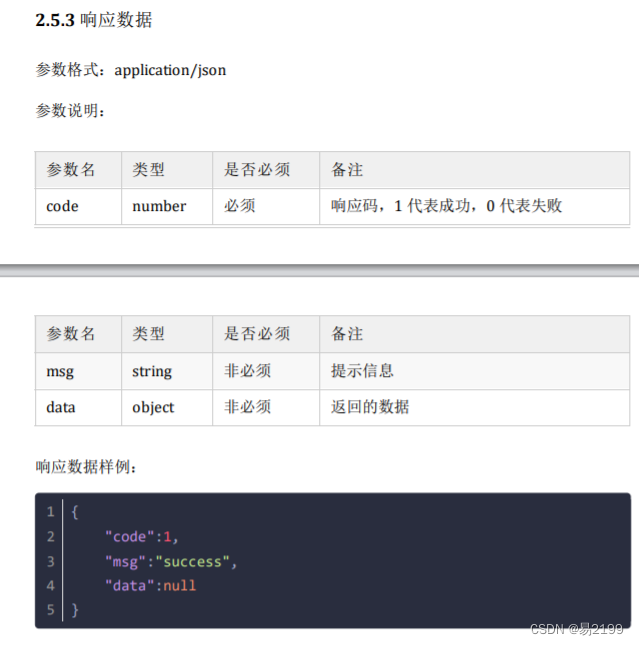
- 2. 接口文档
- 3. 代码实现
- 3.1 controller层
- 3.2 service层
- 3.3 mapper层
- 4. postman测试
- 三、部门管理-删除
- 1. 需求说明
- 2. 接口文档
- 3. 代码实现
- 3.1 controller层
- 3.2 service层
- 3.3 mapper层
- 4. postman测试
- 四、部门管理-新增
- 1. 需求说明
- 2. 接口文档
- 3. 代码实现
- 3.1 controller层
- 3.2 service层
- 3.3 mapper层
- 4. postman测试
- 五、员工管理-分页查询
- 1. 需求说明
- 2. 接口文档
- 3. 代码实现
- 3.1 controller层
- 3.2 service层
- 3.3 mapper层
- 4. postman测试
- 六、员工管理-删除员工
- 1. 需求说明
- 2. 接口文档
- 3. 代码实现
- 3.1 controller层
- 3.2 service层
- 3.3 mapper层
- 4. postman测试
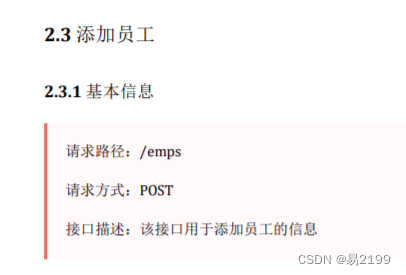
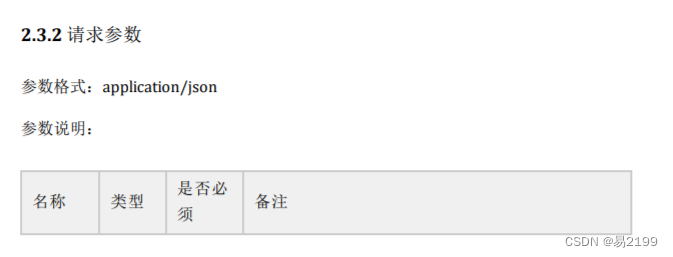
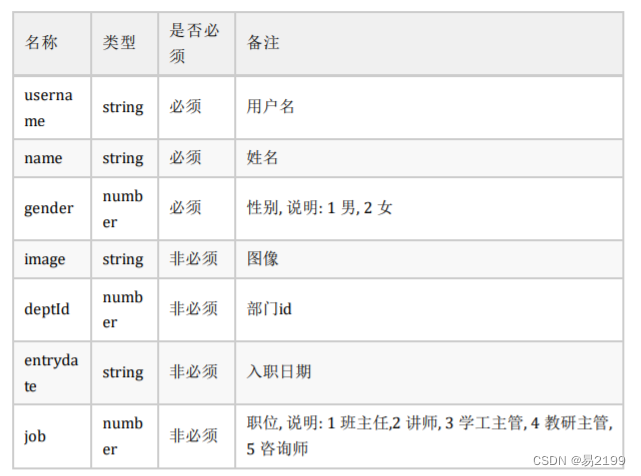
- 七、员工管理-新增员工
- 1. 需求说明
- 2. 接口文档
- 3. 代码实现
- 3.1 controller层
- 3.2 service层
- 3.3 mapper层
- 4. postman测试
- 八、员工管理-修改
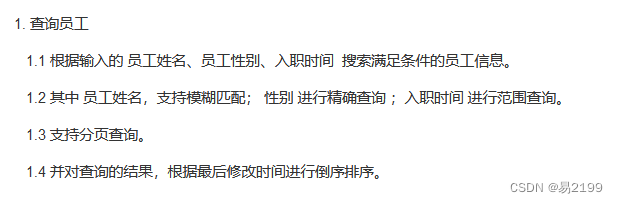
- 1. 根据id 查询员工
- 1.1 需求说明
- 1.2 接口文档
- 1.3 代码实现
- 1.3.1 controller层
- 1.3.2 service层
- 1.3.3 mapper层
- 1.4 postman测试
- 2. 修改员工数据
- 1.1 需求说明
- 1.2 接口文档
- 1.3 代码实现
- 1.3.1 controller层
- 1.3.2 service层
- 1.3.3 mapper层
- 1.4 postman测试
一、准备工作
1. 准备数据库表
1.1 新建数据库mytlias
# 新建数据库 mytlias
create database mytlias;
# 使用数据库 mytlias
use mytlias;
1.2 新建部门表dept
- 新建部门表
-- 部门管理
create table dept(id int unsigned primary key auto_increment comment '主键ID',name varchar(10) not null unique comment '部门名称',create_time datetime not null comment '创建时间',update_time datetime not null comment '修改时间'
) comment '部门表';
- 向部门表中插入数据
insert into dept (id, name, create_time, update_time)
values(1,'学工部',now(),now()),(2,'教研部',now(),now()),(3,'咨询部',now(),now()),(4,'就业部',now(),now()),(5,'人事部',now(),now());
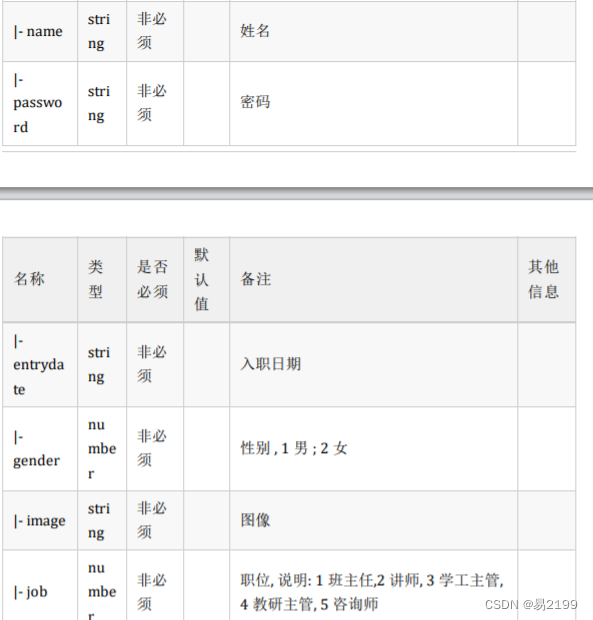
1.3 新建员工表emp
- 新建员工表
-- 员工管理(带约束)
create table emp (id int unsigned primary key auto_increment comment 'ID',username varchar(20) not null unique comment '用户名',password varchar(32) default '123456' comment '密码',name varchar(10) not null comment '姓名',gender tinyint unsigned not null comment '性别, 说明: 1 男, 2 女',image varchar(300) comment '图像',job tinyint unsigned comment '职位, 说明: 1 班主任,2 讲师, 3 学工主管, 4 教研主管, 5 咨询师',entrydate date comment '入职时间',dept_id int unsigned comment '部门ID',create_time datetime not null comment '创建时间',update_time datetime not null comment '修改时间',foreign key (dept_id) references dept(id) # 部门表的主键id 是员工表的一个外键
) comment '员工表';
- 向员工表中插入数据
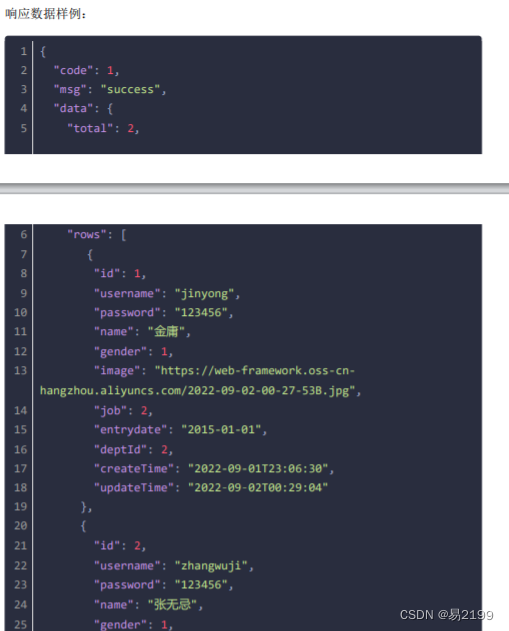
INSERT INTO emp
(id, username, password, name, gender, image, job, entrydate,dept_id, create_time, update_time)
VALUES  (1,'jinyong','123456','金庸',1,'1.jpg',4,'2000-01-01',2,now(),now()),(2,'zhangwuji','123456','张无忌',1,'2.jpg',2,'2015-01-01',2,now(),now()),(3,'yangxiao','123456','杨逍',1,'3.jpg',2,'2008-05-01',2,now(),now()),(4,'weiyixiao','123456','韦一笑',1,'4.jpg',2,'2007-01-01',2,now(),now()),(5,'changyuchun','123456','常遇春',1,'5.jpg',2,'2012-12-05',2,now(),now()),(6,'xiaozhao','123456','小昭',2,'6.jpg',3,'2013-09-05',1,now(),now()),(7,'jixiaofu','123456','纪晓芙',2,'7.jpg',1,'2005-08-01',1,now(),now()),(8,'zhouzhiruo','123456','周芷若',2,'8.jpg',1,'2014-11-09',1,now(),now()),(9,'dingminjun','123456','丁敏君',2,'9.jpg',1,'2011-03-11',1,now(),now()),(10,'zhaomin','123456','赵敏',2,'10.jpg',1,'2013-09-05',1,now(),now()),(11,'luzhangke','123456','鹿杖客',1,'11.jpg',5,'2007-02-01',3,now(),now()),(12,'hebiweng','123456','鹤笔翁',1,'12.jpg',5,'2008-08-18',3,now(),now()),(13,'fangdongbai','123456','方东白',1,'13.jpg',5,'2012-11-01',3,now(),now()),(14,'zhangsanfeng','123456','张三丰',1,'14.jpg',2,'2002-08-01',2,now(),now()),(15,'yulianzhou','123456','俞莲舟',1,'15.jpg',2,'2011-05-01',2,now(),now()),(16,'songyuanqiao','123456','宋远桥',1,'16.jpg',2,'2007-01-01',2,now(),now()),(17,'chenyouliang','123456','陈友谅',1,'17.jpg',NULL,'2015-03-21',NULL,now(),now());
2. 准备一个Springboot工程
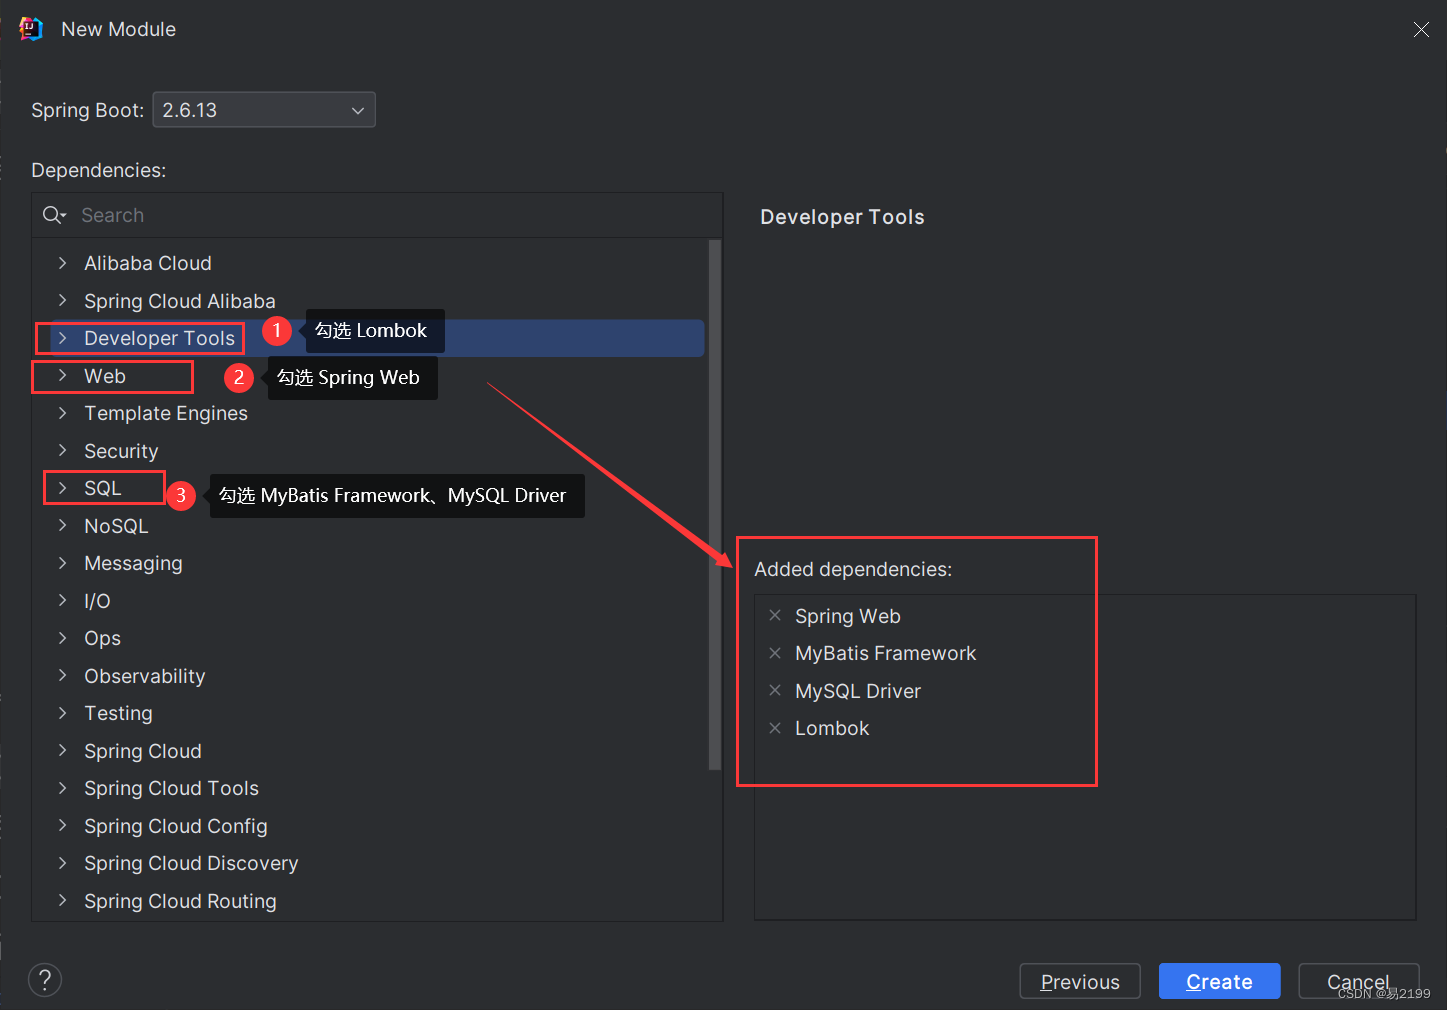
2.1 新建一个项目
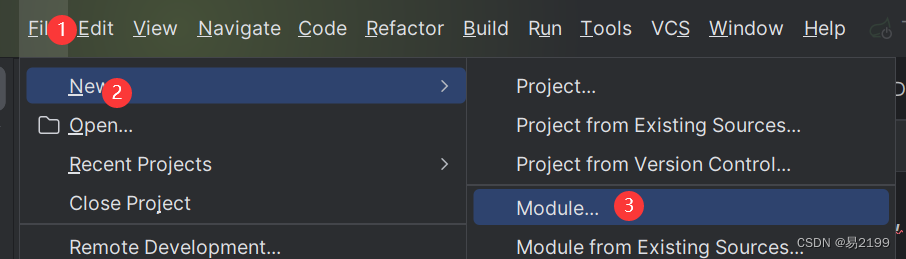
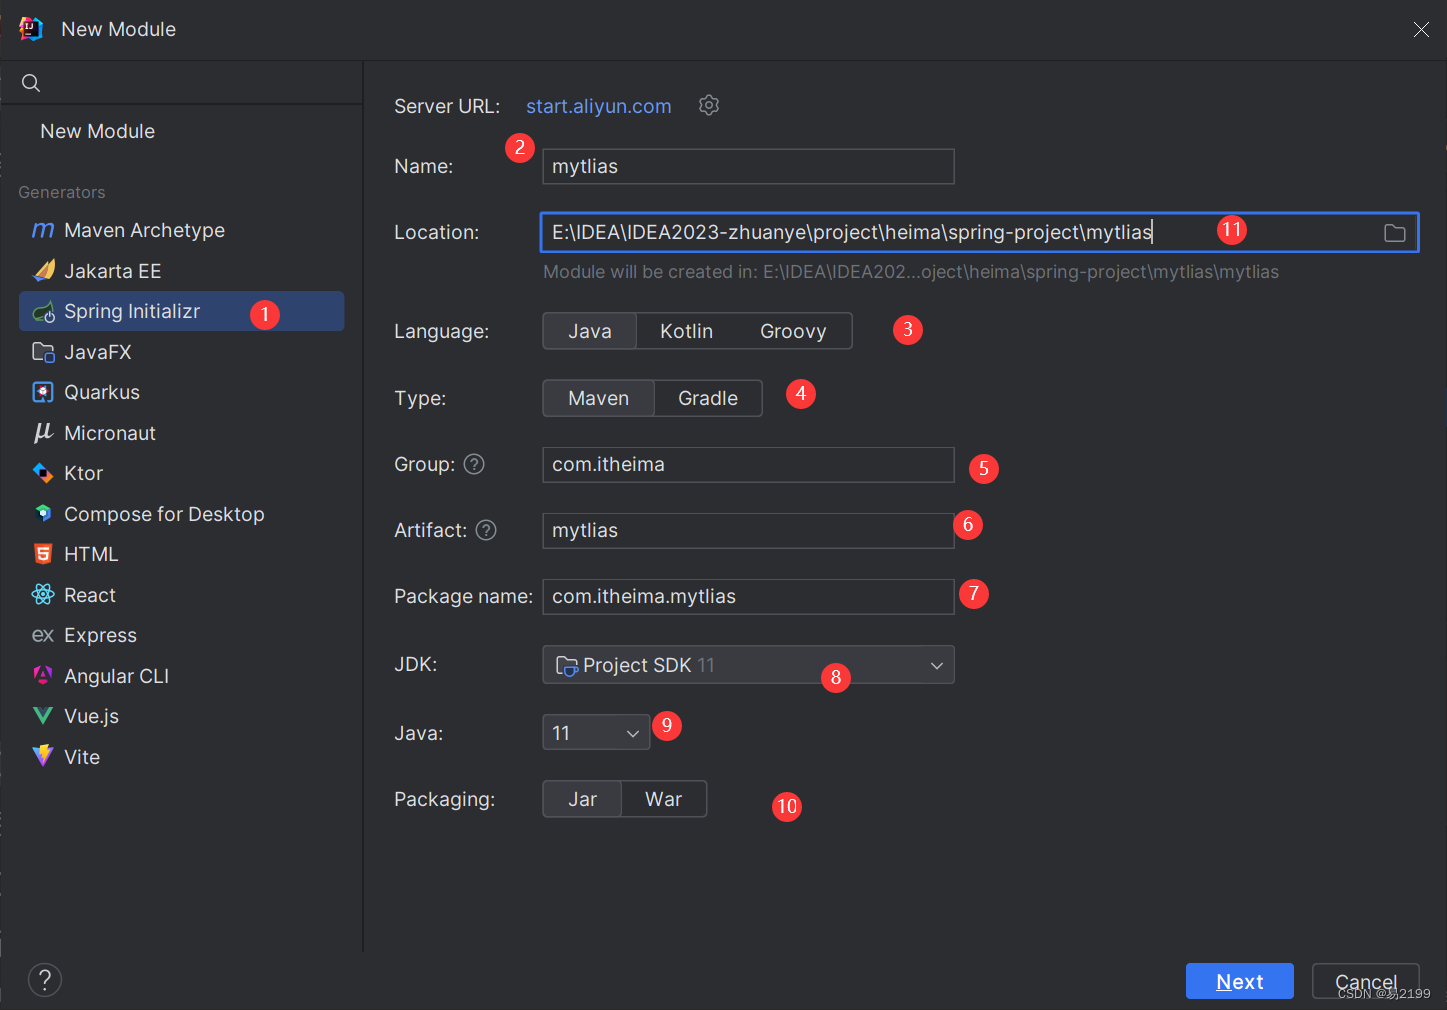
- 引入对应的起步依赖(web、mybatis、mysql驱动、lombok)
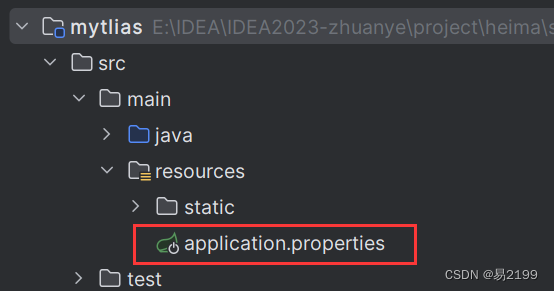
3. 配置文件application.properties中引入mybatis的配置信息,准备对应的实体类
3.1 引入mybatis的配置信息
- 在application.properties中添加以下代码
# MyBatis配置信息
spring.datasource.driver-class-name=com.mysql.cj.jdbc.Driver
# 改成你自己要连接的数据库的名字(mytlias)
spring.datasource.url=jdbc:mysql://localhost:3306/mytlias
# 自己数据库用户名(root)
spring.datasource.username=root
# 自己数据库密码(123456)
spring.datasource.password=123456#开启驼峰命名
mybatis.configuration.map-underscore-to-camel-case=true
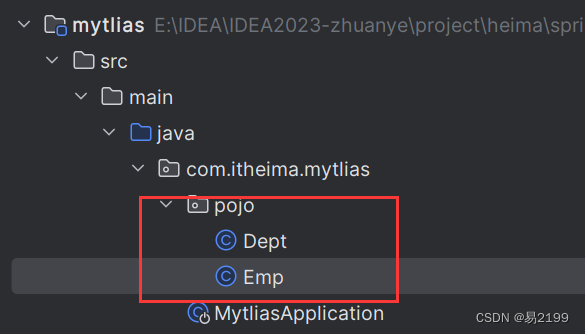
3.2 准备对应的实体类
- 创建一个文件夹pojo,并在其下创建两个类Dept、Emp
- 实体类Dept
package com.itheima.mytlias.pojo;import lombok.AllArgsConstructor;
import lombok.Data;
import lombok.NoArgsConstructor;import java.time.LocalDateTime;@Data//生成getter、setter、tostring等
@AllArgsConstructor//全参构造函数
@NoArgsConstructor//无参构造函数
public class Dept {private Integer id; // 部门idprivate String name; // 部门名称private LocalDateTime createTime; // 创建时间private LocalDateTime updateTime; // 更新时间}- 实体类Emp
package com.itheima.mytlias.pojo;import lombok.AllArgsConstructor;
import lombok.Data;
import lombok.NoArgsConstructor;import java.time.LocalDate;
import java.time.LocalDateTime;@Data
@AllArgsConstructor
@NoArgsConstructor
public class Emp {private Integer id;//用户idprivate String username;//用户名private String password;//用户密码private String name;//用户姓名private Short gender;//用户新别private String image;//图像地址private Short job;//职位private LocalDate entrydate;//日志日期private Integer deptId;//部门idprivate LocalDateTime createTime;//创建时间private LocalDateTime updateTime;//更新时间
}
4. 准备对应的mapper、service、controller基础结构
4.1 创建结构
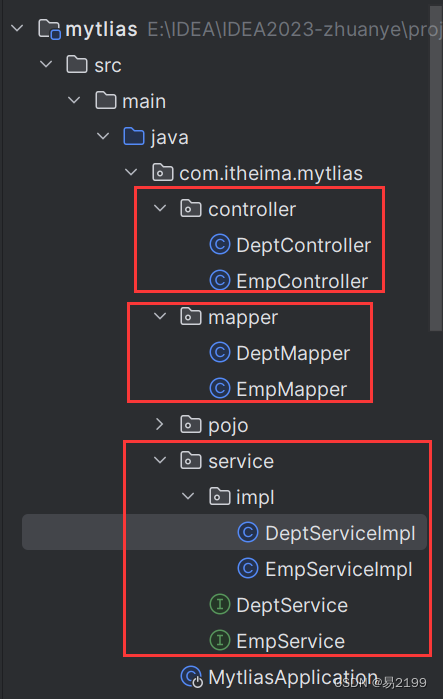
4.2 controller
- DeptController
package com.itheima.mytlias.controller;import org.springframework.web.bind.annotation.RestController;@RestController
public class DeptController {
}- EmpController
package com.itheima.mytlias.controller;import org.springframework.web.bind.annotation.RestController;@RestController
public class EmpController {
}
4.3 service
- deptService
package com.itheima.mytlias.service;public interface DeptService {
}- EmpService
package com.itheima.mytlias.service;public interface EmpService {
}- DeptServiceImpl
package com.itheima.mytlias.service.impl;import com.itheima.mytlias.service.DeptService;
import org.springframework.stereotype.Service;@Service
public class DeptServiceImpl implements DeptService {
}- EmpServiceImpl
package com.itheima.mytlias.service.impl;import com.itheima.mytlias.service.EmpService;
import org.springframework.stereotype.Service;@Service
public class EmpServiceImpl implements EmpService {
}
4.4 Mapper
- DeptMapper
package com.itheima.mytlias.mapper;import org.apache.ibatis.annotations.Mapper;@Mapper
public interfaceDeptMapper {
}- EmpMapper
package com.itheima.mytlias.mapper;import org.apache.ibatis.annotations.Mapper;@Mapper
public interfaceEmpMapper {
}
5. 统一响应结果
- 为了统一响应结果,需要在pojo包下创建Result类
package com.itheima.mytlias.pojo;import lombok.AllArgsConstructor;
import lombok.Data;
import lombok.NoArgsConstructor;@Data
@NoArgsConstructor
@AllArgsConstructor
public class Result {private Integer code;//响应码,1 代表成功; 0 代表失败private String msg;  //响应信息 描述字符串private Object data; //返回的数据//增删改 成功响应public static Result success() {return new Result(1, "success", null);}//查询 成功响应public static Result success(Object data) {return new Result(1, "success", data);}//失败响应public static Result error(String msg) {return new Result(0, msg, null);}
}
二、部门管理-查询
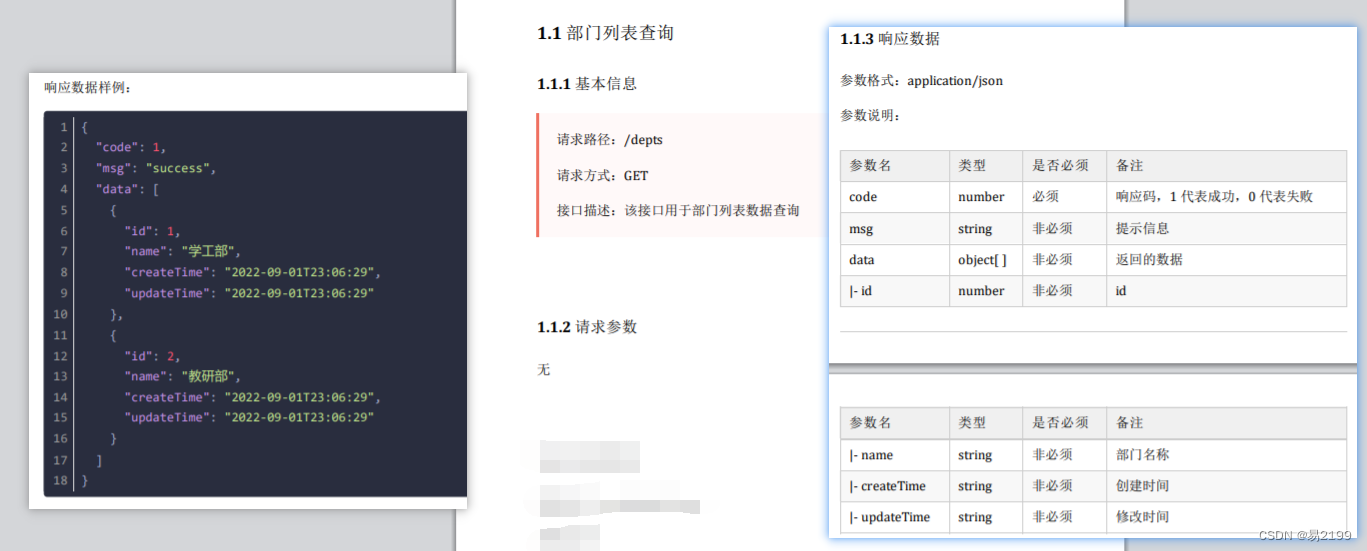
1. 需求说明
2. 接口文档
3. 代码实现
3.1 controller层
package com.itheima.mytlias.controller;import com.itheima.mytlias.pojo.Dept;
import com.itheima.mytlias.pojo.Result;
import com.itheima.mytlias.service.DeptService;
import lombok.extern.slf4j.Slf4j;
import org.springframework.beans.factory.annotation.Autowired;
import org.springframework.web.bind.annotation.GetMapping;
import org.springframework.web.bind.annotation.RequestMapping;
import org.springframework.web.bind.annotation.RestController;import java.awt.*;
import java.util.List;@Slf4j//打印日志使用
@RestController
@RequestMapping("/depts")//本例下所有的请求都会以/dept开头,所以可以使用这个注解,提取出来
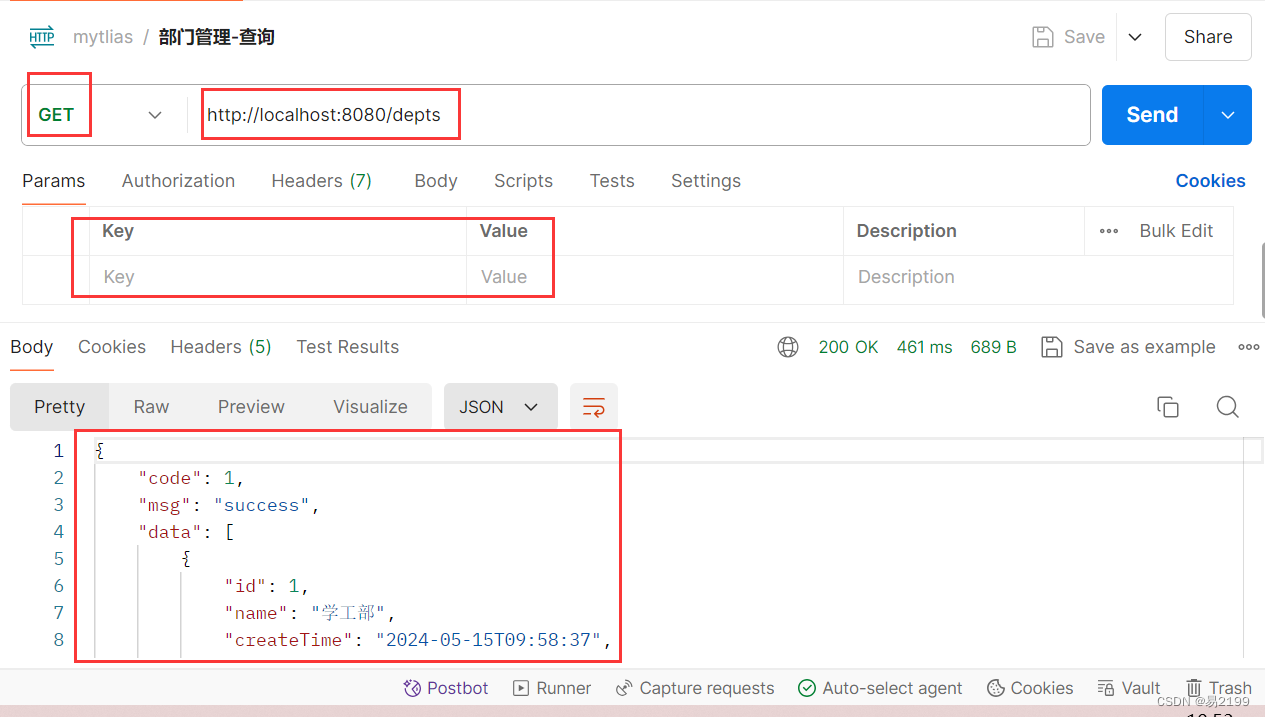
public class DeptController {//注入@Autowiredprivate DeptService deptService;/*** 查询所有部门数据* 请求方式为 Get* 请求路径为/dept* 无参数* 返回统一响应结果* @return*/@GetMappingpublic Result list(){//打印日志log.info("查询所有部门数据");//调用service,查询所有部门数据List<Dept> deptList = deptService.list();//返回结果return Result.success(deptList);}
}3.2 service层
- service
package com.itheima.mytlias.service;import com.itheima.mytlias.pojo.Dept;import java.util.List;public interface DeptService {/*** 查询部门所有数据* @return*/List<Dept> list();
}- impl
package com.itheima.mytlias.service.impl;import com.itheima.mytlias.mapper.DeptMapper;
import com.itheima.mytlias.pojo.Dept;
import com.itheima.mytlias.service.DeptService;
import org.springframework.beans.factory.annotation.Autowired;
import org.springframework.stereotype.Service;import java.util.List;@Service
public class DeptServiceImpl implements DeptService {//注入@Autowiredprivate DeptMapper deptMapper;/*** 查询所有部门数据* @return*/@Overridepublic List<Dept> list() {//调用mapper查询所有部门数据List<Dept> deptList=deptMapper.list();return deptList;}
}
3.3 mapper层
package com.itheima.mytlias.mapper;import com.itheima.mytlias.pojo.Dept;
import org.apache.ibatis.annotations.Mapper;
import org.apache.ibatis.annotations.Select;import java.util.List;@Mapper
public interface DeptMapper {/*** 查询部门全部数据* @return*/@Select("select * from dept")public List<Dept> list();
}
4. postman测试
三、部门管理-删除
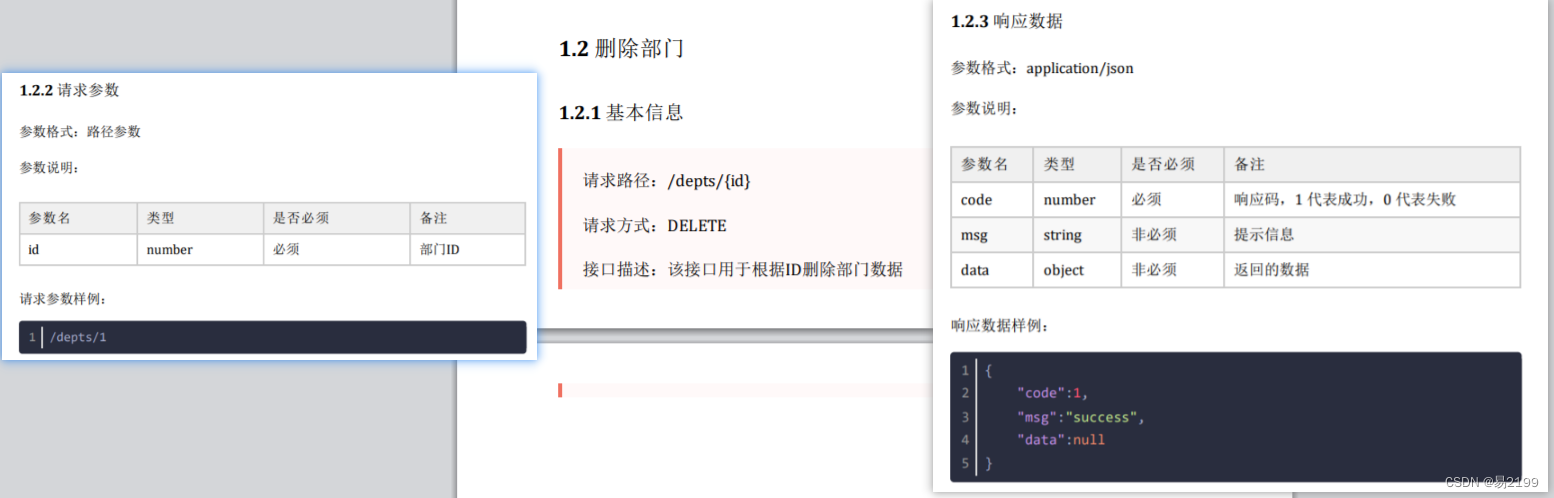
1. 需求说明

- 也就是根据部门id删除部门
2. 接口文档
3. 代码实现
3.1 controller层
- 从这里向后,只给出新增的代码
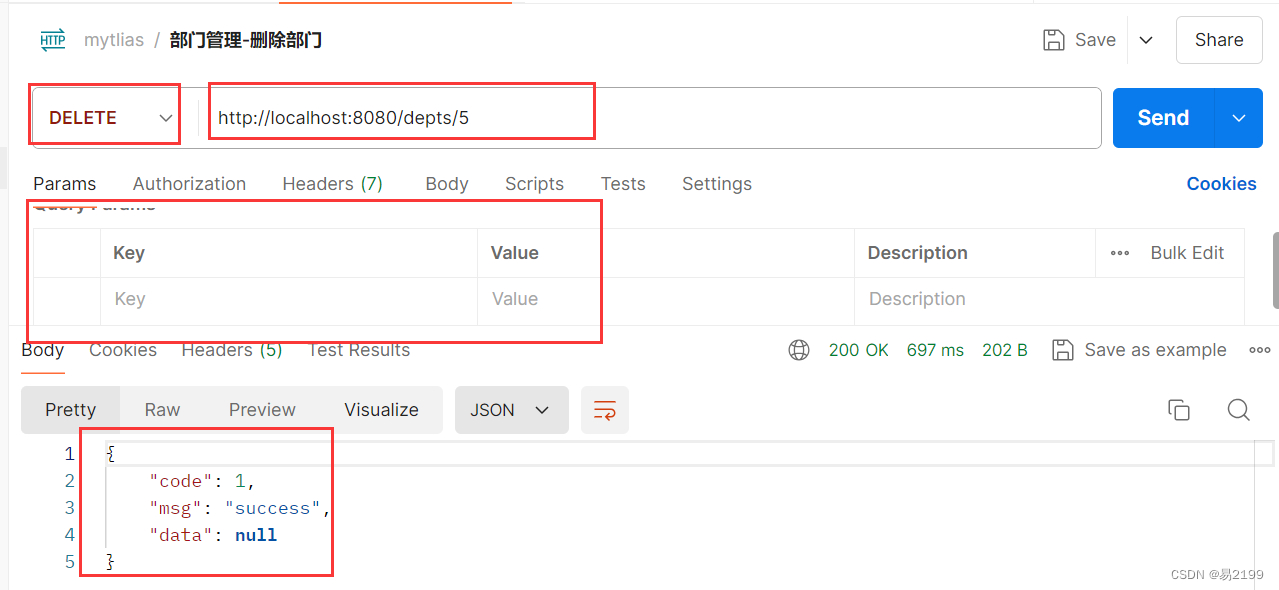
/*** 根据部门id删除部门* 请求方式为 Delete* 请求路径为/depts/{id}* 参数为部门id,路径参数,需要加上注解 @PathVariable* 返回统一响应结果* @param id* @return*/@DeleteMapping("/{id}")public Result deleteById(@PathVariable Integer id){//打印日志log.info("根据部门id删除部门");//调用service,根据部门id删除部门deptService.deleteById(id);//返回结果return Result.success();}
3.2 service层
- service
/*** 根据部门id删除部门* @param id*/void deleteById(Integer id);
- impl
/*** 根据部门id删除部门* @param id*/@Overridepublic void deleteById(Integer id) {//调用mapper,根据部门id删除部门deptMapper.deleteById(id);}
3.3 mapper层
/*** 根据部门id删除部门* @param id*/@Delete("delete from dept where id=#{id}")void deleteById(Integer id);
4. postman测试
四、部门管理-新增
1. 需求说明
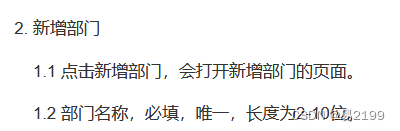
- 根据部门名称新增部门
2. 接口文档
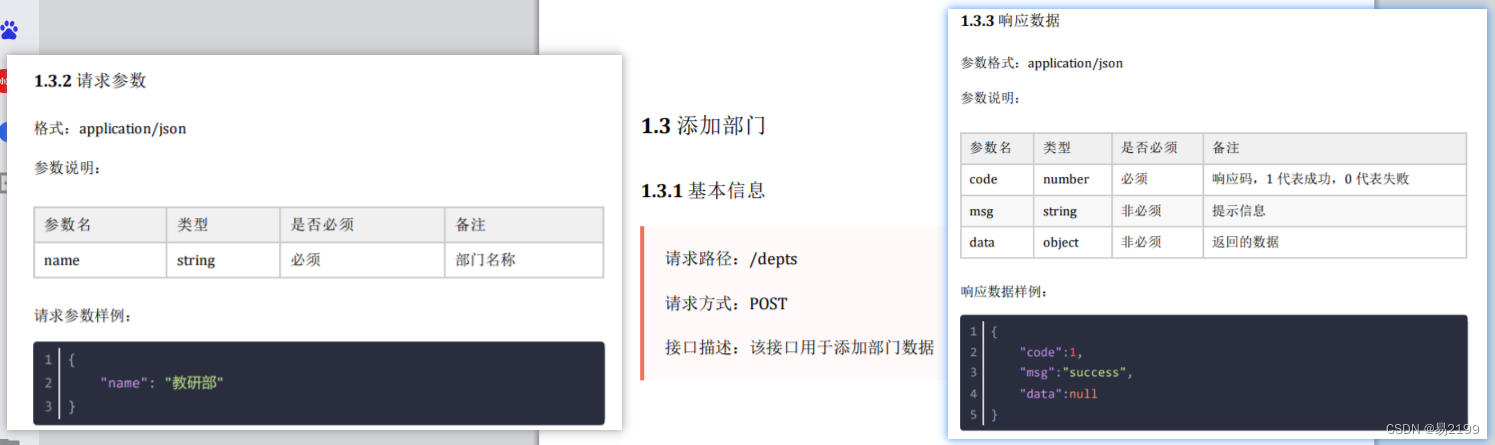
3. 代码实现
3.1 controller层
/*** 根据部门名称添加部门* 请求方式为 POST* 请求路径为/depts* 参数为JSON格式数据,因此需要加上注解 @RequestBody* 返回统一响应结果* @param dept* @return*/@PostMappingpublic Result insertByName(@RequestBody Dept dept){//打印日志log.info("根据部门名称添加部门");//调用service,根据部门名称添加部门deptService.insertByName(dept);//返回结果return Result.success();}
3.2 service层
- service
/*** 根据部门名称添加部门* @param dept*/void insertByName(Dept dept);
- impl
/*** 根据部门名称添加部门* @param dept*/@Overridepublic void insertByName(Dept dept) {//修改基础信息dept.setCreateTime(LocalDateTime.now());dept.setUpdateTime(LocalDateTime.now());//调用mapper,根据部门名称添加部门deptMapper.insertByName(dept);}
3.3 mapper层
/*** 根据部门名称添加部门* @param dept*/@Insert("insert into dept (id, name, create_time, update_time) values (#{id},#{name},#{createTime},#{updateTime})")void insertByName(Dept dept);
4. postman测试
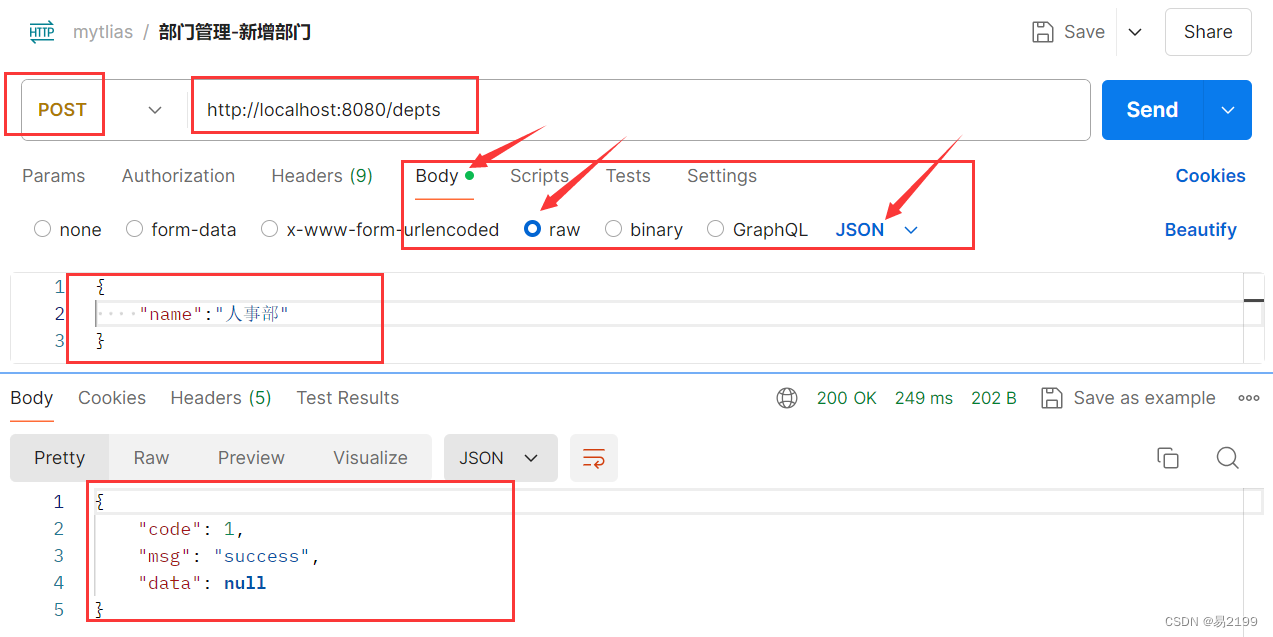
{"name":"人事部"
}
五、员工管理-分页查询
- PageHelper和xml映射文件的使用参考分页查询PageHelper插件&分页条件查询(xml映射文件,动态SQL)
1. 需求说明
2. 接口文档
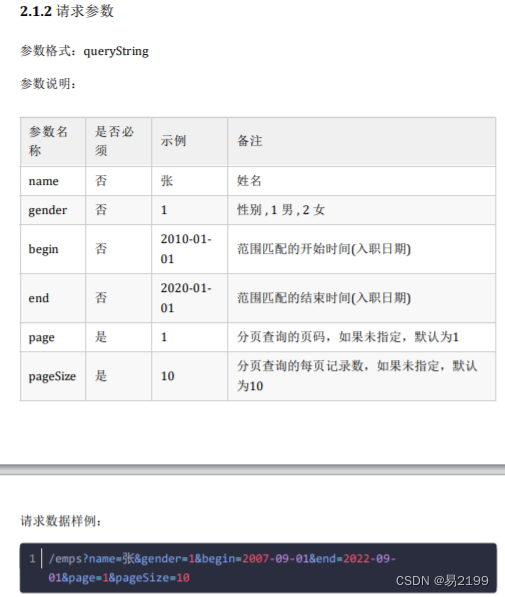
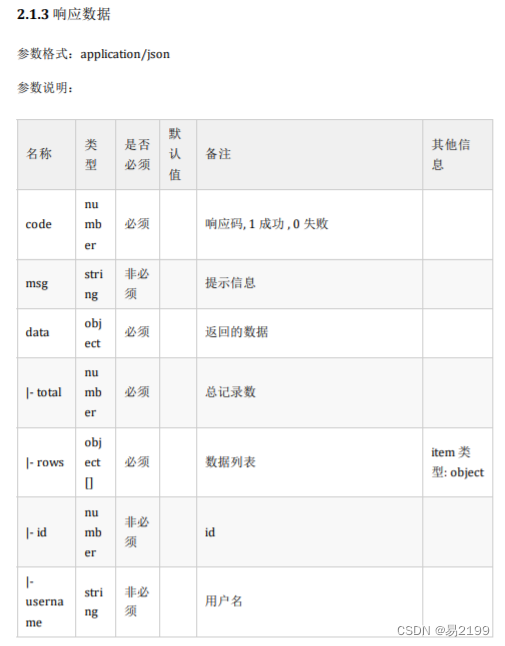
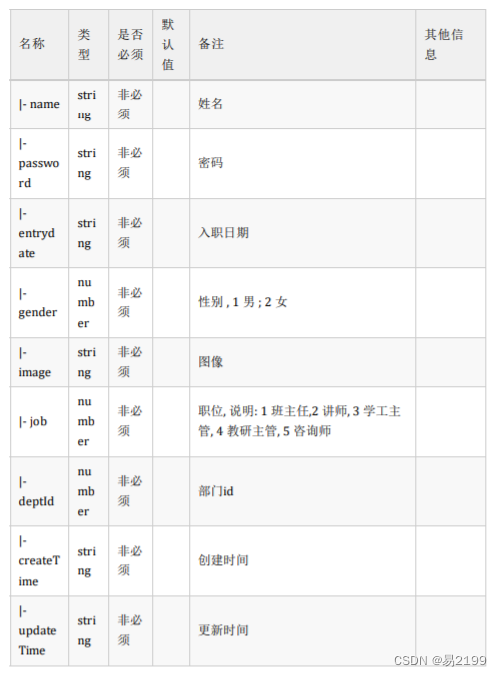
3. 代码实现
3.1 controller层
package com.itheima.mytlias.controller;import com.itheima.mytlias.pojo.PageBean;
import com.itheima.mytlias.pojo.Result;
import com.itheima.mytlias.service.EmpService;
import lombok.extern.slf4j.Slf4j;
import org.springframework.beans.factory.annotation.Autowired;
import org.springframework.format.annotation.DateTimeFormat;
import org.springframework.web.bind.annotation.GetMapping;
import org.springframework.web.bind.annotation.RequestMapping;
import org.springframework.web.bind.annotation.RequestParam;
import org.springframework.web.bind.annotation.RestController;import java.time.LocalDate;@Slf4j
@RestController
@RequestMapping("/emps")
public class EmpController {@Autowiredprivate EmpService empService;@GetMapping//@RequestParam:为了给形参指定默认值//@DateTimeFormat:日期时间类型的参数,需要使用该注解指定格式public Result page(String name, Short gender,@DateTimeFormat(pattern = "yyyy-MM-dd") LocalDate begin,@DateTimeFormat(pattern = "yyyy-MM-dd") LocalDate end,@RequestParam(defaultValue = "1") Integer page,@RequestParam(defaultValue = "2") Integer pageSize) {//打印日志log.info("参数 {},{},{},{},{},{}", name, gender, begin, end, page, pageSize);//调用servicePageBean pageBean = empService.page(name, gender, begin, end, page, pageSize);//返回结果return Result.success(pageBean);}
}
3.2 service层
- service
package com.itheima.mytlias.service;import com.itheima.mytlias.pojo.PageBean;import java.time.LocalDate;public interface EmpService {/*** 分页查询** @return*/PageBean page(String name, Short gender, LocalDate begin, LocalDate end, Integer page, Integer pageSize);
}- impl
package com.itheima.mytlias.service.impl;import com.github.pagehelper.Page;
import com.github.pagehelper.PageHelper;
import com.itheima.mytlias.mapper.EmpMapper;
import com.itheima.mytlias.pojo.Emp;
import com.itheima.mytlias.pojo.PageBean;
import com.itheima.mytlias.service.EmpService;
import org.springframework.beans.factory.annotation.Autowired;
import org.springframework.stereotype.Service;import java.time.LocalDate;
import java.util.List;@Service
public class EmpServiceImpl implements EmpService {@Autowiredprivate EmpMapper empMapper;/*** 分页查询** @return*/@Overridepublic PageBean page(String name, Short gender, LocalDate begin, LocalDate end, Integer page, Integer pageSize) {//使用pagehelper指定查询页码,和每页查询数据PageHelper.startPage(page, pageSize);//执行查询List<Emp> empList = empMapper.list(name, gender, begin, end);Page<Emp> p = (Page<Emp>) empList;//强制转换成Page类型Long count = p.getTotal();List<Emp> result = p.getResult();//封装为 PageBeanPageBean pageBean = new PageBean(count, result);return pageBean;}
}
3.3 mapper层
- mapper
package com.itheima.mytlias.mapper;import com.itheima.mytlias.pojo.Emp;
import org.apache.ibatis.annotations.Mapper;
import org.apache.ibatis.annotations.Param;
import org.apache.ibatis.annotations.Select;
import org.springframework.web.bind.annotation.PathVariable;import java.time.LocalDate;
import java.util.List;@Mapper
public interface EmpMapper {/*** 使用pageHelper的话,只需要定义一个简单的查询就可以** @return*/public List<Emp> list(@Param("name") String name, @Param("gender") Short gender, @Param("begin") LocalDate begin, @Param("end") LocalDate end);
}- EmpMapper.xml
<?xml version="1.0" encoding="UTF-8" ?>
<!DOCTYPE mapperPUBLIC "-//mybatis.org//DTD Mapper 3.0//EN""http://mybatis.org/dtd/mybatis-3-mapper.dtd">
<!--        namespace:EmpMapper的全类名-->
<mapper namespace="com.itheima.mytlias.mapper.EmpMapper"><!--    带条件的分页查询-动态查询--><!--    id:与方法名一致resultType:返回单条记录的全类名--><select id="list" resultType="com.itheima.mytlias.pojo.Emp">select * from emp<where><if test="name!=null">name like concat('%',#{name},'%')</if><if test="gender!=null">and gender=#{gender}</if><if test="begin!=null and end!=null">and entrydate between #{begin} and #{end}</if></where>order by update_time desc</select>
</mapper>
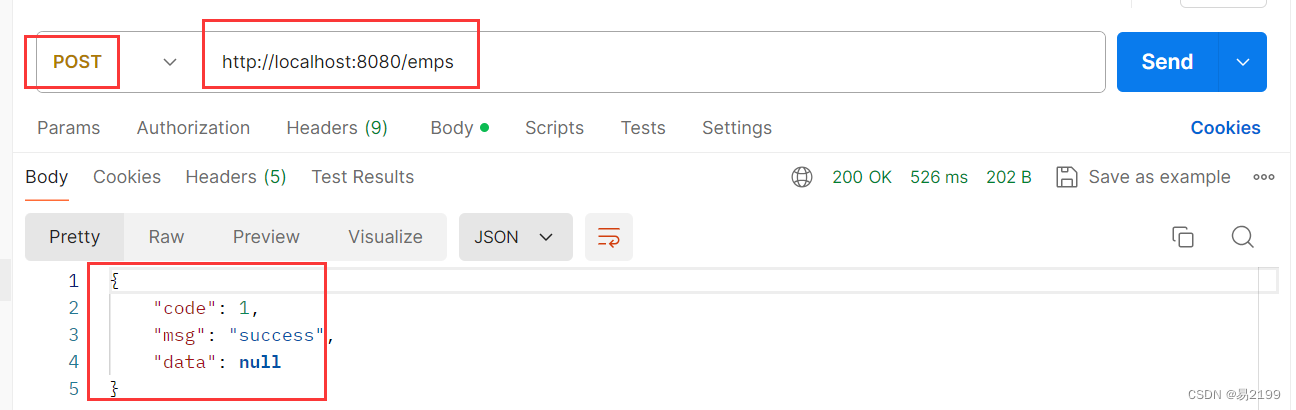
4. postman测试
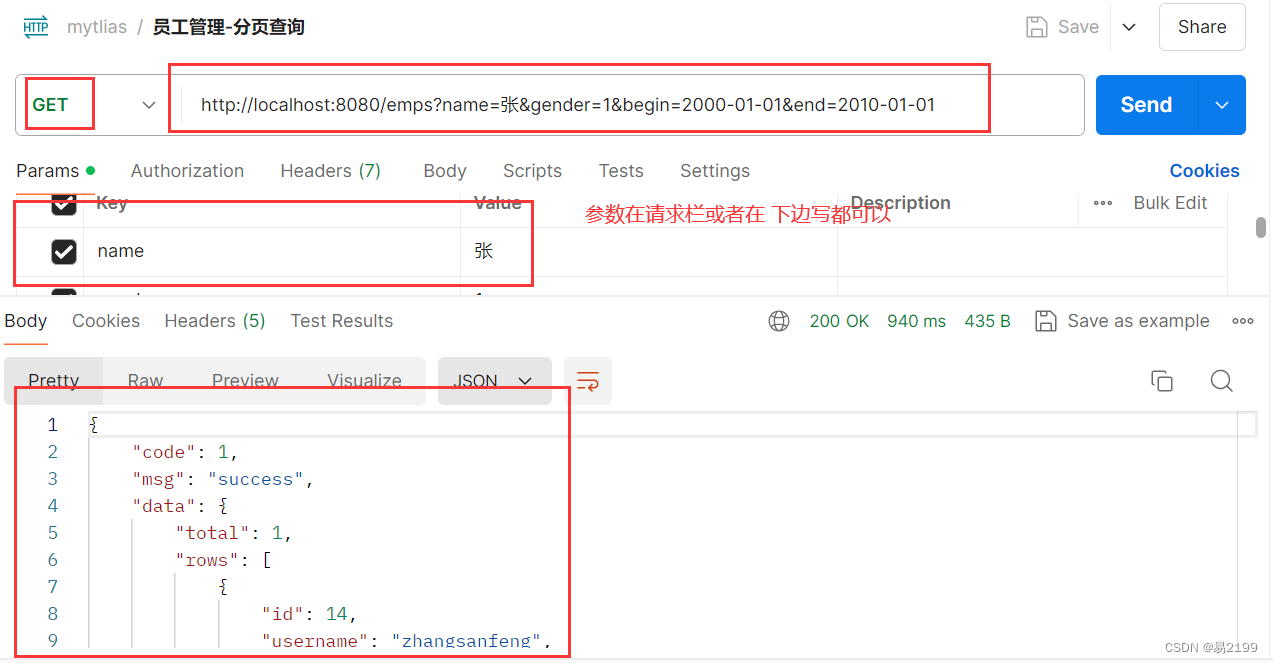
http://localhost:8080/emps?name=张&gender=1&begin=2000-01-01&end=2010-01-01
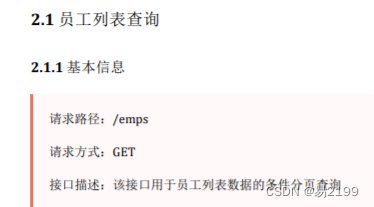
六、员工管理-删除员工
1. 需求说明

2. 接口文档
3. 代码实现
3.1 controller层
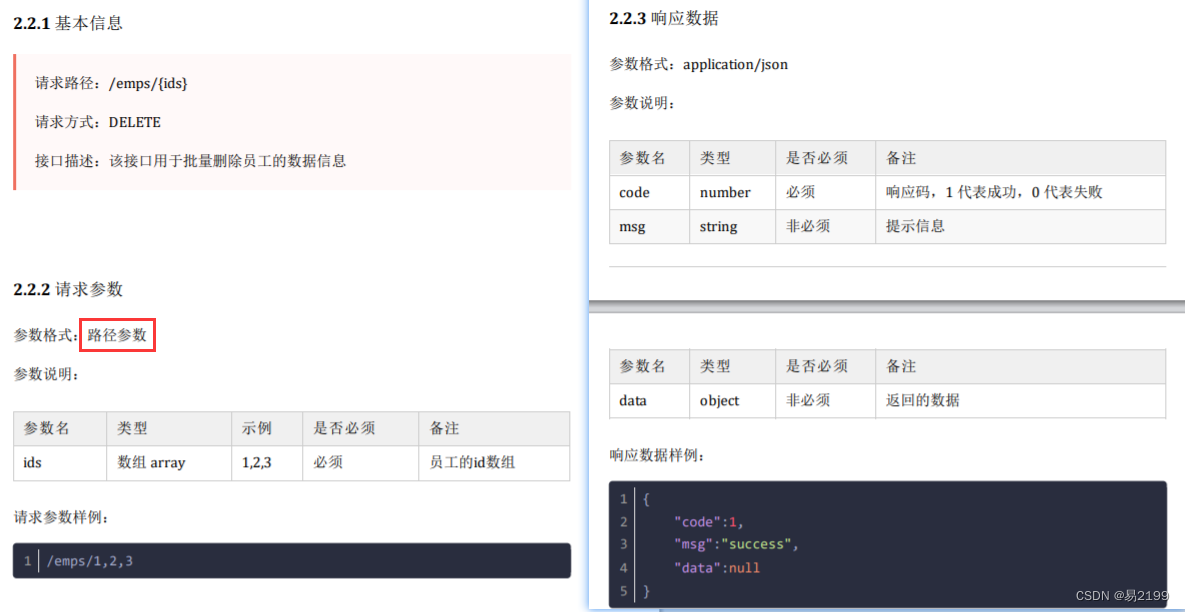
/*** 根据员工id,删除员工* 请求方式为 DELETE* 请求路径为/emps* 返回统一响应结果* 参数:* @param ids @PathVariable 路径参数需要加这个注解* @return*/@DeleteMapping("/{ids}")public Result DeleteById(@PathVariable List<Integer> ids){//打印日志log.info("参数:{}",ids);//调用serviceempService.deleteById(ids);//返回结果return Result.success();}
3.2 service层
- service
/*** 根据员工 id删除员工* @param ids*/void deleteById(List<Integer> ids);
- impl
/*** 根据员工 id删除员工* @param ids*/@Overridepublic void deleteById(List<Integer> ids) {//调用mapper 删除员工empMapper.deleteById(ids);}
3.3 mapper层
- EmpMapper
/*** 根据id删除员工* @param ids*/void deleteById(@Param("ids") List<Integer> ids);
- EmpMApper.xml
<!-- 根据员工删除id--><!-- collection:要遍历的数组close:结束之后的SQL片段open:遍历之前的左侧separator:以什么为分割item遍历后得到的单个元素--><delete id="deleteById">delete from emp where id in<foreach collection="ids" close=")" open="(" separator="," item="id">#{id}</foreach></delete>
4. postman测试

七、员工管理-新增员工
1. 需求说明
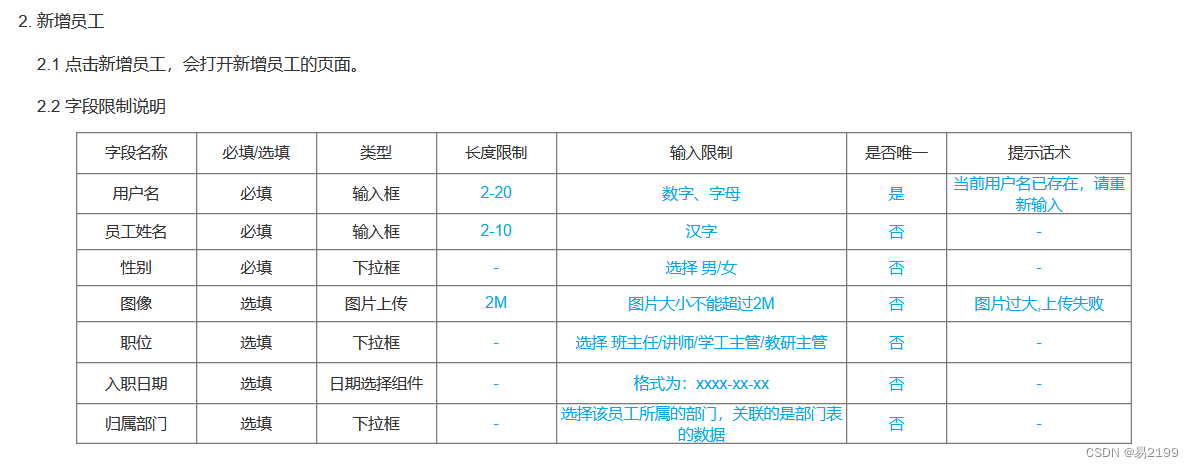
2. 接口文档

3. 代码实现
3.1 controller层
/*** 新增员工* 请求方式为 POST* 请求路径为/emps* 返回统一响应结果* 参数:* @param emp @RequestBody 如果参数是JSON格式的数据,需要加这个注解* @return*/@PostMappingpublic Result insert(@RequestBody Emp emp){//打印日志log.info("新增员工");//调用servicceempService.insert(emp);//返回结果return Result.success();}
3.2 service层
- service
/*** 新增员工*/void insert(Emp emp);
- impl
/*** 新增员工*/@Overridepublic void insert(Emp emp) {//处理基本数据emp.setCreateTime(LocalDateTime.now());emp.setUpdateTime(LocalDateTime.now());//调用mapperempMapper.insert(emp);}
3.3 mapper层
/*** 新增员工*/@Insert("insert into emp(id,username,password,name,gender,image,dept_id,entrydate,job,create_time,update_time) values(null,#{username},#{password},#{name},#{gender},#{image},#{deptId},#{entrydate},#{job},#{createTime},#{updateTime})")void insert(Emp emp);
4. postman测试
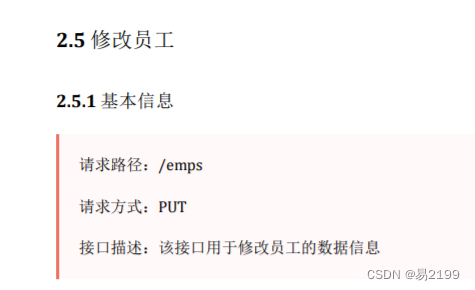
八、员工管理-修改
– 修改可以分为两个步骤:根据id查询员工;修改员工信息
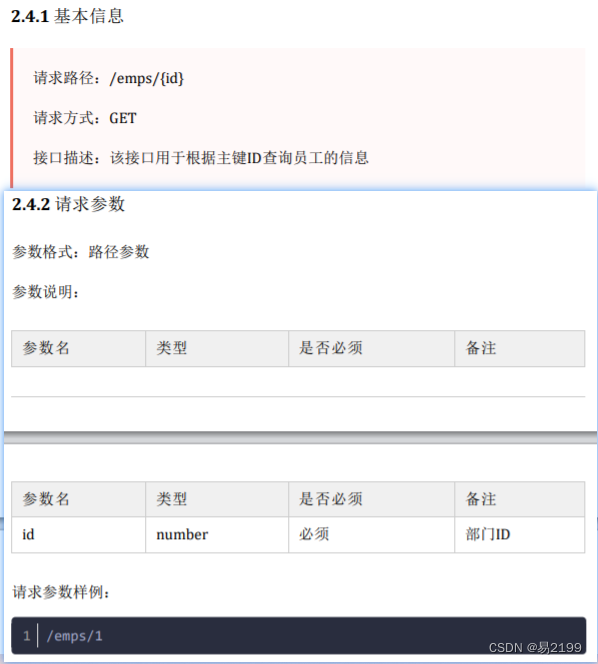
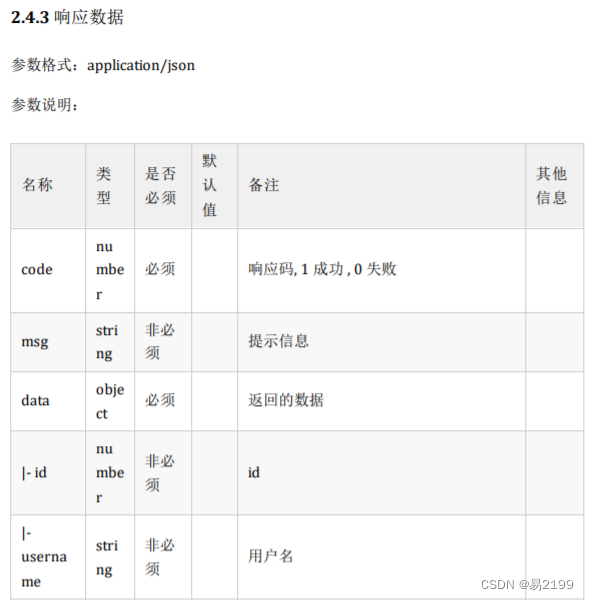
1. 根据id 查询员工
1.1 需求说明

1.2 接口文档

1.3 代码实现
1.3.1 controller层
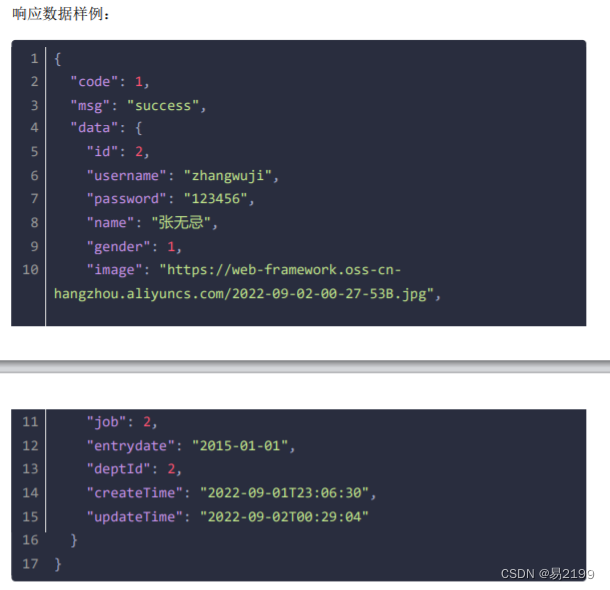
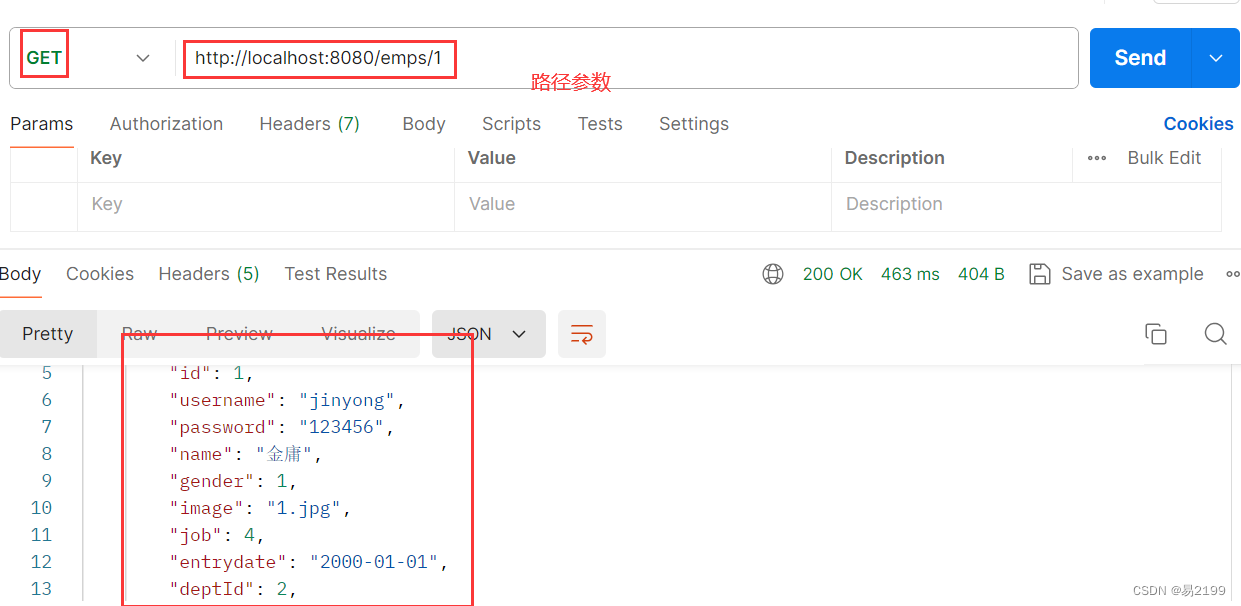
/*** 该接口用于根据主键ID查询员工的信息* 请求方式为 GET* 请求路径为/emps/{id}* 返回统一响应结果-Emp* 参数:** @param id @PathVariable 路径参数,添加此注解* @return*/@GetMapping("/{id}")public Result getById(@PathVariable Integer id) {//打印日志log.info("参数 {}", id);//调用service,根据主键ID查询员工的信息Emp emp = empService.getById(id);//返回结果return Result.success(emp);}
1.3.2 service层
- service
/*** 根据主键ID查询员工的信息* @param id* @return*/Emp getById(Integer id);
- impl
/*** 根据主键ID查询员工的信息* @param id* @return*/@Overridepublic Emp getById(Integer id) {//调用mapper,根据主键ID查询员工的信息Emp emp=empMapper.getById(id);return emp;}
1.3.3 mapper层
/*** 根据主键ID查询员工的信息* @return*/@Select("select * from emp where id=#{id}")Emp getById(@Param("id") Integer id);
1.4 postman测试
2. 修改员工数据
1.1 需求说明
- 同上
1.2 接口文档

1.3 代码实现
1.3.1 controller层
/*** 该接口用于修改员工的数据信息* 请求方式为 PUT* 请求路径为/emps* 返回统一响应结果* 参数:* @param emp @RequestBody 若参数是JSON格式的数据的话,需要加上该注解* @return*/@PutMappingpublic Result update(@RequestBody Emp emp){//打印日志log.info("修改员工的数据信息");//调用serviceempService.update(emp);//返回结果return Result.success();}
1.3.2 service层
- service
/*** 修改员工的数据信息* @param emp*/void update(Emp emp);
- impl
/*** 修改员工的数据信息* @param emp*/@Overridepublic void update(Emp emp) {//设置基本值emp.setUpdateTime(LocalDateTime.now());//调用mapper,修改员工的数据信息empMapper.update(emp);}
1.3.3 mapper层
- EmpMapper
/*** 修改员工的数据信息*/void update(Emp emp);
- EmpMapper.xml
<!-- 修改员工的数据信息--><update id="update">update emp<set><if test="username !=null and username!=' '">username =#{username},</if><if test="name !=null and name!=' '">name=#{name},</if><if test="gender !=null and gender!=' '">gender=#{gender},</if><if test="image !=null and image!=' '">image=#{image},</if><if test="deptId !=null and deptId!=' '">dept_id=#{deptId},</if><if test="entrydate !=null and entrydate!=' '">entrydate=#{entrydate},</if><if test="job !=null and job!=' '">job=#{job}</if></set>where id=#{id}</update>
1.4 postman测试
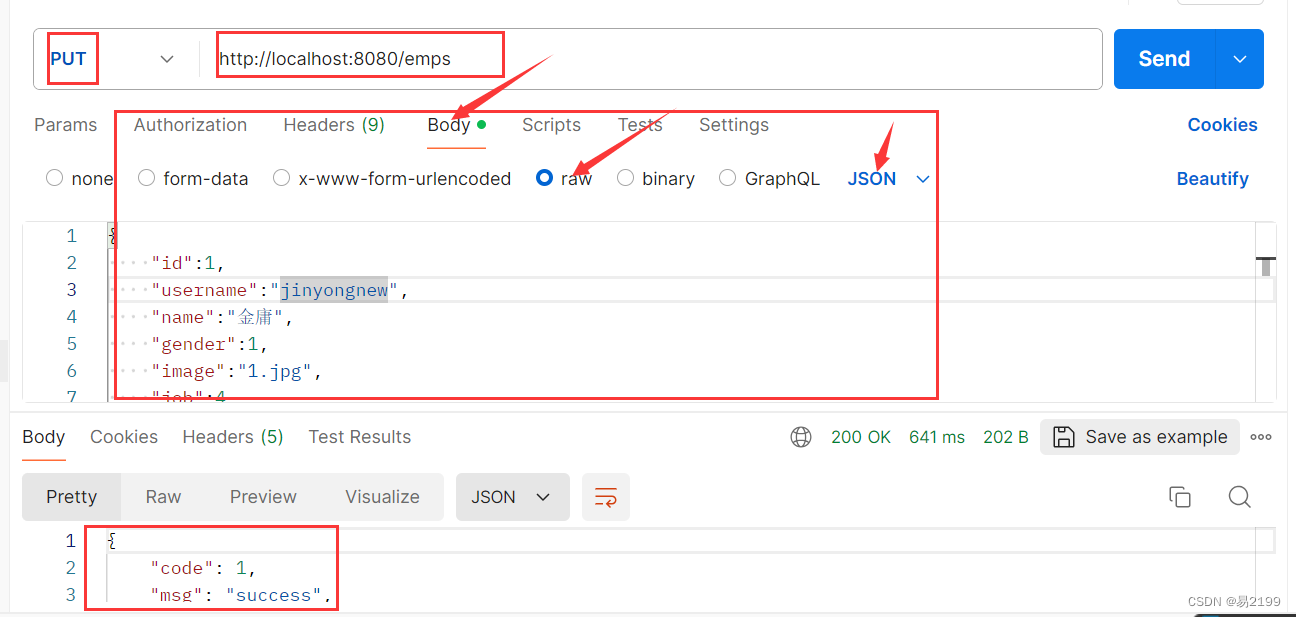
{"id":1,"username":"jinyongnew","name":"金庸","gender":1,"image":"1.jpg","job":4,"entrydate":"2000-01-01","deptId":2
}
相关文章:
SprintBoot案例-增删改查
黑马程序员JavaWeb开发教程 文章目录 一、准备工作1. 准备数据库表1.1 新建数据库mytlias1.2 新建部门表dept1.3 新建员工表emp 2. 准备一个Springboot工程2.1 新建一个项目 3. 配置文件application.properties中引入mybatis的配置信息,准备对应的实体类3.1 引入myb…...
【机器学习】:基于决策树与随机森林对数据分类
机器学习实验报告:决策树与随机森林数据分类 实验背景与目的 在机器学习领域,决策树和随机森林是两种常用的分类算法。决策树以其直观的树形结构和易于理解的特点被广泛应用于分类问题。随机森林则是一种集成学习算法,通过构建多个决策树并…...

.NET 4.8和.NET 8.0的区别和联系、以及查看本地计算机的.NET版本
文章目录 .NET 4.8和.NET 8.0的区别查看本地计算机的.NET版本 .NET 4.8和.NET 8.0的区别 .NET 8.0 和 .NET 4.8 之间的区别主要体现在它们的发展背景、目标平台、架构设计和功能特性上。下面是它们之间的一些主要区别: 发展背景: .NET 4.8 是.NET Fram…...
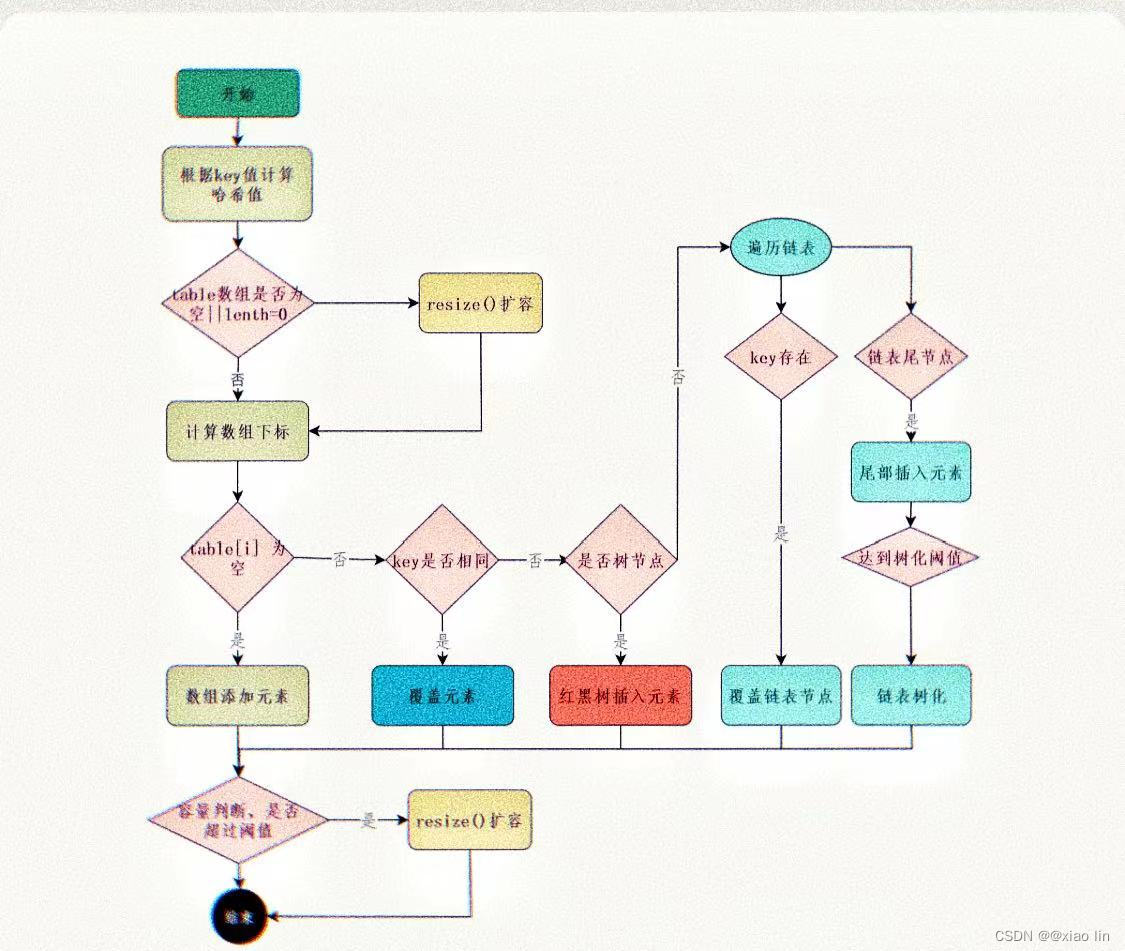
23.HashMap的put方法流程
一、put方法的流程图 二、put方法的执行步骤 首先,根据key值计算哈希值。然后判断table数组是否为空或者数组长度是否为0,是的话则要扩容,resize()。接着,根据哈希值计算数组下标。如果这个下标位置为空&a…...

元类结合__new__
__new__:用来生成骨架 __init__:骨架添加血肉 【一】类中的__new__ class MyClass(object):def __init__(self,name,age):print(f"给当前MyClass类的对象初始化属性的时候会触发__init__")self.name nameself.age age def __call__(self,*args,**kwargs):pri…...
(C语言)队列实现与用队列实现栈
目录 1.队列 1.1队列的概念及结构 1.2 队列的实际应用联想 1.3队列的实现 2. 队列应用——队列实现栈 主要思路 1.队列 1.1队列的概念及结构 队列:只允许在一端进行插入数据操作,在另一端进行删除数据操作的特殊线性表,队列具有先进…...

字符画生成网站 ascii字符画
_____ / ___/__ ___ / /__/ _ \/ _ \ \___/ .__/ .__//_/ /_/ font推荐:1.Slant 2.Small 3.Small slant https://patorjk.com/software/taag/#pdisplay&fSmall%20Slant&tCpp https://www.kammerl.de/ascii/AsciiSignature.php https://asciia…...

【C -> Cpp】由C迈向Cpp (6):静态、友元和内部类
标题:【C -> Cpp】由C迈向Cpp (6):静态、友元和内部类 水墨不写bug (图片来源于网络) 目录 (一)静态成员 (二)友元 (三)…...

探索Playwright:Python下的Web自动化测试革命
在如今这个互联网技术迅速发展的时代,web应用的质量直接关系着企业的声誉和用户的体验。因此,自动化测试成为了保障软件质量的重要手段之一。今天,我将带大家详细了解一款在测试领域大放异彩的神器——Playwright,并通过Python语言…...

先有JVM还是先有垃圾回收器?很多人弄混淆了
是先有垃圾回收器再有JVM呢,还是先有JVM再有垃圾回收器呢?或者是先有垃圾回收再有JVM呢?历史上还真是垃圾回收更早面世,垃圾回收最早起源于1960年诞生的LISP语言,Java只是支持垃圾回收的其中一种。下面我们就来刨析刨析…...
关于 vs2019 c++20 规范里的一个全局函数 _Test_callable
(1)看名思议,觉得这个函数可以测试其形参是否是可以被调用的函数,或可调用对象? 不,这个名字不科学。有误导,故特别列出。看下其源码(该函数位于 头文件): 辅…...
07-Fortran基础--Fortran指针(Pointer)的使用
07-Fortran基础--Fortran指针Pointer的使用 0 引言1 指针(Poionter)的有关内容1.1 一般类型指针1.2 数组指针1.3 派生类(type)指针1.4 函数指针 2 可运行code 0 引言 Fortran是一种广泛使用的编程语言,特别适合科学计算和数值分析。Fortran 9…...

日期差值,
日期差值 ac代码 #include<iostream> using namespace std; int ans0; int get(int n){int mon[14]{0,31,28,31,30,31,30,31,31,30,31,30,31};ans0;int m_dayn%100;int m_month(n/100)%100;int m_year(n/10000);ansm_day;while(m_month--){//加上月数if((m_year%40&…...
GMV ES6直流变频多联空调机组室外机工作原理
GMV ES6直流变频多联空调机组室外机工作原理如下: 内机为制冷模式运行时,室外机根据室内机的运行负荷需求启动运行,室外换热器作为系统的冷凝器,各制冷室内机的换热器并联作为系统的蒸发器,通过室内机的送回风循环实现…...

中国开源 AI 大模型之光-InternLM2
今天给大家带来 AI 大模型领域的国产之光 - InternLM2,在10B量级开源大模型领域取得了全球 Top 3 的成绩,仅次于 Meta 发布的 Llama-3,在国内则是第一名的存在! 简介 InternLM2是由上海人工智能实验室和商汤科技联合研发的一款大型…...

【嵌入式开发】Arduino人机界面及接口技术:独立按键接口,矩阵按键接口,模拟量按键接口(基础知识介绍)
“生活总是让我们遍体鳞伤,但到后来,那些受伤的地方一定会变成我们最强壮的地方。” 🎯作者主页: 追光者♂🔥 🌸个人简介: 📝[1] CSDN 博客专家📝 🏆[2] 人工智能领域优质创作者🏆 🌟[3] 2022年度博客之星人工智能领域TOP4🌟 🌿[4] …...

element ui Tree树形控件
lazy 是否懒加载子节点,需与 load 方法结合使用 boolean 默认为falseload 加载子树数据的方法,仅当 lazy 属性为true 时生效 function(node, resolve)使用懒加载load不需要再使用data,利用resolve返回值即可注意:第一层的数据要写…...
AI 绘画神器 Fooocus 图生图:图像放大或变化、图像提示、图像重绘或扩充、反推提示词、生成参数提取、所需模型下载
本文收录于《AI绘画从入门到精通》专栏,专栏总目录:点这里,订阅后可阅读专栏内所有文章。 大家好,我是水滴~~ 本文讲述 Fooocus 的图生图功能,主要内容包括:图像放大或变化、图像提示、图像重绘或扩充、反推…...

yolov8 模型架构轻量化 | 极致降参数量
模型轻量化加速是深度学习领域的重要研究方向,旨在减小模型的体积和计算复杂度,从而提高在资源受限设备上的运行效率,模型参数量在轻量化加速中扮演着至关重要的角色。 首先,模型参数量直接决定了模型的复杂度和存储空间需求。随…...

uniapp 小程序低功耗蓝牙配网 ble配网 物联网
1.获取蓝牙列表 bleList.vue <template><view><button touchstart"startSearch">获取蓝牙列表</button><scroll-view :scroll-top"scrollTop" scroll-y class"content-pop"><viewclass"bluetoothItem&q…...

网易云QQ音乐歌词获取终极指南:163MusicLyrics让你轻松拥有完美歌词
网易云QQ音乐歌词获取终极指南:163MusicLyrics让你轻松拥有完美歌词 【免费下载链接】163MusicLyrics 云音乐歌词获取处理工具【网易云、QQ音乐】 项目地址: https://gitcode.com/GitHub_Trending/16/163MusicLyrics 还在为音乐播放器缺少歌词而烦恼…...

【算法】小白也能懂 · 第 11 节:动态规划入门
在前面 10 节中,我们学了递归、二叉树、图的 BFS/DFS 等基础数据结构与算法。今天,我们来认识一个让无数初学者又爱又恨的概念——动态规划(Dynamic Programming,简称 DP)。别怕,跟着节奏走,你会发现它其实没那么神秘。 1. 什么是动态规划 简单来说,动态规划的核心思…...
)
别再死记ResNet结构了!用PyTorch手把手带你复现ResNet-50(附完整代码与可视化)
从零构建ResNet-50:PyTorch实战与架构解密 当你第一次看到ResNet的残差连接时,是否曾被那个"跳跃"的结构所困惑?为什么简单的跨层连接就能解决深度网络的退化问题?本文将以工程师视角,带你用PyTorch从第一行…...

RKNN Model Zoo实战:MobileSAM图像分割在瑞芯微平台的完整部署指南
RKNN Model Zoo实战:MobileSAM图像分割在瑞芯微平台的完整部署指南 【免费下载链接】rknn_model_zoo 项目地址: https://gitcode.com/gh_mirrors/rk/rknn_model_zoo 在边缘计算和嵌入式AI应用场景中,图像分割技术正成为智能监控、工业质检和AR/V…...

无王无帝定乾坤,来自田间第一人 大道济世安苍生
无王无帝定乾坤来自田间第一人 一、执念 千秋岁月轮转,历朝治乱兴衰,世人始终困于一个执念:天下安定,必靠帝王君临、强权统御。可纵观古今世道,王权更迭往复,霸业起落无常,真正能长久安社稷、润…...

终极免费AMD Ryzen硬件调试指南:掌握SMUDebugTool的完整使用技巧
终极免费AMD Ryzen硬件调试指南:掌握SMUDebugTool的完整使用技巧 【免费下载链接】SMUDebugTool A dedicated tool to help write/read various parameters of Ryzen-based systems, such as manual overclock, SMU, PCI, CPUID, MSR and Power Table. 项目地址: …...

如何用FunClip在5分钟内完成AI智能视频剪辑:从零到精通完整指南
如何用FunClip在5分钟内完成AI智能视频剪辑:从零到精通完整指南 【免费下载链接】FunClip Open-source, accurate and easy-to-use video speech recognition & clipping tool, LLM based AI clipping intergrated. 项目地址: https://gitcode.com/GitHub_Tre…...

从硬件连接到数据可视化:基于RS485-USB的传感器数据采集全流程解析
1. 硬件连接:从传感器到电脑的物理链路搭建 工业传感器数据采集的第一步,就是建立可靠的物理连接。以常见的星仪压力变送器为例,我们需要解决三个关键问题:传感器供电、信号传输转换、以及电脑端识别。这里我分享几个实际项目中容…...

别再乱选预处理器了!ControlNet 1.1 全模型实战指南:从线稿到3D效果,一次讲清
ControlNet 1.1 预处理器终极选择指南:从草图到成片的智能决策树 当你的手绘线稿在ControlNet中生成出扭曲的五官或崩塌的透视时,问题往往出在预处理器与模型的错配上。本文将通过200次实测对比,拆解14种核心预处理器的隐藏特性,…...

Linux应用配置分层实战指南
Linux应用配置分层实战指南本文面向具备一定 Linux 基础的技术人员,围绕应用配置分层展开,重点讨论默认配置、环境覆盖和敏感参数隔离。在中级运维和系统管理工作中,这类主题常常与配置变更、资源状态、权限边界、自动化任务和业务影响交织在…...