View->Bitmap缩放到自定义ViewGroup的任意区域(Matrix方式绘制Bitmap)
Bitmap缩放和平移
- 加载一张
Bitmap可能为宽高相同的正方形,也可能为宽高不同的矩形 - 缩放方向可以为中心缩放,左上角缩放,右上角缩放,左下角缩放,右下角缩放
Bitmap中心缩放,包含了缩放和平移两个操作,不可拆开Bitmap其余四个方向的缩放,可以单独缩放不带平移,也可以缩放带平移
XML文件
<?xml version="1.0" encoding="utf-8"?>
<LinearLayout xmlns:android="http://schemas.android.com/apk/res/android"android:layout_width="match_parent"android:layout_height="match_parent"android:orientation="vertical"><com.yang.app.MyRelativeLayoutandroid:id="@+id/real_rl"android:layout_width="match_parent"android:layout_height="0dp"android:layout_weight="1"android:layout_marginTop="30dp"android:layout_marginBottom="30dp"android:layout_marginLeft="30dp"android:layout_marginRight="30dp"android:background="@color/gray"><com.yang.app.MyImageViewandroid:id="@+id/real_iv"android:layout_width="match_parent"android:layout_height="match_parent"android:layout_marginTop="30dp"android:layout_marginBottom="30dp"android:layout_marginLeft="30dp"android:layout_marginRight="30dp" /></com.yang.app.MyRelativeLayout><ImageViewandroid:layout_width="match_parent"android:layout_height="200dp"android:layout_weight="0"android:background="#00ff00" />
</LinearLayout>
Activity代码
const val TAG = "Yang"
class MainActivity : AppCompatActivity() {var mRealView : MyImageView ?= nullvar mRelativeLayout : MyRelativeLayout ?= nullvar tempBitmap : Bitmap ?= nullvar mHandler = Handler(Looper.getMainLooper())var screenWidth = 0var screenHeight = 0var srcRect = RectF()var destRect = RectF()override fun onCreate(savedInstanceState: Bundle?) {super.onCreate(savedInstanceState)setContentView(R.layout.activity_main)mRealView = findViewById(R.id.real_iv)mRelativeLayout = findViewById(R.id.real_rl)// 屏幕宽高的一半作为临时RectF, 用于压缩BitmapscreenWidth = resources.displayMetrics.widthPixelsscreenHeight = resources.displayMetrics.heightPixelsval tempRect = RectF(0f, 0f, screenWidth.toFloat() / 2, screenHeight.toFloat() / 2)CoroutineScope(Dispatchers.IO).launch {tempBitmap = getBitmap(resources, tempRect, R.drawable.fake)withContext(Dispatchers.Main) {mRelativeLayout?.post {// 获取初始区域的RectFsrcRect.set(0f,0f,mRelativeLayout?.width?.toFloat()!!,mRelativeLayout?.height?.toFloat()!!)// 获取结束区域的RectFmRelativeLayout?.forEach { childView ->if (childView is MyImageView) {destRect.set(0f,0f,childView.width.toFloat(),childView.height.toFloat())}}scaleRectFun(tempBitmap, srcRect, destRect)}}}}fun scaleRectFun(tempBitmap: Bitmap?, srcRect : RectF, destRect: RectF){tempBitmap?.let { bitmap->mRelativeLayout?.setBitmap(bitmap)val animator = ValueAnimator.ofFloat(0f, 1f)animator.duration = 5000Lanimator.interpolator = DecelerateInterpolator()animator.addUpdateListener {val value = it.animatedValue as Float// 中心缩放mRelativeLayout?.setDestRectCenterWithTranslate(srcRect, destRect, value)// 左上角不带平移缩放// mRelativeLayout?.setDestRectLeftTopNoTranslate(srcRect, destRect, value)// 左上角平移缩放// mRelativeLayout?.setDestRectLeftTopWithTranslate(srcRect, destRect, value)// 右上角不带平移缩放// mRelativeLayout?.setDestRectRightTopNoTranslate(srcRect, destRect, value)// 右上角平移缩放// mRelativeLayout?.setDestRectRightTopWithTranslate(srcRect, destRect, value)// 左下角不带平移缩放// mRelativeLayout?.setDestRectLeftBottomNoTranslate(srcRect, destRect, value)// 左下角平移缩放// mRelativeLayout?.setDestRectLeftBottomWithTranslate(srcRect, destRect, value)// 右下角不带平移缩放// mRelativeLayout?.setDestRectRightBottomNoTranslate(srcRect, destRect, value)// 右下角平移缩放// mRelativeLayout?.setDestRectRightBottomWithTranslate(srcRect, destRect, value)}animator.start()}}
}
fun getBitmap(resources : Resources, destRect : RectF, imageId: Int): Bitmap? {var imageWidth = -1var imageHeight = -1val preOption = BitmapFactory.Options().apply {// 只获取图片的宽高inJustDecodeBounds = trueBitmapFactory.decodeResource(resources, imageId, this)}imageWidth = preOption.outWidthimageHeight = preOption.outHeight// 计算缩放比例val scaleMatrix = Matrix()// 确定未缩放Bitmap的RectFvar srcRect = RectF(0f, 0f, imageWidth.toFloat(), imageHeight.toFloat())// 通过目标RectF, 确定缩放数值,存储在scaleMatrix中scaleMatrix.setRectToRect(srcRect, destRect, Matrix.ScaleToFit.CENTER)// 缩放数值再映射到原始Bitmap上,得到缩放后的RectFscaleMatrix.mapRect(srcRect)val finalOption = BitmapFactory.Options().apply {if (imageHeight > 0 && imageWidth > 0) {inPreferredConfig = Bitmap.Config.RGB_565inSampleSize = calculateInSampleSize(imageWidth,imageHeight,srcRect.width().toInt(),srcRect.height().toInt())}}return BitmapFactory.decodeResource(resources, imageId, finalOption)
}fun calculateInSampleSize(fromWidth: Int, fromHeight: Int, toWidth: Int, toHeight: Int): Int {var bitmapWidth = fromWidthvar bitmapHeight = fromHeightif (fromWidth > toWidth|| fromHeight > toHeight) {var inSampleSize = 2// 计算最大的inSampleSize值,该值是2的幂,并保持原始宽高大于目标宽高while (bitmapWidth >= toWidth && bitmapHeight >= toHeight) {bitmapWidth /= 2bitmapHeight /= 2inSampleSize *= 2}return inSampleSize}return 1
}
自定义ViewGroup和View代码
class MyImageView @JvmOverloads constructor(context: Context, attrs: AttributeSet? = null, defStyleAttr: Int = 0
) : AppCompatImageView(context, attrs, defStyleAttr)class MyRelativeLayout @JvmOverloads constructor(context: Context, attrs: AttributeSet? = null, defStyleAttr: Int = 0
) : RelativeLayout(context, attrs, defStyleAttr) {var mBitmap : Bitmap ?= nullvar mScaleMatrix = Matrix()var mDestRect = RectF()fun setBitmap(bitmap: Bitmap?) {mBitmap = bitmap}override fun onDraw(canvas: Canvas?) {super.onDraw(canvas)mBitmap?.let {canvas?.drawBitmap(it, mScaleMatrix, Paint().apply {isAntiAlias = true})}}
}
中心缩放
ValueAnimator动画的初始值为0,开始区域为外层MyRelativeLayout区域,结束区域为内层MyImageView区域,缩放区域在这两个区域大小之间变化- 缩放比例取决于当前缩放区域
mDestRect和Bitmap宽高的最小宽高比
fun setDestRectCenterWithTranslate(srcRect: RectF, destRect: RectF, value : Float) {mDestRect = RectF(srcRect.left + (destRect.left - srcRect.left) * value,srcRect.top  + (destRect.top - srcRect.top) * value,srcRect.right + (destRect.right - srcRect.right) * value,srcRect.bottom + (destRect.bottom - srcRect.bottom) * value)val scale = Math.min(mDestRect.width() / mBitmap?.width!!, mDestRect.height() / mBitmap!!.height)val dx = (srcRect.width() - mBitmap?.width!! * scale) / 2val dy = (srcRect.height() - mBitmap?.height!! * scale) / 2mScaleMatrix.reset()mScaleMatrix.postScale(scale, scale)mScaleMatrix.postTranslate(dx, dy)invalidate()
}
- 中心缩放效果图
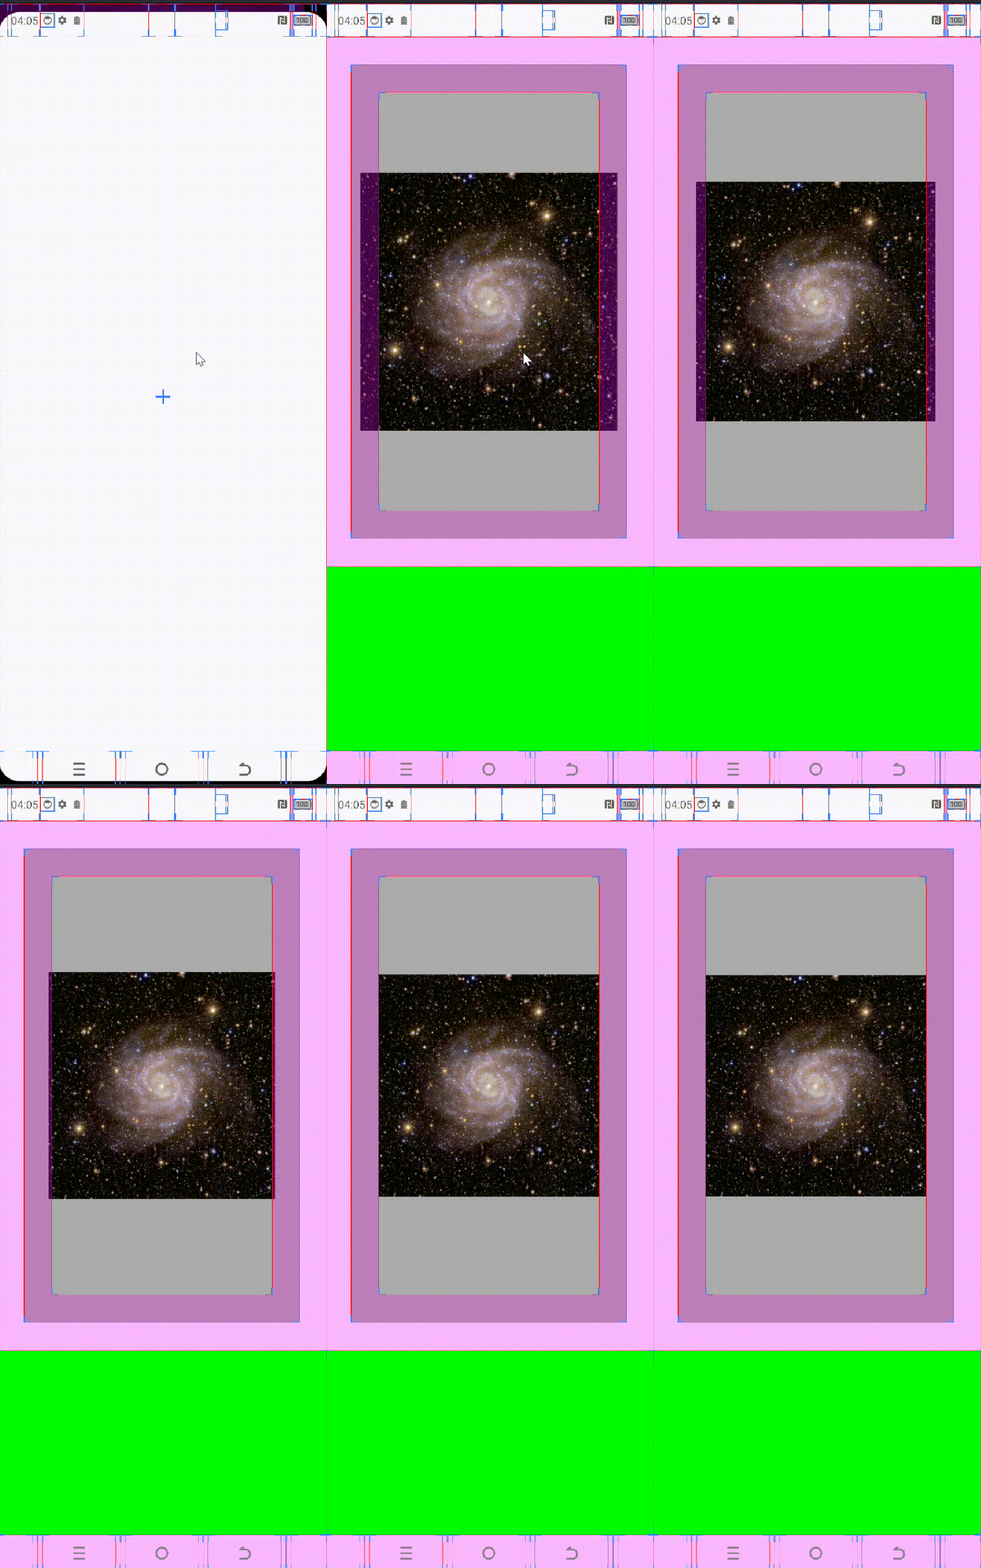
左上角缩放
- 左上角不带平移缩放
fun setDestRectLeftTopNoTranslate(srcRect: RectF, destRect: RectF, value : Float) {mDestRect = RectF(srcRect.left + (destRect.left - srcRect.left) * value,srcRect.top + (destRect.top - srcRect.top) * value,srcRect.right + (destRect.right - srcRect.right) * value,srcRect.bottom + (destRect.bottom - srcRect.bottom) * value)val scale = Math.min(mDestRect.width() / mBitmap?.width!!, mDestRect.height() / mBitmap!!.height)mScaleMatrix.setScale(scale, scale)invalidate()
}
-
左上角不带平移缩放效果图
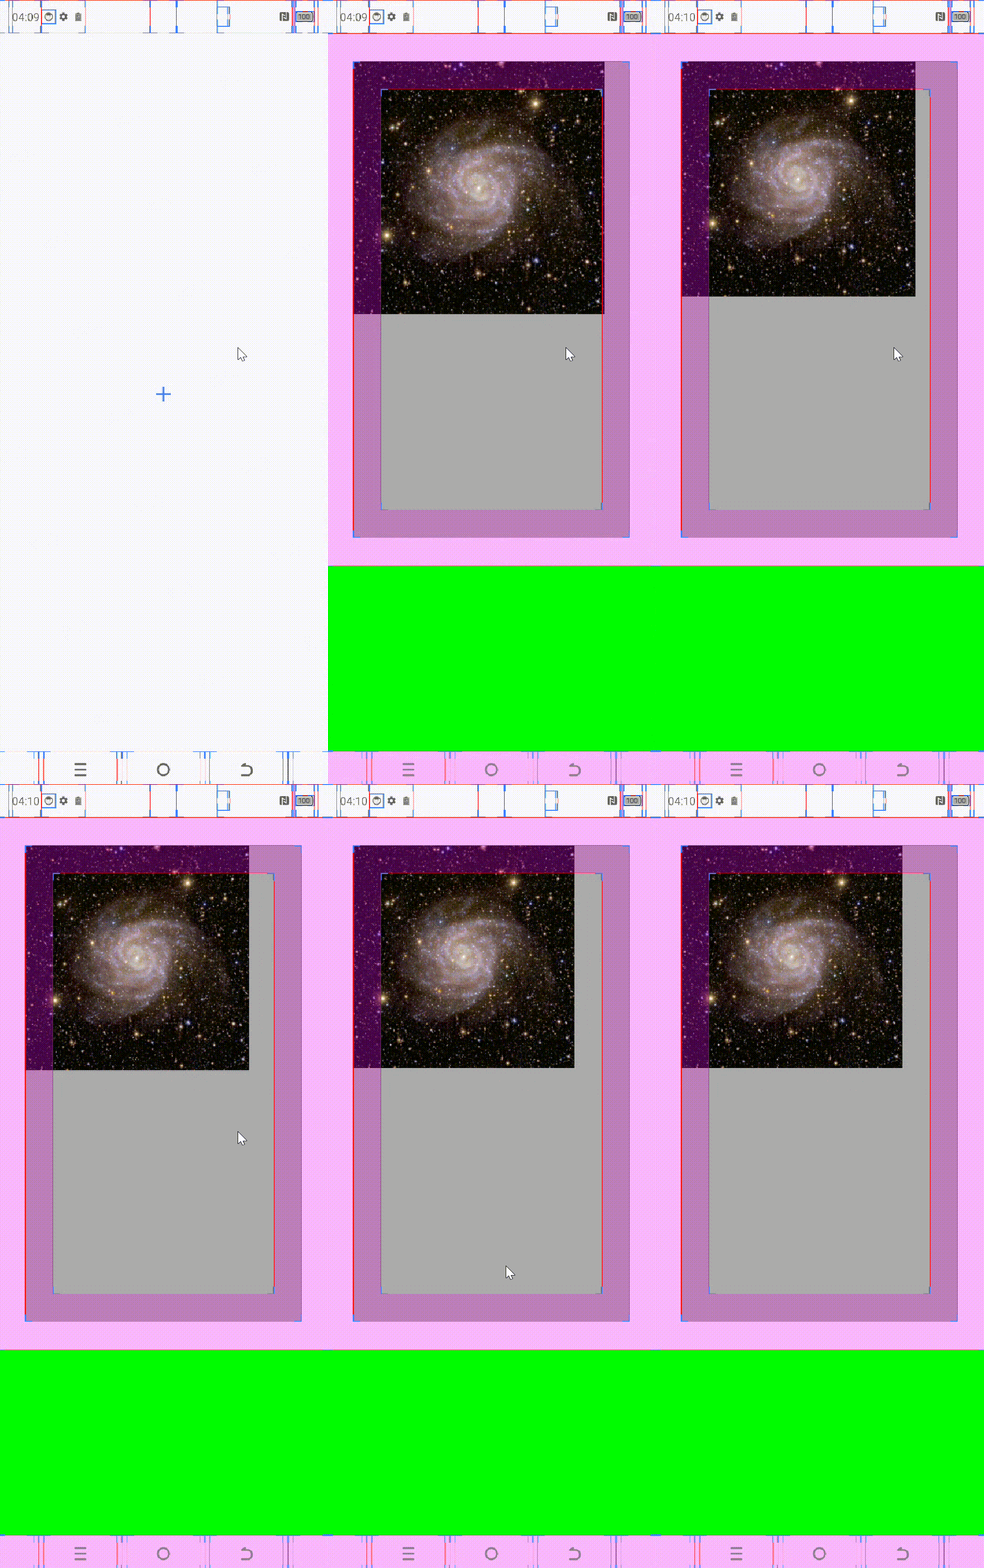
-
左上角带平移缩放
fun setDestRectLeftTopWithTranslate(srcRect: RectF, destRect: RectF, value : Float) {mDestRect = RectF(srcRect.left + (destRect.left - srcRect.left) * value,srcRect.top + (destRect.top - srcRect.top) * value,srcRect.right + (destRect.right - srcRect.right) * value,srcRect.bottom + (destRect.bottom - srcRect.bottom) * value)val scale = Math.min(mDestRect.width() / mBitmap?.width!!, mDestRect.height() / mBitmap!!.height)val dx = ((srcRect.width() - destRect.width())/2) * value + (destRect.left - srcRect.left) * valueval dy = ((srcRect.height() - destRect.height())/2) * value + (destRect.top - srcRect.top) * valuemScaleMatrix.reset()mScaleMatrix.postScale(scale, scale)mScaleMatrix.postTranslate(dx, dy)invalidate()
}
- 左上角带平移缩放效果图

右上角缩放
- 右上角不带平移缩放
fun setDestRectRightTopNoTranslate(srcRect: RectF, destRect: RectF, value : Float) {mDestRect = RectF(srcRect.left  + (destRect.left - srcRect.left) * value,srcRect.top + (destRect.top - srcRect.top) * value,srcRect.right + (destRect.right - srcRect.right) * value,srcRect.bottom + (destRect.bottom - srcRect.bottom) * value)val scale = Math.min(mDestRect.width() / mBitmap?.width!!, mDestRect.height() / mBitmap!!.height)val dx = srcRect.width() - mBitmap!!.width * scaleval dy = 0fmScaleMatrix.reset()mScaleMatrix.postScale(scale, scale)mScaleMatrix.postTranslate(dx, dy)invalidate()
}
- 右上角不带平移缩放效果图
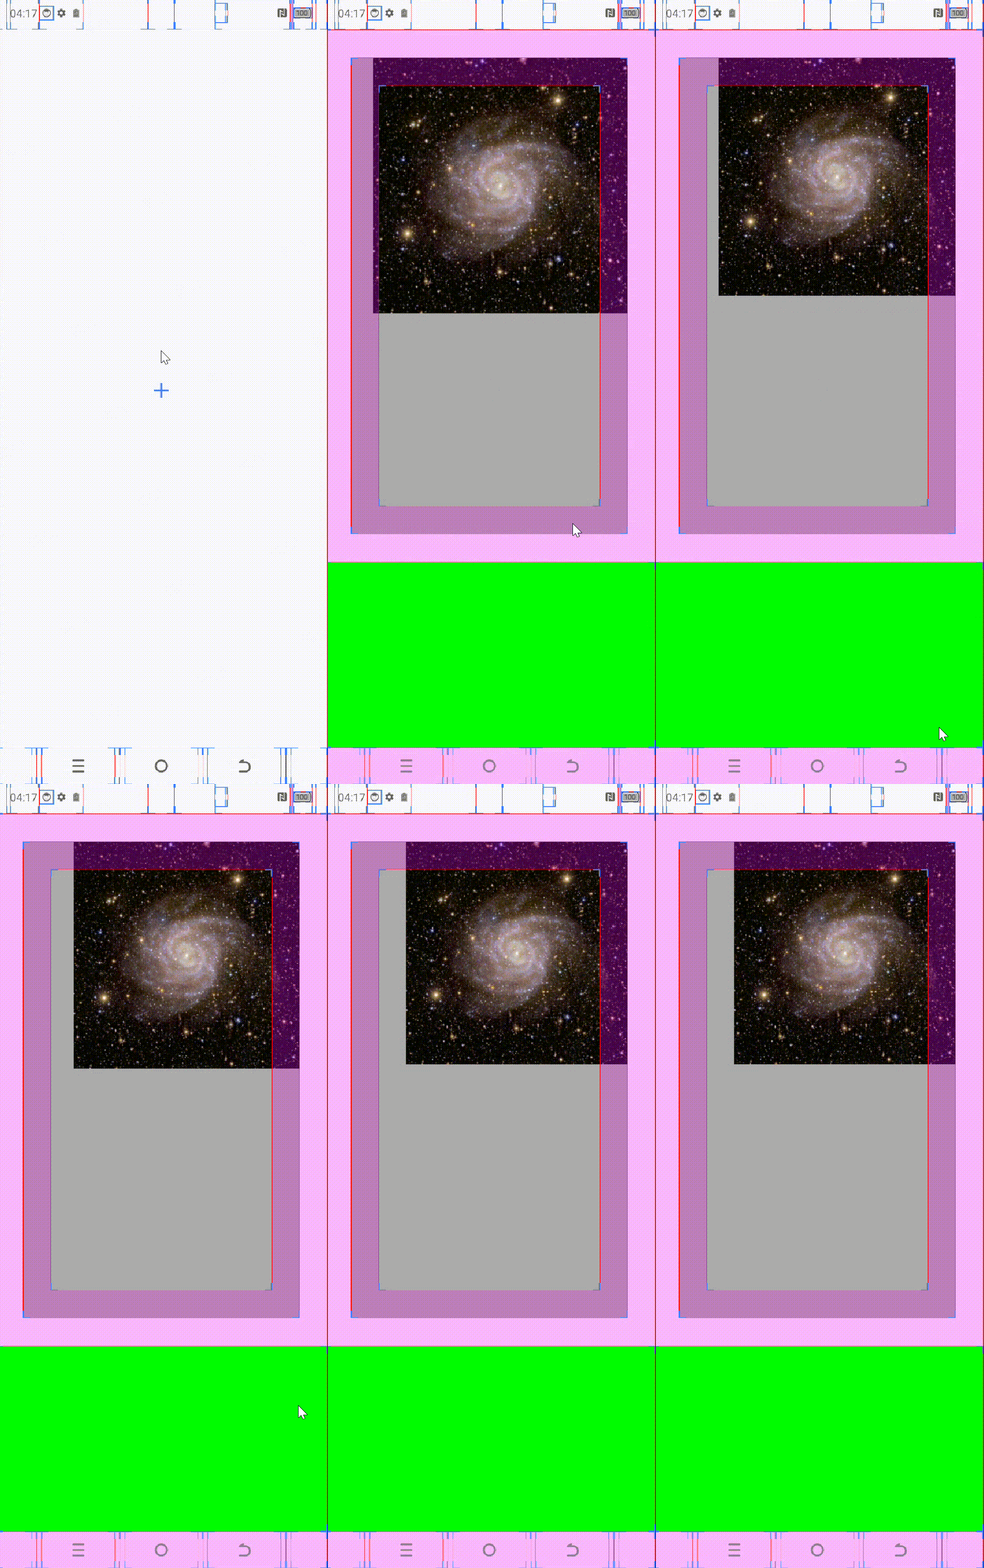
- 右上角带平移缩放
fun setDestRectRightTopWithTranslate(srcRect: RectF, destRect: RectF, value : Float) {mDestRect = RectF(srcRect.left  + (destRect.left - srcRect.left) * value,srcRect.top + (destRect.top - srcRect.top) * value,srcRect.right + (destRect.right - srcRect.right) * value,srcRect.bottom + (destRect.bottom - srcRect.bottom) * value)val scale = Math.min(mDestRect.width() / mBitmap?.width!!, mDestRect.height() / mBitmap!!.height)val dx = ((srcRect.width() - destRect.width())/2) * value + (destRect.left - srcRect.left) * valueval dy = ((srcRect.height() - destRect.height())/2) * value + (destRect.top - srcRect.top) * valuemScaleMatrix.reset()mScaleMatrix.postScale(scale, scale)mScaleMatrix.postTranslate(dx, dy)invalidate()
}
- 右上角不带平移缩放效果图
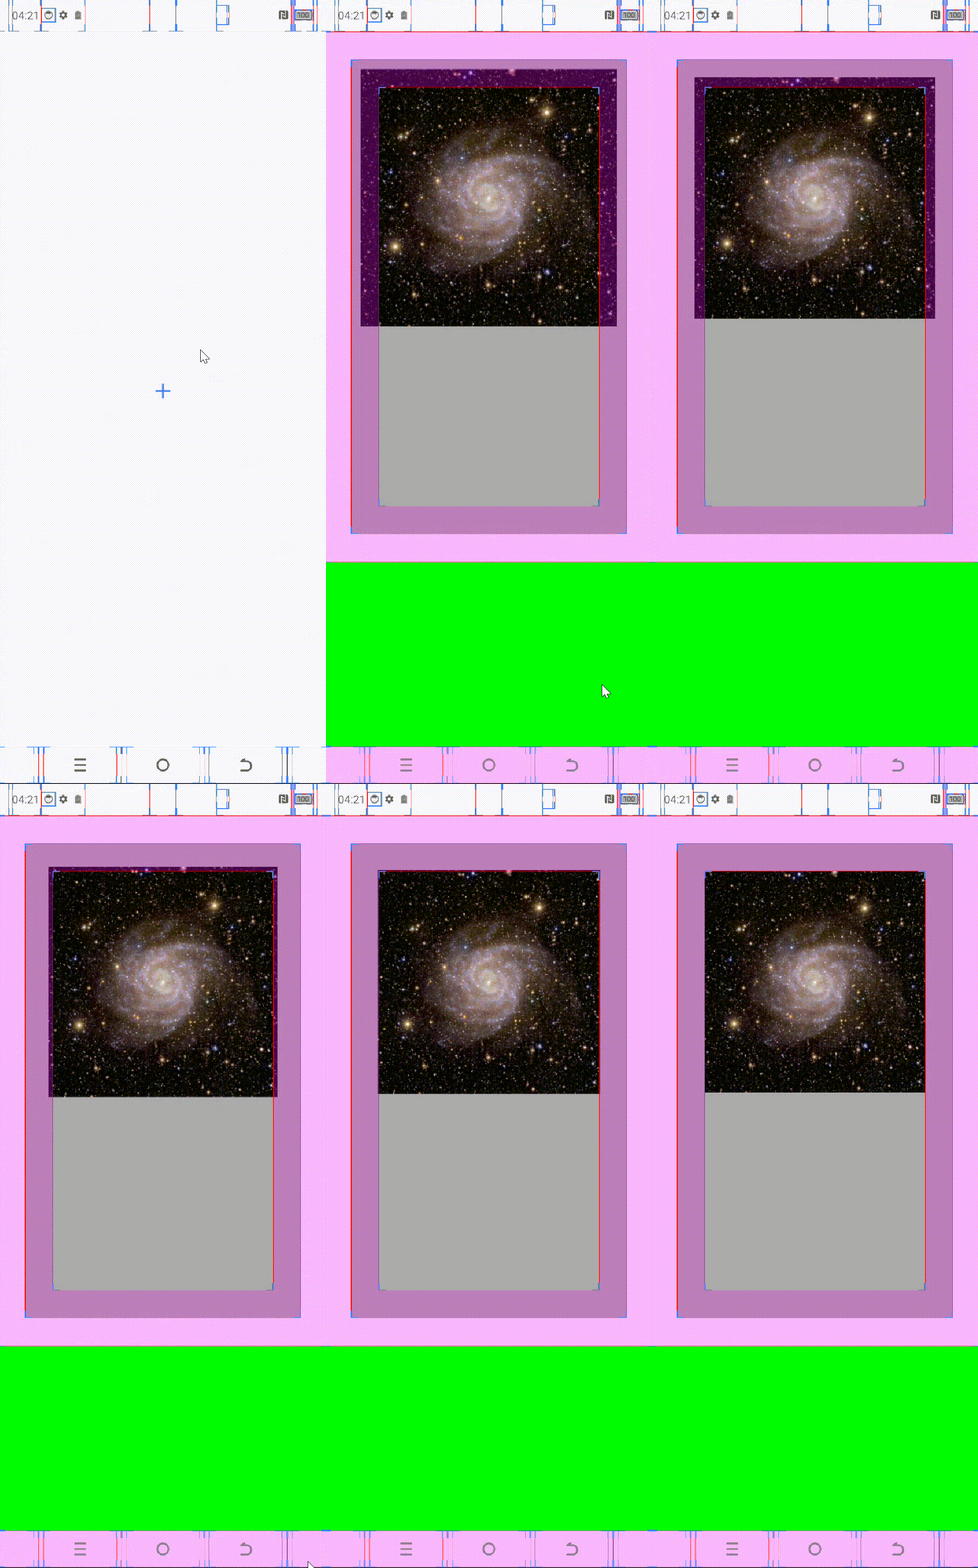
左下角缩放
- 左下角不带平移缩放
fun setDestRectLeftBottomNoTranslate(srcRect: RectF, destRect: RectF, value : Float) {mDestRect = RectF(srcRect.left + (destRect.left - srcRect.left) * value,srcRect.top  + (destRect.top - srcRect.top) * value,srcRect.right + (destRect.right - srcRect.right) * value,srcRect.bottom + (destRect.bottom - srcRect.bottom) * value)val scale = Math.min(mDestRect.width() / mBitmap?.width!!, mDestRect.height() / mBitmap!!.height)val dx = 0fval dy = srcRect.height() - mBitmap?.height!! * scalemScaleMatrix.reset()mScaleMatrix.postScale(scale, scale)mScaleMatrix.postTranslate(dx, dy)invalidate()
}
- 左下角不带平移缩放效果图
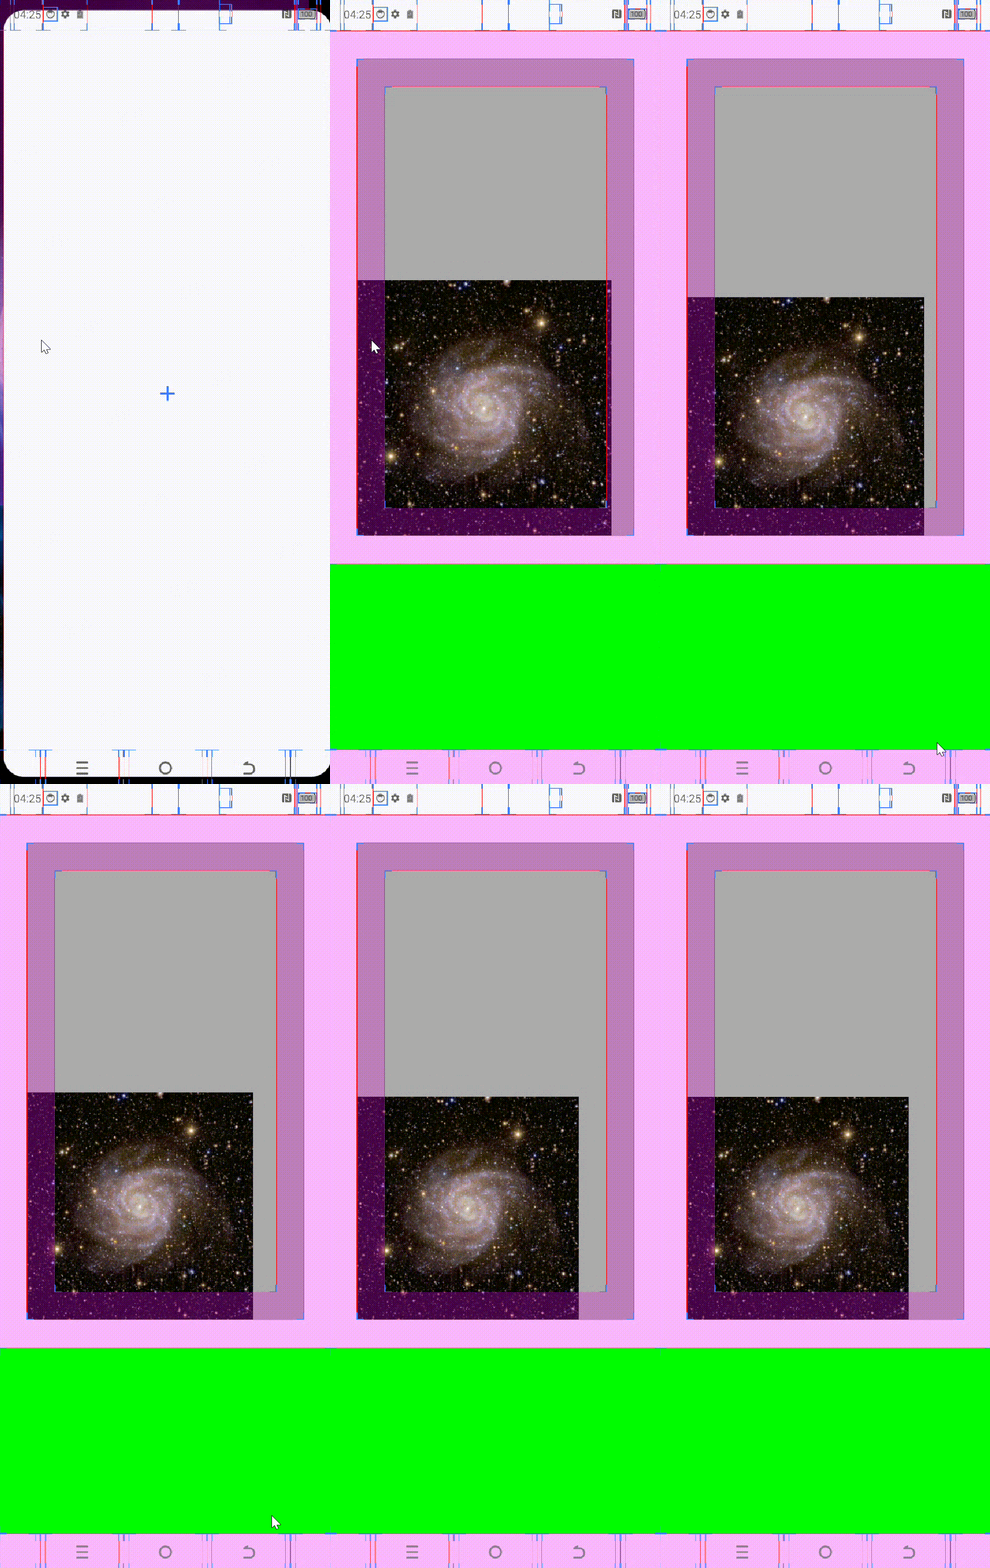
- 左下角平移缩放
fun setDestRectLeftBottomWithTranslate(srcRect: RectF, destRect: RectF, value : Float) {mDestRect = RectF(srcRect.left + (destRect.left - srcRect.left) * value,srcRect.top  + (destRect.top - srcRect.top) * value,srcRect.right + (destRect.right - srcRect.right) * value,srcRect.bottom + (destRect.bottom - srcRect.bottom) * value)val scale = Math.min(mDestRect.width() / mBitmap?.width!!, mDestRect.height() / mBitmap!!.height)val dx = ((srcRect.width() - destRect.width())/2 )* valueval dy = ((srcRect.height() - destRect.height())/2 )* value + (destRect.bottom - srcRect.bottom) * value + (srcRect.height()- mBitmap?.height!! * scale)mScaleMatrix.reset()mScaleMatrix.postScale(scale, scale)mScaleMatrix.postTranslate(dx, dy)invalidate()
}
- 左下角平移缩放效果图
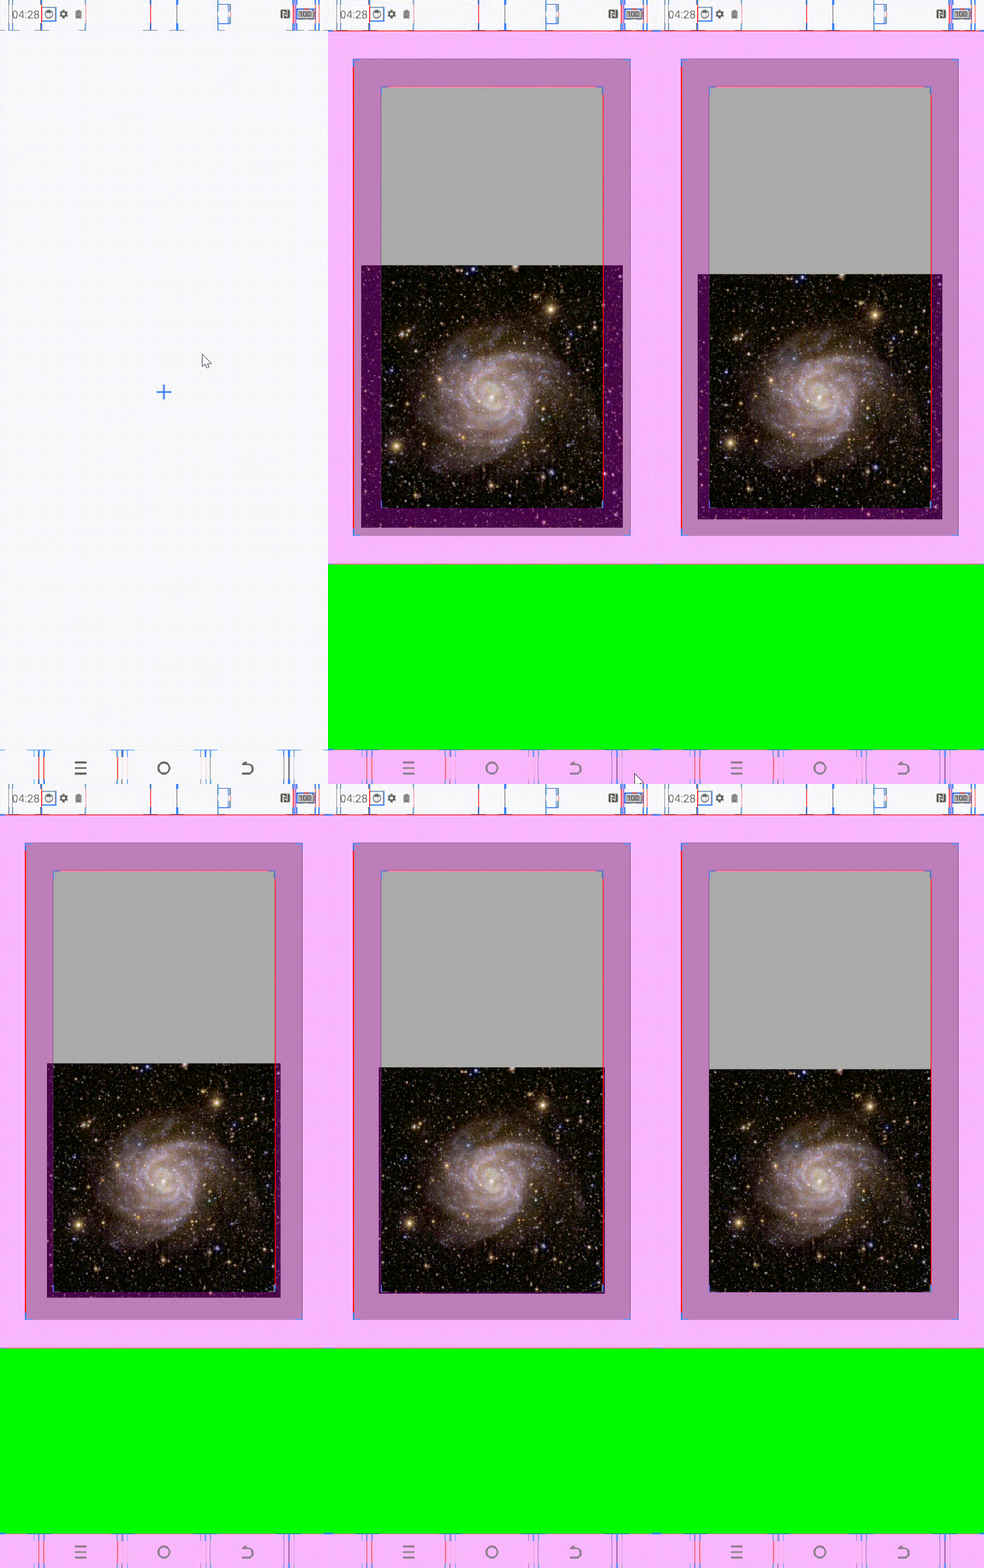
右下角缩放
- 右下角不带平移缩放
fun setDestRectRightBottomNoTranslate(srcRect: RectF, destRect: RectF, value : Float) {mDestRect = RectF(srcRect.left + (destRect.left - srcRect.left) * value,srcRect.top  + (destRect.top - srcRect.top) * value,srcRect.right + (destRect.right - srcRect.right) * value,srcRect.bottom + (destRect.bottom - srcRect.bottom) * value)val scale = Math.min(mDestRect.width() / mBitmap?.width!!, mDestRect.height() / mBitmap!!.height)val dx = srcRect.width() - mBitmap!!.width * scaleval dy = srcRect.height() - mBitmap?.height!! * scalemScaleMatrix.reset()mScaleMatrix.postScale(scale, scale)mScaleMatrix.postTranslate(dx, dy)invalidate()
}
- 右下角不带平移缩放效果图
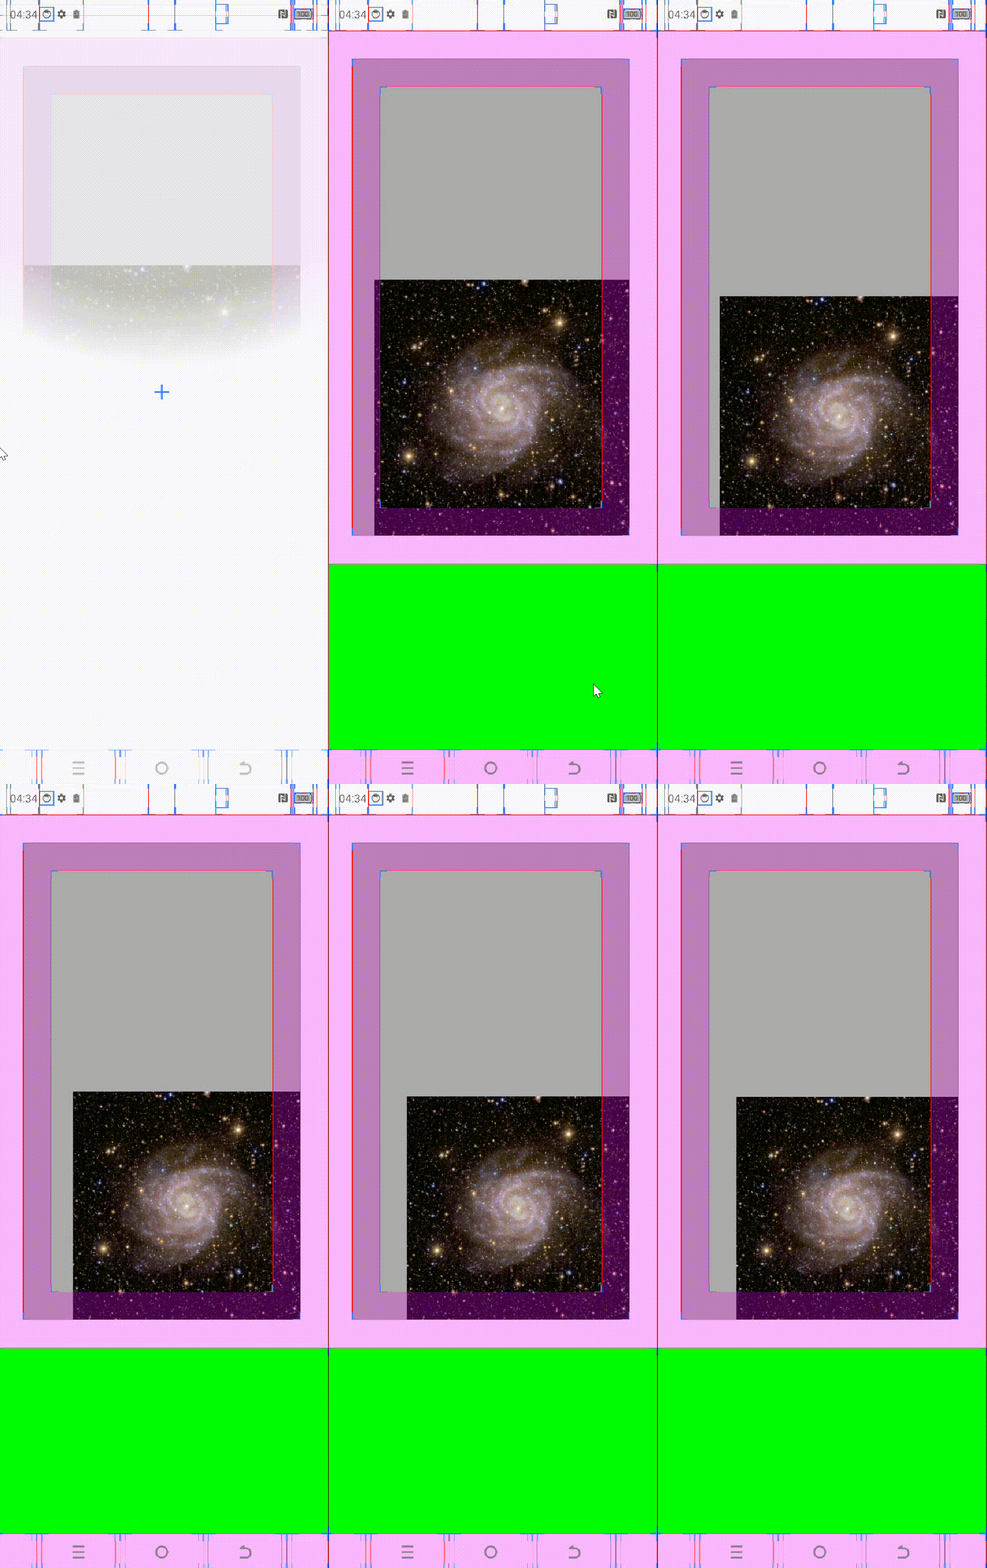
- 右下角平移缩放
fun setDestRectRightBottomWithTranslate(srcRect: RectF, destRect: RectF, value : Float) {mDestRect = RectF(srcRect.left + (destRect.left - srcRect.left) * value,srcRect.top  + (destRect.top - srcRect.top) * value,srcRect.right + (destRect.right - srcRect.right) * value,srcRect.bottom + (destRect.bottom - srcRect.bottom) * value)val scale = Math.min(mDestRect.width() / mBitmap?.width!!, mDestRect.height() / mBitmap!!.height)val dx = ((srcRect.width() - destRect.width())/2 )* valueval dy = ((srcRect.height() - destRect.height())/2 )* value + (destRect.bottom - srcRect.bottom) * value + (srcRect.height()- mBitmap?.height!! * scale)mScaleMatrix.reset()mScaleMatrix.postScale(scale, scale)mScaleMatrix.postTranslate(dx, dy)invalidate()
}
- 右下角平移缩放效果图
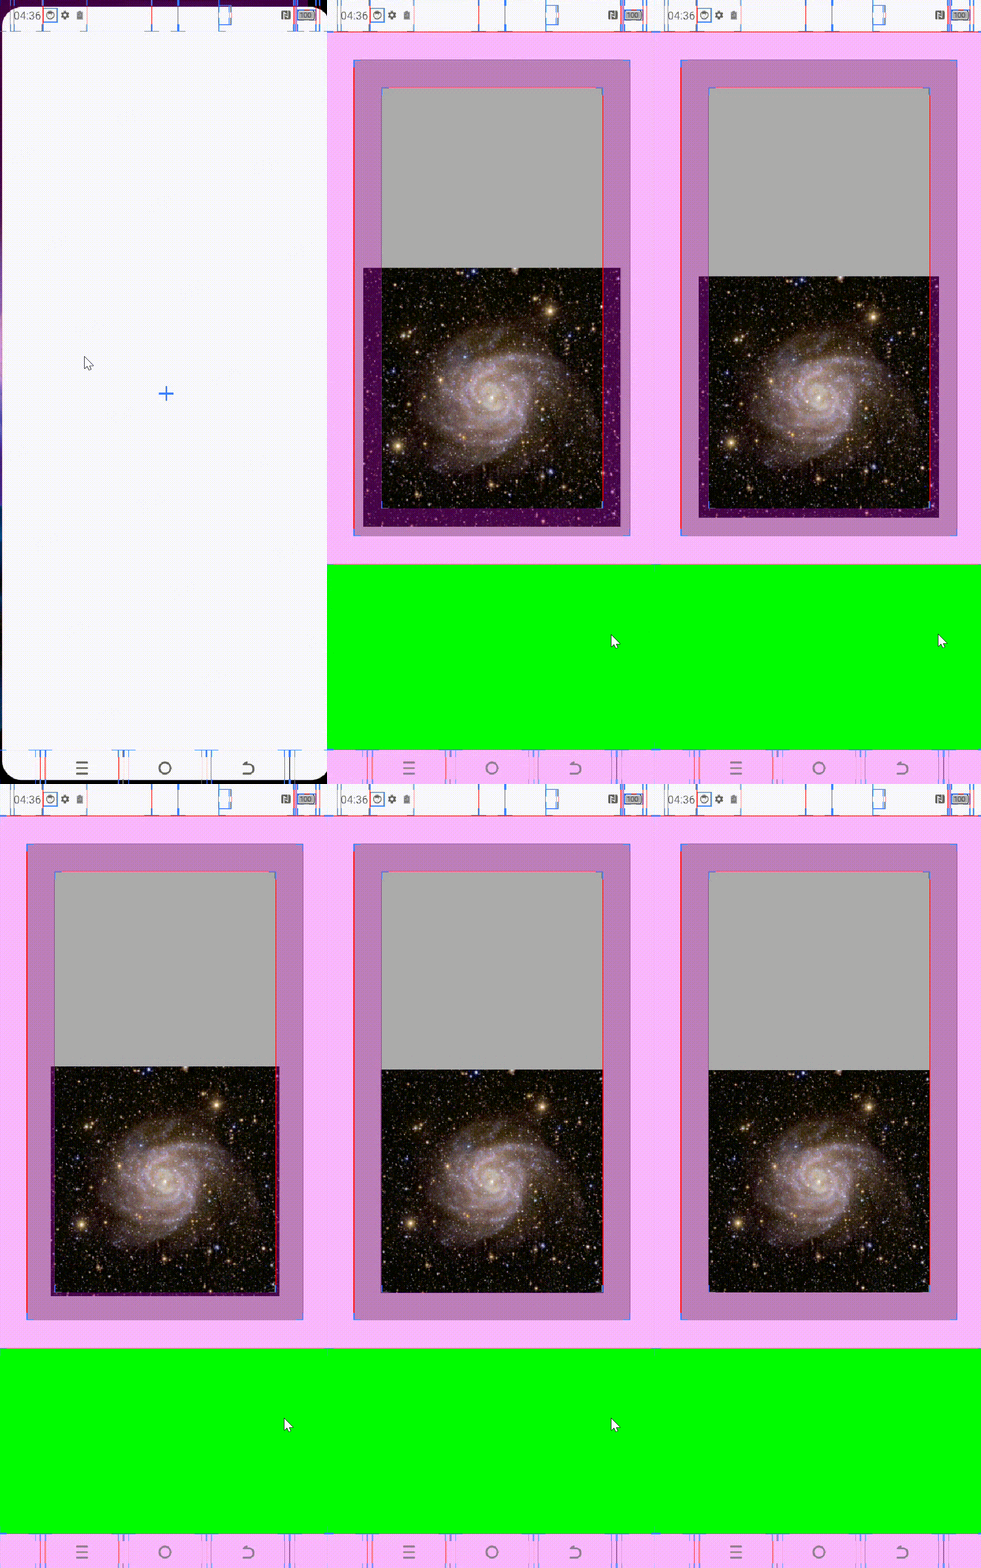
相关文章:

View->Bitmap缩放到自定义ViewGroup的任意区域(Matrix方式绘制Bitmap)
Bitmap缩放和平移 加载一张Bitmap可能为宽高相同的正方形,也可能为宽高不同的矩形缩放方向可以为中心缩放,左上角缩放,右上角缩放,左下角缩放,右下角缩放Bitmap中心缩放,包含了缩放和平移两个操作…...
Centos 7部署NTP
介绍 NTP是Network Time Protocol(网络时间协议)的简称,它是用来通过互联网或局域网将计算机时钟同步到世界协调时间(UTC)的协议。 安装 # yum安装 yum install -y ntp# 离线安装 #下载地址:https://mir…...

【前缀和】42. 接雨水
本文涉及知识点 C算法:前缀和、前缀乘积、前缀异或的原理、源码及测试用例 包括课程视频 LeetCode42. 接雨水 给定 n 个非负整数表示每个宽度为 1 的柱子的高度图,计算按此排列的柱子,下雨之后能接多少雨水。 示例 1: 输入&am…...

我的名字叫大数据
第1章 大家好,我叫大数据 1.1 我的家族传统:从我小小的祖先到壮大的我 1.1.1 最初的我:原始部落里的计数石头 大家好,我是你们人类文明的“老朋友”——大数据。你们知道吗?在我还没有变成你们手机、电脑里飞速跑动的那些数字前,我最初的模样可是一块块“计数石头”。…...

数据库漫谈-infomix
infomix数据库知名度不高,主要跟它的定位有关,它主要用于unix操作系统:Informix便是取自Information和Unix的结合,它也是第一个支持linux系统的数据库。它其实在金融、电信行业使用率非常高。98年,当时我在做银行领域的…...

【Qt】Qt界面美化指南:深入理解QSS样式表的应用与实践
文章目录 前言:1. 背景介绍2. 基本语法3. QSS 设置方式3.1. 设置全局样式3.2. 从文件加载样式表3.3. 使用 Qt Designer 编辑样式 总结: 前言: 在当今这个视觉至上的时代,用户界面(UI)的设计对于任何软件产…...
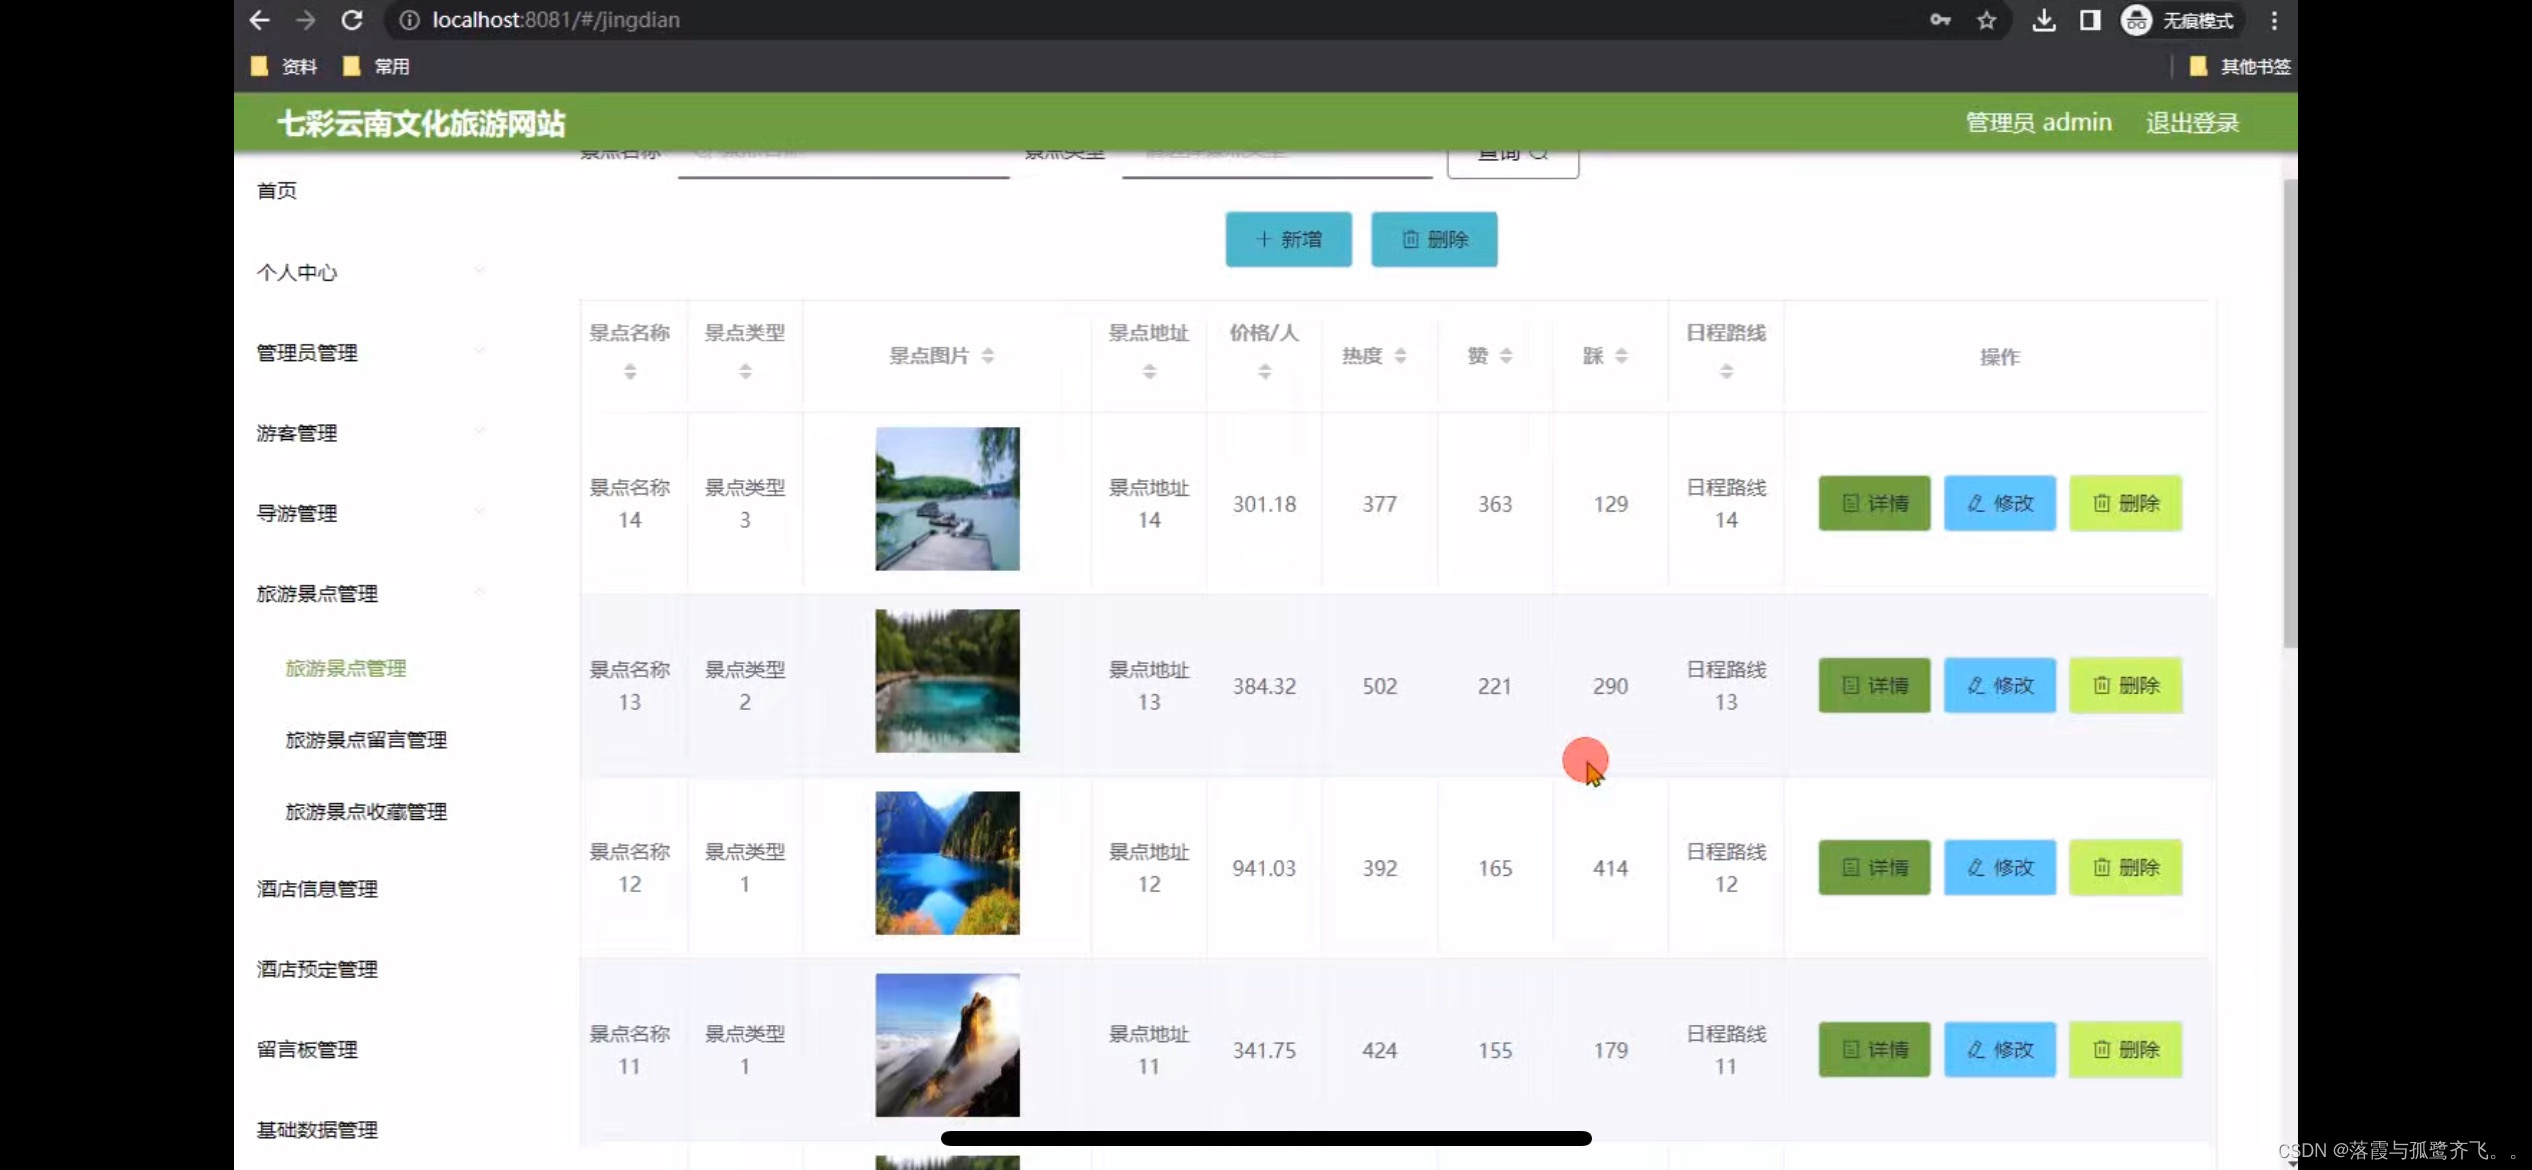
七彩云南文化旅游网站的设计
管理员账户功能包括:系统首页,个人中心,管理员管理,游客管理,导游管理,旅游景点管理,酒店信息管理 前台账户功能包括:系统首页,个人中心,论坛,旅…...
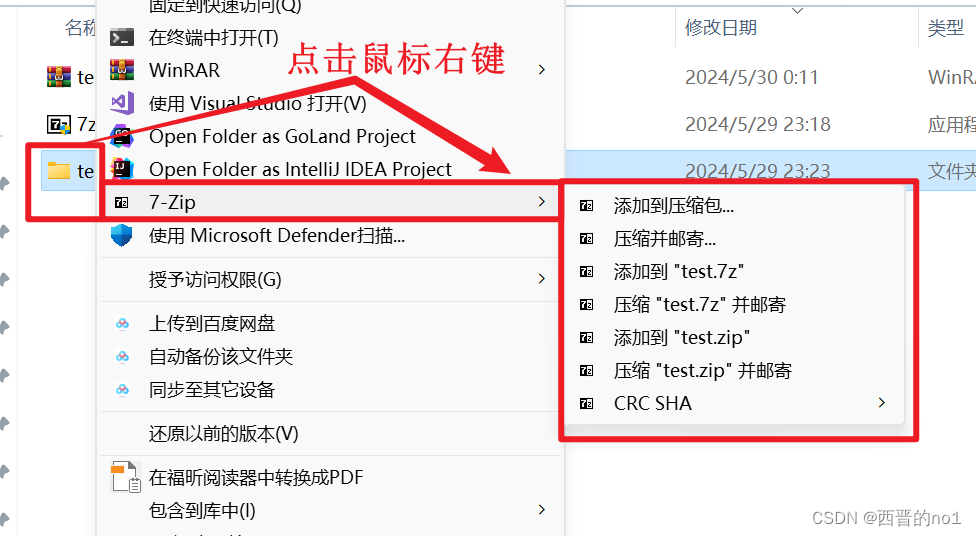
7-zip安装教程
一、简介 7-Zip 是一款开源的文件压缩软件,由 Igor Pavlov 开发。它具有高压缩比、支持多种格式、跨平台等特点。使用 C语言编写,其代码在 Github 上开源。 7-Zip的官网: 7-Zip 7-zip官方中文网站: 7-Zip 官方中文网站 7-Zip 的 G…...

oracle 12c DB卸载流程
1.运行卸载程序 [rootprimary1 ~]# su - oracle [oracleprimary1 ~]$ cd $ORACLE_HOME/deinstall [oracleprimary1 deinstall]$ ./deinstall Checking for required files and bootstrapping ... Please wait ... 这里选择3 、回车、y、y、回车、ASM 这里输入y 2.删除相关目录…...
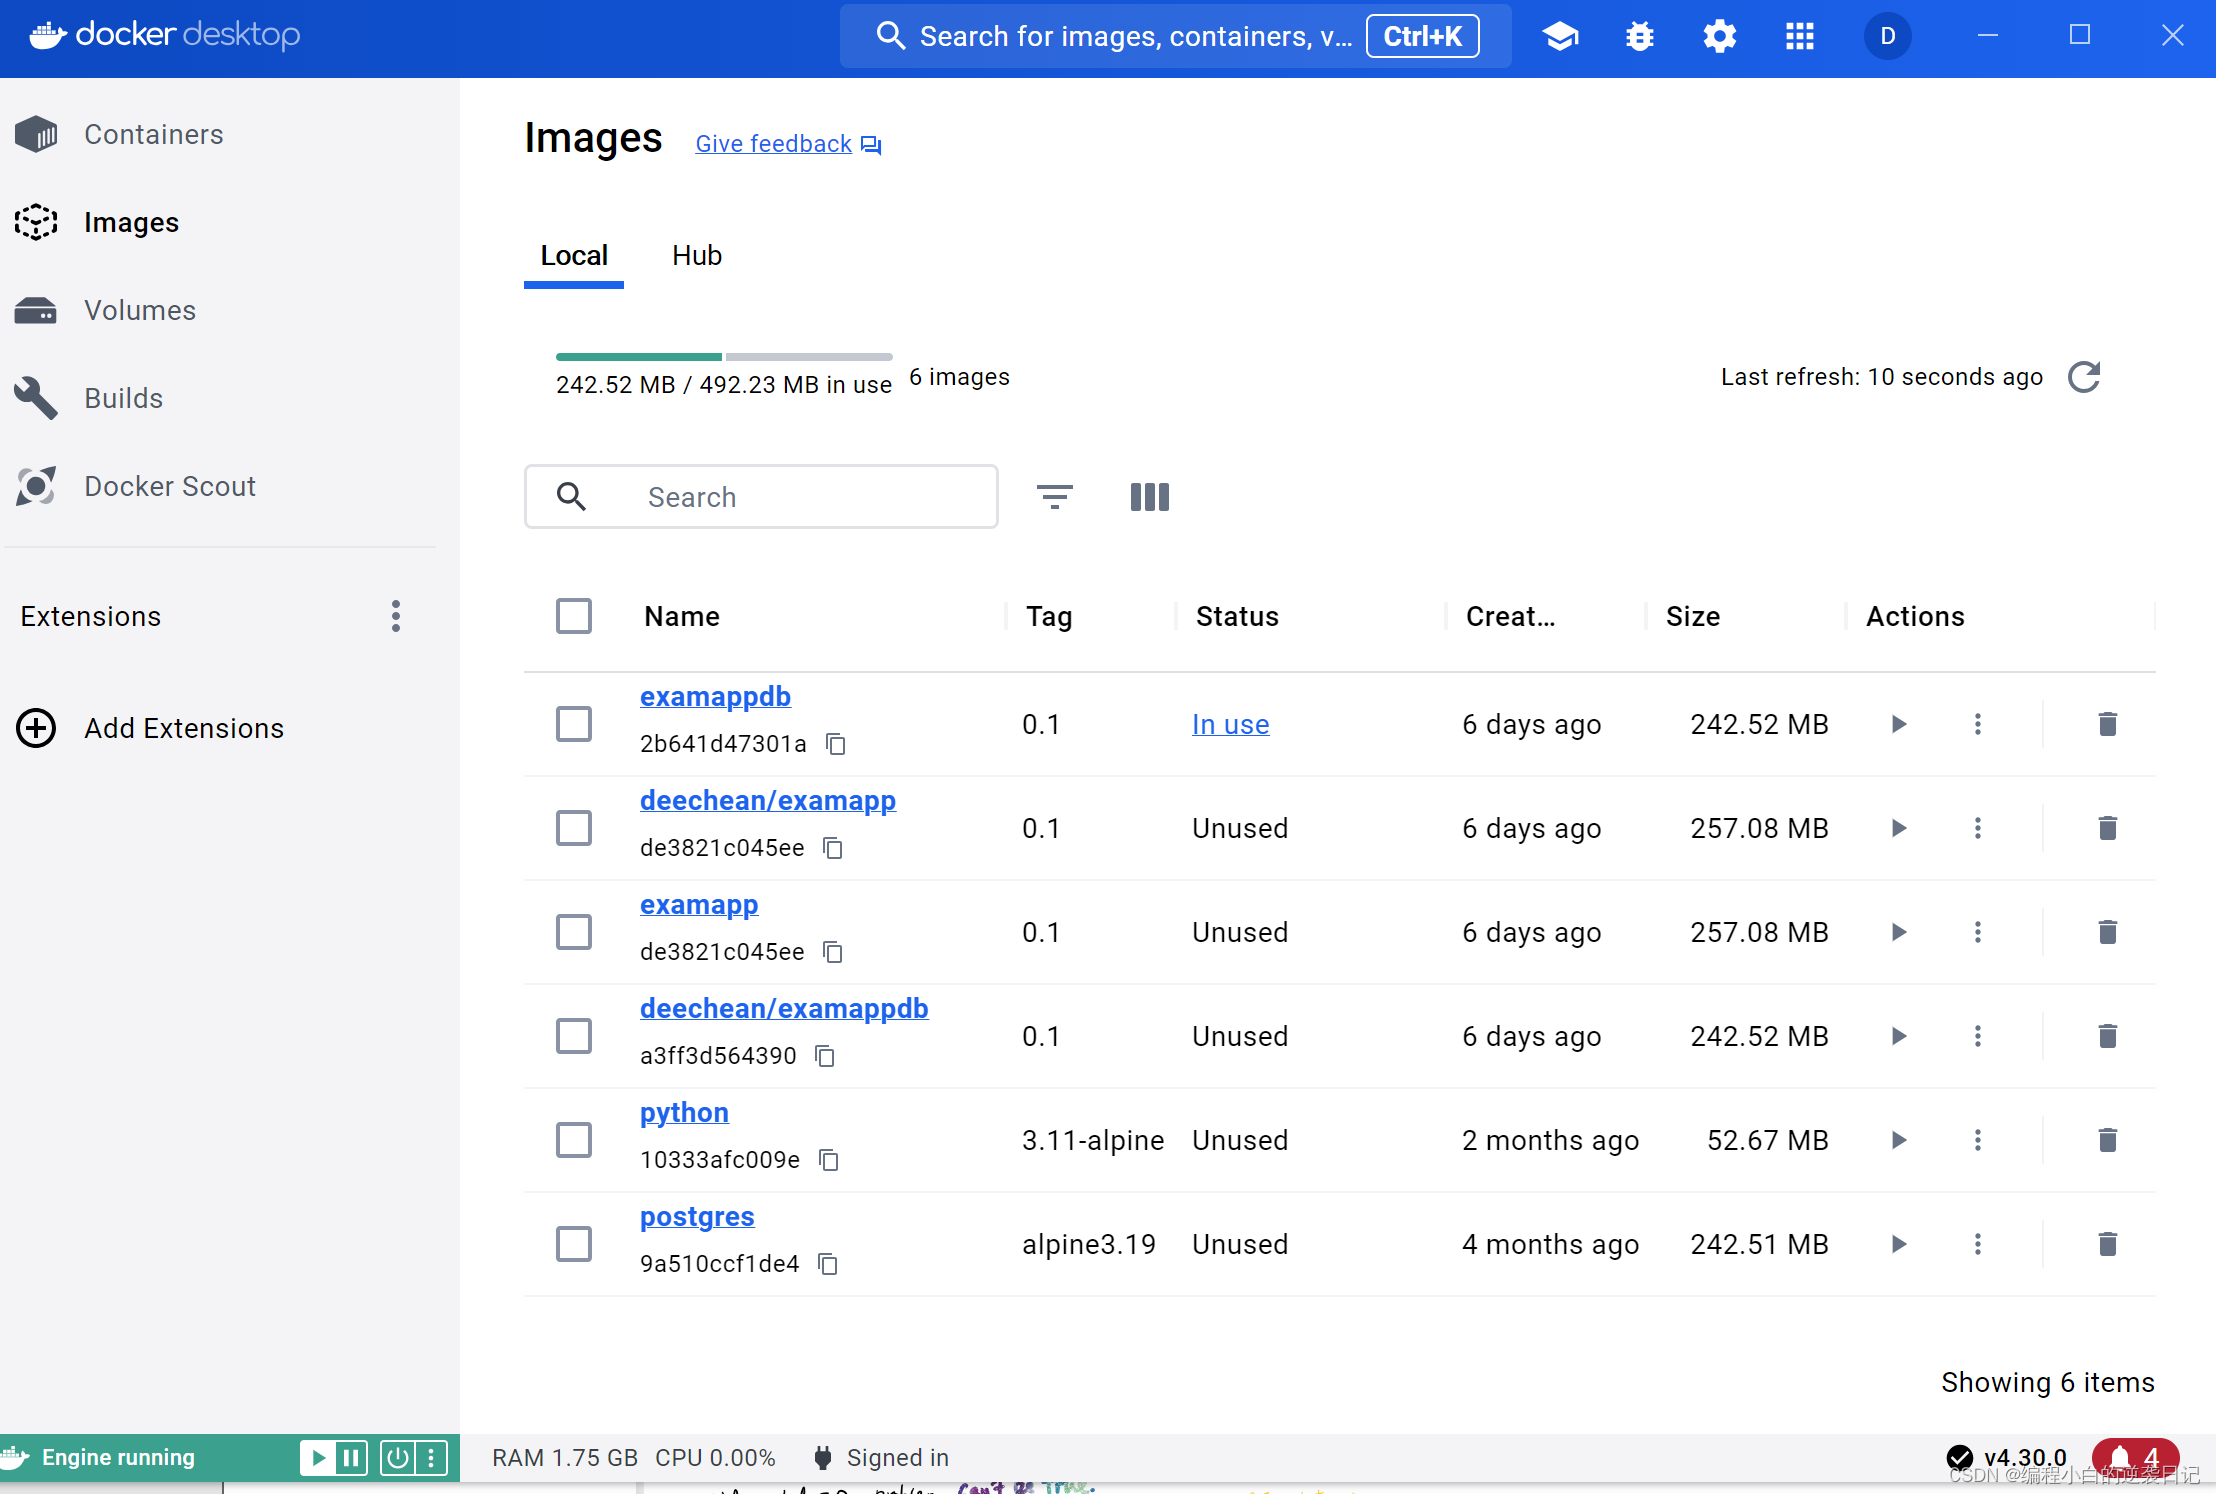
Docker学习笔记 - 创建自己的image
目录 基本概念常用命令使用docker compose启动脚本创建自己的image 使用Docker是现在最为流行的软件发布方式, 本系列将阐述Docker的基本概念,常用命令,启动脚本和如何生产自己的docker image。 在我们发布软件时,往往需要把我…...
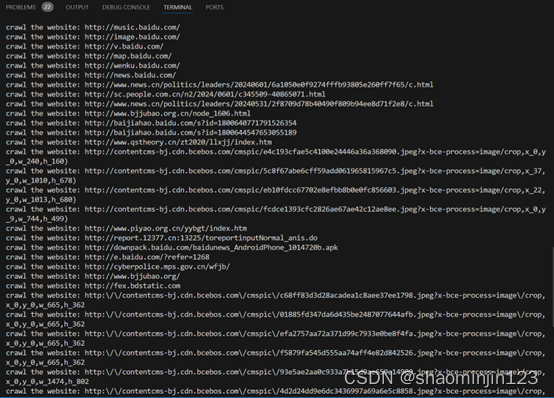
java web爬虫
目录 读取本地文件 从网站读取文件 java爬虫 总结 读取本地文件 import java.io.File; import java.io.PrintWriter; import java.util.Scanner;public class ReplaceText {public static void main() throws Exception{File file new File("basic\\test.txt"…...

MySQL开发教程和具体应用案例
一、MySQL开发教程 初识数据库 定义:数据仓库,安装在操作系统之上,用于存储和管理数据。 分类:关系型数据库(如MySQL、Oracle、SQL Server)和非关系型数据库(如Redis、MongoDB)。 SQL:结构化查询语言,用于管理和操作关系型数据库。 操作数据库 创建、修改、删除…...
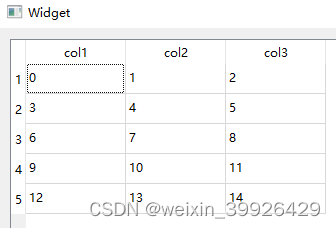
QT C++ 模型视图结构 QTableView 简单例子
在Qt中,MVC模式被广泛使用于各种用户界面框架中,包括Qt的模型视图结构。Qt的模型视图结构是基于MVC模式设计的,其中包括了Model、View和Delegate三个部分。 QTableView是Qt模型视图结构中的一种视图,它用于以表格形式显示数据。 …...
真题题库)
2024年3月电子学会Python编程等级考试(四级)真题题库
2024年3月青少年软件编程Python等级考试(四级)真题试卷 题目总数:38 总分数:100 选择题 第 1 题 单选题 运行如下Python代码,若输入整数3,则最终输出的结果为?( ÿ…...

深入分析 Android BroadcastReceiver (一)
文章目录 深入分析 Android BroadcastReceiver (一)1. Android BroadcastReceiver 设计说明1.1 BroadcastReceiver 的主要用途 2. BroadcastReceiver 的工作机制2.1 注册 BroadcastReceiver2.1.1 静态注册2.1.2 动态注册 3. BroadcastReceiver 的生命周期4. 实现和使用 Broadca…...
2024医美如何做抖音医美抖音号,本地团购、短视频直播双ip爆品引流,实操落地课
课程下载:https://download.csdn.net/download/m0_66047725/89307619 更多资源下载:关注我。 课程内容: 01-0-序.mp4 02-01-账号定位.mp4 03-02-误区.mp4 04-03-五件套.mp4 05-04-文案怎么来.mp4 06-05-对标怎么弄.mp4 07-06-人设怎…...

Debian常用指令指南:高效管理你的Linux系统
Debian作为Linux发行版中的佼佼者,以其稳定性和安全性而闻名。掌握Debian的常用指令对于系统管理员和开发人员来说至关重要。本文将介绍一系列Debian系统中的常用指令,帮助你高效地管理和维护你的系统。喜欢的话记得一键三连哦,方便找到它。 …...

什么是DELINS交货指示?
DELINS 是指 Delivery Instruction(交货指示)报文,用于在供应链管理中传递交货指令和相关信息。该报文用于在供应链中的不同合作伙伴之间交换关于交货的详细信息。 DELINS 报文的主要功能 交货指示:传达具体的交货指令ÿ…...

基于Open3D的点云处理24-ICP匹配cuda加速
参考:docs/jupyter/t_pipelines/t_icp_registration.ipynb 完整测试用例: import open3d as o3d import open3d.core as o3cif o3d.__DEVICE_API__ == cuda:import open3d.cuda.pybind.t.pipelines.registration as treg else:...
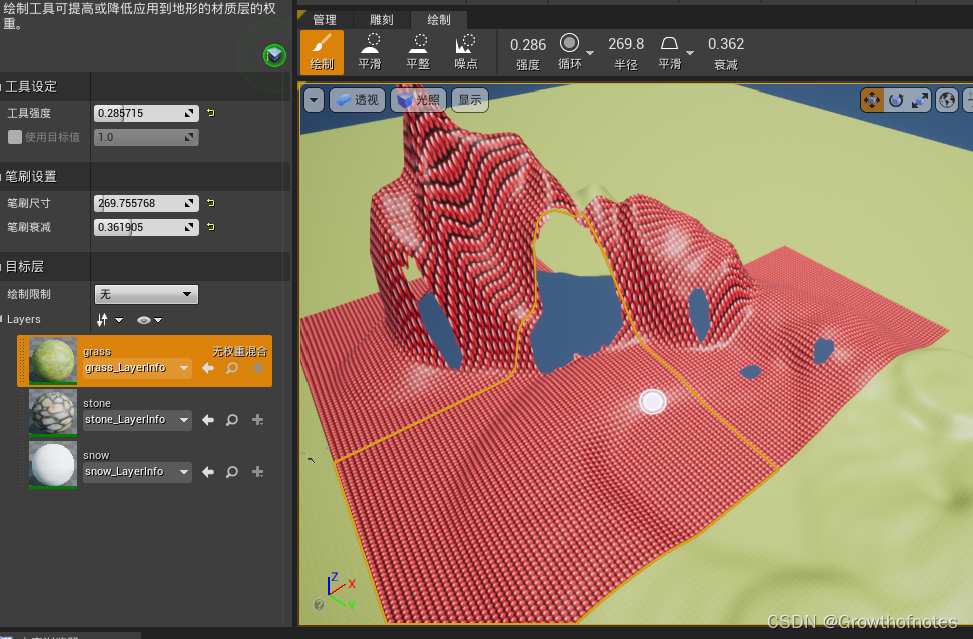
UE_地编教程_创建地形洞材质
个人学习笔记,不喜勿喷。侵权立删! 使用地形洞材质来遮罩地形上特定位置的可视性和碰撞。如要在山脉侧面创建进入洞穴的入口,此操作将非常有用。可使用地形材质和地形洞材质的相同材质,但注意:对比不使用不透明蒙版的…...

Cursor实现用excel数据填充word模版的方法
cursor主页:https://www.cursor.com/ 任务目标:把excel格式的数据里的单元格,按照某一个固定模版填充到word中 文章目录 注意事项逐步生成程序1. 确定格式2. 调试程序 注意事项 直接给一个excel文件和最终呈现的word文件的示例,…...
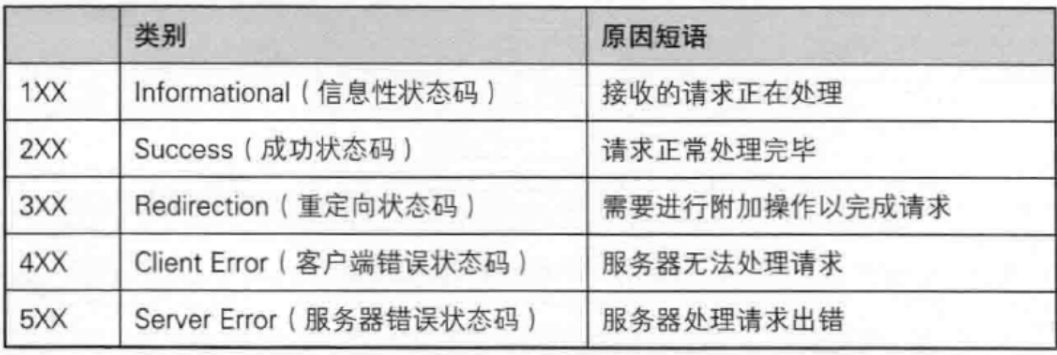
【JavaEE】-- HTTP
1. HTTP是什么? HTTP(全称为"超文本传输协议")是一种应用非常广泛的应用层协议,HTTP是基于TCP协议的一种应用层协议。 应用层协议:是计算机网络协议栈中最高层的协议,它定义了运行在不同主机上…...

QMC5883L的驱动
简介 本篇文章的代码已经上传到了github上面,开源代码 作为一个电子罗盘模块,我们可以通过I2C从中获取偏航角yaw,相对于六轴陀螺仪的yaw,qmc5883l几乎不会零飘并且成本较低。 参考资料 QMC5883L磁场传感器驱动 QMC5883L磁力计…...
【JVM】- 内存结构
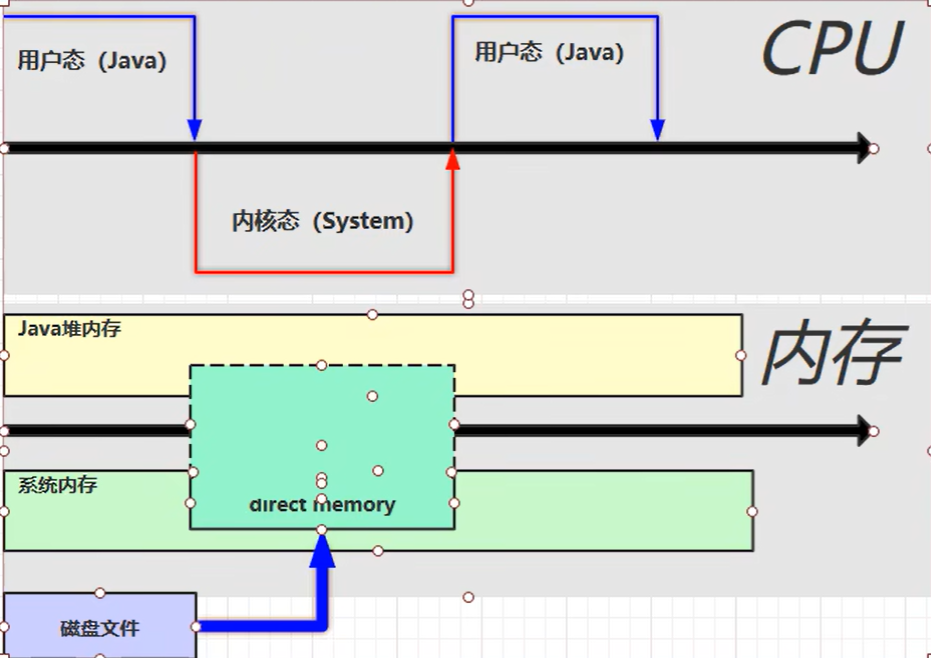
引言 JVM:Java Virtual Machine 定义:Java虚拟机,Java二进制字节码的运行环境好处: 一次编写,到处运行自动内存管理,垃圾回收的功能数组下标越界检查(会抛异常,不会覆盖到其他代码…...

剑指offer20_链表中环的入口节点
链表中环的入口节点 给定一个链表,若其中包含环,则输出环的入口节点。 若其中不包含环,则输出null。 数据范围 节点 val 值取值范围 [ 1 , 1000 ] [1,1000] [1,1000]。 节点 val 值各不相同。 链表长度 [ 0 , 500 ] [0,500] [0,500]。 …...
高等数学(下)题型笔记(八)空间解析几何与向量代数
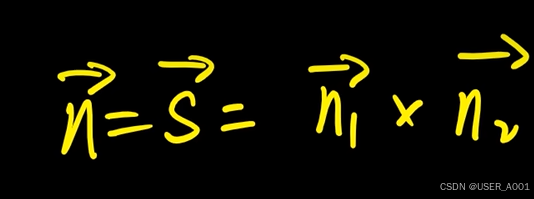
目录 0 前言 1 向量的点乘 1.1 基本公式 1.2 例题 2 向量的叉乘 2.1 基础知识 2.2 例题 3 空间平面方程 3.1 基础知识 3.2 例题 4 空间直线方程 4.1 基础知识 4.2 例题 5 旋转曲面及其方程 5.1 基础知识 5.2 例题 6 空间曲面的法线与切平面 6.1 基础知识 6.2…...

鸿蒙中用HarmonyOS SDK应用服务 HarmonyOS5开发一个医院查看报告小程序
一、开发环境准备 工具安装: 下载安装DevEco Studio 4.0(支持HarmonyOS 5)配置HarmonyOS SDK 5.0确保Node.js版本≥14 项目初始化: ohpm init harmony/hospital-report-app 二、核心功能模块实现 1. 报告列表…...

ETLCloud可能遇到的问题有哪些?常见坑位解析
数据集成平台ETLCloud,主要用于支持数据的抽取(Extract)、转换(Transform)和加载(Load)过程。提供了一个简洁直观的界面,以便用户可以在不同的数据源之间轻松地进行数据迁移和转换。…...

Java 加密常用的各种算法及其选择
在数字化时代,数据安全至关重要,Java 作为广泛应用的编程语言,提供了丰富的加密算法来保障数据的保密性、完整性和真实性。了解这些常用加密算法及其适用场景,有助于开发者在不同的业务需求中做出正确的选择。 一、对称加密算法…...
Android 之 kotlin 语言学习笔记三(Kotlin-Java 互操作)
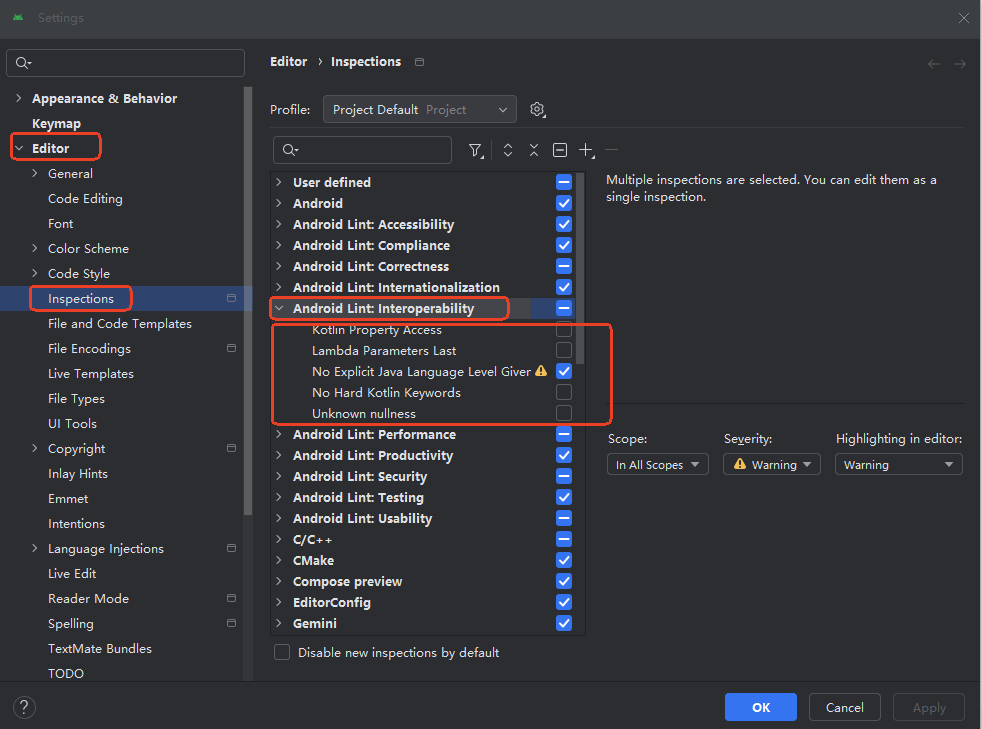
参考官方文档:https://developer.android.google.cn/kotlin/interop?hlzh-cn 一、Java(供 Kotlin 使用) 1、不得使用硬关键字 不要使用 Kotlin 的任何硬关键字作为方法的名称 或字段。允许使用 Kotlin 的软关键字、修饰符关键字和特殊标识…...
