elasticdump和ESM
逐个执行如下命令;
1.拷贝analyzer如分词(需要分词器,可能不成功,不影响复制)
./elasticdump --input=http://[来源IP地址]:9200/[来源索引] --output=http://[目标IP地址]:9200/[目标索引] --type=analyzer
2.拷贝映射
./elasticdump --input=http://[来源IP地址]:9200/[来源索引] --output=http://[目标IP地址]:9200/[目标索引] --type=mapping
3.拷贝数据
./elasticdump --input=http://[来源IP地址]:9200/[来源索引] --output=http://[目标IP地址]:9200/[目标索引] --type=data
恢复顺序是:1、先分词;2、索引、3、数据
注:如查不迁移分词,替换为空值
例: 替换分词
sed -i 's/,"analyzer":"ik_analyzer"//g' geometry_955_mapping.json
elasticdump \
--input=http://192.168.1.140:9200/source_index \
--output=http://192.168.1.141:9200/target_index \
--type=data \
--limit=2000 # 每次操作的objects数量,默认100,数据量大的话,可以调大加快迁移速度
--input=http://172.30.40.125:9200/geometry_833 \
--output=http://47.105.38.107:9200/geometry_833
导出索引结构
elasticdump \
--input=http://production.es.com:9200/my_index \
--output=/data/my_index_mapping.json \
--type=mapping
导出索引数据
elasticdump \
--input=http://production.es.com:9200/my_index \
--output=/data/my_index.json \
--type=data
elasticdump --input=http://172.30.40.125:9200/geometry_833 --output=/mysqldata/es20240516/geometry_833_mapping.json --type=mapping
elasticdump --input=http://172.30.40.125:9200/geometry_833 --output=/mysqldata/es20240516/geometry_833.json --type=data
导入索引和数据
elasticdump \
--input=/data/source_index_mapping.json \
--output=http://192.168.1.141:9200/source_index \
--type=mapping
elasticdump \
--input=/data/source_index.json \
--output=http://192.168.1.141:9200/source_index \
--type=data \
--limit=2000
elasticdump 所有索引
elasticdump --input=./indices.json --output=http://localhost:9201 --all=true
elasticdump 所有数据
elasticdump --input=http://localhost:9200/ --output=all_data.json --all=true
这里的参数解释如下:
--input:指定 Elasticsearch 实例的地址。
--output:指定导出的文件名。
--all=true:指示 elasticdump 导出所有的数据。
elasticdump --input=/data/source_index_mapping.json --output=http://192.168.1.141:9200/source_index --type=mapping
elasticdump --input=/data/source_index.json --output=http://192.168.1.141:9200/source_index --type=data
elasticdump --input==/mysqldata/es20240516/geometry_833_mapping.json --output=http://47.105.38.107:9200/geometry_833 --type=mapping
elasticdump --input==/mysqldata/es20240516/geometry_833.json --output=http://47.105.38.107:9200/geometry_833 --type=data
#es如果有密码,执行以下语句
elasticdump \
--input=http://username:passowrd@production.es.com:9200/my_index \
--output=http://username:password@staging.es.com:9200/my_index \
--type=data
替换分词
sed -i 's/,"analyzer":"ik_analyzer"//g' geometry_955_mapping.json
sed -i 's/,"analyzer":"ik_analyzer"//g' 1.json
大量数据迁移
#ESM迁移工具【适合大数据量】
解析:esm迁移过程原理与elasticsearch-dump类似,区别在于esm使用go语言开发,号称每分钟可以迁移一千万条数据
下载地址:wget https://github.com/medcl/esm/releases/download/v0.7.0/esm-linux-amd64
1、数据迁移
授权:chmod +x esm-linux-amd64
./esm-linux-amd64 -s http://192.168.1.x.:9200 -m 账户:密码 -x "索引名称" -d http://192.168.2.x:9200 -n "账户:密码" -c 10000 -w10 -b=20 -f --refresh
解析:
-s表示读取数据源SOURCE
-d表示将数据源传输到目的地DESTINATION。
-x表示需要复制的索引名称
-q表示指定条件的查询语句
-n表示base认证的用户名和密码
-w表示并发数,默认为1
-b表示buck大小,默认5MB
-f表示复制前删除已有重名索引
–refresh表示完成后再刷新索引
4、下载安装elasticsearch-migration
源码:https://github.com/medcl/esm-abandoned
编译好的工具:https://github.com/medcl/esm-abandoned/releases
下载编译好的工具放到/usr/local/hadoop目录下,解压后可以直接运行,elasticsearch-migration支持linux,windows等不同系统。使用示例
./bin/linux64/esm -s http://10.62.124.x:9200 -d http://10.67.151.y:9200 -x index_name -w=5 -b=10 -c 10000
1
-w 表示线程数
-b 表示一次bulk请求数据大小,单位MB默认 5M
-c 一次scroll请求数量
5、数据迁移
因为需要迁移的索引比较多,大概有几百个,为了提高效率,所以写了一个批量索引迁移脚本:
#!/bin/sh
dir="/usr/local/hadoop"
cd $dir
esIndex=`curl -s 'http://10.62.124.x:9200/_cat/indices' | grep -e mobile_lte_* | awk '{print $3}'`
for indexName in $esIndex
do
echo "Start migration $indexName"
./bin/linux64/esm -s http://10.62.124.x:9200 -d http://10.67.151.y:9200 -x $indexName -y $indexName -w=5 -b=10 -c 10000 --copy_settings --copy_mappings --force --refresh
done
将该脚本放到/usr/local/hadoop目录下,运行即可。
授权:chmod +x esm-linux-amd64
./esm-linux-amd64 -s http://192.168.1.x.:9200 -m 账户:密码 -x "索引名称" -d http://192.168.2.x:9200 -n "账户:密码" -c 10000 -w10 -b=20 -f --refresh
解析:
-s表示读取数据源SOURCE
-d表示将数据源传输到目的地DESTINATION。
-x表示需要复制的索引名称
-q表示指定条件的查询语句
-n表示base认证的用户名和密码
-w表示并发数,默认为1
-b表示buck大小,默认5MB
-f表示复制前删除已有重名索引
–refresh表示完成后再刷新索引
2、使用示例
copy index index_name from 192.168.1.x to 192.168.1.y:9200
./bin/esm -s http://192.168.1.x:9200 -d http://192.168.1.y:9200 -x index_name -w=5 -b=10 -c 10000
copy index src_index from 192.168.1.x to 192.168.1.y:9200 and save with dest_index
./bin/esm -s http://localhost:9200 -d http://localhost:9200 -x src_index -y dest_index -w=5 -b=100
support Basic-Auth
./bin/esm -s http://localhost:9200 -x "src_index" -y "dest_index" -d http://localhost:9201 -n admin:111111
copy settings and override shard size
./bin/esm -s http://localhost:9200 -x "src_index" -y "dest_index" -d http://localhost:9201 -m admin:111111 -c 10000 --shards=50 --copy_settings
copy settings and mapping, recreate target index, add query to source fetch, refresh after migration
./bin/esm -s http://localhost:9200 -x "src_index" -q=query:phone -y "dest_index" -d http://localhost:9201 -c 10000 --shards=5 --copy_settings --copy_mappings --force --refresh
dump elasticsearch documents into local file
./bin/esm -s http://localhost:9200 -x "src_index" -m admin:111111 -c 5000 -q=query:mixer --refresh -o=dump.bin
loading data from dump files, bulk insert to another es instance
./bin/esm -d http://localhost:9200 -y "dest_index" -n admin:111111 -c 5000 -b 5 --refresh -i=dump.bin
support proxy
./bin/esm -d http://123345.ap-northeast-1.aws.found.io:9200 -y "dest_index" -n admin:111111 -c 5000 -b 1 --refresh -i dump.bin --dest_proxy=http://127.0.0.1:9743
use sliced scroll(only available in elasticsearch v5) to speed scroll, and update shard number
./bin/esm -s=http://192.168.3.206:9200 -d=http://localhost:9200 -n=elastic:changeme -f --copy_settings --copy_mappings -x=bestbuykaggle --sliced_scroll_size=5 --shards=50 --refresh
migrate 5.x to 6.x and unify all the types to doc
./esm -s http://source_es:9200 -x "source_index*" -u "doc" -w 10 -b 10 - -t "10m" -d https://target_es:9200 -m elastic:passwd -n elastic:passwd -c 5000
to migrate version 7.x and you may need to rename _type to _doc
./esm -s http://localhost:9201 -x "source" -y "target" -d https://localhost:9200 --rename="_type:type,age:myage" -u"_doc"
filter migration with range query
./esm -s https://192.168.3.98:9200 -m elastic:password -o json.out -x kibana_sample_data_ecommerce -q "order_date:[2020-02-01T21:59:02+00:00 TO 2020-03-01T21:59:02+00:00]"
range query, keyword type and escape
./esm -s https://192.168.3.98:9200 -m test:123 -o 1.txt -x test1 -q "@timestamp.keyword:[\"2021-01-17 03:41:20\" TO \"2021-03-17 03:41:20\"]"
generate testing data, if input.json contains 10 documents, the follow command will ingest 100 documents, good for testing
./bin/esm -i input.json -d http://localhost:9201 -y target-index1 --regenerate_id --repeat_times=10
select source fields
./bin/esm -s http://localhost:9201 -x my_index -o dump.json --fields=author,title
rename fields while do bulk indexing
./bin/esm -i dump.json -d http://localhost:9201 -y target-index41 --rename=title:newtitle
user buffer_count to control memory used by ESM, and use gzip to compress network traffic
./esm -s https://localhost:8000 -d https://localhost:8000 -x logs1kw -y logs122 -m elastic:medcl123 -n elastic:medcl123 --regenerate_id -w 20 --sliced_scroll_size=60 -b 5 --buffer_count=1000000 --compress false
Download
Releases · medcl/esm · GitHub
Compile:
if download version is not fill you environment,you may try to compile it yourself. go required.
make build
- go version >= 1.7
Options
-
Usage: -
esm [OPTIONS] -
Application Options: -
-s, --source= source elasticsearch instance, ie: http://localhost:9200 -
-q, --query= query against source elasticsearch instance, filter data before migrate, ie: name:medcl -
-d, --dest= destination elasticsearch instance, ie: http://localhost:9201 -
-m, --source_auth= basic auth of source elasticsearch instance, ie: user:pass -
-n, --dest_auth= basic auth of target elasticsearch instance, ie: user:pass -
-c, --count= number of documents at a time: ie "size" in the scroll request (10000) -
--buffer_count= number of buffered documents in memory (100000) -
-w, --workers= concurrency number for bulk workers (1) -
-b, --bulk_size= bulk size in MB (5) -
-t, --time= scroll time (1m) -
--sliced_scroll_size= size of sliced scroll, to make it work, the size should be > 1 (1) -
-f, --force delete destination index before copying -
-a, --all copy indexes starting with . and _ -
--copy_settings copy index settings from source -
--copy_mappings copy index mappings from source -
--shards= set a number of shards on newly created indexes -
-x, --src_indexes= indexes name to copy,support regex and comma separated list (_all) -
-y, --dest_index= indexes name to save, allow only one indexname, original indexname will be used if not specified -
-u, --type_override= override type name -
--green wait for both hosts cluster status to be green before dump. otherwise yellow is okay -
-v, --log= setting log level,options:trace,debug,info,warn,error (INFO) -
-o, --output_file= output documents of source index into local file -
-i, --input_file= indexing from local dump file -
--input_file_type= the data type of input file, options: dump, json_line, json_array, log_line (dump) -
--source_proxy= set proxy to source http connections, ie: http://127.0.0.1:8080 -
--dest_proxy= set proxy to target http connections, ie: http://127.0.0.1:8080 -
--refresh refresh after migration finished -
--fields= filter source fields, comma separated, ie: col1,col2,col3,... -
--rename= rename source fields, comma separated, ie: _type:type, name:myname -
-l, --logstash_endpoint= target logstash tcp endpoint, ie: 127.0.0.1:5055 -
--secured_logstash_endpoint target logstash tcp endpoint was secured by TLS -
--repeat_times= repeat the data from source N times to dest output, use align with parameter regenerate_id to amplify the data size -
-r, --regenerate_id regenerate id for documents, this will override the exist document id in data source -
--compress use gzip to compress traffic -
-p, --sleep= sleep N seconds after finished a bulk request (-1) -
Help Options: -
-h, --help Show this help message
FAQ
- Scroll ID too long, update
elasticsearch.ymlon source cluster.
-
http.max_header_size: 16k -
http.max_initial_line_length: 8k
相关文章:

elasticdump和ESM
逐个执行如下命令; 1.拷贝analyzer如分词(需要分词器,可能不成功,不影响复制) ./elasticdump --inputhttp://[来源IP地址]:9200/[来源索引] --outputhttp://[目标IP地址]:9200/[目标索引] --typeanalyzer 2.拷贝映射…...
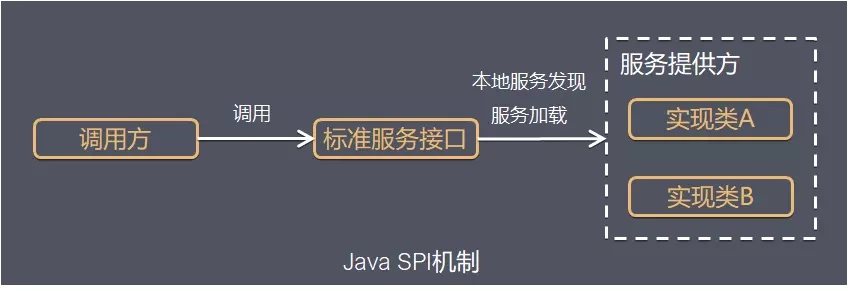
Java扩展机制:SPI与Spring.factories详解
一、SPI SPI全称Service Provider Interface,是Java提供的一套用来被第三方实现或者扩展的API,它可以用来启用框架扩展和替换组件。 整体机制图如下: Java SPI 实际上是“基于接口的编程+策略模式+配置文件”组合实现的动态加载机制。 系统设计的各个抽象,往往有很多不…...

iPhone 语言编程:深入探索与无限可能
iPhone 语言编程:深入探索与无限可能 在数字化时代的浪潮中,iPhone 作为一款全球领先的智能手机,其语言编程的奥秘一直吸引着众多开发者与爱好者的目光。iPhone 的语言编程不仅关乎技术实现,更涉及到用户体验、创新应用等多个层面…...

css动态导航栏鼠标悬停特效
charset "utf-8"; /*科e互联特效基本框架CSS*/ body, ul, dl, dd, dt, ol, li, p, h1, h2, h3, h4, h5, h6, textarea, form, select, fieldset, table, td, div, input {margin:0;padding:0;-webkit-text-size-adjust: none} h1, h2, h3, h4, h5, h6{font-size:12px…...

Vue中使用axios先获取头像上传参数然后上传图片到服务器-demo
这是一个使用axios发送POST请求上传图片到AWS S3的代码。其中: 引入了axios、FormData和fs模块;创建FormData实例,向其中添加上传图片的相关信息;创建axios请求的配置对象config,包含url、method、headers和data等属性…...
Win11环境下Android Studio中Flutter开发环境构建(逐步解决)
flutter开发环境构建 1. Flutter开发环境搭建1.1 Android Studio1.2 flutter下载flutter设置环境变量增加国内镜像 1.3 flutter doctorAndroid toolchain:cmdline-tools component is missingAndroid toolchain:Some Android licenses not acceptedChrom…...

Thread Servlet思考
在开发过程中我们经常会遇到两个对象分别是Thread和Servlet。但是很少会考虑到两者之前的关系。 Thread是线程,在tomcat服务器中请求被接收后,会启动线程对请求进行处理。线程会通过run方法执行实际执行的业务逻辑。在tomcat中当请求请求到线程池后&…...
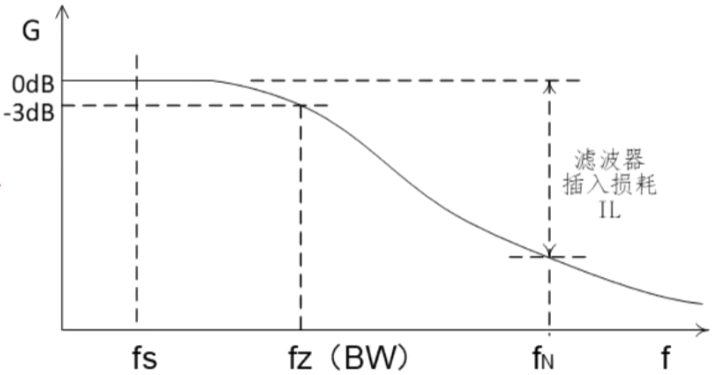
电源滤波器怎么选用
电源滤波器怎么选用 滤波器应用场景及作用第一步:第二步:第三步:第四步: 滤波器应用场景及作用 可以有效解决EMC测试无法通过、端口防护、滤除干扰、设备保护等问题 主要功能有: 1、降低主电源谐波; 2、保护驱动装置电力电子元件…...

终于更新了!时隔一年niushop多商户b2b2c的新补丁v5.0.2终于发布了,一起看看有啥新变化
注意这是最新版的V5.02_多商户V5.0.2版本更新说明 瞧瞧更新了什么内容, 优化功能 优化手机号、身份证等常用验证规则,全局化处理优化商品列表接口查询速度 修复功能修复系统内部分图片上传功能调用接口跨端口问题修复总后台和商家后台订单管理搜索标签在…...
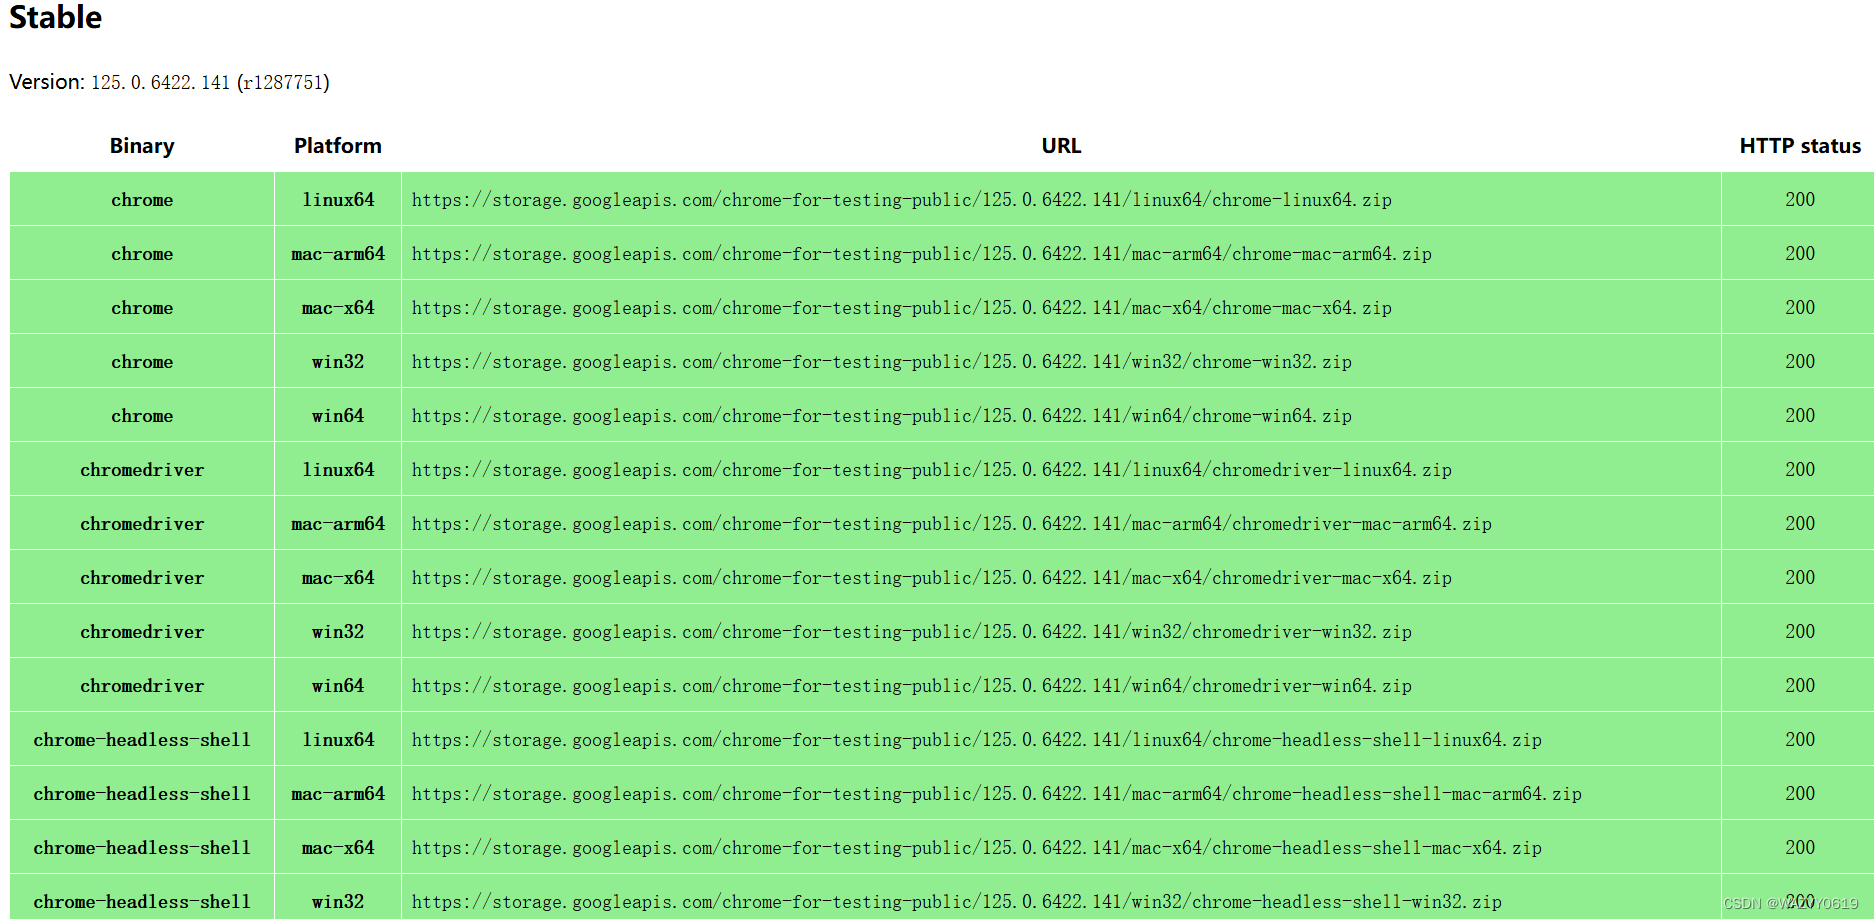
google的chromedriver最新版下载地址
Chrome for Testing availability (googlechromelabs.github.io) 复制对应的地址跳转进去即可下载,下载前先看下自己google浏览器版本,找到对应的版本号去下载,把解压缩的exe放到google浏览器目录下。...
)
Gitee的原理及应用详解(四)
本系列文章简介: Gitee是一款开源的代码托管平台,是国内最大的代码托管平台之一。它基于Git版本控制系统,提供了代码托管、项目管理、协作开发、代码审查等功能,方便团队协作和项目管理。Gitee的出现,在国内的开发者社…...
IP 协议的相关特性
目录 正文: 1.概述 2.协议头的格式 3.地址管理 3.1网段划分 3.2特殊的IP地址 3.3 IPv4的限制和解决办法 4.路由选择 总结: 正文: 1.概述 IP 协议是一个网络层协议,负责在不同网络之间传输数据包。它定义了数据包的格式…...

C++11 在 Windows 环境下的多线程编程指南
引言 随着多核处理器的普及,利用多线程编程来提升应用程序性能变得越来越重要。C11 标准库引入了一系列用于多线程编程的API,使得多线程编程变得更加简洁和高效。 一、基本概念 在开始编写多线程代码之前,了解一些基本概念是非常重要的&am…...

[数据集][目标检测]旋风检测数据集VOC+YOLO格式157张1类别
数据集格式:Pascal VOC格式YOLO格式(不包含分割路径的txt文件,仅仅包含jpg图片以及对应的VOC格式xml文件和yolo格式txt文件) 图片数量(jpg文件个数):159 标注数量(xml文件个数):159 标注数量(txt文件个数):159 标注类别…...
智慧商砼搅拌车安监运营管理的创新实践
随着城市化进程的加速,商砼搅拌车作为城市建设的重要设备,其安全管理与运营效率直接关系到工程质量和施工进度。近年来,通过引入先进的4G无线视频智能车载终端套件,我们实现了对商砼搅拌车的高精度定位、实时音视频调度、实时油量…...
渗透测试框架提权
Metasploit自动提权 Meterpreter自动提权命令 getsystem: getsystem是由Metasploit-Framework提供的一个模块,它可以将一个管理帐户(通常为本地Administrator账户)提升为本地SYSTEM帐户 1)getsystem创建一个新的Windows服务&…...
tcp链接中的三次挥手是什么原因
一、tcp链接中的正常四次挥手过程? 刚开始双方都处于 ESTABLISHED 状态,假如是客户端先发起关闭请求。四次挥手的过程如下: 1、客户端打算关闭连接,此时会发送一个 TCP 首部 FIN 标志位被置为 1 的报文,也即 FIN 报文…...

运维相关知识
一、运维需要关注 服务器的哪些数据? 1. CPU 1.1 CPU使用率: top,vmstat (1) 用户CPU使用率:用户态程序的使用率。top 命令 us 字段和 nice字段 (低优先级) (2) 系统CPU使用率:内核态程序的使用率。top 命令 sy 字…...

网络安全基础技术扫盲篇名词解释之“证书“
用通俗易懂的话说: 证书就好比是一张身份证(类似,但不完全相同),用来证明一个网站的身份是否可信。就像你要确认一个陌生人的身份需要看他的身份证一样,电脑在连接一个网站时,也会查看网站的证…...
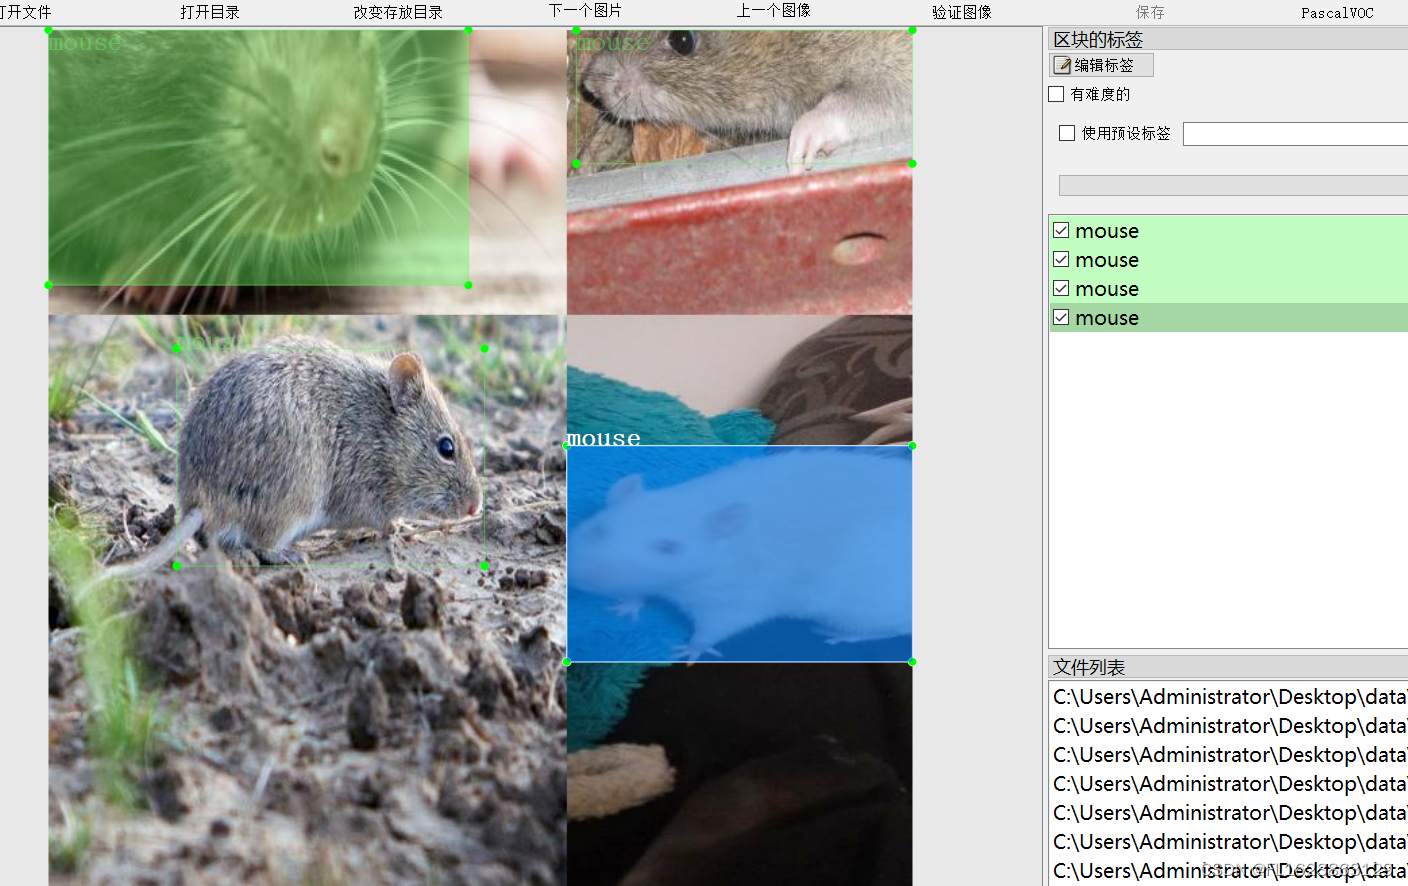
[数据集][目标检测]老鼠检测数据集VOC+YOLO格式4107张1类别
数据集格式:Pascal VOC格式YOLO格式(不包含分割路径的txt文件,仅仅包含jpg图片以及对应的VOC格式xml文件和yolo格式txt文件) 图片数量(jpg文件个数):4107 标注数量(xml文件个数):4107 标注数量(txt文件个数):4107 标注…...

独立开发者如何借助Taotoken多模型能力打造全能AI助手应用
🚀 告别海外账号与网络限制!稳定直连全球优质大模型,限时半价接入中。 👉 点击领取海量免费额度 独立开发者如何借助Taotoken多模型能力打造全能AI助手应用 对于独立开发者或小型工作室而言,构建一个功能全面的AI助手…...

Agent OS:AI智能体开发的操作系统级解决方案
1. 项目概述:一个为AI智能体而生的操作系统最近在AI智能体开发圈子里,一个名为“Agent OS”的项目热度持续攀升。它来自Rivet.dev团队,定位非常清晰:一个专为构建、运行和管理AI智能体而设计的操作系统。如果你正在尝试将大语言模…...

城通网盘解析工具:3步获取高速直连下载地址的终极方案
城通网盘解析工具:3步获取高速直连下载地址的终极方案 【免费下载链接】ctfileGet 获取城通网盘一次性直连地址 项目地址: https://gitcode.com/gh_mirrors/ct/ctfileGet 你是否还在为城通网盘的蜗牛下载速度而烦恼?每次下载大文件都要经历漫长的…...

从纹波和EMI出发:实战分析DC-DC降压电路中PWM与PFM的取舍与优化技巧
从纹波和EMI出发:实战分析DC-DC降压电路中PWM与PFM的取舍与优化技巧 在射频模块或高精度ADC供电设计中,电源的纯净度直接决定系统性能上限。当输出电压纹波超出ADC的LSB范围,或EMI噪声耦合到敏感信号链时,工程师往往需要重新审视D…...

AutoCut终极指南:如何用文本编辑器快速剪辑100个视频
AutoCut终极指南:如何用文本编辑器快速剪辑100个视频 【免费下载链接】autocut 用文本编辑器剪视频 项目地址: https://gitcode.com/GitHub_Trending/au/autocut 还在为手动剪辑视频而烦恼吗?AutoCut项目让你告别复杂的视频编辑软件,通…...

JetBrains IDE试用期重置终极指南:简单三步实现30天无限续杯
JetBrains IDE试用期重置终极指南:简单三步实现30天无限续杯 【免费下载链接】ide-eval-resetter 项目地址: https://gitcode.com/gh_mirrors/id/ide-eval-resetter 你是否曾经在项目开发的关键时刻,突然看到JetBrains IDE弹出"评估期已结束…...

从肌电信号到Arduino控制:MyoWare传感器实战指南
1. 项目概述:当肌肉“说话”,我们如何“倾听”?如果你玩过一些体感游戏,或者看过科幻电影里用意念控制机械臂的场景,心里大概会闪过一个念头:这玩意儿到底是怎么做到的?其实,很多酷炫…...

Cortex-A78C架构解析:AMU与ETM寄存器实战指南
1. Cortex-A78C核心架构与寄存器概览Cortex-A78C是Armv8-A架构的高性能实现,面向移动计算和边缘AI场景优化。作为A78系列的安全增强版本,它在保留原有3发射乱序执行流水线的基础上,新增了Pointer Authentication等安全扩展,同时强…...
)
【独家首发】ElevenLabs马拉雅拉姆文支持状态实测报告(含ISO 639-2代码验证、音素对齐误差率<0.8%)
更多请点击: https://intelliparadigm.com 第一章:ElevenLabs马拉雅拉姆文支持的现状与战略意义 ElevenLabs 作为全球领先的语音合成平台,自2023年11月起正式将马拉雅拉姆语(Malayalam,ISO 639-1: ml)纳入…...

避坑指南:ENVI5.6在Win10/Win11系统下的常见安装失败问题与解决
ENVI5.6安装避坑实战:从报错排查到系统级调优 当你在Windows 10/11系统上双击ENVI5.6安装程序时,可能没想到这个看似标准的安装过程会变成一场技术冒险。不同于常规教程只展示理想路径,我们将直面那些让科研工作者抓狂的"安装已终止&quo…...