Numba 的 CUDA 示例 (2/4):穿针引线
本教程为 Numba CUDA 示例 第 2 部分。
按照本系列从头开始使用 Python 学习 CUDA 编程
介绍
在本系列的第一部分中,我们讨论了如何使用 GPU 运行高度并行算法。高度并行任务是指任务完全相互独立的任务,例如对两个数组求和或应用任何元素函数。

在本教程中
许多任务虽然不是高度并行的,但仍可从并行化中获益。在本期的CUDA by Numba Examples中,我们将介绍一些允许线程协作进行计算的常用技术。本部分的 Google colab 代码:https://colab.research.google.com/drive/1hproEOKvQyBNNxvjr0qM2LPjJWNDfyp9?usp=sharing
入门
导入并加载库,确保您有 GPU。
from time import perf_counter
import numpy as np
import numba
from numba import cudaprint(np.__version__)
print(numba.__version__)---
1.25.2
0.59.1cuda.detect()---
Found 1 CUDA devices
id 0             b'Tesla T4'                              [SUPPORTED]Compute Capability: 7.5PCI Device ID: 4PCI Bus ID: 0UUID: GPU-0f022a60-18f8-5de0-1f24-ad861dcd84aeWatchdog: DisabledFP32/FP64 Performance Ratio: 32
Summary:1/1 devices are supported
True
线程合作
简单并行缩减算法
我们将从一个非常简单的问题开始本节:对数组的所有元素求和。从本质上讲,这个算法非常简单。如果不借助 NumPy,我们可以将其实现为:
def sum_cpu(array):s = 0.0for i in range(array.size):s += array[i]return s
我知道,这看起来不太符合 Python 风格。但它确实强调了s跟踪数组中的所有元素。如果依赖于数组的每个元素,我们如何并行化该算法s?首先,我们需要重写算法以允许某种并行化。如果有些部分我们无法并行化,我们应该允许线程相互通信。
然而,到目前为止,我们还没有学会如何让线程相互通信……事实上,我们之前说过,不同块中的线程不会通信。我们可以考虑只启动一个块,但请记住,大多数 GPU 中的块只能有 1024 个线程!
我们如何克服这个问题?好吧,如果我们将数组拆分成 1024 个块(或适当数量的threads_per_block),然后分别对每个块求和,结果会怎样?最后,我们可以将每个块的总和结果相加。图 2.1 显示了 2 个块拆分的一个非常简单的示例。
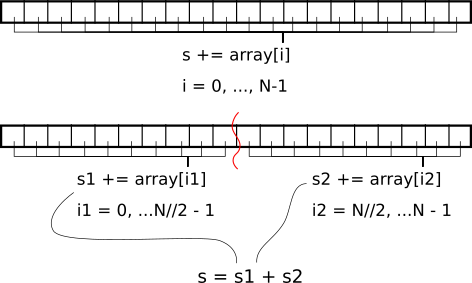
我们如何在 GPU 上做到这一点?首先,我们需要将数组拆分成块。每个块只对应一个块,具有固定数量的线程。在每个块中,每个线程可以对多个数组元素求和(网格步长循环)。然后,我们必须在整个块上计算这些每个线程的值。这部分需要线程进行通信。我们将在下一个示例中介绍如何做到这一点。
由于我们是在块上并行化,因此内核的输出应为块大小。为了完成缩减,我们将其复制到 CPU 并在那里完成作业。
threads_per_block = 1024  # Why not!
blocks_per_grid = 32 * 80  # Use 32 * multiple of streaming multiprocessors# Example 2.1: Naive reduction
@cuda.jit
def reduce_naive(array, partial_reduction):i_start = cuda.grid(1)threads_per_grid = cuda.blockDim.x * cuda.gridDim.xs_thread = 0.0for i_arr in range(i_start, array.size, threads_per_grid):s_thread += array[i_arr]# We need to create a special *shared* array which will be able to be read# from and written to by every thread in the block. Each block will have its# own shared array. See the warning below!s_block = cuda.shared.array((threads_per_block,), numba.float32)# We now store the local temporary sum of a single the thread into the# shared array. Since the shared array is sized#     threads_per_block == blockDim.x# (1024 in this example), we should index it with `threadIdx.x`.tid = cuda.threadIdx.xs_block[tid] = s_thread# The next line synchronizes the threads in a block. It ensures that after# that line, all values have been written to `s_block`.cuda.syncthreads()# Finally, we need to sum the values from all threads to yield a single# value per block. We only need one thread for this.if tid == 0:# We store the sum of the elements of the shared array in its first# coordinatefor i in range(1, threads_per_block):s_block[0] += s_block[i]# Move this partial sum to the output. Only one thread is writing here.partial_reduction[cuda.blockIdx.x] = s_block[0]
⚠️ 注意 :共享数组必须
- 尽量“小”。具体大小取决于 GPU 的计算能力,通常在 48 KB 到 163 KB 之间。请参阅本表:https://docs.nvidia.com/cuda/cuda-c-programming-guide/index.html#features-and-technical-specifications__technical-specifications-per-compute-capability 中的“Maximum amount of shared memory per thread block”项。
- 在编译时有一个已知的大小(这就是为什么我们要设置共享数组
threads_per_block的大小,而不是blockDim.x)。的确,我们可以为任意大小的共享数组定义一个factory function…但要注意这些内核的编译时间- 用 Numba 类型指定 dtype,而不是 Numpy 类型(别问我为什么!)。
N = 1_000_000_000
a = np.arange(N, dtype=np.float32)
a /= a.sum() # a will have sum = 1 (to float32 precision)s_cpu = a.sum()# Highly-optimized NumPy CPU code
timing_cpu = np.empty(21)
for i in range(timing_cpu.size):tic = perf_counter()a.sum()toc = perf_counter()timing_cpu[i] = toc - tic
timing_cpu *= 1e3  # convert to msprint(f"Elapsed time CPU: {timing_cpu.mean():.0f} ± {timing_cpu.std():.0f} ms")---
Elapsed time CPU: 557 ± 307 ms
dev_a = cuda.to_device(a)
dev_partial_reduction = cuda.device_array((blocks_per_grid,), dtype=a.dtype)reduce_naive[blocks_per_grid, threads_per_block](dev_a, dev_partial_reduction)
s = dev_partial_reduction.copy_to_host().sum()  # Final reduction in CPUnp.isclose(s, s_cpu)  # Ensure we have the right number---
True
timing_naive = np.empty(21)
for i in range(timing_naive.size):tic = perf_counter()reduce_naive[blocks_per_grid, threads_per_block](dev_a, dev_partial_reduction)s = dev_partial_reduction.copy_to_host().sum()cuda.synchronize()toc = perf_counter()assert np.isclose(s, s_cpu)    timing_naive[i] = toc - tic
timing_naive *= 1e3  # convert to msprint(f"Elapsed time naive: {timing_naive.mean():.0f} ± {timing_naive.std():.0f} ms")---
Elapsed time naive: 30 ± 11 ms
我在 Google Colab 上运行了这个程序,速度提高了将近 20 倍。非常棒!
一种更好的并行缩减算法
您可能想知道为什么我们将所有内容都命名为“简单”。这意味着有一些非简单的方式来执行相同的功能。事实上,有很多技巧可以加速这种代码(请参阅 Optimizing Parallel Reduction in CUDA 演示以获取基准)。
在我们展示更好的方法之前,让我们回顾一下内核的最后一部分:
if tid == 0: # Single thread taking care of businessfor i in range(1, threads_per_block):s_block[0] += s_block[i]partial_reduction[cuda.blockIdx.x] = s_block[0]
我们几乎把所有事情都并行化了,但在内核末尾,我们让一个线程负责对共享数组 s_block 的所有 threads_per_block 元素求和。我们为什么不把这个总和也并行化呢?
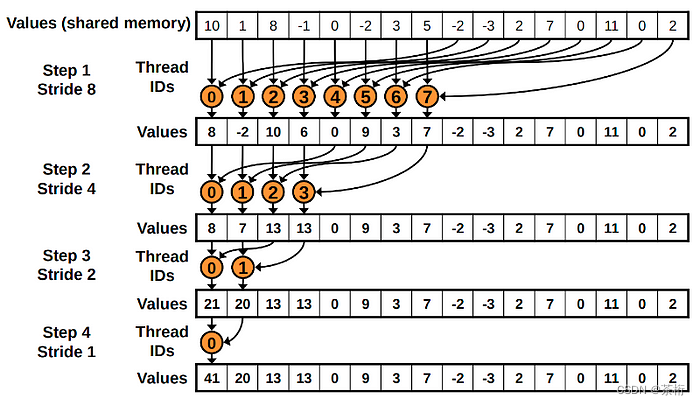
听起来不错,怎么做呢?图 2.2 显示了如何实现 threads_per_block 大小为 16 的函数。我们首先运行 8 个线程,第一个线程将对 s_block[0] 和 s_block[8] 中的值求和。第二个线程对 s_block[1] 和 s_block[9] 中的值求和,直到最后一个线程将对s_block[7] 和 s_block[15] 中的值求和。
下一步,只需要前 4 个线程工作。第一个线程将计算 s_block[0] 和 s_block[4] 的总和;第二个线程将计算 s_block[1] 和 s_block[5] 的总和;第三个线程将计算 s_block[2] 和 s_block[6] 的总和;第四个线程和最后一个线程将计算 s_block[3] 和 s_block[7] 的总和。
在第三步中,我们现在只需要 2 个线程来处理 s_block的前 4 个元素。第四步也是最后一步将使用一个线程来对 2 个元素求和。
由于工作已在线程之间分配,因此它是并行的。当然,它不是由每个线程均等分配的,但这是一种改进。从计算上讲,此算法是 O(log2( threads_per_block)),而第一个算法是 O( threads_per_block)。在我们的示例中,原始算法需要 1024 次操作,而改进算法只需要 10 次!
最后还有一个细节。在每一步中,我们都需要确保所有线程都已写入共享数组。所以我们必须调用cuda.syncthreads()。
来源:Mark Harris,Optimizing Parallel Reduction in CUDA.
# Example 2.2: Better reduction
@cuda.jit
def reduce_better(array, partial_reduction):i_start = cuda.grid(1)threads_per_grid = cuda.blockDim.x * cuda.gridDim.xs_thread = 0.0for i_arr in range(i_start, array.size, threads_per_grid):s_thread += array[i_arr]# We need to create a special *shared* array which will be able to be read# from and written to by every thread in the block. Each block will have its# own shared array. See the warning below!s_block = cuda.shared.array((threads_per_block,), numba.float32)# We now store the local temporary sum of the thread into the shared array.# Since the shared array is sized threads_per_block == blockDim.x,# we should index it with `threadIdx.x`.tid = cuda.threadIdx.xs_block[tid] = s_thread# The next line synchronizes the threads in a block. It ensures that after# that line, all values have been written to `s_block`.cuda.syncthreads()i = cuda.blockDim.x // 2while (i > 0):if (tid < i):s_block[tid] += s_block[tid + i]cuda.syncthreads()i //= 2if tid == 0:partial_reduction[cuda.blockIdx.x] = s_block[0]reduce_better[blocks_per_grid, threads_per_block](dev_a, dev_partial_reduction)
s = dev_partial_reduction.copy_to_host().sum()  # Final reduction in CPUnp.isclose(s, s_cpu)---
True
timing_naive = np.empty(21)
for i in range(timing_naive.size):tic = perf_counter()reduce_better[blocks_per_grid, threads_per_block](dev_a, dev_partial_reduction)s = dev_partial_reduction.copy_to_host().sum()cuda.synchronize()toc = perf_counter()assert np.isclose(s, s_cpu)    timing_naive[i] = toc - tic
timing_naive *= 1e3  # convert to msprint(f"Elapsed time better: {timing_naive.mean():.0f} ± {timing_naive.std():.0f} ms")---
Elapsed time better: 23 ± 1 ms
在 Google Colab 上,这比简单方法快约 30%。
⚠️ 注意:你可能会想把
syncthreads移到if块内部,因为每一步之后,超过当前线程数一半的内核将不会被使用。但是,这样做会让调用syncthreads的 CUDA 线程停止并等待其他线程,而其他线程则会继续运行。因此,停止的线程将永远等待永远不会停止同步的线程。这给我们的启示是:如果要同步线程,请确保所有线程都调用了cuda.syncthreads()。
i = cuda.blockDim.x // 2
while (i > 0): if (tid < i): s_block[tid] += s_block[tid + i] cuda.syncthreads() # 不要放在这里cuda.syncthreads() # 而不是这里i //= 2
减少 Numba
由于上述缩减算法并不简单,Numba 提供了一个便捷cuda.reduce装饰器,可将二元函数转换为缩减算法。上面的长而复杂的算法可以用以下方法替代:
# Example 2.3: Numba reduction
@cuda.reduce
def reduce_numba(a, b):return a + b# Compile and check
s = reduce_numba(dev_a)np.isclose(s, s_cpu)---
True
# Time
timing_numba = np.empty(21)
for i in range(timing_numba.size):tic = perf_counter()s = reduce_numba(dev_a)toc = perf_counter()assert np.isclose(s, s_cpu)    timing_numba[i] = toc - tic
timing_numba *= 1e3  # convert to msprint(f"Elapsed time better: {timing_numba.mean():.0f} ± {timing_numba.std():.0f} ms")---
Elapsed time better: 20 ± 0 ms
就我个人而言,我发现手写缩减通常要快得多(至少快 2 倍),但 Numba 递归非常容易使用。话虽如此,我还是鼓励大家阅读 reduction code in the Numba source code.
还需要注意的是,默认情况下,reduction 会复制到主机,这会强制同步。为了避免这种情况,您可以使用设备数组作为输出来调用 Reduce:
dev_s = cuda.device_array((1,), dtype=s)reduce_numba(dev_a, res=dev_s)s = dev_s.copy_to_host()[0]
np.isclose(s, s_cpu)---
True
2D 缩减示例
并行缩减技术很棒,但如何将其扩展到更高维度并不明显。虽然我们总是可以使用解开的数组 ( array2d.ravel()) 来调用 Numba 缩减,但了解如何手动缩减多维数组非常重要。
在这个例子中,我们将结合所学的关于 2D 内核的知识和所学的关于 1D 缩减的知识来计算 2D 缩减。
threads_per_block_2d = (16, 16)  #  256 threads total
blocks_per_grid_2d = (64, 64)# Total number of threads in a 2D block (has to be an int)
shared_array_len = int(np.prod(threads_per_block_2d))# Example 2.4: 2D reduction with 1D shared array
@cuda.jit
def reduce2d(array2d, partial_reduction2d):ix, iy = cuda.grid(2)threads_per_grid_x, threads_per_grid_y = cuda.gridsize(2)s_thread = 0.0for i0 in range(iy, array2d.shape[0], threads_per_grid_x):for i1 in range(ix, array2d.shape[1], threads_per_grid_y):s_thread += array2d[i0, i1]# Allocate shared arrays_block = cuda.shared.array(shared_array_len, numba.float32)# Index the threads linearly: each tid identifies a unique thread in the# 2D grid.tid = cuda.threadIdx.x + cuda.blockDim.x * cuda.threadIdx.ys_block[tid] = s_threadcuda.syncthreads()# We can use the same smart reduction algorithm by remembering that#     shared_array_len == blockDim.x * cuda.blockDim.y# So we just need to start our indexing accordingly.i = (cuda.blockDim.x * cuda.blockDim.y) // 2while (i != 0):if (tid < i):s_block[tid] += s_block[tid + i]cuda.syncthreads()i //= 2# Store reduction in a 2D array the same size as the 2D blocksif tid == 0:partial_reduction2d[cuda.blockIdx.x, cuda.blockIdx.y] = s_block[0]N_2D = (20_000, 20_000)
a_2d = np.arange(np.prod(N_2D), dtype=np.float32).reshape(N_2D)
a_2d /= a_2d.sum() # a_2d will have sum = 1 (to float32 precision)s_2d_cpu = a_2d.sum()dev_a_2d = cuda.to_device(a_2d)
dev_partial_reduction_2d = cuda.device_array(blocks_per_grid_2d, dtype=a.dtype)reduce2d[blocks_per_grid_2d, threads_per_block_2d](dev_a_2d, dev_partial_reduction_2d)
s_2d = dev_partial_reduction_2d.copy_to_host().sum()  # Final reduction in CPUnp.isclose(s_2d, s_2d_cpu)  # Ensure we have the right number---
True
timing_2d = np.empty(21)
for i in range(timing_2d.size):tic = perf_counter()reduce2d[blocks_per_grid_2d, threads_per_block_2d](dev_a_2d, dev_partial_reduction_2d)s_2d = dev_partial_reduction_2d.copy_to_host().sum()cuda.synchronize()toc = perf_counter()assert np.isclose(s_2d, s_2d_cpu)    timing_2d[i] = toc - tic
timing_2d *= 1e3  # convert to msprint(f"Elapsed time better: {timing_2d.mean():.0f} ± {timing_2d.std():.0f} ms")---
Elapsed time better: 11 ± 0 ms
设备功能
到目前为止,我们只讨论了内核,它们是启动线程的特殊 GPU 函数。内核通常依赖于在 GPU 中定义的较小函数,这些函数只能访问 GPU 数组。这些被称为设备函数。与内核不同的是,它们可以返回值。
为了结束本部分教程,我们将展示一个跨不同内核使用设备函数的示例。该示例还将强调在使用共享数组时同步线程的重要性。
注意:在较新版本的 CUDA 中,内核可以启动其他内核。这称为动态并行,Numba CUDA 尚不支持。*
2D 共享数组示例
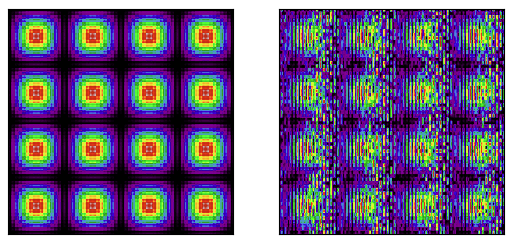
在此示例中,我们将在固定大小的数组中创建波纹图案。我们首先需要声明将使用的线程数,因为这是共享数组所需的。
threads_16 = 16import math@cuda.jit(device=True, inline=True)  # inlining can speed up execution
def amplitude(ix, iy):return (1 + math.sin(2 * math.pi * (ix - 64) / 256)) * (1 + math.sin(2 * math.pi * (iy - 64) / 256))# Example 2.5a: 2D Shared Array
@cuda.jit
def blobs_2d(array2d):ix, iy = cuda.grid(2)tix, tiy = cuda.threadIdx.x, cuda.threadIdx.yshared = cuda.shared.array((threads_16, threads_16), numba.float32)shared[tiy, tix] = amplitude(iy, ix)cuda.syncthreads()array2d[iy, ix] = shared[15 - tiy, 15 - tix]# Example 2.5b: 2D Shared Array without synchronize
@cuda.jit
def blobs_2d_wrong(array2d):ix, iy = cuda.grid(2)tix, tiy = cuda.threadIdx.x, cuda.threadIdx.yshared = cuda.shared.array((threads_16, threads_16), numba.float32)shared[tiy, tix] = amplitude(iy, ix)# When we don't sync threads, we may have not written to shared# yet, or even have overwritten it by the time we write to array2darray2d[iy, ix] = shared[15 - tiy, 15 - tix]N_img = 1024
blocks = (N_img // threads_16, N_img // threads_16)
threads = (threads_16, threads_16)dev_image = cuda.device_array((N_img, N_img), dtype=np.float32)
dev_image_wrong = cuda.device_array((N_img, N_img), dtype=np.float32)blobs_2d[blocks, threads](dev_image)
blobs_2d_wrong[blocks, threads](dev_image_wrong)image = dev_image.copy_to_host()
image_wrong = dev_image_wrong.copy_to_host()import matplotlib.pyplot as pltfig, (ax1, ax2) = plt.subplots(1, 2)
ax1.imshow(image.T, cmap="nipy_spectral")
ax2.imshow(image_wrong.T, cmap="nipy_spectral")
for ax in (ax1, ax2):ax.set_xticks([])ax.set_yticks([])ax.set_xticklabels([])ax.set_yticklabels([])
结论
在本教程中,您学习了如何开发需要缩减模式来处理一维和二维数组的内核。在此过程中,我们学习了如何利用共享数组和设备功能。
相关文章:
Numba 的 CUDA 示例 (2/4):穿针引线
本教程为 Numba CUDA 示例 第 2 部分。 按照本系列从头开始使用 Python 学习 CUDA 编程 介绍 在本系列的第一部分中,我们讨论了如何使用 GPU 运行高度并行算法。高度并行任务是指任务完全相互独立的任务,例如对两个数组求和或应用任何元素函数。 在本教…...

项目的各个阶段如何编写标准的Git commit消息
标准提交消息格式 一个标准的提交消息应包括三部分:标题(summary)、正文(description)和脚注(footer)。 1. 标题(Summary) 简洁明了,不超过50个字符。使用…...
Python课设-学生信息管理系统
一、效果展示图 二、前端代码 1、HTML代码 <1>index.html <!DOCTYPE html> <html lang"en"><head><meta charset"UTF-8"><meta name"viewport" content"widthdevice-width, initial-scale1.0">…...

openssl 常用命令demo
RSA Private Key的结构(ASN.1) RSAPrivateKey :: SEQUENCE { version Version, modulus INTEGER, -- n publicExponent INTEGER, -- e privateExponent INTEGER, -- d prime1 INTEGER, -- …...

【Linux】Linux基本指令2
目录 1.man指令(重要): 2.echo指令 3.cp指令(重要): 4.mv指令 5.cat指令/echo指令重定向 6.more指令 7.less指令(重要) 8.head指令 9.tail指令 我们接着上一篇:h…...

springboot+vue+mybatis博物馆售票系统+PPT+论文+讲解+售后
如今社会上各行各业,都喜欢用自己行业的专属软件工作,互联网发展到这个时候,人们已经发现离不开了互联网。新技术的产生,往往能解决一些老技术的弊端问题。因为传统博物馆售票系统信息管理难度大,容错率低,…...
java—MyBatis框架
简介 什么是 MyBatis? MyBatis 是一款优秀的持久层框架,它支持自定义 SQL、存储过程以及高级映射。MyBatis 免除了几乎所有的 JDBC 代码以及设置参数和获取结果集的工作。MyBatis 可以通过简单的 XML 或注解来配置和映射原始类型、接口和 Java POJO&…...

如何使用Spring Cache优化后端接口?
Spring Cache是Spring框架提供的一种缓存抽象,它可以很方便地集成到应用程序中,用于提高接口的性能和响应速度。使用Spring Cache可以避免重复执行耗时的方法,并且还可以提供一个统一的缓存管理机制,简化缓存的配置和管理。 本文将详细介绍如何使用Spring Cache来优化接口,…...

大话C语言:第21篇 数组
1 数组概述 数组是若干个相同类型的变量在内存中有序存储的集合。 数组是 C 语言中的一种数据结构,用于存储一组具有相同数据类型的数据。 数组在内存中会开辟一块连续的空间 数组中的每个元素可以通过一个索引(下标)来访问,索…...

transfomer中attention为什么要除以根号d_k
简介 得到矩阵 Q, K, V之后就可以计算出 Self-Attention 的输出了,计算的公式如下: A t t e n t i o n ( Q , K , V ) S o f t m a x ( Q K T d k ) V Attention(Q,K,V)Softmax(\frac{QK^T}{\sqrt{d_k}})V Attention(Q,K,V)Softmax(dk QKT)V 好处 除以维…...
iperf3带宽压测工具使用
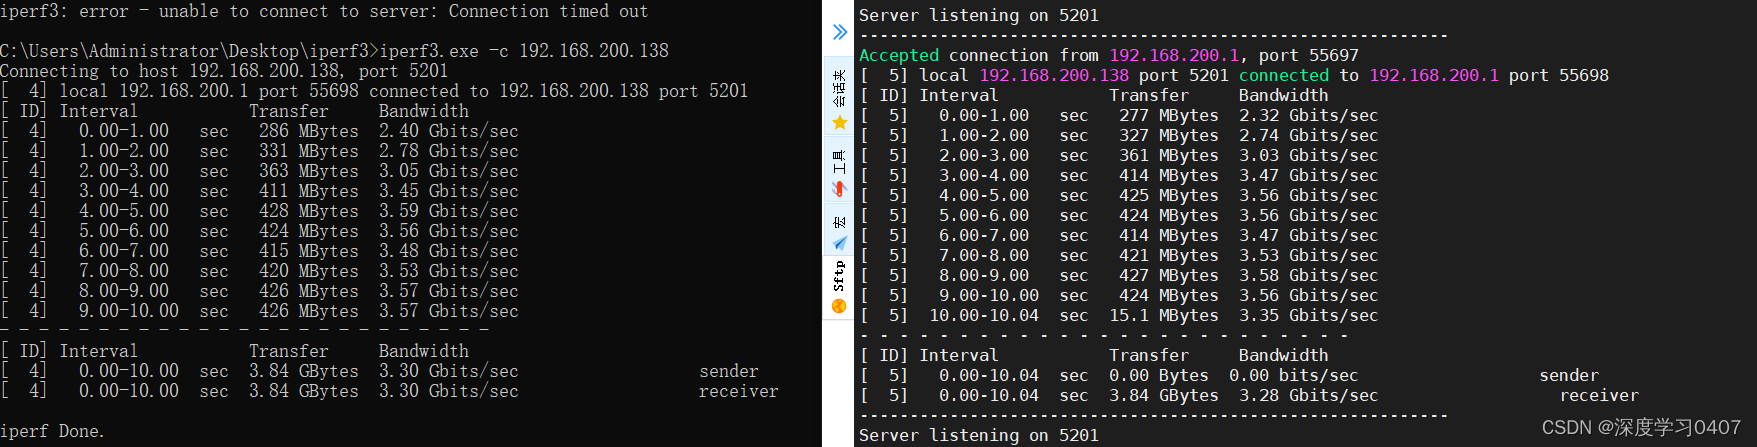
iperf3带宽压测工具使用 安装下载地址:[下载入口](https://iperf.fr/iperf-download.php)测试结果:时长测试(压测使用):并行测试反向测试UDP 带宽测试 iPerf3 是用于主动测试 IP 网络上最大可用带宽的工具 安装 下载地址&#x…...

[数据集][目标检测]焊接处缺陷检测数据集VOC+YOLO格式3400张8类别
数据集格式:Pascal VOC格式YOLO格式(不包含分割路径的txt文件,仅仅包含jpg图片以及对应的VOC格式xml文件和yolo格式txt文件) 图片数量(jpg文件个数):3400 标注数量(xml文件个数):3400 标注数量(txt文件个数):3400 标注…...
)
2024华为OD机试真题-剩余银饰的重量-C++(C卷D卷)
题目描述 有 N 块二手市场收集的银饰,每块银饰的重量都是正整数,收集到的银饰会被熔化用于打造新的饰品。 每一回合,从中选出三块 最重的 银饰,然后一起熔掉。假设银饰的重量分别为 x 、y 和 z, 且 x <= y <= z。那么熔掉的可能结果如下: 如果x == y == z,那么三…...

糖果促销【百度之星】/思维
糖果促销 思维 大佬的解法: #include<bits/stdc.h> using namespace std; typedef long long ll; int main() {ll t;cin>>t;for(int i0;i<t;i){ll p,k;cin>>p>>k;if(k0) cout<<0<<endl;else{k-(k-1)/p;cout<<k<…...
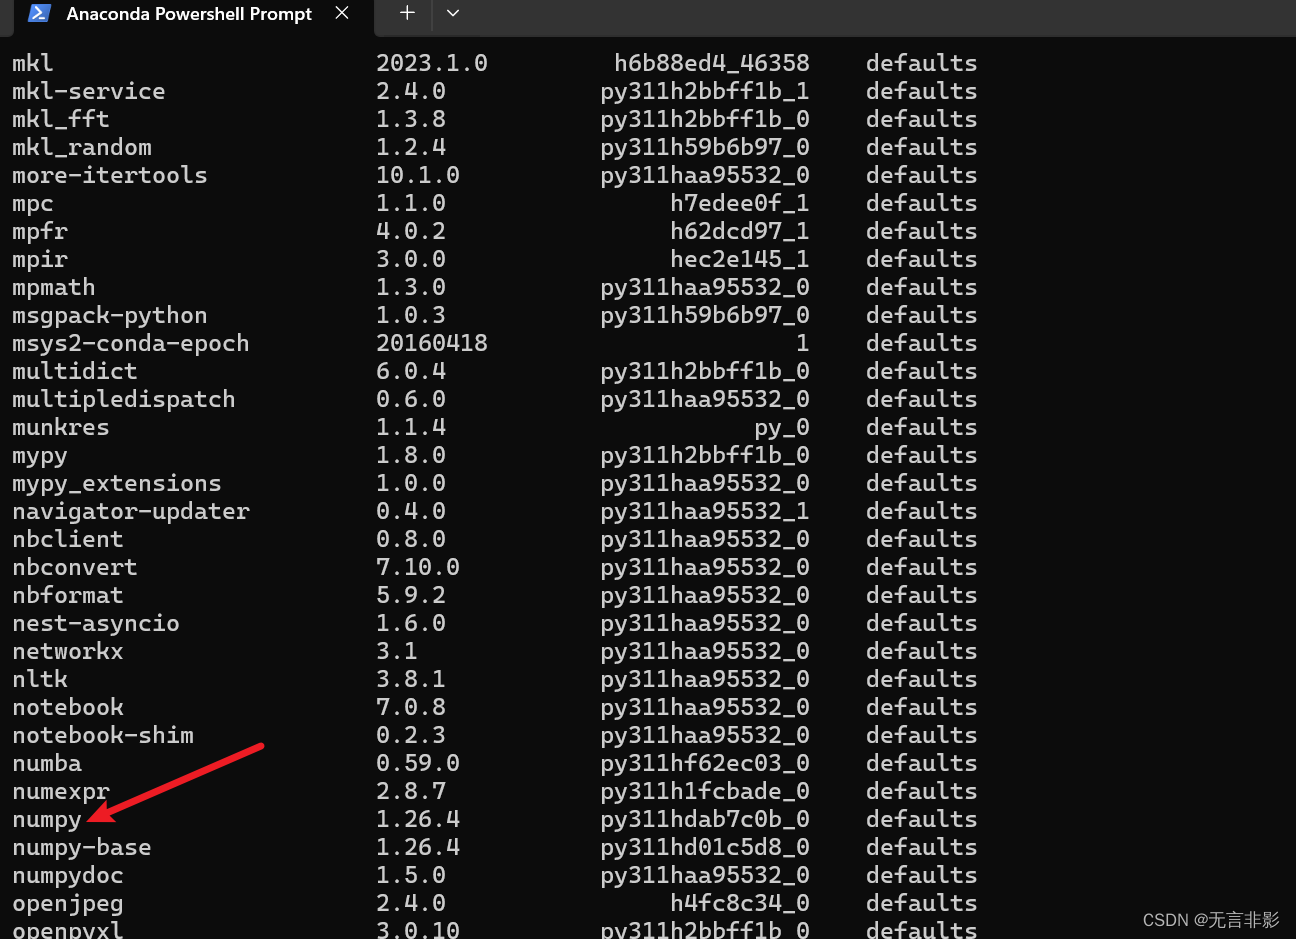
【python学习】安装Anaconda后,如何进行环境管理(命令行操作及图形化操作Anaconda Navigator)及包管理
命令行的方式 首先,打开 Anaconda Powershell Prompt 环境查看 使用以下命令查看当前所有环境: conda env list目前只有一个 base环境,就是安装 anaconda的时候选择的。 光标在闪烁,目前已经进入 base 环境模式: …...

HTML大雪纷飞
目录 写在前面 HTML简介 完整代码 代码分析 运行结果 系列文章 写在后面 写在前面 小编又又又出现啦!这次小编给大家带来大雪纷飞HTML版,不需要任何的环境,只要有一个浏览器,就可以随时随地下一场大雪哦! HTM…...

问界新M7 Ultra仅售28.98万元起,上市即交付
5月31日,问界新M7 Ultra正式上市。发布会上,鸿蒙智行旗下多款产品交出最新答卷——问界新M5上市1个月大定突破2万台;智界S7位列30万纯电轿车4月交付量NO.3;问界M9上市5个月大定突破9万台。其中,作为中国高端豪华SUV市场…...

【Java数据结构】详解LinkedList与链表(四)
🔒文章目录: 1.❤️❤️前言~🥳🎉🎉🎉 2.什么是LinkedList 3.LinkedList的使用 3.1LinkedList的构造方法 3.2LinkedList的其他常用方法介绍 addAll方法 subList方法 LinkedList的常用方法总使…...
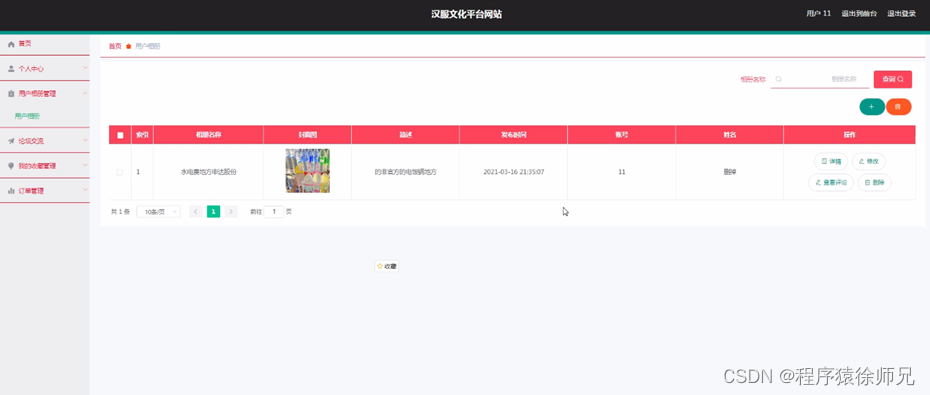
ssm汉服文化平台网站
博主介绍:✌程序员徐师兄、8年大厂程序员经历。全网粉丝15w、csdn博客专家、掘金/华为云/阿里云/InfoQ等平台优质作者、专注于Java技术领域和毕业项目实战✌ 🍅文末获取源码联系🍅 👇🏻 精彩专栏推荐订阅👇…...

如何让 LightRoom 每次导入照片后不自动弹出 SD 卡 LR
如何让 LightRoom 每次导入照片后不自动弹出 SD 卡 LR 在导入窗口左上角有个选项: 导入后弹出 把这个去掉就可以了...

HttpOnly Cookie 深度解析
一、什么是 HttpOnly Cookie HttpOnly 是一个可以附加在 Set-Cookie 响应头上的标志位(flag)。当一个 Cookie 被标记为 HttpOnly 后,客户端脚本(如 JavaScript)将无法通过 document.cookie 等 API 访问该 Cookie&…...

从《西部世界》到现实:AI智能体如何重塑游戏NPC与虚拟社会?
从《西部世界》到现实:AI智能体如何重塑游戏NPC与虚拟社会? 当《西部世界》中的NPC开始拥有记忆、情感和自主决策能力时,观众惊叹于科幻与现实的边界正在模糊。如今,大型语言模型(LLM)驱动的AI智能体正将这…...

FanControl终极指南:免费开源的风扇控制神器,轻松解决Windows散热与噪音问题
FanControl终极指南:免费开源的风扇控制神器,轻松解决Windows散热与噪音问题 【免费下载链接】FanControl.Releases This is the release repository for Fan Control, a highly customizable fan controlling software for Windows. 项目地址: https:…...

Google Labs Jules Awesome List:构建与维护高质量开发者资源清单指南
1. 项目概述:一份面向开发者的“Awesome List”清单在开源社区和开发者圈子里,有一个约定俗成的传统:当某个技术领域或工具生态变得足够庞大和复杂时,总会有热心的贡献者站出来,整理一份名为“Awesome List”的清单。这…...

使用mcp-maker快速构建AI工具集成服务器:从MCP协议到实践
1. 项目概述:一个为AI应用注入“超能力”的MCP服务器工厂 如果你最近在折腾AI应用开发,特别是想给ChatGPT、Claude这类大模型配上“手和脚”,让它们能操作你的本地文件、查询数据库,甚至控制你的智能家居,那你大概率已…...
搞定Linux视频编解码缓冲区)
别再为嵌入式设备大内存发愁了!手把手教你用CMA(连续内存分配器)搞定Linux视频编解码缓冲区
嵌入式多媒体开发中的连续内存优化实战:CMA技术深度解析 在嵌入式多媒体开发领域,视频编解码、图像处理等任务对内存管理提出了严苛要求。当你在树莓派上部署视频监控系统,或在工业摄像头中实现实时H.264编码时,是否经常遇到这样的…...

人性最残忍的真相是:你越不把自己当回事,别人就越不把你当回事
那个总给别人买贵东西的人,最后都怎么样了? 目录 那个总给别人买贵东西的人,最后都怎么样了? 我们为什么会忍不住过度付出? 真正的爱,从来都不是单方面的牺牲 爱自己,是所有健康关系的前提 昨天刷到一句话,瞬间戳中了我:“永远不要拿自己辛苦钱,去给别人买自己都舍不…...

Midjourney像素艺术提示词工程:98%新手忽略的4个隐藏权重指令,实测提升风格还原度320%
更多请点击: https://intelliparadigm.com 第一章:Midjourney像素艺术提示词工程的底层逻辑重构 像素艺术在 Midjourney 中并非天然适配的生成模态,其高精度、低分辨率、强风格约束的特性与扩散模型默认的连续性渲染范式存在根本张力。要实现…...

飞书自动化脚本开发指南:从API集成到智能审批机器人实战
1. 项目概述:飞书自动化,从“手动”到“自动”的效能革命 如果你每天的工作,有超过30%的时间是在飞书里重复点击、复制粘贴、手动发送消息和整理表格,那么“cicbyte/feishu-atuo”这个项目,很可能就是你一直在寻找的“…...

基于Nginx-Lua镜像构建高性能可编程网关的实践指南
1. 项目概述:一个为现代Web架构而生的Nginx镜像如果你和我一样,长期在容器化环境中部署和管理Web服务,那么你一定对Nginx的灵活性和Lua脚本的强大能力印象深刻。但将这两者结合,并打包成一个稳定、安全、功能齐全的Docker镜像&…...