Istio_1.17.8安装
项目背景
按照istio官网的命令一路安装下来,安装好的istio版本为目前的最新版本,1.22.0。而我的k8s集群的版本并不支持istio_1.22的版本,导致ingress-gate网关安装不上,再仔细查看istio的发布文档,如果用istio_1.22版本,k8s的版本至少也得是1.27。与其升级k8s,我还是换掉istio的版本。
# istioctl version
client version: 1.22.0
control plane version: 1.22.0
data plane version: none# kubectl version
Client Version: version.Info{Major:"1", Minor:"23", GitVersion:"v1.23.4", GitCommit:"e6c093d87ea4cbb530a7b2ae91e54c0842d8308a", GitTreeState:"clean", BuildDate:"2022-02-16T12:38:05Z", GoVersion:"go1.17.7", Compiler:"gc", Platform:"linux/amd64"}
Server Version: version.Info{Major:"1", Minor:"23", GitVersion:"v1.23.4", GitCommit:"e6c093d87ea4cbb530a7b2ae91e54c0842d8308a", GitTreeState:"clean", BuildDate:"2022-02-16T12:32:02Z", GoVersion:"go1.17.7", Compiler:"gc", Platform:"linux/amd64"}
1.安装istio_1.17.8
查看istio的支持版本,1.17.8是17版本最后一次更新,也正好适配我目前的k8s版本。
1.1下载地址
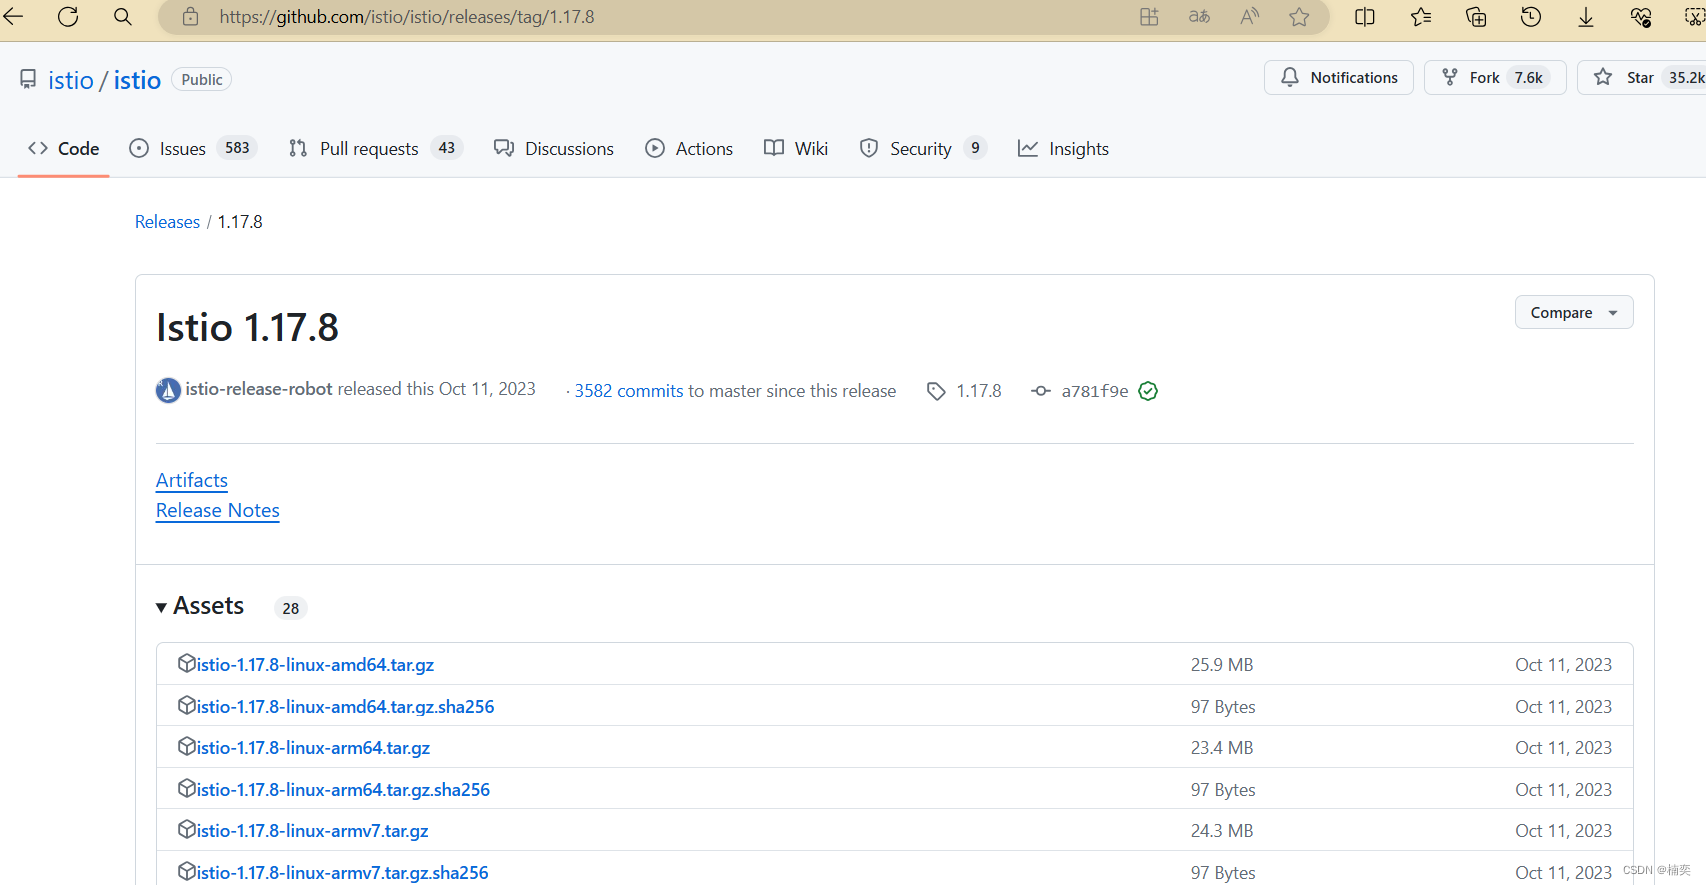
Release Istio 1.17.8 · istio/istio · GitHub
1.2上传并解压
# ll
-rw-r--r-- 1 root root 27127663 Jun  5 16:25 istio-1.17.8-linux-amd64.tar.gz
1.3 新增环境变量
# cat /etc/profile
...
export PATH=/usr/local/openssh-8.5p1/sbin:/usr/local/openssh-8.5p1/bin:$PATH
export KUBECONFIG=/etc/kubernetes/admin.conf
export PATH=/home/root/k8s/istio_test/install/istio-1.17.8/bin/:$PATH
#export PATH=/home/root/k8s/istio_test/install/istio-1.22.0/bin:$PATH
source /etc/profile
# istioctl version
client version: 1.17.8
control plane version: 1.22.0
data plane version: 0
1.4 install
# istioctl install --set profile=demo -y
WARNING: Istio control planes installed: 1.22.0.
WARNING: An older installed version of Istio has been detected. Running this command will overwrite it.
✔ Istio core installed
- Processing resources for Istiod. Waiting for Deployment/istio-system/istiod                                                                                    ^C
[foot@host-10-19-83-151 istio-1.17.8]$ istioctl install --set profile=demo -y -n bookinfo
WARNING: Istio control planes installed: 1.22.0.
WARNING: An older installed version of Istio has been detected. Running this command will overwrite it.
✔ Istio core installed
✔ Istiod installed
- Processing resources for Egress gateways, Ingress gateways. Waiting for Deployment/istio-system/istio-egressgateway, Deployment/istio-system/istio-ingressga...
✔ Egress gateways installed
✔ Ingress gateways installed
✔ Installation complete                                                                                                                                          Making this installation the default for injection and validation.Thank you for installing Istio 1.17.  Please take a few minutes to tell us about your install/upgrade experience!  https://forms.gle/hMHGiwZHPU7UQRWe9
查看pod情况
# kubectl get po -A
NAMESPACE              NAME                                         READY   STATUS    RESTARTS      AGE
ingress-nginx          nginx-deployment-64d5f7665c-56cpz            1/1     Running   0             22d
ingress-nginx          nginx-ingress-controller-7cfc988f46-cszsd    1/1     Running   0             22d
istio-system           istio-egressgateway-85df6b84b7-hjlbx         1/1     Running   0             92s
istio-system           istio-ingressgateway-6bb8fb6549-wcgqq        1/1     Running   0             92s
istio-system           istiod-8d74787f-bckft                        1/1     Running   0             2m37s
再次查看版本
# istioctl version
client version: 1.17.8
control plane version: 1.17.8
data plane version: 1.17.8 (2 proxies)
2.部署demo
2.1.1 准备
给这些示例服务创建一个命名空间。
kubectl create namespace bookinfo给命名空间添加 Istio 的标签,指示 Istio 在部署应用(只对 Pod 起效)的时候,自动注入 Envoy Sidecar Proxy 容器:
kubectl label namespace bookinfo istio-injection=enabled开启让 Istio 注入 Sidecar 有很多种方式,其中一种是给命名空间设置下标签,在此命名空间下部署的 Pod,会被自动注入 Sidecar 。
demo是官方提供的demo,bookinfo
文件位置:https://github.com/whuanle/istio_book/tree/main/3。
仓库拉取后打开 3 目录,执行命令进行部署:
# ll
total 68
-rw-rw-r-- 1 root root 598 Jun  5 15:14 details_deploy.yaml
-rw-rw-r-- 1 root root 108 Jun  5 15:14 details_sa.yaml
-rw-rw-r-- 1 root root 190 Jun  5 15:14 details_svc.yaml
-rw-rw-r-- 1 root root 278 Jun  5 15:14 ingress_gateway.yaml
-rw-rw-r-- 1 root root 754 Jun  5 15:14 productpage_deploy.yaml
-rw-rw-r-- 1 root root 116 Jun  5 15:14 productpage_sa.yaml
-rw-rw-r-- 1 root root 206 Jun  5 15:14 productpage_svc.yaml
-rw-rw-r-- 1 root root 227 Jun  5 15:14 productpage_tmpsvc.yaml
-rw-rw-r-- 1 root root 466 Jun  5 15:14 productpage_vs.yaml
-rw-rw-r-- 1 root root 598 Jun  5 15:14 ratings_deploy.yaml
-rw-rw-r-- 1 root root 108 Jun  5 15:14 ratings_sa.yaml
-rw-rw-r-- 1 root root 190 Jun  5 15:14 ratings_svc.yaml
-rw-rw-r-- 1 root root 108 Jun  5 15:14 reviews_sa.yaml
-rw-rw-r-- 1 root root 190 Jun  5 15:14 reviews_svc.yaml
-rw-rw-r-- 1 root root 913 Jun  5 15:14 reviews_v1_deploy.yaml
-rw-rw-r-- 1 root root 913 Jun  5 15:14 reviews_v2_deploy.yaml
-rw-rw-r-- 1 root root 913 Jun  5 15:14 reviews_v3_deploy.yaml
既然不能一次都执行了,那就一个一个yaml命令执行吧。
2.1.2 detail
Detail:存储了书籍信息的应用。
1.使用 Deployment 部署 details 应用。
2.为 details 服务配置 Kubernetes Service 。
3.为 details 服务创建一个 ServiceAccount。
$ kubectl apply -f *.yaml
error: Unexpected args: [details_sa.yaml details_svc.yaml ingress_gateway.yaml productpage_deploy.yaml productpage_sa.yaml productpage_svc.yaml productpage_tmpsvc.yaml productpage_vs.yaml ratings_deploy.yaml ratings_sa.yaml ratings_svc.yaml reviews_sa.yaml reviews_svc.yaml reviews_v1_deploy.yaml reviews_v2_deploy.yaml reviews_v3_deploy.yaml]
See 'kubectl apply -h' for help and examples# kubectl apply -f details_*.yaml
error: Unexpected args: [details_sa.yaml details_svc.yaml]
See 'kubectl apply -h' for help and examples# kubectl apply -f details_deploy.yaml -n bookinfo
deployment.apps/details-v1 created
# kubectl apply -f details_sa.yaml  -n bookinfo
serviceaccount/bookinfo-details created
# kubectl apply -f details_svc.yaml -n bookinfo
service/details created# kubectl get po  -n bookinfo
NAME                          READY   STATUS    RESTARTS   AGE
details-v1-698b5d8c98-bnd52   1/1     Running   0          2m27s
2.1.3 ratings
提供每条评论的打星数据。
# kubectl apply -f ratings_deploy.yaml -n bookinfo
deployment.apps/ratings-v1 created
# kubectl apply -f ratings_svc.yaml -n bookinfo
service/ratings created
#kubectl apply -f ratings_sa.yaml -n bookinfo
serviceaccount/bookinfo-ratings created# kubectl get po  -n bookinfo
NAME                          READY   STATUS    RESTARTS   AGE
details-v1-698b5d8c98-bnd52   1/1     Running   0          13m
ratings-v1-5967f59c58-st7xr   1/1     Running   0          4m48s
2.1.4 review
提供书籍的评论信息
# kubectl apply -f reviews_svc.yaml -n bookinfo
service/reviews created
# kubectl apply -f reviews_sa.yaml -n bookinfo
serviceaccount/bookinfo-reviews unchanged
# kubectl apply -f reviews_v1_deploy.yaml -n bookinfo
deployment.apps/reviews-v1 created
[foot@host-10-19-83-151 3]$ kubectl apply -f reviews_v2_deploy.yaml -n bookinfo
deployment.apps/reviews-v2 created
[foot@host-10-19-83-151 3]$ kubectl apply -f reviews_v3_deploy.yaml -n bookinfo
deployment.apps/reviews-v3 created# kubectl get po  -n bookinfo
NAME                          READY   STATUS    RESTARTS   AGE
details-v1-698b5d8c98-bnd52   1/1     Running   0          22m
ratings-v1-5967f59c58-st7xr   1/1     Running   0          13m
reviews-v1-9c6bb6658-dc5s9    1/1     Running   0          6m15s
reviews-v2-8454bb78d8-fghsh   1/1     Running   0          6m8s
reviews-v3-6dc9897554-zpdl2   1/1     Running   0          6m3s
2.1.5 productpage
页面
# kubectl apply -f productpage_deploy.yaml -n bookinfo
deployment.apps/productpage-v1 created
# kubectl apply -f productpage_svc.yaml -n bookinfo
service/productpage created
# kubectl apply -f productpage_sa.yaml  -n bookinfo
serviceaccount/bookinfo-productpage created# kubectl get po  -n bookinfo
NAME                             READY   STATUS    RESTARTS   AGE
details-v1-698b5d8c98-bnd52      1/1     Running   0          23m
productpage-v1-bf4b489d8-z9wxp   1/1     Running   0          46s
ratings-v1-5967f59c58-st7xr      1/1     Running   0          15m
reviews-v1-9c6bb6658-dc5s9       1/1     Running   0          7m56s
reviews-v2-8454bb78d8-fghsh      1/1     Running   0          7m49s
reviews-v3-6dc9897554-zpdl2      1/1     Running   0          7m44s
聚合服务,供用户浏览书籍信息。
2.1.6 检查
2.6.1 get all
# kubectl get all -n bookinfo
NAME                                 READY   STATUS    RESTARTS   AGE
pod/details-v1-698b5d8c98-bnd52      1/1     Running   0          25m
pod/productpage-v1-bf4b489d8-z9wxp   1/1     Running   0          2m4s
pod/ratings-v1-5967f59c58-st7xr      1/1     Running   0          16m
pod/reviews-v1-9c6bb6658-dc5s9       1/1     Running   0          9m14s
pod/reviews-v2-8454bb78d8-fghsh      1/1     Running   0          9m7s
pod/reviews-v3-6dc9897554-zpdl2      1/1     Running   0          9m2sNAME                  TYPE        CLUSTER-IP       EXTERNAL-IP   PORT(S)    AGE
service/details       ClusterIP   10.102.62.72     <none>        9080/TCP   24m
service/productpage   ClusterIP   10.96.210.213    <none>        9080/TCP   117s
service/ratings       ClusterIP   10.103.80.45     <none>        9080/TCP   16m
service/reviews       ClusterIP   10.102.163.207   <none>        9080/TCP   9m40sNAME                             READY   UP-TO-DATE   AVAILABLE   AGE
deployment.apps/details-v1       1/1     1            1           25m
deployment.apps/productpage-v1   1/1     1            1           2m5s
deployment.apps/ratings-v1       1/1     1            1           16m
deployment.apps/reviews-v1       1/1     1            1           9m14s
deployment.apps/reviews-v2       1/1     1            1           9m7s
deployment.apps/reviews-v3       1/1     1            1           9m2sNAME                                       DESIRED   CURRENT   READY   AGE
replicaset.apps/details-v1-698b5d8c98      1         1         1       25m
replicaset.apps/productpage-v1-bf4b489d8   1         1         1       2m5s
replicaset.apps/ratings-v1-5967f59c58      1         1         1       16m
replicaset.apps/reviews-v1-9c6bb6658       1         1         1       9m14s
replicaset.apps/reviews-v2-8454bb78d8      1         1         1       9m7s
replicaset.apps/reviews-v3-6dc9897554      1         1         1       9m2s
2.1.6.2 curl productpage
$ curl 10.96.210.213:9080
<!DOCTYPE html>
<html><head><title>Simple Bookstore App</title>
<meta charset="utf-8">
<meta http-equiv="X-UA-Compatible" content="IE=edge">
<meta name="viewport" content="width=device-width, initial-scale=1"><!-- Latest compiled and minified CSS -->
<link rel="stylesheet" href="static/bootstrap/css/bootstrap.min.css"><!-- Optional theme -->
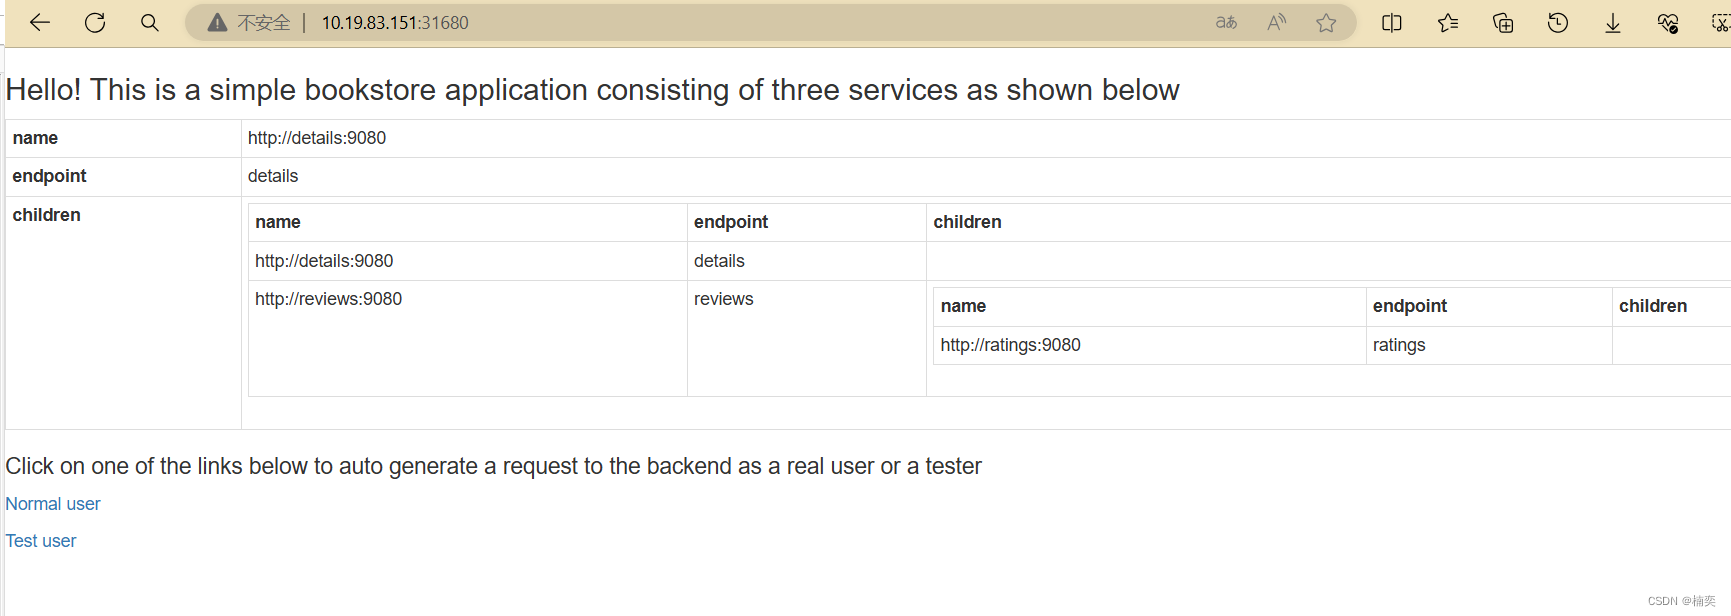
<link rel="stylesheet" href="static/bootstrap/css/bootstrap-theme.min.css"></head><body><p><h3>Hello! This is a simple bookstore application consisting of three services as shown below</h3>
</p><table class="table table-condensed table-bordered table-hover"><tr><th>name</th><td>http://details:9080</td></tr><tr><th>endpoint</th><td>details</td></tr><tr><th>children</th><td><table class="table table-condensed table-bordered table-hover"><tr><th>name</th><th>endpoint</th><th>children</th></tr><tr><td>http://details:9080</td><td>details</td><td></td></tr><tr><td>http://reviews:9080</td><td>reviews</td><td><table class="table table-condensed table-bordered table-hover"><tr><th>name</th><th>endpoint</th><th>children</th></tr><tr><td>http://ratings:9080</td><td>ratings</td><td></td></tr></table></td></tr></table></td></tr></table><p><h4>Click on one of the links below to auto generate a request to the backend as a real user or a tester</h4>
</p>
<p><a href="/productpage?u=normal">Normal user</a></p>
<p><a href="/productpage?u=test">Test user</a></p><!-- Latest compiled and minified JavaScript -->
<script src="static/jquery.min.js"></script><!-- Latest compiled and minified JavaScript -->
<script src="static/bootstrap/js/bootstrap.min.js"></script></body>
</html>有这一串xml文件,就是部署成功了。放到浏览器中访问,无法访问。
2.1.7 临时访问
将ingress-gageway.yaml复制一份
# kubectl apply -f productpage_tmpsvc.yaml -n bookinfo
service/productpagetmp created
# kubectl get svc -n book
No resources found in book namespace.
# kubectl get svc -n bookinfo
NAME             TYPE        CLUSTER-IP       EXTERNAL-IP   PORT(S)          AGE
details          ClusterIP   10.102.62.72     <none>        9080/TCP         30m
productpage      ClusterIP   10.96.210.213    <none>        9080/TCP         7m14s
productpagetmp   NodePort    10.111.122.78    <none>        9080:31680/TCP   17s
ratings          ClusterIP   10.103.80.45     <none>        9080/TCP         21m
reviews          ClusterIP   10.102.163.207   <none>        9080/TCP         14m
页面中输入 虚拟机ip:31680
带上上下文访问
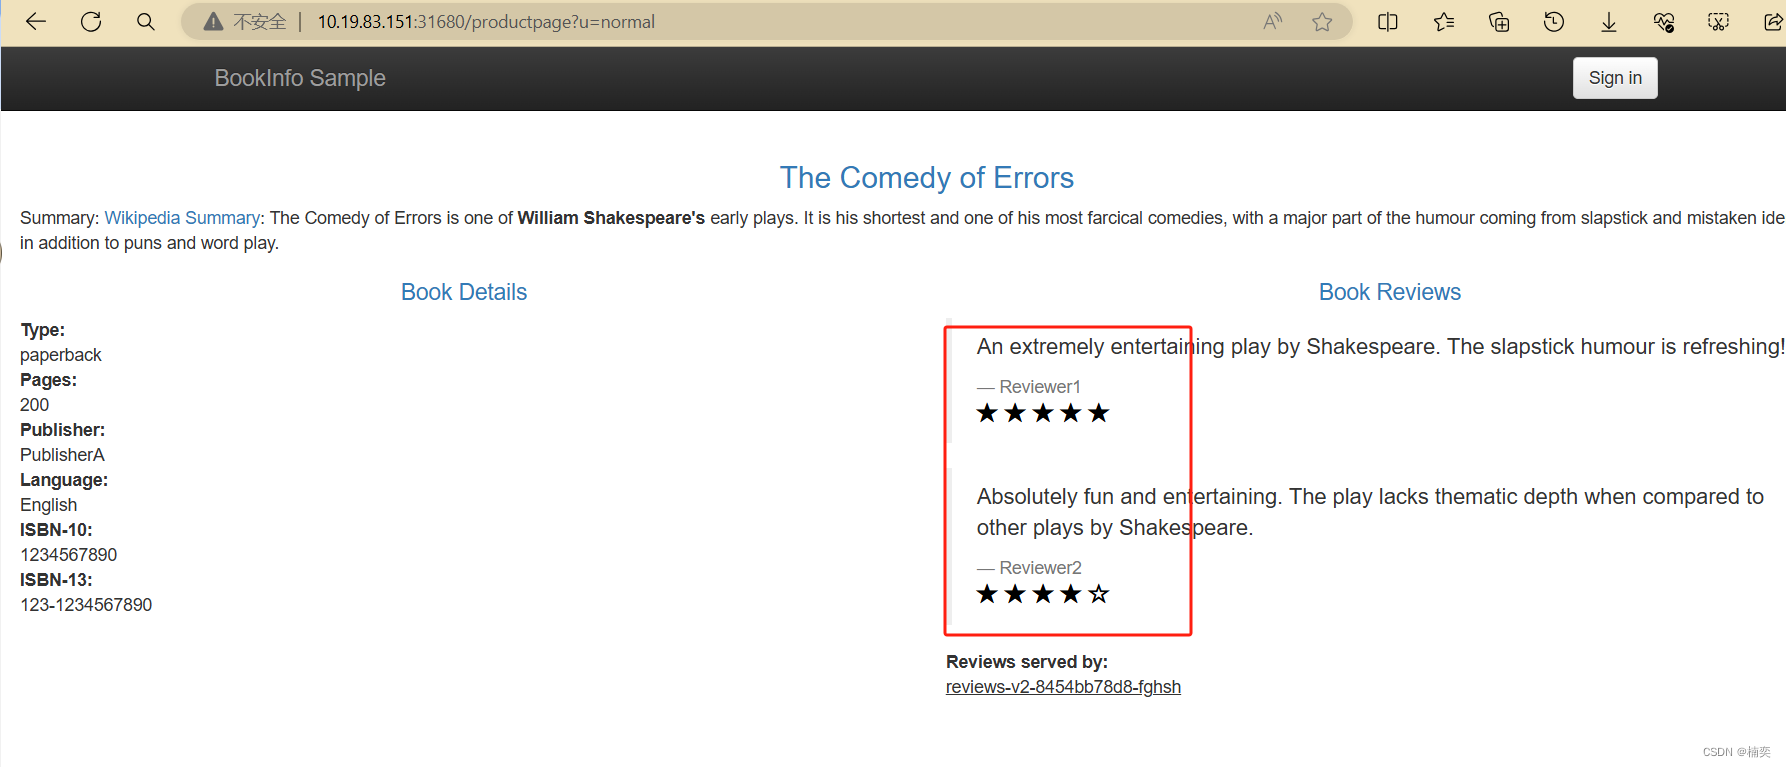
一直刷新就行,会轮寻review的三个版本的pod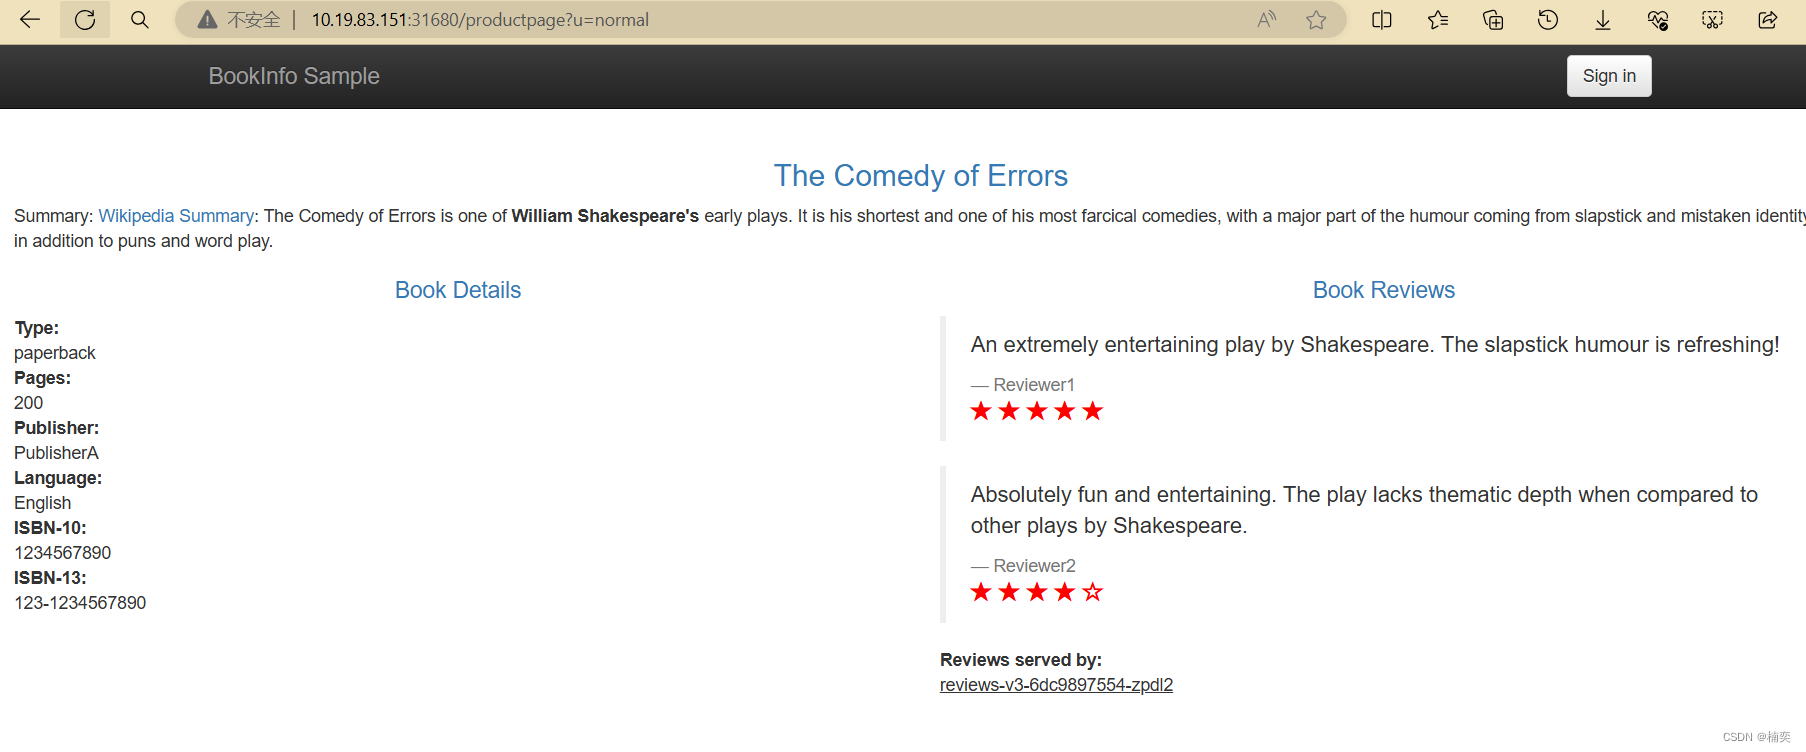
2.1.8 配置gateway
hosts表示对外开放的访问路径,你可以绑定域名、IP 等。这里使用
*,表示所有访问都可以进入此网关。
# kubectl apply -f ingress_gateway.yaml  -n bookinfo
gateway.networking.istio.io/bookinfo-gateway created
模型来到这会
2.1.9 部署VistualService
虽然创建了 Istio Gateway,但是我们还不能直接通过网关访问到前面部署的微服务,我们还需要创建 Istio VirtualService 将 Istio Gateway 跟对应的 Kubernetes Service 绑定起来,然后流量才能正式流向 Pod。

流量实际并不会经过 Service 中,但是 VirtualService 需要通过 Service 来发现 Pod
# kubectl apply -f productpage_vs.yaml
virtualservice.networking.istio.io/bookinfo created
2.1.10 检查,验证是否部署成功
有返回,则bookinfo应用正常
# kubectl exec "$(kubectl get pod -l app=ratings -n bookinfo -o jsonpath='{.items[0].metadata.name}')" -n bookinfo -c ratings -- curl -S productpage:9080/productpage | grep -o "<title>.*</title>"% Total    % Received % Xferd  Average Speed   Time    Time     Time  CurrentDload  Upload   Total   Spent    Left  Speed
100  5294  100  5294    0     0   4086      0  0:00:01  0:00:01 --:--:--  4088
<title>Simple Bookstore App</title>
3.对外开放应用程序
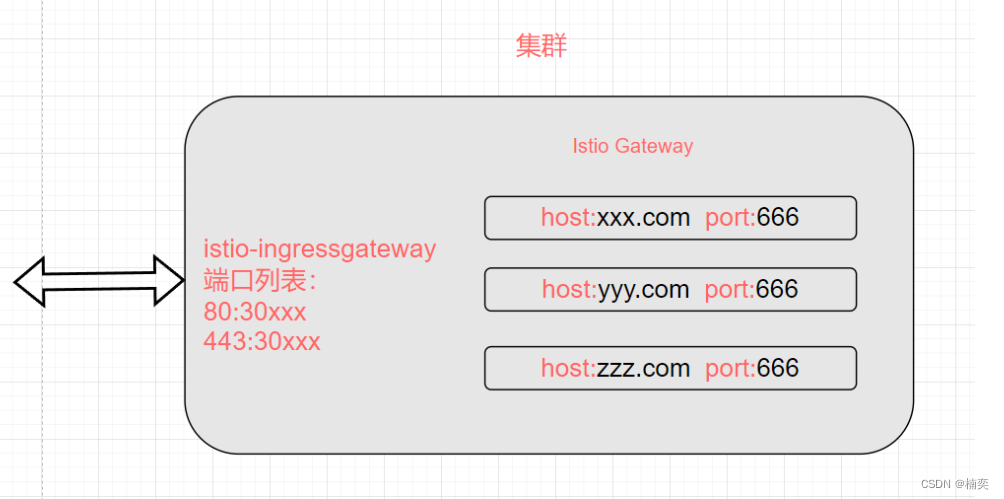
3.1 创建istio入站ingress Gateway
不设置namespace时,ingressGageway将运行在默认default命名空间中。添加方式如下,新增namespace属性。
cat bookinfo-gateway.yaml
apiVersion: networking.istio.io/v1alpha3
kind: Gateway
metadata:name: bookinfo-gatewaynamespace: bookinfo
spec:selector:istio: ingressgateway # use istio default controllerservers:- port:number: 80name: httpprotocol: HTTPhosts:- "*"
---
apiVersion: networking.istio.io/v1alpha3
kind: VirtualService
metadata:name: bookinfonamespace: bookinfo
spec:hosts:- "*"gateways:- bookinfo-gatewayhttp:- match:- uri:exact: /productpage- uri:prefix: /static- uri:exact: /login- uri:exact: /logout- uri:prefix: /api/v1/productsroute:- destination:host: productpageport:number: 9080
3.2 运行安装ingress Gateway
# kubectl apply -f bookinfo-gateway.yaml
gateway.networking.istio.io/bookinfo-gateway created
virtualservice.networking.istio.io/bookinfo created# istioctl analyze
Info [IST0102] (Namespace default) The namespace is not enabled for Istio injection. Run 'kubectl label namespace default istio-injection=enabled' to enable it, or 'kubectl label namespace default istio-injection=disabled' to explicitly mark it as not needing injection.# kubectl label namespace default istio-injection=disabled
namespace/default labeled# kubectl apply -f bookinfo-gateway.yaml
gateway.networking.istio.io/bookinfo-gateway unchanged
virtualservice.networking.istio.io/bookinfo unchanged# istioctl analyze✔ No validation issues found when analyzing namespace: default.
3.3 确定入站IP
# kubectl get svc  istio-ingressgateway -n istio-system
NAME                   TYPE           CLUSTER-IP      EXTERNAL-IP   PORT(S)                                                                      AGE
istio-ingressgateway   LoadBalancer   10.104.41.124   <pending>     15021:32515/TCP,80:31183/TCP,443:32582/TCP,31400:30302/TCP,15443:32277/TCP   41h
[foot@host-10-19-83-151 networking]$
设置
EXTERNAL-IP的值之后, 您的环境就有了一个外部的负载均衡器,可以将其用作入站网关。 但如果EXTERNAL-IP的值为<none>(或者一直是<pending>状态), 则您的环境则没有提供可作为入站流量网关的外部负载均衡器。 在这个情况下,您还可以用服务(Service)的节点端口访问网关。如何配置自己的外部负载均衡器,参考
https://www.cnblogs.com/yinzhengjie/p/17811466.html![]() https://www.cnblogs.com/yinzhengjie/p/17811466.html环境中,没有找到外部负载均衡器,就选择一个节点来代替
https://www.cnblogs.com/yinzhengjie/p/17811466.html环境中,没有找到外部负载均衡器,就选择一个节点来代替
# export INGRESS_PORT=$(kubectl -n istio-system get service istio-ingressgateway -o jsonpath='{.spec.ports[?(@.name=="http2")].nodePort}')
# echo $INGRESS_PORT
31183# export SECURE_INGRESS_PORT=$(kubectl -n istio-system get service istio-ingressgateway -o jsonpath='{.spec.ports[?(@.name=="https")].nodePort}')
# echo $SECURE_INGRESS_PORT
32582# export INGRESS_HOST=$(kubectl get po -l istio=ingressgateway -n istio-system -o jsonpath='{.items[0].status.hostIP}')# echo $INGRESS_HOST
xx.xx.xx.xx# export GATEWAY_URL=$INGRESS_HOST:$INGRESS_PORT
# echo $GATEWAY_URL
xx.xx.xx.xx:31183
3.4 外部验证
 4 查看仪表盘
Istio 和几个遥测应用做了集成。 遥测能帮您了解服务网格的结构、展示网络的拓扑结构、分析网格的健康状态
4.1 Kiali及其插件
4.1.1 安装Kiali
# kubectl apply -f addons/
serviceaccount/grafana created
configmap/grafana created
service/grafana created
deployment.apps/grafana created
configmap/istio-grafana-dashboards created
configmap/istio-services-grafana-dashboards created
deployment.apps/jaeger created
service/tracing created
service/zipkin created
service/jaeger-collector created
serviceaccount/kiali created
configmap/kiali created
clusterrole.rbac.authorization.k8s.io/kiali-viewer created
clusterrole.rbac.authorization.k8s.io/kiali created
clusterrolebinding.rbac.authorization.k8s.io/kiali created
role.rbac.authorization.k8s.io/kiali-controlplane created
rolebinding.rbac.authorization.k8s.io/kiali-controlplane created
service/kiali created
deployment.apps/kiali created
serviceaccount/prometheus created
configmap/prometheus created
clusterrole.rbac.authorization.k8s.io/prometheus created
clusterrolebinding.rbac.authorization.k8s.io/prometheus created
service/prometheus created
deployment.apps/prometheus created
使用
kubectl rollout status命令可以检查部署的滚动更新进度,直到部署完成或超时。如果部署正在进行滚动更新,该命令将会显示更新的进度情况,直到更新完成或超时。如果部署已经完成更新,命令将会输出 "deployment "kiali" successfully rolled out"。
请注意,这个命令只适用于使用 Deployment 进行部署管理的场景。如果你在其它类型的控制器上进行了部署(例如 StatefulSet),则需要使用相应的命令来检查滚动更新状态。
# kubectl rollout status deployment/kiali -n istio-system
deployment "kiali" successfully rolled out
4.1.2 修改kiali配置NodePort
# kubectl get svc -n istio-system
NAME                   TYPE           CLUSTER-IP       EXTERNAL-IP   PORT(S)                                                                      AGE
grafana                ClusterIP      10.102.208.36    <none>        3000/TCP                                                                     179m
istio-egressgateway    ClusterIP      10.100.225.194   <none>        80/TCP,443/TCP                                                               2d
istio-ingressgateway   LoadBalancer   10.104.41.124    <pending>     15021:32515/TCP,80:31183/TCP,443:32582/TCP,31400:30302/TCP,15443:32277/TCP   2d
istiod                 ClusterIP      10.104.226.207   <none>        15010/TCP,15012/TCP,443/TCP,15014/TCP                                        3d7h
jaeger-collector       ClusterIP      10.96.191.105    <none>        14268/TCP,14250/TCP,9411/TCP                                                 179m
kiali                  ClusterIP      10.98.246.20     <none>        20001/TCP,9090/TCP                                                           179m
prometheus             ClusterIP      10.110.173.109   <none>        9090/TCP                                                                     179m
tracing                ClusterIP      10.106.222.123   <none>        80/TCP,16685/TCP                                                             179m
zipkin                 ClusterIP      10.101.205.116   <none>        9411/TCP                                                                     179m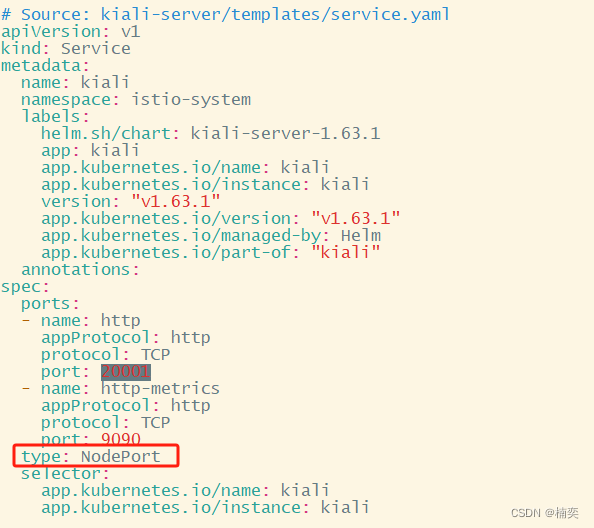
4.1.3 kubectl apply -f kiali.yaml
# kubectl apply -f kiali.yaml
serviceaccount/kiali unchanged
configmap/kiali unchanged
clusterrole.rbac.authorization.k8s.io/kiali-viewer unchanged
clusterrole.rbac.authorization.k8s.io/kiali unchanged
clusterrolebinding.rbac.authorization.k8s.io/kiali unchanged
role.rbac.authorization.k8s.io/kiali-controlplane unchanged
rolebinding.rbac.authorization.k8s.io/kiali-controlplane unchanged
service/kiali configured
deployment.apps/kiali unchanged# kubectl get svc -n istio-system
NAME TYPE CLUSTER-IP EXTERNAL-IP PORT(S) AGE
grafana ClusterIP 10.102.208.36 <none> 3000/TCP 3h2m
istio-egressgateway ClusterIP 10.100.225.194 <none> 80/TCP,443/TCP 2d
istio-ingressgateway LoadBalancer 10.104.41.124 <pending> 15021:32515/TCP,80:31183/TCP,443:32582/TCP,31400:30302/TCP,15443:32277/TCP 2d
istiod ClusterIP 10.104.226.207 <none> 15010/TCP,15012/TCP,443/TCP,15014/TCP 3d7h
jaeger-collector ClusterIP 10.96.191.105 <none> 14268/TCP,14250/TCP,9411/TCP 3h2m
kiali NodePort 10.98.246.20 <none> 20001:30853/TCP,9090:32008/TCP 3h2m
prometheus ClusterIP 10.110.173.109 <none> 9090/TCP 3h2m
tracing ClusterIP 10.106.222.123 <none> 80/TCP,16685/TCP 3h2m
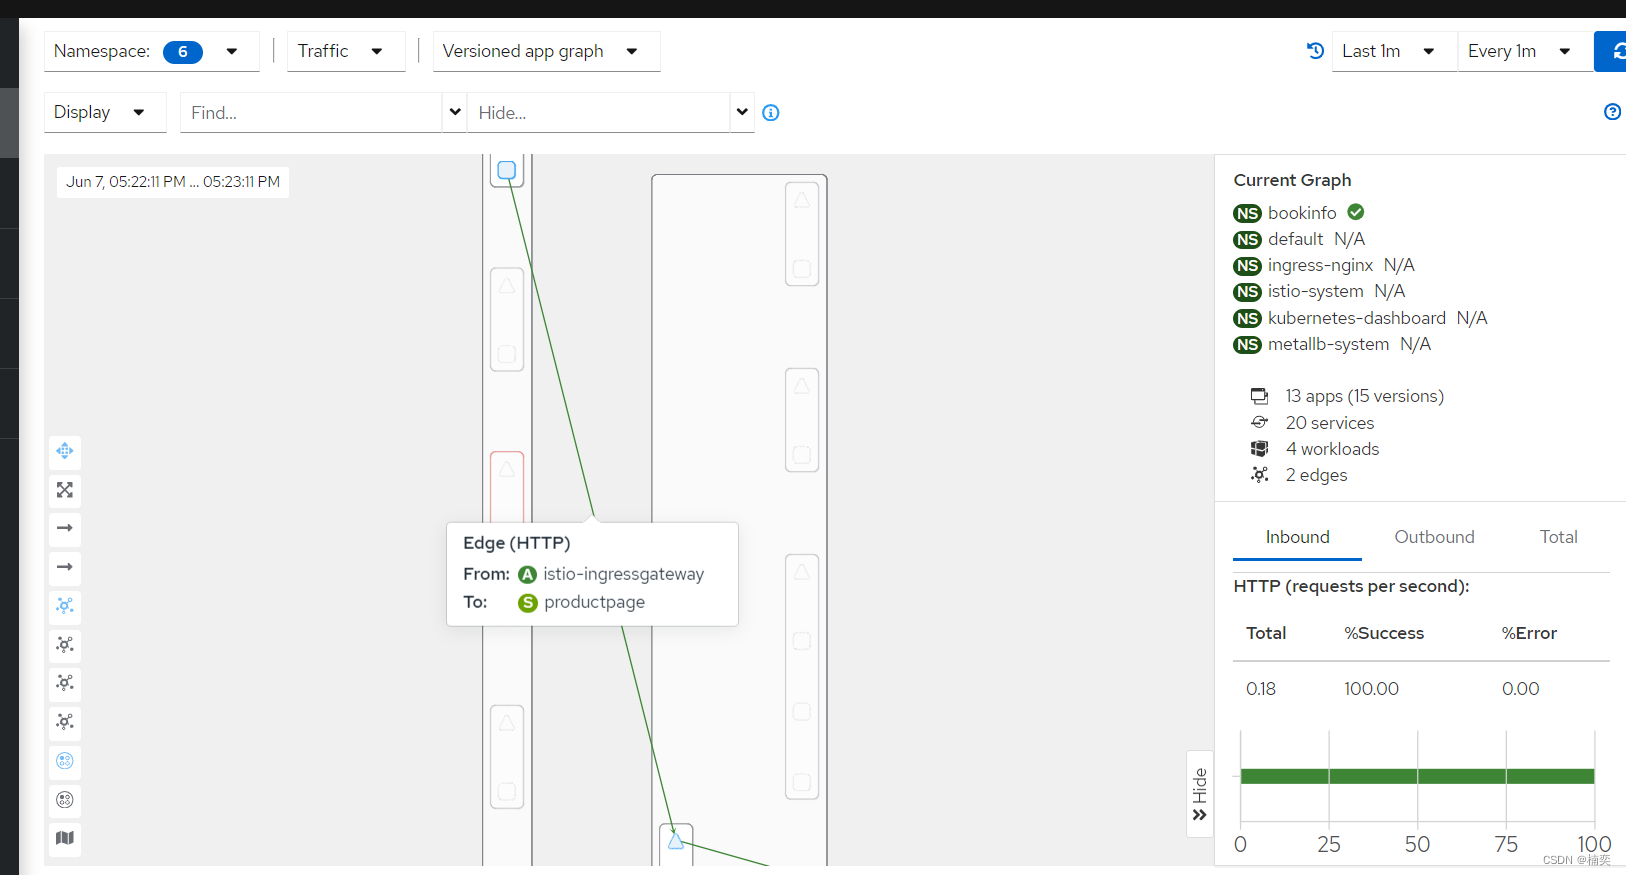
zipkin ClusterIP 10.101.205.116 <none> 9411/TCP 4.1.4 访问kiali页面
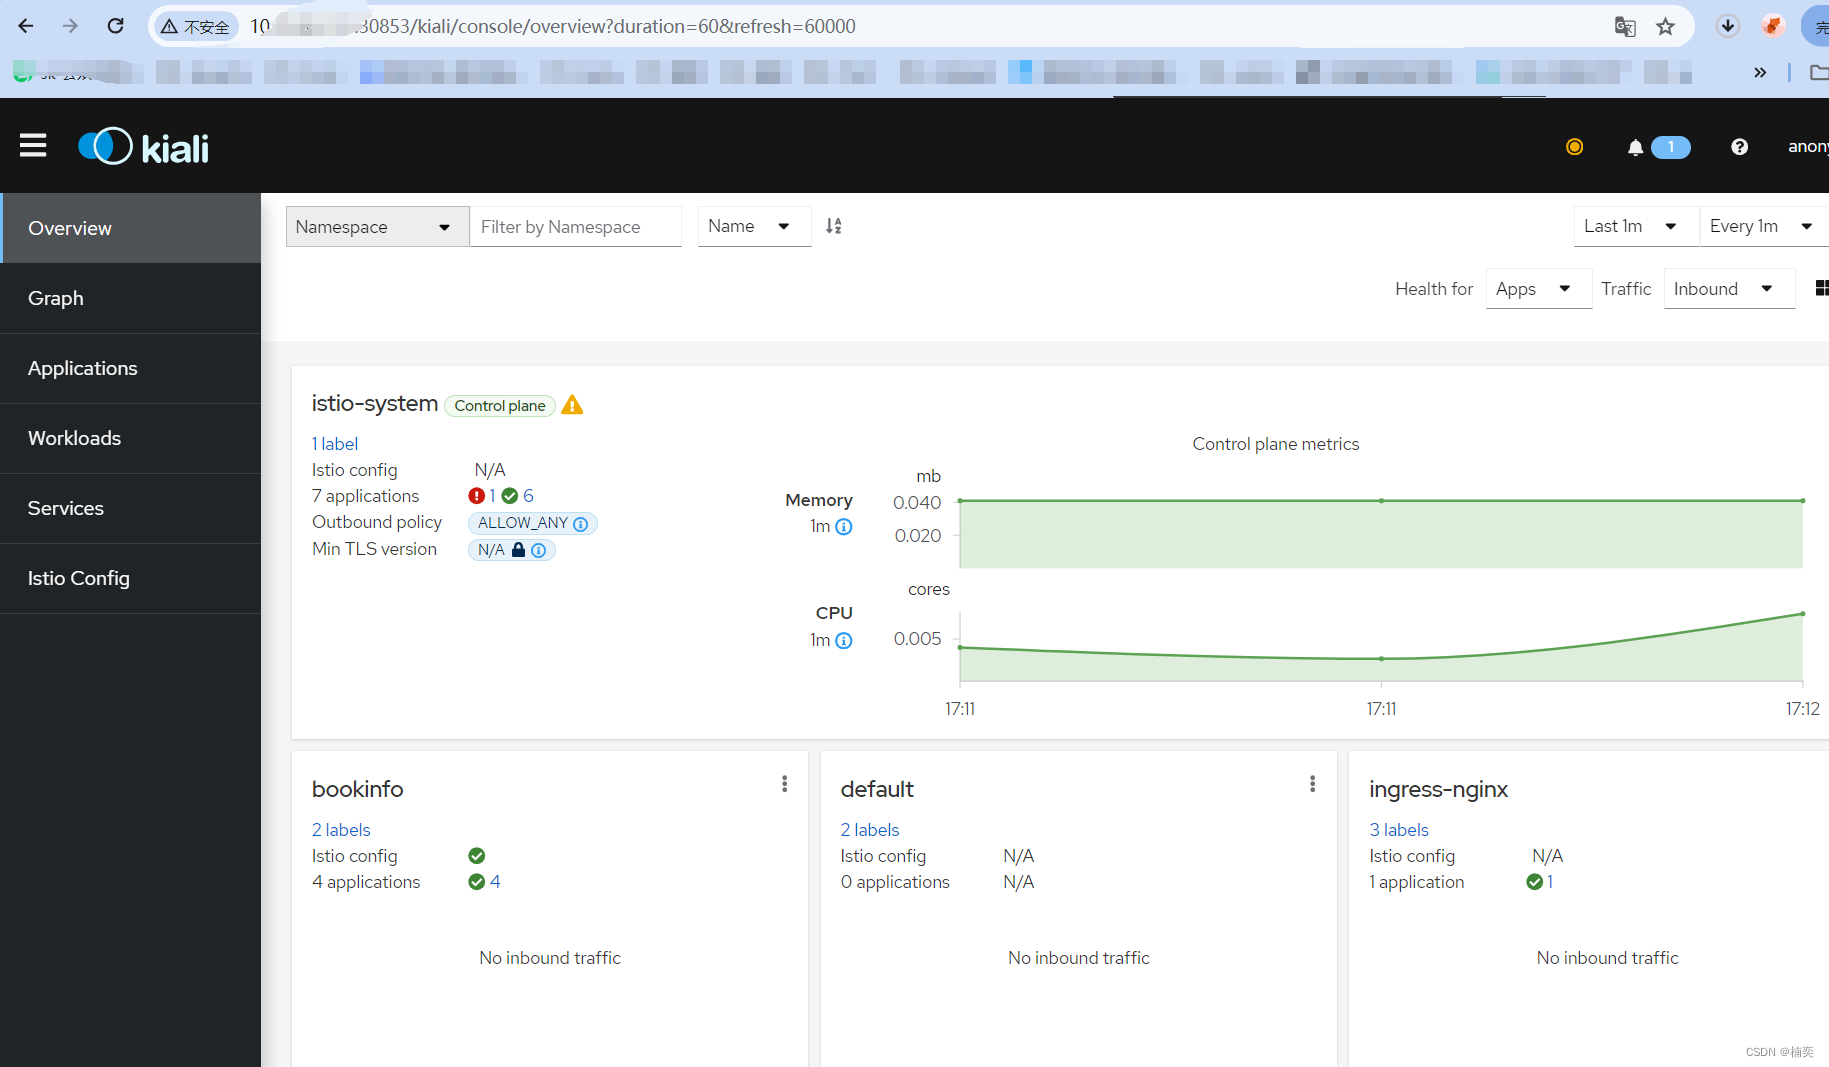
4.1.5 造数据
要查看追踪数据,必须向服务发送请求。请求的数量取决于 Istio 的采样率。 采样率在安装 Istio 时设置,默认采样速率为 1%。在第一个跟踪可见之前,您需要发送至少 100 个请求。 使用以下命令向
productpage服务发送 100 个请求:for i in `seq 1 100`; do curl -s -o /dev/null http://$GATEWAY_URL/productpage; done
for i in `seq 1 100`; do curl -s -o /dev/null http://10.19.83.151:31183/productpage; done4.1.6 访问kiali页面
5.卸载
删除 Bookinfo 示例应用和配置, 参阅清理 Bookinfo。
Istio 卸载程序按照层次结构逐级的从 istio-system 命令空间中删除 RBAC 权限和所有资源。对于不存在的资源报错,可以安全的忽略掉,毕竟它们已经被分层地删除了。
$ kubectl delete -f samples/addons $ istioctl uninstall -y --purge
命名空间 istio-system 默认情况下并不会被移除。 不需要的时候,使用下面命令移除它:
$ kubectl delete namespace istio-system
指示 Istio 自动注入 Envoy 边车代理的标签默认也不移除。 不需要的时候,使用下面命令移除它。
$ kubectl label namespace default istio-injection-
相关文章:
Istio_1.17.8安装
项目背景 按照istio官网的命令一路安装下来,安装好的istio版本为目前的最新版本,1.22.0。而我的k8s集群的版本并不支持istio_1.22的版本,导致ingress-gate网关安装不上,再仔细查看istio的发布文档,如果用istio_1.22版本…...

[数据集][目标检测]室内积水检测数据集VOC+YOLO格式761张1类别
数据集格式:Pascal VOC格式YOLO格式(不包含分割路径的txt文件,仅仅包含jpg图片以及对应的VOC格式xml文件和yolo格式txt文件) 图片数量(jpg文件个数):761 标注数量(xml文件个数):761 标注数量(txt文件个数):761 标注类别…...
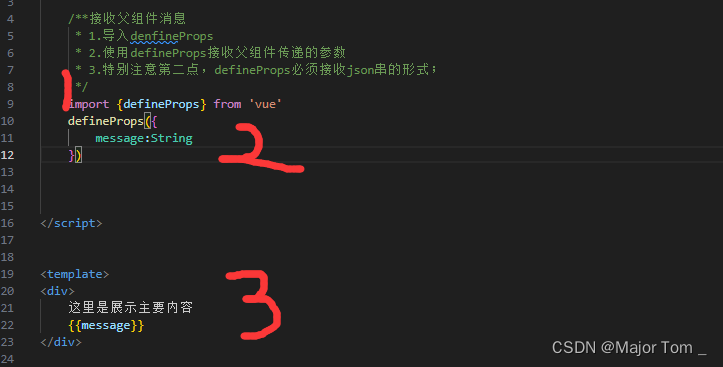
17_Vue高级监听器生命周期Vue组件组件通信
文章目录 1. 数据监听器watch2. Vue生命周期3. Vue组件4. Vue组件通信Appendix 1. 数据监听器watch 首先watch需要单独引 import {watch} from vuewatch函数监听ref响应式数据 watch(监听的内容,监听行为)监听行为默认为(newValue,oldValue) let firstname ref…...
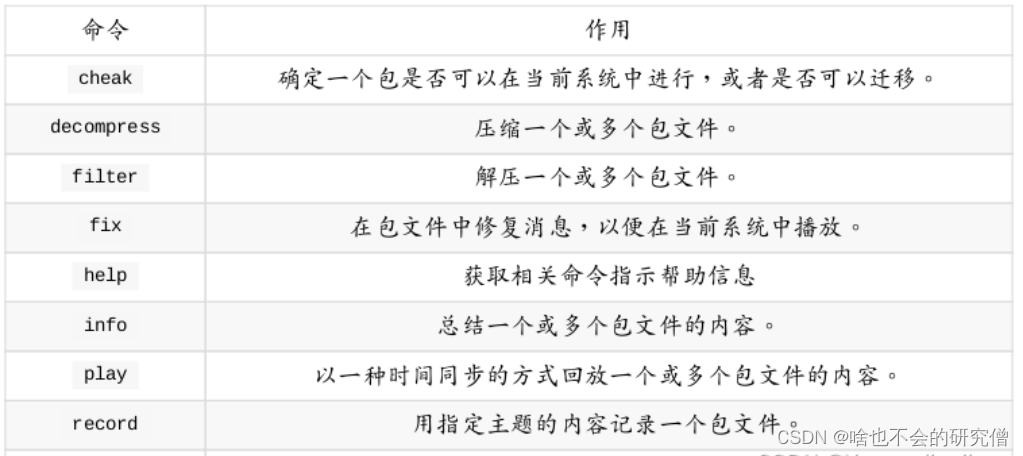
【ROS使用记录】—— ros使用过程中的rosbag录制播放和ros话题信息相关的指令与操作记录
提示:文章写完后,目录可以自动生成,如何生成可参考右边的帮助文档 文章目录 前言一、rosbag的介绍二、rosbag的在线和离线录制三、rosbag的播放相关的指令四、其他rosbag和ros话题相关的指令总结 前言 rosbag是ROS(机器人操作系统…...

Laravel 富文本内容
Laravel 获取富文本的纯文本内容-CSDN博客 Laravel 富文本内容里面的图片添加前缀URL-CSDN博客 Laravel 富文本图片的style样式删除-CSDN博客. Laravel 获取富文本中的所有图片-CSDN博客 富文本字体font-famly删除 $data preg_replace(/(<[^>])style["\][^"…...

Spark Python环境搭建与优化:深入剖析四个方面、五个方面、六个方面及七个关键要点
Spark Python环境搭建与优化:深入剖析四个方面、五个方面、六个方面及七个关键要点 在大数据处理领域,Apache Spark凭借其出色的性能和灵活性备受瞩目。而要在Python中利用Spark的强大功能,首先需要搭建一个稳定且高效的Spark Python环境。本…...
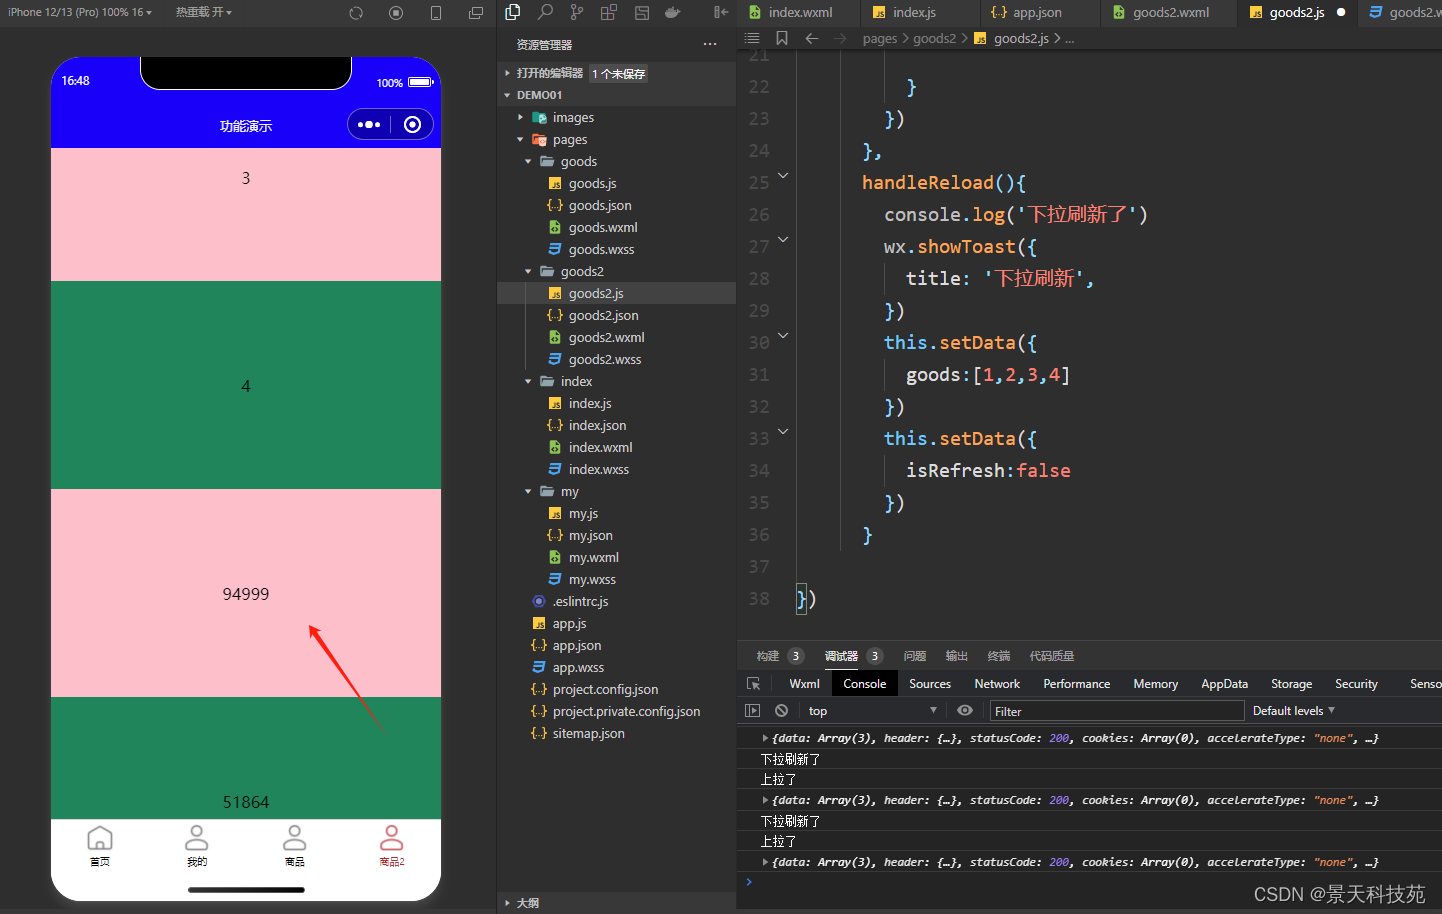
【微信小程序开发】小程序中的上滑加载更多,下拉刷新是如何实现的?
✨✨ 欢迎大家来到景天科技苑✨✨ 🎈🎈 养成好习惯,先赞后看哦~🎈🎈 🏆 作者简介:景天科技苑 🏆《头衔》:大厂架构师,华为云开发者社区专家博主,…...

从 Android 恢复已删除的备份录
本文介绍了几种在 Android 上恢复丢失和删除的短信的方法。这些方法都不能保证一定成功,但您可能能够恢复一些短信或其中存储的文件。 首先要尝试什么 首先,尝试保留数据。如果你刚刚删除了信息,请立即将手机置于飞行模式,方法是…...

如何使用Python中的random模块生成随机数
在Python中,random模块提供了多种用于生成随机数的函数。以下是一些基本示例: 生成随机整数: 使用random.randint(a, b)函数生成一个介于a和b之间的随机整数(包括a和b)。 python复制代码 import random random_int …...
AI大数据处理与分析实战--体育问卷分析
AI大数据处理与分析实战–体育问卷分析 前言:前一段时间接了一个需求,使用AI进行数据分析与处理,遂整理了一下大致过程和大致简要结果(更详细就不方便放了)。 文章目录 AI大数据处理与分析实战--体育问卷分析一、数据…...
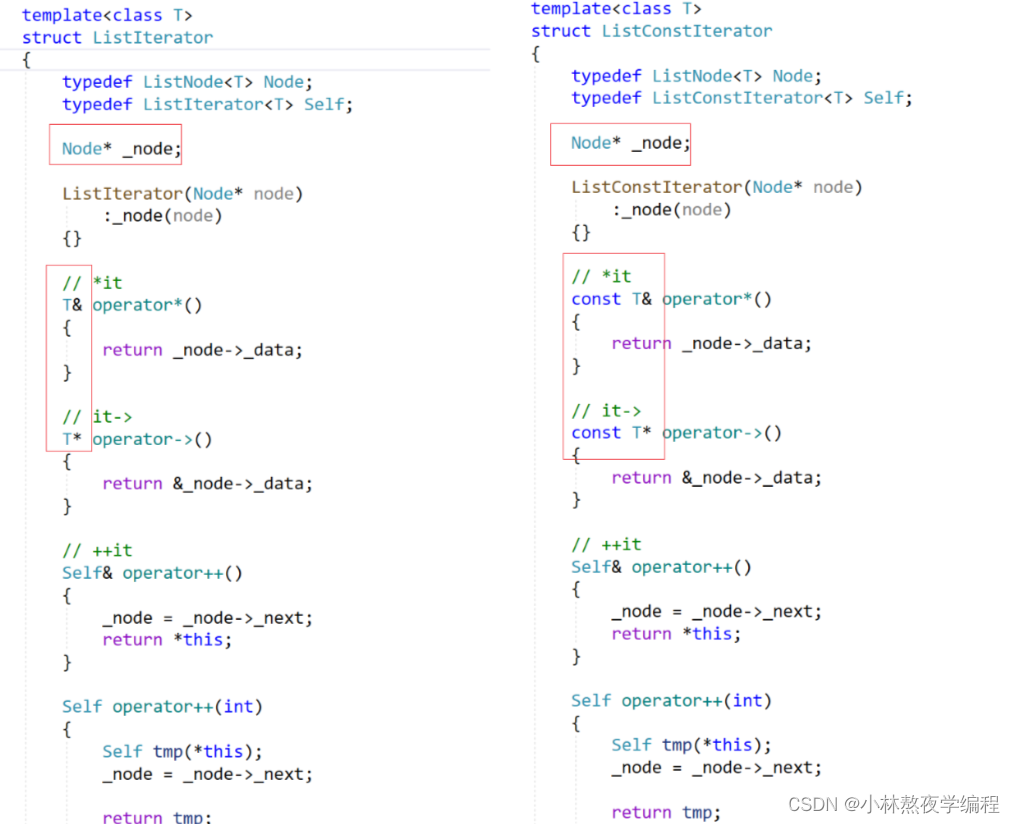
C++第二十五弹---从零开始模拟STL中的list(下)
✨个人主页: 熬夜学编程的小林 💗系列专栏: 【C语言详解】 【数据结构详解】【C详解】 目录 1、函数补充 2、迭代器完善 3、const迭代器 总结 1、函数补充 拷贝构造 思路: 先构造一个头结点,然后将 lt 类中的元…...

STM32/keil把多个c文件编译为静态库lib
把常用的、不经常修改的代码库编译成lib以后,可以加快整个工程的编译速度。 一个常见的应用场景就是,把ST的标准库或HAL库等编译成lib,这样以后再编译整个工程时,就无需再次编译他们了,可以节省编译时间。当然&#x…...
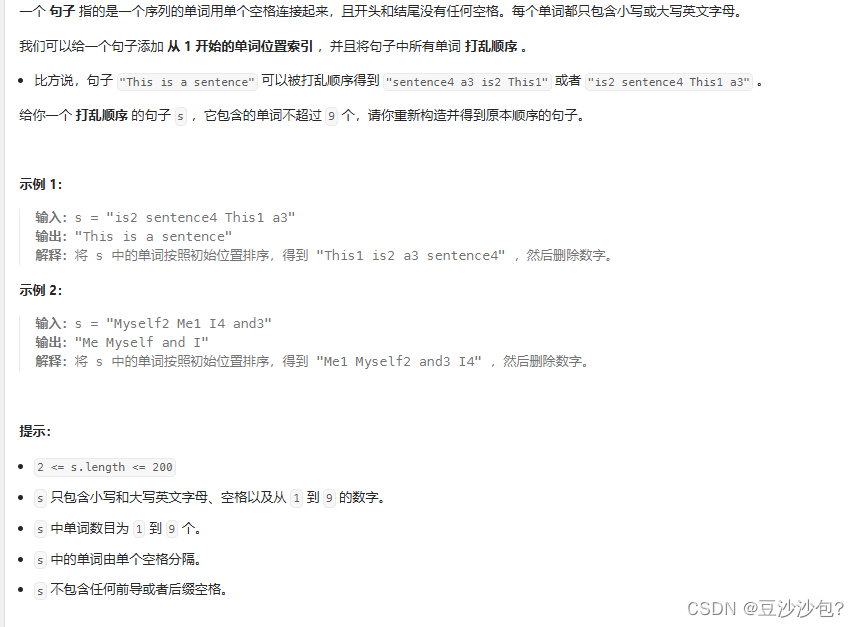
L45---506.相对名次(java)--排序
1.题目描述 2.知识点 (1)String.join(" ", words) 是 Java 中的一个语法,用于将数组或集合中的元素连接成一个单独的字符串,连接时使用指定的分隔符。这里的 " " 是作为分隔符使用的一个空格字符串。 Strin…...

跨网段路由
跨网段路由通常是指在网络中配置路由,以允许不同子网之间的通信。要设置跨网段的永久路由,取决于你是在操作路由器、交换机这样的网络设备,还是在配置个人计算机(如Windows或Linux系统)。下面是两种常见情况下的简要指…...

HO-3D 数据集
// 由于非刚体的追踪比较困难,所以看看刚体数据集 HOnnotate: A method for 3D Annotation of Hand and Object Poses // cvpr20https://arxiv.org/abs/1907.01481 https://github.com/shreyashampali/ho3d https://paperswithcode.com/paper/ho-3d-a-mult…...

Elasticsearch 认证模拟题 - 8
一、题目 在集群中输入以下指令: PUT phones/_doc/1 {"brand":"Samsumg","model":"Galaxy S9","features":[{"type":"os", "value":"Android"},{"type":&q…...
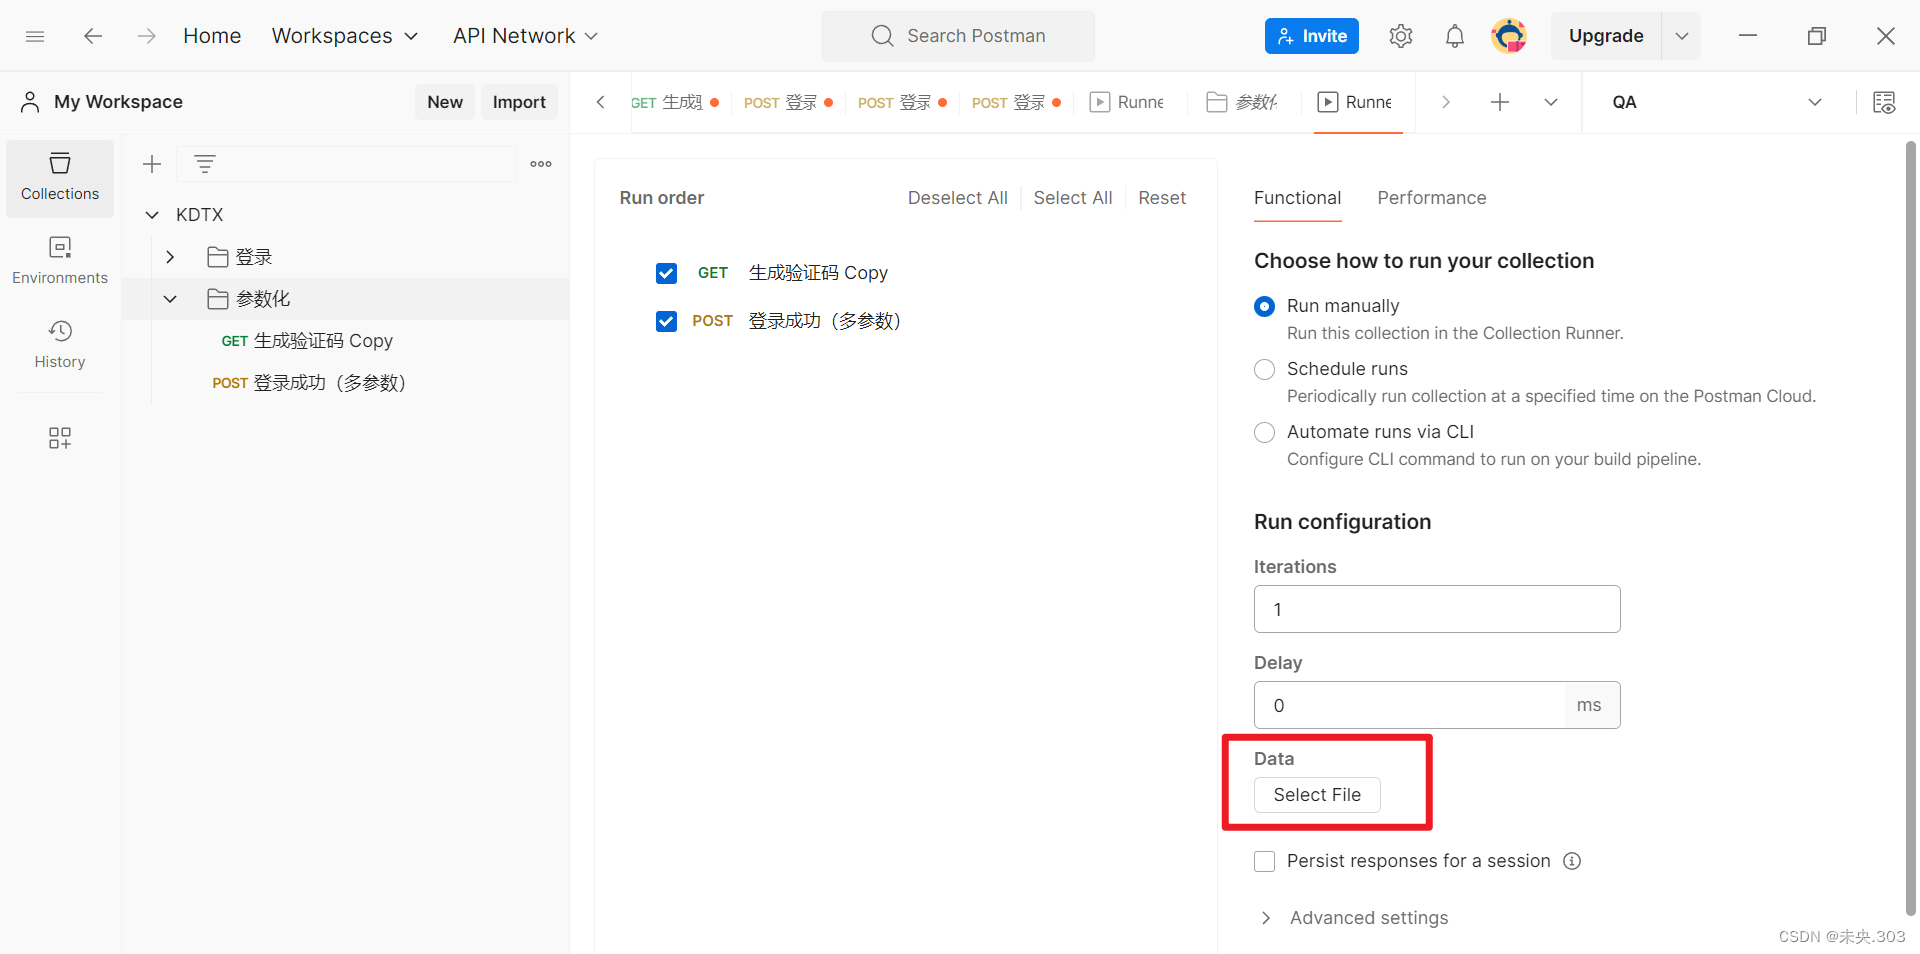
【Postman接口测试】第四节.Postman接口测试项目实战(中)
文章目录 前言五、Postman断言 5.1 Postman断言介绍 5.2 响应状态码断言 5.3 包含指定字符串断言 5.4 JSON数据断言六、参数化 5.1 Postman参数化介绍 5.2 Postman参数化实现 5.3 针对项目登录接口参数化实现 总结 前言 五、Postman断言 5.1 Postman断言介…...
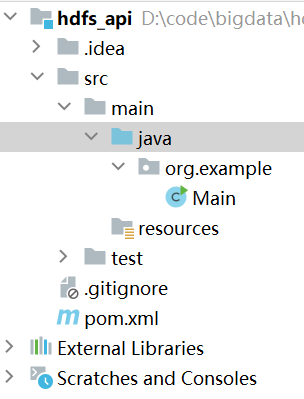
Hadoop的Windows环境准备
一、将Hadoop传输到Windows中 1、备份副本 cp -r /opt/softs/hadoop3.1.3/ /opt/softs/hadoop3.1.3_temp 2、删除备份的share目录 cd /opt/softs/hadoop3.1.3_temp rm -rf share/ 3、下载到Windows中 重命名去掉_temp 4、删除备份文件 rm -rf /opt/softs/hadoop3.1.3_t…...
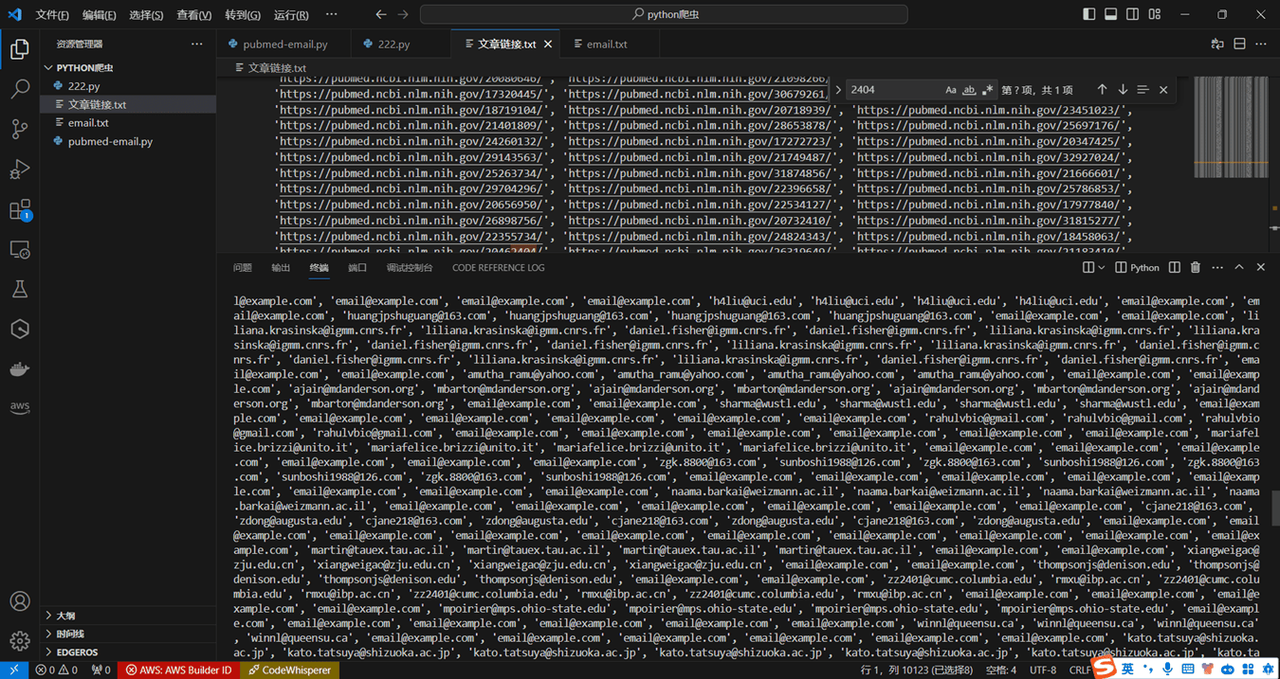
使用亮数据代理IP爬取PubMed文章链接和邮箱地址
💂 个人网站:【 摸鱼游戏】【神级代码资源网站】【工具大全】🤟 一站式轻松构建小程序、Web网站、移动应用:👉注册地址🤟 基于Web端打造的:👉轻量化工具创作平台💅 想寻找共同学习交…...

electron调用dll时应用程序闪退
electron调用dll时,直接闪退,且用如下方式监听无任何输出: window-all-closed 或 will-quit 此时需要检查传给dll的参数及参数类型是否正确,特别是使用ffi-napi时调用dll,使用 ref-napi定义类型,经常容易…...

终极指南:在Windows上轻松安装安卓应用,告别笨重模拟器
终极指南:在Windows上轻松安装安卓应用,告别笨重模拟器 【免费下载链接】APK-Installer An Android Application Installer for Windows 项目地址: https://gitcode.com/GitHub_Trending/ap/APK-Installer 你是否曾经想在Windows电脑上运行安卓应…...

量子计算威胁下的密码安全:从后量子密码到密码敏捷性实战解析
1. 量子计算:从实验室概念到国家安全的“灰犀牛”最近几年,每当我和业内的同行、安全专家,甚至是投资圈的朋友聊起前沿技术风险,话题总会在某个时刻滑向量子计算。这感觉很像十几年前大家第一次严肃讨论“云计算安全”时一样——一…...

ClawRouter:智能流量路由与内容处理工具的设计与实践
1. 项目概述与核心价值 最近在折腾一些网络相关的自动化任务时,发现了一个挺有意思的项目,叫 ClawRouter。乍一看这个名字,可能会联想到“爪子”和“路由器”,感觉像是某种抓取工具和网络设备的结合体。实际上,这个项目…...
为你的五子棋项目加个‘智能大脑’)
从AlphaGo到你的小游戏:如何用MCTS(蒙特卡洛树搜索)为你的五子棋项目加个‘智能大脑’
从AlphaGo到你的小游戏:如何用MCTS为五子棋项目构建智能决策引擎 当你在手机上下棋输给AI时,是否好奇过这些"电子大脑"如何思考?2016年AlphaGo击败李世石的关键技术之一——蒙特卡洛树搜索(MCTS),…...

EdgeRemover技术深度解析:Windows系统级浏览器管理解决方案
EdgeRemover技术深度解析:Windows系统级浏览器管理解决方案 【免费下载链接】EdgeRemover A PowerShell script that correctly uninstalls or reinstalls Microsoft Edge on Windows 10 & 11. 项目地址: https://gitcode.com/gh_mirrors/ed/EdgeRemover …...
)
省下PLC的钱!用海康VC3000工控机GPIO控制LED灯(C# WinForm实战)
海康VC3000工控机GPIO控制实战:低成本替代PLC的完整方案 在工业自动化领域,PLC(可编程逻辑控制器)长期以来都是控制系统的核心组件。但对于简单的指示灯控制、报警系统或小型继电器控制这类基础应用,动辄数千元的PLC模…...

效率翻倍!用 ModelSim 2019.2 给 Vivado 2020.2 工程做仿真的几个高级技巧
效率翻倍!用 ModelSim 2019.2 给 Vivado 2020.2 工程做仿真的几个高级技巧 对于已经熟悉Vivado与ModelSim基础联合仿真流程的开发者来说,真正的挑战往往在于如何突破常规操作的限制,在大型工程中实现高效调试。本文将分享三个经过实战验证的高…...

Arm CoreSight TPIU-M调试技术详解与应用
1. Arm CoreSight TPIU-M技术深度解析在嵌入式系统开发中,调试和追踪功能是确保系统可靠性和性能优化的关键。作为Arm CoreSight调试架构的重要组成部分,TPIU-M(Trace Port Interface Unit for Cortex-M)为Cortex-M系列处理器提供…...

矩阵本地化获客技术落地:同城流量精准匹配与合规运营方案
前言同城本地化流量是短视频生态中转化率最高、精准度最强的流量赛道,广泛适配本地生活服务、实体门店、同城咨询、区域服务商等各类业态。相比于泛全域流量,同城用户具备明确的地域消费属性、就近服务需求,成交意向更强烈,获客落…...
