GNU/Linux - 使用字符设备来操作GPIO
从 4.8 版开始,Linux 内核引入了基于字符设备的新用户空间 API,用于管理和控制 GPIO(通用输入/输出)。这篇文章介绍了新接口的基本原理,并通过一个简单的教程/示例演示了如何使用新 API 控制 GPIO。
教程中使用的硬件是 Raspberry Pi 3B,但代码是通用的,可用于任何嵌入式硬件。
| From the version 4.8, the Linux kernel introduces a new user space API based on character devices for managing and controlling GPIOs ( General-Purpose Input/Output). This post presents the basic of the new interface as well as a simple tutorial/example to demonstrate how to use the new API to control GPIOs. The hardware used in the tutorial is the Raspberry Pi 3B but the code is generic and can be used on any embedded hardware. |
The old user space interface
在 Linux 内核 4.8 之前,在用户空间管理 GPIO 的唯一接口是 sysfs 接口。GPIO 通过 /sys/class/gpio 中的导出文件进行配置和控制。可通过该接口执行 GPIO 的基本操作:
-
通过 /sys/class/gpio/export 导出 GPIO
-
通过 /sys/class/gpio/export 配置 GPIO 方向(输入/输出): 通过: /sys/class/gpio/gpioX/direction 配置 GPIO 方向(输入/输出
-
通过 /sys/class/gpio/gpioX/value 读写 GPIO 值
该接口简单易用,但也有一些缺点:
-
缺乏批量 GPIO 读写功能,GPIO 配置选项有限(例如:无法将 GPIO 配置为低电平有效、漏极开路、开源等)。
-
当两个或多个进程同时访问同一个 GPIO 时,可能会出现竞赛条件问题。
-
从 GPIO 轮询事件不可靠
-
等等。
| Before the Linux kernel 4.8, the only interface to manage GPIO in user space is the sysfs interface. GPIOs are configured and controlled via exported files in /sys/class/gpio. Basic GPIO operations that can be performed via this interface: * Export a GPIO via /sys/class/gpio/export * Configure the GPIO direction (input/output) via: /sys/class/gpio/gpioX/direction * Read/write GPIO value via /sys/class/gpio/gpioX/value This interface is simple and easy to use but it has some drawbacks: * Lack of bulk GPIO reads and writes, GPIO configuration options are limited (for example: unable to configure a GPIO as Active low, open drain, open source etc.) * Race condition problems may occur when two or more processes accessing the same GPIO at the same time. * Polling event from GPIO is not reliable * etc. |
The new Character Device interface
自 4.8 版起,Linux 内核引入了基于字符设备的新用户空间 GPIO 接口。用户空间的 GPIO 控制器接口以字符设备的形式提供: /dev/gpiochipX。基本的文件操作,如 open()、read()、write()、ioctl()、poll()、close(),都可以用来与 GPIO 控制器交互。
本节将详细介绍如何使用这一新 API,通过 ioctl 接口配置和控制 GPIO。
基本上,要与 GPIO 控制器交互,我们首先需要使用传统的文件打开操作打开字符设备:
| Since version 4.8, Linux kernel introduces a new user-space GPIO interface based on character device. Interface to the GPIO controller is available in user space in form of a character device: /dev/gpiochipX. Basic file operations such as open(), read(), write(), ioctl(), poll(), close() can be used to interact with the GPIO controller. This section will detail on how to use this new API to configure and control GPIO via the ioctl interface. Basically, to interact with the GPIO controller, we first need to open character device using the traditional file open operation: |
// include API header for the new interface
#include <linux/gpio.h>
#include <unistd.h>
#include <fcntl.h>
#include <string.h>
#include <errno.h>
#include <sys/ioctl.h>
#include <stdint.h>
#include <stdlib.h>
#define DEV_NAME "/dev/gpiochip0"
void func()
{
int fd, ret;
fd = open(DEV_NAME, O_RDONLY);
if (fd < 0)
{
printf("Unabled to open %%s: %%s", dev_name, strerror(errno));
return;
}
/*
control GPIO here, such as:
- configure
- read
- write
- polling
*/
(void)close(fd);
}
请注意,我们以只读模式打开字符设备 /dev/gpiochip0,所有 GPIO 控制操作都将在打开的文件描述符 fd 上执行。
| Note that we open the character device /dev/gpiochip0 in read only mode, all GPIO control operations will be performed on the opened file descriptor fd. |
本教程包括以下操作:
-
读取 GPIO 芯片和线路信息
-
GPIO 读写操作(批量模式)。
-
GPIO 事件轮询
| This tutorial covers the following operations: * GPIO chip and lines information reading * GPIO read and write operations (in bulk mode). * GPIO event polling |
通过 IOCTL 接口获取 GPIO 芯片信息
GPIO 芯片信息存储在一个结构类型为 gpiochip_info 的结构中,可通过 IOCTL GPIO_GET_CHIPINFO_IOCTL 请求进行查询:
| Get GPIO chip information via the IOCTL interface GPIO chip information is stored in a structure of type struct gpiochip_info and can be queried via the IOCTL GPIO_GET_CHIPINFO_IOCTL request: |
struct gpiochip_info info;
struct gpioline_info line_info;
int fd, ret;
// open the device
fd = open(DEV_NAME, O_RDONLY);
if (fd < 0)
{
printf("Unabled to open %%s: %%s", dev_name, strerror(errno));
return;
}
// Query GPIO chip information
ret = ioctl(fd, GPIO_GET_CHIPINFO_IOCTL, &info);
if (ret == -1)
{
printf("Unable to get chip info from ioctl: %%s", strerror(errno));
close(fd);
return;
}
printf("Chip name: %%s\n", info.name);
printf("Chip label: %%s\n", info.label);
printf("Number of lines: %%d\n", info.lines);
在第 13 行,我们使用 IOCTL 接口(GPIO_GET_CHIPINFO_IOCTL 请求)从内核中查询芯片信息。结构信息包含芯片名称、芯片标签,以及重要的 GPIO 线路数。在此基础上,我们可以通过对文件描述符发出 IOCTL GPIO_GET_LINEINFO_IOCTL 请求,进一步查询各 GPIO 线路的状态。每个 GPIO 的线路信息都存储在一个结构类型为 struct gpioline_info 的结构中:
| On line 13 we query the chip info from the kernel using the IOCTL interface (GPIO_GET_CHIPINFO_IOCTL request). The structure info contains the chip name, the chip label, and importantly the number of GPIO lines. From here, we can further query the state of each GPIO lines by issuing the IOCTL GPIO_GET_LINEINFO_IOCTL request on the file descriptor. The line information for each GPIO is stored in a structure of type: struct gpioline_info: |
struct gpioline_info line_info;
for (int i = 0; i < info.lines; i++)
{
line_info.line_offset = i;
ret = ioctl(fd, GPIO_GET_LINEINFO_IOCTL, &line_info);
if (ret == -1)
{
printf("Unable to get line info from offset %%d: %%s", i, strerror(errno));
}
else
{
printf("offset: %%d, name: %%s, consumer: %%s. Flags:\t[%%s]\t[%%s]\t[%%s]\t[%%s]\t[%%s]\n",
i,
line_info.name,
line_info.consumer,
(line_info.flags & GPIOLINE_FLAG_IS_OUT) ? "OUTPUT" : "INPUT",
(line_info.flags & GPIOLINE_FLAG_ACTIVE_LOW) ? "ACTIVE_LOW" : "ACTIVE_HIGHT",
(line_info.flags & GPIOLINE_FLAG_OPEN_DRAIN) ? "OPEN_DRAIN" : "...",
(line_info.flags & GPIOLINE_FLAG_OPEN_SOURCE) ? "OPENSOURCE" : "...",
(line_info.flags & GPIOLINE_FLAG_KERNEL) ? "KERNEL" : "");
}
}
在第 4 行,我们将 line_info 结构的 line_offset 属性设置为要查询的 GPIO 线路/偏移量,然后通过 GPIO_GET_LINEINFO_IOCTL 请求调用 ioctl 函数。
下面是在 Raspberry Pi 3B+ 上执行代码的输出示例:
| On line 4, we set the line_offset property of the structure line_info to the GPIO line/offset that we want to query before calling the ioctl function with the GPIO_GET_LINEINFO_IOCTL request. Below is the example output of the code executed on a Raspberry Pi 3B+: |
Chip name: gpiochip0
Chip label: pinctrl-bcm2835
Number of lines: 54
offset: 0, name: , consumer: . Flags: [INPUT] [ACTIVE_HIGHT] [...] [...] []
offset: 1, name: , consumer: . Flags: [INPUT] [ACTIVE_HIGHT] [...] [...] []
offset: 2, name: , consumer: . Flags: [INPUT] [ACTIVE_HIGHT] [...] [...] []
offset: 3, name: , consumer: . Flags: [INPUT] [ACTIVE_HIGHT] [...] [...] []
offset: 4, name: , consumer: . Flags: [INPUT] [ACTIVE_HIGHT] [...] [...] []
offset: 5, name: , consumer: . Flags: [INPUT] [ACTIVE_HIGHT] [...] [...] []
offset: 6, name: , consumer: . Flags: [INPUT] [ACTIVE_HIGHT] [...] [...] []
offset: 7, name: , consumer: spi0 CS1. Flags: [OUTPUT] [ACTIVE_LOW] [...] [...] [KERNEL]
offset: 8, name: , consumer: spi0 CS0. Flags: [OUTPUT] [ACTIVE_LOW] [...] [...] [KERNEL]
offset: 9, name: , consumer: . Flags: [INPUT] [ACTIVE_HIGHT] [...] [...] []
offset: 10, name: , consumer: . Flags: [INPUT] [ACTIVE_HIGHT] [...] [...] []
offset: 11, name: , consumer: . Flags: [INPUT] [ACTIVE_HIGHT] [...] [...] []
offset: 12, name: , consumer: . Flags: [INPUT] [ACTIVE_HIGHT] [...] [...] []
offset: 13, name: , consumer: . Flags: [INPUT] [ACTIVE_HIGHT] [...] [...] []
offset: 14, name: , consumer: . Flags: [INPUT] [ACTIVE_HIGHT] [...] [...] []
offset: 15, name: , consumer: . Flags: [INPUT] [ACTIVE_HIGHT] [...] [...] []
offset: 16, name: , consumer: . Flags: [INPUT] [ACTIVE_HIGHT] [...] [...] []
offset: 17, name: , consumer: ads7846_pendown. Flags: [INPUT] [ACTIVE_HIGHT] [...] [...] [KERNEL]
offset: 18, name: , consumer: . Flags: [INPUT] [ACTIVE_HIGHT] [...] [...] []
offset: 19, name: , consumer: . Flags: [INPUT] [ACTIVE_HIGHT] [...] [...] []
offset: 20, name: , consumer: . Flags: [INPUT] [ACTIVE_HIGHT] [...] [...] []
offset: 21, name: , consumer: . Flags: [INPUT] [ACTIVE_HIGHT] [...] [...] []
offset: 22, name: , consumer: . Flags: [INPUT] [ACTIVE_HIGHT] [...] [...] []
offset: 23, name: , consumer: . Flags: [INPUT] [ACTIVE_HIGHT] [...] [...] []
offset: 24, name: , consumer: dc. Flags: [OUTPUT] [ACTIVE_HIGHT] [...] [...] [KERNEL]
offset: 25, name: , consumer: reset. Flags: [OUTPUT] [ACTIVE_LOW] [...] [...] [KERNEL]
offset: 26, name: , consumer: . Flags: [INPUT] [ACTIVE_HIGHT] [...] [...] []
offset: 27, name: , consumer: . Flags: [INPUT] [ACTIVE_HIGHT] [...] [...] []
offset: 28, name: , consumer: . Flags: [INPUT] [ACTIVE_HIGHT] [...] [...] []
offset: 29, name: , consumer: . Flags: [INPUT] [ACTIVE_HIGHT] [...] [...] []
offset: 30, name: , consumer: . Flags: [INPUT] [ACTIVE_HIGHT] [...] [...] []
offset: 31, name: , consumer: . Flags: [INPUT] [ACTIVE_HIGHT] [...] [...] []
offset: 32, name: , consumer: . Flags: [INPUT] [ACTIVE_HIGHT] [...] [...] []
offset: 33, name: , consumer: . Flags: [INPUT] [ACTIVE_HIGHT] [...] [...] []
offset: 34, name: , consumer: . Flags: [INPUT] [ACTIVE_HIGHT] [...] [...] []
offset: 35, name: , consumer: . Flags: [INPUT] [ACTIVE_HIGHT] [...] [...] []
offset: 36, name: , consumer: . Flags: [INPUT] [ACTIVE_HIGHT] [...] [...] []
offset: 37, name: , consumer: . Flags: [INPUT] [ACTIVE_HIGHT] [...] [...] []
offset: 38, name: , consumer: . Flags: [INPUT] [ACTIVE_HIGHT] [...] [...] []
offset: 39, name: , consumer: . Flags: [INPUT] [ACTIVE_HIGHT] [...] [...] []
offset: 40, name: , consumer: . Flags: [INPUT] [ACTIVE_HIGHT] [...] [...] []
offset: 41, name: , consumer: . Flags: [INPUT] [ACTIVE_HIGHT] [...] [...] []
offset: 42, name: , consumer: . Flags: [INPUT] [ACTIVE_HIGHT] [...] [...] []
offset: 43, name: , consumer: . Flags: [INPUT] [ACTIVE_HIGHT] [...] [...] []
offset: 44, name: , consumer: . Flags: [INPUT] [ACTIVE_HIGHT] [...] [...] []
offset: 45, name: , consumer: . Flags: [INPUT] [ACTIVE_HIGHT] [...] [...] []
offset: 46, name: , consumer: . Flags: [INPUT] [ACTIVE_HIGHT] [...] [...] []
offset: 47, name: , consumer: . Flags: [OUTPUT] [ACTIVE_HIGHT] [...] [...] []
offset: 48, name: , consumer: . Flags: [INPUT] [ACTIVE_HIGHT] [...] [...] []
offset: 49, name: , consumer: . Flags: [INPUT] [ACTIVE_HIGHT] [...] [...] []
offset: 50, name: , consumer: . Flags: [INPUT] [ACTIVE_HIGHT] [...] [...] []
offset: 51, name: , consumer: . Flags: [INPUT] [ACTIVE_HIGHT] [...] [...] []
offset: 52, name: , consumer: . Flags: [INPUT] [ACTIVE_HIGHT] [...] [...] []
offset: 53, name: , consumer: . Flags: [INPUT] [ACTIVE_HIGHT] [...] [...] []
问题:GPIO 偏移(bcm2835)与 raspberry Pi 的物理引脚输出之间的映射关系是什么?
如果我们看一下树莓派的引脚布局:
这里的偏移量对应于上述模式中的 BCMx 引脚。例如,偏移量 17 对应 BCM 17(物理引脚 11)。
| Question: what is exactly the mapping between GPIO offsets (bcm2835) and the physical pinout of the raspberry Pi ? Well, if we look at the Raspberry pinout: The offsets here correspond to the BCMx pins on the schema above. For example the offset 17 correspond to the BCM 17 (physical pin 11) |
(批量)通过 IOCTL 接口向输出 GPIO 写值
假设我们要将引脚 11 和 13(BCM 17 和 BCM 27)配置为 OUTPUT,并在引脚 11 上写入高电平 (1),在引脚 13 上写入低电平 (0)。
新的 API 允许以批量模式执行配置、读取和写入操作,它可以在单个 IOCTL 请求中处理多个 GPIO 线路。
| (Bulk) Writing values to output GPIOs via the IOCTL interface Let say we want to configure pin 11 and 13 (BCM 17 and BCM 27) as OUTPUT and we want to write HIGH (1) on pin 11 and LOW (0) on pin 13. The new API allows to perform configuration, read and write operation in bulk mode, it can handle multiple GPIO lines in a single IOCTL request. |
基本上,要向 GPIO 写入数值,我们首先需要将其配置为 OUTPUT。具体方法如下:
-
在结构类型为 struct gpiohandle_request 的结构中填写配置值
-
通过 IOCTL 接口向 GPIO 控制器发出 GPIO_GET_LINEHANDLE_IOCTL,请求获得已配置 GPIO 的线路句柄
| Basically, to write values to GPIOs, we first need to configured them as OUTPUTs. This can be done by : * Filling configuration values in a struct of type struct gpiohandle_request * Issuing a GPIO_GET_LINEHANDLE_IOCTL to the GPIO controller via the IOCTL interface to request a lines handle of the configured GPIOs |
// open the device
fd = ...
...
struct gpiohandle_request rq;
rq.lineoffsets[0] = 17;
rq.lineoffsets[1] = 27;
rq.lines = 2;
rq.flags = GPIOHANDLE_REQUEST_OUTPUT;
ret = ioctl(fd, GPIO_GET_LINEHANDLE_IOCTL, &rq);
close(fd);
if (ret == -1)
{
printf("Unable to line handle from ioctl : %%s", strerror(errno));
close(fd);
return;
}
在 rq 结构中,我们需要指定要配置的行数(偏移 17 和偏移 27)以及行标志。在本例中,我们使用 GPIOHANDLE_REQUEST_OUTPUT 标志将两行(17 和 27)配置为输出。
如果 IOCTL GPIO_GET_LINEHANDLE_IOCTL 请求成功,单行句柄将以文件描述符(rq.fd)的形式设置到结构 rq(struct gpiohandle_request)的属性 fd 中。该文件描述符用于向配置的 GPIO 写入值。现在可以安全关闭设备文件 (fd) 描述符。
要向两个 GPIO 写入数值,只需将数值填入一个 struct gpiohandle_data 类型的结构,然后在行句柄文件描述符上使用该结构执行一个 IOCTL GPIOHANDLE_SET_LINE_VALUES_IOCTL请求
| In the structure rq, we need to specify which lines (offset 17, offset 27) and the number of lines we want to configured as well as the lines flags. In this case we use the flag GPIOHANDLE_REQUEST_OUTPUT to configure the two lines (17 and 27) as outputs. If the IOCTL GPIO_GET_LINEHANDLE_IOCTL request successes, a single lines handle is set to the property fd of the structure rq (struct gpiohandle_request) in form of a file descriptor (rq.fd). This file descriptor should be used to write values to the configured GPIOs. The device file (fd) descriptor can now be safety closed. To write values to the two GPIOs, simply fill the values to a structure of type struct gpiohandle_data, then perform a IOCTL GPIOHANDLE_SET_LINE_VALUES_IOCTL request with this structure on the lines handle file descriptor |
struct gpiohandle_data data;
data.values[0] = 1; // HIGH offset 17
data.values[1] = 0; // LOW offset 27
ret = ioctl(rq.fd, GPIOHANDLE_SET_LINE_VALUES_IOCTL, &data);
if (ret == -1)
{
printf("Unable to set line value using ioctl : %%s", strerror(errno));
}
// do something else
close(rq.fd);
(Bulk) reading input GPIOs values via the IOCTL interface [(批量)通过 IOCTL 接口读取输入 GPIO 值]
GPIO 的读取操作遵循与写入操作相同的原则。所需的修改如下:
-
用 GPIOHANDLE_REQUEST_INPUT 代替 GPIOHANDLE_REQUEST_OUTPUT
-
用 GPIOHANDLE_GET_LINE_VALUES_IOCTL 代替 GPIOHANDLE_SET_LINE_VALUES_IOCTL
| The GPIOs reading operation follows the same principle as the writing operation. The modifications necessary are to: * Replace GPIOHANDLE_REQUEST_OUTPUT with GPIOHANDLE_REQUEST_INPUT * Replace GPIOHANDLE_SET_LINE_VALUES_IOCTL with GPIOHANDLE_GET_LINE_VALUES_IOCTL |
struct gpiohandle_request rq;
struct gpiohandle_data data;
int fd, ret;
// open the device
fd = ...
...
rq.lineoffsets[0] = 17;
rq.lineoffsets[1] = 27;
rq.flags = GPIOHANDLE_REQUEST_INPUT;
rq.lines = 2;
ret = ioctl(fd, GPIO_GET_LINEHANDLE_IOCTL, &rq);
close(fd);
if (ret == -1)
{
printf("Unable to get line handle from ioctl : %%s", strerror(errno));
return;
}
ret = ioctl(rq.fd, GPIOHANDLE_GET_LINE_VALUES_IOCTL, &data);
if (ret == -1)
{
printf("Unable to get line value using ioctl : %%s", strerror(errno));
}
else
{
printf("Value of GPIO at offset 17: %%d and offset 27: %%d\n", data.values[0], data.values[1]);
}
close(rq.fd);
GPIO event polling
新 API 为使用传统轮询 API(文件描述符)轮询 GPIO 事件(如上升沿、下降沿或两个沿)提供了一种方便的方法。GPIO 事件轮询有两个基本步骤:
-
以文件描述符的形式(通过 IOCTL 接口)请求 GPIO 线路上的事件句柄
-
对该文件描述符执行传统轮询
下面的代码段请求偏移量 17(BCM 17)处 GPIO 的事件句柄。
| The new API provides a convenient way to poll GPIO events such as raising edge, falling edge or both edges using the traditional polling API (on file descriptors). Two basic steps for GPIO event polling: * Request the event handle on a GPIO line in form of a file descriptor (via the IOCTL interface) * Perform traditional polling on that file descriptor The following snippet requests a event handle on the GPIO at offset 17 (BCM 17). |
#include <sys/poll.h>
...
struct gpioevent_request rq;
int fd, ret;
// open the device
fd = ...
rq.lineoffset = 17;
rq.eventflags = GPIOEVENT_EVENT_RISING_EDGE;
ret = ioctl(fd, GPIO_GET_LINEEVENT_IOCTL, &rq);
close(fd);
if (ret == -1)
{
printf("Unable to get line event from ioctl : %%s", strerror(errno));
close(fd);
return;
}
请注意,在第 10 行和第 11 行,我们配置了事件句柄,以监听偏移 17 处 GPIO 上的上升沿事件 (GPIOEVENT_EVENT_RISING_EDGE)。
如果请求成功,行事件文件描述符将被设置为结构 rq(struct gpioevent_request)的 fd 属性。可以对该文件描述符 (rq.fd) 执行传统的轮询操作。
| Note that on lines 10 and 11, we configure the event handle to listen to the rising edge event (GPIOEVENT_EVENT_RISING_EDGE) on the GPIO at offset 17. If the request successes, the line event file descriptor is set to the fd property of the structure rq (struct gpioevent_request). The traditional polling operation can the be performed on this file descriptor (rq.fd). |
struct pollfd pfd;
pfd.fd = rq.fd;
pfd.events = POLLIN;
ret = poll(&pfd, 1, -1);
if (ret == -1)
{
printf("Error while polling event from GPIO: %%s", strerror(errno));
}
else if (pfd.revents & POLLIN)
{
printf("Rising edge event on GPIO offset: %%d, of %%s\n", offset, dev_name);
}
close(rq.fd);
上面的代码只是简单地阻塞,直到事件被触发(轮询超时设置为-1)。请注意,轮询 API 可以同时轮询多个文件描述符,因此可以轮询多个 GPIO 线路上的事件。
| The code above simply blocks until the event is triggered (polling timeout set to -1). Note that the polling API can poll multiple file descriptors at the same time, thus, it is able to poll events on multiple GPIO lines. |
Final code
下面是本帖中介绍的所有 GPIO 操作的完整工作代码:
| Bellow is the complete working code of all GPIO operations presented in this post: |
#include <linux/gpio.h>
#include <unistd.h>
#include <fcntl.h>
#include <string.h>
#include <errno.h>
#include <sys/ioctl.h>
#include <stdio.h>
#include <stdint.h>
#include <getopt.h>
#include <stdlib.h>
#include <sys/poll.h>
typedef enum
{
APP_OPT_GPIO_LIST,
APP_OPT_GPIO_READ,
APP_OPT_GPIO_WRITE,
APP_OPT_GPIO_POLL,
APP_OPT_UNKNOWN
} app_mode_t;
typedef struct
{
char *dev;
int offset;
uint8_t val;
app_mode_t mode;
} app_opt_t;
static void gpio_list(const char *dev_name)
{
struct gpiochip_info info;
struct gpioline_info line_info;
int fd, ret;
fd = open(dev_name, O_RDONLY);
if (fd < 0)
{
printf("Unabled to open %%s: %%s", dev_name, strerror(errno));
return;
}
ret = ioctl(fd, GPIO_GET_CHIPINFO_IOCTL, &info);
if (ret == -1)
{
printf("Unable to get chip info from ioctl: %%s", strerror(errno));
close(fd);
return;
}
printf("Chip name: %%s\n", info.name);
printf("Chip label: %%s\n", info.label);
printf("Number of lines: %%d\n", info.lines);
for (int i = 0; i < info.lines; i++)
{
line_info.line_offset = i;
ret = ioctl(fd, GPIO_GET_LINEINFO_IOCTL, &line_info);
if (ret == -1)
{
printf("Unable to get line info from offset %%d: %%s", i, strerror(errno));
}
else
{
printf("offset: %%d, name: %%s, consumer: %%s. Flags:\t[%%s]\t[%%s]\t[%%s]\t[%%s]\t[%%s]\n",
i,
line_info.name,
line_info.consumer,
(line_info.flags & GPIOLINE_FLAG_IS_OUT) ? "OUTPUT" : "INPUT",
(line_info.flags & GPIOLINE_FLAG_ACTIVE_LOW) ? "ACTIVE_LOW" : "ACTIVE_HIGHT",
(line_info.flags & GPIOLINE_FLAG_OPEN_DRAIN) ? "OPEN_DRAIN" : "...",
(line_info.flags & GPIOLINE_FLAG_OPEN_SOURCE) ? "OPENSOURCE" : "...",
(line_info.flags & GPIOLINE_FLAG_KERNEL) ? "KERNEL" : "");
}
}
close(fd);
}
static void gpio_write(const char *dev_name, int offset, uint8_t value)
{
struct gpiohandle_request rq;
struct gpiohandle_data data;
int fd, ret;
printf("Write value %%d to GPIO at offset %%d (OUTPUT mode) on chip %%s\n", value, offset, dev_name);
fd = open(dev_name, O_RDONLY);
if (fd < 0)
{
printf("Unabled to open %%s: %%s", dev_name, strerror(errno));
return;
}
rq.lineoffsets[0] = offset;
rq.flags = GPIOHANDLE_REQUEST_OUTPUT;
rq.lines = 1;
ret = ioctl(fd, GPIO_GET_LINEHANDLE_IOCTL, &rq);
close(fd);
if (ret == -1)
{
printf("Unable to line handle from ioctl : %%s", strerror(errno));
return;
}
data.values[0] = value;
ret = ioctl(rq.fd, GPIOHANDLE_SET_LINE_VALUES_IOCTL, &data);
if (ret == -1)
{
printf("Unable to set line value using ioctl : %%s", strerror(errno));
}
else
{
usleep(2000000);
}
close(rq.fd);
}
static void gpio_read(const char *dev_name, int offset)
{
struct gpiohandle_request rq;
struct gpiohandle_data data;
int fd, ret;
fd = open(dev_name, O_RDONLY);
if (fd < 0)
{
printf("Unabled to open %%s: %%s", dev_name, strerror(errno));
return;
}
rq.lineoffsets[0] = offset;
rq.flags = GPIOHANDLE_REQUEST_INPUT;
rq.lines = 1;
ret = ioctl(fd, GPIO_GET_LINEHANDLE_IOCTL, &rq);
close(fd);
if (ret == -1)
{
printf("Unable to get line handle from ioctl : %%s", strerror(errno));
return;
}
ret = ioctl(rq.fd, GPIOHANDLE_GET_LINE_VALUES_IOCTL, &data);
if (ret == -1)
{
printf("Unable to get line value using ioctl : %%s", strerror(errno));
}
else
{
printf("Value of GPIO at offset %%d (INPUT mode) on chip %%s: %%d\n", offset, dev_name, data.values[0]);
}
close(rq.fd);
}
static void gpio_poll(const char *dev_name, int offset)
{
struct gpioevent_request rq;
struct pollfd pfd;
int fd, ret;
fd = open(dev_name, O_RDONLY);
if (fd < 0)
{
printf("Unabled to open %%s: %%s", dev_name, strerror(errno));
return;
}
rq.lineoffset = offset;
rq.eventflags = GPIOEVENT_EVENT_RISING_EDGE;
ret = ioctl(fd, GPIO_GET_LINEEVENT_IOCTL, &rq);
close(fd);
if (ret == -1)
{
printf("Unable to get line event from ioctl : %%s", strerror(errno));
close(fd);
return;
}
pfd.fd = rq.fd;
pfd.events = POLLIN;
ret = poll(&pfd, 1, -1);
if (ret == -1)
{
printf("Error while polling event from GPIO: %%s", strerror(errno));
}
else if (pfd.revents & POLLIN)
{
printf("Rising edge event on GPIO offset: %%d, of %%s\n", offset, dev_name);
}
close(rq.fd);
}
static void help(const char *app)
{
fprintf(stderr,
"Usage: %%s options dev_name.\n"
"Options:\n"
"\t -i: print gpio chip info\n"
"\t -r <offset>: Read GPIO value at offset (INPUT mode)\n"
"\t -w <offset>: Write GPIO value at offset (OUTPUT mode). Option -v should be set\n"
"\t -v <0|1>: value that should be written to the GPIO, used only with option -w\n"
"\t -p <offset>: Polling raising event on the GPIO at offset\n",
app);
}
int main(int argc, char *const *argv)
{
int ret;
app_opt_t opt;
opt.val = 0;
opt.dev = NULL;
opt.mode = APP_OPT_UNKNOWN;
while ((ret = getopt(argc, argv, "lr:w:p:v:")) != -1)
{
switch (ret)
{
case 'l':
opt.mode = APP_OPT_GPIO_LIST;
break;
case 'r':
opt.mode = APP_OPT_GPIO_READ;
opt.offset = atoi(optarg);
break;
case 'w':
opt.mode = APP_OPT_GPIO_WRITE;
opt.offset = atoi(optarg);
break;
case 'v':
opt.val = (uint8_t)atoi(optarg);
break;
case 'p':
opt.mode = APP_OPT_GPIO_POLL;
opt.offset = atoi(optarg);
break;
default:
help(argv[0]);
return -1;
}
}
if (optind >= argc || opt.mode == APP_OPT_UNKNOWN)
{
help(argv[0]);
return -1;
}
opt.dev = argv[optind];
switch (opt.mode)
{
case APP_OPT_GPIO_LIST:
gpio_list(opt.dev);
break;
case APP_OPT_GPIO_WRITE:
gpio_write(opt.dev, opt.offset, opt.val);
break;
case APP_OPT_GPIO_READ:
gpio_read(opt.dev, opt.offset);
break;
case APP_OPT_GPIO_POLL:
gpio_poll(opt.dev, opt.offset);
break;
default:
help(argv[0]);
return -1;
}
return 0;
}
参考;
Control GPIO using the new Linux user space GPIO API (lxsang.me)
相关文章:

GNU/Linux - 使用字符设备来操作GPIO
从 4.8 版开始,Linux 内核引入了基于字符设备的新用户空间 API,用于管理和控制 GPIO(通用输入/输出)。这篇文章介绍了新接口的基本原理,并通过一个简单的教程/示例演示了如何使用新 API 控制 GPIO。 教程中使用的硬件是…...

Android13 Settings 左上角箭头图标点击无效
最近在修改A311D2方案固件,系统Settings发现很多bug 最明显的是左上角有个箭头样子的图标,通常认为是返回键,点击之后没有任何效果,目测这个是ActionBar的按键。 SettingsBaseActivity里面有一段这样的代码: // Th…...

WinForms 应用(.NET 8.0)使用ReportViewerCore.WinForms显示打印RDLC报表
在要WinForms 应用(.NET 8.0)中,显示RDLC报表,就要使用ReportViewerCore.WinForms。原来的ReportViewer只能在.NET Framework框架下运行。 1.ReportViewerCore.WinForms 程序包说明 SQL Server Reporting Services ReportViewer…...
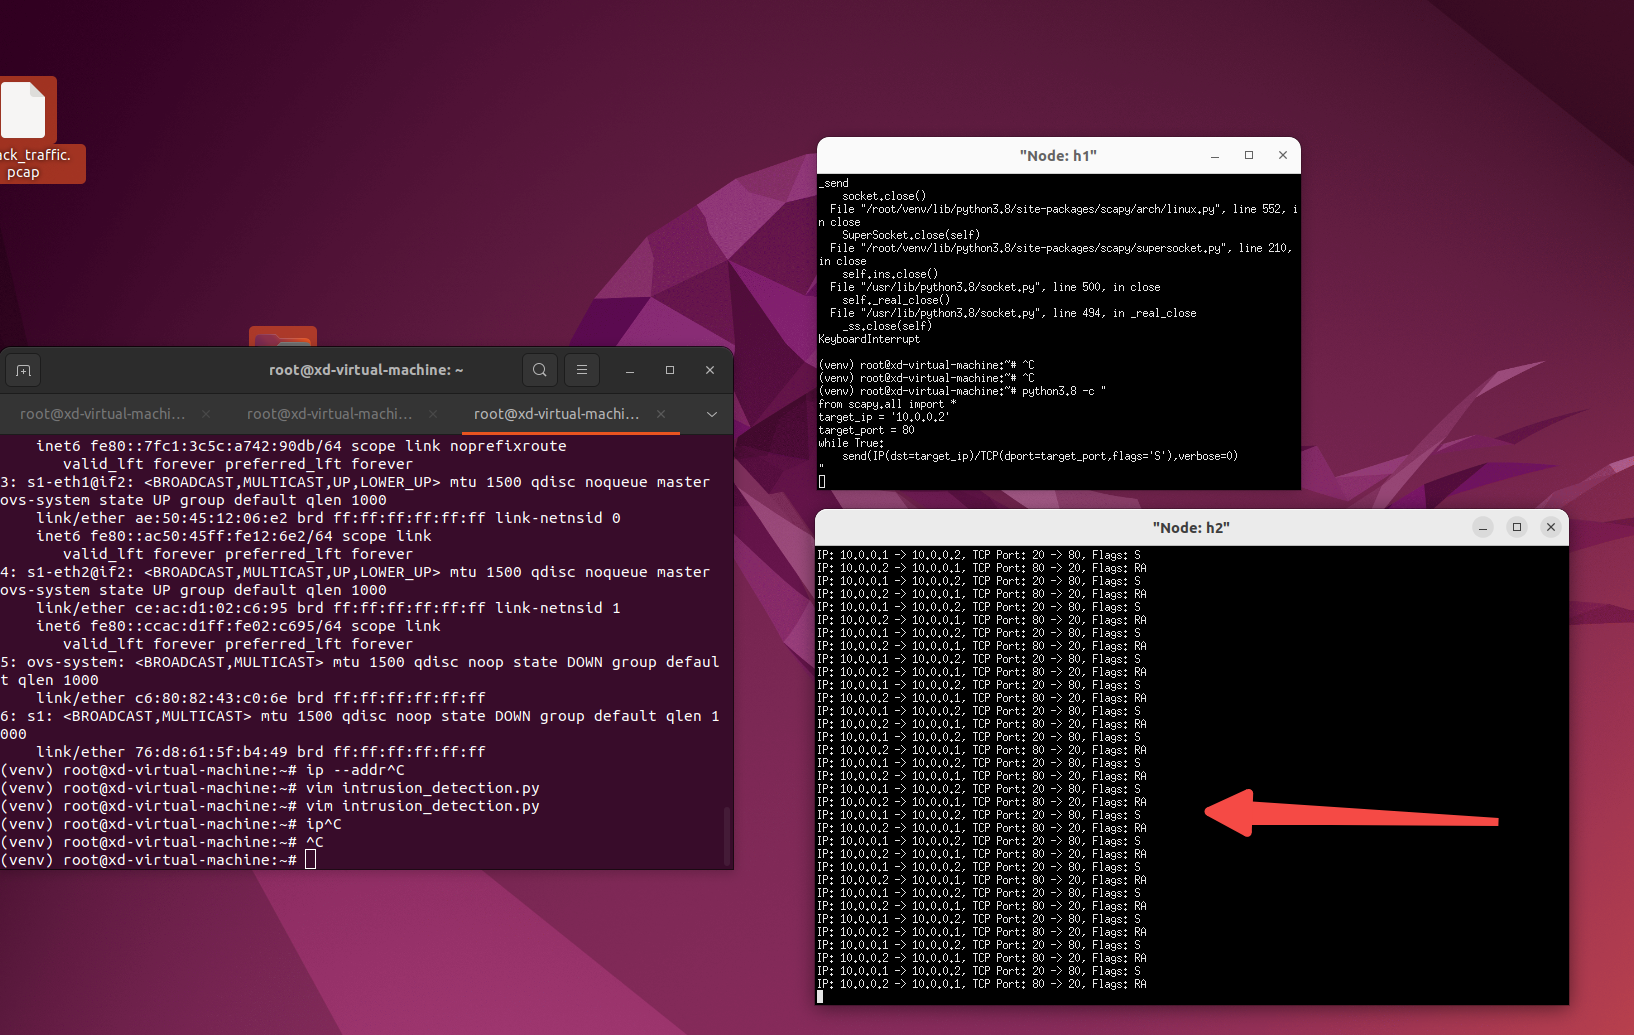
【网络安全】【深度学习】【入侵检测】SDN模拟网络入侵攻击并检测,实时检测,深度学习
文章目录 1. 前言2. Mininet 和 Ryu 的区别2.1 Mininet2.2 Ryu2.3 总结 3. 模拟攻击3.1 环境准备3.2 创建 Mininet 网络拓扑3.2 启动 Ryu 控制器3.3 模拟网络攻击3.4 捕获流量 4. 实时异常检测4.1 在 Ryu 控制器中4.2 在 h2 机器上的实验结果4.3 深度学习模型部署上h2机器 帮助…...

【CentOS】手动编译安装make、cmake、gcc、git
摘要 Centos7升级make和gcc版本到最新——CSDN make make 各个版本下载地址 http://ftp.gnu.org/pub/gnu/make 以4.4为例安装: # 下载 wget https://ftp.gnu.org/pub/gnu/make/make-4.4.tar.gz # 解压配置 tar zxf make-4.4.tar.gz cd make-4.4 ./configure --p…...

45.django - 开始建立第一个项目
1.django是什么? Django是一个高级的、免费的、开源的Web应用框架,它由Python编程语言编写而成。Django遵循模型-视图-控制器(MVC)的设计模式,但通常将其称为模型-视图-模板(MVT)架构。它的主要…...
# 梯影传媒T6投影仪刷机方法及一些刷机工具链接
梯影传媒T6投影仪刷机方法及一些刷机工具链接 文章目录 梯影传媒T6投影仪刷机方法及一些刷机工具链接1、安装驱动程序2、备份设备rom【boot、system】3、还原我要刷进设备的rom【system】4、打开开发者模式以便于安装apk5、root设备6、更多好链接: 梯影传媒T6使用的…...

【代码随想录算法训练营第37期 第三十二天 | LeetCode122.买卖股票的最佳时机II、55. 跳跃游戏、45.跳跃游戏II】
代码随想录算法训练营第37期 第三十二天 | LeetCode122.买卖股票的最佳时机II、55. 跳跃游戏、45.跳跃游戏II 一、122.买卖股票的最佳时机II 解题代码C: class Solution { public:int maxProfit(vector<int>& prices) {int result 0;for(int i 1; i &…...

DP:回文串模型
一、回文子串 . - 力扣(LeetCode) 该题有3种解法 (1)中心扩展算法(在字符串章节有介绍)时间复杂度O(N^2),空间复杂度O(1) (2)马丁车…...

STM32CubeMX软件的安装以及配置
STM32CubeMX软件的配置过程可以详细分为以下几个步骤,以确保您能够顺利地使用该软件进行STM32微控制器的配置和代码生成: 1. 安装前准备 安装JAVA环境:由于STM32CubeMX软件是基于JAVA环境运行的,所以需要先安装Java Runtime Env…...

【适配鸿蒙next】Flutter 新一代混合栈管理框架
前言 据最新消息显示,华为今年下半年将全面转向其自主平台HarmonyOS,放弃Android系统。 报道中提到,下一版HarmonyOS预计将随华为即将推出的Mate 70旗舰系列一起发布。 据悉,HarmonyOS Next 已经扩展到4000个应用程序,…...

车载电子电气架构 --- 车载信息安全
我是穿拖鞋的汉子,魔都中坚持长期主义的汽车电子工程师。 老规矩,分享一段喜欢的文字,避免自己成为高知识低文化的工程师: 屏蔽力是信息过载时代一个人的特殊竞争力,任何消耗你的人和事,多看一眼都是你的不对。非必要不费力证明自己,无利益不试图说服别人,是精神上的节…...
【数据结构(邓俊辉)学习笔记】图04——双连通域分解
文章目录 0. 概述1 关节点与双连通域2 蛮力算法3 可行算法4 实现5 示例6 复杂度 0. 概述 学习下双连通域分解,这里略微有一点点难,这个算是DFS算法的非常非常经典的应用,解决的问题也非常非常有用。 1 关节点与双连通域 连通性很好理解&am…...

UI学习(二)
UI学习(二) 文章目录 UI学习(二)布局子视图手动布局自动布局 导航控制器导航控制器基础导航控制器的切换导航栏工具栏 分栏控制器分栏控制器协议部分的内容UITableView基础部分相关的协议函数高级协议与单元格 多界面传值 布局子视…...

【嵌入式】波特率9600,发送8个字节需要多少时间,如何计算?
问题: 波特率9600,发送 01 03 00 00 00 04 44 09 (8字节) 需要多少时间,如何计算? 在计算发送数据的时间时,首先要考虑波特率以及每个字符的数据格式。对于波特率9600和标准的UART数据格式(1个起始位&…...
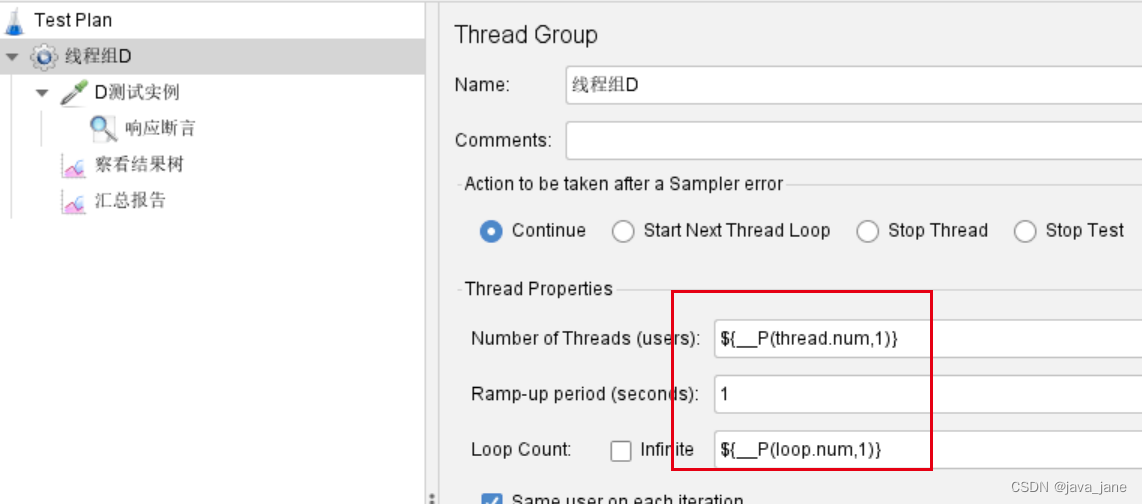
jmeter -n -t 使用非GUI模式运行脚本说明
命令模式下执行jmx文件 jmeter -n -t fatie.jmx -l results\t4.jtl -e -o results\h1 表示以命令行模式运行当前目录下的脚本fatie.jmx,将结果存入当前目录下的results\t1.jtl,并且生成html格式的报告,写入文件夹results\h1。 说明:生成结果的文件夹r…...

网络流媒体协议——HLS协议
HTTP 实时流媒体(HTTP Live Streaming,HLS)协议是苹果公司提出的主要用于直播的流媒体协议。一个完整的基于HLS协议的流媒体直播系统由四部分组成,即音视频采集器、媒体服务器、媒体分发器和播放客户端。 媒体服务器 媒体服务器的…...
Linux服务器扩容及磁盘分区(LVM和非LVM)
Linux扩容及磁盘分区(LVM和非LVM) 本文主要介绍了阿里云服务器centos的扩容方法:非LVM分区扩容方法(系统盘),以及磁盘改LVM并分区(数据盘)。主要是ext4文件系统及xfs磁盘scsi MBR分…...

支持向量机
支持向量机(SVM) 支持向量机(Support Vector Machine, SVM)是一种用于分类和回归任务的监督学习算法。SVM 的核心思想是找到一个最优的决策边界(或称为超平面),以最大化不同类别之间的间隔。以…...

Kafka 架构
1 整体架构 1.1 Zookeeper Zookeeper 是一个分布式协调服务,用于管理 Kafka 的元数据。它负责维护 Kafka 集群的配置信息、Broker 列表和分区的 Leader 信息。 Zookeeper 确保了 Kafka 集群的高可用性和可靠性。 但 Zookeeper 已经成为 Kafka 性能瓶颈,…...

20 鸿蒙LiteOS信号量原理实战:信号量作用、MAX_COUNT含义、线程同步源码解析
鸿蒙LiteOS信号量原理实战:信号量作用、MAX_COUNT含义、线程同步源码解析 一、前言 本文基于小凌派 RK2206鸿蒙LiteOS标准示例代码,从零讲解LiteOS内核信号量核心概念:为什么需要信号量、信号量能干什么、MAX_COUNT参数真实含义,…...

终极指南:如何使用Etcher安全快速烧录系统镜像到SD卡和USB驱动器
终极指南:如何使用Etcher安全快速烧录系统镜像到SD卡和USB驱动器 【免费下载链接】etcher Flash OS images to SD cards & USB drives, safely and easily. 项目地址: https://gitcode.com/GitHub_Trending/et/etcher Etcher(BalenaEtcher&am…...

基于物理信息神经网络与降阶模型的文物数字孪生保护框架
1. 项目概述:当文化遗产保护遇上科学计算与人工智能最近几年,我一直在关注一个交叉领域:如何用前沿的计算科学和人工智能技术,去解决那些看似传统、实则充满挑战的文物保护难题。这次分享的“基于SciML与数字孪生的文化遗产保护框…...

通用汽车IT部门裁员600人,为AI人才腾空间,软件团队变革进行时
通用汽车IT部门裁员600人,AI人才成新宠 通用汽车证实已对其IT部门进行裁员,约600名领薪员工(占比10%以上)被裁,目的是清除专业知识不再适用的员工,为具有AI背景的人员腾出空间。公司表示这是面向未来做好准…...

初次使用Taotoken平台从注册到完成API调用的全程指引
🚀 告别海外账号与网络限制!稳定直连全球优质大模型,限时半价接入中。 👉 点击领取海量免费额度 初次使用Taotoken平台从注册到完成API调用的全程指引 对于初次接触大模型API的开发者而言,从注册平台到成功发出第一个…...

NovelForge:AI长篇小说创作引擎,结构化写作与知识图谱实战
1. 项目概述:一个为长篇创作而生的AI写作伙伴如果你和我一样,是一个对长篇故事创作充满热情,但又时常被海量设定、角色关系、情节推进和前后一致性搞得焦头烂额的作者,那么NovelForge的出现,可能正是我们一直在等待的“…...

从DEM到glTF:打造跨平台三维地形模型的完整工作流
1. 为什么需要从DEM到glTF的三维地形工作流 三维地形模型在游戏开发、虚拟现实、城市规划等领域有着广泛应用。传统的工作流程往往存在平台兼容性差、数据转换复杂等问题。glTF作为"3D界的JPEG",已经成为跨平台三维模型交换的事实标准。将数字高程模型&am…...

终极分布式编程框架全攻略:从零掌握Awesome BigData核心技术
终极分布式编程框架全攻略:从零掌握Awesome BigData核心技术 【免费下载链接】awesome-bigdata A curated list of awesome big data frameworks, ressources and other awesomeness. 项目地址: https://gitcode.com/gh_mirrors/aw/awesome-bigdata 在数据爆…...

Cursor Pro激活器:终极解决方案告别API限制,实现无限免费使用
Cursor Pro激活器:终极解决方案告别API限制,实现无限免费使用 【免费下载链接】cursor-free-vip [Support 0.45](Multi Language 多语言)自动注册 Cursor Ai ,自动重置机器ID , 免费升级使用Pro 功能: Youv…...

使用Taotoken后如何清晰观测API用量与成本变化
🚀 告别海外账号与网络限制!稳定直连全球优质大模型,限时半价接入中。 👉 点击领取海量免费额度 使用Taotoken后如何清晰观测API用量与成本变化 对于团队管理者或开发者而言,将大模型能力集成到产品中后,资…...