yolo-inference多后端+多任务+多算法+多精度模型 框架开发记录(python版)
先贴出github地址,欢迎大家批评指正:https://github.com/taifyang/yolo-inference
不知不觉LZ已经快工作两年了,由于之前的工作内容主要和模型部署相关,想着利用闲暇时间写一些推理方面的经验总结,于是有了这个工程。其实本来也是自己写了玩的,不过已经陆续迭代半年多了,期间也通过借签优秀代码吸收了经验,索性总结一下心得~
1.0 初始版本
1.1 支持多精度模型
1.2 支持tensorrt的cuda前后处理
1.3 支持onnxruntime的int8推理
1.4 onnxruntime推理代码采用cpp风格接口
1.5 采用抽象工厂和单例模式重构代码
1.6 增加cmake编译支持和重构python代码
1.7 增加Linux系统编译支持
2.0 增加yolov8检测器支持
2.1 增加cmake条件编译选项和自动化测试脚本
3.0 增加分类和分割算法支持
3.1 重构代码结构和缺陷修复
初始版本的接口类定义如下:
import cv2
import numpy as np
from enum import Enum
from abc import ABC, abstractclassmethod...class Device_Type(Enum):CPU = 0GPU = 1class YOLOv5(ABC):def infer(self, image_path:str) -> None:self.image = cv2.imread(image_path)self.result = self.image.copy()self.pre_process()self.process()self.post_process()cv2.imwrite("result.jpg", self.result)cv2.imshow("result", self.result)cv2.waitKey(0)@abstractclassmethoddef pre_process(self) -> None:pass@abstractclassmethoddef process(self) -> None:pass    @abstractclassmethoddef post_process(self) -> None:pass
子类如YOLOv5_ONNXRuntime继承上述类:
import onnxruntime
from yolov5 import *
from utils import *class YOLOv5_ONNXRuntime(YOLOv5):def __init__(self, model_path:str, device_type:Device_Type) -> None:super().__init__()if device_type == Device_Type.CPU:self.onnx_session = onnxruntime.InferenceSession(model_path, providers=['CPUExecutionProvider'])if device_type == Device_Type.GPU:self.onnx_session = onnxruntime.InferenceSession(model_path, providers=['CUDAExecutionProvider'])self.input_name = []for node in self.onnx_session.get_inputs():self.input_name.append(node.name)self.output_name = []for node in self.onnx_session.get_outputs():self.output_name.append(node.name)self.inputs = {}def pre_process(self) -> None:input = letterbox(self.image, input_shape)input = input[:, :, ::-1].transpose(2, 0, 1).astype(dtype=np.float32)  #BGR2RGB和HWC2CHWinput = input / 255.0input = np.expand_dims(input, axis=0)for name in self.input_name:self.inputs[name] = inputdef process(self) -> None:self.outputs = self.onnx_session.run(None, self.inputs)def post_process(self) -> None:self.outputs = np.squeeze(self.outputs)self.outputs = self.outputs[self.outputs[..., 4] > confidence_threshold]classes_scores = self.outputs[..., 5:]     boxes = []scores = []class_ids = []for i in range(len(classes_scores)):class_id = np.argmax(classes_scores[i])self.outputs[i][4] *= classes_scores[i][class_id]self.outputs[i][5] = class_idif self.outputs[i][4] > score_threshold:boxes.append(self.outputs[i][:6])scores.append(self.outputs[i][4])class_ids.append(self.outputs[i][5])               boxes = np.array(boxes)boxes = xywh2xyxy(boxes)scores = np.array(scores)indices = nms(boxes, scores, score_threshold, nms_threshold) boxes = boxes[indices]draw(self.result, boxes)
调用demo如下:
from yolov5_onnxruntime import *yolov5 = YOLOv5_ONNXRuntime(model_path="yolov5n.onnx", device_type=Device_Type.CPU)
yolov5.infer("bus.jpg")
后续支持其他功能后调用demo增加了parse_args解析命令参数,通过importlib导入相应模块,并通过getattr通过类名获取类(反射机制),具体内容如下:
import argparse
import importlib
from yolov5 import *def parse_args():parser = argparse.ArgumentParser('yolov5')parser.add_argument('--algo_type', default='ONNXRuntime', type=str, help='ONNXRuntime, OpenCV, OpenVINO, TensorRT')parser.add_argument('--model_path', default='yolov5n_fp32.onnx', type=str, help='the path of model')parser.add_argument('--device_type',  default='cpu', type=str, help='cpu, gpu')parser.add_argument('--model_type',  default='fp32', type=str, help='fp32, fp16, int8')return parser.parse_args()if __name__ == '__main__':args = parse_args()algo_type = args.algo_typealgo = importlib.import_module('yolov5_' + algo_type.lower()) YOLOv5 = getattr(algo, 'YOLOv5_' + algo_type)model_path = args.model_pathif args.device_type == 'cpu':device_type = Device_Type.CPUelif args.device_type == 'gpu':device_type = Device_Type.GPUif args.model_type == 'fp32':model_type = Model_Type.FP32elif args.model_type == 'fp16':model_type = Model_Type.FP16elif args.model_type == 'int8':model_type = Model_Type.INT8yolov5 = YOLOv5(model_path, device_type, model_type)yolov5.infer("test.mp4")
在3.0版本中由于增加了对分类和分割算法的支持,以onnxruntime框架为例具体实现类如下:
import onnxruntime
from yolo import *
from utils import *class YOLO_ONNXRuntime(YOLO):def __init__(self, algo_type:Algo_Type, device_type:Device_Type, model_type:Model_Type, model_path:str) -> None:super().__init__()assert os.path.exists(model_path), "model not exists!"if device_type == Device_Type.CPU:self.onnx_session = onnxruntime.InferenceSession(model_path, providers=['CPUExecutionProvider'])elif device_type == Device_Type.GPU:self.onnx_session = onnxruntime.InferenceSession(model_path, providers=['CUDAExecutionProvider'])self.algo_type = algo_typeself.model_type = model_typeself.input_name = []for node in self.onnx_session.get_inputs(): self.input_name.append(node.name)self.output_name = []for node in self.onnx_session.get_outputs():self.output_name.append(node.name)self.input = {}@abstractclassmethod       def pre_process(self) -> None:passdef process(self) -> None:self.output = self.onnx_session.run(None, self.input)@abstractclassmethod         def post_process(self) -> None:passclass YOLO_ONNXRuntime_Classification(YOLO_ONNXRuntime):           def pre_process(self) -> None:if self.algo_type == Algo_Type.YOLOv5:crop_size = min(self.image.shape[0], self.image.shape[1])left = (self.image.shape[1] - crop_size) // 2top = (self.image.shape[0] - crop_size) // 2crop_image = self.image[top:(top+crop_size), left:(left+crop_size), ...]input = cv2.resize(crop_image, self.input_shape)input = input / 255.0input = input - np.array([0.406, 0.456, 0.485])input = input / np.array([0.225, 0.224, 0.229])if self.algo_type == Algo_Type.YOLOv8:self.input_shape = (224, 224)if self.image.shape[1] > self.image.shape[0]:self.image = cv2.resize(self.image, (self.input_shape[0]*self.image.shape[1]//self.image.shape[0], self.input_shape[0]))else:self.image = cv2.resize(self.image, (self.input_shape[1], self.input_shape[1]*self.image.shape[0]//self.image.shape[1]))crop_size = min(self.image.shape[0], self.image.shape[1])left = (self.image.shape[1] - crop_size) // 2top = (self.image.shape[0] - crop_size) // 2crop_image = self.image[top:(top+crop_size), left:(left+crop_size), ...]input = cv2.resize(crop_image, self.input_shape)input = input / 255.0input = input[:, :, ::-1].transpose(2, 0, 1)  #BGR2RGB和HWC2CHWif self.model_type == Model_Type.FP32 or self.model_type == Model_Type.INT8:input = np.expand_dims(input, axis=0).astype(dtype=np.float32)elif self.model_type == Model_Type.FP16:input = np.expand_dims(input, axis=0).astype(dtype=np.float16)for name in self.input_name:self.input[name] = inputdef post_process(self) -> None:output = np.squeeze(self.output).astype(dtype=np.float32)if self.algo_type == Algo_Type.YOLOv5:print("class:", np.argmax(output), " scores:", np.exp(np.max(output))/np.sum(np.exp(output)))if self.algo_type == Algo_Type.YOLOv8:print("class:", np.argmax(output), " scores:", np.max(output))class YOLO_ONNXRuntime_Detection(YOLO_ONNXRuntime):def pre_process(self) -> None:input = letterbox(self.image, self.input_shape)input = input[:, :, ::-1].transpose(2, 0, 1)  #BGR2RGB和HWC2CHWinput = input / 255.0if self.model_type == Model_Type.FP32 or self.model_type == Model_Type.INT8:input = np.expand_dims(input, axis=0).astype(dtype=np.float32)elif self.model_type == Model_Type.FP16:input = np.expand_dims(input, axis=0).astype(dtype=np.float16)for name in self.input_name:self.input[name] = inputdef post_process(self) -> None:output = np.squeeze(self.output[0]).astype(dtype=np.float32)boxes = []scores = []class_ids = []if self.algo_type == Algo_Type.YOLOv5:output = output[output[..., 4] > self.confidence_threshold]classes_scores = output[..., 5:85]     for i in range(output.shape[0]):class_id = np.argmax(classes_scores[i])obj_score = output[i][4]cls_score = classes_scores[i][class_id]output[i][4] = obj_score * cls_scoreoutput[i][5] = class_idif output[i][4] > self.score_threshold:boxes.append(output[i][:6])scores.append(output[i][4])class_ids.append(output[i][5])   output[i][5:] *= obj_scoreif self.algo_type == Algo_Type.YOLOv8: for i in range(output.shape[0]):classes_scores = output[..., 4:]     class_id = np.argmax(classes_scores[i])output[i][4] = classes_scores[i][class_id]output[i][5] = class_idif output[i][4] > self.score_threshold:boxes.append(output[i, :6])scores.append(output[i][4])class_ids.append(output[i][5])                  boxes = np.array(boxes)boxes = xywh2xyxy(boxes)scores = np.array(scores)indices = nms(boxes, scores, self.score_threshold, self.nms_threshold) boxes = boxes[indices]self.result = draw(self.image, boxes)class YOLO_ONNXRuntime_Segmentation(YOLO_ONNXRuntime):def pre_process(self) -> None:input = letterbox(self.image, self.input_shape)input = input[:, :, ::-1].transpose(2, 0, 1)  #BGR2RGB和HWC2CHWinput = input / 255.0if self.model_type == Model_Type.FP32 or self.model_type == Model_Type.INT8:input = np.expand_dims(input, axis=0).astype(dtype=np.float32)elif self.model_type == Model_Type.FP16:input = np.expand_dims(input, axis=0).astype(dtype=np.float16)for name in self.input_name:self.input[name] = inputdef post_process(self) -> None:output = np.squeeze(self.output[0]).astype(dtype=np.float32)boxes = []scores = []class_ids = []preds = []if self.algo_type == Algo_Type.YOLOv5:output = output[output[..., 4] > self.confidence_threshold]classes_scores = output[..., 5:85]     for i in range(output.shape[0]):class_id = np.argmax(classes_scores[i])obj_score = output[i][4]cls_score = classes_scores[i][class_id]output[i][4] = obj_score * cls_scoreoutput[i][5] = class_idif output[i][4] > self.score_threshold:boxes.append(output[i][:6])scores.append(output[i][4])class_ids.append(output[i][5])   output[i][5:] *= obj_scorepreds.append(output[i])if self.algo_type == Algo_Type.YOLOv8: for i in range(output.shape[0]):classes_scores = output[..., 4:84]     class_id = np.argmax(classes_scores[i])output[i][4] = classes_scores[i][class_id]output[i][5] = class_idif output[i][4] > self.score_threshold:boxes.append(output[i, :6])scores.append(output[i][4])class_ids.append(output[i][5])    preds.append(output[i])           boxes = np.array(boxes)boxes = xywh2xyxy(boxes)scores = np.array(scores)indices = nms(boxes, scores, self.score_threshold, self.nms_threshold) boxes = boxes[indices]masks_in = np.array(preds)[indices][..., -32:]proto= np.squeeze(self.output[1]).astype(dtype=np.float32)c, mh, mw = proto.shape masks = (1/ (1 + np.exp(-masks_in @ proto.reshape(c, -1)))).reshape(-1, mh, mw)downsampled_bboxes = boxes.copy()downsampled_bboxes[:, 0] *= mw / self.input_shape[0]downsampled_bboxes[:, 2] *= mw / self.input_shape[0]downsampled_bboxes[:, 3] *= mh / self.input_shape[1]downsampled_bboxes[:, 1] *= mh / self.input_shape[1]masks = crop_mask(masks, downsampled_bboxes)self.result = draw(self.image, boxes, masks)
即YOLO基类派生出YOLO_ONNXRuntime等类,再由YOLO_ONNXRuntime类派生一系列具体算法实现子类。由于功能的扩充,此时调用方法变得比较臃肿:
import argparse
import importlib
from yolo import *def parse_args():parser = argparse.ArgumentParser('yolo_inference')parser.add_argument('--algo_type', default='YOLOv8', type=str, help='YOLOv5, YOLOv8')parser.add_argument('--backend_type', default='TensorRT', type=str, help='ONNXRuntime, OpenCV, OpenVINO, TensorRT')parser.add_argument('--task_type', default='Segmentation', type=str, help='Classification, Detection, Segmentation')parser.add_argument('--device_type',  default='GPU', type=str, help='CPU, GPU')parser.add_argument('--model_type',  default='FP32', type=str, help='FP32, FP16, INT8')parser.add_argument('--model_path', default='yolov8n_seg_fp32.engine', type=str, help='the path of model')parser.add_argument('--input_path', default="bus.jpg", type=str, help='save result')parser.add_argument('--output_path', default="", type=str, help='save result')parser.add_argument('--show_result', default=False, type=bool, help='show result')parser.add_argument('--save_result', default=True, type=bool, help='save result')return parser.parse_args()if __name__ == '__main__':args = parse_args()backend_type = args.backend_typebackend = importlib.import_module('yolo_' + backend_type.lower()) yolo = getattr(backend, 'YOLO_' + backend_type + '_' + args.task_type)model_path = args.model_pathif args.algo_type == 'YOLOv5':algo_type = Algo_Type.YOLOv5if args.algo_type == 'YOLOv8':algo_type = Algo_Type.YOLOv8if args.task_type == 'Classification':task_type = Task_Type.Classificationif args.task_type == 'Detection':task_type = Task_Type.Detectionif args.task_type == 'Segmentation':task_type = Task_Type.Segmentation  if args.device_type == 'CPU':device_type = Device_Type.CPUif args.device_type == 'GPU':device_type = Device_Type.GPUif args.model_type == 'FP32':model_type = Model_Type.FP32if args.model_type == 'FP16':model_type = Model_Type.FP16if args.model_type == 'INT8':model_type = Model_Type.INT8show_result = args.show_result and (task_type == Task_Type.Detection or task_type == Task_Type.Segmentation)save_result = args.save_result and (task_type == Task_Type.Detection or task_type == Task_Type.Segmentation)args.output_path = "./result/"+str(args.algo_type)+"_"+str(args.backend_type)+"_"+str(args.task_type)+"_"+str(args.device_type)+"_"+str(args.model_type)+".jpg"yolo = yolo(algo_type, device_type, model_type, model_path)yolo.infer(args.input_path, args.output_path, show_result, save_result)
3.1版本中,借签了https://github.com/ultralytics/ultralytics的做法,项目层级划分如下:
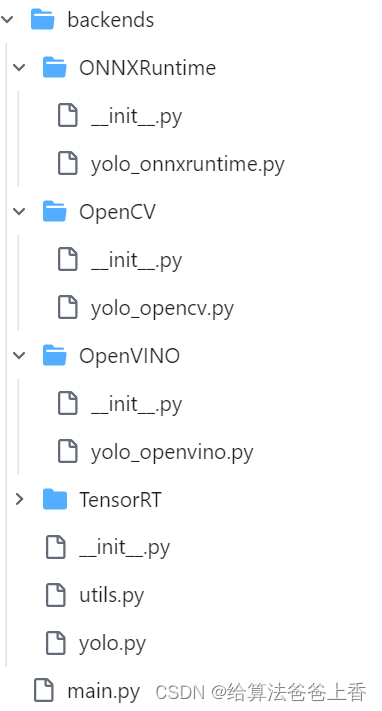
即将不同推理后端封装入算法包,此时yolo.py内容如下:
import os
import cv2
import time
from enum import Enum
import backendsclass YOLO:  def __init__(self) -> None:super().__init__()self.score_threshold = 0.2self.nms_threshold = 0.5self.confidence_threshold = 0.2  self.input_shape = (640, 640) def task_map(self):return {'ONNXRuntime':{'Classify':backends.ONNXRuntime.YOLO_ONNXRuntime_Classify,'Detect':backends.ONNXRuntime.YOLO_ONNXRuntime_Detect,'Segment':backends.ONNXRuntime.YOLO_ONNXRuntime_Segment,},'OpenCV':{'Classify':backends.OpenCV.YOLO_OpenCV_Classify,'Detect':backends.OpenCV.YOLO_OpenCV_Detect,#'Segment':tasks.OpenCV.YOLO_OpenCV_Segment,},'OpenVINO':{'Classify':backends.OpenVINO.YOLO_OpenVINO_Classify,'Detect':backends.OpenVINO.YOLO_OpenVINO_Detect,'Segment':backends.OpenVINO.YOLO_OpenVINO_Segment,},'TensorRT':{'Classify':backends.TensorRT.YOLO_TensorRT_Classify,'Detect':backends.TensorRT.YOLO_TensorRT_Detect,'Segment':backends.TensorRT.YOLO_TensorRT_Segment,},}def infer(self, input_path:str, output_path:str, show_result:bool, save_result:bool) -> None:assert os.path.exists(input_path), 'input not exists!'if input_path.endswith('.bmp') or input_path.endswith('.jpg') or input_path.endswith('.png'):self.image = cv2.imread(input_path)self.pre_process()self.process()self.post_process()if save_result and output_path!='':cv2.imwrite(output_path, self.result)if show_result:cv2.imshow('result', self.result)cv2.waitKey(0)elif input_path.endswith('.mp4'):cap = cv2.VideoCapture(input_path)start = time.time()if save_result and output_path!='':fourcc = cv2.VideoWriter_fourcc(*'XVID')wri = cv2.VideoWriter(output_path, fourcc, 30.0, (1280,720))while True:ret, self.image  = cap.read()if not ret:breakself.result = self.image.copy()self.pre_process()self.process()self.post_process()if show_result:cv2.imshow('result', self.result)cv2.waitKey(1)if save_result and output_path!='':wri.write(self.result)end = time.time()print((end-start)*1000, 'ms')
即通过task_map接口返回具体算法类的实现。其同级的__init__.py文件内容如下:
from backends import ONNXRuntime, OpenCV, OpenVINO, TensorRT__all__ = 'ONNXRuntime', 'OpenCV', 'OpenVINO', 'TensorRT'
用来初始化ONNXRuntime,OpenCV,OpenVINO,TensorRT四个package。ONNXRuntime文件夹下的yolo_onnxruntime.py内容为:
import onnxruntime
from backends.yolo import *
from backends.utils import *class YOLO_ONNXRuntime(YOLO):def __init__(self, algo_type:str, device_type:str, model_type:str, model_path:str) -> None:super().__init__()assert os.path.exists(model_path), "model not exists!"if device_type == 'CPU':self.onnx_session = onnxruntime.InferenceSession(model_path, providers=['CPUExecutionProvider'])elif device_type == 'GPU':self.onnx_session = onnxruntime.InferenceSession(model_path, providers=['CUDAExecutionProvider'])self.algo_type = algo_typeself.model_type = model_typeself.input_name = []for node in self.onnx_session.get_inputs(): self.input_name.append(node.name)self.output_name = []for node in self.onnx_session.get_outputs():self.output_name.append(node.name)self.input = {}def process(self) -> None:self.output = self.onnx_session.run(None, self.input)class YOLO_ONNXRuntime_Classify(YOLO_ONNXRuntime):           def pre_process(self) -> None:if self.algo_type == 'YOLOv5':crop_size = min(self.image.shape[0], self.image.shape[1])left = (self.image.shape[1] - crop_size) // 2top = (self.image.shape[0] - crop_size) // 2crop_image = self.image[top:(top+crop_size), left:(left+crop_size), ...]input = cv2.resize(crop_image, self.input_shape)input = input / 255.0input = input - np.array([0.406, 0.456, 0.485])input = input / np.array([0.225, 0.224, 0.229])if self.algo_type == 'YOLOv8':self.input_shape = (224, 224)if self.image.shape[1] > self.image.shape[0]:self.image = cv2.resize(self.image, (self.input_shape[0]*self.image.shape[1]//self.image.shape[0], self.input_shape[0]))else:self.image = cv2.resize(self.image, (self.input_shape[1], self.input_shape[1]*self.image.shape[0]//self.image.shape[1]))crop_size = min(self.image.shape[0], self.image.shape[1])left = (self.image.shape[1] - crop_size) // 2top = (self.image.shape[0] - crop_size) // 2crop_image = self.image[top:(top+crop_size), left:(left+crop_size), ...]input = cv2.resize(crop_image, self.input_shape)input = input / 255.0input = input[:, :, ::-1].transpose(2, 0, 1)  #BGR2RGB和HWC2CHWif self.model_type == 'FP32' or self.model_type == 'INT8':input = np.expand_dims(input, axis=0).astype(dtype=np.float32)elif self.model_type == 'FP16':input = np.expand_dims(input, axis=0).astype(dtype=np.float16)for name in self.input_name:self.input[name] = inputdef post_process(self) -> None:output = np.squeeze(self.output).astype(dtype=np.float32)if self.algo_type == 'YOLOv5':print("class:", np.argmax(output), " scores:", np.exp(np.max(output))/np.sum(np.exp(output)))if self.algo_type == 'YOLOv8':print("class:", np.argmax(output), " scores:", np.max(output))class YOLO_ONNXRuntime_Detect(YOLO_ONNXRuntime):def pre_process(self) -> None:input = letterbox(self.image, self.input_shape)input = input[:, :, ::-1].transpose(2, 0, 1)  #BGR2RGB和HWC2CHWinput = input / 255.0if self.model_type == 'FP32' or self.model_type == 'INT8':input = np.expand_dims(input, axis=0).astype(dtype=np.float32)elif self.model_type == 'FP16':input = np.expand_dims(input, axis=0).astype(dtype=np.float16)for name in self.input_name:self.input[name] = inputdef post_process(self) -> None:output = np.squeeze(self.output[0]).astype(dtype=np.float32)boxes = []scores = []class_ids = []if self.algo_type == 'YOLOv5':output = output[output[..., 4] > self.confidence_threshold]classes_scores = output[..., 5:85]     for i in range(output.shape[0]):class_id = np.argmax(classes_scores[i])obj_score = output[i][4]cls_score = classes_scores[i][class_id]output[i][4] = obj_score * cls_scoreoutput[i][5] = class_idif output[i][4] > self.score_threshold:boxes.append(output[i][:6])scores.append(output[i][4])class_ids.append(output[i][5])   output[i][5:] *= obj_scoreif self.algo_type == 'YOLOv8': for i in range(output.shape[0]):classes_scores = output[..., 4:]     class_id = np.argmax(classes_scores[i])output[i][4] = classes_scores[i][class_id]output[i][5] = class_idif output[i][4] > self.score_threshold:boxes.append(output[i, :6])scores.append(output[i][4])class_ids.append(output[i][5])                  boxes = np.array(boxes)boxes = xywh2xyxy(boxes)scores = np.array(scores)indices = nms(boxes, scores, self.score_threshold, self.nms_threshold) boxes = boxes[indices]self.result = draw(self.image, boxes)class YOLO_ONNXRuntime_Segment(YOLO_ONNXRuntime):def pre_process(self) -> None:input = letterbox(self.image, self.input_shape)input = input[:, :, ::-1].transpose(2, 0, 1)  #BGR2RGB和HWC2CHWinput = input / 255.0if self.model_type == 'FP32' or self.model_type == 'INT8':input = np.expand_dims(input, axis=0).astype(dtype=np.float32)elif self.model_type == 'FP16':input = np.expand_dims(input, axis=0).astype(dtype=np.float16)for name in self.input_name:self.input[name] = inputdef post_process(self) -> None:output = np.squeeze(self.output[0]).astype(dtype=np.float32)boxes = []scores = []class_ids = []preds = []if self.algo_type == 'YOLOv5':output = output[output[..., 4] > self.confidence_threshold]classes_scores = output[..., 5:85]     for i in range(output.shape[0]):class_id = np.argmax(classes_scores[i])obj_score = output[i][4]cls_score = classes_scores[i][class_id]output[i][4] = obj_score * cls_scoreoutput[i][5] = class_idif output[i][4] > self.score_threshold:boxes.append(output[i][:6])scores.append(output[i][4])class_ids.append(output[i][5])   output[i][5:] *= obj_scorepreds.append(output[i])if self.algo_type == 'YOLOv8': for i in range(output.shape[0]):classes_scores = output[..., 4:84]     class_id = np.argmax(classes_scores[i])output[i][4] = classes_scores[i][class_id]output[i][5] = class_idif output[i][4] > self.score_threshold:boxes.append(output[i, :6])scores.append(output[i][4])class_ids.append(output[i][5])    preds.append(output[i])           boxes = np.array(boxes)boxes = xywh2xyxy(boxes)scores = np.array(scores)indices = nms(boxes, scores, self.score_threshold, self.nms_threshold) boxes = boxes[indices]masks_in = np.array(preds)[indices][..., -32:]proto= np.squeeze(self.output[1]).astype(dtype=np.float32)c, mh, mw = proto.shape masks = (1/ (1 + np.exp(-masks_in @ proto.reshape(c, -1)))).reshape(-1, mh, mw)downsampled_bboxes = boxes.copy()downsampled_bboxes[:, 0] *= mw / self.input_shape[0]downsampled_bboxes[:, 2] *= mw / self.input_shape[0]downsampled_bboxes[:, 3] *= mh / self.input_shape[1]downsampled_bboxes[:, 1] *= mh / self.input_shape[1]masks = crop_mask(masks, downsampled_bboxes)self.result = draw(self.image, boxes, masks)
init.py文件内容为:
from backends.ONNXRuntime.yolo_onnxruntime import YOLO_ONNXRuntime_Classify, YOLO_ONNXRuntime_Detect, YOLO_ONNXRuntime_Segment__all__ = "YOLO_ONNXRuntime_Classify", "YOLO_ONNXRuntime_Detect", "YOLO_ONNXRuntime_Segment",
来初始化具体算法实现子类。
相关文章:
yolo-inference多后端+多任务+多算法+多精度模型 框架开发记录(python版)
先贴出github地址,欢迎大家批评指正:https://github.com/taifyang/yolo-inference 不知不觉LZ已经快工作两年了,由于之前的工作内容主要和模型部署相关,想着利用闲暇时间写一些推理方面的经验总结,于是有了这个工程。其…...

uniapp使用vue3语法构建自定义导航栏,适配小程序胶囊
具体代码 <template><view class"nav-wrapper-container" :style"height:navBarHeight px"><view class"nav-status-container" :style"height:navstatusBarHeight px;" /><view v-if"isCustom" clas…...

wpf、winform 监听USB拔插时触发
C# USB拔插监听 C#查找设备管理器中所有的 USB 设备 wpf、winform 监听USB拔插时触发 监听Windows USB 拔插时触发 private void MainWindow_Loaded(object sender, RoutedEventArgs e){FleckWebSocketConfig.OpenSocketConfig().GetAwaiter(); //websocket 服务开启用于监听W…...

C语言:指针笔试题
// 输入某一年的第几天,计算并输出它是这一年的第几月第几日。 /* 函数功能: 对给定的某一年的第几天,计算它是这一年的第几月第几日。 函数入口参数: 整形变量year,存储年; 整形变量yearDay,存储某一年的第几天&am…...
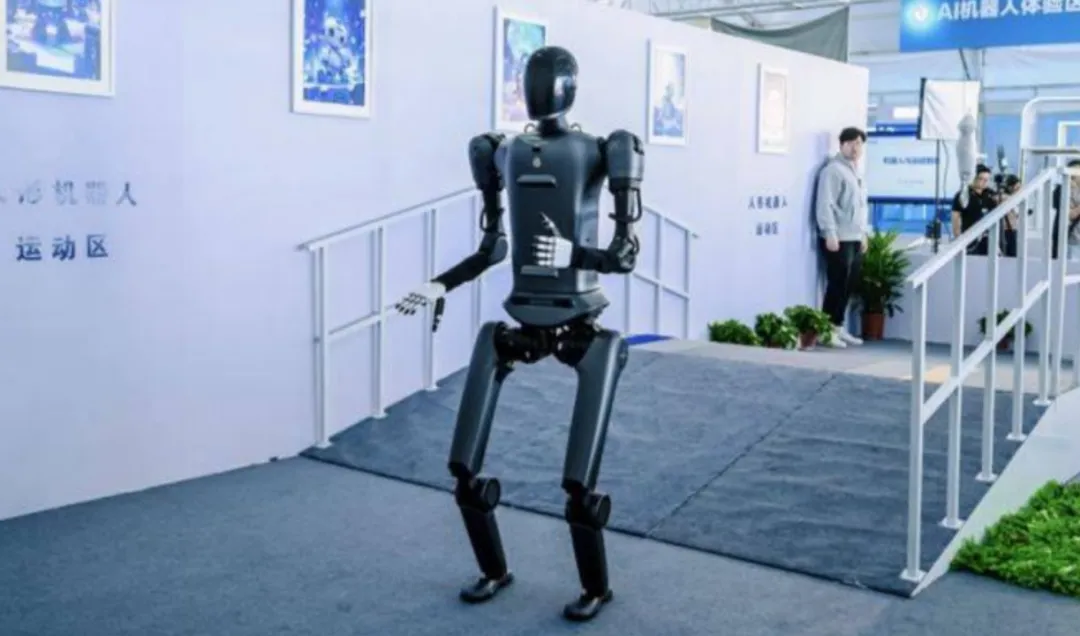
搜维尔科技:Movella旗下的Xsens在人形机器人开发中得到广泛应用
人形机器人的发展正在全球范围内受到广泛关注。作为机器人领域的重要分支,人形机器人因其具备高度仿真的外观和动作,以及更贴近人类的行为模式,有望逐渐成为人们日常生活和工业生产中的得力助手。在中国,这一领域的发展尤为引人注…...

k8s学习--kubernetes服务自动伸缩之水平伸缩(pod副本伸缩)HPA详细解释与案例应用
文章目录 前言HPA简介简单理解详细解释HPA 的工作原理监控系统负载模式HPA 的优势使用 HPA 的注意事项应用类型 应用环境1.metircs-server部署2.HPA演示示例(1)部署一个服务(2)创建HPA对象(3)执行压测 前言…...

Mock数据
Mock 数据 引入依赖 <dependency><groupId>com.github.jsonzou</groupId><artifactId>jmockdata</artifactId><version>4.3.0</version></dependency>mock 数据 MockConfig mockConfig new MockConfig().sizeRange(1, 1);A.…...

【MySQL】性能分析
https://www.bilibili.com/video/BV1Kr4y1i7ru/?p78 查看执行频次 查看当前数据库的 INSERT, UPDATE, DELETE, SELECT 访问频次: SHOW GLOBAL STATUS LIKE Com_______; 或者 SHOW SESSION STATUS LIKE Com_______; 慢查询日志 慢查询日志记录了所有执行时间超过指…...
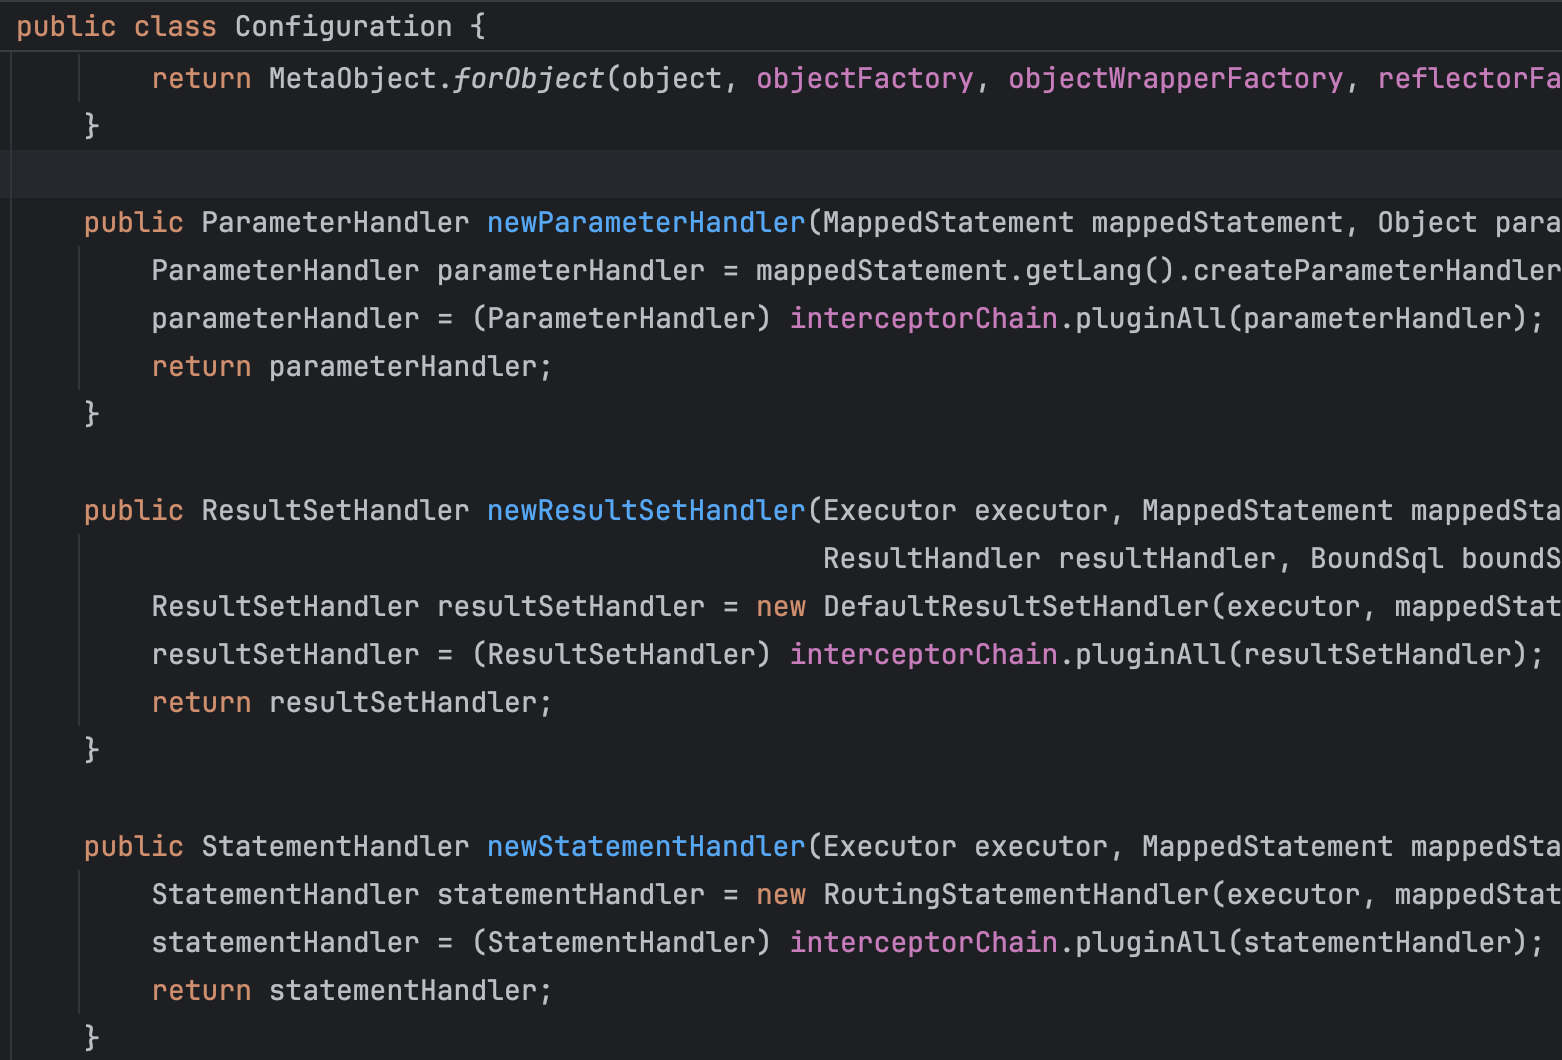
MyBatis插件机制
MyBatis插件机制是该框架提供的一种灵活扩展方式,允许开发者在不修改框架源代码的情况下对MyBatis的功能进行定制和增强。这种机制主要通过拦截器(Interceptor)实现,使得开发者可以拦截和修改MyBatis在执行SQL语句过程中的行为。 …...

NVIDIA Jetson Linux 35.3.1-开发指南-导言
原文地址:Welcome — Jetson Linux Developer Guide documentation (nvidia.com) 欢迎 本开发人员指南适用于 NVIDIA Jetson Linux版本 35.3.1 GA 。 最后更新: 2023年5月19日 NVIDIA Jetson是世界领先的边缘AI平台。其高性能、低功耗计算 深度学习 ,…...

14. fastLED调色板
Color Palettes Functions and class definitions for color palettes.调色板的函数和类定义。 RGB palettes map an 8-bit value (0-255) to an RGB color. You can create any color palette you wish; a couple of starters are provided: ForestColors_p, CloudColors_p…...
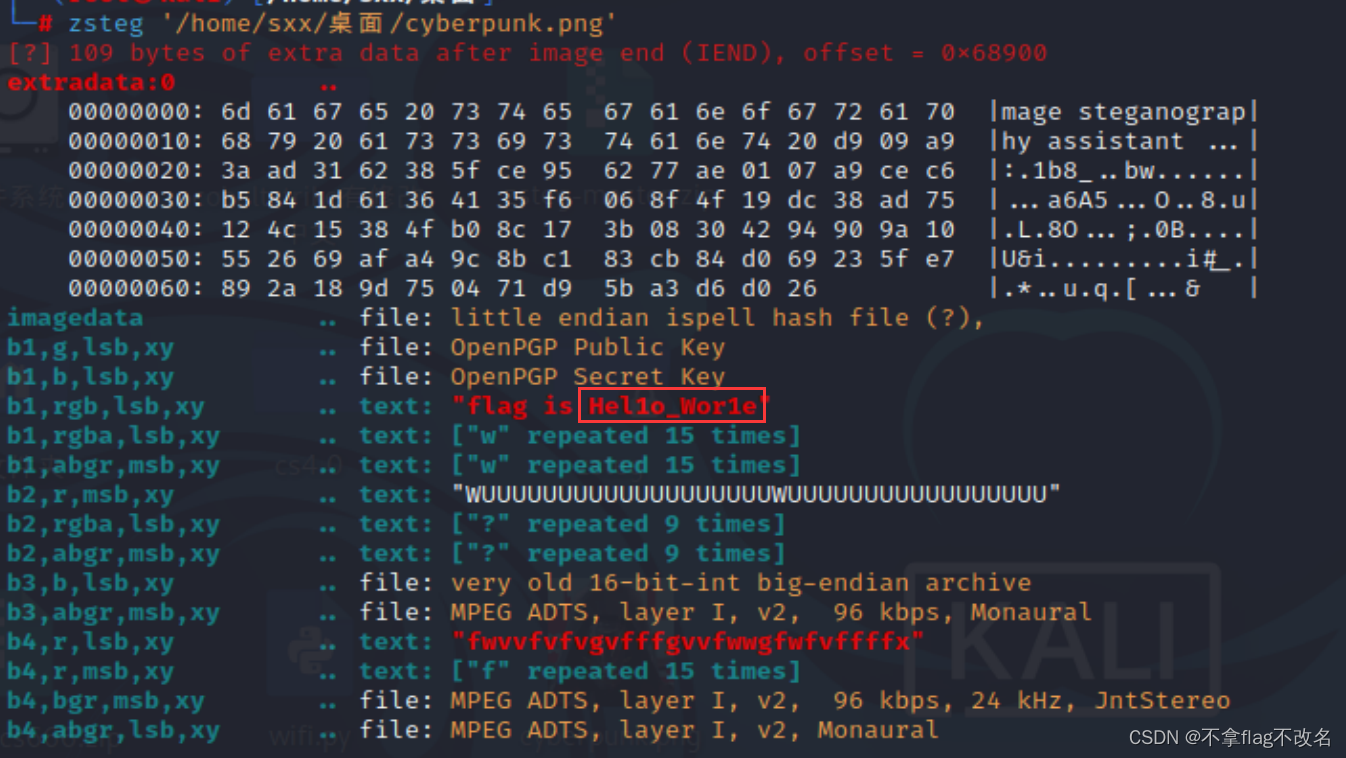
bugku---misc---赛博朋克
1、下载附件解压之后是一个txt文本,查看文本的时候看到头部有NG的字样 2、把txt改为png后缀得到一张图片 3、binwalk没发现奇怪的地方,分离出来还是图片 4、stegslove分析,切换图片没有发现奇怪地方 5、将通道rgb置为0。出现了flag但是flag不…...
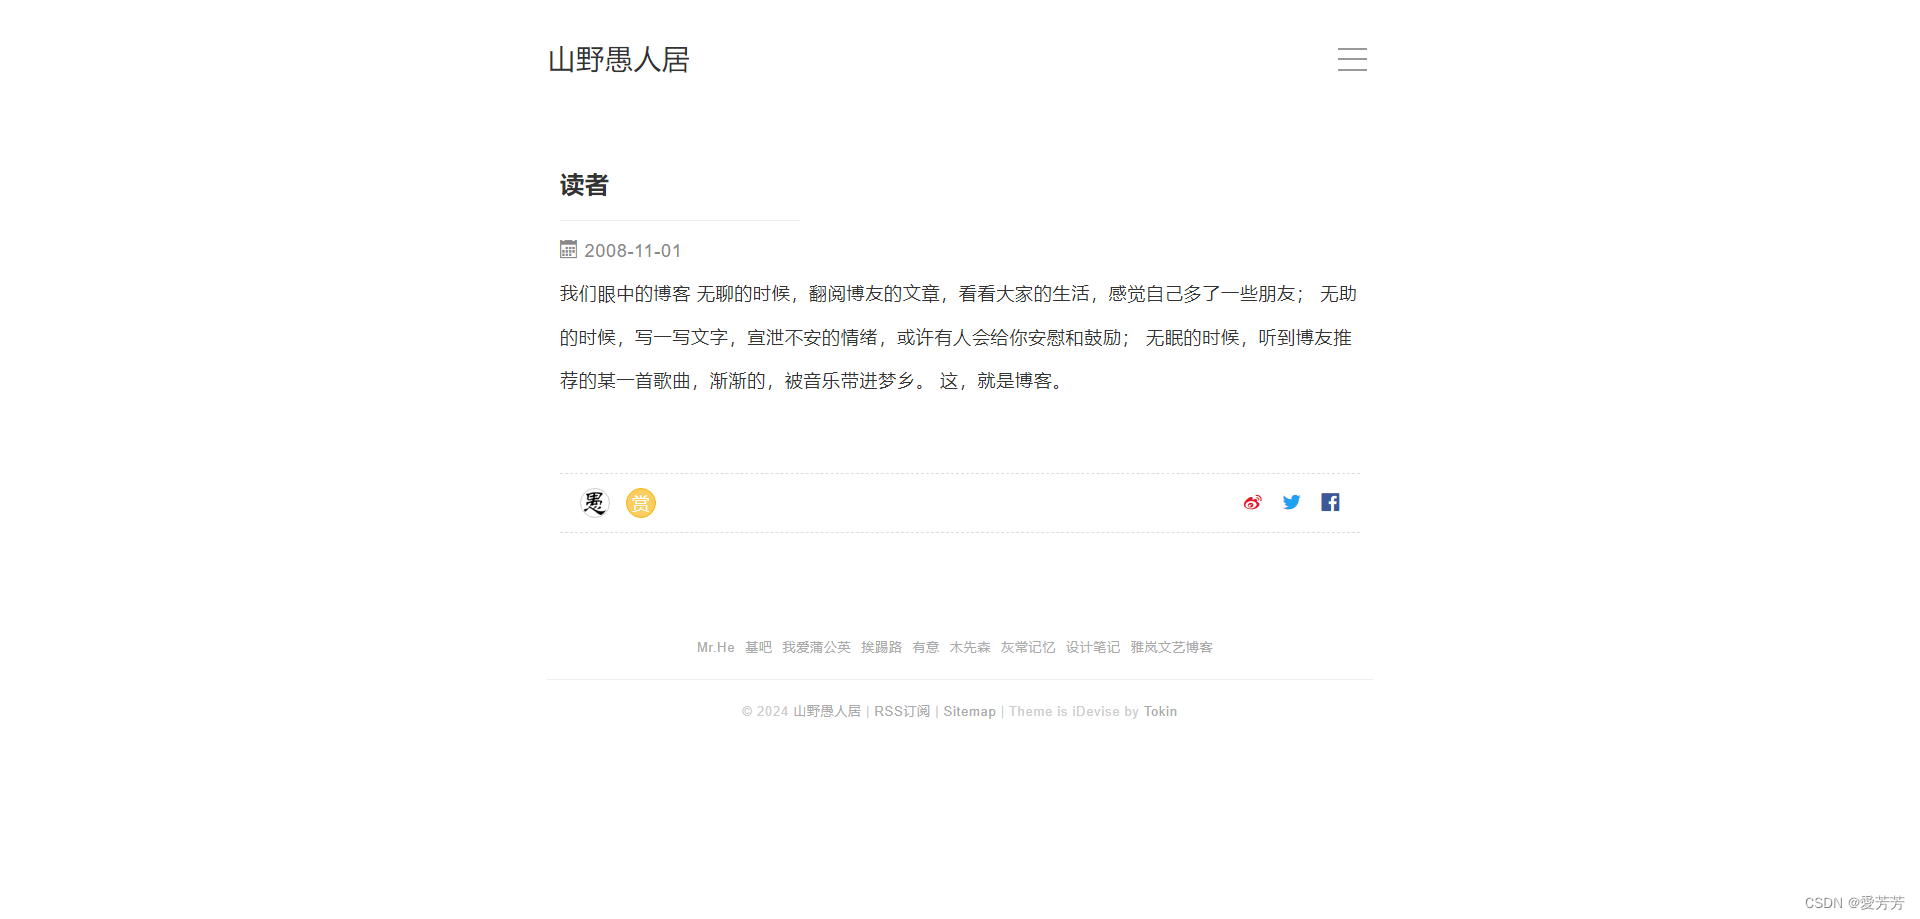
vue+elementplus模拟“山野愚人居”简单实现个人博客
目录 一、项目介绍 二、项目截图 1.项目结构图 2.项目首页 3.文章详情 4.留言 5.读者 三、源码实现 1.项目依赖package.json 2.项目启动 3.读者页面源码 四、总结 一、项目介绍 模仿原博客:山野愚人居 - 记录我的生活、所见、所闻、所想…… 本项目参考以…...

ComfyUI 完全入门:Refiner精炼器
在 SDXL基础模型1.0版本发布时,Stability AI 公司同时发布了一个名为SDXL Refiner的模型。这个Refiner模型是专门设计用来对基础模型生成的图像进行进一步优化和细化的,所以大家也经常称之为精炼器或者精修器。 Refiner模型的主要目的是提升图像的质量&…...
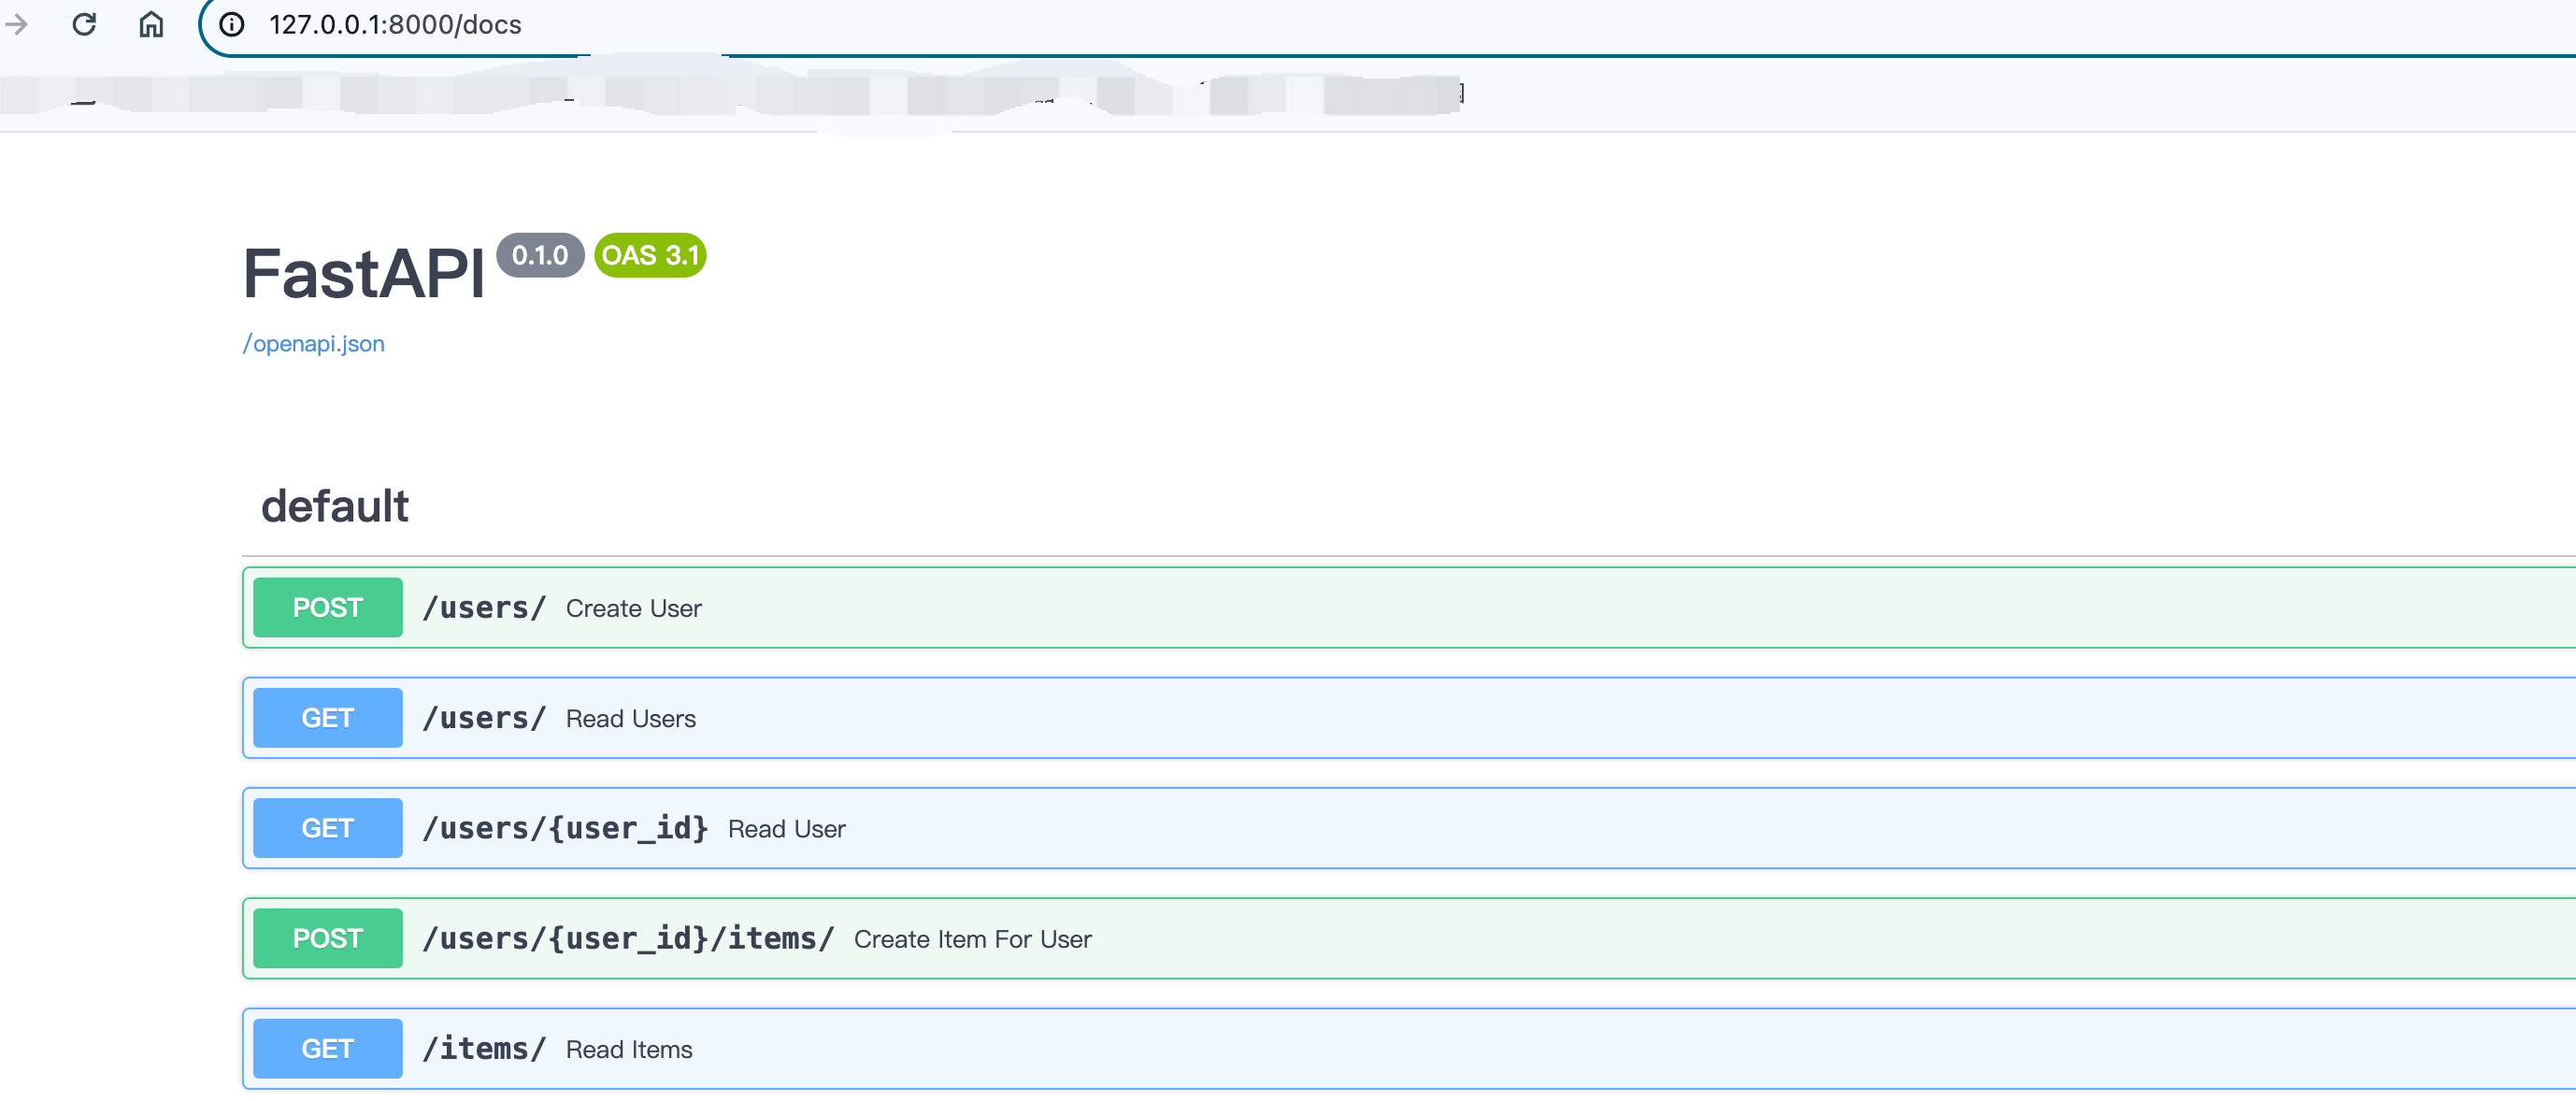
FastAPI操作关系型数据库
FastAPI可以和任何数据库和任意样式的库配合使用,这里看一下使用SQLAlchemy的示例。下面的示例很容易的调整为PostgreSQL,MySQL,SQLite,Oracle等。当前示例中我们使用SQLite ORM对象关系映射 FastAPI可以与任何数据库在任何样式…...

数字化那点事:一文读懂智慧城市
一、智慧城市的定义 一个城市信息化发展历程主要包括数字城市、信息城市、智慧城市、互联城市等阶段,现就我们当前所处的智慧城市阶段做个简要介绍。 智慧城市是利用先进的信息和通信技术(ICT)、物联网(IoT)、大数据分…...

RabbitMQ-topic exchange使用方法
RabbitMQ-默认读、写方式介绍 RabbitMQ-发布/订阅模式 RabbitMQ-直连交换机(direct)使用方法 目录 1、概述 2、topic交换机使用方法 2.1 适用场景 2.2 解决方案 3、代码实现 3.1 源代码实现 3.2 运行记录 4、小结 1、概述 topic 交换机是比直连交换机功能更加强大的…...

6-11 函数题:某范围中的最小值
6-11 函数题:某范围中的最小值 分数 5 全屏浏览 作者 雷丽兰 单位 宜春学院 有n(n<1000)个整数,从这n个整数中找到值落在(60至100之间)的最小整数。 函数接口定义: int min ( int arr[], int n); 说明…...
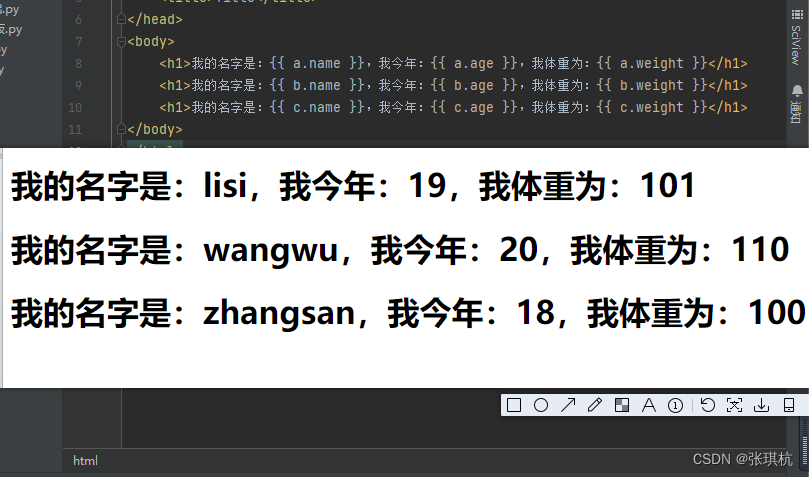
Flask基础2-Jinja2模板
目录 1.介绍 2.模板传参 1.变量传参 2.表达式 3.控制语句 4.过滤器 5.自定义过滤器 6.测试器 7.块和继承 flask基础1 1.介绍 Jinja2:是Python的Web项目中被广泛应用的模板引擎,是由Python实现的模板语言,Jinja2 的作者也是 Flask 的作 者。他的设计思想来源于Django的模…...
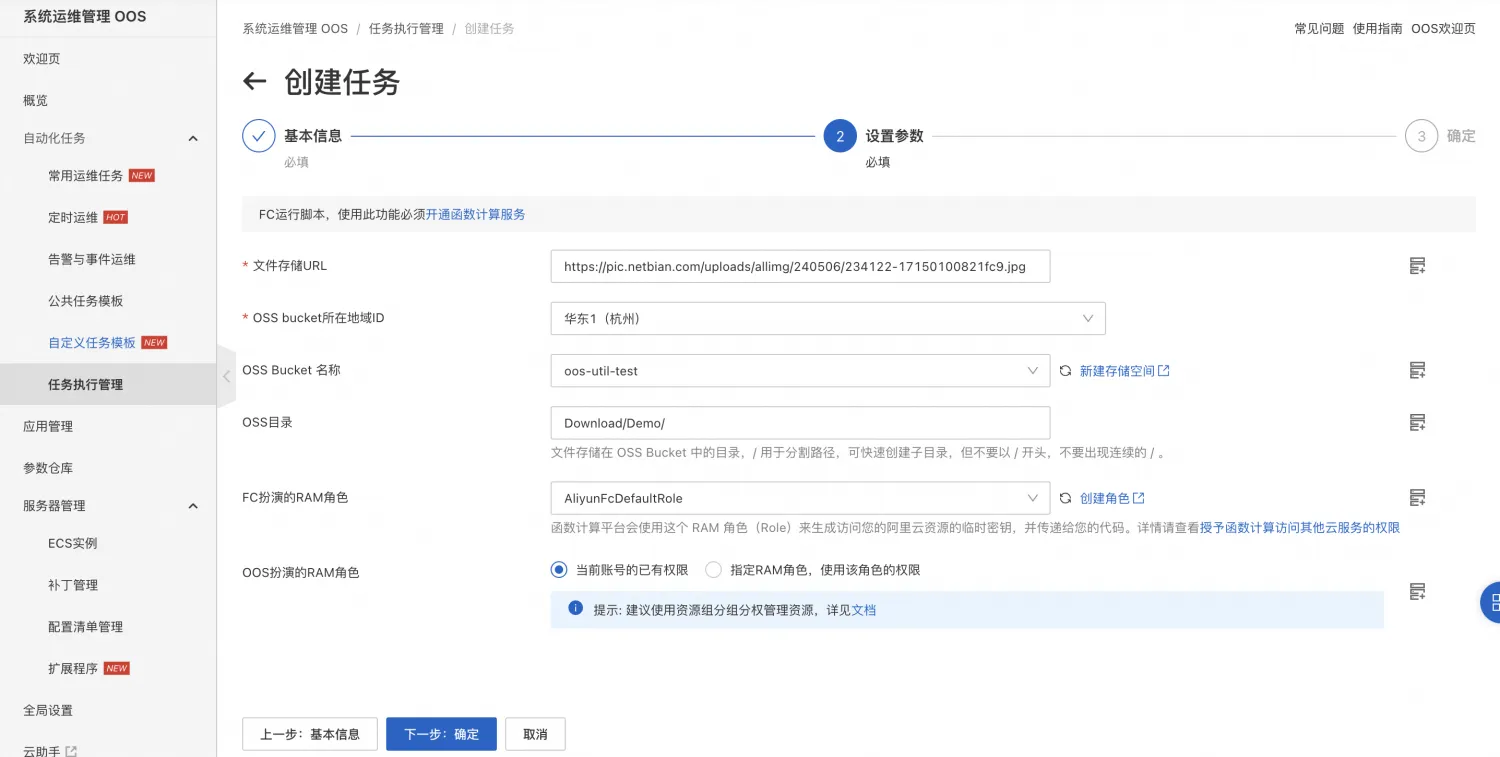
Serverless 使用OOS将http文件转存到对象存储
目录 背景介绍 系统运维管理OOS 文件转存场景 前提条件 实践步骤 附录 示例模板 背景介绍 系统运维管理OOS 系统运维管理OOS(CloudOps Orchestration Service)提供了一个高度灵活和强大的解决方案,通过精巧地编排阿里云提供的OpenAPI…...

AI Agent在智能风控中的实战:多智能体欺诈检测与预警
AI Agent在智能风控中的实战:多智能体欺诈检测与预警 你有没有过明明是正常交易却被银行冻结账户的糟糕体验?或是听说过某电商平台上线新活动首日就被黑产团伙薅走数千万补贴的新闻?随着黑产欺诈向团伙化、专业化、动态化演进,传统依赖规则引擎、单模型机器学习的风控体系已…...

Stitches API完全指南:从基础配置到自定义扩展
Stitches API完全指南:从基础配置到自定义扩展 【免费下载链接】stitches HTML5 Sprite Sheet Generator 项目地址: https://gitcode.com/gh_mirrors/sti/stitches Stitches是一款强大的HTML5 Sprite Sheet Generator,它提供了直观的API接口&…...

Redis沙盒体验:在浏览器中零门槛掌握NoSQL核心技能
Redis沙盒体验:在浏览器中零门槛掌握NoSQL核心技能 【免费下载链接】try.redis A demonstration of the Redis database. 项目地址: https://gitcode.com/gh_mirrors/tr/try.redis 当你第一次听说Redis时,是否被那些晦涩的技术术语吓退࿱…...

告别虚频困扰:用VASP+DynaPhoPy搞定高温材料声子谱的保姆级教程
高温材料声子谱计算实战:从虚频困境到非谐解决方案 引言:虚频问题的根源与突破路径 在计算材料学领域,声子谱分析是理解材料动力学稳定性和热力学性质的核心手段。然而许多研究者都遭遇过这样的困境:对实验合成的材料进行简谐近似…...

2026年,本地精准营销高性价比服务商来袭,你还不了解一下?
在本地商业竞争日益激烈的2026年,实体店面临着诸多挑战,引流难、成本高、复购率低等问题困扰着众多商家。而中粤(广州)信息科技有限公司作为本地精准营销的高性价比服务商,正以其独特的优势和卓越的服务,为…...

基于MaixCam的延时摄影系统:从硬件选型到Python编程全解析
1. 项目概述:用MaixCam打造你的专属延时摄影工坊延时摄影,这个听起来有点专业、甚至带点“魔法”色彩的词,其实离我们并不遥远。想想看,把一朵花从含苞到绽放的几天时间,压缩成十几秒的惊艳绽放;或者把一座…...

MongoDB Limit 与 Skip 方法详解
MongoDB Limit 与 Skip 方法详解 引言 MongoDB 是一个高性能、可伸缩的文档存储系统,它提供了强大的数据存储和查询功能。在处理大量数据时,Limit 与 Skip 方法是 MongoDB 中常用的查询优化工具。本文将详细介绍 MongoDB 中的 Limit 与 Skip 方法,包括其基本用法、性能影响…...

WebSocket实时通信架构进阶:Room、命名空间与集群部署
WebSocket实时通信架构进阶:Room、命名空间与集群部署 作者:Crown_22 | AI Agent & Hermes Agent 桌面程序开发者 前言 WebSocket已经成为实时应用的标准技术,但大多数教程只停留在"建立连接、发送消息"的基础阶段。在生产环境中,你需要处理Room管理、命名空…...

风控系统如何全维度识别爬虫:IP、账号与行为的协同决策机制
1. 这不是“反爬失败”,而是风控系统在对你做全维度画像你写完一段 requests BeautifulSoup 的代码,本地跑通了,开开心心部署到服务器,结果第二天早上发现:所有请求返回 403,日志里全是空响应;…...

别再只用递归了!用C语言栈实现非递归快速排序,内存效率提升实战
从递归到迭代:C语言栈实现非递归快速排序的工程实践 在嵌入式开发和大规模数据处理场景中,递归实现的快速排序常常面临栈溢出风险。当排序10万个元素的数组时,递归深度可能达到log₂100000≈17层,在仅有2KB栈空间的STM32F103上极易…...