MyBatis操作数据库
目录
MyBatis
功能架构
学习MyBatis
第一个MyBatis查询
1、创建数据库和表
2、搭建MyBatis开发环境
2.1、在项目中添加MyBatis框架
2.2、配置数据库连接信息
2.3、配置MyBatis中xml的保存路径(规则)
3、添加业务代码
3.1、创建实体类
3.2、构建Mapper层的代码实现(接口+XML)
SpringBoot单元测试
1、优点
2、执行单元测试
2.1、生成单元测试
2.2、添加单元测试的代码
1、添加用户
1.1、在接口中声明方法
1.2、在xml中提供实现
1.3、后端实现
1.4、测试
2、添加并返回用户的自增ID
2.1、在接口中声明方法
2.2、在xml中提供实现
2.3、后端实现
2.4、测试
3、修改用户信息(姓名)
3.1、在接口中声明方法
3.2、在xml中提供实现
3.3、后端实现
3.4、测试
4、删除用户信息
4.1、在接口中声明方法
4.2、在xml中提供实现
4.3、后端实现
4.4、测试
5、查询所有用户信息
5.1、在接口中声明方法
5.2、在xml中提供实现
5.3、后端实现
查询操作
1、单表查询
1.1、参数占位符#{}和{}
1.2、${}的优点
1.3、SQL注入
1.4、like查询
2、多表查询
2.1、返回类型:resultType
2.2、返回字典映射:resultMap
2.3、一对一的表映射
2.4、一对多
动态SQL使用
1、<if>标签
2、<trim>标签
3、<where>标签
4、<set>标签
5、<foreach>标签
MyBatis
MyBatis 是一款优秀的持久层框架,它支持定制化 SQL、存储过程以及高级映射。MyBatis 避免了几乎所有的 JDBC 代码和手动设置参数以及获取结果集。MyBatis 可以使用简单的 XML 或注解来配置和映射原生信息,将接口和 Java 的 POJOs(Plain Ordinary Java Object,普通的 Java对象)映射成数据库中的记录。
功能架构
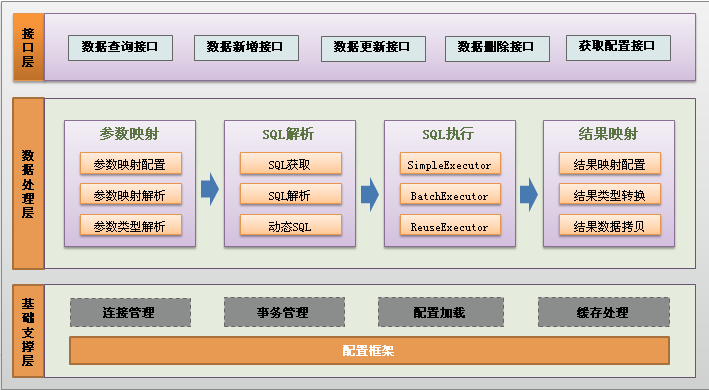
Mybatis的功能架构分为三层:
(1)API接口层:提供给外部使用的接口API,开发人员通过这些本地API来操纵数据库。接口层一接收到调用请求就会调用数据处理层来完成具体的数据处理。
(2)数据处理层:负责具体的SQL查找、SQL解析、SQL执行和执行结果映射处理等。它主要的目的是根据调用的请求完成一次数据库操作。
(3)基础支撑层:负责最基础的功能支撑,包括连接管理、事务管理、配置加载和缓存处理,这些都是共用的东西,将他们抽取出来作为最基础的组件。为上层的数据处理层提供最基础的支撑。
学习MyBatis
1、配置MyBatis开发环境
2、使用MyBatis模式和语法操作数据库
第一个MyBatis查询
1、创建数据库和表
-- 创建数据库
drop database if exists mycnblog;
create database mycnblog DEFAULT CHARACTER SET utf8mb4;-- 使用数据数据
use mycnblog;-- 创建表[用户表]
drop table if exists  userinfo;
create table userinfo(id int primary key auto_increment,username varchar(100) not null,password varchar(32) not null,photo varchar(500) default '',createtime datetime,updatetime datetime,`state` int default 1
) default charset 'utf8mb4';-- 创建文章表
drop table if exists  articleinfo;
create table articleinfo(id int primary key auto_increment,title varchar(100) not null,content text not null,createtime datetime,updatetime datetime,uid int not null,rcount int not null default 1,`state` int default 1
)default charset 'utf8mb4';-- 创建视频表
drop table if exists videoinfo;
create table videoinfo(vid int primary key,`title` varchar(250),`url` varchar(1000),createtime datetime,updatetime datetime,uid int
)default charset 'utf8mb4';-- 添加一个用户信息
INSERT INTO `mycnblog`.`userinfo` (`id`, `username`, `password`, `photo`, `createtime`, `updatetime`, `state`) VALUES
(1, 'admin', 'admin', '', '2021-12-06 17:10:48', '2021-12-06 17:10:48', 1);-- 文章添加测试数据
insert into articleinfo(title,content,uid)values('Java','Java正文',1);-- 添加视频
insert into videoinfo(vid,title,url,uid) values(1,'java title','http://www.baidu.com',1);
2、搭建MyBatis开发环境
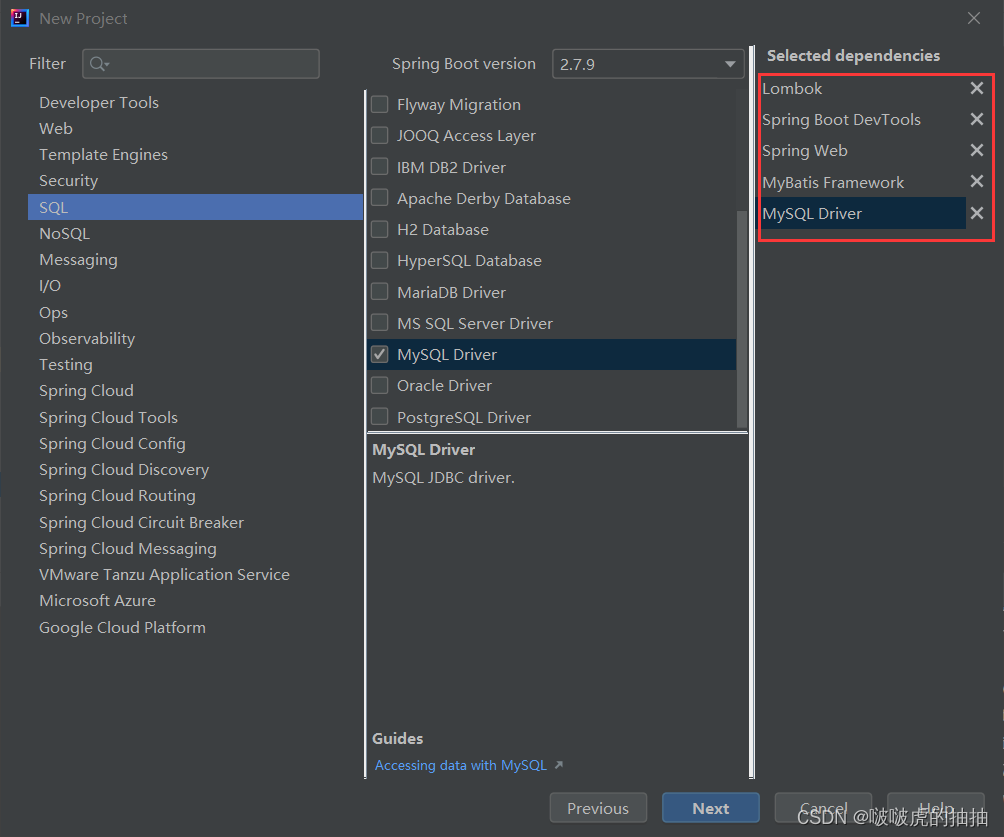
2.1、在项目中添加MyBatis框架
老项目中添加MyBatis


新项目中添加MyBatis框架
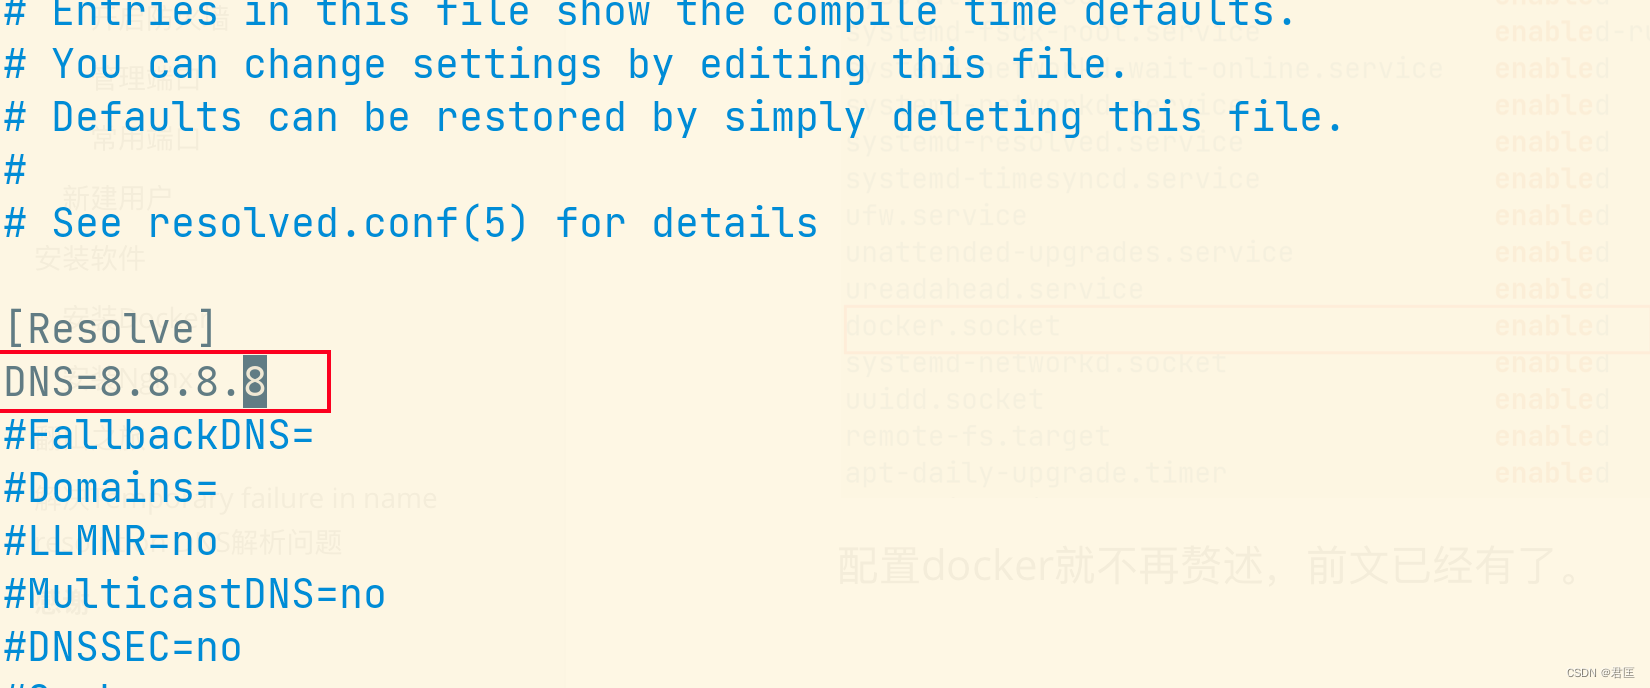
2.2、配置数据库连接信息
spring.datasource.url=jdbc:mysql://localhost:3306/mycnblog?characterEncoding=utf8&useSSL=false
spring.datasource.username=root
spring.datasource..password=19930112
spring.datasource.driver-class-name=com.mysql.cj.jdbc.Driver
2.3、配置MyBatis中xml的保存路径(规则)

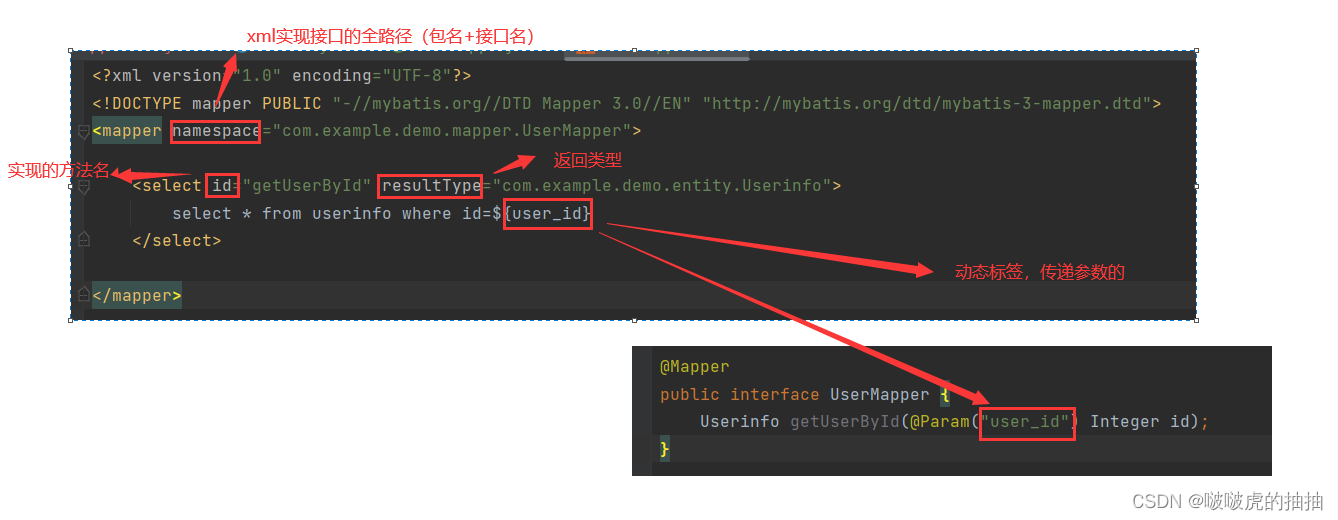
MyBatis组成:
1、接口(表的所有操作方法)->给程序其他类的调用
2、XML实现接口->写具体SQL语句
3、添加业务代码
实现MyBatis查询所有用户的功能

3.1、创建实体类
@Data
public class Userinfo {private int id;private String username;private String password;private String photo;private LocalDateTime createtime;private LocalDateTime updatetime;private int state;
}
3.2、构建Mapper层的代码实现(接口+XML)
先创建接口
@Mapper
public interface UserMapper {/*根据用户id查询*/Userinfo getUserById(Integer id);}
创建xml实现
实现服务层
@Service
public class UserService {@Autowiredprivate UserMapper userMapper;public Userinfo getUserById(Integer id){return userMapper.getUserById(id);}
}
实现控制器
@RestController
@RequestMapping("/user")
public class UserController {@Autowiredprivate UserService userService;@RequestMapping("/getUserById")public Userinfo getUserById(Integer id){if (id==null) return null;return userService.getUserById(id);}
}
SpringBoot单元测试
1、优点
1、方便、快捷测试一个功能模块;
2、在打包时会运行所有的单元测试,只有所有的单元测试都通过之后才能正常的打包,这个过程可以减少问题发生的概率;
3、使用单元测试可以在不污染数据库数据的情况下,来测试某个功能的正确性
2、执行单元测试
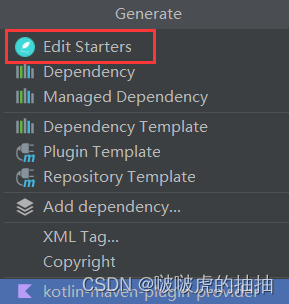
2.1、生成单元测试
单击右键


2.2、添加单元测试的代码
后端实现
@SpringBootTest  //表明当前单元测试是运行在Spring Boot环境中的
class UserMapperTest {//注入测试对象(属性注入)@Autowiredprivate UserMapper userMapper;@Testvoid getUserById() {//添加单元测试的运行代码Userinfo userinfo=userMapper.getUserById(1);System.out.println(userinfo);Assertions.assertEquals("admin",userinfo.getUsername());}
}
前端实现

MyBatis增删改查操作
@Transactional在不污染数据库的前提下进行测试功能是否正确
1、添加用户
1.1、在接口中声明方法
/*添加用户信息*/int add(Userinfo userinfo);1.2、在xml中提供实现
<insert id="add">insert into userinfo(username,password,createtime,updatetime)values(#{username},#{password},#{createtime},#{updatetime})</insert>1.3、后端实现
@Testvoid add() {//构造对象并设置相应的值Userinfo userinfo=new Userinfo();userinfo.setUsername("边伯贤");userinfo.setPassword("1992");userinfo.setCreatetime(LocalDateTime.now());userinfo.setUpdatetime(LocalDateTime.now());//调用MyBatis添加方法执行添加操作int result=userMapper.add(userinfo);System.out.println("添加:"+result);Assertions.assertEquals(1,result);}1.4、测试

2、添加并返回用户的自增ID
2.1、在接口中声明方法
/*添加并返回用户的自增ID*/int addGetId(Userinfo userinfo);2.2、在xml中提供实现
<insert id="addGetId" useGeneratedKeys="true" keyProperty="id">insert into userinfo(username,password,createtime,updatetime)values(#{username},#{password},#{createtime},#{updatetime})</insert>2.3、后端实现
@Testvoid addGetId() {//构造对象并设置相应的值Userinfo userinfo=new Userinfo();userinfo.setUsername("郑秀晶");userinfo.setPassword("1994");userinfo.setCreatetime(LocalDateTime.now());userinfo.setUpdatetime(LocalDateTime.now());//调用MyBatis添加方法执行添加操作int result=userMapper.addGetId(userinfo);System.out.println("添加:"+result);int uid=userinfo.getId();System.out.println("用户id:"+uid);Assertions.assertEquals(1,result);}2.4、测试

3、修改用户信息(姓名)
3.1、在接口中声明方法
/*修改*/int upUserName(Userinfo userinfo);3.2、在xml中提供实现
<update id="upUserName">update userinfo set username=#{username} where id=#{id}</update>3.3、后端实现
@Testvoid upUserName() {//构造对象并设置相应的值Userinfo userinfo=new Userinfo();userinfo.setId(3);userinfo.setUsername("嘟嘟");int result=userMapper.upUserName(userinfo);System.out.println("修改:"+userinfo);}3.4、测试

4、删除用户信息
4.1、在接口中声明方法
/*删除*/int delById(@Param("id") Integer id);4.2、在xml中提供实现
<delete id="delById">delete from userinfo where id=#{id}</delete>4.3、后端实现
@Testvoid delById() {Integer id=4;int result=userMapper.delById(id);System.out.println("删除:"+result);}4.4、测试

5、查询所有用户信息
5.1、在接口中声明方法
/*查询全部*/List<Userinfo> getAll();5.2、在xml中提供实现
<select id="getAll" resultType="com.example.demo.entity.Userinfo">select * from userinfo</select>5.3、后端实现
@Testvoid getAll() {List<Userinfo> list=userMapper.getAll();Assertions.assertEquals(1,list.size());}查询操作
1、单表查询
1.1、参数占位符#{}和{}
#{}:预编译处理
${}:字符直接替换
预编译处理是指: MyBatis 在处理#()时,会将SQL中的#0}替换为?号,使用PreparedStatement的set方法来赋值。
直接替换:是MyBatis 在处理${0}时,就是把${}替换成变量的值。
区别:
1、${}存在SQL注入问题,而#{}不存在;
2、${}直接替换,#{}是预处理
1.2、${}的优点
它会把其内部变量解析为字符串值拼接到一条语句上,不会做其余的处理,例如加''
1.3、SQL注入

1.4、like查询
like查询要使用concat()连接
List<Userinfo> getListByName(@Param("username") String username); <select id="getListByName" resultType="com.example.demo.entity.Userinfo">select * from userinfo where username like concat('%',#{username},'%')</select> @Testvoid getListByName() {String username="伯";List<Userinfo> list=userMapper.getListByName(username);System.out.println("list:"+list);}
2、多表查询
2.1、返回类型:resultType
数据库表中的字段名和实体类中的属性完全一致时,才能使用,否则会出现数据不显示的情况
2.2、返回字典映射:resultMap
使用场景:实现程序中属性和表中字段的映射功能(当程序中的属性和表的字段不一致时,可以强行的映射到一起)

当程序中的属性和数据库的字段名不一致时的解决方案:
1、使用resultMap标签;
2、使用数据库别名as重命名
<select id="getAll" resultType="com.example.demo.entity.Userinfo">select id,username as name,password,photo,createtime,updatetime,state from userinfo</select>2.3、一对一的表映射
使用<association>标签
联表查询
@Data
public class Articleinfo {private int id;private String title;private String content;private String createtime;private String updatetime;private int uid;private int rcount;private int state;
}
@Data
public class ArticleinfoVO extends Articleinfo{private String username;
}@Mapper
public interface ArticleMapper {ArticleinfoVO getById(@Param("id") Integer id);
} <select id="getById" resultType="com.example.demo.entity.vo.ArticleinfoVO">select a.*,u.username from articleinfo aleft join userinfo u on u.id=a.uidwhere a.id=#{id}</select>@SpringBootTest
class ArticleMapperTest {@Autowiredprivate ArticleMapper articleMapper;@Testvoid getById() {ArticleinfoVO articleinfoVO=articleMapper.getById(1);System.out.println(":"+articleinfoVO);}
}问题:扩展类 继承了基类,但是在查询时,只展示出了扩展类的字段,而没有展示基础类的字段
在扩展类页面单击右键


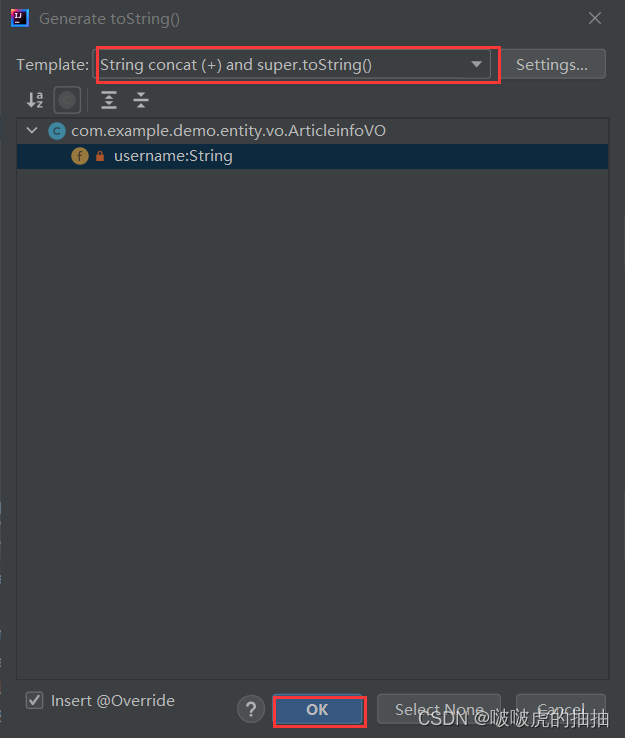
@Data
public class ArticleinfoVO extends Articleinfo implements Serializable{private String username;@Overridepublic String toString() {return "ArticleinfoVO{" +"username='" + username + '\'' +"} " + super.toString();}
}
2.4、一对多
使用<collection>标签
联表查询语句(left.join/inner join)+XXXVO
动态SQL使用
能够满足复杂条件的sql连接
1、<if>标签
语法:
<if test=“参数名!=null”>
...
</if>
test会产生一个boolean类型的结果,如果是true,那么执行if标签里边的内容,如果是false,那么就不执行if标签里边的内容
int add2(Userinfo userinfo);
<insert id="add2">insert into userinfo(username,<if test="photo!=null">photo;</if>password)values(#{username},<if test="photo!=null">#{photo},</if>#{password})</insert> @Testvoid add2() {Userinfo userinfo=new Userinfo();userinfo.setUsername("krystal");userinfo.setPhoto(null);userinfo.setPassword("1994");int result=userMapper.add2(userinfo);System.out.println("结果是"+result);}2、<trim>标签
一般用于去除 SQL 语句中多余的 AND 关键字、逗号,或者给 SQL 语句前拼接 where、set 等后缀,可用于选择性插入、更新、删除或者条件查询等操作。
语法:
<trim prefix="(" suffix=")" suffixOverrides=","><if test="username!=null">username,</if><if test="password!=null">password,</if><if test="photo!=null">photo,</if>
</trim>
prefix是指在最前边加上某个内容
suffix是指在最后边加上某个内容
suffixoverrides 是指如果做后边是某个值时就去掉
int add3(Userinfo userinfo); <insert id="add3">insert into userinfo<trim prefix="(" suffix=")" suffixOverrides=","><if test="username!=null">username,</if><if test="password!=null">password,</if><if test="photo!=null">photo,</if></trim>values<trim prefix="(" suffix=")" suffixOverrides=","><if test="username!=null">#{username},</if><if test="password!=null">#{password},</if><if test="photo!=null">#{photo},</if></trim></insert> @Testvoid add3() {Userinfo userinfo=new Userinfo();userinfo.setUsername("sehun");userinfo.setPassword("1994");userinfo.setPhoto("exo.jpg");int result=userMapper.add3(userinfo);System.out.println("添加:"+result);}3、<where>标签
语法:
<where><if test="username!=null">username=#{username}</if><if test="password!=null">and password=#{password}</if>
</where>
特征:
1、where标签通常要配合if标签一起使用;
2、where标签会删除最前边的and关键字(不会删除最后边的);
3、where标签中如果没有内容,那么也不会生成where sql关键字
List<Userinfo> getListByParam(String username,String password); <select id="getListByParam" resultType="com.example.demo.entity.Userinfo">select * from userinfo<where><if test="username!=null">username=#{username}</if><if test="password!=null">and password=#{password}</if></where></select>或者
<trim prefix="where" prefixOverrides="and"><if test="username!=null">username=#{username}</if><if test="password!=null">and password=#{password}</if></trim> @Testvoid getListByParam() {List<Userinfo> list=userMapper.getListByParam("krystal","1994");System.out.println("list:"+list);}4、<set>标签
根据传入的用户对象属性来更新用户数据,使用<set>标签来指定动态内容
语法:
<set><if test="username!=null">username=#{username},</if><if test="password!=null">password=#{password},</if><if test="photo!=null">photo=#{photo}</if>
</set>
特征:
1、set标签通常要配合if标签一起使用;
2、set标签会自动去除最后一个英文逗号
int update2(Userinfo userinfo); <update id="update2">update userinfo<set><if test="username!=null">username=#{username},</if><if test="password!=null">password=#{password},</if><if test="photo!=null">photo=#{photo}</if></set>where id=#{id}</update> @Testvoid update2() {Userinfo userinfo=new Userinfo();userinfo.setId(2);userinfo.setUsername("啵啵虎");userinfo.setPassword("1992");userinfo.setPhoto("exo.jpg");int result=userMapper.update2(userinfo);System.out.println("修改:"+result);}5、<foreach>标签
对集合进行遍历时可以使用该标签
<foreach> 标签有如下属性: .
collection: 绑定方法参数中的集合,如List, Set, Map或数组对象
item:遍历时的每一个对象
open: 语句块开头的字符串
close: 语句块结束的字符串
separator: 每次遍历之间间隔的字符串
int dels(List<Integer> ids); <delete id="dels">delete from userinfo where id in<foreach collection="ids" open="(" close=")" item="id" separator=",">#{id}</foreach></delete> @Testvoid dels() {List<Integer> ids=new ArrayList<>();ids.add(4);ids.add(5);int result=userMapper.dels(ids);System.out.println("删除:"+result);}相关文章:
MyBatis操作数据库
目录 MyBatis 功能架构 学习MyBatis 第一个MyBatis查询 1、创建数据库和表 2、搭建MyBatis开发环境 2.1、在项目中添加MyBatis框架 2.2、配置数据库连接信息 2.3、配置MyBatis中xml的保存路径(规则) 3、添加业务代码 3.1、创建实体类 3.2、构…...
与Object.values(obj)的用法)
Object.keys(obj)与Object.values(obj)的用法
语法 Object.keys(obj) 参数:要返回其枚举自身属性的对象 返回值:一个表示给定对象的所有枚举属性的字符串数组 传入对象,返回属性名 1 var obj {a:123,b:345}; 2 console.log(Object.keys(obj)); //[a,b] 处理字符串,返回索…...

关于ES6新特性的总结
目录1.let & const2.解构赋值3.模板字符串4.简化对象写法5.箭头函数6.函数参数的默认值设置7.rest参数8.扩展运算符9.SymbolSymbol特点创建SymbolSymbol使用场景Symbol内置值10.迭代器11.生成器12.Promise基本使用Promise封装读取文件Promise封装ajaxPromise.prototype.the…...

13. CSS 处理
提取 Css 成单独文件CSS 文件目前被打包到 js 文件中,当 js 文件加载时,会创建一个 style 标签来生成样式,加载一个页面的时候,先 html -> js -> css,会有页面闪屏现象,用户体验不好。应该是单独的 Css 文件&…...

One-hot编码
One-Hot 编码,又称一位有效编码,其方法是使用N位状态寄存器来对N个状态进行编码,每个状态都由他独立的寄存器位,并且在任意时候,其中只有一位有效。 例如: 自然状态码为:000,001,010,011,100,1…...
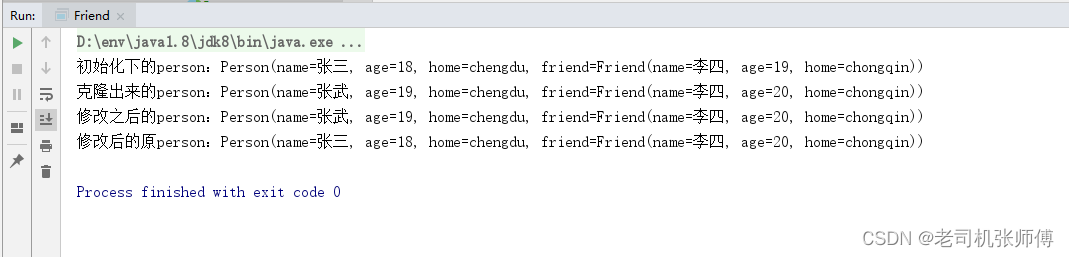
Java中的深克隆与浅克隆
浅克隆: 实现Cloneable接口即可实现,浅克隆只对象内部的基础数据类型(包括包装类)被克隆,引用数据类型(负责对象)会被使用引用的方式传递。 简单来说,就是浅克隆属性如果是复杂对象…...

如何使用MyBatis框架实现对数据库的增删查改?
目录:1.创建MyBatis项目以及如何配置2.MyBatis操作数据库的模式3.实现增删查改注意:在我们操作数据库之前,先要保证我们已经在数据库建好了一张表。创建MyBatis项目以及如何配置我们在创建项目的时候,引入MyBatis相关依赖配置数据…...
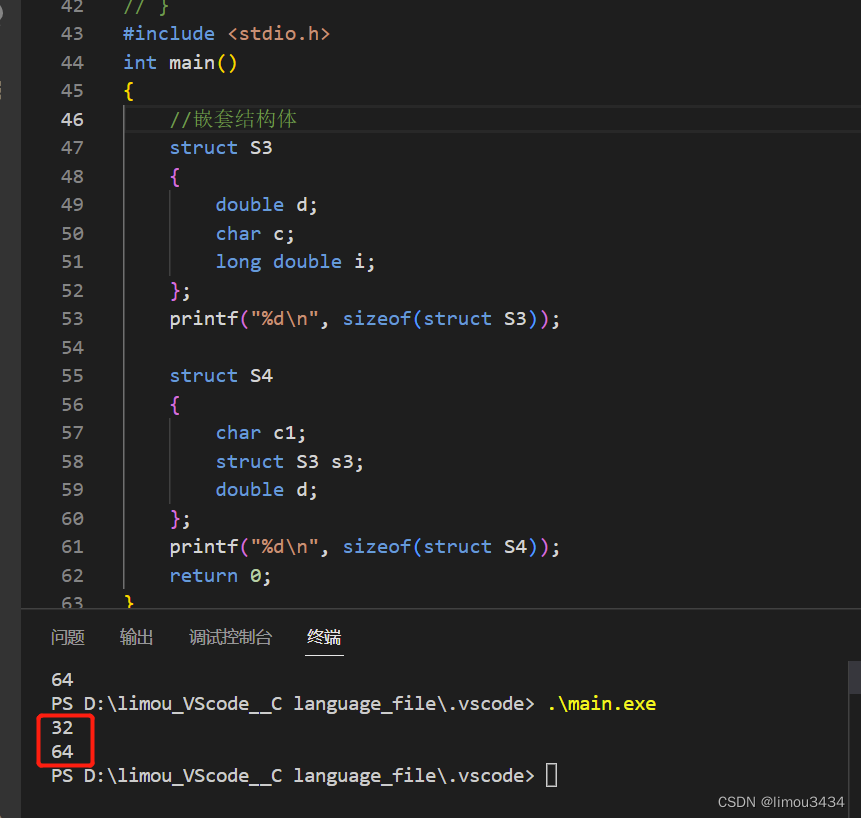
结构体内存大小
000、前言 要想计算结构体内存大小,就会涉及到一个结构体内存对齐的问题,而不是对其成员进行简单的加运算 (1)在写本博客之前 有位同学和我讨论了一个学校的题目,题目如下: 我借这道题目问了另外一位同…...
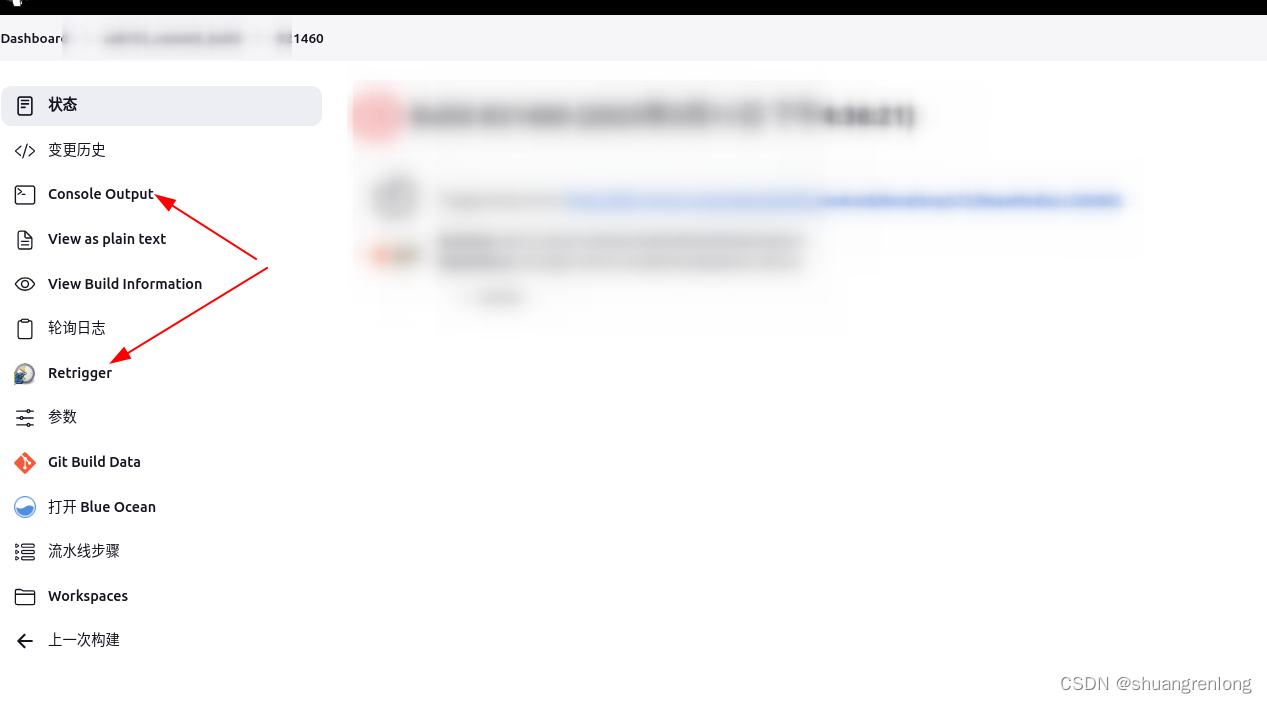
gerrit操作和jinkens编译合入代码
gerrit 先 查看自己的push 找到后添加reviewer 填写邮箱开头就可以出来 记得1 然后send 让人review 编译不过,gerrit上查看 1.是不是checkstyle问题 2.编译不过,去jinkens查看 先retrigger重新编译 如果发现多次编译失败 则要看下console output 查…...

网络工程师面试题(面试必看)(3)
作者简介:一名云计算网络运维人员、每天分享网络与运维的技术与干货。 座右铭:低头赶路,敬事如仪 个人主页:网络豆的主页 前言 本系列将会提供网络工程师面试题,由多位专家整合出本系列面试题,包含上百家面试时的问题。面试必考率达到80%,本系列共86道题…...
第N次重装系统之Ubtntu
前言又一次换了服务器,由于centOS已经完成了自己的生命周期,接下来我会转去使用Ubtntu系统。当然,大部分docker命令是不会收到影响的,但是一部分安装过程可能就要重新学习了。其实这个系统也有自己的老牌包管理器apt,所…...

一个 适用 vue3 ts h5移动端 table组件
vue3-h5-table 介绍 适用于 vue3 ts 的 h5 移动端项目 table 组件 支持 左侧固定 滑动 每行点击回调 支持 指定列排序 链接 :https://github.com/duKD/vue3-h5-table 效果 props说明minTableHeight表格最小高度 可选 默认600rowNum表格显示几行 可选 默认 6he…...

Vue.js 生产打包上线实战
项目管理后台采用Vue.js 架构,开发完毕后设计到打包上传到服务器发布。 发布成功后,总结出主要要决绝两个主要问题: 1.打包前,环境设置 2.上传到服务器,直接放在Tomcat中出现跨域访问问题。 此次项目实际处理方法为…...

C语言指针的算术运算
C语言指针的算术运算 C语言中,指针是一种非常重要的数据类型。除了可以指向特定的内存地址外,指针还可以进行算术运算。指针的算术运算包括加、减、比较等操作,下面我们将详细介绍这些运算符的使用方法,并提供实际的示例。 指针…...
快速排序/快速选择算法
一.快速排序 1.基本介绍 快速排序(Quicksort〉是对冒泡排序的一种改进,都属于交换排序。基本思想是:通过一趟排序将要排序的数据分割成独立的两部分(每次选择中轴值),中轴值左边的元素小于中轴值,中轴值右边的元素全部大于中轴值(但不要求有序)&#x…...

【数据结构初阶】单链表面试题|内含链表带环问题
目录 前言 链表面试题 1. 删除链表中等于给定值 val 的所有节点。oj链接 2.反转一个单链表。oj链接 3. 给定一个带有头结点 head 的非空单链表,返回链表的中间结点。如果有两个中间结点,则返回第二个中间结点。oj链接 4. 输入一个链表,…...

一文解析ethtool 命令的使用
命令简介 ethtool命令用于查询和控制网络设备驱动程序和硬件设置,尤其是有线以太网设备,devname网卡的名称。网卡就像是交换机的一个端口,正常使用我们只是配置网卡IP地址等信息,网卡的速率、双工模式等我们并不关心。通过ethtoo…...
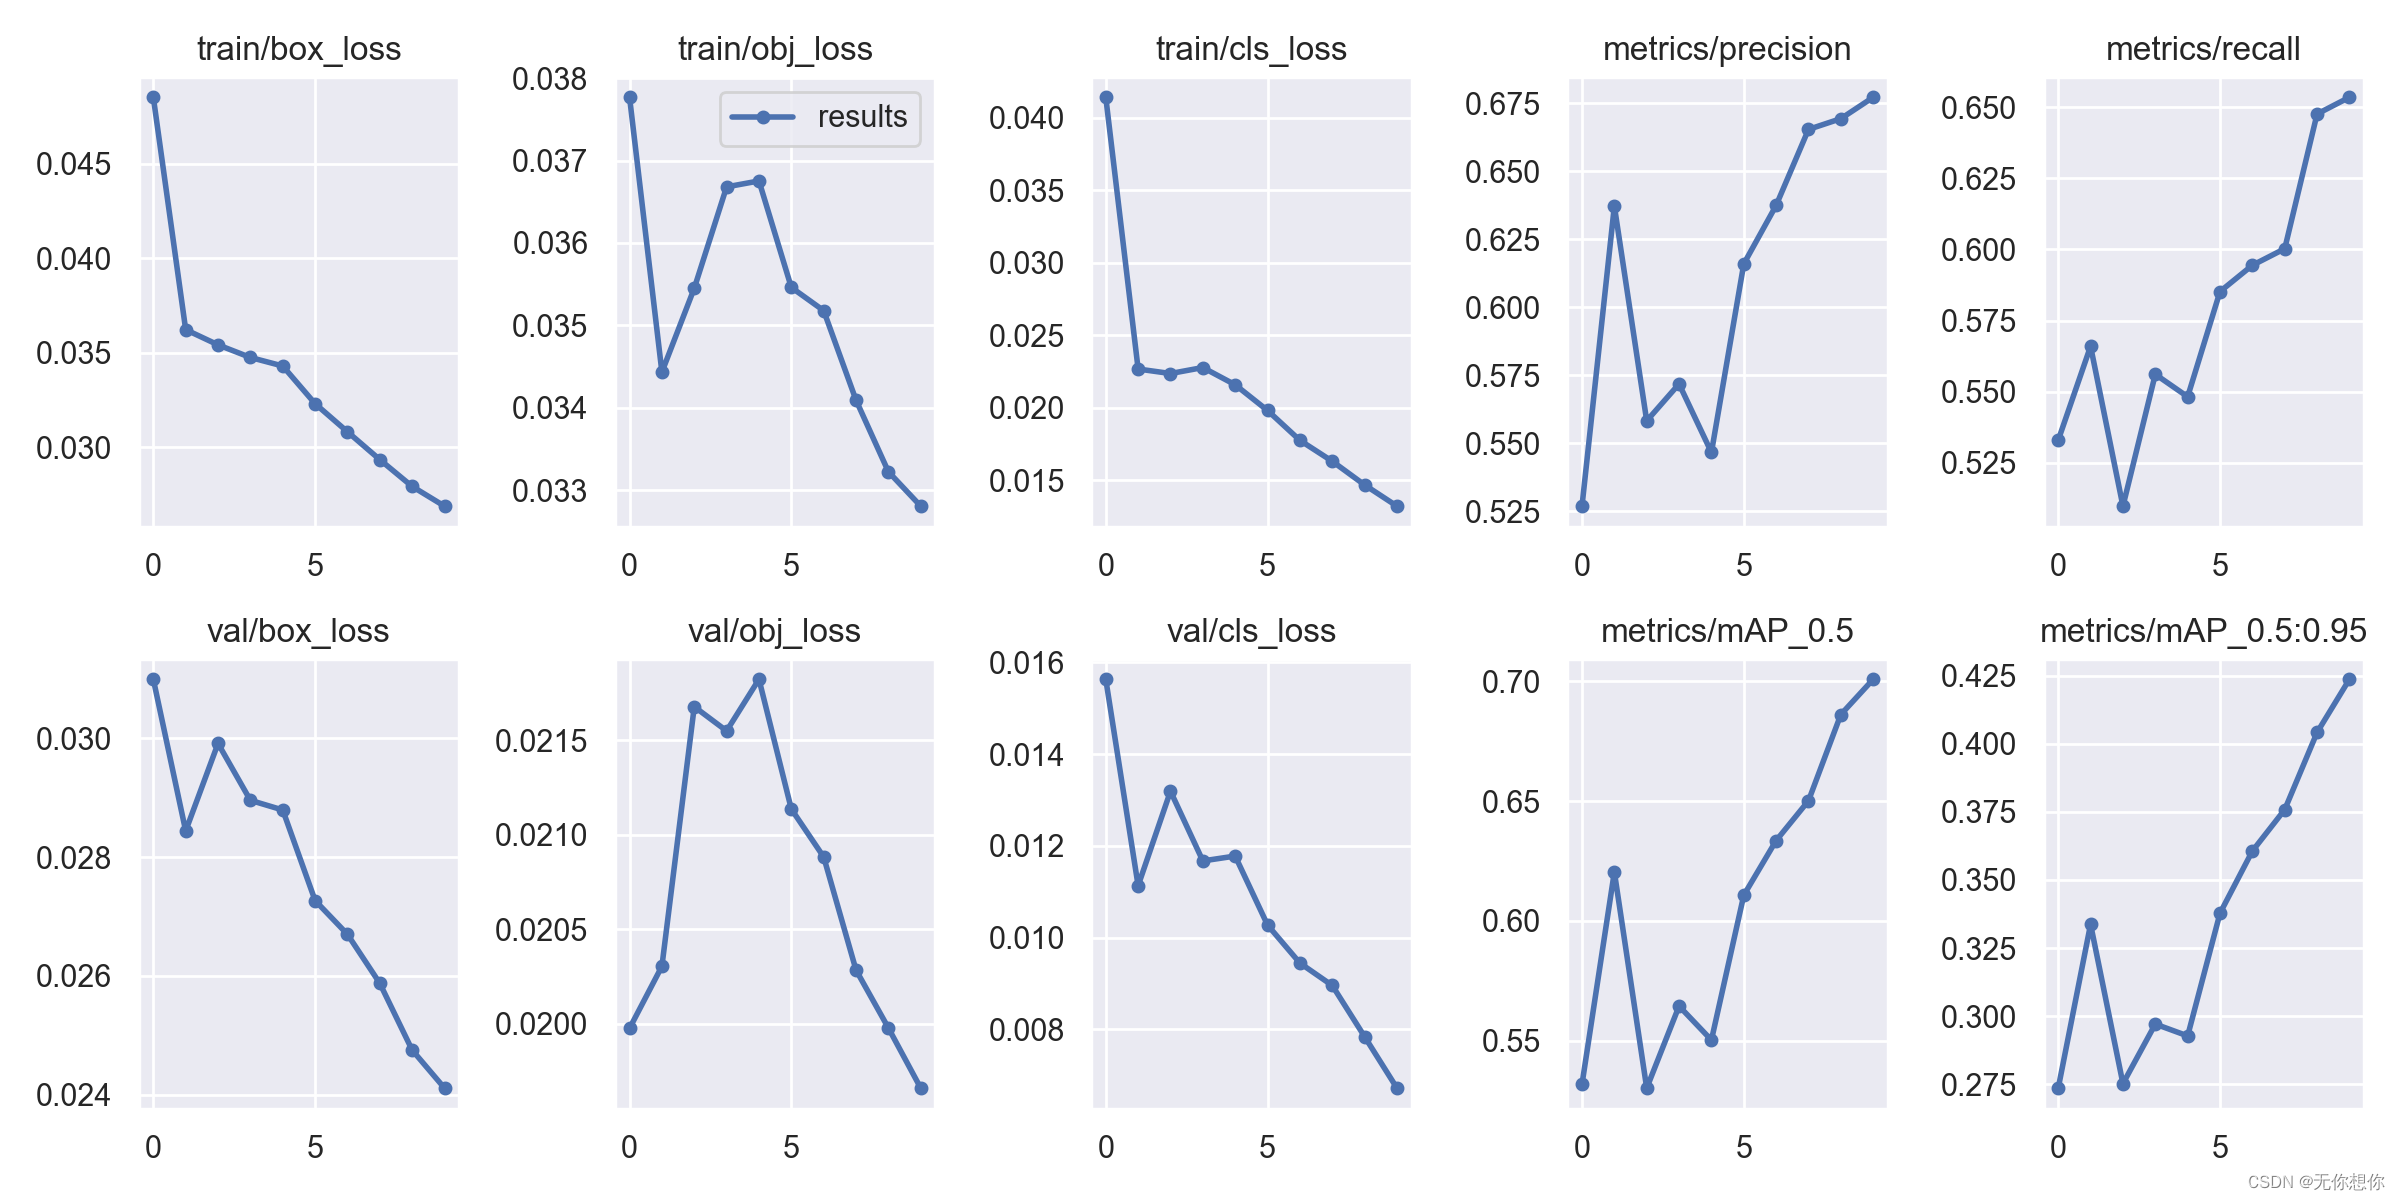
深度学习训练营之yolov5训练自己的数据集
深度学习训练营之训练自己的数据集原文链接环境介绍准备好数据集划分数据集运行voc_train.py遇到问题完整代码创建new_data.yaml文件模型训练时遇到的报错模型训练结果可视化参考链接原文链接 🍨 本文为🔗365天深度学习训练营 中的学习记录博客…...

Java中的AQS
文章目录什么是AQSAbstractQueuedSynchronizer方法解析自旋与阻塞ReentrantLock,Semaphore以及CountDownLatch对比ReentrantLock实现原理原理ReentrantLock源码中compareAndSetState的方法Semaphore实现原理CountDownLatch实现原理什么是AQS AQS是Java中的一个抽象…...
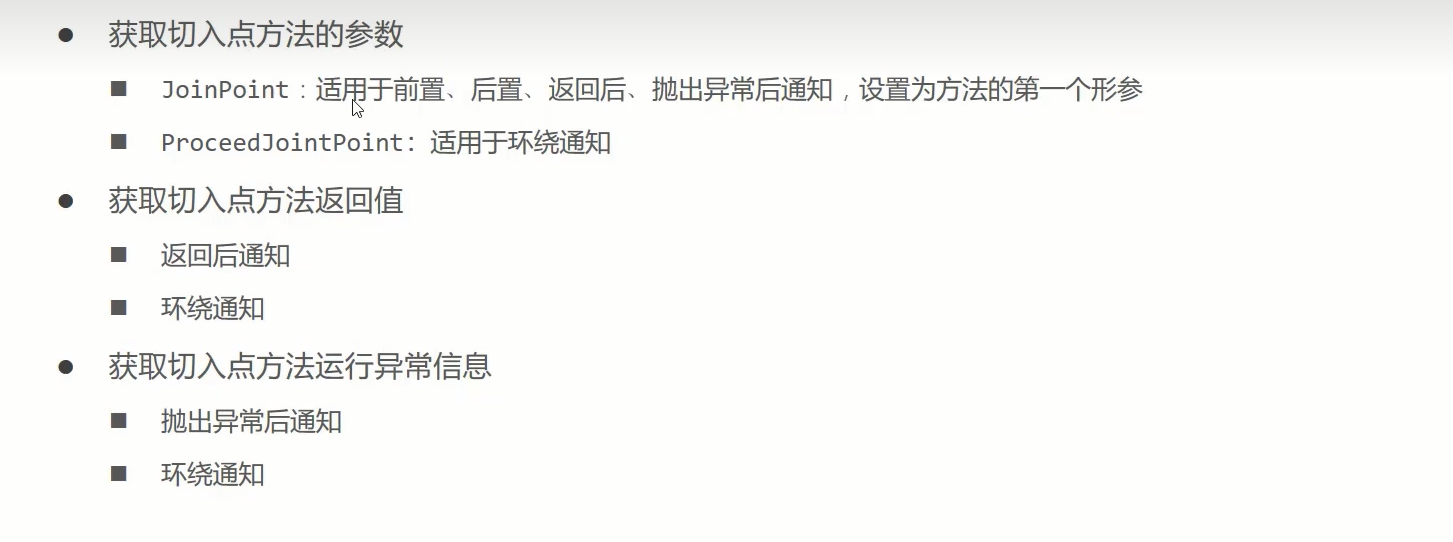
Spring——案例-业务层接口执行效率和AOP通知获取数据+AOP总结
执行时间获取:记录开始时间和结束时间,取差值。 这里使用环绕通知来实现。 环境准备: 项目文件结构: 业务层接口和实现类: 数据层: 采用mybatis注解开发,这里没有实现类,直接在接口方法里面实现映射。 domain层: 实现了数据库里面每一个…...

终极指南:在Windows上轻松安装安卓应用,告别笨重模拟器
终极指南:在Windows上轻松安装安卓应用,告别笨重模拟器 【免费下载链接】APK-Installer An Android Application Installer for Windows 项目地址: https://gitcode.com/GitHub_Trending/ap/APK-Installer 你是否曾经想在Windows电脑上运行安卓应…...
)
告别复杂配置:用MobaXterm+网线直连,5分钟让树莓派SSH并上网(Windows环境)
极简主义者的树莓派连接方案:MobaXterm全流程实战指南 树莓派作为一款功能强大的微型计算机,在嵌入式开发、物联网项目和教育领域广受欢迎。然而对于许多初学者甚至有一定经验的开发者来说,如何快速、稳定地连接树莓派始终是个令人头疼的问题…...

移动安全架构:ECC加密与硬件加速实践解析
1. 移动安全架构的核心价值解析在2004年的移动通信市场,设备制造商正面临一个关键转折点。当时全球手机平均售价为163美元(智能手机高达360美元),而设备替换率预计将从2003年的22%增长到2009年的34%。在这个背景下,Cer…...

终极指南:5步安装Koikatu HF Patch解锁完整游戏体验
终极指南:5步安装Koikatu HF Patch解锁完整游戏体验 【免费下载链接】KK-HF_Patch Automatically translate, uncensor and update Koikatu! and Koikatsu Party! 项目地址: https://gitcode.com/gh_mirrors/kk/KK-HF_Patch KK-HF Patch是专为《恋活…...

不止于Kali:在Ubuntu、Debian上给COMFAST CF-812AC无线网卡装RTL8812BU驱动的通用教程
跨平台兼容:Ubuntu/Debian系统安装COMFAST CF-812AC无线网卡驱动全指南 COMFAST CF-812AC作为一款高性价比的双频无线网卡,凭借Realtek RTL8812BU芯片的稳定表现,成为许多开发者和技术爱好者的首选。然而,当用户从Kali Linux转向U…...

QProcess::FailedToStart “No program defined“。qtcreator用的好好的,然后就不能调试了
点击 项目-》运行-》执行档根本原因:执行档:路径为空 解决办法:添加这样执行档 就有路径了。就可以用了...
)
毕设成品 深度学习安全帽佩戴检测(源码+论文)
文章目录 0 前言🔥这两年开始毕业设计和毕业答辩的要求和难度不断提升,传统的毕设题目缺少创新和亮点,往往达不到毕业答辩的要求,这两年不断有学弟学妹告诉学长自己做的项目系统达不到老师的要求。为了大家能够顺利以及最少的精力…...

跨平台文件自由:Free-NTFS-for-Mac 终极解决方案深度解析
跨平台文件自由:Free-NTFS-for-Mac 终极解决方案深度解析 【免费下载链接】Free-NTFS-for-Mac Nigate: An open-source NTFS utility for Mac. It supports all Mac models (Intel and Apple Silicon), providing full read-write access, mounting, and management…...

别再花钱买板卡了!手把手教你用NI-MAX虚拟PCI6224玩转LabVIEW数字IO
零成本玩转LabVIEW数字IO:NI-MAX虚拟设备全攻略 在工程教育与原型开发领域,硬件成本往往是阻碍学习进程的第一道门槛。一块标准的NI PCI-6224数字IO板卡市场价超过万元,而学生和独立开发者可能需要反复实验数十次才能掌握基础操作。但鲜为人知…...
)
不止于建模:用COMSOL几何操作优化你的仿真效率(分隔、二维轴对称实战)
不止于建模:用COMSOL几何操作优化你的仿真效率 在工程仿真领域,几何建模往往被视为前期准备工作,但真正的高手知道:建模阶段的每一个决策都会在后续网格划分和求解过程中产生指数级影响。我们曾对比过两个相似的电机散热模型——一…...