docker环境部署ruoyi系统前后端分离项目
创建局域网
docker network create net-ry
安装Redis
1 安装
- 创建两个目录
mkdir -p /data/redis/{conf,data}
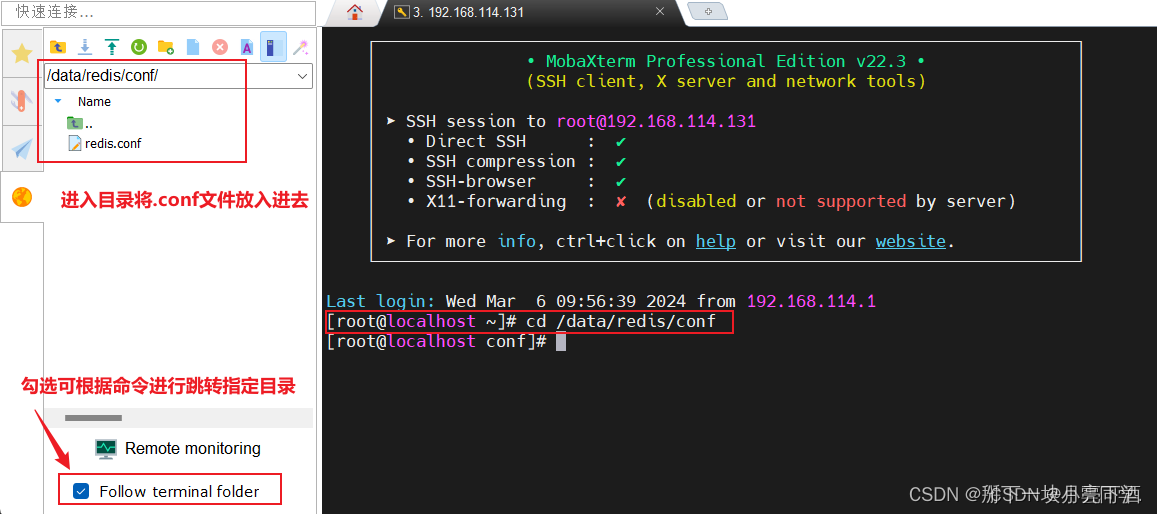
- 上传redis.conf文件到/data/redis/conf文件夹中
cd /data/redis/conf
3.2 配置redis.conf文件
- 配置redis.conf文件:
redis.conf文件配置注意:
bind 0.0.0.0 允许任何主机访问
daemonize no
requirepass sasa 数据库密码
# Redis configuration file example.
#
# Note that in order to read the configuration file, Redis must be
# started with the file path as first argument:
#
# ./redis-server /path/to/redis.conf# Note on units: when memory size is needed, it is possible to specify
# it in the usual form of 1k 5GB 4M and so forth:
#
# 1k => 1000 bytes
# 1kb => 1024 bytes
# 1m => 1000000 bytes
# 1mb => 1024*1024 bytes
# 1g => 1000000000 bytes
# 1gb => 1024*1024*1024 bytes
#
# units are case insensitive so 1GB 1Gb 1gB are all the same.################################## INCLUDES #################################### Include one or more other config files here.  This is useful if you
# have a standard template that goes to all Redis servers but also need
# to customize a few per-server settings.  Include files can include
# other files, so use this wisely.
#
# Notice option "include" won't be rewritten by command "CONFIG REWRITE"
# from admin or Redis Sentinel. Since Redis always uses the last processed
# line as value of a configuration directive, you'd better put includes
# at the beginning of this file to avoid overwriting config change at runtime.
#
# If instead you are interested in using includes to override configuration
# options, it is better to use include as the last line.
#
# include /path/to/local.conf
# include /path/to/other.conf################################## MODULES ###################################### Load modules at startup. If the server is not able to load modules
# it will abort. It is possible to use multiple loadmodule directives.
#
# loadmodule /path/to/my_module.so
# loadmodule /path/to/other_module.so################################## NETWORK ###################################### By default, if no "bind" configuration directive is specified, Redis listens
# for connections from all the network interfaces available on the server.
# It is possible to listen to just one or multiple selected interfaces using
# the "bind" configuration directive, followed by one or more IP addresses.
#
# Examples:
#
# bind 192.168.1.100 10.0.0.1
# bind 127.0.0.1 ::1
#
# ~~~ WARNING ~~~ If the computer running Redis is directly exposed to the
# internet, binding to all the interfaces is dangerous and will expose the
# instance to everybody on the internet. So by default we uncomment the
# following bind directive, that will force Redis to listen only into
# the IPv4 loopback interface address (this means Redis will be able to
# accept connections only from clients running into the same computer it
# is running).
#
# IF YOU ARE SURE YOU WANT YOUR INSTANCE TO LISTEN TO ALL THE INTERFACES
# JUST COMMENT THE FOLLOWING LINE.
# ~~~~~~~~~~~~~~~~~~~~~~~~~~~~~~~~~~~~~~~~~~~~~~~~~~~~~~~~~~~~~~~~~~~~~~~~
bind 0.0.0.0# Protected mode is a layer of security protection, in order to avoid that
# Redis instances left open on the internet are accessed and exploited.
#
# When protected mode is on and if:
#
# 1) The server is not binding explicitly to a set of addresses using the
#    "bind" directive.
# 2) No password is configured.
#
# The server only accepts connections from clients connecting from the
# IPv4 and IPv6 loopback addresses 127.0.0.1 and ::1, and from Unix domain
# sockets.
#
# By default protected mode is enabled. You should disable it only if
# you are sure you want clients from other hosts to connect to Redis
# even if no authentication is configured, nor a specific set of interfaces
# are explicitly listed using the "bind" directive.
protected-mode no# Accept connections on the specified port, default is 6379 (IANA #815344).
# If port 0 is specified Redis will not listen on a TCP socket.
port 6379# TCP listen() backlog.
#
# In high requests-per-second environments you need an high backlog in order
# to avoid slow clients connections issues. Note that the Linux kernel
# will silently truncate it to the value of /proc/sys/net/core/somaxconn so
# make sure to raise both the value of somaxconn and tcp_max_syn_backlog
# in order to get the desired effect.
tcp-backlog 511# Unix socket.
#
# Specify the path for the Unix socket that will be used to listen for
# incoming connections. There is no default, so Redis will not listen
# on a unix socket when not specified.
#
# unixsocket /tmp/redis.sock
# unixsocketperm 700# Close the connection after a client is idle for N seconds (0 to disable)
timeout 0# TCP keepalive.
#
# If non-zero, use SO_KEEPALIVE to send TCP ACKs to clients in absence
# of communication. This is useful for two reasons:
#
# 1) Detect dead peers.
# 2) Take the connection alive from the point of view of network
#    equipment in the middle.
#
# On Linux, the specified value (in seconds) is the period used to send ACKs.
# Note that to close the connection the double of the time is needed.
# On other kernels the period depends on the kernel configuration.
#
# A reasonable value for this option is 300 seconds, which is the new
# Redis default starting with Redis 3.2.1.
tcp-keepalive 300################################# GENERAL ###################################### By default Redis does not run as a daemon. Use 'yes' if you need it.
# Note that Redis will write a pid file in /var/run/redis.pid when daemonized.
daemonize no# If you run Redis from upstart or systemd, Redis can interact with your
# supervision tree. Options:
#   supervised no      - no supervision interaction
#   supervised upstart - signal upstart by putting Redis into SIGSTOP mode
#   supervised systemd - signal systemd by writing READY=1 to $NOTIFY_SOCKET
#   supervised auto    - detect upstart or systemd method based on
#                        UPSTART_JOB or NOTIFY_SOCKET environment variables
# Note: these supervision methods only signal "process is ready."
#       They do not enable continuous liveness pings back to your supervisor.
supervised no# If a pid file is specified, Redis writes it where specified at startup
# and removes it at exit.
#
# When the server runs non daemonized, no pid file is created if none is
# specified in the configuration. When the server is daemonized, the pid file
# is used even if not specified, defaulting to "/var/run/redis.pid".
#
# Creating a pid file is best effort: if Redis is not able to create it
# nothing bad happens, the server will start and run normally.
pidfile /var/run/redis_6379.pid# Specify the server verbosity level.
# This can be one of:
# debug (a lot of information, useful for development/testing)
# verbose (many rarely useful info, but not a mess like the debug level)
# notice (moderately verbose, what you want in production probably)
# warning (only very important / critical messages are logged)
loglevel notice# Specify the log file name. Also the empty string can be used to force
# Redis to log on the standard output. Note that if you use standard
# output for logging but daemonize, logs will be sent to /dev/null
logfile ""# To enable logging to the system logger, just set 'syslog-enabled' to yes,
# and optionally update the other syslog parameters to suit your needs.
# syslog-enabled no# Specify the syslog identity.
# syslog-ident redis# Specify the syslog facility. Must be USER or between LOCAL0-LOCAL7.
# syslog-facility local0# Set the number of databases. The default database is DB 0, you can select
# a different one on a per-connection basis using SELECT <dbid> where
# dbid is a number between 0 and 'databases'-1
databases 16# By default Redis shows an ASCII art logo only when started to log to the
# standard output and if the standard output is a TTY. Basically this means
# that normally a logo is displayed only in interactive sessions.
#
# However it is possible to force the pre-4.0 behavior and always show a
# ASCII art logo in startup logs by setting the following option to yes.
always-show-logo yes################################ SNAPSHOTTING  ################################
#
# Save the DB on disk:
#
#   save <seconds> <changes>
#
#   Will save the DB if both the given number of seconds and the given
#   number of write operations against the DB occurred.
#
#   In the example below the behaviour will be to save:
#   after 900 sec (15 min) if at least 1 key changed
#   after 300 sec (5 min) if at least 10 keys changed
#   after 60 sec if at least 10000 keys changed
#
#   Note: you can disable saving completely by commenting out all "save" lines.
#
#   It is also possible to remove all the previously configured save
#   points by adding a save directive with a single empty string argument
#   like in the following example:
#
#   save ""save 900 1
save 300 10
save 60 10000# By default Redis will stop accepting writes if RDB snapshots are enabled
# (at least one save point) and the latest background save failed.
# This will make the user aware (in a hard way) that data is not persisting
# on disk properly, otherwise chances are that no one will notice and some
# disaster will happen.
#
# If the background saving process will start working again Redis will
# automatically allow writes again.
#
# However if you have setup your proper monitoring of the Redis server
# and persistence, you may want to disable this feature so that Redis will
# continue to work as usual even if there are problems with disk,
# permissions, and so forth.
stop-writes-on-bgsave-error yes# Compress string objects using LZF when dump .rdb databases?
# For default that's set to 'yes' as it's almost always a win.
# If you want to save some CPU in the saving child set it to 'no' but
# the dataset will likely be bigger if you have compressible values or keys.
rdbcompression yes# Since version 5 of RDB a CRC64 checksum is placed at the end of the file.
# This makes the format more resistant to corruption but there is a performance
# hit to pay (around 10%) when saving and loading RDB files, so you can disable it
# for maximum performances.
#
# RDB files created with checksum disabled have a checksum of zero that will
# tell the loading code to skip the check.
rdbchecksum yes# The filename where to dump the DB
dbfilename dump.rdb# The working directory.
#
# The DB will be written inside this directory, with the filename specified
# above using the 'dbfilename' configuration directive.
#
# The Append Only File will also be created inside this directory.
#
# Note that you must specify a directory here, not a file name.
dir ./################################# REPLICATION ################################## Master-Replica replication. Use replicaof to make a Redis instance a copy of
# another Redis server. A few things to understand ASAP about Redis replication.
#
#   +------------------+      +---------------+
#   |      Master      | ---> |    Replica    |
#   | (receive writes) |      |  (exact copy) |
#   +------------------+      +---------------+
#
# 1) Redis replication is asynchronous, but you can configure a master to
#    stop accepting writes if it appears to be not connected with at least
#    a given number of replicas.
# 2) Redis replicas are able to perform a partial resynchronization with the
#    master if the replication link is lost for a relatively small amount of
#    time. You may want to configure the replication backlog size (see the next
#    sections of this file) with a sensible value depending on your needs.
# 3) Replication is automatic and does not need user intervention. After a
#    network partition replicas automatically try to reconnect to masters
#    and resynchronize with them.
#
# replicaof <masterip> <masterport># If the master is password protected (using the "requirepass" configuration
# directive below) it is possible to tell the replica to authenticate before
# starting the replication synchronization process, otherwise the master will
# refuse the replica request.
#
# masterauth <master-password># When a replica loses its connection with the master, or when the replication
# is still in progress, the replica can act in two different ways:
#
# 1) if replica-serve-stale-data is set to 'yes' (the default) the replica will
#    still reply to client requests, possibly with out of date data, or the
#    data set may just be empty if this is the first synchronization.
#
# 2) if replica-serve-stale-data is set to 'no' the replica will reply with
#    an error "SYNC with master in progress" to all the kind of commands
#    but to INFO, replicaOF, AUTH, PING, SHUTDOWN, REPLCONF, ROLE, CONFIG,
#    SUBSCRIBE, UNSUBSCRIBE, PSUBSCRIBE, PUNSUBSCRIBE, PUBLISH, PUBSUB,
#    COMMAND, POST, HOST: and LATENCY.
#
replica-serve-stale-data yes# You can configure a replica instance to accept writes or not. Writing against
# a replica instance may be useful to store some ephemeral data (because data
# written on a replica will be easily deleted after resync with the master) but
# may also cause problems if clients are writing to it because of a
# misconfiguration.
#
# Since Redis 2.6 by default replicas are read-only.
#
# Note: read only replicas are not designed to be exposed to untrusted clients
# on the internet. It's just a protection layer against misuse of the instance.
# Still a read only replica exports by default all the administrative commands
# such as CONFIG, DEBUG, and so forth. To a limited extent you can improve
# security of read only replicas using 'rename-command' to shadow all the
# administrative / dangerous commands.
replica-read-only yes# Replication SYNC strategy: disk or socket.
#
# -------------------------------------------------------
# WARNING: DISKLESS REPLICATION IS EXPERIMENTAL CURRENTLY
# -------------------------------------------------------
#
# New replicas and reconnecting replicas that are not able to continue the replication
# process just receiving differences, need to do what is called a "full
# synchronization". An RDB file is transmitted from the master to the replicas.
# The transmission can happen in two different ways:
#
# 1) Disk-backed: The Redis master creates a new process that writes the RDB
#                 file on disk. Later the file is transferred by the parent
#                 process to the replicas incrementally.
# 2) Diskless: The Redis master creates a new process that directly writes the
#              RDB file to replica sockets, without touching the disk at all.
#
# With disk-backed replication, while the RDB file is generated, more replicas
# can be queued and served with the RDB file as soon as the current child producing
# the RDB file finishes its work. With diskless replication instead once
# the transfer starts, new replicas arriving will be queued and a new transfer
# will start when the current one terminates.
#
# When diskless replication is used, the master waits a configurable amount of
# time (in seconds) before starting the transfer in the hope that multiple replicas
# will arrive and the transfer can be parallelized.
#
# With slow disks and fast (large bandwidth) networks, diskless replication
# works better.
repl-diskless-sync no# When diskless replication is enabled, it is possible to configure the delay
# the server waits in order to spawn the child that transfers the RDB via socket
# to the replicas.
#
# This is important since once the transfer starts, it is not possible to serve
# new replicas arriving, that will be queued for the next RDB transfer, so the server
# waits a delay in order to let more replicas arrive.
#
# The delay is specified in seconds, and by default is 5 seconds. To disable
# it entirely just set it to 0 seconds and the transfer will start ASAP.
repl-diskless-sync-delay 5# Replicas send PINGs to server in a predefined interval. It's possible to change
# this interval with the repl_ping_replica_period option. The default value is 10
# seconds.
#
# repl-ping-replica-period 10# The following option sets the replication timeout for:
#
# 1) Bulk transfer I/O during SYNC, from the point of view of replica.
# 2) Master timeout from the point of view of replicas (data, pings).
# 3) Replica timeout from the point of view of masters (REPLCONF ACK pings).
#
# It is important to make sure that this value is greater than the value
# specified for repl-ping-replica-period otherwise a timeout will be detected
# every time there is low traffic between the master and the replica.
#
# repl-timeout 60# Disable TCP_NODELAY on the replica socket after SYNC?
#
# If you select "yes" Redis will use a smaller number of TCP packets and
# less bandwidth to send data to replicas. But this can add a delay for
# the data to appear on the replica side, up to 40 milliseconds with
# Linux kernels using a default configuration.
#
# If you select "no" the delay for data to appear on the replica side will
# be reduced but more bandwidth will be used for replication.
#
# By default we optimize for low latency, but in very high traffic conditions
# or when the master and replicas are many hops away, turning this to "yes" may
# be a good idea.
repl-disable-tcp-nodelay no# Set the replication backlog size. The backlog is a buffer that accumulates
# replica data when replicas are disconnected for some time, so that when a replica
# wants to reconnect again, often a full resync is not needed, but a partial
# resync is enough, just passing the portion of data the replica missed while
# disconnected.
#
# The bigger the replication backlog, the longer the time the replica can be
# disconnected and later be able to perform a partial resynchronization.
#
# The backlog is only allocated once there is at least a replica connected.
#
# repl-backlog-size 1mb# After a master has no longer connected replicas for some time, the backlog
# will be freed. The following option configures the amount of seconds that
# need to elapse, starting from the time the last replica disconnected, for
# the backlog buffer to be freed.
#
# Note that replicas never free the backlog for timeout, since they may be
# promoted to masters later, and should be able to correctly "partially
# resynchronize" with the replicas: hence they should always accumulate backlog.
#
# A value of 0 means to never release the backlog.
#
# repl-backlog-ttl 3600# The replica priority is an integer number published by Redis in the INFO output.
# It is used by Redis Sentinel in order to select a replica to promote into a
# master if the master is no longer working correctly.
#
# A replica with a low priority number is considered better for promotion, so
# for instance if there are three replicas with priority 10, 100, 25 Sentinel will
# pick the one with priority 10, that is the lowest.
#
# However a special priority of 0 marks the replica as not able to perform the
# role of master, so a replica with priority of 0 will never be selected by
# Redis Sentinel for promotion.
#
# By default the priority is 100.
replica-priority 100# It is possible for a master to stop accepting writes if there are less than
# N replicas connected, having a lag less or equal than M seconds.
#
# The N replicas need to be in "online" state.
#
# The lag in seconds, that must be <= the specified value, is calculated from
# the last ping received from the replica, that is usually sent every second.
#
# This option does not GUARANTEE that N replicas will accept the write, but
# will limit the window of exposure for lost writes in case not enough replicas
# are available, to the specified number of seconds.
#
# For example to require at least 3 replicas with a lag <= 10 seconds use:
#
# min-replicas-to-write 3
# min-replicas-max-lag 10
#
# Setting one or the other to 0 disables the feature.
#
# By default min-replicas-to-write is set to 0 (feature disabled) and
# min-replicas-max-lag is set to 10.# A Redis master is able to list the address and port of the attached
# replicas in different ways. For example the "INFO replication" section
# offers this information, which is used, among other tools, by
# Redis Sentinel in order to discover replica instances.
# Another place where this info is available is in the output of the
# "ROLE" command of a master.
#
# The listed IP and address normally reported by a replica is obtained
# in the following way:
#
#   IP: The address is auto detected by checking the peer address
#   of the socket used by the replica to connect with the master.
#
#   Port: The port is communicated by the replica during the replication
#   handshake, and is normally the port that the replica is using to
#   listen for connections.
#
# However when port forwarding or Network Address Translation (NAT) is
# used, the replica may be actually reachable via different IP and port
# pairs. The following two options can be used by a replica in order to
# report to its master a specific set of IP and port, so that both INFO
# and ROLE will report those values.
#
# There is no need to use both the options if you need to override just
# the port or the IP address.
#
# replica-announce-ip 5.5.5.5
# replica-announce-port 1234################################## SECURITY #################################### Require clients to issue AUTH <PASSWORD> before processing any other
# commands.  This might be useful in environments in which you do not trust
# others with access to the host running redis-server.
#
# This should stay commented out for backward compatibility and because most
# people do not need auth (e.g. they run their own servers).
#
# Warning: since Redis is pretty fast an outside user can try up to
# 150k passwords per second against a good box. This means that you should
# use a very strong password otherwise it will be very easy to break.
#
#requirepass sasa# Command renaming.
#
# It is possible to change the name of dangerous commands in a shared
# environment. For instance the CONFIG command may be renamed into something
# hard to guess so that it will still be available for internal-use tools
# but not available for general clients.
#
# Example:
#
# rename-command CONFIG b840fc02d524045429941cc15f59e41cb7be6c52
#
# It is also possible to completely kill a command by renaming it into
# an empty string:
#
# rename-command CONFIG ""
#
# Please note that changing the name of commands that are logged into the
# AOF file or transmitted to replicas may cause problems.################################### CLIENTS ##################################### Set the max number of connected clients at the same time. By default
# this limit is set to 10000 clients, however if the Redis server is not
# able to configure the process file limit to allow for the specified limit
# the max number of allowed clients is set to the current file limit
# minus 32 (as Redis reserves a few file descriptors for internal uses).
#
# Once the limit is reached Redis will close all the new connections sending
# an error 'max number of clients reached'.
#
# maxclients 10000############################## MEMORY MANAGEMENT ################################# Set a memory usage limit to the specified amount of bytes.
# When the memory limit is reached Redis will try to remove keys
# according to the eviction policy selected (see maxmemory-policy).
#
# If Redis can't remove keys according to the policy, or if the policy is
# set to 'noeviction', Redis will start to reply with errors to commands
# that would use more memory, like SET, LPUSH, and so on, and will continue
# to reply to read-only commands like GET.
#
# This option is usually useful when using Redis as an LRU or LFU cache, or to
# set a hard memory limit for an instance (using the 'noeviction' policy).
#
# WARNING: If you have replicas attached to an instance with maxmemory on,
# the size of the output buffers needed to feed the replicas are subtracted
# from the used memory count, so that network problems / resyncs will
# not trigger a loop where keys are evicted, and in turn the output
# buffer of replicas is full with DELs of keys evicted triggering the deletion
# of more keys, and so forth until the database is completely emptied.
#
# In short... if you have replicas attached it is suggested that you set a lower
# limit for maxmemory so that there is some free RAM on the system for replica
# output buffers (but this is not needed if the policy is 'noeviction').
#
# maxmemory <bytes># MAXMEMORY POLICY: how Redis will select what to remove when maxmemory
# is reached. You can select among five behaviors:
#
# volatile-lru -> Evict using approximated LRU among the keys with an expire set.
# allkeys-lru -> Evict any key using approximated LRU.
# volatile-lfu -> Evict using approximated LFU among the keys with an expire set.
# allkeys-lfu -> Evict any key using approximated LFU.
# volatile-random -> Remove a random key among the ones with an expire set.
# allkeys-random -> Remove a random key, any key.
# volatile-ttl -> Remove the key with the nearest expire time (minor TTL)
# noeviction -> Don't evict anything, just return an error on write operations.
#
# LRU means Least Recently Used
# LFU means Least Frequently Used
#
# Both LRU, LFU and volatile-ttl are implemented using approximated
# randomized algorithms.
#
# Note: with any of the above policies, Redis will return an error on write
#       operations, when there are no suitable keys for eviction.
#
#       At the date of writing these commands are: set setnx setex append
#       incr decr rpush lpush rpushx lpushx linsert lset rpoplpush sadd
#       sinter sinterstore sunion sunionstore sdiff sdiffstore zadd zincrby
#       zunionstore zinterstore hset hsetnx hmset hincrby incrby decrby
#       getset mset msetnx exec sort
#
# The default is:
#
# maxmemory-policy noeviction# LRU, LFU and minimal TTL algorithms are not precise algorithms but approximated
# algorithms (in order to save memory), so you can tune it for speed or
# accuracy. For default Redis will check five keys and pick the one that was
# used less recently, you can change the sample size using the following
# configuration directive.
#
# The default of 5 produces good enough results. 10 Approximates very closely
# true LRU but costs more CPU. 3 is faster but not very accurate.
#
# maxmemory-samples 5# Starting from Redis 5, by default a replica will ignore its maxmemory setting
# (unless it is promoted to master after a failover or manually). It means
# that the eviction of keys will be just handled by the master, sending the
# DEL commands to the replica as keys evict in the master side.
#
# This behavior ensures that masters and replicas stay consistent, and is usually
# what you want, however if your replica is writable, or you want the replica to have
# a different memory setting, and you are sure all the writes performed to the
# replica are idempotent, then you may change this default (but be sure to understand
# what you are doing).
#
# Note that since the replica by default does not evict, it may end using more
# memory than the one set via maxmemory (there are certain buffers that may
# be larger on the replica, or data structures may sometimes take more memory and so
# forth). So make sure you monitor your replicas and make sure they have enough
# memory to never hit a real out-of-memory condition before the master hits
# the configured maxmemory setting.
#
# replica-ignore-maxmemory yes############################# LAZY FREEING ##################################### Redis has two primitives to delete keys. One is called DEL and is a blocking
# deletion of the object. It means that the server stops processing new commands
# in order to reclaim all the memory associated with an object in a synchronous
# way. If the key deleted is associated with a small object, the time needed
# in order to execute the DEL command is very small and comparable to most other
# O(1) or O(log_N) commands in Redis. However if the key is associated with an
# aggregated value containing millions of elements, the server can block for
# a long time (even seconds) in order to complete the operation.
#
# For the above reasons Redis also offers non blocking deletion primitives
# such as UNLINK (non blocking DEL) and the ASYNC option of FLUSHALL and
# FLUSHDB commands, in order to reclaim memory in background. Those commands
# are executed in constant time. Another thread will incrementally free the
# object in the background as fast as possible.
#
# DEL, UNLINK and ASYNC option of FLUSHALL and FLUSHDB are user-controlled.
# It's up to the design of the application to understand when it is a good
# idea to use one or the other. However the Redis server sometimes has to
# delete keys or flush the whole database as a side effect of other operations.
# Specifically Redis deletes objects independently of a user call in the
# following scenarios:
#
# 1) On eviction, because of the maxmemory and maxmemory policy configurations,
#    in order to make room for new data, without going over the specified
#    memory limit.
# 2) Because of expire: when a key with an associated time to live (see the
#    EXPIRE command) must be deleted from memory.
# 3) Because of a side effect of a command that stores data on a key that may
#    already exist. For example the RENAME command may delete the old key
#    content when it is replaced with another one. Similarly SUNIONSTORE
#    or SORT with STORE option may delete existing keys. The SET command
#    itself removes any old content of the specified key in order to replace
#    it with the specified string.
# 4) During replication, when a replica performs a full resynchronization with
#    its master, the content of the whole database is removed in order to
#    load the RDB file just transferred.
#
# In all the above cases the default is to delete objects in a blocking way,
# like if DEL was called. However you can configure each case specifically
# in order to instead release memory in a non-blocking way like if UNLINK
# was called, using the following configuration directives:lazyfree-lazy-eviction no
lazyfree-lazy-expire no
lazyfree-lazy-server-del no
replica-lazy-flush no############################## APPEND ONLY MODE ################################ By default Redis asynchronously dumps the dataset on disk. This mode is
# good enough in many applications, but an issue with the Redis process or
# a power outage may result into a few minutes of writes lost (depending on
# the configured save points).
#
# The Append Only File is an alternative persistence mode that provides
# much better durability. For instance using the default data fsync policy
# (see later in the config file) Redis can lose just one second of writes in a
# dramatic event like a server power outage, or a single write if something
# wrong with the Redis process itself happens, but the operating system is
# still running correctly.
#
# AOF and RDB persistence can be enabled at the same time without problems.
# If the AOF is enabled on startup Redis will load the AOF, that is the file
# with the better durability guarantees.
#
# Please check http://redis.io/topics/persistence for more information.appendonly no# The name of the append only file (default: "appendonly.aof")appendfilename "appendonly.aof"# The fsync() call tells the Operating System to actually write data on disk
# instead of waiting for more data in the output buffer. Some OS will really flush
# data on disk, some other OS will just try to do it ASAP.
#
# Redis supports three different modes:
#
# no: don't fsync, just let the OS flush the data when it wants. Faster.
# always: fsync after every write to the append only log. Slow, Safest.
# everysec: fsync only one time every second. Compromise.
#
# The default is "everysec", as that's usually the right compromise between
# speed and data safety. It's up to you to understand if you can relax this to
# "no" that will let the operating system flush the output buffer when
# it wants, for better performances (but if you can live with the idea of
# some data loss consider the default persistence mode that's snapshotting),
# or on the contrary, use "always" that's very slow but a bit safer than
# everysec.
#
# More details please check the following article:
# http://antirez.com/post/redis-persistence-demystified.html
#
# If unsure, use "everysec".# appendfsync always
appendfsync everysec
# appendfsync no# When the AOF fsync policy is set to always or everysec, and a background
# saving process (a background save or AOF log background rewriting) is
# performing a lot of I/O against the disk, in some Linux configurations
# Redis may block too long on the fsync() call. Note that there is no fix for
# this currently, as even performing fsync in a different thread will block
# our synchronous write(2) call.
#
# In order to mitigate this problem it's possible to use the following option
# that will prevent fsync() from being called in the main process while a
# BGSAVE or BGREWRITEAOF is in progress.
#
# This means that while another child is saving, the durability of Redis is
# the same as "appendfsync none". In practical terms, this means that it is
# possible to lose up to 30 seconds of log in the worst scenario (with the
# default Linux settings).
#
# If you have latency problems turn this to "yes". Otherwise leave it as
# "no" that is the safest pick from the point of view of durability.no-appendfsync-on-rewrite no# Automatic rewrite of the append only file.
# Redis is able to automatically rewrite the log file implicitly calling
# BGREWRITEAOF when the AOF log size grows by the specified percentage.
#
# This is how it works: Redis remembers the size of the AOF file after the
# latest rewrite (if no rewrite has happened since the restart, the size of
# the AOF at startup is used).
#
# This base size is compared to the current size. If the current size is
# bigger than the specified percentage, the rewrite is triggered. Also
# you need to specify a minimal size for the AOF file to be rewritten, this
# is useful to avoid rewriting the AOF file even if the percentage increase
# is reached but it is still pretty small.
#
# Specify a percentage of zero in order to disable the automatic AOF
# rewrite feature.auto-aof-rewrite-percentage 100
auto-aof-rewrite-min-size 64mb# An AOF file may be found to be truncated at the end during the Redis
# startup process, when the AOF data gets loaded back into memory.
# This may happen when the system where Redis is running
# crashes, especially when an ext4 filesystem is mounted without the
# data=ordered option (however this can't happen when Redis itself
# crashes or aborts but the operating system still works correctly).
#
# Redis can either exit with an error when this happens, or load as much
# data as possible (the default now) and start if the AOF file is found
# to be truncated at the end. The following option controls this behavior.
#
# If aof-load-truncated is set to yes, a truncated AOF file is loaded and
# the Redis server starts emitting a log to inform the user of the event.
# Otherwise if the option is set to no, the server aborts with an error
# and refuses to start. When the option is set to no, the user requires
# to fix the AOF file using the "redis-check-aof" utility before to restart
# the server.
#
# Note that if the AOF file will be found to be corrupted in the middle
# the server will still exit with an error. This option only applies when
# Redis will try to read more data from the AOF file but not enough bytes
# will be found.
aof-load-truncated yes# When rewriting the AOF file, Redis is able to use an RDB preamble in the
# AOF file for faster rewrites and recoveries. When this option is turned
# on the rewritten AOF file is composed of two different stanzas:
#
#   [RDB file][AOF tail]
#
# When loading Redis recognizes that the AOF file starts with the "REDIS"
# string and loads the prefixed RDB file, and continues loading the AOF
# tail.
aof-use-rdb-preamble yes################################ LUA SCRIPTING  ################################ Max execution time of a Lua script in milliseconds.
#
# If the maximum execution time is reached Redis will log that a script is
# still in execution after the maximum allowed time and will start to
# reply to queries with an error.
#
# When a long running script exceeds the maximum execution time only the
# SCRIPT KILL and SHUTDOWN NOSAVE commands are available. The first can be
# used to stop a script that did not yet called write commands. The second
# is the only way to shut down the server in the case a write command was
# already issued by the script but the user doesn't want to wait for the natural
# termination of the script.
#
# Set it to 0 or a negative value for unlimited execution without warnings.
lua-time-limit 5000################################ REDIS CLUSTER  ################################ Normal Redis instances can't be part of a Redis Cluster; only nodes that are
# started as cluster nodes can. In order to start a Redis instance as a
# cluster node enable the cluster support uncommenting the following:
#
# cluster-enabled yes# Every cluster node has a cluster configuration file. This file is not
# intended to be edited by hand. It is created and updated by Redis nodes.
# Every Redis Cluster node requires a different cluster configuration file.
# Make sure that instances running in the same system do not have
# overlapping cluster configuration file names.
#
# cluster-config-file nodes-6379.conf# Cluster node timeout is the amount of milliseconds a node must be unreachable
# for it to be considered in failure state.
# Most other internal time limits are multiple of the node timeout.
#
# cluster-node-timeout 15000# A replica of a failing master will avoid to start a failover if its data
# looks too old.
#
# There is no simple way for a replica to actually have an exact measure of
# its "data age", so the following two checks are performed:
#
# 1) If there are multiple replicas able to failover, they exchange messages
#    in order to try to give an advantage to the replica with the best
#    replication offset (more data from the master processed).
#    Replicas will try to get their rank by offset, and apply to the start
#    of the failover a delay proportional to their rank.
#
# 2) Every single replica computes the time of the last interaction with
#    its master. This can be the last ping or command received (if the master
#    is still in the "connected" state), or the time that elapsed since the
#    disconnection with the master (if the replication link is currently down).
#    If the last interaction is too old, the replica will not try to failover
#    at all.
#
# The point "2" can be tuned by user. Specifically a replica will not perform
# the failover if, since the last interaction with the master, the time
# elapsed is greater than:
#
#   (node-timeout * replica-validity-factor) + repl-ping-replica-period
#
# So for example if node-timeout is 30 seconds, and the replica-validity-factor
# is 10, and assuming a default repl-ping-replica-period of 10 seconds, the
# replica will not try to failover if it was not able to talk with the master
# for longer than 310 seconds.
#
# A large replica-validity-factor may allow replicas with too old data to failover
# a master, while a too small value may prevent the cluster from being able to
# elect a replica at all.
#
# For maximum availability, it is possible to set the replica-validity-factor
# to a value of 0, which means, that replicas will always try to failover the
# master regardless of the last time they interacted with the master.
# (However they'll always try to apply a delay proportional to their
# offset rank).
#
# Zero is the only value able to guarantee that when all the partitions heal
# the cluster will always be able to continue.
#
# cluster-replica-validity-factor 10# Cluster replicas are able to migrate to orphaned masters, that are masters
# that are left without working replicas. This improves the cluster ability
# to resist to failures as otherwise an orphaned master can't be failed over
# in case of failure if it has no working replicas.
#
# Replicas migrate to orphaned masters only if there are still at least a
# given number of other working replicas for their old master. This number
# is the "migration barrier". A migration barrier of 1 means that a replica
# will migrate only if there is at least 1 other working replica for its master
# and so forth. It usually reflects the number of replicas you want for every
# master in your cluster.
#
# Default is 1 (replicas migrate only if their masters remain with at least
# one replica). To disable migration just set it to a very large value.
# A value of 0 can be set but is useful only for debugging and dangerous
# in production.
#
# cluster-migration-barrier 1# By default Redis Cluster nodes stop accepting queries if they detect there
# is at least an hash slot uncovered (no available node is serving it).
# This way if the cluster is partially down (for example a range of hash slots
# are no longer covered) all the cluster becomes, eventually, unavailable.
# It automatically returns available as soon as all the slots are covered again.
#
# However sometimes you want the subset of the cluster which is working,
# to continue to accept queries for the part of the key space that is still
# covered. In order to do so, just set the cluster-require-full-coverage
# option to no.
#
# cluster-require-full-coverage yes# This option, when set to yes, prevents replicas from trying to failover its
# master during master failures. However the master can still perform a
# manual failover, if forced to do so.
#
# This is useful in different scenarios, especially in the case of multiple
# data center operations, where we want one side to never be promoted if not
# in the case of a total DC failure.
#
# cluster-replica-no-failover no# In order to setup your cluster make sure to read the documentation
# available at http://redis.io web site.########################## CLUSTER DOCKER/NAT support  ######################### In certain deployments, Redis Cluster nodes address discovery fails, because
# addresses are NAT-ted or because ports are forwarded (the typical case is
# Docker and other containers).
#
# In order to make Redis Cluster working in such environments, a static
# configuration where each node knows its public address is needed. The
# following two options are used for this scope, and are:
#
# * cluster-announce-ip
# * cluster-announce-port
# * cluster-announce-bus-port
#
# Each instruct the node about its address, client port, and cluster message
# bus port. The information is then published in the header of the bus packets
# so that other nodes will be able to correctly map the address of the node
# publishing the information.
#
# If the above options are not used, the normal Redis Cluster auto-detection
# will be used instead.
#
# Note that when remapped, the bus port may not be at the fixed offset of
# clients port + 10000, so you can specify any port and bus-port depending
# on how they get remapped. If the bus-port is not set, a fixed offset of
# 10000 will be used as usually.
#
# Example:
#
# cluster-announce-ip 10.1.1.5
# cluster-announce-port 6379
# cluster-announce-bus-port 6380################################## SLOW LOG #################################### The Redis Slow Log is a system to log queries that exceeded a specified
# execution time. The execution time does not include the I/O operations
# like talking with the client, sending the reply and so forth,
# but just the time needed to actually execute the command (this is the only
# stage of command execution where the thread is blocked and can not serve
# other requests in the meantime).
#
# You can configure the slow log with two parameters: one tells Redis
# what is the execution time, in microseconds, to exceed in order for the
# command to get logged, and the other parameter is the length of the
# slow log. When a new command is logged the oldest one is removed from the
# queue of logged commands.# The following time is expressed in microseconds, so 1000000 is equivalent
# to one second. Note that a negative number disables the slow log, while
# a value of zero forces the logging of every command.
slowlog-log-slower-than 10000# There is no limit to this length. Just be aware that it will consume memory.
# You can reclaim memory used by the slow log with SLOWLOG RESET.
slowlog-max-len 128################################ LATENCY MONITOR ############################### The Redis latency monitoring subsystem samples different operations
# at runtime in order to collect data related to possible sources of
# latency of a Redis instance.
#
# Via the LATENCY command this information is available to the user that can
# print graphs and obtain reports.
#
# The system only logs operations that were performed in a time equal or
# greater than the amount of milliseconds specified via the
# latency-monitor-threshold configuration directive. When its value is set
# to zero, the latency monitor is turned off.
#
# By default latency monitoring is disabled since it is mostly not needed
# if you don't have latency issues, and collecting data has a performance
# impact, that while very small, can be measured under big load. Latency
# monitoring can easily be enabled at runtime using the command
# "CONFIG SET latency-monitor-threshold <milliseconds>" if needed.
latency-monitor-threshold 0############################# EVENT NOTIFICATION ############################### Redis can notify Pub/Sub clients about events happening in the key space.
# This feature is documented at http://redis.io/topics/notifications
#
# For instance if keyspace events notification is enabled, and a client
# performs a DEL operation on key "foo" stored in the Database 0, two
# messages will be published via Pub/Sub:
#
# PUBLISH __keyspace@0__:foo del
# PUBLISH __keyevent@0__:del foo
#
# It is possible to select the events that Redis will notify among a set
# of classes. Every class is identified by a single character:
#
#  K     Keyspace events, published with __keyspace@<db>__ prefix.
#  E     Keyevent events, published with __keyevent@<db>__ prefix.
#  g     Generic commands (non-type specific) like DEL, EXPIRE, RENAME, ...
#  $     String commands
#  l     List commands
#  s     Set commands
#  h     Hash commands
#  z     Sorted set commands
#  x     Expired events (events generated every time a key expires)
#  e     Evicted events (events generated when a key is evicted for maxmemory)
#  A     Alias for g$lshzxe, so that the "AKE" string means all the events.
#
#  The "notify-keyspace-events" takes as argument a string that is composed
#  of zero or multiple characters. The empty string means that notifications
#  are disabled.
#
#  Example: to enable list and generic events, from the point of view of the
#           event name, use:
#
#  notify-keyspace-events Elg
#
#  Example 2: to get the stream of the expired keys subscribing to channel
#             name __keyevent@0__:expired use:
#notify-keyspace-events Ex
#
#  By default all notifications are disabled because most users don't need
#  this feature and the feature has some overhead. Note that if you don't
#  specify at least one of K or E, no events will be delivered.
#notify-keyspace-events ""############################### ADVANCED CONFIG ################################ Hashes are encoded using a memory efficient data structure when they have a
# small number of entries, and the biggest entry does not exceed a given
# threshold. These thresholds can be configured using the following directives.
hash-max-ziplist-entries 512
hash-max-ziplist-value 64# Lists are also encoded in a special way to save a lot of space.
# The number of entries allowed per internal list node can be specified
# as a fixed maximum size or a maximum number of elements.
# For a fixed maximum size, use -5 through -1, meaning:
# -5: max size: 64 Kb  <-- not recommended for normal workloads
# -4: max size: 32 Kb  <-- not recommended
# -3: max size: 16 Kb  <-- probably not recommended
# -2: max size: 8 Kb   <-- good
# -1: max size: 4 Kb   <-- good
# Positive numbers mean store up to _exactly_ that number of elements
# per list node.
# The highest performing option is usually -2 (8 Kb size) or -1 (4 Kb size),
# but if your use case is unique, adjust the settings as necessary.
list-max-ziplist-size -2# Lists may also be compressed.
# Compress depth is the number of quicklist ziplist nodes from *each* side of
# the list to *exclude* from compression.  The head and tail of the list
# are always uncompressed for fast push/pop operations.  Settings are:
# 0: disable all list compression
# 1: depth 1 means "don't start compressing until after 1 node into the list,
#    going from either the head or tail"
#    So: [head]->node->node->...->node->[tail]
#    [head], [tail] will always be uncompressed; inner nodes will compress.
# 2: [head]->[next]->node->node->...->node->[prev]->[tail]
#    2 here means: don't compress head or head->next or tail->prev or tail,
#    but compress all nodes between them.
# 3: [head]->[next]->[next]->node->node->...->node->[prev]->[prev]->[tail]
# etc.
list-compress-depth 0# Sets have a special encoding in just one case: when a set is composed
# of just strings that happen to be integers in radix 10 in the range
# of 64 bit signed integers.
# The following configuration setting sets the limit in the size of the
# set in order to use this special memory saving encoding.
set-max-intset-entries 512# Similarly to hashes and lists, sorted sets are also specially encoded in
# order to save a lot of space. This encoding is only used when the length and
# elements of a sorted set are below the following limits:
zset-max-ziplist-entries 128
zset-max-ziplist-value 64# HyperLogLog sparse representation bytes limit. The limit includes the
# 16 bytes header. When an HyperLogLog using the sparse representation crosses
# this limit, it is converted into the dense representation.
#
# A value greater than 16000 is totally useless, since at that point the
# dense representation is more memory efficient.
#
# The suggested value is ~ 3000 in order to have the benefits of
# the space efficient encoding without slowing down too much PFADD,
# which is O(N) with the sparse encoding. The value can be raised to
# ~ 10000 when CPU is not a concern, but space is, and the data set is
# composed of many HyperLogLogs with cardinality in the 0 - 15000 range.
hll-sparse-max-bytes 3000# Streams macro node max size / items. The stream data structure is a radix
# tree of big nodes that encode multiple items inside. Using this configuration
# it is possible to configure how big a single node can be in bytes, and the
# maximum number of items it may contain before switching to a new node when
# appending new stream entries. If any of the following settings are set to
# zero, the limit is ignored, so for instance it is possible to set just a
# max entires limit by setting max-bytes to 0 and max-entries to the desired
# value.
stream-node-max-bytes 4096
stream-node-max-entries 100# Active rehashing uses 1 millisecond every 100 milliseconds of CPU time in
# order to help rehashing the main Redis hash table (the one mapping top-level
# keys to values). The hash table implementation Redis uses (see dict.c)
# performs a lazy rehashing: the more operation you run into a hash table
# that is rehashing, the more rehashing "steps" are performed, so if the
# server is idle the rehashing is never complete and some more memory is used
# by the hash table.
#
# The default is to use this millisecond 10 times every second in order to
# actively rehash the main dictionaries, freeing memory when possible.
#
# If unsure:
# use "activerehashing no" if you have hard latency requirements and it is
# not a good thing in your environment that Redis can reply from time to time
# to queries with 2 milliseconds delay.
#
# use "activerehashing yes" if you don't have such hard requirements but
# want to free memory asap when possible.
activerehashing yes# The client output buffer limits can be used to force disconnection of clients
# that are not reading data from the server fast enough for some reason (a
# common reason is that a Pub/Sub client can't consume messages as fast as the
# publisher can produce them).
#
# The limit can be set differently for the three different classes of clients:
#
# normal -> normal clients including MONITOR clients
# replica  -> replica clients
# pubsub -> clients subscribed to at least one pubsub channel or pattern
#
# The syntax of every client-output-buffer-limit directive is the following:
#
# client-output-buffer-limit <class> <hard limit> <soft limit> <soft seconds>
#
# A client is immediately disconnected once the hard limit is reached, or if
# the soft limit is reached and remains reached for the specified number of
# seconds (continuously).
# So for instance if the hard limit is 32 megabytes and the soft limit is
# 16 megabytes / 10 seconds, the client will get disconnected immediately
# if the size of the output buffers reach 32 megabytes, but will also get
# disconnected if the client reaches 16 megabytes and continuously overcomes
# the limit for 10 seconds.
#
# By default normal clients are not limited because they don't receive data
# without asking (in a push way), but just after a request, so only
# asynchronous clients may create a scenario where data is requested faster
# than it can read.
#
# Instead there is a default limit for pubsub and replica clients, since
# subscribers and replicas receive data in a push fashion.
#
# Both the hard or the soft limit can be disabled by setting them to zero.
client-output-buffer-limit normal 0 0 0
client-output-buffer-limit replica 256mb 64mb 60
client-output-buffer-limit pubsub 32mb 8mb 60# Client query buffers accumulate new commands. They are limited to a fixed
# amount by default in order to avoid that a protocol desynchronization (for
# instance due to a bug in the client) will lead to unbound memory usage in
# the query buffer. However you can configure it here if you have very special
# needs, such us huge multi/exec requests or alike.
#
# client-query-buffer-limit 1gb# In the Redis protocol, bulk requests, that are, elements representing single
# strings, are normally limited ot 512 mb. However you can change this limit
# here.
#
# proto-max-bulk-len 512mb# Redis calls an internal function to perform many background tasks, like
# closing connections of clients in timeout, purging expired keys that are
# never requested, and so forth.
#
# Not all tasks are performed with the same frequency, but Redis checks for
# tasks to perform according to the specified "hz" value.
#
# By default "hz" is set to 10. Raising the value will use more CPU when
# Redis is idle, but at the same time will make Redis more responsive when
# there are many keys expiring at the same time, and timeouts may be
# handled with more precision.
#
# The range is between 1 and 500, however a value over 100 is usually not
# a good idea. Most users should use the default of 10 and raise this up to
# 100 only in environments where very low latency is required.
hz 10# Normally it is useful to have an HZ value which is proportional to the
# number of clients connected. This is useful in order, for instance, to
# avoid too many clients are processed for each background task invocation
# in order to avoid latency spikes.
#
# Since the default HZ value by default is conservatively set to 10, Redis
# offers, and enables by default, the ability to use an adaptive HZ value
# which will temporary raise when there are many connected clients.
#
# When dynamic HZ is enabled, the actual configured HZ will be used as
# as a baseline, but multiples of the configured HZ value will be actually
# used as needed once more clients are connected. In this way an idle
# instance will use very little CPU time while a busy instance will be
# more responsive.
dynamic-hz yes# When a child rewrites the AOF file, if the following option is enabled
# the file will be fsync-ed every 32 MB of data generated. This is useful
# in order to commit the file to the disk more incrementally and avoid
# big latency spikes.
aof-rewrite-incremental-fsync yes# When redis saves RDB file, if the following option is enabled
# the file will be fsync-ed every 32 MB of data generated. This is useful
# in order to commit the file to the disk more incrementally and avoid
# big latency spikes.
rdb-save-incremental-fsync yes# Redis LFU eviction (see maxmemory setting) can be tuned. However it is a good
# idea to start with the default settings and only change them after investigating
# how to improve the performances and how the keys LFU change over time, which
# is possible to inspect via the OBJECT FREQ command.
#
# There are two tunable parameters in the Redis LFU implementation: the
# counter logarithm factor and the counter decay time. It is important to
# understand what the two parameters mean before changing them.
#
# The LFU counter is just 8 bits per key, it's maximum value is 255, so Redis
# uses a probabilistic increment with logarithmic behavior. Given the value
# of the old counter, when a key is accessed, the counter is incremented in
# this way:
#
# 1. A random number R between 0 and 1 is extracted.
# 2. A probability P is calculated as 1/(old_value*lfu_log_factor+1).
# 3. The counter is incremented only if R < P.
#
# The default lfu-log-factor is 10. This is a table of how the frequency
# counter changes with a different number of accesses with different
# logarithmic factors:
#
# +--------+------------+------------+------------+------------+------------+
# | factor | 100 hits   | 1000 hits  | 100K hits  | 1M hits    | 10M hits   |
# +--------+------------+------------+------------+------------+------------+
# | 0      | 104        | 255        | 255        | 255        | 255        |
# +--------+------------+------------+------------+------------+------------+
# | 1      | 18         | 49         | 255        | 255        | 255        |
# +--------+------------+------------+------------+------------+------------+
# | 10     | 10         | 18         | 142        | 255        | 255        |
# +--------+------------+------------+------------+------------+------------+
# | 100    | 8          | 11         | 49         | 143        | 255        |
# +--------+------------+------------+------------+------------+------------+
#
# NOTE: The above table was obtained by running the following commands:
#
#   redis-benchmark -n 1000000 incr foo
#   redis-cli object freq foo
#
# NOTE 2: The counter initial value is 5 in order to give new objects a chance
# to accumulate hits.
#
# The counter decay time is the time, in minutes, that must elapse in order
# for the key counter to be divided by two (or decremented if it has a value
# less <= 10).
#
# The default value for the lfu-decay-time is 1. A Special value of 0 means to
# decay the counter every time it happens to be scanned.
#
# lfu-log-factor 10
# lfu-decay-time 1########################### ACTIVE DEFRAGMENTATION #######################
#
# WARNING THIS FEATURE IS EXPERIMENTAL. However it was stress tested
# even in production and manually tested by multiple engineers for some
# time.
#
# What is active defragmentation?
# -------------------------------
#
# Active (online) defragmentation allows a Redis server to compact the
# spaces left between small allocations and deallocations of data in memory,
# thus allowing to reclaim back memory.
#
# Fragmentation is a natural process that happens with every allocator (but
# less so with Jemalloc, fortunately) and certain workloads. Normally a server
# restart is needed in order to lower the fragmentation, or at least to flush
# away all the data and create it again. However thanks to this feature
# implemented by Oran Agra for Redis 4.0 this process can happen at runtime
# in an "hot" way, while the server is running.
#
# Basically when the fragmentation is over a certain level (see the
# configuration options below) Redis will start to create new copies of the
# values in contiguous memory regions by exploiting certain specific Jemalloc
# features (in order to understand if an allocation is causing fragmentation
# and to allocate it in a better place), and at the same time, will release the
# old copies of the data. This process, repeated incrementally for all the keys
# will cause the fragmentation to drop back to normal values.
#
# Important things to understand:
#
# 1. This feature is disabled by default, and only works if you compiled Redis
#    to use the copy of Jemalloc we ship with the source code of Redis.
#    This is the default with Linux builds.
#
# 2. You never need to enable this feature if you don't have fragmentation
#    issues.
#
# 3. Once you experience fragmentation, you can enable this feature when
#    needed with the command "CONFIG SET activedefrag yes".
#
# The configuration parameters are able to fine tune the behavior of the
# defragmentation process. If you are not sure about what they mean it is
# a good idea to leave the defaults untouched.# Enabled active defragmentation
# activedefrag yes# Minimum amount of fragmentation waste to start active defrag
# active-defrag-ignore-bytes 100mb# Minimum percentage of fragmentation to start active defrag
# active-defrag-threshold-lower 10# Maximum percentage of fragmentation at which we use maximum effort
# active-defrag-threshold-upper 100# Minimal effort for defrag in CPU percentage
# active-defrag-cycle-min 5# Maximal effort for defrag in CPU percentage
# active-defrag-cycle-max 75# Maximum number of set/hash/zset/list fields that will be processed from
# the main dictionary scan
# active-defrag-max-scan-fields 1000
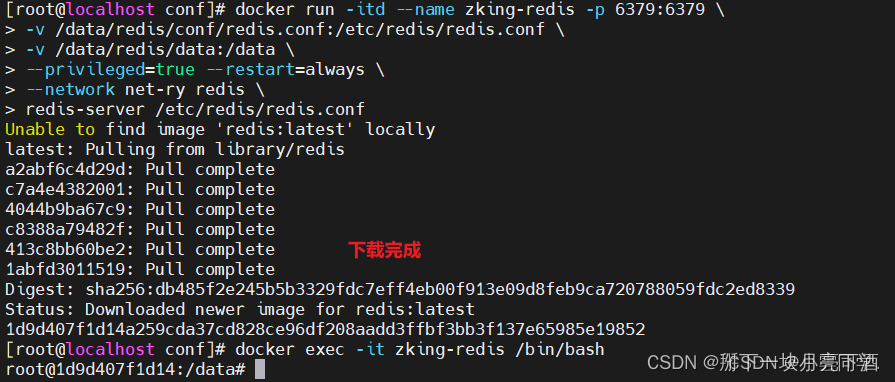
- 一次性执行相关命令
将下方命令一次性全部粘贴上去执行即可
docker run -itd --name zking-redis -p 6379:6379
-v /data/redis/conf/redis.conf:/etc/redis/redis.conf
-v /data/redis/data:/data
–privileged=true --restart=always
–network net-ry redis \ redis-server /etc/redis/redis.conf
- 测试
进入容器(测试是否安装成功)
docker exec -it zking-redis /bin/bash
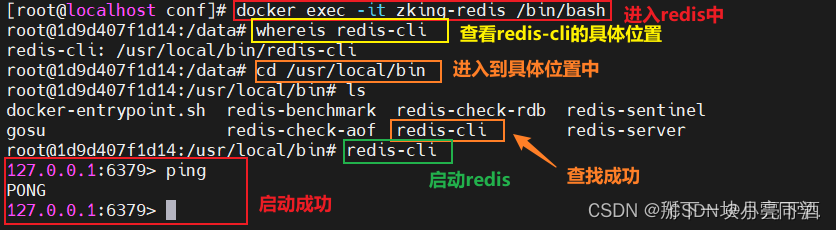
输入 ping 指令后,出现 PONG 标识,代表我们安装成功了,服务可以正常启动
二、若依部署后端服务
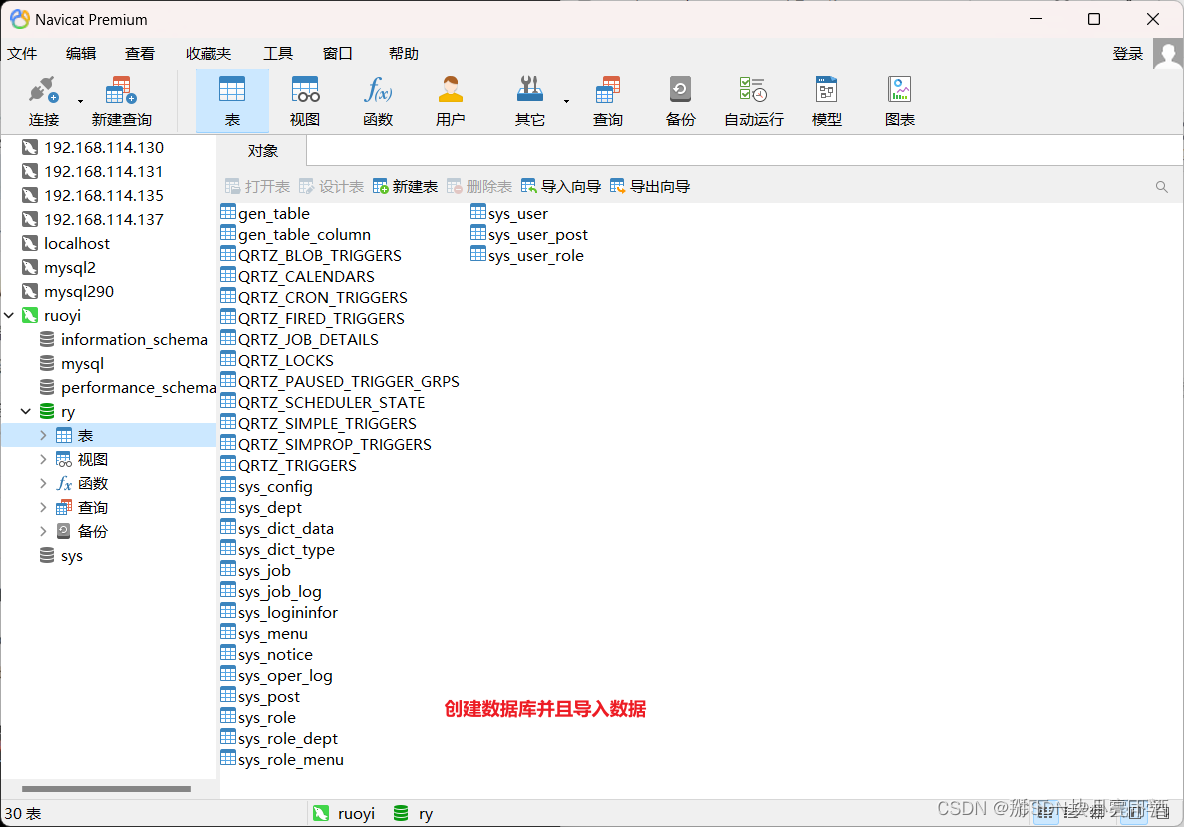
2.1 数据导入
创建数据库并导入脚本
2.2 使用Dockerfile自定义镜像
- 构建Dockerfile镜像
#1.切换到家目录 cd ~
#2.新建文件夹 mkdir ruoyi-admin
#3.进入到新建文件夹 cd ruoyi-admin
-
上传ruoyi-admin.jar和Dockerfile_ruoyi-admin文件到同一目录,例如:/root/ruoyi-admin
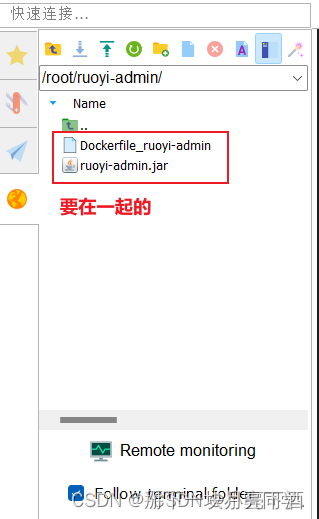
-
Dockerfile_ruoyi-admin的文件内容
FROM anapsix/alpine-java:8_server-jre_unlimited
MAINTAINER “donkee@vip.qq.com”
ADD ruoyi-admin.jar /opt/app.jar
EXPOSE 8080
ENTRYPOINT [“java”,“-jar”,“/opt/app.jar”]
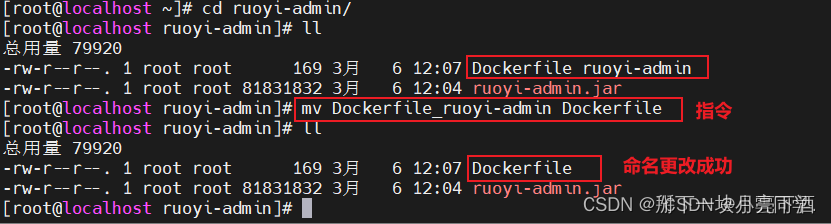
将Dockerfile_ruoyi-admin重命名一下
mv Dockerfile_ruoyi-admin Dockerfile
- ruoyi-admin为镜像名称,开始制作镜像
docker build -t ruoyi-admin .
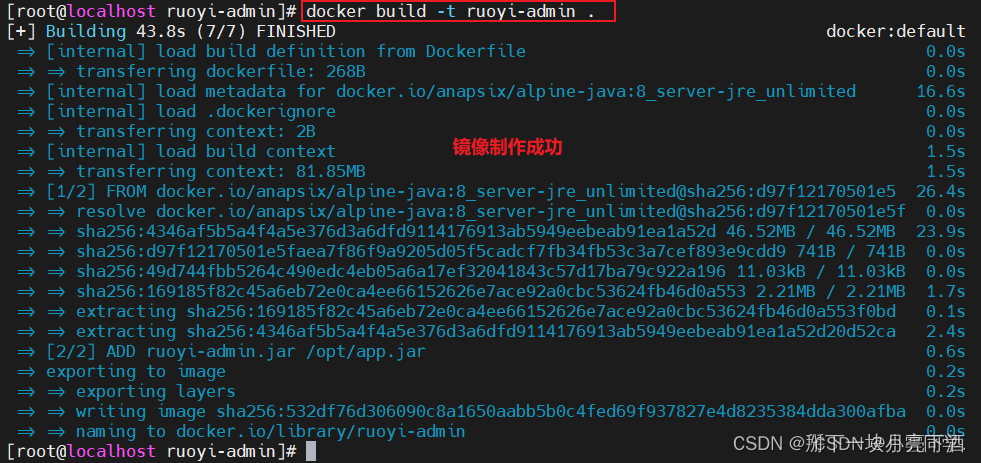
使用 docker images 可以查看到我们刚刚自定义生成的一个镜像

5.3 运行容器
- 运行容器
docker run -itd --name ruoyi-admin --network net-ry -p 8080:8080
ruoyi-admin

- 查看日志
#进入容器中 docker exec -it ruoyi-admin /bin/bash
#查看日志 cd /home/ruoyi/logs/
#详情 ls -l

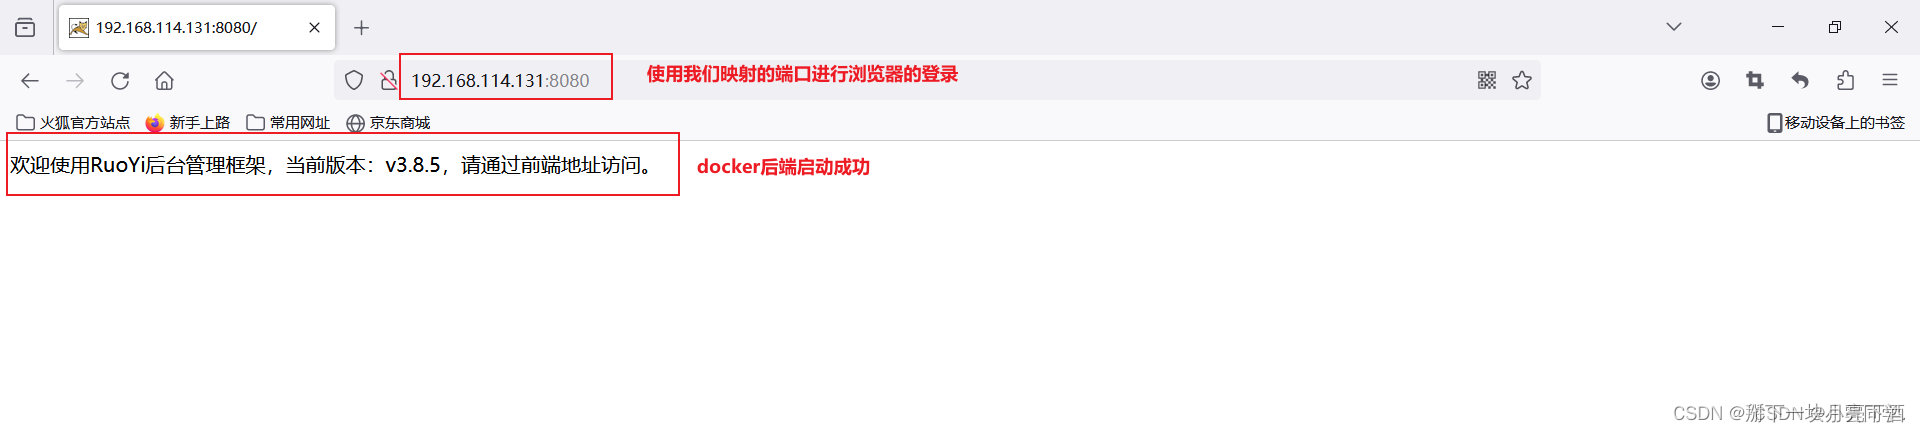
- 使用宿主机访问docker项目后端
访问成功
若依部署前端项目
1 创建目录
mkdir -p /data/nginx/{conf,html}
- 上传nginx.conf至/data/nginx/conf文件夹中
代码如下:
139.129.36.12修改为自己服务器ip
worker_processes  1;events {worker_connections  1024;
}http {include       mime.types;default_type  application/octet-stream;sendfile        on;keepalive_timeout  65;server {listen       8010;server_name  139.129.36.12charset utf-8;location / {root  /usr/share/nginx/html/dist;try_files $uri $uri/ /index.html;index  index.html index.htm;}location /prod-api/ {proxy_set_header Host $http_host;proxy_set_header X-Real-IP $remote_addr;proxy_set_header REMOTE-HOST $remote_addr;proxy_set_header X-Forwarded-For $proxy_add_x_forwarded_for;proxy_pass http://139.129.36.12:8080/;}error_page   500 502 503 504  /50x.html;location = /50x.html {root   html;}}include /etc/nginx/conf.d/*.conf;
}
3.获取nignx镜像
docker pull nginx:latest
4.启动容器
docker run -d -p 8010:8010 --name ruo-yi-nginx -v /data/nginx/html:/usr/share/nginx/html -v /data/nginx/conf/nginx.conf:/etc/nginx/nginx.conf nginx
相关文章:
docker环境部署ruoyi系统前后端分离项目
创建局域网 docker network create net-ry 安装Redis 1 安装 创建两个目录 mkdir -p /data/redis/{conf,data} 上传redis.conf文件到/data/redis/conf文件夹中 cd /data/redis/conf 3.2 配置redis.conf文件 配置redis.conf文件: redis.conf文件配置注意&…...

UI(二)控件
文章目录 PatternLockProgressQRCodeRadioRatingRichTextScollBarSearchSelectSlideSpanStepper和StepperItemTextTextAreaTextClockTextInputTextPickerTextTimerTimePickerToggleWeb PatternLock PatternLock是图案密码锁组件,以九宫格图案的方式输入密码&#x…...

【图像分类】Yolov8 完整教程 |分类 |计算机视觉
目标:用YOLOV8进行图像分类。 图像分类器。 学习资源:https://www.youtube.com/watch?vZ-65nqxUdl4 努力的小巴掌 记录计算机视觉学习道路上的所思所得。 1、文件结构化 划分数据集:train,val,test 知道怎么划分数据集很重要。 文件夹…...

PyCharm 2024.1最新变化
PyCharm 2024.1 版本带来了一系列激动人心的新功能和改进,以下是一些主要的更新亮点: Hugging Face 模型和数据集文档预览:在 PyCharm 内部快速获取 Hugging Face 模型或数据集的详细信息,通过鼠标悬停或使用 F1 键打开文档工具窗口来预览。 …...
金融行业专题|某头部期货基于 K8s 原生存储构建自服务数据库云平台
为了进一步提升资源交付效率,不少用户都将数据库应用从物理环境迁移到容器环境。而对于 Kubernetes 部署环境,用户不仅需要考虑数据库在性能方面的需求,还要为数据存储提供更安全、可靠的高可用保障。 近期,某头部期货机构基于 S…...

DELL服务器 OpenManage监控指标解读
监控易是一款专业的IT基础设施监控软件,通过SNMP等多种方式,实时监控服务器、网络设备等IT资源的各项性能指标。对于DELL服务器 OpenManage,监控易提供了全面的监控解决方案,确保服务器的稳定运行。 一、网络连通性监控ÿ…...
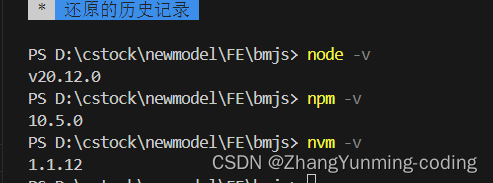
vscode下无法识别node、npm的问题
node : 无法将“node”项识别为 cmdlet、函数、脚本文件或可运行程序的名称 因为node是在cmd安装的,是全局安装的,并不是在这个项目里安装的。 解决方案: 1.在vscode的控制台,针对一个项目安装特定版本的node; 2.已经…...

C语言之字符串处理函数
文章目录 1 字符串处理函数1.1 输入输出1.1.1 输出函数puts1.1.2 输入函数gets 1.2 连接函数1.2.1 stract1.2.2 strncat 1.3 复制1.3.1 复制strcpy1.3.2 复制strncpy1.3.3 复制memcpy1.3.4 指定复制memmove1.3.5 指定复制memset1.3.6 新建复制strdup1.3.7 字符串设定strset 1.4…...

昇思25天学习打卡营第4天|onereal
今天学习的内容是:ResNet50迁移学习 以下内容拷贝至教程,实话实话看不懂,迷迷糊糊都运行jupyter里的代码。走完程序,训练生成了一些图片。 ResNet50迁移学习 在实际应用场景中,由于训练数据集不足,所以很少…...

restTemplate使用总结
1、配置类 Configuration public class RestTemplateConfig() {Beanpublic RestTemplate restTemplate(ClientHttpRequestFactory factory) {return new RestTemplate(factory);}Beanpublic ClientHttpRequestFactory simpleClientHttpRequestFactory() {HttpComponentsClient…...
【云服务器介绍】选择指南 腾讯云 阿里云全配置对比 搭建web 个人开发 app 游戏服务器
省流目录:适用于博客建站(2-4G)、个人开发/小型游戏[传奇/我的世界/饥荒](4-8G)、数据分析/大型游戏[幻兽帕鲁/雾锁王国]服务器(16-64G) 1.京东云-618专属活动 官方采购季专属活动地址&#x…...
)
PostgreSQL 高级SQL查询(三)
1. JOIN 操作 1.1 内连接(INNER JOIN) 内连接用于返回两个表中存在匹配关系的记录。基本语法如下: SELECT columns FROM table1 INNER JOIN table2 ON table1.column table2.column;例如,从 users 表和 orders 表中检索所有用…...

麒麟系统安装Redis
一、背景 如前文(《麒麟系统安装MySQL》)所述。 二、下载Redis源码 官方未提供麒麟系统的Redis软件,须下载源码编译。 下载地址:https://redis.io/downloads 6.2.14版本源码下载地址:https://download.redis.io/re…...
Java-方法引用
方法引用概念 把已经有的方法拿过来用,当做函数式接口中抽象方法的方法体 前提条件 1、引用处必须是函数式接口 2、被引用的方法必须已经存在 3、被引用方法的形参和返回值 需要跟抽象方法保持一致 4、被引用方法的功能要满足当前需求 方法引用格式示例 方…...

华为---配置基本的访问控制列表(ACL)
11、访问控制列表(ACL) 11.1 配置基本的访问控制列表 11.1.1 原理概述 访问控制列表ACL(Access Control List)是由permit或deny语句组成的一系列有顺序的规则集合,这些规则根据数据包的源地址、目的地址、源端口、目的端口等信息来描述。A…...

Apple Intelligence,我们能得到什么?(上)
苹果公司WWDC 2024发布会,苹果AI成为最吸睛的焦点。不过,苹果的AI不是大家口中的AI,而是苹果独有的概念:Apple Intelligence,苹果智能。 所谓Apple Intelligence,被定义为iPhone、iPad和Mac的个人智能系统…...

【数据库中的存储桶】
存储桶是对象存储系统中的一个核心概念,起源于Amazon S3(Simple Storage Service)并被其他对象存储解决方案(如MinIO、Google Cloud Storage等)广泛采用。在传统的文件系统中,我们通常使用目录和子目录来组…...

多选项卡的shiny
下面是一个包含多个选项卡的 Shiny 应用程序示例代码。在这个例子中,我们创建了一个包含三个选项卡的 Shiny 应用程序,每个选项卡中都有不同的内容。 library(shiny)# Define UI ui <- fluidPage(titlePanel("多选项卡 Shiny 应用"),tabse…...

Python项目Django框架发布相关
1.Nginx配置 server { listen 80; server_name 域名地址;location / { uwsgi_pass 0.0.0.0:4563;// 运行地址include uwsgi_params;} location /static{ // 静态文件路径alias /www/wwwroot/djserverproject/static;}}server { listen 443; server_name 域名地址;ssl_certific…...

kettle使用手册 安装9.0版本 建议设置为英语
0.新建转换的常用组件 0. Generate rows 定义一个字符串 name value就是字符串的值 0.1 String operations 字段转大写 去空格 1. Json input 来源于一个json文件 1.json 或mq接收到的data内容是json字符串 2. Json output 定义Jsonbloc值为 data, 左侧Fieldname是数据库…...

惠来海康医院眼科母亲节:愿岁月温柔,护她眼底有光
惠来海康医院眼科母亲节:愿岁月温柔,护她眼底有光五月浅夏,暖意氤氲,当康乃馨的芬芳漫过街巷,母亲节便载着满心敬意如期而至。母亲,是岁月里最温柔的守望者,用一双眼眸,藏下对我们所…...

PLC编程入门学习路径
PLC编程入门学习路径基础概念理解PLC(可编程逻辑控制器)是一种工业自动化控制设备。需要理解其工作原理、硬件组成(CPU、I/O模块、电源等)以及常见的品牌(如西门子、三菱、欧姆龙)。编程语言学习PLC常用编程…...

轻量级AI智能体运行时Neko:边缘设备部署与自动化实践
1. 项目概述:为边缘设备而生的轻量级AI智能体运行时如果你和我一样,一直在寻找一个能在树莓派Zero 2W或者一台年费不到10美元的低配VPS上稳定运行的AI智能体框架,那么neko的出现,可能就是我们等待已久的那个答案。这个项目最吸引我…...

在OpenClaw项目中配置Taotoken作为Agent的模型供应商
🚀 告别海外账号与网络限制!稳定直连全球优质大模型,限时半价接入中。 👉 点击领取海量免费额度 在OpenClaw项目中配置Taotoken作为Agent的模型供应商 基础教程类,指导在虚拟机环境使用OpenClaw框架开发AI Agent的用户…...

开源AI工具集Muse:模块化架构与创意工作流实践指南
1. 项目概述:一个面向创意工作者的开源AI工具集最近在开源社区里,一个名为myths-labs/muse的项目引起了我的注意。乍一看这个名字,你可能会联想到艺术灵感,但实际上,它是一个定位非常精准的开发者工具集合。简单来说&a…...

3步解决下载难题:imFile下载管理器实战指南
3步解决下载难题:imFile下载管理器实战指南 【免费下载链接】imfile-desktop A full-featured download manager. 项目地址: https://gitcode.com/gh_mirrors/im/imfile-desktop 你是否经常遇到这些下载烦恼?浏览器下载速度慢如蜗牛,大…...
实战分配指南(MDK/IAR双环境))
告别内存焦虑!STM32H743全系列SRAM(ITCM/DTCM/AXI)实战分配指南(MDK/IAR双环境)
STM32H743内存优化实战:从理论到精准分配的完整指南 在嵌入式系统开发中,内存管理往往是决定项目成败的关键因素之一。STM32H743作为STMicroelectronics推出的高性能微控制器系列,其复杂的内存架构既带来了性能优势,也增加了开发难…...

别再只会scp了!Ansible copy和file模块的5个实战场景,从配置文件分发到权限管理
别再只会scp了!Ansible copy和file模块的5个实战场景,从配置文件分发到权限管理 如果你还在用scp或rsync手动同步服务器文件,每次修改权限都要逐台登录操作,那么这篇文章将彻底改变你的运维工作流。Ansible的copy和file模块不仅能…...

2026免费照片去水印软件App排行榜,手机电脑去水印哪款好用?实测推荐
2026免费照片去水印软件App排行榜,手机电脑去水印哪款好用?实测推荐 图片上的水印去不掉,一直是不少人的痛点。从社交平台保存下来的图片带着平台Logo,下载的素材图带有版权标识,或者照片里不小心拍到广告文字——这些…...

AI智能体基准测试与差异分析:从评估原理到工程实践
1. 项目概述:当AI智能体学会“自我进化”最近在开源社区里,一个名为agentdiff的项目引起了我的注意。它的名字很有意思,直译过来是“智能体差异”。乍一看,你可能会联想到代码差异对比工具diff,但它的前缀agent又明确指…...