Spring4.3.x xml配置文件搜索和解析过程
###概述
这篇文章的研究不只是涉及到spring如何创建一个BeanDefinition对象,还涉及到spring如何加载文件、如何读取XML文件、以及我们在使用spring的时候如何扩展spring的配置。
spring在创建BeanFactory时会把xml配置文件和注解信息转换为一个个BeanDefinition对象,BeanDefinition对象存储的是单个bean的配置信息,比如依赖类、scope、是否延迟加载等等。因此,研究配置文件的解析过程,对学习spring也是重要的一点。
我们还是以XmlWebApplicationContext为研究对象来研究Spring配置文件的解析。XmlWebApplicationContext解析配置文件分为以下4个过程:
1) XmlWebApplicationContext对象创建BeanDefinitionReader对象。在XmlWebApplicationContext的实现中使用的是BeanDefinitionReader实现类XmlBeanDefinitionReader。
2) XmlBeanDefinitionReader使用ResourceLoader把指定的配置文件地址封装成Resource对象。
在第一步中XmlWebApplicationContext对象把自身作为ResourceLoader传给了XmlBeanDefinitionReader对象,因此这部使用的ResourceLoader为XmlWebApplicationContext对象。
3) XmlBeanDefinitionReader使用DocumentLoader把Resource对象中的XML文件内容转换为Document对象。默认使用DocumentLoader的实现类DefaultDocumentLoader来加载Document对象
4)XmlBeanDefinitionReader使用BeanDefinitionDocumentReader把Document对象中包含的配置信息转换成BeanDefinition对象并把它注册到BeanDefintionRegistry对象中。默认使用BeanDefinitionDocumentReader的实现类DefaultBeanDefinitionDocumentReader来操作Document对象。在DefaultBeanDefinitionDocumentReader的实现中,它把创建BeanDefinition的责任以及处理自定义XML命名空间的标签(比如aop:,context:,p:等)的任务委托给BeanDefinitionParserDelegate对象。
下面我们通过spring源码来探讨这个4个过程。
###1 XmlWebApplicationContext对象创建并使用BeanDefinitionReader对象
1.1 创建BeanDefinitionReader对象,执行XmlWebApplicationContext重写的loadBeanDefinitions(DefaultListableBeanFactory beanFactory)方法,代码如下。
@Overrideprotected void loadBeanDefinitions(DefaultListableBeanFactory beanFactory) throws BeansException, IOException {// 根据给定的bean工厂创建新的XmlBeanDefinitionReader对象XmlBeanDefinitionReader beanDefinitionReader = new XmlBeanDefinitionReader(beanFactory);// 使XmlBeanDefinitionReader对象与上下文对象在同一个资源环境中beanDefinitionReader.setEnvironment(this.getEnvironment());// 使用上下文对象为XmlBeanDefinitionReader对象的资源加载器beanDefinitionReader.setResourceLoader(this);// 设置EntityResolver对象,用于加载XML的xsd或者dtd文件beanDefinitionReader.setEntityResolver(new ResourceEntityResolver(this));// 钩子方法,允许子类在加载bean definition之前进一步设置XmlBeanDefinitionReader// ->比如,更改XmlBeanDefinitionReader自己提供的DocumentLoader// 或者BeanDefinitionDocumentReader等默认对象initBeanDefinitionReader(beanDefinitionReader);// 使用BeanDefinitionReader加载所有的BeanDefinition对象,见下面的代码loadBeanDefinitions(beanDefinitionReader);}
这段代码是为使用BeanDefinitionReader对象加载BeanDefinitioin对象做准备工作。在XmlWebApplicationContext类的实现里,XmlBeanDefinitionReader对象要加载BeanDefinitioin需要4个必备条件,第一个是用于保存创建好的BeanDefinition的BeanDefinitionRegistry对象,DefaultListableBeanFactory类实现了此接口;第二个是资源环境Environment对象,它用于判断beans标签的profile属性,后面会谈到;第三个是资源加载器ResourceLoader对象;最后一个是用于加载XML验证文件(dtd或者xsd文件)的EntityResolver对象。
1.2 使用BeanDefinitionReader对象。执行XmlWebApplicationContext的loadBeanDefinitions(XmlBeanDefinitionReader reader)方法,代码如下。
/*** 使用XmlBeanDefinitionReader加载所有的BeanDefinition对象**/protected void loadBeanDefinitions(XmlBeanDefinitionReader reader) throws IOException {// 获取容器需要加载的配置文件的地址String[] configLocations = getConfigLocations();if (configLocations != null) {for (String configLocation : configLocations) {// 使用XmlBeanDefinitionReader一个一个的读取spring配置文件reader.loadBeanDefinitions(configLocation);}}}
这部分代码是BeanDefinitionReader 使用配置文件地址加载BeanDefinition对象的入口。这里所调用BeanDefinitionReader 的loadBeanDefinitions方法继承自它的父类AbstractBeanDefinitionReader。下面代码是loadBeanDefinitions方法在AbstractBeanDefinitionReader类中的实现。
public int loadBeanDefinitions(String location) throws BeanDefinitionStoreException {return loadBeanDefinitions(location, null);}
public int loadBeanDefinitions(String location, Set<Resource> actualResources) throws BeanDefinitionStoreException {ResourceLoader resourceLoader = getResourceLoader();if (resourceLoader == null) {throw new BeanDefinitionStoreException("Cannot import bean definitions from location [" + location + "]: no ResourceLoader available");}if (resourceLoader instanceof ResourcePatternResolver) {// 使用资源模式解析器解析配置文件的路径并加载资源try {// 加载所有与指定location参数匹配的所有资源,见第2.2点Resource[] resources = ((ResourcePatternResolver) resourceLoader).getResources(location);// 加载指定的资源中的所有BeanDefinition, 见第3.1点int loadCount = loadBeanDefinitions(resources);if (actualResources != null) {for (Resource resource : resources) {actualResources.add(resource);}}if (logger.isDebugEnabled()) {logger.debug("Loaded " + loadCount + " bean definitions from location pattern [" + location + "]");}return loadCount;}catch (IOException ex) {throw new BeanDefinitionStoreException("Could not resolve bean definition resource pattern [" + location + "]", ex);}}else {// 直接加载资源且只加载一个资源,默认使用DefaultResourceLoader的getResource方法// 详见2.1Resource resource = resourceLoader.getResource(location);// 加载指定的resource中的所有BeanDefinition,见第3.2点int loadCount = loadBeanDefinitions(resource);if (actualResources != null) {actualResources.add(resource);}if (logger.isDebugEnabled()) {logger.debug("Loaded " + loadCount + " bean definitions from location [" + location + "]");}return loadCount;}}
这段代码主要做的事情是,使用BeanDefinitionReader对象所持有的ResourceLoader来生成Resource对象。然后调用BeanDefinitionReader的loadBeanDefinitions(Resource… resources)或者loadBeanDefinitions(Resource resource)方法来执行加载BeanDefinition的代码,其中,前一个方法通过多个资源文件来加载,后一个方法通过一个资源文件来加载。
下面探讨ResourceLoader如何查找资源文件后,再继续探讨BeanDefinitionReader如何加载指定的资源文件中的BeanDefinitiion信息。
###2 使用ResourceLoader把配置文件地址封装为Resource对象
Spring通过两种方式加载资源,一种是根据具体的路径加载一个资源,另一种方式通过模式匹配来加载多个资源。前者通过ResourceLoader的getResource(String location)方法实现,后者通过ResourceLoader子接口ResourcePatternResolver扩展的getResources(String locationPattern)方法实现,下面通过spring源码的分析来探讨这两个方法。
####2.1 根据具体的路径加载资源
在Spring中加载单个资源有个默认的实现,那就是DefaultResourceLoader的getResource(String location)方法,而XmlWebApplicationContext继承了此方法,getResource方法的代码如下。
/*** 根据指定location获取第一个查找到的资源*/public Resource getResource(String location) {Assert.notNull(location, "Location must not be null");// 声明有:String CLASSPATH_URL_PREFIX ="classpath:";if (location.startsWith(CLASSPATH_URL_PREFIX)) {// 返回ClassPathResource对象return new ClassPathResource(location.substring(CLASSPATH_URL_PREFIX.length()), getClassLoader());} else {try {// 把location解析成URL对象URL url = new URL(location);// 返回UrlResource对象return new UrlResource(url);} catch (MalformedURLException ex) {// 给定的location是一个相对地址,即没有前缀。// ->把location解析为一个ClassPathContextResourcereturn getResourceByPath(location);}}}
这段代码处理三种类型的location:
第一种是以classpath:为前缀的,这种location参数直接返回一个ClassPathResource对象,表示加载classes路径下的资源;
第二种是使用网络协议作为前缀的,比如http、ftp等,这种直接返回一个UrlResource对象;
第三种是无前缀的,在默认实现中和第一种一样是加载classes路径下的资源,只是现在返回的对象是ClassPathContextResource对象,代码如下。
/*** 根据指定路径获取资源。* 返回的是一个ClassPathContextResource对象*/protected Resource getResourceByPath(String path) {return new ClassPathContextResource(path, getClassLoader());}/*** ClassPathContextResource 通过实现ContextResource,明确的指明了加载的文件是相对于上线文所在的路径。*/private static class ClassPathContextResource extends ClassPathResource implements ContextResource {public ClassPathContextResource(String path, ClassLoader classLoader) {super(path, classLoader);}public String getPathWithinContext() {return getPath();}@Overridepublic Resource createRelative(String relativePath) {String pathToUse = StringUtils.applyRelativePath(getPath(), relativePath);return new ClassPathContextResource(pathToUse, getClassLoader());}}
XmlWebApplicationContext的父类AbstractRefreshableWebApplicationContext重写了getResourceByPath(String path)方法,代码如下。
@Overrideprotected Resource getResourceByPath(String path) {return new ServletContextResource(this.servletContext, path);}
ServletContextResource代表的文件是相对于web容器根目录的,通过它的下面一段代码就一目了然了。
public InputStream getInputStream() throws IOException {InputStream is = this.servletContext.getResourceAsStream(this.path);if (is == null) {throw new FileNotFoundException("Could not open " + getDescription());}return is;}
因此在web应用中,spring会把无前缀的location当成是web容器根目录下的某个文件。
####2.2 根据模式匹配加载多个资源
所谓的模式匹配也就是location参数使用了通配符,比如’*‘、’?'等,在spring中,location参数为下面3中情况时,会加载多个资源
- 使用ant风格的通配符
- 以classpath*:为前缀
- 以上两种同用
Spring通过实现ResoureLoader的子接口ResourcePatternResolver来加载多个资源文件。其中,XmlWebApplicationContext实现了ResourcePatternResolver接口,而此接口的getResources(String locationPattern)方法已在XmlWebApplicationContext的父类AbstractApplicationContext中实现了,代码如下。
public Resource[] getResources(String locationPattern) throws IOException {// 把获取资源的实现委托给其他ResourcePatternResolver,默认为PathMatchingResourcePatternResolverreturn this.resourcePatternResolver.getResources(locationPattern);}
这段代码把加载指定模式的资源的任务委托给PathMatchingResourcePatternResolver的getResources(String locationPattern)方法,这个方法的代码如下,
public Resource[] getResources(String locationPattern) throws IOException {Assert.notNull(locationPattern, "Location pattern must not be null");// 在ResourcePatternResolver接口中声明:String CLASSPATH_ALL_URL_PREFIX = "classpath*:";if (locationPattern.startsWith(CLASSPATH_ALL_URL_PREFIX)) {// 处理classpath*:前缀的location配置// 这里默认的模式匹配器是AntPathMatcher,即处理ant风格的匹配if (getPathMatcher().isPattern(locationPattern.substring(CLASSPATH_ALL_URL_PREFIX.length()))) {// 查找与匹配模式匹配的资源,详见2.2.3return findPathMatchingResources(locationPattern);} else {// 没有使用通配符,返回classes路径下和所有jar包中的所有相匹配的资源return findAllClassPathResources(locationPattern.substring(CLASSPATH_ALL_URL_PREFIX.length()));}} else {// Note:这里只会查找第一个根目录下面的所有相匹配的资源// 检查模式是否被匹配器匹配int prefixEnd = locationPattern.indexOf(":") + 1;if (getPathMatcher().isPattern(locationPattern.substring(prefixEnd))) {// 查找与匹配模式匹配的资源return findPathMatchingResources(locationPattern);}else {// locationPattern没有使用通配符// 只加载第一个找到的资源,默认使用DefaultResourceLoader的getResource方法// 详见2.1return new Resource[] {getResourceLoader().getResource(locationPattern)};}}}
这段代码主要是对locationPattern参数做分类,然后根据不同的分类调用相应的处理方法,它把locationPattern分成以下四种情况:
第一种是前缀为classpath*:且含有通配符,这种情况将查找与匹配模式匹配的所有资源;
第二种是前缀为classpath*:但不含通配符,这种情况返回classes路径和jar包中匹配的所有资源;
第三种是前缀不为classpath*:为前缀且含有通配符,这种情况与第一种情况有点类似,同样是查找与匹配器相匹配的资源,但只返回找到的第一个根目录下的所有与匹配模式匹配的资源;
第四种是前缀不为classpath*:为前缀且不含通配符,这种情况只返回查找到的第一个资源,详见2.1节。
上面代码spring的开发者写的有点绕,仔细分析这段代码,对于第一种情况和第三种情况,判断逻辑其实都是一样的,开发者完全可以把这段代码合成一段。下面是我通过继承PathMatchingResourcePatternResolver重写了getResources接口,代码如下。点此下载
public class MyPathMatchingResourcePatternResolver extends PathMatchingResourcePatternResolver
{public MyPathMatchingResourcePatternResolver(ClassLoader classLoader) {super(classLoader);}@Overridepublic Resource[] getResources(String locationPattern) throws IOException {int prefixEnd = locationPattern.indexOf(":") + 1;if (getPathMatcher().isPattern(locationPattern.substring(prefixEnd))) {// 查找与匹配模式匹配的资源return findPathMatchingResources(locationPattern);}// 不使用通配符if (locationPattern.startsWith(CLASSPATH_ALL_URL_PREFIX)) {// 返回classes路径下和所有jar包中的所有相匹配的资源return findAllClassPathResources(locationPattern.substring(CLASSPATH_ALL_URL_PREFIX.length()));}// 只加载一个资源return new Resource[] {getResourceLoader().getResource(locationPattern)};}
}
这段代码我只把locationPattern分成三种情况:第一种是含有通配符的,第二种是以classpath*:为前缀但没有使用通配符的,第三种是没有以classpath*:为前缀也没有使用通配符的。
对于只加载一个资源的情况已经在2.1中探讨了。下面先来看看spring如何处理以classpath*:为前缀但没使用通配符情况,再回过头来看spring如何处理使用通配符的情况。
2.2.1 加载与以classpath:为前缀但没有使用通配符的location相匹配的资源。*
在PathMatchingResourcePatternResolver的getResources(String locationPattern)方法中对于以classpath*:为前缀但没有使用通配符的location参数是通过调用它的findAllClassPathResources(String location)方法来创建相应的Resource对象的,代码如下。
protected Resource[] findAllClassPathResources(String location) throws IOException {String path = location;if (path.startsWith("/")) {path = path.substring(1);}// 通过ClassLoader对象加载指定名称的资源Enumeration<URL> resourceUrls = getClassLoader().getResources(path);Set<Resource> result = new LinkedHashSet<Resource>(16);// 遍历资源while (resourceUrls.hasMoreElements()) {URL url = resourceUrls.nextElement();result.add(convertClassLoaderURL(url));}return result.toArray(new Resource[result.size()]);}
/*** 返回一个UrlResource对象*/protected Resource convertClassLoaderURL(URL url) {return new UrlResource(url);}
findAllClassPathResources方法通过ClassLoader对象来加载指定名称的资源,不管它在classes路径下还是任何jar包中。
2.2.2 加载与含有通配符的location参数相匹配的资源。
如果location参数中使用了通配符,那么PathMatchingResourcePatternResolver将调用它的findPathMatchingResources(String locationPattern)方法,代码如下。
protected Resource[] findPathMatchingResources(String locationPattern) throws IOException {// 获取文件所在的根目录String rootDirPath = determineRootDir(locationPattern);// 获取含有通配符部分的字符串String subPattern = locationPattern.substring(rootDirPath.length());// 把根目录封装成Resource对象Resource[] rootDirResources = getResources(rootDirPath);Set<Resource> result = new LinkedHashSet<Resource>(16);// 遍历查找到的根目录资源,这些根目录可能是来自class路径、jar包、其他压缩包等for (Resource rootDirResource : rootDirResources) {rootDirResource = resolveRootDirResource(rootDirResource);if (isJarResource(rootDirResource)) {// 从jar包中加载匹配的资源result.addAll(doFindPathMatchingJarResources(rootDirResource, subPattern));} else if (rootDirResource.getURL().getProtocol().startsWith(ResourceUtils.URL_PROTOCOL_VFS)) {// 从vfs中加载匹配的资源result.addAll(VfsResourceMatchingDelegate.findMatchingResources(rootDirResource, subPattern, getPathMatcher()));} else {// 从文件系统中加载匹配的资源,见2.2.5result.addAll(doFindPathMatchingFileResources(rootDirResource, subPattern));}}if (logger.isDebugEnabled()) {logger.debug("Resolved location pattern [" + locationPattern + "] to resources " + result);}return result.toArray(new Resource[result.size()]);}
/*** 根据指定location查找根目录。比如location为“/WEB-INF/config/*.xml”,根目录为“/WEB-INF/config/”*/protected String determineRootDir(String location) {int prefixEnd = location.indexOf(":") + 1;int rootDirEnd = location.length();while (rootDirEnd > prefixEnd && getPathMatcher().isPattern(location.substring(prefixEnd, rootDirEnd))) {rootDirEnd = location.lastIndexOf('/', rootDirEnd - 2) + 1;}if (rootDirEnd == 0) {rootDirEnd = prefixEnd;}return location.substring(0, rootDirEnd);}
findPathMatchingResources方法主要是获取根目录资源,然后根据根目录的类型调用相应的方法来获取根目录下的资源。它把根目录分为三类,其一jar包中的目录,其二是vfs中的目录,其三是文件系统中的目录。
(1)加载jar包目录下的资源
如果目录在jar包中,PathMatchingResourcePatternResolver执行 doFindPathMatchingJarResources(Resource rootDirResource, String subPattern)方法,代码如下。
protected Set<Resource> doFindPathMatchingJarResources(Resource rootDirResource, String subPattern)throws IOException {URLConnection con = rootDirResource.getURL().openConnection();JarFile jarFile;String jarFileUrl;String rootEntryPath;boolean newJarFile = false;if (con instanceof JarURLConnection) {JarURLConnection jarCon = (JarURLConnection) con;ResourceUtils.useCachesIfNecessary(jarCon);jarFile = jarCon.getJarFile();jarFileUrl = jarCon.getJarFileURL().toExternalForm();JarEntry jarEntry = jarCon.getJarEntry();rootEntryPath = (jarEntry != null ? jarEntry.getName() : "");} else {String urlFile = rootDirResource.getURL().getFile();int separatorIndex = urlFile.indexOf(ResourceUtils.JAR_URL_SEPARATOR);if (separatorIndex != -1) {jarFileUrl = urlFile.substring(0, separatorIndex);rootEntryPath = urlFile.substring(separatorIndex + ResourceUtils.JAR_URL_SEPARATOR.length());jarFile = getJarFile(jarFileUrl);} else {jarFile = new JarFile(urlFile);jarFileUrl = urlFile;rootEntryPath = "";}newJarFile = true;}try {if (logger.isDebugEnabled()) {logger.debug("Looking for matching resources in jar file [" + jarFileUrl + "]");}if (!"".equals(rootEntryPath) && !rootEntryPath.endsWith("/")) {// 确保rootEntryPath以'/'结尾rootEntryPath = rootEntryPath + "/";}Set<Resource> result = new LinkedHashSet<Resource>(8);// 遍历目录下的文件for (Enumeration<JarEntry> entries = jarFile.entries(); entries.hasMoreElements();) {JarEntry entry = entries.nextElement();String entryPath = entry.getName();if (entryPath.startsWith(rootEntryPath)) {String relativePath = entryPath.substring(rootEntryPath.length());// 判断当前资源路径是否与指定模式匹配if (getPathMatcher().match(subPattern, relativePath)) {result.add(rootDirResource.createRelative(relativePath));}}}return result;}finally {if (newJarFile) {jarFile.close();}}}
(2)加载vfs下的资源
如果目录在vfs中,PathMatchingResourcePatternResolver会调用它的私有内部类VfsResourceMatchingDelegate 的静态方法findMatchingResources来加载vfs中的资源,代码如下。
private static class VfsResourceMatchingDelegate {public static Set<Resource> findMatchingResources(Resource rootResource, String locationPattern, PathMatcher pathMatcher) throws IOException {Object root = VfsPatternUtils.findRoot(rootResource.getURL());PatternVirtualFileVisitor visitor =new PatternVirtualFileVisitor(VfsPatternUtils.getPath(root), locationPattern, pathMatcher);VfsPatternUtils.visit(root, visitor);return visitor.getResources();}}
(3)从文件系统中加载资源
如果根目录不在jar包或者vfs中,PathMatchingResourcePatternResolver会把根目录当成本地文件系统中的目录,调用它的 doFindPathMatchingFileResources(Resource rootDirResource, String subPattern)方法来实现,代码如下。
protected Set<Resource> doFindPathMatchingFileResources(Resource rootDirResource, String subPattern)throws IOException {File rootDir;try {// 获取根目录File对象rootDir = rootDirResource.getFile().getAbsoluteFile();}catch (IOException ex) {if (logger.isWarnEnabled()) {logger.warn("Cannot search for matching files underneath " + rootDirResource +" because it does not correspond to a directory in the file system", ex);}return Collections.emptySet();}// 从文件系统中查找匹配的资源return doFindMatchingFileSystemResources(rootDir, subPattern);}
上面代码主要是获取根目录文件,同时也检查根目录是否存在,然后调用PathMatchingResourcePatternResolver对象的doFindMatchingFileSystemResources方法,代码如下。
/*** 从文件系统中查找匹配的资源*/protected Set<Resource> doFindMatchingFileSystemResources(File rootDir, String subPattern) throws IOException {if (logger.isDebugEnabled()) {logger.debug("Looking for matching resources in directory tree [" + rootDir.getPath() + "]");}// 获取匹配的文件Set<File> matchingFiles = retrieveMatchingFiles(rootDir, subPattern);Set<Resource> result = new LinkedHashSet<Resource>(matchingFiles.size());for (File file : matchingFiles) {// 使用FileSystemResource对象封装匹配的文件对象result.add(new FileSystemResource(file));}return result;}
doFindMatchingFileSystemResources方法主要做的事情是调用PathMatchingResourcePatternResolver对象的retrieveMatchingFiles方法来获取根目录下与指定模式匹配的文件(见下面代码)。然后把匹配的文件封装到FileSystemResource对象中。
/*** 获取匹配的文件*/protected Set<File> retrieveMatchingFiles(File rootDir, String pattern) throws IOException {// 判断根文件是否存在if (!rootDir.exists()) {if (logger.isDebugEnabled()) {logger.debug("Skipping [" + rootDir.getAbsolutePath() + "] because it does not exist");}return Collections.emptySet();}// 判断根文件是否是目录文件if (!rootDir.isDirectory()) {// Complain louder if it exists but is no directory.if (logger.isWarnEnabled()) {logger.warn("Skipping [" + rootDir.getAbsolutePath() + "] because it does not denote a directory");}return Collections.emptySet();}// 判断根目录是否可读if (!rootDir.canRead()) {if (logger.isWarnEnabled()) {logger.warn("Cannot search for matching files underneath directory [" + rootDir.getAbsolutePath() +"] because the application is not allowed to read the directory");}return Collections.emptySet();}// 获取完整的模式路径String fullPattern = StringUtils.replace(rootDir.getAbsolutePath(), File.separator, "/");if (!pattern.startsWith("/")) {fullPattern += "/";}fullPattern = fullPattern + StringUtils.replace(pattern, File.separator, "/");Set<File> result = new LinkedHashSet<File>(8);// 把匹配的文件放到result对象中doRetrieveMatchingFiles(fullPattern, rootDir, result);return result;}
retrieveMatchingFiles方法主要做的事情是保证传入的根文件必须存在、必须目录和必须可读,以及调用doRetrieveMatchingFiles方法来获取匹配的文件。
/*** 根据指定的模式(fullPattern)获取匹配的文件,并把文件放到指定的(result)列表中**/protected void doRetrieveMatchingFiles(String fullPattern, File dir, Set<File> result) throws IOException {if (logger.isDebugEnabled()) {logger.debug("Searching directory [" + dir.getAbsolutePath() +"] for files matching pattern [" + fullPattern + "]");}// 获取目录中所有的文件File[] dirContents = dir.listFiles();if (dirContents == null) {if (logger.isWarnEnabled()) {logger.warn("Could not retrieve contents of directory [" + dir.getAbsolutePath() + "]");}return;}// 遍历目录中的文件for (File content : dirContents) {String currPath = StringUtils.replace(content.getAbsolutePath(), File.separator, "/");// 检查子文件是否为目录,且是否与指定的模式开头部分匹配if (content.isDirectory() && getPathMatcher().matchStart(fullPattern, currPath + "/")) {if (!content.canRead()) {if (logger.isDebugEnabled()) {logger.debug("Skipping subdirectory [" + dir.getAbsolutePath() +"] because the application is not allowed to read the directory");}}else {// 递归扫描子目录doRetrieveMatchingFiles(fullPattern, content, result);}}// 检查子文件路径是否与指定的模全匹配if (getPathMatcher().match(fullPattern, currPath)) {result.add(content);}}}
doRetrieveMatchingFiles方法是获取匹配文件的终极方法,这个方法遍历指定的根目录下的所有文件,并把匹配的文件放到指定的Set对象中。
###3 使用DocumentLoader根据Resource对象持有的XML文件内容创建Document对象
在第2节中已经讲了XmlBeanDefinitionReader如何利用location参数创建Resource对象。在这一节中,我们来探讨XmlBeanDefinitionReader如何通过把Resource对象持有xml文件内容,生成Document对象。
在第1.2节中,我们看到AbstractBeanDefinitionReader获取到Resource对象后,会调用处理多个Resource对象的loadBeanDefinitions(Resource… resources)方法,或者调用处理单个Resource对象的loadBeanDefinitions(Resource resource)方法。下面我们首先从处理多个Resource对象的loadBeanDefinitions(Resource… resources)方法开始,这个方法已经在AbstractBeanDefinitionReader中有实现,并且XmlBeanDefinitionReader直接继承了它,代码如下。
public int loadBeanDefinitions(Resource... resources) throws BeanDefinitionStoreException {Assert.notNull(resources, "Resource array must not be null");int counter = 0;for (Resource resource : resources) {// 一个一个资源文件的加载BeanDefinition// 此接口方法在AbstractBeanDefinitionReader没有实现// XmlWebApplicationContext使用XmlBeanDefinitionReader// ->则调用XmlBeanDefinitionReader的实现,见第3.2点counter += loadBeanDefinitions(resource);}return counter;}
这部分代码的所做的事情是遍历传入的资源Resource对象,并调用loadBeanDefinitions(Resource resource)方法加载每一个资源。这个方法在AbstractBeanDefinitionReader并没有实现,下面是此方法在XmlBeanDefinitionReader类中的实现代码。
public int loadBeanDefinitions(Resource resource) throws BeanDefinitionStoreException {return loadBeanDefinitions(new EncodedResource(resource));}
public int loadBeanDefinitions(EncodedResource encodedResource) throws BeanDefinitionStoreException {Assert.notNull(encodedResource, "EncodedResource must not be null");if (logger.isInfoEnabled()) {logger.info("Loading XML bean definitions from " + encodedResource.getResource());}Set<EncodedResource> currentResources = this.resourcesCurrentlyBeingLoaded.get();if (currentResources == null) {currentResources = new HashSet<EncodedResource>(4);this.resourcesCurrentlyBeingLoaded.set(currentResources);}if (!currentResources.add(encodedResource)) {throw new BeanDefinitionStoreException("Detected cyclic loading of " + encodedResource + " - check your import definitions!");}try {// 读取资源文件输入流InputStream inputStream = encodedResource.getResource().getInputStream();try {InputSource inputSource = new InputSource(inputStream);if (encodedResource.getEncoding() != null) {inputSource.setEncoding(encodedResource.getEncoding());}// 根据指定的XML文件加载BeanDefinition, 见第3.3点。return doLoadBeanDefinitions(inputSource, encodedResource.getResource());}finally {inputStream.close();}}catch (IOException ex) {throw new BeanDefinitionStoreException("IOException parsing XML document from " + encodedResource.getResource(), ex);}finally {currentResources.remove(encodedResource);if (currentResources.isEmpty()) {this.resourcesCurrentlyBeingLoaded.remove();}}}
loadBeanDefinitions(EncodedResource encodedResource)方法主要做的事情是从Resource对象中获取xml文件输入流,并用它来创建InputSource对象。然后调用XmlBeanDefinitionReader的doLoadBeanDefinitions(InputSource inputSource, Resource resource)方法,代码如下。
protected int doLoadBeanDefinitions(InputSource inputSource, Resource resource)throws BeanDefinitionStoreException {try {// 获取XML文件的验证模式,spring使用的是XSD模式int validationMode = getValidationModeForResource(resource);// 使用DefaultDocumentLoader把XML文件输入流转换成Document对象// Ducment对象持有XML文件的所有节点信息Document doc = this.documentLoader.loadDocument(inputSource, getEntityResolver(), this.errorHandler, validationMode, isNamespaceAware());// 注册BeanDefinition,见第4.1点。return registerBeanDefinitions(doc, resource);} catch (BeanDefinitionStoreException ex) {throw ex;} catch (SAXParseException ex) {throw new XmlBeanDefinitionStoreException(resource.getDescription(),"Line " + ex.getLineNumber() + " in XML document from " + resource + " is invalid", ex);} catch (SAXException ex) {throw new XmlBeanDefinitionStoreException(resource.getDescription(),"XML document from " + resource + " is invalid", ex);} catch (ParserConfigurationException ex) {throw new BeanDefinitionStoreException(resource.getDescription(),"Parser configuration exception parsing XML from " + resource, ex);} catch (IOException ex) {throw new BeanDefinitionStoreException(resource.getDescription(),"IOException parsing XML document from " + resource, ex);} catch (Throwable ex) {throw new BeanDefinitionStoreException(resource.getDescription(),"Unexpected exception parsing XML document from " + resource, ex);}}这部分代码所做的事情首先是获取xml文档的验证模式,spring使用的xsd模式;然后调用DocumentLoader的loadDocument来读取InputSource对象中的XML内容并创建Document对象,spring默认的DocumentLoader为DefaultDocumentLoader,下面是DefaultDocumentLoader的loadDocument方法代码;最后调用registerBeanDefinitions(Document doc, Resource resource)方法来处理刚创建的Document对象,见第4节。
/*** 加载Document对象**/public Document loadDocument(InputSource inputSource, EntityResolver entityResolver,ErrorHandler errorHandler, int validationMode, boolean namespaceAware) throws Exception {DocumentBuilderFactory factory = createDocumentBuilderFactory(validationMode, namespaceAware);if (logger.isDebugEnabled()) {logger.debug("Using JAXP provider [" + factory.getClass().getName() + "]");}DocumentBuilder builder = createDocumentBuilder(factory, entityResolver, errorHandler);return builder.parse(inputSource);}
这段代码首先调用DefaultDocumentLoader的createDocumentBuilderFactory方法创建DocumentBuilderFactory 工厂对象;然后调用DefaultDocumentLoader的createDocumentBuilder方法创建DocumentBuilder对象,见下面代码;最后调用DocumentBuilder的parse方法来解析InputSource对象。
这里的工厂对象和文档构造器对象都是来自JAXP的默认实现,因此就不过多的探讨JAXP如何解析xml了。
/*** 创建DocumentBuilderFactory工厂对象* 默认为com.sun.org.apache.xerces.internal.jaxp.DocumentBuilderFactoryImpl**/protected DocumentBuilderFactory createDocumentBuilderFactory(int validationMode, boolean namespaceAware)throws ParserConfigurationException {DocumentBuilderFactory factory = DocumentBuilderFactory.newInstance();factory.setNamespaceAware(namespaceAware);if (validationMode != XmlValidationModeDetector.VALIDATION_NONE) {factory.setValidating(true);if (validationMode == XmlValidationModeDetector.VALIDATION_XSD) {// 验证模式为xsdfactory.setNamespaceAware(true);try {factory.setAttribute(SCHEMA_LANGUAGE_ATTRIBUTE, XSD_SCHEMA_LANGUAGE);}catch (IllegalArgumentException ex) {ParserConfigurationException pcex = new ParserConfigurationException("Unable to validate using XSD: Your JAXP provider [" + factory +"] does not support XML Schema. Are you running on Java 1.4 with Apache Crimson? " +"Upgrade to Apache Xerces (or Java 1.5) for full XSD support.");pcex.initCause(ex);throw pcex;}}}return factory;}
/*** 创建文档构造器(DocumentBuilder)对象**/protected DocumentBuilder createDocumentBuilder(DocumentBuilderFactory factory, EntityResolver entityResolver, ErrorHandler errorHandler)throws ParserConfigurationException {DocumentBuilder docBuilder = factory.newDocumentBuilder();if (entityResolver != null) {docBuilder.setEntityResolver(entityResolver);}if (errorHandler != null) {docBuilder.setErrorHandler(errorHandler);}return docBuilder;}###4 使用BeanDefinitionDocumentReader读取Document对象来创建并注册BeanDefinition
XmlBeanDefinitionReader获取到xml的Document对象后会调用它的registerBeanDefinitions(Document doc, Resource resource)方法来处理Document对象。下面我们以registerBeanDefinitions为入口,开始探讨XmlBeanDefinitionReader如何把Document对象中的节点转换为BeanDefinition对象,见下面代码。
public int registerBeanDefinitions(Document doc, Resource resource) throws BeanDefinitionStoreException {// 创建BeanDefinitionDocumentReader对象// 默认为DefaultBeanDefinitionDocumentReaderBeanDefinitionDocumentReader documentReader = createBeanDefinitionDocumentReader();// documentReader需要持有当前的环境对象documentReader.setEnvironment(this.getEnvironment());int countBefore = getRegistry().getBeanDefinitionCount();//首先创建XmlReaderContext对象// 通过BeanDefinitionDocumentReader注册BeanDefinitiondocumentReader.registerBeanDefinitions(doc, createReaderContext(resource));return getRegistry().getBeanDefinitionCount() - countBefore;}
这部分代码主要做的事情有3步。第一步是创建BeanDefinitionDocumentReader对象,默认是DefaultBeanDefinitionDocumentReader;第二步是创建调用它的registerBeanDefinitions方法所需要的XmlReaderContext上下文对象,XmlReaderContext对象持有当前要读取的资源、xml命名空间处理;第三步是调用documentReader的registerBeanDefinitions(Document doc, XmlReaderContext readerContext)处理Document对象。下面分别探讨这三步的代码。
第一步创建BeanDefinitionDocumentReader对象。
/*** 创建BeanDefinitionDocumentReader对象**/protected BeanDefinitionDocumentReader createBeanDefinitionDocumentReader() {return BeanDefinitionDocumentReader.class.cast(BeanUtils.instantiateClass(this.documentReaderClass));}
第二步:创建XmlReaderContext上下文对象。
/*** 创建XmlReaderContext对象**/protected XmlReaderContext createReaderContext(Resource resource) {if (this.namespaceHandlerResolver == null) {this.namespaceHandlerResolver = createDefaultNamespaceHandlerResolver();}return new XmlReaderContext(resource, this.problemReporter, this.eventListener,this.sourceExtractor, this, this.namespaceHandlerResolver);}/*** 创建默认的命名空间处理器容器**/protected NamespaceHandlerResolver createDefaultNamespaceHandlerResolver() {return new DefaultNamespaceHandlerResolver(getResourceLoader().getClassLoader());}
第三步执行DefaultBeanDefinitionDocumentReader的registerBeanDefinitions(Document doc, XmlReaderContext readerContext)方法。
public void registerBeanDefinitions(Document doc, XmlReaderContext readerContext) {this.readerContext = readerContext;logger.debug("Loading bean definitions");// 获得root节点Element root = doc.getDocumentElement();// 注册root节点中的所有BeanDefinitiondoRegisterBeanDefinitions(root);}
这一步是处理Document对象的重点也是入口。XML文件中只允许有一个根节点,上面的代码所做的事情就是保存XmlReaderContext 对象并提取根节点,然后调用DefaultBeanDefinitionDocumentReader的doRegisterBeanDefinitions(Element root)方法,这个方法的代码如下。
/*** 注册root节点中的所有BeanDefinition*/protected void doRegisterBeanDefinitions(Element root) {// 读取profile属性// 声明:public static final String PROFILE_ATTRIBUTE = "profile";String profileSpec = root.getAttribute(PROFILE_ATTRIBUTE);if (StringUtils.hasText(profileSpec)) {Assert.state(this.environment != null, "Environment must be set for evaluating profiles");String[] specifiedProfiles = StringUtils.tokenizeToStringArray(profileSpec, BeanDefinitionParserDelegate.MULTI_VALUE_ATTRIBUTE_DELIMITERS);// 检查环境的profile是否匹配root节点的profile属性值if (!this.environment.acceptsProfiles(specifiedProfiles)) {return;}}// 在这个方法中,递归所有嵌套<beans>元素。// 为了正确地延用并保存<beans>元素的default-*属性// ->需要把父节点<beans>的delegate记录下来,也许这个delegate可能为null。BeanDefinitionParserDelegate parent = this.delegate;// 为当前的<beans>节点创建delgate对象this.delegate = createHelper(this.readerContext, root, parent);preProcessXml(root);// 解析rootparseBeanDefinitions(root, this.delegate);postProcessXml(root);// 解析完嵌套的<beans>标签后,还原父节点的delegatethis.delegate = parent;}
这段代码主要也分成3步,第一步检查bean标签的profile属性值是否与环境的匹配,如果不匹配则不处理而直接返回;第二步创建BeanDefinitionParserDelegate对象,这个对象的作用是代理DefaultBeanDefinitionDocumentReader解析BeanDefinition对象;第三步执行parseBeanDefinitions(Element root, BeanDefinitionParserDelegate delegate)方法。下面分别探讨后面两步。
(1) 创建BeanDefinitionParserDelegate对象,代码如下
protected BeanDefinitionParserDelegate createHelper(XmlReaderContext readerContext, Element root, BeanDefinitionParserDelegate parentDelegate) {// 创建BeanDefinitionParserDelegate BeanDefinitionParserDelegate delegate = new BeanDefinitionParserDelegate(readerContext, environment);// 初始化delegate的Defaults// 如果当前<beans>节点的属性值等于默认值,则使用父节点<beans>对应的属性值。delegate.initDefaults(root, parentDelegate);return delegate;}
(2) 执行DefaultBeanDefinitionDocumentReader的parseBeanDefinitions(Element root, BeanDefinitionParserDelegate delegate)方法,代码如下
protected void parseBeanDefinitions(Element root, BeanDefinitionParserDelegate delegate) {// 检查root节点的命名空间是否为默认命名空间// spring配置文件中默认的命名空间为"http://www.springframework.org/schema/beans"if (delegate.isDefaultNamespace(root)) {NodeList nl = root.getChildNodes();// 遍历root节点下的所有子节点for (int i = 0; i < nl.getLength(); i++) {Node node = nl.item(i);if (node instanceof Element) {Element ele = (Element) node;// 检查子节点的命名空间是否为默认命名空间if (delegate.isDefaultNamespace(ele)) {// 解析默认命名空间的元素节点,详见4.5parseDefaultElement(ele, delegate);} else {// 解析自定义元素节点delegate.parseCustomElement(ele);}}}} else {// 解析自定义元素节点delegate.parseCustomElement(root);}}
这段代码主要是区分节点的命名空间,根据不同命名空间,调用相应的方法。如果节点在默认命名空间(http://www.springframework.org/schema/beans),则调用DefaultBeanDefinitionDocumentReader的parseDefaultElement(Element ele, BeanDefinitionParserDelegate delegate)方法,否则调用BeanDefinitionParserDelegate 的parseCustomElement(Element ele)方法。
(1)处理自定义命名空间下的节点。执行BeanDefinitionParserDelegate的 parseCustomElement(Element ele) 方法,代码如下
public BeanDefinition parseCustomElement(Element ele) {return parseCustomElement(ele, null);}
public BeanDefinition parseCustomElement(Element ele, BeanDefinition containingBd) {String namespaceUri = getNamespaceURI(ele);NamespaceHandler handler = this.readerContext.getNamespaceHandlerResolver().resolve(namespaceUri);if (handler == null) {error("Unable to locate Spring NamespaceHandler for XML schema namespace [" + namespaceUri + "]", ele);return null;}return handler.parse(ele, new ParserContext(this.readerContext, this, containingBd));}
这部分代码主要是获取自定义命名空间的处理器,然后执行处理器的parse方法来创建一个BeanDefinition对象。
(2)处理默认命名空间下的节点。 执行DefaultBeanDefinitionDocumentReader的parseDefaultElement(Element ele, BeanDefinitionParserDelegate delegate)方法,代码如下。
private void parseDefaultElement(Element ele, BeanDefinitionParserDelegate delegate) {if (delegate.nodeNameEquals(ele, IMPORT_ELEMENT)) {// 处理import节点元素// 这里同样是获取配置文件并把注册BeanDefinition对象importBeanDefinitionResource(ele);}else if (delegate.nodeNameEquals(ele, ALIAS_ELEMENT)) {// 处理alias节点元素processAliasRegistration(ele);}else if (delegate.nodeNameEquals(ele, BEAN_ELEMENT)) {// 处理bean节点元素,详见4.6processBeanDefinition(ele, delegate);}else if (delegate.nodeNameEquals(ele, NESTED_BEANS_ELEMENT)) {// 处理beans节点元素,递归调用doRegisterBeanDefinitions,详见4.3doRegisterBeanDefinitions(ele);}}
这段代码是处理import、beans、alias、bean标签的入口方法。
- import标签是引入其它spring配置文件;
- beans标签是对bean进行分类配置,比如用一个beans来管理测试环境的bean,用另一个beans来管理生产环境的bean;
- alias标签是为一个bean取别名,它的name属性值是bean的id,alias属性值是要取的别名,多个别名用英文逗号、分号或者空格隔开;
- bean标签的信息就是spring要实例化的对象。
下面重点探讨的bean标签处理。 执行DefaultBeanDefinitionDocumentReader的processBeanDefinition(Element ele, BeanDefinitionParserDelegate delegate)方法,代码如下。
/*** 解析bean节点,并注册BeanDefinition对象*/protected void processBeanDefinition(Element ele, BeanDefinitionParserDelegate delegate) {// 创建BeanDefinitionHolderBeanDefinitionHolder bdHolder = delegate.parseBeanDefinitionElement(ele);if (bdHolder != null) {// 装饰BeanDefinitionbdHolder = delegate.decorateBeanDefinitionIfRequired(ele, bdHolder);try {// 注册已经创建好的BeanDefintionBeanDefinitionReaderUtils.registerBeanDefinition(bdHolder, getReaderContext().getRegistry());}catch (BeanDefinitionStoreException ex) {getReaderContext().error("Failed to register bean definition with name '" +bdHolder.getBeanName() + "'", ele, ex);}// 发送BeanDefinition注册事件getReaderContext().fireComponentRegistered(new BeanComponentDefinition(bdHolder));}}
这段代码分成三步。第一步,根据传入的Element对象(bean标签的)调用代理对象的parseBeanDefinitionElement(Element ele)方法创建BeanDefinitionHolder 对象,这个对象持有创建好的BeanDefinition对象、bean的id和bean的别名。
第二步,调用代理对象的decorateBeanDefinitionIfRequired(Element ele, BeanDefinitionHolder definitionHolder)来对BeanDefinition对象再加工,主要是解析bean标签中自定义属性和自定义标签。
第三步,调用工具类BeanDefinitionReaderUtils的registerBeanDefinition(BeanDefinitionHolder definitionHolder, BeanDefinitionRegistry registry)方法,这个方法用于注册创建好的BeanDefinition。
下面分别探讨这三步。
第一步,创建BeanDefinitionHolder 对象。 执行BeanDefinitionParserDelegate的parseBeanDefinitionElement(Element ele)方法,代码如下。
public BeanDefinitionHolder parseBeanDefinitionElement(Element ele) {return parseBeanDefinitionElement(ele, null);}
public BeanDefinitionHolder parseBeanDefinitionElement(Element ele, BeanDefinition containingBean) {// 获取id属性String id = ele.getAttribute(ID_ATTRIBUTE);// 获取name属性String nameAttr = ele.getAttribute(NAME_ATTRIBUTE);List<String> aliases = new ArrayList<String>();if (StringUtils.hasLength(nameAttr)) {String[] nameArr = StringUtils.tokenizeToStringArray(nameAttr, MULTI_VALUE_ATTRIBUTE_DELIMITERS);aliases.addAll(Arrays.asList(nameArr));}String beanName = id;if (!StringUtils.hasText(beanName) && !aliases.isEmpty()) {// 使用第一个alias作为idbeanName = aliases.remove(0);if (logger.isDebugEnabled()) {logger.debug("No XML 'id' specified - using '" + beanName +"' as bean name and " + aliases + " as aliases");}}if (containingBean == null) {// 检查id和别名是否已经被使用了,如果已经被其他bean占用,则会抛出异常checkNameUniqueness(beanName, aliases, ele);}// 创建BeanDefinition对象AbstractBeanDefinition beanDefinition = parseBeanDefinitionElement(ele, beanName, containingBean);if (beanDefinition != null) {if (!StringUtils.hasText(beanName)) {// 配置中没有指定id属性try {if (containingBean != null) {// bean是另一个bean的内部beanbeanName = BeanDefinitionReaderUtils.generateBeanName(beanDefinition, this.readerContext.getRegistry(), true);}else {// 为一个顶层bean生成idbeanName = this.readerContext.generateBeanName(beanDefinition);String beanClassName = beanDefinition.getBeanClassName();if (beanClassName != null &&beanName.startsWith(beanClassName) && beanName.length() > beanClassName.length() &&!this.readerContext.getRegistry().isBeanNameInUse(beanClassName)) {aliases.add(beanClassName);}}if (logger.isDebugEnabled()) {logger.debug("Neither XML 'id' nor 'name' specified - " +"using generated bean name [" + beanName + "]");}}catch (Exception ex) {error(ex.getMessage(), ele);return null;}}String[] aliasesArray = StringUtils.toStringArray(aliases);// 返回BeanDefinitionHolder对象// 此对象持有生成的BeanDefinition对象和id以及别名列表return new BeanDefinitionHolder(beanDefinition, beanName, aliasesArray);}return null;}
这部分代码主要是检查用户给的bean id是否已经被占用、为没有id属性值的bean创建id值以及调用parseBeanDefinitionElement(Element ele, String beanName, BeanDefinition containingBean)方法来解析Element对象并创建BeanDefinition对象。
parseBeanDefinitionElement方法是解析bean节点的入口方法,在这里我们重点探讨它。下面是BeanDefinitionParserDelegate的parseBeanDefinitionElement(Element ele, String beanName, BeanDefinition containingBean)方法代码。
/**
* 创建BeanDefinition对象
**/
public AbstractBeanDefinition parseBeanDefinitionElement(Element ele, String beanName, BeanDefinition containingBean) {this.parseState.push(new BeanEntry(beanName));String className = null;// 读取<bean>节点的class属性if (ele.hasAttribute(CLASS_ATTRIBUTE)) {className = ele.getAttribute(CLASS_ATTRIBUTE).trim();}try {String parent = null;// 读取<bean>节点的parent属性if (ele.hasAttribute(PARENT_ATTRIBUTE)) {parent = ele.getAttribute(PARENT_ATTRIBUTE);}// 创建一个GenericBeanDefinition对象AbstractBeanDefinition bd = createBeanDefinition(className, parent);// 解析<bean>节点的属性parseBeanDefinitionAttributes(ele, beanName, containingBean, bd);// 获取<desription>节点的值bd.setDescription(DomUtils.getChildElementValueByTagName(ele, DESCRIPTION_ELEMENT));// 解析<meta>节点parseMetaElements(ele, bd);// 解析<lookup-method>节点parseLookupOverrideSubElements(ele, bd.getMethodOverrides());// 解析<replaced-method>节点parseReplacedMethodSubElements(ele, bd.getMethodOverrides());// 解析<constructor-arg>节点parseConstructorArgElements(ele, bd);// 解析<property>节点parsePropertyElements(ele, bd);// 解析<qualifier>节点parseQualifierElements(ele, bd);// 让BeanDefinition持有当前Resource对象bd.setResource(this.readerContext.getResource());bd.setSource(extractSource(ele));return bd;} catch (ClassNotFoundException ex) {error("Bean class [" + className + "] not found", ele, ex);} catch (NoClassDefFoundError err) {error("Class that bean class [" + className + "] depends on not found", ele, err);} catch (Throwable ex) {error("Unexpected failure during bean definition parsing", ele, ex);} finally {this.parseState.pop();}return null;}
这段代码就是根据bean标签的内容来创建BeanDefinition对象。
第二步,装饰BeanDefinition对象。这部分主要是处理p:命名空间的属性,或者自定义命名空间的标签。执行BeanDefinitionParserDelegate的decorateBeanDefinitionIfRequired(Element ele, BeanDefinitionHolder definitionHolder)方法,对BeanDefinition做更多的装饰,代码如下。
public BeanDefinitionHolder decorateBeanDefinitionIfRequired(Element ele, BeanDefinitionHolder definitionHolder) {return decorateBeanDefinitionIfRequired(ele, definitionHolder, null);}
public BeanDefinitionHolder decorateBeanDefinitionIfRequired(Element ele, BeanDefinitionHolder definitionHolder, BeanDefinition containingBd) {BeanDefinitionHolder finalDefinition = definitionHolder;// 首先根据自定义属性装饰BeanDefinition// 比如http://www.springframework.org/schema/p命名空间的属性NamedNodeMap attributes = ele.getAttributes();for (int i = 0; i < attributes.getLength(); i++) {Node node = attributes.item(i);finalDefinition = decorateIfRequired(node, finalDefinition, containingBd);}// 根据嵌套的自定义标签元素装饰BeanDefinitionNodeList children = ele.getChildNodes();for (int i = 0; i < children.getLength(); i++) {Node node = children.item(i);if (node.getNodeType() == Node.ELEMENT_NODE) {finalDefinition = decorateIfRequired(node, finalDefinition, containingBd);}}return finalDefinition;}
这段代码的责任是遍历标签的属性和子节点来检查其它命名空间的属性和标签元素,如果检查到,则调用decorateIfRequired(Node node, BeanDefinitionHolder originalDef, BeanDefinition containingBd)方法来处理其他命名空间的属性和标签元素,详见以下代码。
/*** 处理自定义命名空间标签来装饰BeanDefinition对象**/private BeanDefinitionHolder decorateIfRequired(Node node, BeanDefinitionHolder originalDef, BeanDefinition containingBd) {String namespaceUri = getNamespaceURI(node);if (!isDefaultNamespace(namespaceUri)) {// 根据节点所在的命名空间,获取NamespaceHandler对象// 比如http://www.springframework.org/schema/p命名空间的为SimplePropertyNamespaceHandlerNamespaceHandler handler = this.readerContext.getNamespaceHandlerResolver().resolve(namespaceUri);if (handler != null) {// 执行装饰BeanDefinition对象return handler.decorate(node, originalDef, new ParserContext(this.readerContext, this, containingBd));}else if (namespaceUri != null && namespaceUri.startsWith("http://www.springframework.org/")) {error("Unable to locate Spring NamespaceHandler for XML schema namespace [" + namespaceUri + "]", node);}else {// 节点为自定义命名空间的,但没有指定NamespaceHandler if (logger.isDebugEnabled()) {logger.debug("No Spring NamespaceHandler found for XML schema namespace [" + namespaceUri + "]");}}}return originalDef;}
这段代码告诉我们如何处理自定义属性和标签。
第三步,注册BeanDefinition对象。 执行BeanDefinitionReaderUtils的registerBeanDefinition(BeanDefinitionHolder definitionHolder, BeanDefinitionRegistry registry)方法,把BeanDefinition对象注册到BeanDefinitionRegistry 对象中
public static void registerBeanDefinition(BeanDefinitionHolder definitionHolder, BeanDefinitionRegistry registry)throws BeanDefinitionStoreException {String beanName = definitionHolder.getBeanName();// 把BeanDefinition对象注册到BeanDefinitionRegistry 对象中// 我们通过DefaultListableBeanFactory为例,介绍BeanDefinition的注册,详见4.11registry.registerBeanDefinition(beanName, definitionHolder.getBeanDefinition());// 把bean id与别名关联起来String[] aliases = definitionHolder.getAliases();if (aliases != null) {for (String aliase : aliases) {registry.registerAlias(beanName, aliase);}}}
这部分代码的作用是调用BeanDefinitionRegistry 的registerBeanDefinition(String beanName, BeanDefinition beanDefinition)方法来注册BeanDefinition,然后调用它的registerAlias(String name, String alias)来使bean的id和别名关联起来。
DefaultListableBeanFactory实现了BeanDefinitionRegistry 接口的registerBeanDefinition(String beanName, BeanDefinition beanDefinition)方法,代码如下。
//---------------------------------------------------------------------// Implementation of BeanDefinitionRegistry interface//---------------------------------------------------------------------public void registerBeanDefinition(String beanName, BeanDefinition beanDefinition)throws BeanDefinitionStoreException {Assert.hasText(beanName, "Bean name must not be empty");Assert.notNull(beanDefinition, "BeanDefinition must not be null");if (beanDefinition instanceof AbstractBeanDefinition) {try {((AbstractBeanDefinition) beanDefinition).validate();}catch (BeanDefinitionValidationException ex) {throw new BeanDefinitionStoreException(beanDefinition.getResourceDescription(), beanName,"Validation of bean definition failed", ex);}}synchronized (this.beanDefinitionMap) {Object oldBeanDefinition = this.beanDefinitionMap.get(beanName);if (oldBeanDefinition != null) {if (!this.allowBeanDefinitionOverriding) {throw new BeanDefinitionStoreException(beanDefinition.getResourceDescription(), beanName,"Cannot register bean definition [" + beanDefinition + "] for bean '" + beanName +"': There is already [" + oldBeanDefinition + "] bound.");}else {if (this.logger.isInfoEnabled()) {this.logger.info("Overriding bean definition for bean '" + beanName +"': replacing [" + oldBeanDefinition + "] with [" + beanDefinition + "]");}}}else {this.beanDefinitionNames.add(beanName);this.frozenBeanDefinitionNames = null;}// 以bean的id为key,把BeanDefinition对象存放到beanDefinitionMap中this.beanDefinitionMap.put(beanName, beanDefinition);}// 重置BeanDefintiionresetBeanDefinition(beanName);}
这段代码的主要作用是DefaultListableBeanFactory把创建完成的BeanDefinition保存到Map对象beanDefinitionMap中,同时还要把以前已经创建好的bean(如果存在)销毁掉。
###总结
1. 关于配置文件的指定
spring支持的location前缀有多种,可以为任何网络协议为,比如http:、ftp:、file:等。也可以为classpath:、classpath*:,此时加载的为classes路径下和jar包中的文件。也可以没有前缀,此时加载的是相对于当前资源所在路径下的文件。
关于classpath:和classpath*:的区别在2.2.2部分的代码已经很明确。classpath:扫描的范围更小,它只加载第一个匹配的根目录下所匹配的资源;classpath*:扫描的范围更广,它查找所有匹配的根目录下所匹配的资源。
spring支持ant风格的location。但是要加载的资源为其他服务器上的资源,不能使用ant风格,必须为一个明确的地址,比如http://special.csdncms.csdn.net/programmer-covers。
2. 更改XmlBeanDefinitionReader的默认DocumentLoader、NamespaceHandlerResolver或者BeanDefinitionDocumentReader,甚至是ResourceLoader
继承XmlWebApplicationContext,并重写initBeanDefinitionReader(XmlBeanDefinitionReader beanDefinitionReader),这个方法在XmlWebApplicationContext只是一个空实现,特意留给子类在使用XmlBeanDefinitionReader对象加载BeanDefinition之前对这个对象进行定制的。
3. 自定义属性和标签
在解析Document对象上,spring做了很好的扩展,使得用户可以任意的自定义标签和属性,甚至是在整个配置文件中完全可以使用自定义的标签。自定义属性和标签只需下面两步:
(1)创建自己的NamespaceHandler。直接实现NamespaceHandler接口或者继承NamespaceHandlerSupport类。
a. 直接实现NamespaceHandler接口,比如spring的p:命名空间的处理器SimplePropertyNamespaceHandler,代码如下
public class SimplePropertyNamespaceHandler implements NamespaceHandler {private static final String REF_SUFFIX = "-ref";public void init() {}public BeanDefinition parse(Element element, ParserContext parserContext) {parserContext.getReaderContext().error("Class [" + getClass().getName() + "] does not support custom elements.", element);return null;}public BeanDefinitionHolder decorate(Node node, BeanDefinitionHolder definition, ParserContext parserContext) {if (node instanceof Attr) {Attr attr = (Attr) node;String propertyName = parserContext.getDelegate().getLocalName(attr);String propertyValue = attr.getValue();MutablePropertyValues pvs = definition.getBeanDefinition().getPropertyValues();if (pvs.contains(propertyName)) {parserContext.getReaderContext().error("Property '" + propertyName + "' is already defined using " +"both <property> and inline syntax. Only one approach may be used per property.", attr);}if (propertyName.endsWith(REF_SUFFIX)) {propertyName = propertyName.substring(0, propertyName.length() - REF_SUFFIX.length());pvs.add(Conventions.attributeNameToPropertyName(propertyName), new RuntimeBeanReference(propertyValue));}else {pvs.add(Conventions.attributeNameToPropertyName(propertyName), propertyValue);}}return definition;}}
b. 通过继承NamespaceHandlerSupport。子类需要在init方法中通过registerBeanDefinitionParser方法提供自定义标签的解析器,通过registerBeanDefinitionDecorator方法提供自定义标签的装饰器,通过registerBeanDefinitionDecoratorForAttribute方法提供自定义属性的装饰器。比如spring的aop:命名空间的处理器AopNamespaceHandler的代码如下。
public class AopNamespaceHandler extends NamespaceHandlerSupport {/*** Register the {@link BeanDefinitionParser BeanDefinitionParsers} for the* '{@code config}', '{@code spring-configured}', '{@code aspectj-autoproxy}'* and '{@code scoped-proxy}' tags.*/public void init() {// In 2.0 XSD as well as in 2.1 XSD.registerBeanDefinitionParser("config", new ConfigBeanDefinitionParser());registerBeanDefinitionParser("aspectj-autoproxy", new AspectJAutoProxyBeanDefinitionParser());registerBeanDefinitionDecorator("scoped-proxy", new ScopedProxyBeanDefinitionDecorator());// Only in 2.0 XSD: moved to context namespace as of 2.1registerBeanDefinitionParser("spring-configured", new SpringConfiguredBeanDefinitionParser());}}
通过这种方式创建自己的命名空间处理器就需要提供解析器或者装饰器,但优点是更灵活。
(2)注册自定义的命名空间处理器。在META-INF文件中创建spring.handlers文件,格式形如
http\://www.springframework.org/schema/c=org.springframework.beans.factory.xml.SimpleConstructorNamespaceHandler
http\://www.springframework.org/schema/p=org.springframework.beans.factory.xml.SimplePropertyNamespaceHandler
http\://www.springframework.org/schema/util=org.springframework.beans.factory.xml.UtilNamespaceHandler
等号左边的是命名空间,等号右边的是命名空间处理器类的class全名称。
注
这是几年前写的,这几年工作忙,没时间管理博客,今天整理草稿箱时才看到这篇还未公布,虽已过时,不过我还是觉得spring通过xml加载bean定义的过程还是值得了解一下。
相关文章:

Spring4.3.x xml配置文件搜索和解析过程
###概述 这篇文章的研究不只是涉及到spring如何创建一个BeanDefinition对象,还涉及到spring如何加载文件、如何读取XML文件、以及我们在使用spring的时候如何扩展spring的配置。 spring在创建BeanFactory时会把xml配置文件和注解信息转换为一个个BeanDefinition对…...
网络爬虫(一)深度优先爬虫与广度优先爬虫
1. 深度优先爬虫:深度优先爬虫是一种以深度为优先的爬虫算法。它从一个起始点开始,先访问一个链接,然后再访问该链接下的链接,一直深入地访问直到无法再继续深入为止。然后回溯到上一个链接,再继续深入访问下一个未被访…...

JavaScript懒加载图像
懒加载图像是一种优化网页性能的技术,它将页面中的图像延迟加载,即在用户需要查看它们之前不会立即加载。这种技术通常用于处理大量或大尺寸图像的网页,特别是那些包含长页面或大量媒体内容的网站。 好处 **1. 加快页面加载速度:…...

Git指令
一 参考:https://zhuanlan.zhihu.com/p/389814854 1.clone远程仓库 git clone https://git.xiaojukeji.com/falcon-mg/dagger.git 2.增加当前子目录下所有更改过的文件至index git add . 3.提交并备注‘xxx’ git commit -m ‘xxx’ 4.显示本地分支 git branch 5.显…...
DllImport进阶:参数配置与高级主题探究
深入讨论DllImport属性的作用和配置方法 在基础篇中,我们已经简单介绍了DllImport的一些属性。现在我们将深入探讨这些属性的实际应用。 1. EntryPoint EntryPoint属性用于指定要调用的非托管函数的名称。如果托管代码中的函数名与非托管代码中的函数名不同&#…...

HTTP与HTTPS协议区别及应用场景
HTTP(超文本传输协议)和 HTTPS(安全超文本传输协议)都是用于通过网络传输数据的协议。虽然它们有一些相似之处,但在安全性和数据保护方面也存在显著差异。 在这篇博文中,我们将探讨 HTTP 和 HTTPS…...

Vue2-Vue Router前端路由实现思路
1.路由是什么? Router路由器:数据包转发设备,路由器通过转发数据包(数据分组)来实现网络互连 Route路由:数据分组从源到目的地时,决定端到端路径的网络范围的进程 | - 网络层 Distribute分发…...

2024 年 亚太赛 APMCM (C题)中文赛道国际大学生数学建模挑战赛 | 量子计算的物流配送 | 数学建模完整代码+建模过程全解全析
当大家面临着复杂的数学建模问题时,你是否曾经感到茫然无措?作为2022年美国大学生数学建模比赛的O奖得主,我为大家提供了一套优秀的解题思路,让你轻松应对各种难题! 完整内容可以在文章末尾领取! 该段文字…...

客观分析-自己和本科学生之间的差距
进入专科学校和与985、211等重点本科院校学生之间的差距可能由多种因素造成,这些因素可能包括但不限于: 1. **入学标准**: 985和211工程院校通常有更高的入学标准和更严格的选拔过程。 你得使你自己适应更高的入学标准和更严格的选拔过程&am…...

清华镜像源
python在安装各种库的时候为了下载速度快,经常使用镜像源,下面是使用清华镜像源案例。其中的 xxx 表示要安装的库,如 requests。 pip install xxx -i https://pypi.tuna.tsinghua.edu.cn/simple 安装requests案例:pip install r…...
大语言模型测评工具-ChatHub和ChatAll
背景 现在国内外拥有上百个大语言模型,在AI业务中,我们需要在其中选择一个合适业务模型,就需要对这些模型进行测试。手工去测试这么多模型效率一定不高,今天就介绍两个提高测评模型效率的工具 ChatHub和ChatAll。 介绍 ChatHub…...

使用redis分布式锁,不要把锁放在本地事务内部
在使用分布式锁的时候,习惯性的尽量缩小同步代码块的范围。 但是如果数据库隔离级别是可重复读,这种情况下不要把分布式锁加在Transactional注解的事务方法内部。 因为可能会出现这种情况: 线程1开启事务A后获取分布式锁,执行业务代码后在事务内释放了分布式锁。…...
Python学生信息管理系统(完整代码)
引言:(假装不是一个大学生课设)在现代教育管理中,学生管理系统显得尤为重要。这种系统能够帮助教育机构有效地管理学生资料、成绩、出勤以及其他教育相关活动,从而提高管理效率并减少人为错误。通过使用Python…...
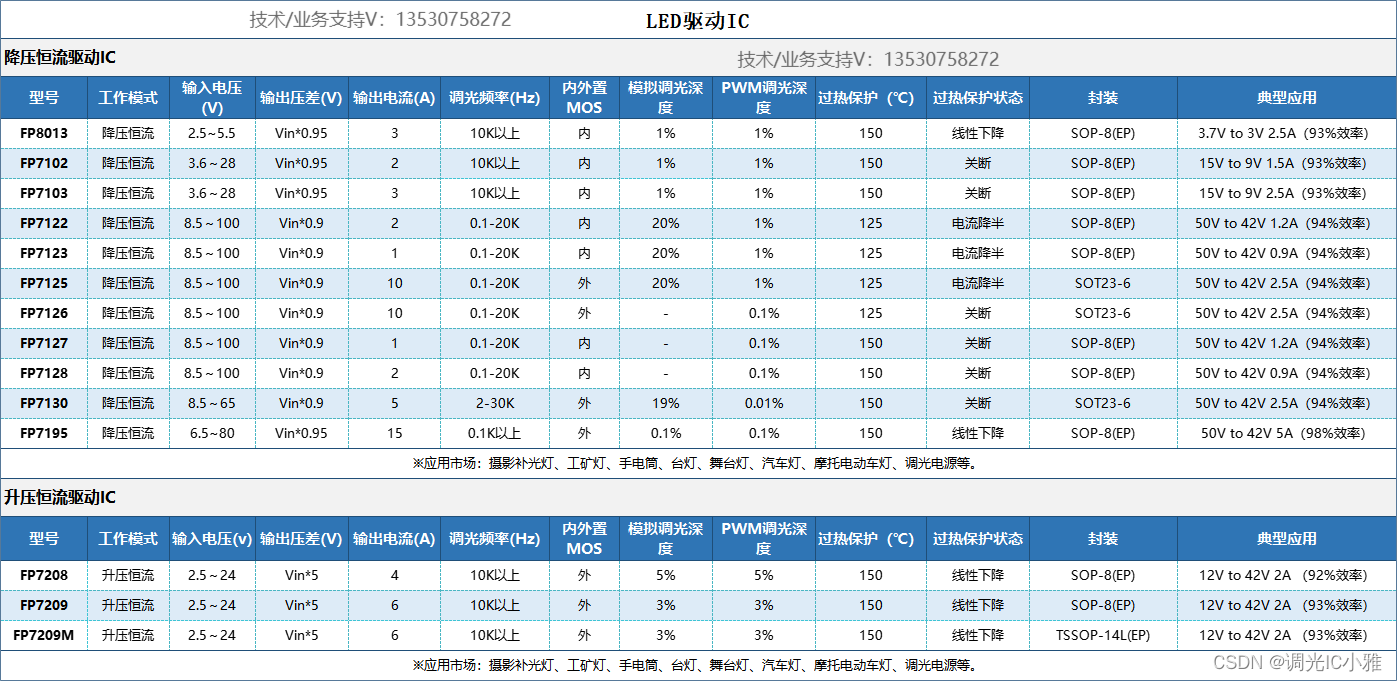
【大功率汽车大灯升压方案】LED恒流驱动芯片FP7208升压车灯调光应用,PWM内部转模拟,调光深度1%,无频闪顾虑,低亮无抖动
文章目录 前言 一、LED车灯的内部组成结构 二、驱动板详解 三、FP7208芯片介绍 芯片参数 总结 前言 近年来,汽车市场飞速发展,车灯作为汽车重要的组成部分,也得到了广泛的关注。车灯对于汽车不仅是外观件更是汽车主动安全的重要组成部…...

uniapp应用如何实现传感器数据采集和分析
UniApp是一种跨平台的应用开发框架,它支持在同一份代码中同时开发iOS、Android、H5等多个平台的应用。在UniApp中实现传感器数据采集和分析的过程可以分为以下几个步骤: 引入相关插件或库 UniApp通过插件或库的形式扩展功能。对于传感器数据采集和分析&…...
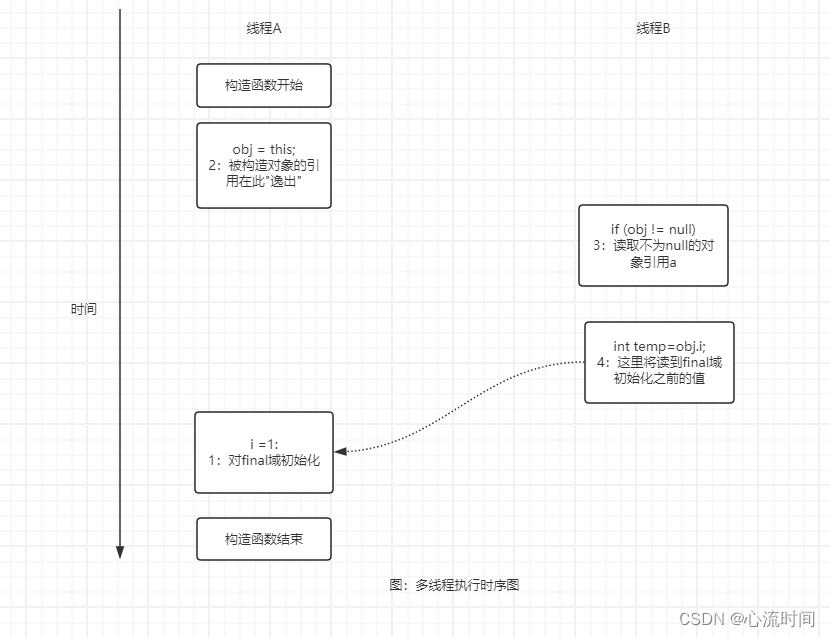
读书笔记-Java并发编程的艺术-第3章(Java内存模型)-第6节(final域的内存语义)
文章目录 3.6 final域的内存语义3.6.1 final 域的重排序规则3.6.2 写final 域的重排序规则3.6.3 读final 域的重排序规则3.6.4 final 域为引用类型3.6.5 为什么 final 引用不能从构造函数内“逸出”3.6.6 final 语义在处理器中的实现3.6.7 JSR-133 为什么要增强final 的语义 3.…...
Spring AI 1.0.0 新变化,从 0.8.1 如何升级
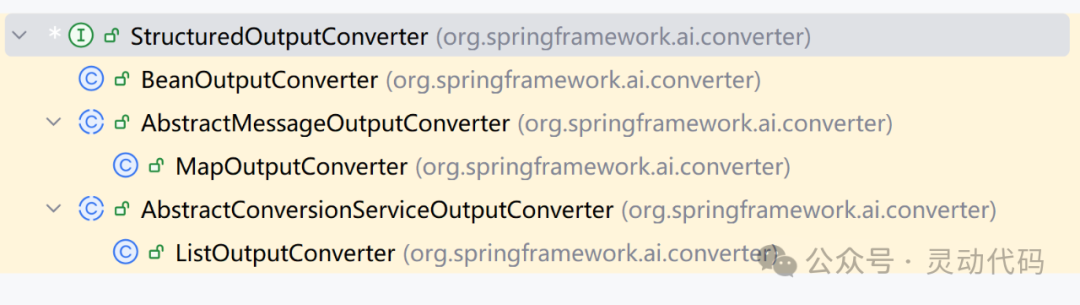
Spring AI 1.0.0-M1 版本已经发布,距离 1.0.0 正式版又更近了一步。同时这也意味着,Spring AI 1.0.0 的 API 已经基本确定,不会发生大的改动。这里介绍一下,相对于上一个发布版本 0.8.1,Spring AI 1.0.0 的一些重要的变…...
【机器学习】FFmpeg+Whisper:二阶段法视频理解(video-to-text)大模型实战
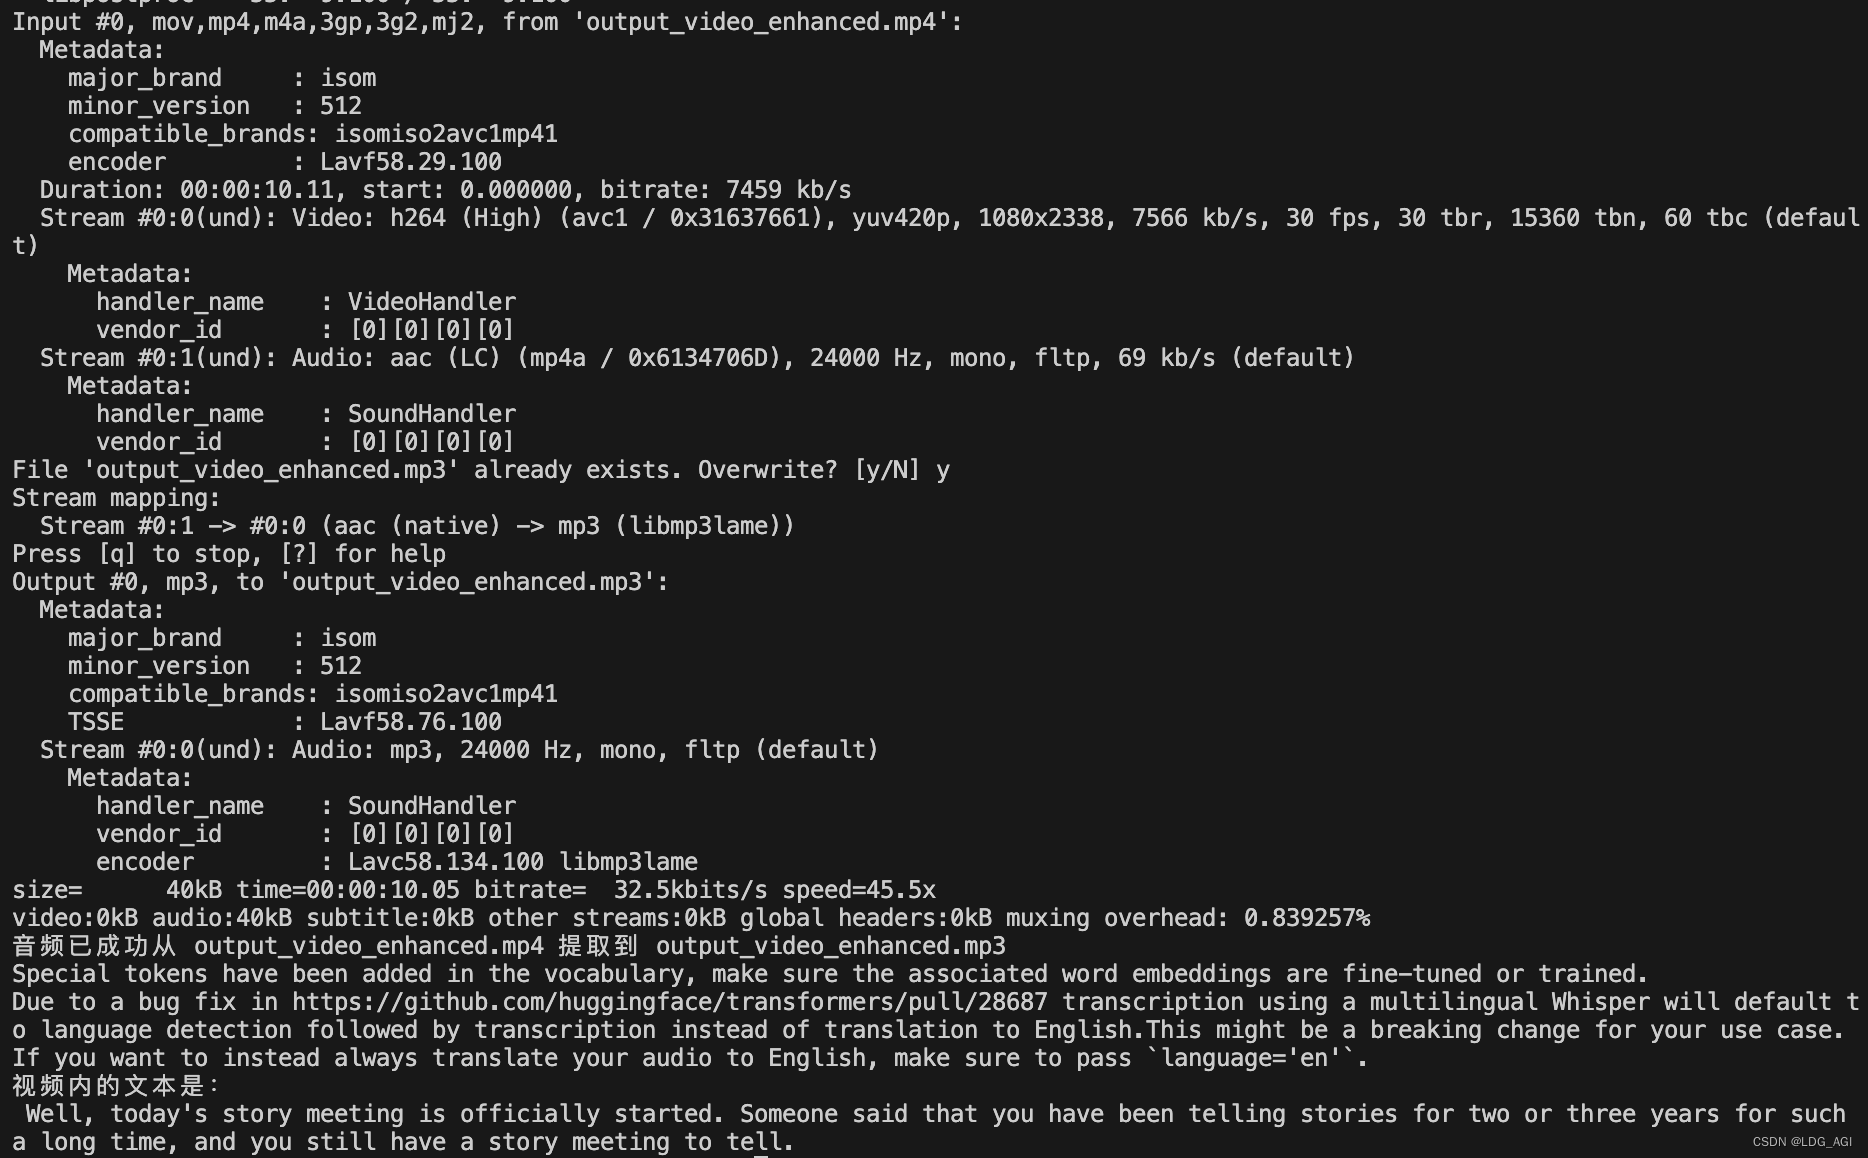
目录 一、引言 二、FFmpeg工具介绍 2.1 什么是FFmpeg 2.2 FFmpeg核心原理 2.3 FFmpeg使用示例 三、FFmpegWhisper二阶段法视频理解实战 3.1 FFmpeg安装 3.2 Whisper模型下载 3.3 FFmpeg抽取视频的音频 3.3.1 方案一:命令行方式使用ffmpeg 3.3.2 方案二&a…...

Java中继承接口和实现接口的区别、接口和抽象类的区别、并理解关键字interface、implements
初学者容易把继承接口和实现接口搞混,专门整理一下,顺便简单介绍一下interface、implements关键字。 继承接口和实现接口的区别、接口的特点 继承接口是说的只有接口才可以继承接口,是接口与接口间的。实现接口是说的接口与类之间ÿ…...

Excel为数据绘制拆线图,并将均值线叠加在图上,以及整个过程的区域录屏python脚本
Excel为数据绘制拆线图,并将均值线叠加在图上,以及整个过程的区域录屏python脚本 1.演示动画A.视频B.gif动画 2.跟踪鼠标区域的录屏脚本 Excel中有一组数据,希望画出曲线,并且能把均值线也绘制在图上,以下动画演示了整个过程,并且提供了区域录屏脚本,原理如下: 为节约空间,避免…...

软阴影:那个让虚拟世界“温柔起来“的光影小秘密
一、从一只小猫的影子说起 前几天我在朋友家做客,他家养了一只胖乎乎的橘猫,正趴在阳台的窗边晒太阳。我无意间瞥了一眼那只猫脚边的影子,突然被一个细节震撼了—— 那只猫的影子——并不是一片均匀的黑。 仔细看——猫肚子紧贴地板的地方——…...

基于声卡与电流互感器的安全交流功率测量系统设计与实践
1. 项目概述:用声卡安全测量交流功率我一直对各种测量技术抱有浓厚的兴趣,毕竟“测量即认知”这句老话在今天依然适用。对于电力消耗和产出,没有什么比直接测量更能说明问题了。交流功率的测量,核心在于同时获取电压和电流的瞬时值…...

HarmonyOS ArkTS DateUtil 日期增减与日历计算完整指南
文章目录 背景一、引言二、日期增减方法详解使用示例 三、日历计算方法详解四、Demo 演示:日期增减结果展示五、Demo 演示:月历视图完整实现六、日历视图关键点解析为什么要填充前置空格?getLastDayOfMonth 的实现技巧 七、小结 背景 近期发现…...

上线前最后一道防线,DeepSeek代码审查如何帮你拦截87%的CVE类缺陷?
更多请点击: https://intelliparadigm.com 第一章:上线前最后一道防线,DeepSeek代码审查如何帮你拦截87%的CVE类缺陷? 在软件交付生命周期末期,传统人工代码审计与通用SAST工具常因误报率高、上下文理解弱而漏检高危漏…...

免费抓包工具选型指南:Wireshark、Fiddler、mitmproxy、Charles实战对比
1. 抓包工具不是“黑科技”,而是网络世界的显微镜很多人第一次听说“抓包”,脑子里立刻浮现出黑客电影里满屏滚动的绿色代码、键盘敲得噼啪作响、三秒破解银行防火墙的画面。其实完全不是这样——抓包(Packet Capture)本质上就是把…...
用Azure Kinect DK和Body Tracking SDK,5分钟实现一个实时人体骨骼点检测Demo(C++版)
5分钟实战:用Azure Kinect DK实现实时人体骨骼点追踪(C版) 当你第一次拿到Azure Kinect DK时,最令人兴奋的莫过于它强大的人体追踪能力。这款深度相机不仅能捕捉高清彩色图像,更能通过AI算法实时重建人体骨骼关节点。本…...

告别枯燥理论!用Unity脚本生命周期与预制体玩转一个“会变身的敌人”
用Unity打造会变身的敌人:脚本生命周期与预制体的实战应用在游戏开发中,敌人AI的行为设计往往是新手开发者最感兴趣也最容易感到困惑的部分。Unity的脚本生命周期和预制体系统为这类需求提供了强大支持,但教科书式的讲解常常让学习者陷入枯燥…...

统信UOS浏览器书签同步难题?一招搞定所有新用户默认书签配置
统信UOS浏览器书签批量配置:系统管理员的高效部署指南在企业或教育机构的IT运维工作中,统信UOS作为国产操作系统的代表,其浏览器书签的统一管理常常成为系统管理员面临的挑战。想象一下,每当有新员工入职或学生入学,都…...

输电线路在线监测系统|架空线路安全运行的“第一道防线“!
输电线路微气象监测站是专为高压输电线路、电网廊道、杆塔运维量身打造的专利级一体化微气象智能监测设备。依托双专利超声波探测技术、六要素集成传感架构、无启动风速高精测量、智能抗干扰稳控系统,实现输电线路沿线气象24小时全自动捕捉、动态实时监测、大风风险…...

告别手动复制!用这个自定义编辑器脚本一键备份/克隆Unity Terrain Data
告别手动复制!用这个自定义编辑器脚本一键备份/克隆Unity Terrain Data在Unity关卡设计和技术美术的工作流中,地形数据的灵活复用往往意味着反复的手动操作——导出高度图、备份材质参数、复制植被分布,每个环节都可能成为效率瓶颈。想象这样…...