koa+Vite+vue3+ts+pinia构建项目
一、 初始化构建项目
npm create vite myProject -- --template vue-ts注:Vite 需要 Node.js 版本 14.18+,16+。然而,有些模板需要依赖更高的 Node 版本才能正常运行,当你的包管理器发出警告时,请注意升级你的 Node 版本。
二、创建服务器
使用 Koa2
1. 安装koa
npm i koa --save && npm i @types/koa --save-dev2. 安装中间件(koa-connect)
npm i koa-connect --save3. 安装koa处理跨域(koa2-cors)
npm i koa2-cors --save4. 安装中间件(koa-bodyparser)
利用koa-bodyparser来处理POST请求参数
npm i koa-bodyparser --savePOST请求参数的处理有2种方式:
- 利用
node.js原生的querystring.parse()方式拿到前端传过来的数据。 - 利用第三方中间件
koa-bodyparser
注:
- 本模块不支持解析multipart表单格式数据,请使用co-busboy解析multipart表单格式数据。
- middleware的顺序很重要,这个koa-bodyparser必须在router之前被注册到app对象上
5. 注册中间件
- 新增bin/app.js文件
const Koa = require('koa');const cors = require('koa2-cors')const bodyParser = require('koa-bodyparser')(async () => {const app = new Koa();app.use(cors())app.use(bodyParser())app.use(async (ctx, next) => {console.log(ctx)ctx.body = `<!DOCTYPE html><html lang="en"><head><title>koa2 + vite + ts + vue3 + vue-router</title></head><body><h1 style="text-align: center;">Hello</h1></body></html>`;});// parse request body:app.listen(9000, () => {console.log('server is listening in 9000');});
})();
6. node进行启动服务
node bin/app.js三、安装模板引擎
npm i nunjucks --savenunjucks文档:Nunjucks 中文文档
廖雪峰nunjucks文档:使用Nunjucks - 廖雪峰的官方网站
- 创建config/templates.js
const nunjucks = require('nunjucks');function createEnv(path, opts) {var autoescape = opts.autoescape === undefined ? true : opts.autoescape,noCache = opts.noCache || false,watch = opts.watch || false,throwOnUndefined = opts.throwOnUndefined || false,env = new nunjucks.Environment(new nunjucks.FileSystemLoader(path, {noCache: noCache,watch: watch,}),{autoescape: autoescape,throwOnUndefined: throwOnUndefined,});if (opts.filters) {for (var f in opts.filters) {env.addFilter(f, opts.filters[f]);}}return env;
}function templates(path, opts) {var env = createEnv(path, opts);return async (ctx, next) => {ctx.render = function (view, model) {ctx.response.body = env.render(view, Object.assign({}, ctx.state || {}, model || {}));ctx.response.type = "text/html";};await next();};
}module.exports = templates;
- bin/app.js
// nunjucks 模板渲染
const templates = require('../config/templates')// add nunjucks as ./:
app.use(templates('./', {noCache: !isProduction,watch: !isProduction})
)
四、路由配置
1. 安装 koa-router
npm i koa-router --save2. 创建config/controller.js
const router = require('koa-router')()
router.staticFiles = {}// add url-route in /controllers:function interception(str) {return str.substring(0, str.lastIndexOf('/'))
}
function addMapping(mapping) {for (const url in mapping) {if (url.startsWith('GET ')) {const path = url.substring(4)const funStr = mapping[url].toString()if (funStr.indexOf('ctx.render') > 0) {const str1 = funStr.match(/ctx.render[\s]*\([\s]*'(\S*)', \{/g)[0]const str2 = str1.replace(/ctx.render[\s]*\([\s]*'/g, '')const str3 = str2.replace(/'[\s]*,[\s]*\{/g, '')const strUrl = url.replace('GET ', '')if (strUrl != '/') {router.staticFiles[interception(strUrl)] = interception(str3)}}router.get(path, mapping[url])console.log(`register URL mapping: GET ${path}`);} else if (url.startsWith('POST ')) {const path = url.substring(5)router.post(path, mapping[url])console.log(`register URL mapping: POST ${path}`)} else if (url.startsWith('PUT ')) {const path = url.substring(4)router.put(path, mapping[url])console.log(`register URL mapping: PUT ${path}`)} else if (url.startsWith('DELETE ')) {const path = url.substring(7)router.del(path, mapping[url])console.log(`register URL mapping: DELETE ${path}`)} else {console.log(`invalid URL: ${url}`)}}
}function addControllers(filePath) {const fs = require('fs')fs.readdirSync(filePath).filter(f => {if (fs.statSync(filePath + '/' + f).isFile()) {if (f.endsWith('.js')) {const mapping = require(filePath + '/' + f)()addMapping(mapping)}}if (fs.statSync(filePath + '/' + f).isDirectory()) {addControllers(filePath + '/' + f)}})
}module.exports = function (dir, app) {// 读取/routes目录的路由配置const controllers_dir = dir || '../routes'addControllers(__dirname + '/' + controllers_dir)return router.routes()
}
3. routes/admin/index.js配置
module.exports = function () {return {'GET /': async (ctx, next) => {const pageInfo = {title: '页面标题'}ctx.render('src/mobile/official/dist/index.html', {pageInfo})}}
}五、集成 vue-router
1. 安装vue-router
npm i vue-router --save2. 新增项目模块(test)
- src/test/index.html(页面)
<!DOCTYPE html>
<html lang="en"><head><meta charset="UTF-8" /><meta name="viewport" content="initial-scale=1.0, maximum-scale=1.0, minimum-scale=1.0, user-scalable=no, width=device-width" /><meta name="format-detection" content="telephone=no" /></head><body><div id="app"></div><script type="module" src="./main.ts"></script></body>
</html>- src/test/views/index.vue (子页面)
<template><h1>内容</h1>
</template><script setup lang="ts">
import { inject } from 'vue'
const title = 'test'
</script>
- test/router/index.ts (路由配置)
import { createRouter, createWebHistory, RouteRecordRaw } from 'vue-router'const routes: RouteRecordRaw[] = [{path: '/',redirect: to => {return '/index'}},{path: '/index',name: 'Index',component: () => import('../views/index.vue')}
]const router = createRouter({history: createWebHistory(),routes
})export default router
- test/main.ts(main.js)
import { createApp } from 'vue'
import App from './App.vue'
import router from './router/index'
import { createPinia } from 'pinia'const app = createApp(App)
app.use(createPinia)
app.use(router)
app.mount('#app')
六、Vite配置(vite.config.ts)
Vite 会自动解析根目录下名为vite.config.ts的文件
配置 Vite | Vite 官方中文文档
1. 基本配置(vite.config.ts)
import { defineConfig } from 'vite'
import vue from '@vitejs/plugin-vue'
import { resolve } from 'path'
import { existsSync } from 'fs'// 获取模块路径
const modulePath = process.env.npm_config_path.endsWith('/')? process.env.npm_config_path.slice(0, -1): process.env.npm_config_pathconst projectDirname = resolve(__dirname, './' + modulePath)let publicPath = '//res.test.com'if (!modulePath || !existsSync(projectDirname)) {// 路径不存在,停止运行console.log('\x1b[40m \x1b[31m 模块路径错误,请检查路径 \x1b[0m')process.exit(0)
}export default defineConfig(({ mode }) => {const alias: Record<string, string> = {'@': resolve(__dirname, 'src'),'@admin': resolve(__dirname, 'src/admin'),'@mobile': resolve(__dirname, 'src/mobile'),'@pc': resolve(__dirname, 'src/pc')}// 路径存在,配置入口/出口路径const moduleName = modulePath.split('/').reverse()[0]const project_pages = {}project_pages[moduleName] = resolve(__dirname, modulePath + '/index.html')return {// https://cn.vitejs.dev/guide/#index-html-and-project-rootroot: modulePath, // 项目根目录base: mode === 'production' ? publicPath + modulePath.replace(/^(.\/)?src+/, '') + '/' : '/',plugins: [vue()],resolve: {extensions: ['.js', '.ts', '.vue', '.json'],alias},server: {port: 8081,open: false,proxy: {}},build: {rollupOptions: {input: project_pages,output: {dir: resolve(__dirname, modulePath + '/dist'),chunkFileNames: 'static/js/[name]-[hash].js',entryFileNames: 'static/js/[name]-[hash].js',assetFileNames: 'static/[ext]/[name]-[hash].[ext]'}},minify: 'terser',terserOptions: {compress: {drop_console: true,drop_debugger: true}}}}
})
1. element-plus 按需引入
首先你需要安装 unplugin-vue-components 和 unplugin-auto-import这两款插件
npm install -D unplugin-vue-components unplugin-auto-importvite.config.ts
import AutoImport from 'unplugin-auto-import/vite'
import viteCompression from 'vite-plugin-compression'export default defineConfig(({ mode }) => {return {plugins: [vue(),AutoImport({imports: ['vue', 'vue-router'], // 自动导入vue和vue-router相关函数eslintrc: {enabled: false, // 默认false, true启用。生成一次就可以,避免每次工程启动都生成filepath: './.eslintrc-auto-import.json', // 生成json文件globalsPropValue: true}}),// gzip压缩 生产环境生成 .gz 文件viteCompression({verbose: true,disable: false,threshold: 10240,algorithm: 'gzip',ext: '.gz'})]}
})
2. Vant按需引入
npm i vite-plugin-style-import -Dvite.config.ts
注:2.0版本需要使用的是createStyleImportPlugin不要使用styleImprot了
import { defineConfig } from 'vite'
import vue from '@vitejs/plugin-vue'
import { resolve } from 'path'
import { existsSync } from 'fs'//2.0之后版本用createStyleImportPlugin
import { createStyleImportPlugin, VantResolve } from 'vite-plugin-style-import';export default defineConfig(({ mode }) => {const alias: Record<string, string> = {'@': resolve(__dirname, 'src'),'@admin': resolve(__dirname, 'src/admin'),'@mobile': resolve(__dirname, 'src/mobile'),'@pc': resolve(__dirname, 'src/pc')}// 路径存在,配置入口/出口路径const moduleName = modulePath.split('/').reverse()[0]const project_pages = {}project_pages[moduleName] = resolve(__dirname, modulePath + '/index.html')return {root: modulePath,base: mode === 'production' ? '//res.test.com' + modulePath.replace(/^(.\/)?src+/, '') + '/' : '/',plugins: [vue(),createStyleImportPlugin({resolves: [VantResolve()],libs: [{libraryName: 'vant',esModule: true,resolveStyle: name => `../es/${name}/style`}]})],resolve: {extensions: ['.js', '.ts', '.vue', '.json'],alias},server: {port: 8081,open: false,proxy: {}},build: {rollupOptions: {input: project_pages,output: {dir: resolve(__dirname, modulePath + '/dist'),chunkFileNames: 'static/js/[name]-[hash].js',entryFileNames: 'static/js/[name]-[hash].js',assetFileNames: 'static/[ext]/[name]-[hash].[ext]'}},minify: 'terser',terserOptions: {compress: {drop_console: true,drop_debugger: true}}}}
})
如出现 Error: Cannot find module ‘consola‘
则需要安装consola(由于改依赖包有使用到consola)
npm i consola -D七、本地启动服务、打包项目的命令设置
package.json
{"name": "myProject","private": true,"version": "0.0.0","scripts": {"dev": "vite","vuedev": "vite serve --force --","build": "vue-tsc && vite build","vuebuild": "vue-tsc --noEmit && vite build --","preview": "vite preview"},"dependencies": {"axios": "^1.3.4","element-plus": "^2.3.0","koa": "^2.14.1","koa-bodyparser": "^4.3.0","koa-connect": "^2.1.0","koa-router": "^12.0.0","koa2-cors": "^2.0.6","nunjucks": "^3.2.3","pinia": "^2.0.33","qs": "^6.11.1","vant": "^4.1.0","vite-plugin-compression": "^0.5.1","vite-plugin-style-import": "^2.0.0","vue": "^3.2.45","vue-router": "^4.1.6"},"devDependencies": {"@types/koa": "^2.13.5","@vitejs/plugin-vue": "^4.0.0","consola": "^2.15.3","cross-env": "^7.0.3","less": "^4.1.3","typescript": "^4.9.3","unplugin-auto-import": "^0.15.1","unplugin-vue-components": "^0.24.1","vite": "^4.1.0","vue-tsc": "^1.0.24"}
}
npm run vuedev --path=src/test相关文章:

koa+Vite+vue3+ts+pinia构建项目
一、 初始化构建项目 npm create vite myProject -- --template vue-ts 注:Vite 需要 Node.js 版本 14.18,16。然而,有些模板需要依赖更高的 Node 版本才能正常运行,当你的包管理器发出警告时,请注意升级你的 Node 版…...

k8s-yaml文件
文章目录一、K8S支持的文件格式1、yaml和json的主要区别2、YAML语言格式二、YAML1、查看 API 资源版本标签2、编写资源配置清单2.1 编写 nginx-test.yaml 资源配置清单2.2 创建资源对象2.3 查看创建的pod资源3、创建service服务对外提供访问并测试3.1 编写nginx-svc-test.yaml文…...
存储引擎
目录 ❤ MySQL存储引擎 什么是存储引擎? MySQL支持哪个存储引擎? ❤ 各种存储引擎的特性 概述 各种存储引擎的特性 各种搜索引擎介绍 ❤ 常用存储引擎及适用场景 ❤ 存储引擎在mysql中的使用 存储引擎相关sql语句 指定存储引擎建表 在建表时指定 在配置文件中…...

Go中 channel的使用
文章目录背景channel 简介使用说明声明发送和接受数据关闭channel使用示例背景 使用 sync 包和 context 包的工具可以实现多个协程之间互相协作, 但是没有一种很好的方式解决多个协程之间通信的问题. golang 作者 Rob Pike 说过一句话,不要通过共享内存来通信&…...

【C++】string OJ练习
文章目录1. 仅仅反转字母思路分析代码实现2. 字符串中的第一个唯一字符题目分析代码实现3. 《剑指offer》——替换空格解法一:寻找替换思路分析代码实现优化解法二:空间换时间思路分析代码实现4.字符串最后一个单词的长度思路分析代码实现5. 字符串相加思…...
进程间通信IPC
进程间通信IPC (InterProcess Communication) 一、进程间通信的概念 每个进程各自有不同的用户地址空间,任何一个进程的全局变量在另一个进程中都看不到,所以进程之间要交换数据必须通过内核,在内核中开辟一块缓冲区,进程1把数据…...
操作系统-页面淘汰算法(下)-软件设计(二十六)
操作系统-PV操作(上)-软件设计(二十五)https://blog.csdn.net/ke1ying/article/details/129476031 存储管理-分区存储组织 问:计算机系统内存大小为128k,当前系统分配情况如图,那么作业4再次申…...
)
23种设计模式-责任链模式(Android开发实际应用场景介绍)
什么是责任链模式 责任链模式是一种行为型设计模式,它的核心思想是将请求从一系列处理者中传递,直到其中一个处理者能够处理它为止。在这个过程中,请求可以被任何一个处理者处理,也可以被拒绝,直到有一个处理者能够处…...

Socket+Select+Epoll笔记
讲到epoll,就必须了解Socket,上篇博客写了Socket的基本使用方法,步骤主要为创建一个socketsocket是进程之间通信的,那么进程通信如何找到这个socket呢?当然是端口号,所以socket就要和端口号进行绑定&#x…...

git查看最近修改的文件
git log --name-status 每次修改的文件列表, 显示状态 git log --name-only 每次修改的文件列表 git log --stat 每次修改的文件列表, 及文件修改的统计 git whatchanged 每次修改的文件列表 git whatchanged --stat 每次修改的文件列表, 及文件修改的统计 git show 显示最…...
】堆排序(二))
【算法基础(四)】堆排序(二)
堆排序(二) 把数组从零开始连续的一段 完全二叉树 size i 左 son 2*11 i 右 son 2*12 父 (i-1) / 2 堆是完全二叉树,分为大根堆和小根堆 在完全二叉树里,每一棵子数最大的值是头节点的值,就是大根堆 同理&…...

C++类型转换
C语言的转换是在变量前加类型名进行转换的,比如double pi 3.14;int a (int) pi;对于指针也是如此double* dptr πint* iptr (int*)dptr;虽然c兼容了C语言的转型方式,但是也做了很多限制,比如向上类型转换,在c中建议使用…...

Keil MDK6要来了,将嵌入式软件开发水平带到新高度,支持跨平台(2023-03-11)
注:这个是MDK6,不是MDK5 AC6,属于下一代MDK视频版: https://www.bilibili.com/video/BV16s4y157WF Keil MDK6要来了,将嵌入式软件开发水平带到新高度,支持跨平台一年一度的全球顶级嵌入式会展Embedded Wor…...

蓝桥杯刷题第九天
题目描述本题为填空题,只需要算出结果后,在代码中使用输出语句将所填结果输出即可。素数就是不能再进行等分的整数。比如7,11。而 9 不是素数,因为它可以平分为 3 等份。一般认为最小的素数是2,接着是 3,5&…...
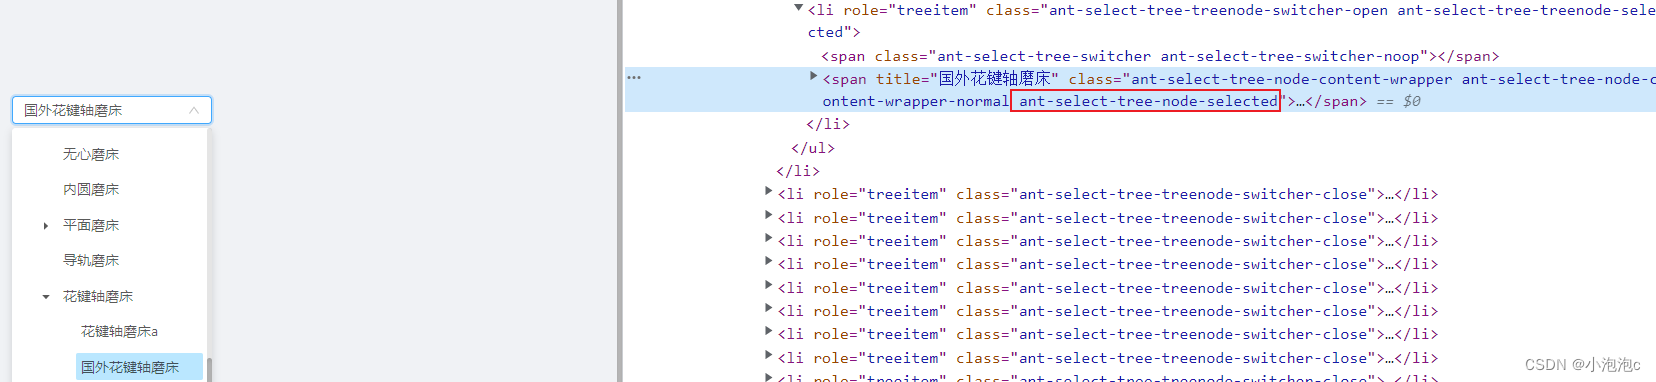
a-tree-select 基本使用,下拉框高度和宽度设置、回显时滚动条定位解决。
目录一、基本使用1. 界面效果2. 代码实现3. 问题1:下拉框占满整个屏幕4. 问题4:菜单内容过长时,下拉菜单宽度无限变宽。二、数据回显、滚动条定位1. 界面效果2. 代码实现2.1 获取默认展开节点2.1.1 代码实现2.1.2 说明2.2 设置滚动条定位2.2.…...
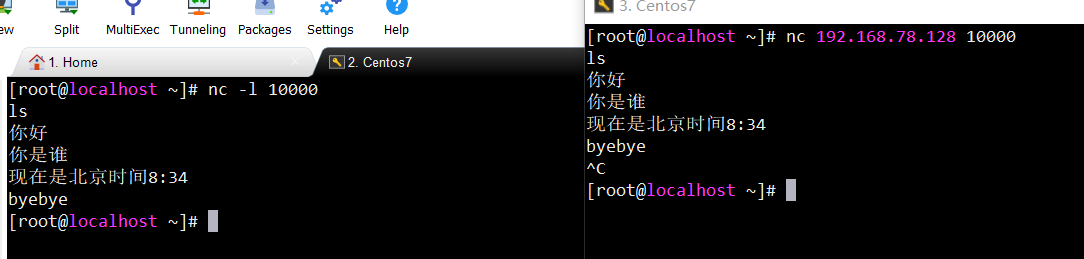
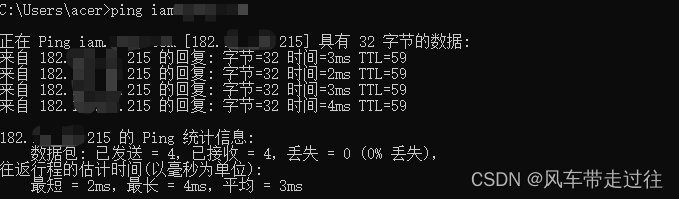
【Linux】之nc命令(连接与扫描指定端口、监测服务端口的使用情况)解析、详解实例、邮件告警
🍁博主简介 🏅云计算领域优质创作者 🏅华为云开发者社区专家博主 🏅阿里云开发者社区专家博主 💊交流社区:运维交流社区 欢迎大家的加入! 文章目录nc命令简介nc命令的安装nc命令语法格式…...
cdn简单配置
cdn配置域名接入CDN编辑CDN配置本地修改hosts文件,绕过公网解析域名接入CDN 添加CDN域名以及回源配置 编辑CDN配置 默认后端端口是80,如果测试发现无法访问,则可能是443或其它 如果域名在CDN后端有https强制跳转,后端端口一定是44…...

前端安全(自留)
目录XSS——跨站脚本常见解决CSRF ——跨站请求伪造常见解决XSS——跨站脚本 当目标站点在渲染html的过程中,遇到陌生的脚本指令执行。 攻击者通过在网站注入恶意脚本,使之在用户的浏览器上运行,从而盗取用户的信息如 cookie 等。 常见 解…...

零基础转行云计算可行吗
目前处于云年代,云计算运维工程师的工作远景还是十分广泛的。像是阿里云计算,滴滴,抖音等等互联网大厂目前都在使用云核算技能。 云计算运维工程师的薪资水平也十分可观。 运维工程师(Operations),在国内又称为运维开发工程师(Dev…...
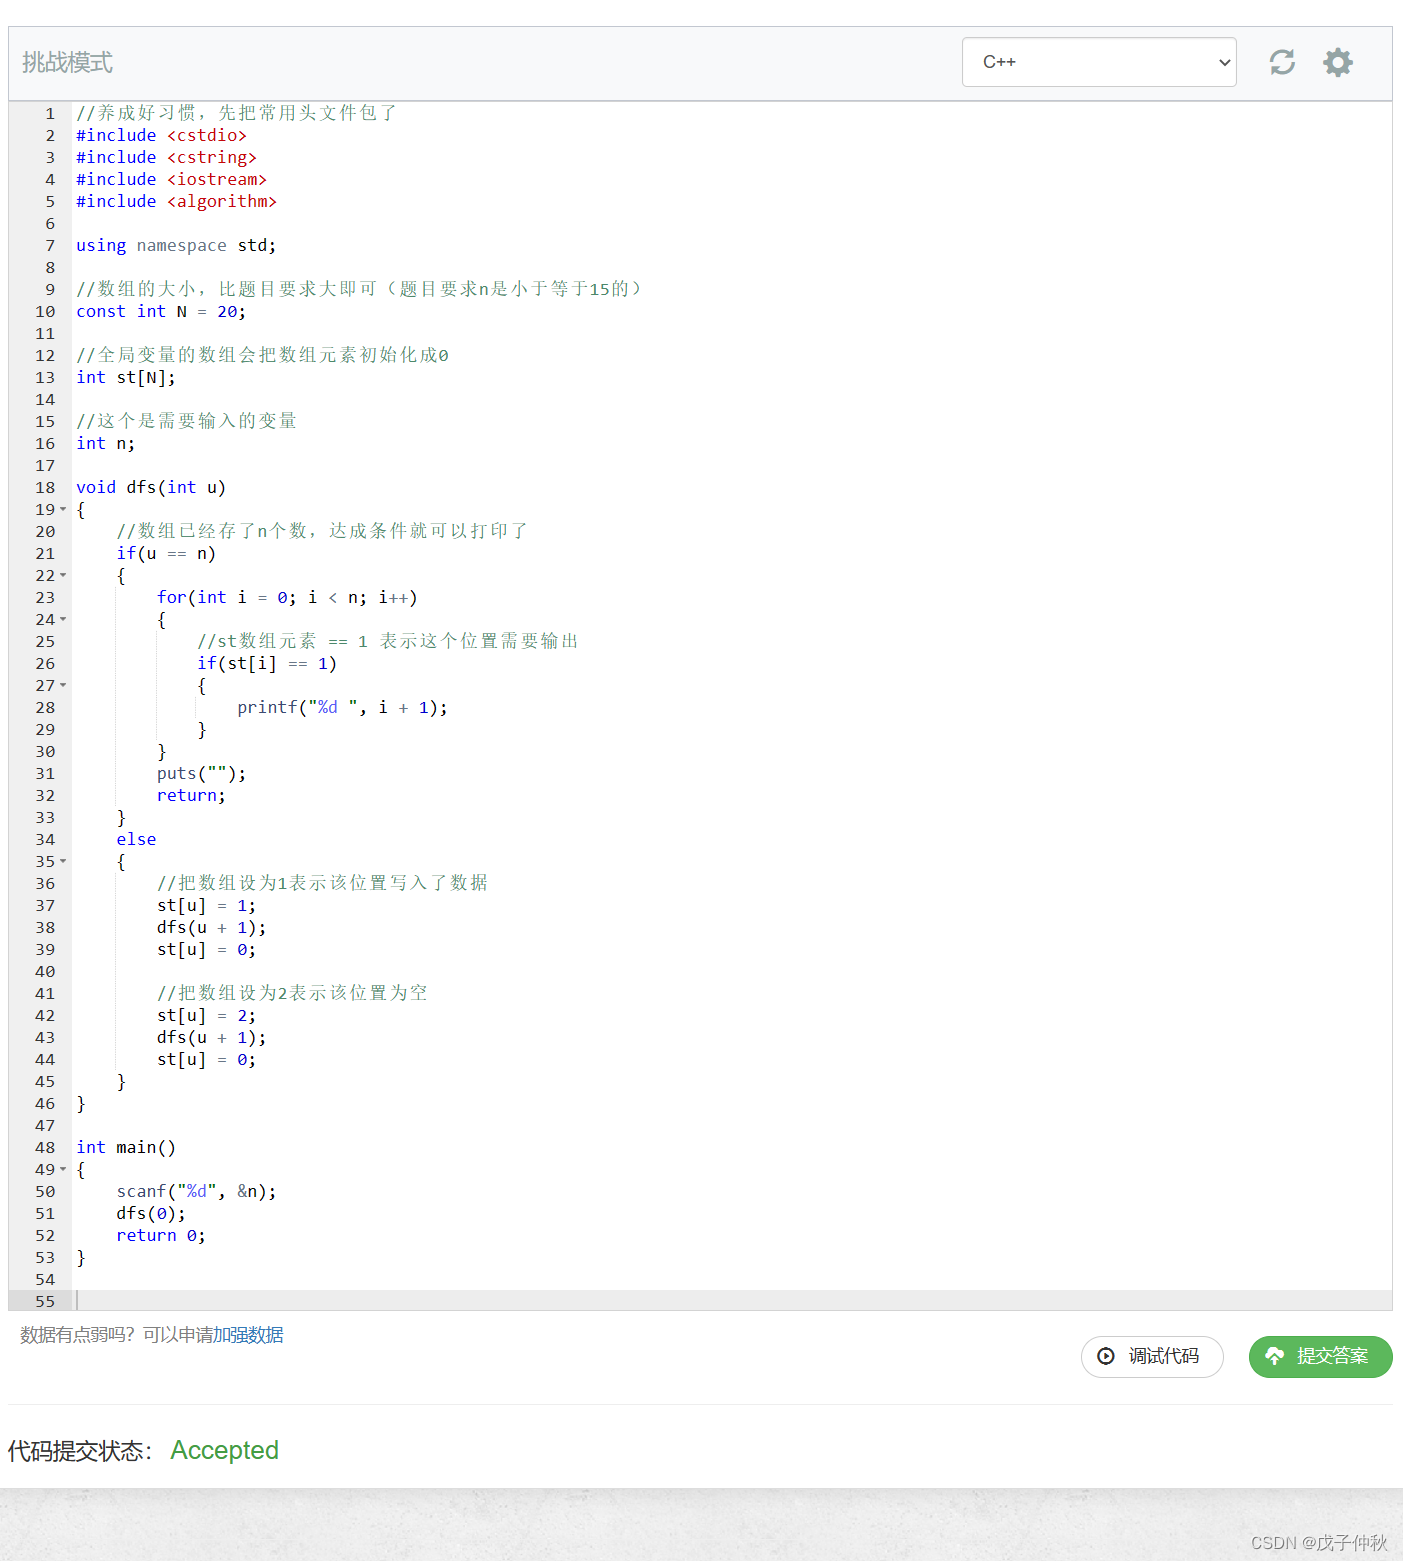
【AcWing】蓝桥杯备赛-深度优先搜索-dfs(1)
目录 写在前面: 题目:92. 递归实现指数型枚举 - AcWing题库 读题: 输入格式: 输出格式: 数据范围: 输入样例: 输出样例: 解题思路: 代码: AC &…...

终极免费跨平台待办清单:My-TODOs 让您的任务管理回归简单高效
终极免费跨平台待办清单:My-TODOs 让您的任务管理回归简单高效 【免费下载链接】My-TODOs A cross-platform desktop To-Do list. 跨平台桌面待办小工具 项目地址: https://gitcode.com/gh_mirrors/my/My-TODOs 在信息爆炸的时代,我们每天都在处理…...

智能网联时代的分心驾驶:技术悖论、工程困境与系统化安全框架
1. 项目概述:一个被忽视的致命悖论 作为一名在汽车电子和智能网联领域摸爬滚打了十几年的工程师,我见过太多关于“未来出行”的炫酷概念和激动人心的技术路线图。从早期的车载信息娱乐系统,到后来的高级驾驶辅助系统,再到如今如火…...

DeepRead Skills:为AI编程助手注入OCR与文档处理能力
1. 项目概述:为AI助手注入文档处理“超能力”如果你和我一样,日常开发中重度依赖Claude Code、Cursor这类AI编程助手,那你肯定遇到过这样的场景:想让它帮你写一段调用OCR API的代码,结果它要么给你一个过时的库示例&am…...

GetQzonehistory:三步轻松备份QQ空间历史说说,永久保存青春记忆
GetQzonehistory:三步轻松备份QQ空间历史说说,永久保存青春记忆 【免费下载链接】GetQzonehistory 获取QQ空间发布的历史说说 项目地址: https://gitcode.com/GitHub_Trending/ge/GetQzonehistory 你是否担心QQ空间里的青春记忆会随着时间流逝而消…...

CANN昇腾算子开发套件
SetSingleOutputShape 【免费下载链接】asc-devkit 本项目是CANN 推出的昇腾AI处理器专用的算子程序开发语言,原生支持C和C标准规范,主要由类库和语言扩展层构成,提供多层级API,满足多维场景算子开发诉求。 项目地址: https://g…...

Obsidian 坚果云同步最佳实践:Nutstore Sync 大仓库提速、冲突策略、.obsidian配置同步与恢复方案
适用人群:Obsidian 重度用户(上千/上万文件、图片/附件多、跨设备高频编辑、对稳定性与可恢复性要求高)。 强烈建议:操作前先把整个 Vault 复制一份做离线备份。 1. 你要解决的不是“能不能同步”,而是“同步体系” 重…...

为什么92%参会者在P3东区绕行超4分钟?2026大会停车动线算法白皮书首度披露
更多请点击: https://intelliparadigm.com 第一章:2026年AI技术大会停车指引概览 2026年AI技术大会主会场设于上海张江科学城国际会展中心,周边共开放3个智能停车场(P1–P3),全部支持车牌自动识别、无感支…...

LinkSwift:八大网盘直链下载助手终极指南,告别客户端束缚![特殊字符]
LinkSwift:八大网盘直链下载助手终极指南,告别客户端束缚!🚀 【免费下载链接】Online-disk-direct-link-download-assistant 一个基于 JavaScript 的网盘文件下载地址获取工具。基于【网盘直链下载助手】修改 ,支持 百…...

Letta框架:全栈AI应用开发,从模型集成到部署上线的完整解决方案
1. 项目概述:一个开箱即用的AI应用开发框架最近在折腾AI应用开发的朋友,估计都绕不开一个核心痛点:想法很美好,落地很骨感。从模型调用、提示词工程,到前后端集成、状态管理,再到部署上线,每个环…...

AI编程智能体评估平台CodingAgentExplorer:从原理到实践的系统评测指南
1. 项目概述:一个探索智能体编码能力的开源工具最近在GitHub上闲逛,发现了一个挺有意思的项目:tndata/CodingAgentExplorer。光看名字,你可能会觉得这又是一个“AI写代码”的工具,市面上这类工具已经多如牛毛了。但当我…...