使用SpringBoot+Vue3开发项目(2)---- 设计文章分类的相关接口及页面
目录
一.所用技术栈:
二.后端开发:
1.文章分类列表渲染:
2.新增文章分类:
3.编辑文章分类:
4.删除文章分类 :
5.完整三层架构后端代码:
(1)Controller层:
(2)Service层:
(3)Mapper层:
三.前端开发:
1.路由的使用:
(1)Vue Router的使用:
(2)使用vue-router来实现登录页面与主页面展示效果:
①创建 index.js :
②在 main.js 导入创建的路由器:
(3)子路由的使用:
①添加五个组件
②配置子路由:
③在主页面的展示区声明router-view标签:
④给菜单项设置index属性,设置点击后的路由地址:
2.对于文章分类的前端开发:
(1)导入ArticleCategory.vue文件:
(2)文章分类的前端相关请求开发:
①Pinia状态管理库:
1.在main.js文件导入pinia:
2.定义store状态:
②文章分类列表渲染:
③添加请求拦截器:
④使用拦截器来对未登录统一处理:
(3)新增文章分类:
(4)编辑文章分类与删除:
引言:上篇文章实现了用户的注册以及登录的接口及页面的开发,我们本篇博客讲述设计文章分类的相关接口及页面 =>
一.所用技术栈:
- Vue3
- pinia
- axios
- element-plus
- router(路由)
- SpringBoot
- JWT
二.后端开发:
我们整个布局是下面的样子:

需要我们开发四个接口:
- 文章分类列表渲染
- 新增文章分类
- 编辑文章分类
- 删除文章分类
因为这四个接口是基本的增删改查操作,所以这里不过多强调代码如何写,这里介绍一下参数校验的注解:
①在pojo类内属性上加的注解:
- @NotNull:值不能为空
- @NotEmpty:值不能为空并且不能为空串
- @Email:格式是email邮箱格式
- @Patten(regexp="正则表达式"):判断格式
上面这四个需要在Controller层内参数前加上@Validated注解才能使用。
- @JsonIgnore:返回响应数据会忽略该属性(eg:可以在密码上加来加密)
- @JsonFormat(patten="yyyy-MM-dd HH:mm:ss"):时间格式
上面这两个注解使用时可不用加@Validated注解 。
②在Controller层内参数前加的注解:
- @URL:参数需要是地址格式
而基于上面还是有些不够便捷,我们提出了分组校验的概念,在@NotNull@NotEmpty这两个注解前可加上(groups="接口的字节码")来限定哪些方法会使用,随后我们就再Controller层的参数前注解@Validated(接口的字节码),这样就可以实现分组校验。
如果我们同一个校验项属于多个分组,这样会很麻烦,这个时候我们就可以借助默认分组来处理 =>
若某个校验项没有指定分组,默认属于Default分组,分组之间可以继承,A extends B,那么A中可以拥有B中所有的校验项,所以在@Validated()括号内写继承Default的接口字节码就可以使用默认的校验项。
@Data
public class Category {
//    @NotEmpty(groups = {Add.class,Update.class})@NotEmptyprivate String categoryName;//分类名称
//    @NotEmpty(groups = {Add.class,Update.class})@NotEmptyprivate String categoryAlias;//分类别名//若某个校验项没有指定分组,默认属于Default分组//分组之间可以继承,A extends B,那么A中可以拥有B中所有的校验项public interface Add extends Default {}public interface Update extends Default {}
}
基于上面的注解功能,我们在pojo包下的Category类属性前加上完整注解代码:
@Data
public class Category {@NotNull(groups = Update.class)private Integer id;//主键ID//    @NotEmpty(groups = {Add.class,Update.class})@NotEmptyprivate String categoryName;//分类名称
//    @NotEmpty(groups = {Add.class,Update.class})@NotEmptyprivate String categoryAlias;//分类别名private Integer createUser;//创建人ID@JsonFormat(pattern = "yyyy-MM-dd HH:mm:ss")private LocalDateTime createTime;//创建时间@JsonFormat(pattern = "yyyy-MM-dd HH:mm:ss")private LocalDateTime updateTime;//更新时间//若某个校验项没有指定分组,默认属于Default分组//分组之间可以继承,A extends B,那么A中可以拥有B中所有的校验项public interface Add extends Default {}public interface Update extends Default {}
}
介绍完这个注解开发,我们就可以开发后端接口。
1.文章分类列表渲染:
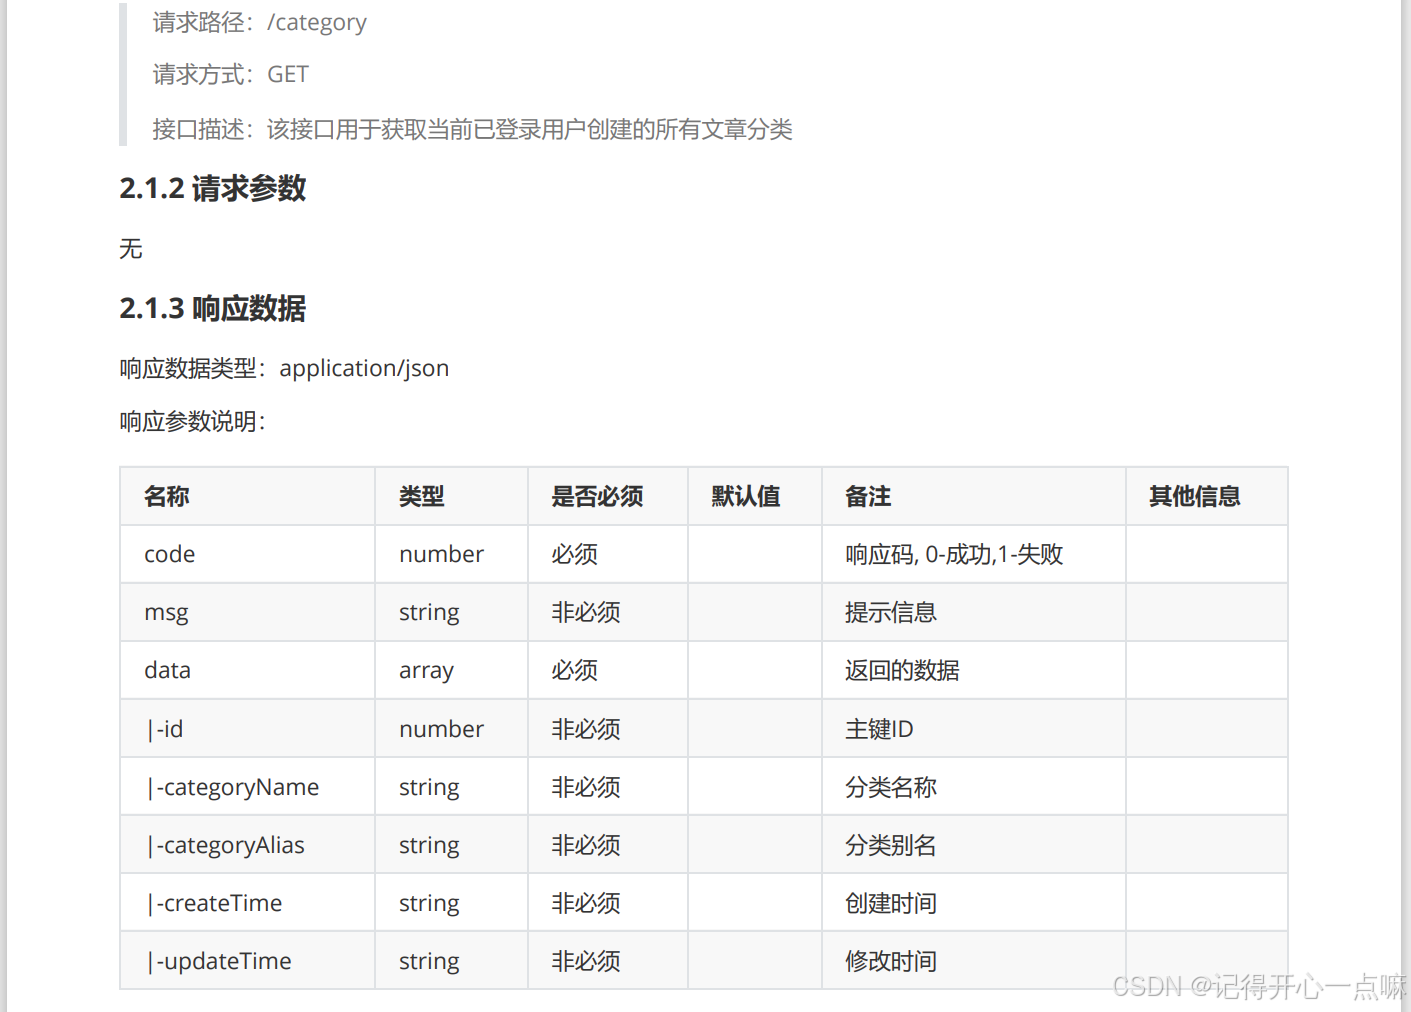
根据文档要求,我们需要返回一个列表,每个元素是一个Category类封装的数据。
2.新增文章分类:
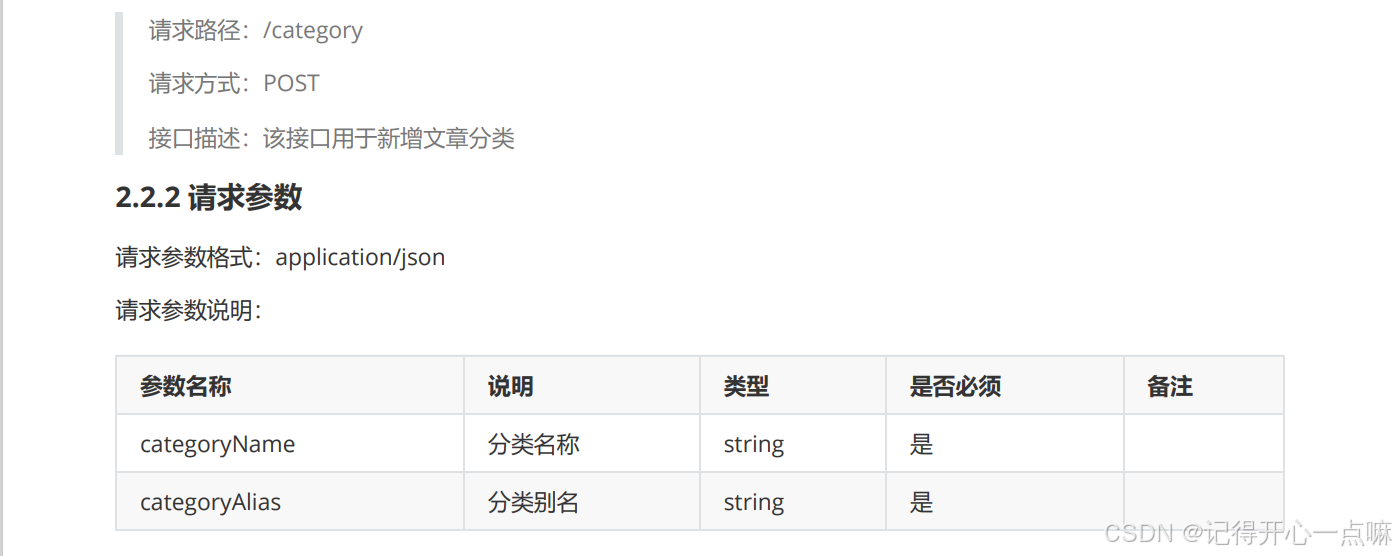
这里新增数据就可以使用@Validated注解来判断数据
根据文档要求,我们只需根据用户 id 保存两个数据值,为了在我们JWT令牌中拿到用户id,我们就会使用ThreadLocal来开辟线程空间存储JWT令牌,如果想使用就可以在线程空间获取JWT令牌中的用户id。
如果不了解ThreadLocal请查看下面博客:使用ThreadLocal来存取单线程内的数据-CSDN博客
Map<String,Object> map = ThreadLocalUtil.get();
Integer userId = (Integer) map.get("id");
category.setCreateUser(userId);
3.编辑文章分类:
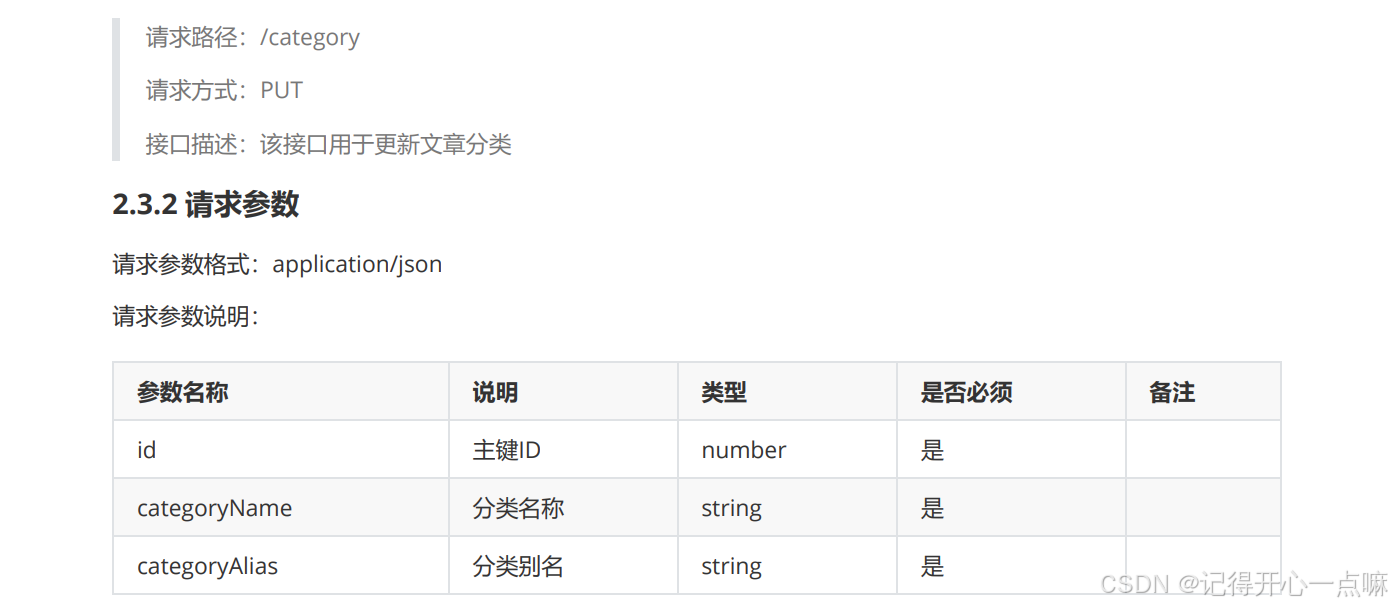
这里更新数据就可以使用@Validated注解来判断数据。
4.删除文章分类 :
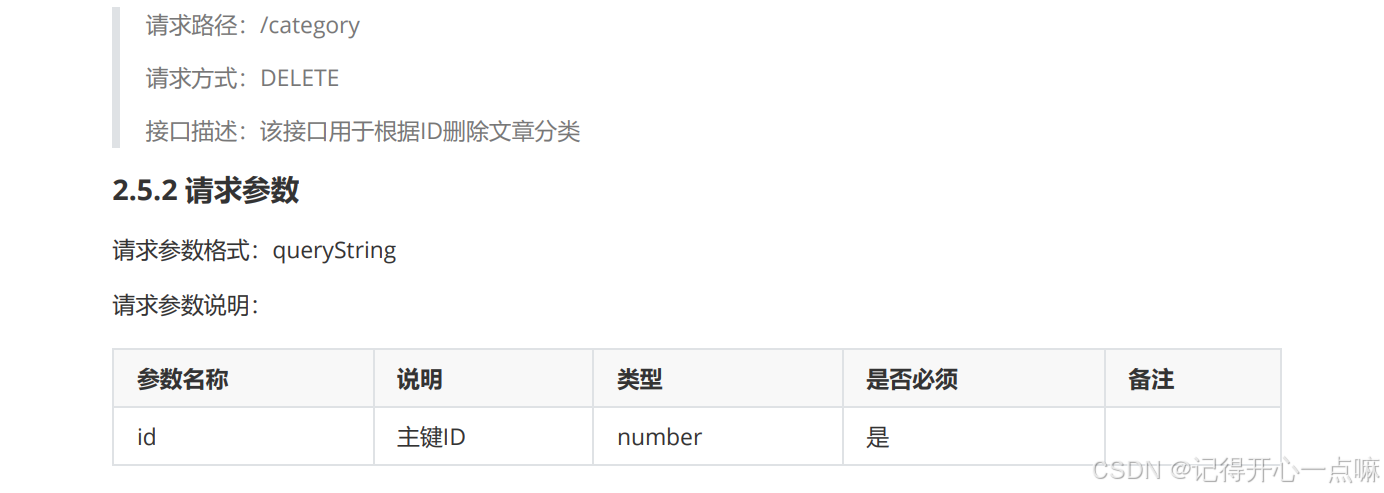
删除就没什么好说的了,这里就不过多强调。
5.完整三层架构后端代码:
(1)Controller层:
@RestController
@RequestMapping("/category")
public class CateController {@Autowiredprivate CategoryService categoryService;@PostMappingpublic Result add(@RequestBody @Validated(Category.Add.class) Category category){categoryService.add(category);return Result.success();}@GetMappingpublic Result<List<Category>> list(){List<Category> list = categoryService.list();return Result.success(list);}@PutMappingpublic Result update(@RequestBody @Validated(Category.Update.class) Category category){categoryService.update(category);return Result.success();}@DeleteMappingpublic Result delete(Integer id){categoryService.deleteById(id);return Result.success();}
}
(2)Service层:
@Service
public class CategoryServiceImpl implements CategoryService {@Autowiredprivate CategoryMapper categoryMapper;@Overridepublic void add(Category category) {category.setCreateTime(LocalDateTime.now());category.setUpdateTime(LocalDateTime.now());Map<String,Object> map = ThreadLocalUtil.get();Integer userId = (Integer) map.get("id");category.setCreateUser(userId);categoryMapper.add(category);}@Overridepublic List<Category> list() {Map<String,Object> map = ThreadLocalUtil.get();Integer userId = (Integer) map.get("id");return categoryMapper.list(userId);}@Overridepublic Category findById(Integer id) {return categoryMapper.findById(id);}@Overridepublic void update(Category category) {category.setUpdateTime(LocalDateTime.now());categoryMapper.update(category);}@Overridepublic void deleteById(Integer id) {categoryMapper.deleteById(id);}
}
(3)Mapper层:
@Mapper
public interface CategoryMapper {@Insert("insert into category(category_name,category_alias,create_user,create_time,update_time)" +" values (#{categoryName},#{categoryAlias},#{createUser},#{createTime},#{updateTime})")void add(Category category);@Select("select * from category where create_user = #{userId}")List<Category> list(Integer userId);@Select("select * from category where id = #{id}")Category findById(Integer id);@Update("update category set category_name = #{categoryName} , category_alias = #{categoryAlias} , update_time = #{updateTime} where id = #{id}")void update(Category category);@Delete("delete from category where id = #{id}")void deleteById(Integer id);
}
三.前端开发:
1.路由的使用:
路由指的是根据不同的访问路径,展示不同组件的内容。
Vue Router 是 Vue.js 的官方路由。
(1)Vue Router的使用:
- 安装vue-router: cnpm install vue-router@4
- 在src/router/index.js中创建路由器,并导出
- 在vue应用实例中使用vue-router
- 声明router-view标签,展示组件内容
(2)使用vue-router来实现登录页面与主页面展示效果:
①创建 index.js :
//导入vue-router
import { createRouter , createWebHistory } from "vue-router";//导入vue组件
import LoginVue from '@/views/Login.vue';
import LayoutVue from "@/views/Layout.vue";//定义路由关系
const routes = [{path:'/login',component: LoginVue},{path:'/',  //设置访问路径component: LayoutVue,  //设置访问路径对应的访问组件}
]//创建路由器
const router = createRouter({history: createWebHistory(), //路由模式routes: routes  //路由关系
})//导出路由器
export default router;
②在 main.js 导入创建的路由器:
import './assets/main.scss'import { createApp } from 'vue'
import ElementPlus from 'element-plus'
import 'element-plus/dist/index.css'
import App from './App.vue'
//导入创建的路由器
//index.js可以省略不写,会默认导入该文件
import router from '@/router'const app = createApp(App);
//将router传递至App.vue
app.use(router)
app.use(ElementPlus);
app.mount('#app')
③在App.vue声明标签:
<script setup></script><template><router-view></router-view>
</template><style></style>这样就可以实现在同一页面显示不同组件。但是这样如果我们登录成功后,不会直接跳转主页面,那么这个时候我们需要通过路由来完成跳转主页面。
//导入路由器
import { useRouter } from 'vue-router';
const router = useRouter();
//通过路由跳转首页
router.push('跳转路径');
所以在login.vue文件内进行操作:
//导入路由器
import { useRouter } from 'vue-router';
const router = useRouter();
//表单数据校验
const login = async()=>{let result = await userLoginService(registerData.value);ElMessage.success(result.msg ? result.msg : '登录成功');//通过路由跳转首页router.push('/');
}
(3)子路由的使用:
为了在我们主页面下展示区点击按钮展示不同的子组件,我们就引入了子路由的知识:
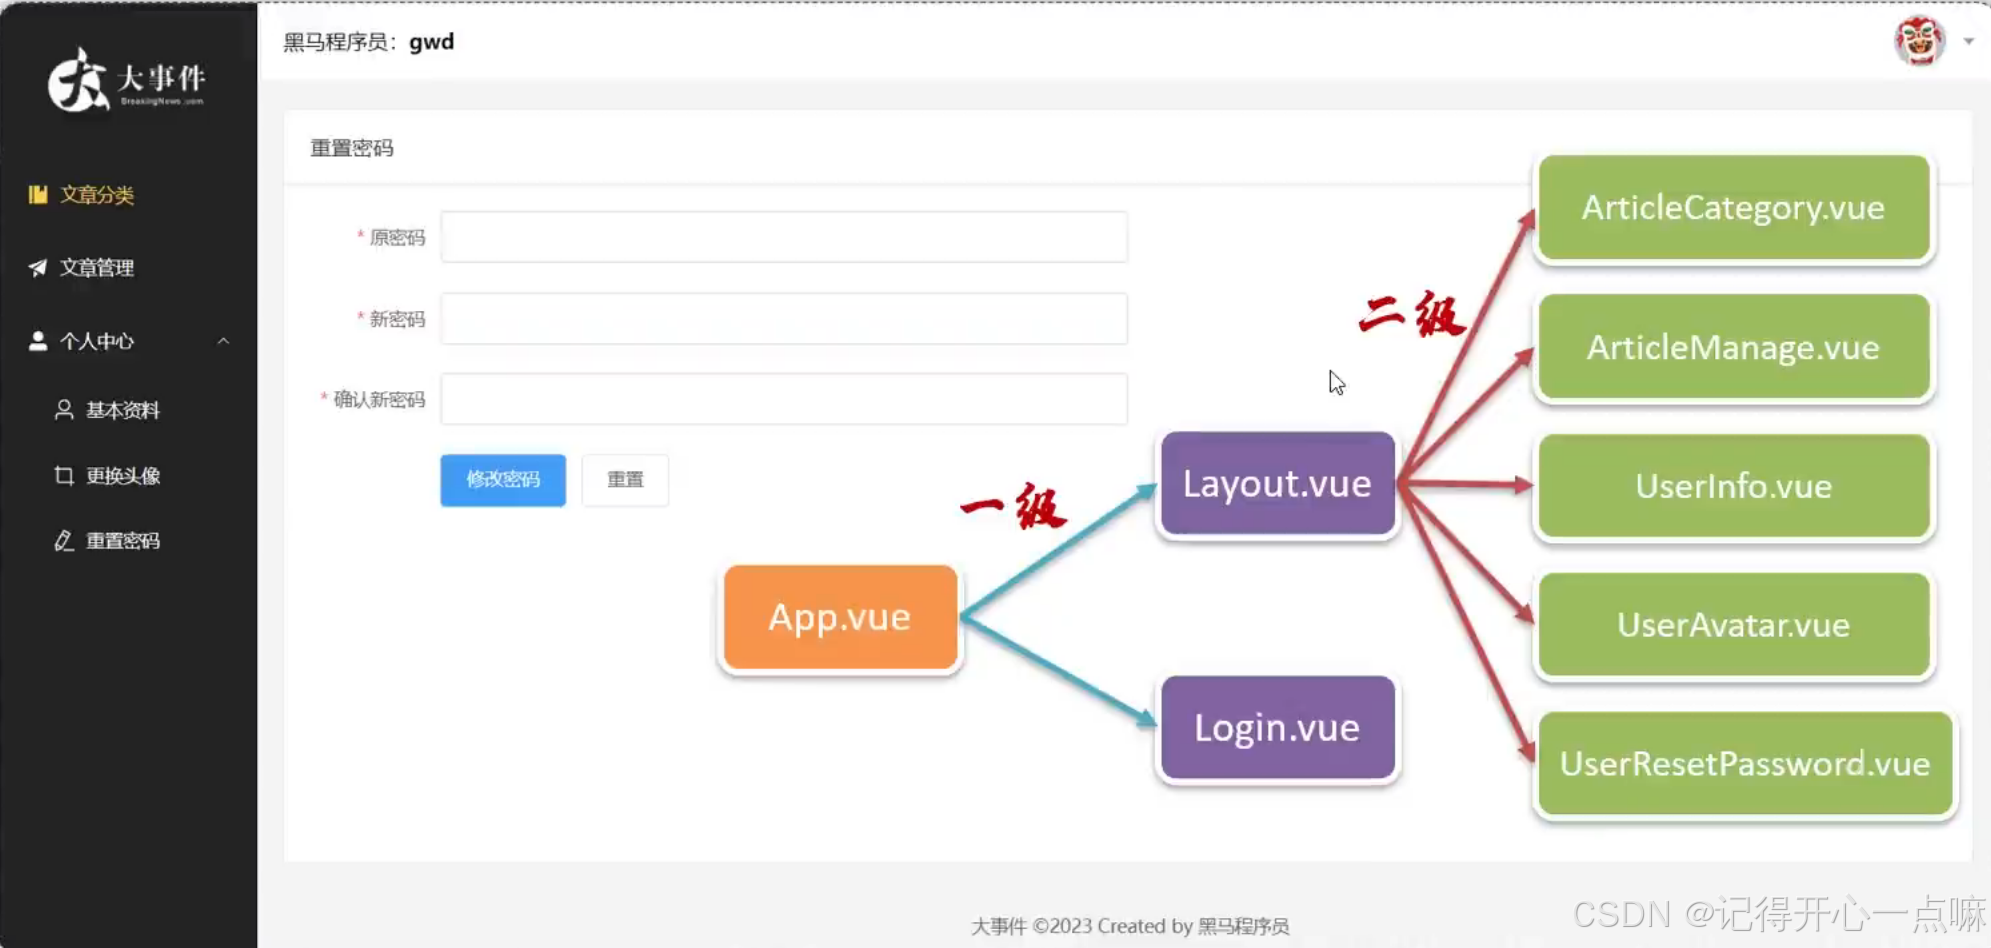
上图是我们的每一级路由关系,我们想将五个vue文件在主页面Layout.vue中的展示区展示,就需要配置子路由 =>
①添加五个组件
②配置子路由:
在内部先定义路由关系,然后创建路由器,最后导出(暴露)路由器。
在路由关系内主页面内部设置 children 属性来声明五个子路由,并且为了不让主页面'/'为空,我们使用 redirect 来将 '/' 地址重定向为 '/article/manage' =>
//导入vue-router
import { createRouter , createWebHistory } from "vue-router";//导入vue组件
import LoginVue from '@/views/Login.vue';
import LayoutVue from "@/views/Layout.vue";
import ArticleCategoryVue from '@/views/article/ArticleCategory.vue'
import ArticleManageVue from '@/views/article/ArticleManage.vue'
import UserAvatarVue from '@/views/user/UserAvatar.vue'
import UserInfoVue from '@/views/user/UserInfo.vue'
import UserResetPasswordVue from '@/views/user/UserResetPassword.vue'//定义路由关系
const routes = [{path:'/login',component: LoginVue},{path:'/',component: LayoutVue,redirect: '/article/manage',  //重定向//子路由children:[{path:'/article/category',component: ArticleCategoryVue},{path:'/article/manage',component: ArticleManageVue},{path:'/user/avatar',component: UserAvatarVue},{path:'/user/info',component: UserInfoVue},{path:'/user/resetPassword',component: UserResetPasswordVue},]}
]//创建路由器
const router = createRouter({history: createWebHistory(), //路由模式routes: routes  //路由关系
})//导出路由器
export default router;
③在主页面的展示区声明router-view标签:
<!-- 中间区域 --><el-main><!-- <div style="width: 1290px; height: 570px;border: 1px solid red;">内容展示区</div> --><!-- 路由 --><router-view></router-view></el-main>④给菜单项设置index属性,设置点击后的路由地址:
这样设置后,当我们点击文字时候就可以自动在我们设置的标签router-view展示区来展示index='地址'中的地址。
<!-- 左侧菜单 -->
<el-aside width="200px"><div class="el-aside__logo"></div><el-menu active-text-color="#ffd04b" background-color="#232323"  text-color="#fff"router><el-menu-item index="/article/category"><el-icon><Management /></el-icon><span>文章分类</span></el-menu-item><el-menu-item index="/article/manage"><el-icon><Promotion /></el-icon><span>文章管理</span></el-menu-item><el-sub-menu ><template #title><el-icon><UserFilled /></el-icon><span>个人中心</span></template><el-menu-item index="/user/info"><el-icon><User /></el-icon><span>基本资料</span></el-menu-item><el-menu-item index="/user/avatar"><el-icon><Crop /></el-icon><span>更换头像</span></el-menu-item><el-menu-item index="/user/resetPassword"><el-icon><EditPen /></el-icon><span>重置密码</span></el-menu-item></el-sub-menu></el-menu>
</el-aside>
所以这样我们就分别对五个vue组件开发就可以了。
2.对于文章分类的前端开发:
(1)导入ArticleCategory.vue文件:
<script setup>
import {Edit,Delete
} from '@element-plus/icons-vue'
import { ref } from 'vue'
const categorys = ref([{"id": 3,"categoryName": "美食","categoryAlias": "my","createTime": "2023-09-02 12:06:59","updateTime": "2023-09-02 12:06:59"},{"id": 4,"categoryName": "娱乐","categoryAlias": "yl","createTime": "2023-09-02 12:08:16","updateTime": "2023-09-02 12:08:16"},{"id": 5,"categoryName": "军事","categoryAlias": "js","createTime": "2023-09-02 12:08:33","updateTime": "2023-09-02 12:08:33"}
])
</script>
<template><el-card class="page-container"><template #header><div class="header"><span>文章分类</span><div class="extra"><el-button type="primary">添加分类</el-button></div></div></template><el-table :data="categorys" style="width: 100%"><el-table-column label="序号" width="100" type="index"> </el-table-column><el-table-column label="分类名称" prop="categoryName"></el-table-column><el-table-column label="分类别名" prop="categoryAlias"></el-table-column><el-table-column label="操作" width="100"><template #default="{ row }"><el-button :icon="Edit" circle plain type="primary" ></el-button><el-button :icon="Delete" circle plain type="danger"></el-button></template></el-table-column><template #empty><el-empty description="没有数据" /></template></el-table></el-card>
</template><style lang="scss" scoped>
.page-container {min-height: 100%;box-sizing: border-box;.header {display: flex;align-items: center;justify-content: space-between;}
}
</style>
我们通过定义响应式数据categorys来动态响应文章分类数据。
设置 :data="categorys" 将categorys数据绑定 table 表格,并 prop 属性来分别把属性绑定到 column 上。
(2)文章分类的前端相关请求开发:
- 文章分类列表渲染
- 新增文章分类
- 编辑文章分类
- 删除文章分类
我们根据上面的四个内容开发 =>
一般我们都会再 js 文件内定义函数然后再vue组件进行使用请求函数。
①Pinia状态管理库:
在article.js文件定义请求函数:
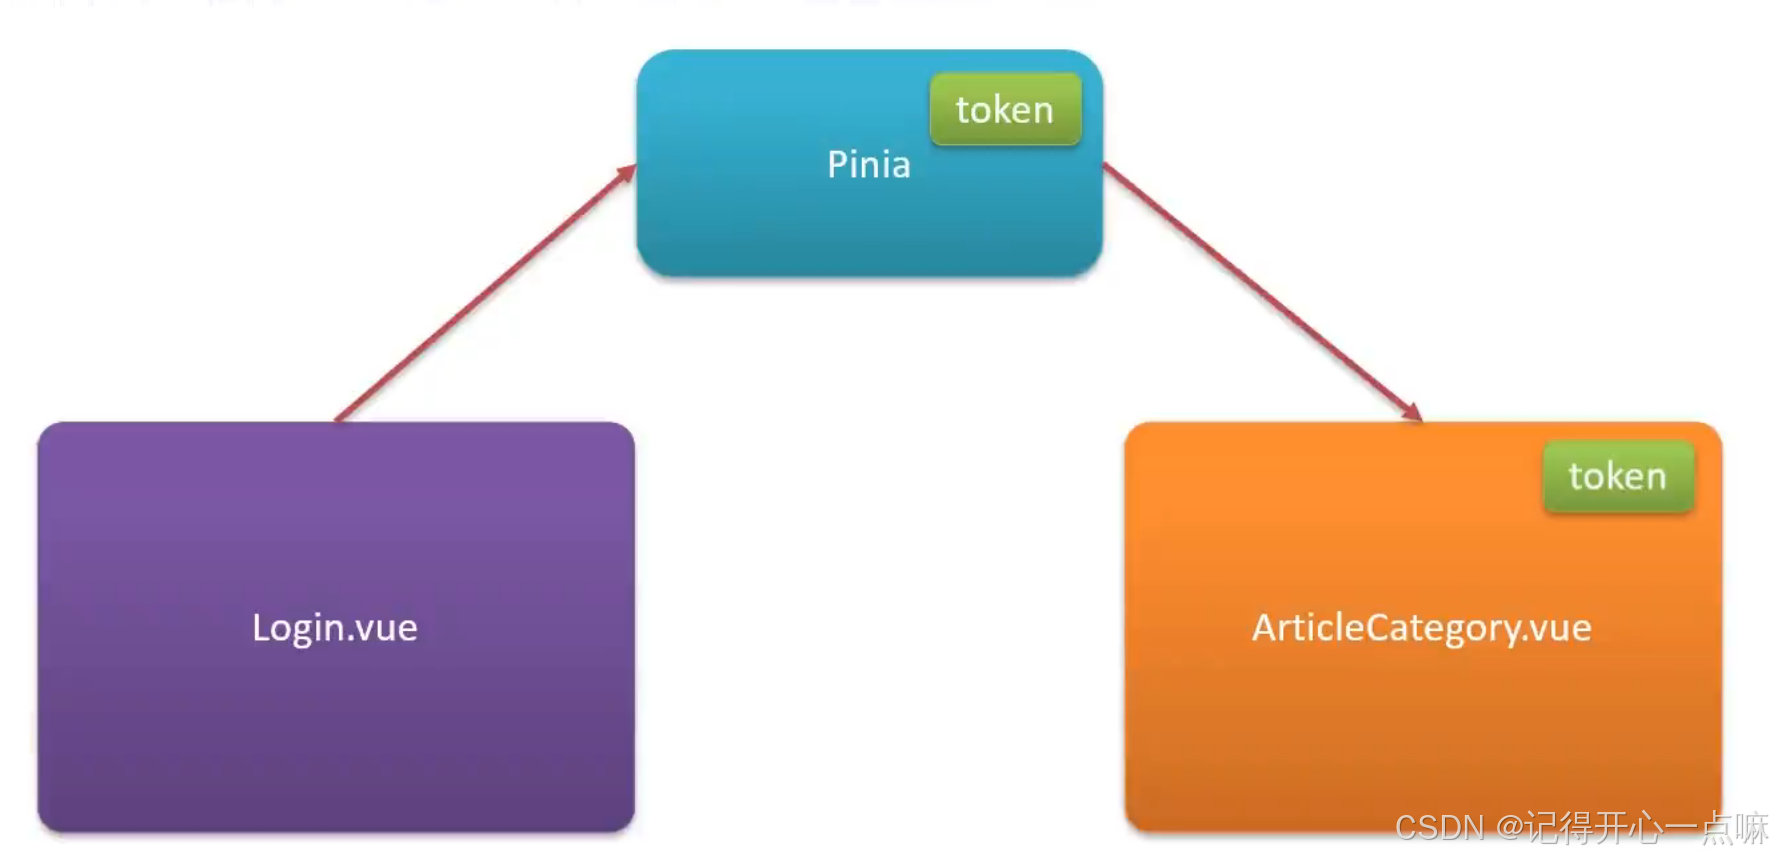
为了传递JWT令牌,我们就会利用Pinia状态管理库,它允许跨组件或页面共享状态。
使用Pinia步骤:
- 安装pinia:cnpm install pinia
- 在vue应用实例中使用pinia
- 在src/stores/token.js中定义store
- 在组件中使用store
1.在main.js文件导入pinia:
这里因为Pinia是默认内存存储,刷新浏览器会丢失数据,我们使用pinia内的Persist插件就可以将Pinia中的数据持久化存储。
为了使用persist,我们需要安装persist:cnpm install pinia-persistedstate-plugin,然后再pinia中使用persist,并且需要再main.js导入一下。
import './assets/main.scss'import { createApp } from 'vue'
import ElementPlus from 'element-plus'
import 'element-plus/dist/index.css'
import App from './App.vue'
import router from '@/router'
import { createPinia } from 'pinia'
import { createPersistedState } from 'pinia-persistedstate-plugin'const app = createApp(App);
//创建createPinia()函数实例
const pinia = createPinia();
const persist = createPersistedState();
pinia.use(persist)
app.use(pinia)
app.use(router)
app.use(ElementPlus);
app.mount('#app')
2.定义store状态:
其实无外乎就是使用defineStore()方法,在方法内部分为两个参数来写 :
第一个参数:名字,确保唯一性。
第二个参数:函数,其内部可以定义状态的所有内容,其内部先创建一个响应式数据,然后设置获取数据以及删除数据的方法,最后返回数据以及方法。加上Persist插件就可以将Pinia中的数据持久化存储。
//定义store
import { defineStore } from "pinia";
import {ref} from 'vue'
/*第一个参数:名字,确保唯一性第二个参数:函数,其内部可以定义状态的所有内容返回值:函数
*/
export const useTokenStore = defineStore('token',()=>{//定义状态内容//1.定义响应式变量const token = ref('');//2.定义函数来修改token值const setToken = (newToken)=>{token.value = newToken;}//3.定义函数来移除token值const removeToken = ()=>{token.value = '';}return {token,setToken,removeToken}
},{persist: true  //因为Pinia是默认内存存储,刷新浏览器会丢失数据,使用Persist插件就可以将Pinia中的数据持久化存储
}
);
这样我们就可以调用定义的useTokenStore来使用pinia了。
②文章分类列表渲染:
我们首先再Login.vue文件中把得到的token存储到pinia中:
//导入store状态
import { useTokenStore } from '@/stores/token.js';
//导入路由器
import { useRouter } from 'vue-router';
const tokenstore = useTokenStore();
const router = useRouter();
//表单数据校验
const login = async()=>{let result = await userLoginService(registerData.value);// alert(result.msg ? result.msg : '登录成功'); ElMessage.success(result.msg ? result.msg : '登录成功');//将得到的token存储到pinia中tokenstore.setToken(result.data);//通过路由跳转首页router.push('/');
}
然后再article.js中定义请求函数:
import request from '@/utils/request.js'
import { useTokenStore } from '@/stores/token.js';export const ArticleCategoryListService = ()=>{const tokenStore = useTokenStore();//在pinia中定义的响应式数据不需要加.value才能使用数据return request.get('/category',{headers:{'Authorization':tokenStore.token}});
}
但是这样我们需要将剩下的请求函数都要传递JWT令牌,代码会很繁琐,这个时候我们就可以添加请求拦截器来使用回调函数来发送。
③添加请求拦截器:
在request.js文件中添加请求拦截器:
import { useTokenStore } from '@/stores/token.js';
//添加请求拦截器
instance.interceptors.request.use((config)=>{//请求前的回调const tokenStore = useTokenStore();if(tokenStore.token){//通过config调用headers获取请求头,在调用Authorization将JWT令牌存放到内部以此来添加统一的请求头config.headers.Authorization = tokenStore.token;}return config;},(err)=>{//请求错误的回调Promise.reject(err);//异步的状态转化成失败的状态}
)
export default instance;
修改article.js文件的请求函数:
import request from '@/utils/request.js'export const ArticleCategoryListService = ()=>{return request.get('/category');
}
④使用拦截器来对未登录统一处理:
为了将没有登录的用户直接打开主界面,随后浏览器直接能跳转到登录页面,我们就可以添加响应拦截器来对未登录统一处理:
在request.js文件中必须通过下面的方式才能导入router进行使用 =>
import router from '@/router';
// import { useRouter } from 'vue-router';
// const router = useRouter();
//在request.js文件中必须通过下面的方式才能导入router进行使用
import router from '@/router'
//添加响应拦截器
instance.interceptors.response.use(result=>{//判断业务状态码if(result.data.code === 0){return result.data;}//操作失败// alert(result.data.message ? result.data.message : '服务异常')ElMessage.error(result.data.message ? result.data.message : '服务异常')//异步操作的状态转换为失败return Promise.reject(result.data);},err=>{//判断响应状态码401if(err.response.status === 401){ElMessage.error('请先登录');//使用路由跳转登录页面router.push('/login');}else{ElMessage.error('服务异常');}return Promise.reject(err);//异步的状态转化成失败的状态}
)
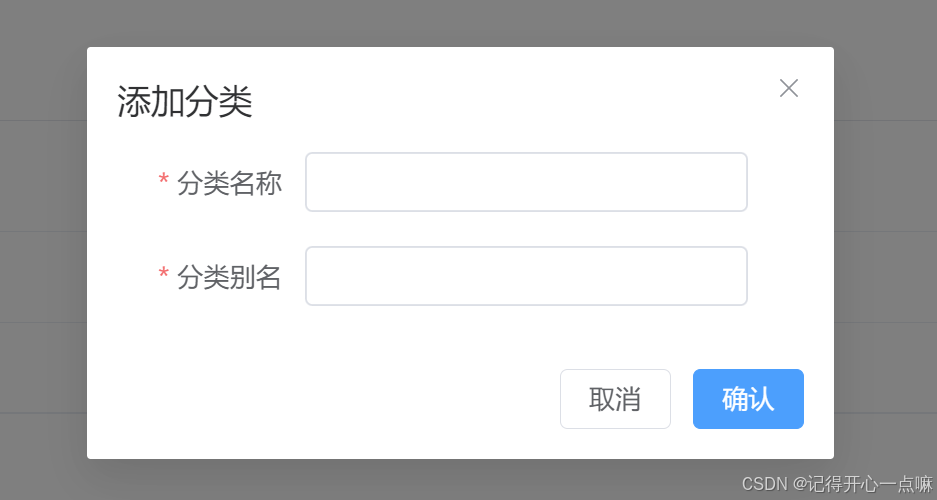
export default instance;(3)新增文章分类:
我们为了实现上面操作,在Article.vue添加组件:
<!-- 添加分类弹窗 -->
<el-dialog v-model="dialogVisible" title="添加弹层" width="30%"><el-form :model="categoryModel" :rules="rules" label-width="100px" style="padding-right: 30px"><el-form-item label="分类名称" prop="categoryName"><el-input v-model="categoryModel.categoryName" minlength="1" maxlength="10"></el-input></el-form-item><el-form-item label="分类别名" prop="categoryAlias"><el-input v-model="categoryModel.categoryAlias" minlength="1" maxlength="15"></el-input></el-form-item></el-form><template #footer><span class="dialog-footer"><el-button @click="dialogVisible = false">取消</el-button><el-button type="primary"> 确认 </el-button></span></template>
</el-dialog>
随后我们通过设置响应式数据来控制添加分类弹窗 =>
//控制添加分类弹窗
const dialogVisible = ref(false)
随后调用点击方法:
//添加分类数据模型
const categoryModel = ref({categoryName: '',categoryAlias: ''
})
//添加分类表单校验
const rules = {categoryName: [{ required: true, message: '请输入分类名称', trigger: 'blur' },],categoryAlias: [{ required: true, message: '请输入分类别名', trigger: 'blur' },]
}
//添加表单
import { ElMessage } from 'element-plus';
const addCategory = async ()=>{//调用接口let result = await ArticleCategoryAddService(categoryModel.value);ElMessage.success(result.message ? result.message : '添加成功');//获取文章分类的函数articleCategoryList();//让添加分类弹窗消失dialogVisible = false;//添加后值消失categoryModel = ref({categoryName: '',categoryAlias: ''})
}
在article.js中:
import request from '@/utils/request.js'export const ArticleCategoryAddService = (categoryData)=>{return request.post('/category',categoryData);
}
(4)编辑文章分类与删除:
在组件内:
我们复用添加的弹框给编辑弹框,在下面点击事件使用三目运算符进行处理。
<script setup>
import {Edit,Delete
} from '@element-plus/icons-vue'
import { ref } from 'vue'
const categorys = ref([]);
//声明异步函数
import { ArticleCategoryListService,ArticleCategoryAddService,ArticleCategoryUpdateService,ArticleCategoryDeleteService } from '@/api/article.js';
const articleCategoryList = async ()=>{let result = await ArticleCategoryListService();categorys.value = result.data;
}
articleCategoryList();
//控制添加分类弹窗
const dialogVisible = ref(false)//添加分类数据模型
const categoryModel = ref({categoryName: '',categoryAlias: ''
})
//添加分类表单校验
const rules = {categoryName: [{ required: true, message: '请输入分类名称', trigger: 'blur' },],categoryAlias: [{ required: true, message: '请输入分类别名', trigger: 'blur' },]
}
//添加表单
import { ElMessage } from 'element-plus';
const addCategory = async ()=>{//调用接口let result = await ArticleCategoryAddService(categoryModel.value);ElMessage.success(result.message ? result.message : '添加成功');//获取文章分类的函数articleCategoryList();//让添加分类弹窗消失dialogVisible = false;//添加后值消失categoryModel = ref({categoryName: '',categoryAlias: ''})
}
//定义变量来控制标题
const title = ref('');
//展示编辑弹窗
const showDialog = (row)=>{dialogVisible.value = true;title.value ='编辑分类';//数据拷贝categoryModel.value.categoryName = row.categoryName;categoryModel.value.categoryAlias = row.categoryAlias;//扩展id属性,将来需要传递给后台完成分类的修改categoryModel.value.id = row.id;
}
//编辑分类
const updateCategory = ()=>{let result  = ArticleCategoryUpdateService(categoryModel.value);ElMessage.success(result.message ? result.message : '修改成功');articleCategoryList();dialogVisible.value = false;
}
//清空
const clearData = ()=>{categoryModel.value.categoryName = '';categoryModel.value.categoryAlias = '';
}
//删除分类
import { ElMessageBox } from 'element-plus'
const deleteCategory = (row)=>{//提示用户ElMessageBox.confirm('确认要删除该分类信息吗?','温馨提示',{confirmButtonText: '确认',cancelButtonText: '取消',type: 'warning',center: true,}).then(async () => {let result = await ArticleCategoryDeleteService(row.id); ElMessage({type: 'success',message: '删除成功',})articleCategoryList();}).catch(() => {ElMessage({type: 'info',message: '取消删除',})})
}
</script>
<template><el-card class="page-container"><template #header><div class="header"><span>文章分类</span><div class="extra"><el-button type="primary" @click="dialogVisible = true;title = '添加分类';clearData()">添加分类</el-button></div></div></template><el-table :data="categorys" style="width: 100%"><el-table-column label="序号" width="100" type="index"> </el-table-column><el-table-column label="分类名称" prop="categoryName"></el-table-column><el-table-column label="分类别名" prop="categoryAlias"></el-table-column><el-table-column label="操作" width="100"><template #default="{ row }"><el-button :icon="Edit" circle plain type="primary" @click="showDialog(row)" ></el-button><el-button :icon="Delete" circle plain type="danger" @click="deleteCategory(row)"></el-button></template></el-table-column><template #empty><el-empty description="没有数据" /></template></el-table><!-- 添加分类弹窗 --><el-dialog v-model="dialogVisible" :title="title" width="30%"><el-form :model="categoryModel" :rules="rules" label-width="100px" style="padding-right: 30px"><el-form-item label="分类名称" prop="categoryName"><el-input v-model="categoryModel.categoryName" minlength="1" maxlength="10"></el-input></el-form-item><el-form-item label="分类别名" prop="categoryAlias"><el-input v-model="categoryModel.categoryAlias" minlength="1" maxlength="15"></el-input></el-form-item></el-form><template #footer><span class="dialog-footer"><el-button @click="dialogVisible = false">取消</el-button><el-button type="primary" @click="title ==='添加分类' ? addCategory() : updateCategory()"> 确认 </el-button></span></template></el-dialog></el-card>
</template><style lang="scss" scoped>
.page-container {min-height: 100%;box-sizing: border-box;.header {display: flex;align-items: center;justify-content: space-between;}
}
</style>
在article.js完整代码:
import request from '@/utils/request.js'
// import { useTokenStore } from '@/stores/token.js';export const ArticleCategoryListService = ()=>{//在请求拦截器添加了JWT令牌到请求头中return request.get('/category');
} export const ArticleCategoryAddService = (categoryData)=>{return request.post('/category',categoryData);
}//文章分类编辑
export const ArticleCategoryUpdateService = (categoryData)=>{return request.put('/category',categoryData);
}//文章分类删除
export const ArticleCategoryDeleteService = (id)=>{return request.delete('/category?id='+id)
}
好了,今天的内容就到这里了,下期继续更新大事件项目前后端开发,感谢收看!!!
相关文章:
使用SpringBoot+Vue3开发项目(2)---- 设计文章分类的相关接口及页面
目录 一.所用技术栈: 二.后端开发: 1.文章分类列表渲染: 2.新增文章分类: 3.编辑文章分类: 4.删除文章分类 : 5.完整三层架构后端代码: (1)Controller层:…...

Layui---toolbar与 tool的区别
table.on(toolbar): table.on(toolbar): 这个事件监听器是用来处理表格工具栏的事件。工具栏通常位于表格的上方,可以包含添加、删除、导出等按钮。当用户与这些工具栏中的按钮交互时,比如点击一个按钮来添加新行或者进行搜索操作,…...

U-Net++原理与实现(含Pytorch和TensorFlow源码)
U-Net原理与实现 引言1. U-Net简介1.1 编码器(Encoder)1.2 解码器(Decoder)1.3 跳跃连接(Skip Connections) 2. U-Net详解2.1 密集跳跃连接2.2 嵌套和多尺度特征融合2.3 参数效率和性能2.4 Pytorch代码2.5 …...

产品心理学:啦啦队效应
电视里我们常会看见这样一个场景,一群女孩穿着短裙有说有笑地在大街上走过,把路人们都看傻了,其实单个来看,她们的长相并不出众,可是凑在一起就显得青春貌美,这就是“啦啦队效应”——cheerleader effect。…...

AC+AP组网
配置DHCP Switch1 <Huawei>sys [Huawei]undo in en [Huawei]vlan batch 10 20 30 40[Huawei]int vlan 10 [Huawei-Vlanif10]ip add 192.168.10.1 24 [Huawei-Vlanif10]quit[Huawei]int vlan 20 [Huawei-Vlanif20]ip add 192.168.20.1 24 [Huawei-Vlanif20]quit[Huawei]…...

2024.8.05(glibc的安装及MySQL的安全用户角色权限)
一、glibc的安装 1、清空/etc目录下的my.cnf [rootlocalhost ~]# ls -l /etc/my.cnf -rw-r--r--. 1 root root 570 6月 8 2017 /etc/my.cnf [rootlocalhost ~]# rm -rf /etc/my.cnf 2、删除mariadb [rootlocalhost ~]# yum -y remove mariadb [rootlocalhost ~]# find / -na…...

【精选】6款一键生成论文的软件3000字论文网站
千笔-AIPassPaPer是一款功能强大且全面的AI论文写作工具,特别适合学术研究者和学生使用。它不仅能够一键生成高质量的论文初稿,还涵盖了700多个学科专业方向,满足各种学术需求。 一、千笔-AIPassPaPer 传送门:https://www.aipape…...

如何使用 PHP Simple HTML DOM Parser 轻松获取网页中的特定数据
背景介绍 网页数据的抓取已经成为数据分析、市场调研等领域的重要工具。无论是获取产品价格、用户评论还是其他公开数据,网页抓取技术都能提供极大的帮助。今天,我们将探讨如何使用 PHP Simple HTML DOM Parser 轻松获取网页中的特定数据。PHP Simple H…...

Linux笔记 --- 传统链表
目录 链表 单向链表 单向循环链表 双向链表 设计表 初始化 在auchor后插入节点, 在auchor前插入节点 删除节点 传统链表 通过使用链表我们可以将一个数组中的数据分开到不同位置存放并使用指针指向他们,使之逻辑相连,解决了顺序存储所需要…...

C语言的编译(预处理操作)+链接
目录 翻译环境和执行环境 预定义符号 #define定义标识符 续行符\ #define定义宏 再说一下,#define其实就是替换 #和## 宏和函数的对比 命名约定 #undef 命令行定义 条件编译 文件包含 避免头文件重复引用,否则会增加代码长度 翻译环境和执行环境 在C中存…...

FFmpeg实战 - 解复用与解码
大纲目录 文章目录 前置知识音视频基础概念解复用、解码的流程分析FFMPEG有8个常用库 常见音视频格式的介绍aac格式介绍(ADTS)h264格式分析FLV和MP4格式介绍 FFmpeg解码解封装实战数据包和数据帧(AVPacket/AVFrame)AVPacket/AVFra…...

8.5作业
1.思维导图 2.提示并输入一个字符串,统计该字符中大写、小写字母个数、数字个数、空格个数以及其他字符个数,要求使用C风格字符串完成 #include <iostream>using namespace std;int main() {string str;cout << "请输入一个字符串&quo…...

【问题】C++:有哪些类型的智能指针,区别?
智能指针是一种在 C 中管理动态分配内存的工具,可以帮助避免内存泄漏和提高程序的安全性。在 C11 标准引入之后,C 提供了三种主要类型的智能指针,它们分别是 std::unique_ptr、std::shared_ptr 和 std::weak_ptr。这些智能指针有不同的所有权…...

Go-反射
概念 在Go语言中,反射(reflection)是指在运行时检查程序的结构、变量和接口的机制。可以通过反射获取和修改变量的值、获取变量的类型信息、调用方法等操作。 反射主要由reflect包提供,它定义了两个重要的类型:Type和…...

【深度学习】DeepSpeed,ZeRO 数据并行的三个阶段是什么?
文章目录 ZeRO实验实验设置DeepSpeed ZeRO Stage-2 实验性能比较进一步优化DeepSpeed ZeRO Stage-3 和 CPU 卸载结论ZeRO ZeRO(Zero Redundancy Optimizer)是一种用于分布式训练的大规模深度学习模型的优化技术。它通过分片模型状态(参数、梯度和优化器状态)来消除数据并行…...

代码随想录算法训练营第三十六天 | 1049. 最后一块石头的重量 II、494. 目标和、474.一和零
一、1049. 最后一块石头的重量 II 题目链接:1049. 最后一块石头的重量 II - 力扣(LeetCode) 文章讲解:代码随想录 (programmercarl.com)——1049. 最后一块石头的重量 II 视频讲解:动态规划之背包问题,这个…...

Pandas行列变换指南:数据重塑的艺术
数据分析中,数据的形态至关重要。pandas库提供了一系列工具,让我们能够轻松地重塑数据。以下是一些常见的pandas行列变换方法,每种方法都配有完整的代码示例。 环境准备 首先,确保你的环境中安装了pandas和numpy库: …...

1.MySQL面试题之innodb如何解决幻读
1. 写在前面 在数据库系统中,幻读(Phantom Read)是指在一个事务中,两次读取同一范围的数据集时,由于其他事务的插入操作,导致第二次读取结果集发生变化的问题。InnoDB 作为 MySQL 的一个存储引擎ÿ…...

Nginx中$http_host、$host、$proxy_host的区别
知识巩固! 网上看到这篇文章,这里转载记录一下。 简介 变量是否显示端口值是否存在 host 浏览器请求的ip,不显示端口 否 "Host:value"显示 值为a:b的时候,只显示a http_host 浏览器请求的ip和端口号 是"Host:v…...

C# Unity 面向对象补全计划 七大原则 之 里氏替换(LSP) 难度:☆☆☆ 总结:子类可以当父类用,牛马是马,骡马也是马
本文仅作学习笔记与交流,不作任何商业用途,作者能力有限,如有不足还请斧正 本系列作为七大原则和设计模式的进阶知识,看不懂没关系 请看专栏:http://t.csdnimg.cn/mIitr,尤其是关于继承的两篇文章ÿ…...

Hitboxer:开源SOCD清理工具,3分钟提升游戏操作精准度
Hitboxer:开源SOCD清理工具,3分钟提升游戏操作精准度 【免费下载链接】socd Key remapper for epic gamers 项目地址: https://gitcode.com/gh_mirrors/so/socd 你是否在激烈的游戏对抗中经历过这样的挫败:同时按下左右方向键时角色卡…...

从多路复用到三维光阵:Arduino驱动8x8x8 LED立方体全解析
1. 项目概述:用Arduino点亮一个三维世界几年前,我第一次在创客展上看到一个8x8x8的LED立方体,那种由数百个光点构成的、在三维空间中流动的动画效果,瞬间就把我吸引住了。它不像普通的平面LED屏,而是真正有“深度”的光…...
)
别再只测accuracy!DeepSeek集成测试必须监控的5个隐性指标(P99首token延迟、context bleed率、tool-call schema漂移)
更多请点击: https://intelliparadigm.com 第一章:DeepSeek集成测试的核心范式演进 DeepSeek大模型的工程化落地对集成测试提出了全新挑战:传统基于接口响应码与字段校验的测试范式已难以覆盖语义一致性、推理链鲁棒性、上下文敏感度等高阶质…...

长期使用Taotoken聚合服务对项目月度账单的可预测性提升
🚀 告别海外账号与网络限制!稳定直连全球优质大模型,限时半价接入中。 👉 点击领取海量免费额度 长期使用Taotoken聚合服务对项目月度账单的可预测性提升 在AI驱动的项目开发与运营中,成本控制与预算规划是团队管理者…...

MySQL GROUP BY 原理与优化
我刚工作的时候,有次统计每个用户的订单总金额,写了 SELECT user_id, SUM(amount) FROM orders GROUP BY user_id,结果执行了 60 秒还没出结果。DBA 帮我一看执行计划,发现没走索引,导致 Using temporary(用…...

2026年一键生成论文工具对比实测:5款神器从选题到格式全流程护航
写论文的焦虑,是每个科研人和学生都心照不宣的“隐形压力”。选题无从下手,文献检索耗时费力,逻辑框架反复推翻,格式排版让人抓狂,查重降重更是像在和系统玩“猫鼠游戏”。2026年的AI工具早已不是过去那种“打字机”&a…...

FairyGUI Unity鼠标悬停与点击对象获取原理与实战
1. 这不是“加个OnMouseEnter就能用”的事:FairyGUI在Unity中处理鼠标交互的真实困境很多人第一次在Unity里集成FairyGUI,想实现“鼠标悬停显示提示”或“点击高亮当前按钮”,下意识就去翻Unity的MonoBehaviour文档,找OnMouseEnte…...

PCL 基于强度的双边滤波【2026最新版】
目录 一、算法原理 1、计算步骤 2、算法源码 3、函数解析 4、参考文献 二、代码实现 三、结果展示 四、滤波后未发生变化的原因 五、解决办法 六、结果展示 七、相关链接 本文由CSDN点云侠原创,博客长期更新,本文最近一次更新时间为:2026年5月24日。 一、算法原理 1、计算…...

基于IRS2092的200W D类功放设计:从PWM原理到保护电路实战
1. 项目概述与核心思路折腾音响功放,从经典的AB类玩到D类,感觉就像是从燃油车换到了电动车,动力响应和效率完全是两个维度。这次要聊的这块“200W Class-D Audio Power Amplifier [150115]”单板功放,就是一个非常典型的D类功放设…...

终极歌词同步神器LRCGET:5分钟为你的音乐库添加完美歌词
终极歌词同步神器LRCGET:5分钟为你的音乐库添加完美歌词 【免费下载链接】lrcget Utility for mass-downloading LRC synced lyrics for your offline music library. 项目地址: https://gitcode.com/gh_mirrors/lr/lrcget 你是否厌倦了在听歌时手动搜索歌词…...