【物联网设备端开发】ESP开发工具:QEMU的使用方法
概要
本文提供了一些运行QEMU的ESP特定说明。有关QEMU的一般使用问题,请参阅官方文档:https://www.qemu.org/documentation/.
编译 QEMU
准备工作
在此之前,请查看有关构建先决条件的QEMU文档。如果你在Linux主机上构建QEMU,你可以参考 这篇文章.
请确保您的系统上安装了libgcrypt ( Ubuntu 中的libgcrypt-devel, Arch 中的 libgcrypt, macOS Homebrew 中的libgcrypt ).
配置
要生成 ninja 构建文件,我们需要先配置项目,可以使用以下命令:
./configure --target-list=xtensa-softmmu \--enable-gcrypt \--enable-slirp \--enable-debug --enable-sanitizers \--enable-sdl \--disable-strip --disable-user \--disable-capstone --disable-vnc \--disable-gtk
为了减少第一次编译时间,可以添加的 --disable 选项。可启用或禁用的选项的完整列表可以通过 ./configure --help 命令获取。
If you need a graphical interface for the virtual machine, make sure to provide --enable-sdl or --enable-gtk or both.
如果您需要虚拟机的图形界面,请添加 --enable-sdl 或 --enable-gtk配置,或两者都添加。
编译
成功配置项目后,可以使用 ninja 来构建它:
ninja -C build
编译可能需要几分钟,具体取决于之前启用或禁用的组件。编译完成后,会创建build/qemu-system-xtensa 可执行文件。
编译ESP-IDF程序进行仿真
QEMU for ESP32 target is ready, it already includes the first stage bootloader, located on the ROM on the real chip, which is mainly responsible for initializing the peripherals, like the UART and, more importantly, the SPI Flash. The latter must contain the second stage bootloader and the program to run.
Thus, in this section, we are going to create a flash image that combines the (second stage) bootloader, the partition table and the application to run. This can be done using esptool.py merge_bin command, supported in esptool.py 3.1 or later. Let’s suppose that the ESP-IDf project has just been compiled successfully, the following commands will create that flash image:
cd build
esptool.py --chip esp32 merge_bin --fill-flash-size 4MB -o flash_image.bin @flash_args
Here, flash_args is a file generated by ESP-IDF build system in the build directory, it contains the list of names of binary files and corresponding flash addresses. merge_bin command takes this list and creates the binary image of the whole flash. --fill-flash-size 4MB argument specifies the total flash size.
ESP32 target in QEMU supports flash of size 2, 4, 8 and 16MB, creating an image with any other size will result in an error.
Notes
-
For “Secure Boot” feature in ESP-IDF, we recommend separate command to flash bootloader and hence
flash_argsfile do not have corresponding entry. However, you may modifyflash_argsfile to add entry forbootloader.binas per below:0x1000 bootloader/bootloader.bin -
It is also possible to use
esptool.pyto “flash” the application into QEMU, but QEMU needs to be started with the right strapping mode. See Bootstrapping Mode section below for more info.
Run QEMU
Without attaching GDB
If you don’t need to debug the guest application, you can execute QEMU without attaching GDB to it:
build/qemu-system-xtensa -nographic \-machine esp32 \-drive file=flash_image.bin,if=mtd,format=raw
Where flash_image.bin is the SPI flash image generated previously.
With GDB server, waiting for a connection
If you need to debug the guest application, you can execute QEMU with -s -S options. This tells QEMU not to start the CPU after initializing the virtual machine. It will wait for a connection from a GDB client:
build/qemu-system-xtensa -nographic -s -S \-machine esp32 \-drive file=flash_image.bin,if=mtd,format=raw
Where flash_image.bin is the SPI flash image generated previously.
Then, to connect the GDB client, use the following command:
xtensa-esp32-elf-gdb build/app-name.elf \-ex "target remote :1234" \-ex "monitor system_reset" \-ex "tb app_main" -ex "c"
The last line sets a breakpoint in app_main function of the guest application and starts the virtual CPU with c. If you need to put a breakpoint in any other functions or if you don’t need to start the CPU directly, please adapt this last line.
GDB and toolchain compatibility
If you are using esp2021r1 or an earlier toolchain release, GDB may report the following error when connecting to QEMU:
Remote 'g' packet reply is too long (expected 420 bytes, got 628 bytes):
In that case, you need to set the following environment variable beforehand:
export QEMU_XTENSA_CORE_REGS_ONLY=1
When this environment variable is set, QEMU will only send the values of non-privileged registers to GDB.
If you are using later releases of Xtensa toolchain, i.e. esp-2021r2 and later, GDB will work out-of-the-box, without the need to set this environment variable.
Hardware crypto support
Starting from IDF 4.1, the following hardware crypto features are enabled by default: AES, SHA, RSA.
All of them are implemented in QEMU for ESP32 target. However, please note that the SHA emulation currently doesn’t support concurrent operations with different SHA types.
Ethernet support
Support for Opencores Ethernet MAC in ESP-IDF is added in https://github.com/espressif/esp-idf/commit/31dac92e5f0daac98190fd603df213a0a25a3807.
- When running
protocolsexamples, enableCONFIG_EXAMPLE_CONNECT_ETHERNETandCONFIG_EXAMPLE_USE_OPENETH. - When running a custom app, enable
CONFIG_ETH_USE_OPENETHand initialize the Ethernet driver as it is done in examples/common_components/protocol_examples_common/connect.c (look foresp_eth_mac_new_openeth).
When starting QEMU, use open_eth network device.
User mode networking
For example, to start networking in user mode (TCP/UDP only, emulated device is behind NAT), add the following option to the QEMU command line:
-nic user,model=open_eth
Some ESP projects (specifically running TCP listeners) might need port forwarding to be setup,
-nic user,model=open_eth,id=lo0,hostfwd=tcp:127.0.0.1:PORT_HOST-:PORT_GUEST
(e.g. asio-echo-server sets up a server on 2222 by default, so hostfwd=tcp:127.0.0.1:2222-:2222 enables to nc localhost 2222 from host machine)
Bridge/tap networking
- Tap networking
Specifying bootstrapping mode
To specify the desired strapping mode, it is necessary to add the following argument when running QEMU:
-global driver=esp32.gpio,property=strap_mode,value=0x0f
This sets the value of GPIO_STRAP register.
- Use
0x12for flash boot mode (default) - Use
0x0ffor UART-only download mode (since the SDIO part is not implemented)
Specifying eFuse storage
Add extra arguments to the command line:
-drive file=qemu_efuse.bin,if=none,format=raw,id=efuse
-global driver=nvram.esp32.efuse,property=drive,value=efuse
The first argument creates a block device backed by qemu_efuse.bin file, with identifier efuse. The second line configures nvram.esp32.efuse device to use this block device for storage.
The file must be created before starting QEMU:
dd if=/dev/zero bs=1 count=124 of=/tmp/qemu_efuse.bin
124 bytes is the total size of ESP32 eFuse blocks.
Note
Specifying eFuse storage is mandatory to test out any platform security features like “Secure Boot” or “Flash Encryption”.
Emulating ESP32 ECO3
For the application to detect the emulated chip as ESP32 ECO3, the following virtual efuses must be set:
- CHIP_VER_REV1
- CHIP_VER_REV2
Here is the corresponding efuse file (in hexadecimal, produced using xxd -p):
000000000000000000000000008000000000000000001000000000000000
000000000000000000000000000000000000000000000000000000000000
000000000000000000000000000000000000000000000000000000000000
000000000000000000000000000000000000000000000000000000000000
00000000
To convert this (efuse.hex) back to binary, run xxd -r -p efuse.hex qemu_efuse.bin.
Alternatively, these bits can be set using espefuse:
espefuse.py --port=socket://localhost:5555 burn_efuse CHIP_VER_REV1
espefuse.py --port=socket://localhost:5555 burn_efuse CHIP_VER_REV2
Disabling the watchdogs
By default, Timer Group watchdog timers are emulated, and TG0 WDT is enabled at reset. It is sometimes useful to disable these watchdog timers. This can be done by adding the following to the command line:
-global driver=timer.esp32.timg,property=wdt_disable,value=true
This disables the emulation of TG watchdog timers. Even if the application configures them, they will not fire.
The RTC watchdog timer is not emulated yet, so it doesn’t need to be disabled.
Using esptool.py and espefuse.py to interact with QEMU
-
Start QEMU:
build/qemu-system-xtensa -nographic \-machine esp32 \-drive file=flash_image.bin,if=mtd,format=raw \-global driver=esp32.gpio,property=strap_mode,value=0x0f \-drive file=qemu_efuse.bin,if=none,format=raw,id=efuse \-global driver=nvram.esp32.efuse,property=drive,value=efuse \-serial tcp::5555,server,nowaitThe final line redirects the emulated UART to TCP port 5555 (QEMU acts as a server).
Type q and press Enter at any time to quit.
-
Run esptool.py:
esptool.py -p socket://localhost:5555 flash_idFlashing with
idf.pyalso works:export ESPPORT=socket://localhost:5555 idf.py flash -
Or, run espefuse.py:
espefuse.py --port socket://localhost:5555 --do-not-confirm burn_custom_mac 00:11:22:33:44:55
Note: esptool can not reset the emulated chip using the RTS signal, because the state of RTS is not transmitted over TCP to QEMU. To reset the emulated chip, run system_reset command in QEMU console (started at step 1).
Specifying ROM ELF file
If -kernel and -bios arguments are not given, ESP32 (rev. 3) ROM code will be loaded. This ROM code binary is included in the repository. To specify the ROM code ELF file to load, pass the filename with a -bios <filename> argument.
Using flash encryption
Self-encryption workflow
- In the IDF application, enable
CONFIG_SECURE_FLASH_ENC_ENABLEDthroughmenuconfig, and build it - Build the flash image as per the instructions from the Compiling the ESP-IDF program to emulate section.
- Create
qemu_efuse.binas highlighted in the Specifying eFuse storage section. - Execute
qemu-system-xtensausing the following command:build/qemu-system-xtensa -nographic -machine esp32 \-drive file=/path/to/qemu_efuse.bin,if=none,format=raw,id=efuse \-global driver=nvram.esp32.efuse,property=drive,value=efuse \-drive file=/path/to/flash_image.bin,if=mtd,format=raw \-global driver=timer.esp32.timg,property=wdt_disable,value=true
Adding PSRAM
QEMU “memory size” option can be used to enable PSRAM emulation. By default, no PSRAM is added to the machine. You can add 2MB or 4MB PSRAM using -m 2M or -m 4M command line options, respectively.
Note that PSRAM MMU is not emulated yet, so things like bank switching (himem in IDF) do not work.
Using SD cards
QEMU emulates SD/MMC host controller used in ESP32. To add an SD card to the system, create an image and pass it to QEMU.
-
Create a raw image file, for example, 64 MB:
$ dd if=/dev/zero bs=$((1024*1024)) count=64 of=sd_image.bin -
Add the following argument when running QEMU:
-drive file=sd_image.bin,if=sd,format=raw
If you need to create a large SD card image, it is recommended to use sparse cqow2 images instead of raw ones. Consult QEMU manual about qemu-img tool for details.
Only one SD card is supported at a time. You can use either slot 0 or slot 1 of the SD/MMC controller in the application code.
Enabling graphical user interface (GUI)
The ESP32 QEMU implementation implements a virtual RGB panel, absent on the real hardware, that can be used to show graphical interface. It is associated to a virtual frame buffer that can be used to populate the pixels to show. It is also possible to use the target internal RAM as a frame buffer.
To enable the graphical interface, while keeping the serial output in the console, use the following command line:
build/qemu-system-xtensa \-machine esp32 \-drive file=flash_image.bin,if=mtd,format=raw-display sdl \-serial stdio
If gtk backend was enabled when compiling QEMU, it is possible to replace -display sdl with -display gtk
相关文章:

【物联网设备端开发】ESP开发工具:QEMU的使用方法
概要 本文提供了一些运行QEMU的ESP特定说明。有关QEMU的一般使用问题,请参阅官方文档:https://www.qemu.org/documentation/. 编译 QEMU 准备工作 在此之前,请查看有关构建先决条件的QEMU文档。如果你在Linux主机上构建QEMU,你…...

c++中std::endl 和“\n“ 这两个换行符有什么区别
std::endl 和 "\n" 都用于在C中生成换行符,但它们之间有一些重要的区别 std::endl: 功能:输出一个换行符,并刷新输出流(即缓冲区)。作用:确保所有数据立即输出到目的地,例…...

http中get和post怎么选
5.4.2.怎么选择1.如果你是想从服务器上获取资源,建议使用GET请求,如果你这个请求是为了向服务器提交数据,建议使用POST请求。2.大部分的form表单提交,都是post方式,因为form表单中要填写大量的数据,这些数据…...

数据分析及应用:快手直播间人员在线分析
目录 0 需求描述 1、进入直播间的高峰期为?(以进入用户数衡量) 2、晚上 11 点,哪个直播间的进入人数最多? 3、20:00-23:00,娱乐类、搞笑类,进入人数最多直播间分别是? 4、娱乐类、搞笑类,人均在线时长(退出时间-进入时间)最长的直播间分别是? 5、同时在线人数…...

【Python】nn.nn.CircularPad1、2、3d函数和nn.ConstantPad1、2、3d函数详解和示例
前言 在深度学习中,尤其是在处理图像、音频或其他多维数据时,数据填充(Padding)是一个常见的操作。填充不仅可以保持数据的空间维度,还能在卷积操作中避免信息丢失。PyTorch提供了多种填充方式,其中nn.Cir…...

LearnOpenGL——混合、面剔除
LearnOpenGL——混合、面剔除 混合 Blending一、丢弃片段 Alpha Test二、混合 Alpha Blending渲染顺序 面剔除一、环绕顺序二、面剔除 混合 Blending OpenGL中,混合(Blending)通常是实现物体透明度(Transparency)的一种技术。透明的物体可以是完全透明的࿰…...

视频网站为何热衷于SCDN
视频网站为何热衷于SCDN?随着互联网技术的飞速发展,视频网站已成为人们日常生活中不可或缺的一部分。无论是观看高清电影、热门剧集,还是直播体育赛事、游戏竞技,视频网站都以其丰富的内容和便捷的访问方式吸引了无数用户。然而&a…...
Redis与DataBase保持数据一致性
文章目录 1. 读取数据2. 写数据2.1 先操作缓存2.2 先操作数据库 在我们系统中缓存最常用的策略是:服务端需要同时维系DB和Cache,并且是以DB的结果为准, Cache-Aside Pattern(缓存分离模式、旁路缓存)。 1. 读取数据 当…...

解决 MacOS 连接公司 VPN 成功但是不能网络的问题
目录 解决办法2024 Mac mini 爆料 解决办法 操作比较简单,修改配置文件即可(如果没有则需要手动创建)。 sudo vim /etc/ppp/options在此文件下,加入 plugin L2TP.ppp: plugin L2TP.ppp如果文件里有l2tpnoipsec&…...

【Kubernetes】k8s集群之Pod容器资源限制和三种探针
目录 一、Pod容器的资源限制 1.资源限制 2.Pod 和容器的资源请求与限制 3.CPU 资源单位 4.内存资源单位 二、Pod容器的三种探针 1.探针的三种规则 2.Probe支持三种检查方法: 一、Pod容器的资源限制 1.资源限制 当定义 Pod 时可以选择性地为每个容器设定所…...

从古代驿站体系看软件安全管控@安全历史04
在古代,车、马都很慢,信息传递很不顺畅,中央的政令又是如何传达至地方的呢?实际上,很多朝代都有专门的驿站制度,可以保障全国各地的信息传递,对于维护统治和稳定有着关键作用。 若将国家比作一个…...

8.8 哈希表简单 1 Two Sum 141 Linked List Cycle
1 Two Sum class Solution { public:vector<int> twoSum(vector<int>& nums, int target) {//给的target是目标sum 要返回vector<int> res(2,0);是在num中找加数//首先假设每个输入都是由唯一的结果,而且不适用相同的元素两次一共有n*(n-1)种…...

动态规划之——背包DP(完结篇)
文章目录 概要说明分组背包模板例题1思路code模板例题2思路code 有依赖的背包问题模板例题思路code 背包问题求方案数模板例题思路code 背包问题求具体方案模板例题思路code 概要说明 本文讲分组背包、有依赖的背包、 背包问题求方案数以及背包问题求具体方案 入门篇(01背包和…...

Advanced IP Scanner - 网络扫描工具介绍
Advanced IP Scanner 是一款免费、快速且用户友好的网络扫描工具。它能够帮助用户扫描局域网(LAN)中的所有设备,提供详细的设备信息,包括IP地址、MAC地址、设备名称和厂商信息。该工具对IT管理员和普通用户都非常有用,…...

数据库事务的四大特性ACID
数据库事务的四大特性ACID 数据库事务(Transaction)是数据库管理系统(DBMS)执行过程中的一个逻辑单位,由一个或多个SQL语句组成,这些语句作为一个整体一起向系统提交,要么全部执行,…...
ELK架构介绍
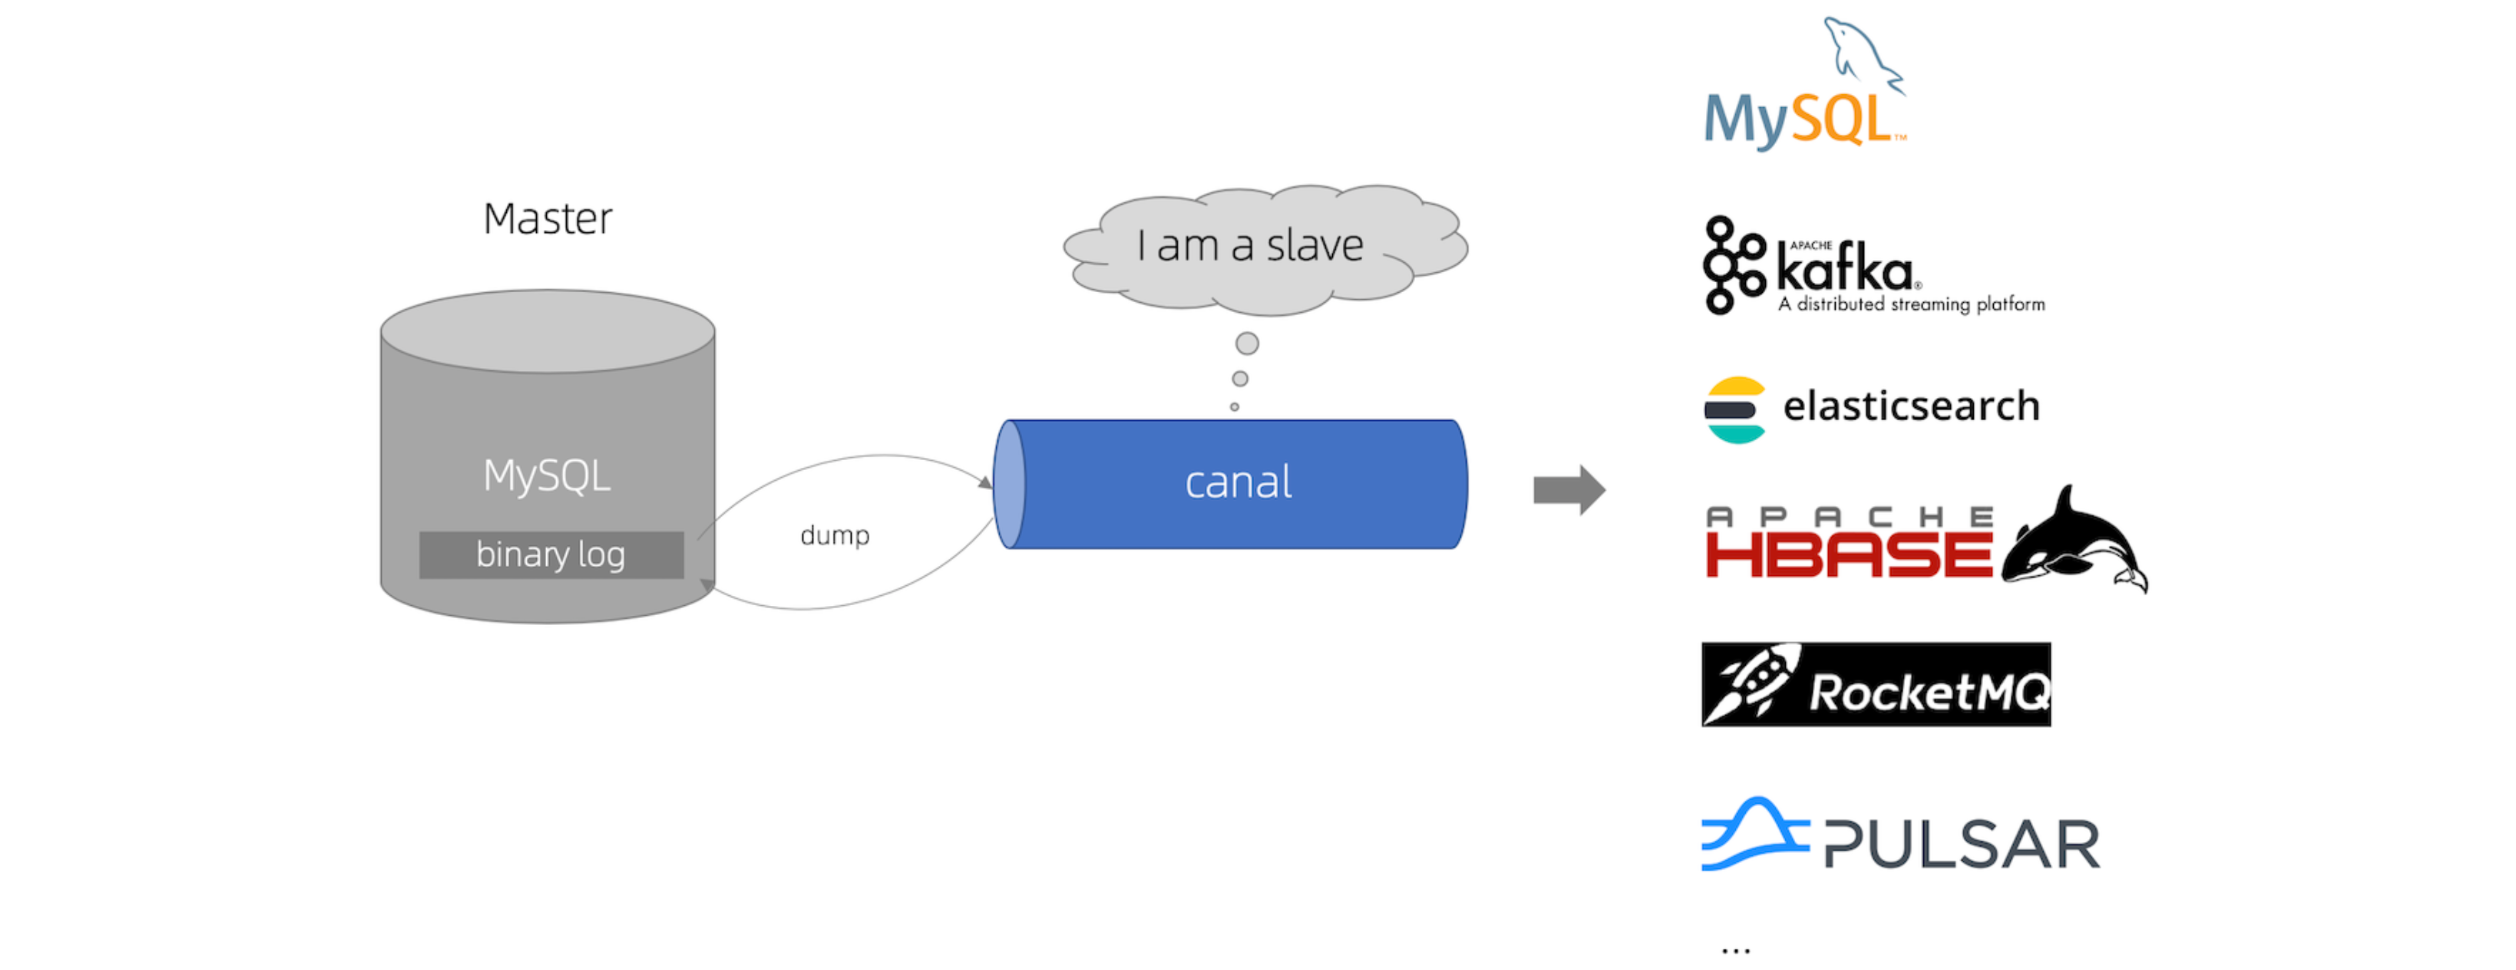
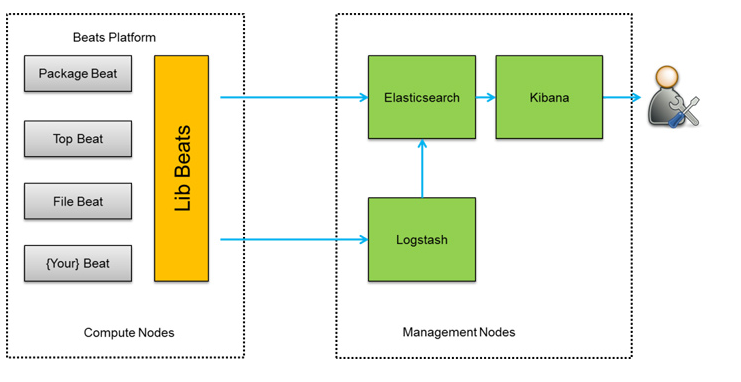
一、ELK简介 ELK 是由三个开源软件组成的,分别是:Elasticsearch、Logstash和Kibana,这三个软件各自在日志管理和数据分析领域发挥着重要作用。Elasticsearch提供分布式存储和搜索能力;Logstash负责数据收集和处理,而K…...

Vscode下ESP32工程函数定义无法跳转
1.删除.vscode 2.按下 ctrlshiftp,搜索 ESP-IDF:Add vscode Configuration Folder...

liquibase.exception.LockException: Could not acquire change log lock.
项目场景: 启动应用花了好长时间,最后报出异常. 问题描述 启动应用花了好长时间,最后报出异常. 异常: Caused by: liquibase.exception.LockException: Could not acquire change log lock. Currently locked by LAPTOP-OQ9VB…...
【多线程-从零开始-捌】阻塞队列,消费者生产者模型
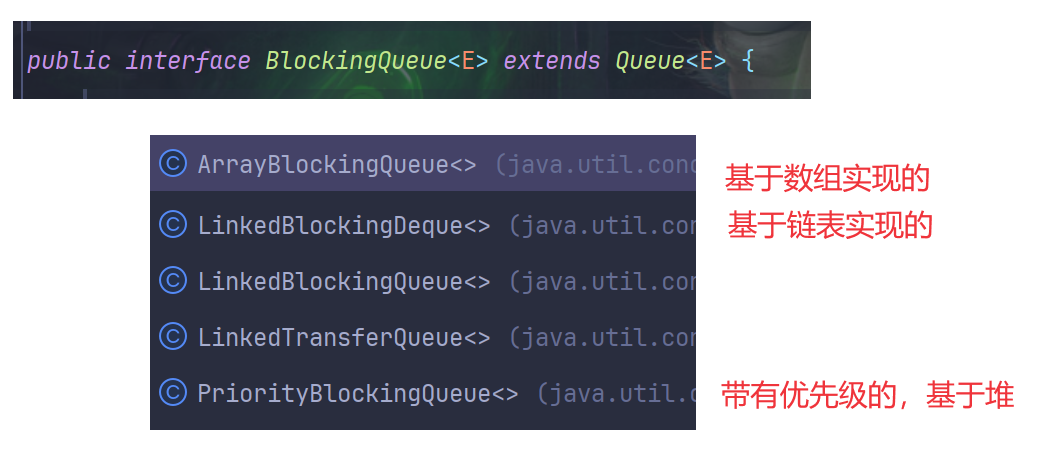
什么是阻塞队列 阻塞队里是在普通的队列(先进先出队列)基础上,做出了扩充 线程安全 标准库中原有的队列 Queue 和其子类,默认都是线程不安全的 具有阻塞特性 如果队列为空,进行出队列操作,此时就会出现阻…...

数据结构——栈(Stack)
目录 前言 一、栈的概念 1、栈的基本定义 2、栈的特性 二、栈的基本操作 1.相关操作概念 2.实现方式 (1)顺序栈 (2)链式栈 三、栈的应用 总结 前言 栈(Stack)是一种常见且重要的数据结构,它遵循…...

终极指南:如何快速构建企业级Vue3后台管理系统
终极指南:如何快速构建企业级Vue3后台管理系统 【免费下载链接】vue3-element-admin 🔥基于 Vue 3 Vite 7 TypeScript element-plus 构建的后台管理前端模板(配套后端源码),vue-element-admin 的 vue3 版本。 项目…...
)
保姆级教程:用PyTorch从零复现DeepLab v3+(附MobileNet v2/Xception双Backbone代码详解)
从零构建DeepLab v3语义分割模型:MobileNet v2/Xception双主干网络实战指南 1. 语义分割与DeepLab v3架构精要 语义分割作为计算机视觉领域的核心任务之一,要求模型对图像中的每个像素进行分类,实现像素级的语义理解。不同于传统的图像分类…...

Hi3519 DV500上跑YOLOv5n,从7秒到34毫秒:一个模型算子优化带来的200倍加速实战
Hi3519 DV500上YOLOv5n性能优化实战:从7秒到34毫秒的200倍加速秘诀 当我们在嵌入式设备上部署目标检测模型时,性能往往是最大的挑战。最近在Hi3519 DV500芯片上部署YOLOv5n模型的经历让我深刻体会到了这一点——最初的推理时间竟然长达7秒,完…...

破解土地-生态耦合难题,从数据处理到SCI论文:AI辅助下PLUS-InVEST模型土地利用格局模拟与生态系统服务
做土地利用、生态系统服务、国土空间规划的同学,是不是经常遇到这些问题:PLUS 模型装不上、跑不通、参数看不懂InVEST 产水 / 土壤保持 / 碳储量 / 生境质量数据总是报错ArcGIS 栅格处理、投影转换、重分类一头雾水多情景模拟不会设计,结果不…...

基于python的安全信息隐藏技术在数字图像和文本中的应用
一、系统概述 随着信息技术的快速发展,数据泄露与隐私保护问题日益严重。传统的加密技术虽然能有效保护数据的机密性,但在某些特定场合下,数据的“隐蔽性”同样至关重要。隐写术(Steganography)作为一种安全信息隐藏技…...

开发提效新思路:用快马平台打造你的个性化qoderwork代码片段工厂
今天想和大家分享一个提升前端开发效率的实用思路 - 用InsCode(快马)平台打造自己的代码片段工厂。作为一个经常需要重复编写UI组件的前端开发者,我发现这个方案能显著减少重复劳动。 痛点分析 每次新项目都要从零开始写导航栏、页脚这些基础组件特别浪费时间。虽然…...

BetterGI:原神智能辅助系统 重新定义游戏体验
BetterGI:原神智能辅助系统 重新定义游戏体验 【免费下载链接】better-genshin-impact 📦BetterGI 更好的原神 - 自动拾取 | 自动剧情 | 全自动钓鱼(AI) | 全自动七圣召唤 | 自动伐木 | 自动刷本 | 自动采集/挖矿/锄地 | 一条龙 | 全连音游 - UI Automa…...

新谈设计模式 Chapter 05 — 原型模式 Prototype
Chapter 05 — 原型模式 Prototype灵魂速记:复印机——照着原件复制一份,省得从头再造。秒懂类比 你有一份精心排版的简历模板。每次投不同公司,你不是从头写一份新的,而是复印一份,改几个字。 原型模式就是这个"…...

2026届最火的AI辅助论文网站横评
Ai论文网站排名(开题报告、文献综述、降aigc率、降重综合对比) TOP1. 千笔AI TOP2. aipasspaper TOP3. 清北论文 TOP4. 豆包 TOP5. kimi TOP6. deepseek 要想把内容被认定成AIGC的可能性给降低,能够采用下面这些策略:第一&a…...

Go Routine 调度模型详解
Go Routine 调度模型详解 在现代编程语言中,高效的并发模型是提升程序性能的关键。Go语言凭借其轻量级的Go Routine和高效的调度器,成为高并发场景下的佼佼者。本文将深入解析Go Routine的调度模型,帮助开发者理解其底层机制,从而…...