ShardingSphere之ShardingProxy集群部署
文章目录
- 介绍
- 使用Zookeeper进行集群部署
- 统一ShardingJDBC和ShardingProxy配置
- 通过Zookeeper注册中心同步配置
- 直接使用ShardingProxy提供的JDBC驱动读取配置文件
介绍
开发者手册
在conf/server.yaml配置文件中有下面这一段配置,就是关于集群部署的
mode:
#  type: standalonetype: Clusterrepository:type: ZooKeeperprops:namespace: governance_dsserver-lists: localhost:2181retryIntervalMilliseconds: 500timeToLiveSeconds: 60maxRetries: 3operationTimeoutMilliseconds: 500
ShardingSphere支持两种运行模式,Standalone独立模式和Cluster集群模式。
在Standalone独立模式下,ShardingSphere不需要考虑其他实例的影响,直接在内存中管理核心配置规则就可以了。如果把整个mode都注释掉,他就是ShardingSphere默认的运行模式。
而在Cluster集群模式下,ShardingSphere不光要考虑自己的配置规则,还需要考虑如何跟集群中的其他实例同步自己的配置规则。这就需要引入第三方组件来提供配置信息同步。ShardingSphere目前支持的配置中心包括:Zookeeper、etcd、Nacos、Consule。
但是在ShardingSphere分库分表的场景下,这些配置信息几乎不会变动,访问频率也不会太高。所以,最为推荐的,是基于CP架构的Zookeeper。
另外,如果应用的本地和Zookeeper中都有配置信息,那么ShardingSphere会以Zookeeper中的配置为准。
使用Zookeeper进行集群部署
接下来我们可以基于Zookeeper部署一下ShardingProxy集群,看一下ShardingSphere需要同步的配置有哪些。
我们只需要在本地部署一个Zookeeper,然后将server.yaml中的mode部分解除注释:
mode:type: Clusterrepository:type: ZooKeeperprops:namespace: governance_dsserver-lists: localhost:2181retryIntervalMilliseconds: 500timeToLiveSeconds: 60maxRetries: 3operationTimeoutMilliseconds: 500
启动ShardingProxy服务后,可以看到Zookeeper注册中心的信息如下是:
namespace
├──rules # 全局规则配置
├──props # 属性配置
├──metadata # Metadata 配置
├ ├──${databaseName} # 逻辑数据库名称
├ ├ ├──schemas # Schema 列表
├ ├ ├ ├──${schemaName} # 逻辑 Schema 名称
├ ├ ├ ├ ├──tables # 表结构配置
├ ├ ├ ├ ├ ├──${tableName}
├ ├ ├ ├ ├ ├──...
├ ├ ├ ├──...
├ ├ ├──versions # 元数据版本列表
├ ├ ├ ├ ├──views # 视图结构配置
├ ├ ├ ├ ├ ├──${viewName}
├ ├ ├ ├ ├ ├──...
├ ├ ├ ├──${versionNumber} # 元数据版本号
├ ├ ├ ├ ├──dataSources # 数据源配置
├ ├ ├ ├ ├──rules # 规则配置
├ ├ ├ ├──...
├ ├ ├──active_version # 激活的元数据版本号
├ ├──...
├──nodes
├ ├──compute_nodes
├ ├ ├──online
├ ├ ├ ├──proxy
├ ├ ├ ├ ├──UUID # Proxy 实例唯一标识
├ ├ ├ ├ ├──....
├ ├ ├ ├──jdbc
├ ├ ├ ├ ├──UUID # JDBC 实例唯一标识
├ ├ ├ ├ ├──....
├ ├ ├──status
├ ├ ├ ├──UUID
├ ├ ├ ├──....
├ ├ ├──worker_id
├ ├ ├ ├──UUID
├ ├ ├ ├──....
├ ├ ├──process_trigger
├ ├ ├ ├──process_list_id:UUID
├ ├ ├ ├──....
├ ├ ├──labels
├ ├ ├ ├──UUID
├ ├ ├ ├──....
├ ├──storage_nodes
├ ├ ├──${databaseName.groupName.ds}
├ ├ ├──${databaseName.groupName.ds}
而在rules部分,就是我们配置的ShardingProxy的核心属性
- !AUTHORITYprovider:type: ALL_PERMITTEDusers:- root@%:root- sharding@%:sharding
- !TRANSACTIONdefaultType: XAproviderType: Atomikos
- !SQL_PARSERparseTreeCache:initialCapacity: 128maximumSize: 1024sqlCommentParseEnabled: truesqlStatementCache:initialCapacity: 2000maximumSize: 65535
而分库分表的信息,则配置在/governance_ds/metadata/sharding_db/versions/0/rules节点下
- !SHARDINGtables:# 逻辑表sys_user:actualDataNodes: ds_${0..1}.sys_user${1..2}# 分表策略tableStrategy:standard:shardingColumn: uidshardingAlgorithmName: sys_user_tab_alg# 分布式主键生成策略keyGenerateStrategy:column: uidkeyGeneratorName: alg_snowflake# 默认分库策略defaultDatabaseStrategy:standard:shardingColumn: uidshardingAlgorithmName: database_inline# 默认分表策略defaultTableStrategy:none:# 分片策略shardingAlgorithms:database_inline:type: INLINEprops:algorithm-expression: ds_${uid % 2}sys_user_tab_alg:type: INLINEprops:algorithm-expression: sys_user$->{((uid+1)%4).intdiv(2)+1}# 分布式主键生成策略keyGenerators:alg_snowflake:type: COSID_SNOWFLAKE
统一ShardingJDBC和ShardingProxy配置
既然ShardingProxy可以通过Zookeeper同步配置信息,那么我们可不可以在ShardingJDBC中也采用Zookeeper的配置呢?当然是可以的。
通过Zookeeper注册中心同步配置
第一种简单的思路就是将ShardingProxy中的mod部分配置移植到之前的ShardingJDBC示例中。
将application.properties中的配置信息全部删除,只配置Zookeeper地址:

# 微服务中配置信息如下,如果使用yml配置文件方式就不需要spring.shardingsphere这个前缀,当然使用yml加上这个前缀也能正常运行,只是需要了解这一点
# 如果使用properties就需要再上方配置的基础上加上spring.shardingsphere前缀
spring.shardingsphere.mode.type=Cluster
spring.shardingsphere.mode.repository.type=ZooKeeper
spring.shardingsphere.mode.repository.props.namespace=governance_ds
spring.shardingsphere.mode.repository.props.server-lists=localhost:2181
spring.shardingsphere.mode.repository.props.retryIntervalMilliseconds=600
spring.shardingsphere.mode.repository.props.timeToLiveSecoonds=60
spring.shardingsphere.mode.repository.props.maxRetries=3
spring.shardingsphere.mode.repository.props.operationTimeoutMilliseconds=500# 指定读取Zookeeper上的哪一个库。默认值是logic_db
# ShardingProxy的配置文件中默认配置的库是sharding_db
# 如果有多个数据库需要读取,用逗号隔开 spring.shardingsphere.database.name=sharding_hs_db,logic_db,sharding_db
spring.shardingsphere.database.name=sharding_hs_db
这里需要注意,如果是使用ShardingJDBC的方式,那么默认是会读取一个logic_db数据库,而ShardingProxy的配置中,默认的数据库名是sharding_db,就会造成微服务端在进行查询更新操作时没有想过的分片策略使用

org.apache.shardingsphere.mode.metadata.MetaDataContextsFactory#create()
public static MetaDataContexts create(...) throws SQLException {// instanceContext.getInstance().getMetaData() 这个方法判断是不是JDBCInstanceMetaData// 我们使用ShardingJDBC就是会创建JDBCInstanceMetaData类型Collection<String> databaseNames = instanceContext.getInstance().getMetaData() instanceof JDBCInstanceMetaData// 是JDBC类型就相当于读取本地的配置 ,当前我们配置文件中只有zookeeper连接的配置信息,所以最终读取到一个默认值logic_db   ? parameter.getDatabaseConfigs().keySet()     // 而ShardingProxy就相当于是去读取Zookeeper中metadata下的所有数据库   : persistService.getDatabaseMetaDataService().loadAllDatabaseNames();......
}
上方中instanceContext.getInstance().getMetaData()值的来源是ShardingSphereDataSource类中
// org.apache.shardingsphere.driver.jdbc.core.datasource.ShardingSphereDataSource类
// 构造方法会调用下面这个方法
private ContextManager createContextManager(...) throws SQLException {//  创建JDBCInstanceMetaDataInstanceMetaData instanceMetaData = InstanceMetaDataBuilderFactory.create("JDBC", -1);......
}// 进入到create()方法 下面使用SPI机制加载InstanceMetaDataBuilder接口的实现类
// 而InstanceMetaDataBuilder接口的实现类就只有 JDBCInstanceMetaDataBuilder 和  ProxyInstanceMetaDataBuilder
// 对应的就是SharingJDBC和ShardingProxy两种方式
public static InstanceMetaData create(String type, int port) {return ((InstanceMetaDataBuilder)TypedSPIRegistry.getRegisteredService(InstanceMetaDataBuilder.class, type)).build(port);
}
上方中parameter.getDatabaseConfigs().keySet()会读取到一个默认值logic_db 对应的源码在DatabaseNameSetter类中
package org.apache.shardingsphere.spring.boot.schema;public final class DatabaseNameSetter {private static final String DATABASE_NAME_KEY = "spring.shardingsphere.database.name";private static final String SCHEMA_NAME_KEY = "spring.shardingsphere.schema.name";/*** Get database name.** @param environment spring boot environment* @return schema name*/public static String getDatabaseName(final Environment environment) {StandardEnvironment standardEnv = (StandardEnvironment) environment;// 先读取spring.shardingsphere.database.name配置项的值String databaseName = standardEnv.getProperty(DATABASE_NAME_KEY);if (!Strings.isNullOrEmpty(databaseName)) {return databaseName;}// 再去读取 spring.shardingsphere.schema.name 配置项的值String schemaName = standardEnv.getProperty(SCHEMA_NAME_KEY);//  DefaultDatabase.LOGIC_NAME 默认值是 logic_dbreturn Strings.isNullOrEmpty(schemaName) ? DefaultDatabase.LOGIC_NAME : schemaName;}
}
直接使用ShardingProxy提供的JDBC驱动读取配置文件
ShardingSphere还提供了自己的JDBC驱动
在我们的微服务中 classpath下增加一个config.yaml,然后将我们之前在ShardingProxy中的几个关键配置整合到一起
databaseName: sharding_hs_dbdataSources:ds_0:url: jdbc:mysql://localhost:3306/sharding_sphere1?serverTimezone=UTC&useSSL=falseusername: rootpassword: 1234connectionTimeoutMilliseconds: 30000idleTimeoutMilliseconds: 60000maxLifetimeMilliseconds: 1800000maxPoolSize: 50minPoolSize: 1ds_1:url: jdbc:mysql://localhost:3306/sharding_sphere2?serverTimezone=UTC&useSSL=falseusername: rootpassword: 1234connectionTimeoutMilliseconds: 30000idleTimeoutMilliseconds: 60000maxLifetimeMilliseconds: 1800000maxPoolSize: 50minPoolSize: 1rules:
- !SHARDINGtables:# 逻辑表sys_user:actualDataNodes: ds_${0..1}.sys_user${1..2}# 分表策略tableStrategy:standard:shardingColumn: uidshardingAlgorithmName: sys_user_tab_alg# 分布式主键生成策略keyGenerateStrategy:column: uidkeyGeneratorName: alg_snowflake# 默认分库策略defaultDatabaseStrategy:standard:shardingColumn: uidshardingAlgorithmName: database_inline# 默认分表策略defaultTableStrategy:none:# 分片策略shardingAlgorithms:database_inline:type: INLINEprops:algorithm-expression: ds_${uid % 2}sys_user_tab_alg:type: INLINEprops:algorithm-expression: sys_user$->{((uid+1)%4).intdiv(2)+1}# 分布式主键生成策略keyGenerators:alg_snowflake:type: COSID_SNOWFLAKE# 注意,下方rules需要注释掉
rules:- !AUTHORITYusers:- root@%:root- sharding@:shardingprovider:type: ALL_PERMITTED- !TRANSACTIONdefaultType: XAproviderType: Atomikos- !SQL_PARSERsqlCommentParseEnabled: truesqlStatementCache:initialCapacity: 2000maximumSize: 65535parseTreeCache:initialCapacity: 128maximumSize: 1024props:max-connections-size-per-query: 1kernel-executor-size: 16  # Infinite by default.proxy-frontend-flush-threshold: 128  # The default value is 128.proxy-hint-enabled: falsesql-show: falsecheck-table-metadata-enabled: false# Proxy backend query fetch size. A larger value may increase the memory usage of ShardingSphere Proxy.# The default value is -1, which means set the minimum value for different JDBC drivers.proxy-backend-query-fetch-size: -1proxy-frontend-executor-size: 0 # Proxy frontend executor size. The default value is 0, which means let Netty decide.# Available options of proxy backend executor suitable: OLAP(default), OLTP. The OLTP option may reduce time cost of writing packets to client, but it may increase the latency of SQL execution# and block other clients if client connections are more than `proxy-frontend-executor-size`, especially executing slow SQL.proxy-backend-executor-suitable: OLAPproxy-frontend-max-connections: 0 # Less than or equal to 0 means no limitation.# Available sql federation type: NONE (default), ORIGINAL, ADVANCEDsql-federation-type: NONE# Available proxy backend driver type: JDBC (default), ExperimentalVertxproxy-backend-driver-type: JDBCproxy-mysql-default-version: 8.0.15 # In the absence of schema name, the default version will be used.proxy-default-port: 3307 # Proxy default port.proxy-netty-backlog: 1024 # Proxy netty backlog.
然后,可以直接用JDBC的方式访问带有分库分表的虚拟库。
public class ShardingJDBCDriverTest {@Testpublic void test() throws ClassNotFoundException, SQLException {String jdbcDriver = "org.apache.shardingsphere.driver.ShardingSphereDriver";String jdbcUrl = "jdbc:shardingsphere:classpath:config.yaml";String sql = "select * from sharding_hs_db.sys_user";Class.forName(jdbcDriver);try(Connection connection = DriverManager.getConnection(jdbcUrl);) {Statement statement = connection.createStatement();ResultSet resultSet = statement.executeQuery(sql);while (resultSet.next()){System.out.println("uid= "+resultSet.getLong("uid"));}}}
}
启动时,发现报错了
Caused by: java.lang.IllegalStateException: dataSourceClassName can not be null.

看样子直接把配置从ShardingProxy中复制过来有点小问题,那边是不需要加的。
所以需要再现有数据源配置上加上dataSourceClassName的配置,我这里先是使用com.mysql.cj.jdbc.Driver

结果报错了
java.lang.ClassCastException: com.mysql.cj.jdbc.Driver cannot be cast to javax.sql.DataSource

再通过查看开发手册,修改成了com.zaxxer.hikari.HikariDataSource

此时又报了新的错误
java.lang.NullPointerException: Can not find transaction manager of `XA`

接下来再解决XA事务管理器相关的问题,因为ShardingProxy默认 XA事务管理器 使用的是 Atomikos ,我们上方config.yaml配置文件中也是这个配置。所以我接下里导入相关依赖
<!--XA 分布式事务 -->
<dependency><groupId>org.apache.shardingsphere</groupId><artifactId>shardingsphere-transaction-xa-core</artifactId><!-- 因为文本使用的是ShardingSphere 5.2.1这里和总版本对应上 --><version>5.2.1</version>
</dependency>
又报错了
Failed to instantiate [javax.sql.DataSource]: Factory method 'shardingSphereDataSource' threw exception; nested exception is java.lang.AbstractMethodError: com.atomikos.icatch.jta.JtaTransactionServicePlugin.beforeInit()V

从报错信息可以看出来是Atomikos源码包中有问题,接下来在进行解决
最终导入的依赖如下
<!--XA 分布式事务 -->
<dependency><groupId>org.apache.shardingsphere</groupId><artifactId>shardingsphere-transaction-xa-core</artifactId><version>5.2.1</version><exclusions><exclusion><artifactId>transactions-jdbc</artifactId><groupId>com.atomikos</groupId></exclusion><exclusion><artifactId>transactions-jta</artifactId><groupId>com.atomikos</groupId></exclusion></exclusions>
</dependency>
<!-- 版本滞后了 -->
<dependency><artifactId>transactions-jdbc</artifactId><groupId>com.atomikos</groupId><version>5.0.8</version>
</dependency>
<dependency><artifactId>transactions-jta</artifactId><groupId>com.atomikos</groupId><version>5.0.8</version>
</dependency>
终于执行通过

下方这种测试方法也可以
public class ShardingSphereDatasourceTest {public static void main(String[] args) throws SQLException, ClassNotFoundException {HikariDataSource dataSource = new HikariDataSource();dataSource.setDriverClassName("org.apache.shardingsphere.driver.ShardingSphereDriver");dataSource.setJdbcUrl("jdbc:shardingsphere:classpath:config.yaml");//        Class.forName("org.apache.shardingsphere.driver.ShardingSphereDriver");
//        String jdbcUrl = "jdbc:shardingsphere:classpath:config.yaml";
//        Connection conn = DriverManager.getConnection(jdbcUrl);Connection conn = dataSource.getConnection();String sql = "SELECT cid,cname,user_id,cstatus from course where cid=851198093910081536";try {//ShardingConnectioinconn = dataSource.getConnection();//ShardingStatementStatement statement = conn.createStatement();//ShardingResultSetResultSet result = statement.executeQuery(sql);while (result.next()) {System.out.println("result:" + result);}} catch (SQLException e) {e.printStackTrace();} finally {if (null != conn) {conn.close();}}}
}
相关文章:
ShardingSphere之ShardingProxy集群部署
文章目录 介绍使用Zookeeper进行集群部署统一ShardingJDBC和ShardingProxy配置通过Zookeeper注册中心同步配置直接使用ShardingProxy提供的JDBC驱动读取配置文件 介绍 开发者手册 在conf/server.yaml配置文件中有下面这一段配置,就是关于集群部署的 mode: # typ…...

同态加密和SEAL库的介绍(六)BGV 方案
前面介绍 BFV 和 CKKS 加密方案,这两者更为常用。并且也解释了 Batch Encoder 和 级别的概念,这对接下来演示 BGV 会很有帮助。 一、BGV简介 BGV (Brakerski-Gentry-Vaikuntanathan) 方案 是一种基于环学习同态加密(RLWE)问题的加…...

uniapp微信小程序 canvas绘制圆形半透明阴影 createCircularGradient函数不支持透明度部分解决方案
背景 我需要在微信小程序中,用canvas绘制一个圆形钟表,在ui设计图中,有一部分阴影,这里我节选一下: 即深色发黑的部分 canvas通用阴影绘制 由于canvas中并不支持css那样简单的方式为圆形添加阴影或高光,…...

W34KN3SS靶机
信息收集: 靶机地址:https://www.vulnhub.com/entry/w34kn3ss-1,270/# (1)ip扫描 nmap 192.168.254.0/24 -sn | grep -B 2 00:0C:29:E8:66:AB (2)端口扫描 nmap -p- -A 192.168.254.145 (3&…...
8.9套题
A. 猴猴吃苹果 题意:给定根节点k,求访问点的顺序,使得每次从上一个点到当前点的权值最大。访问过的点权值为0。权值一样时,输出最小编号 思路:由于是双向边,先求根节点到每一个节点的距离值。在第一轮中&…...

Python 爬取网页水务数据并实现智慧水务前端可视化
提示:本文爬取深圳市环境水务集团有限公司的公开数据作为数据样例进行数据分析与可视化。 文章目录 一、爬虫二、对爬取的数据进行数据库、excel的存储与数据处理1.代码实现 三、应用Flask框架将后端获取数据后渲染到前端四、前端Echarts的使用1.下载echarts.min.js…...

百度智能云发布3款轻量级+2款场景大模型
文心大模型ERNIE 3.5是目前百度智能云千帆大模型平台上最受欢迎的基础大模型之一。针对用户的常见通用的对话场景,ERNIE 3.5 在指令遵循、上下文学习和逻辑推理能力三方面分别进行了能力增强。 ERNIE Speed作为三款轻量级大模型中的“大个子”,推理场景…...

UE基础 —— 编辑器界面
菜单栏 UE中每个编辑器都有一个菜单栏,部分菜单会出现在所有编辑器窗口中,如File、Window、Help,其他则是其编辑器特有的; 主工具栏 UE中部分最常用的工具和命令的快捷方式; 1,保存按钮(ctrls&a…...
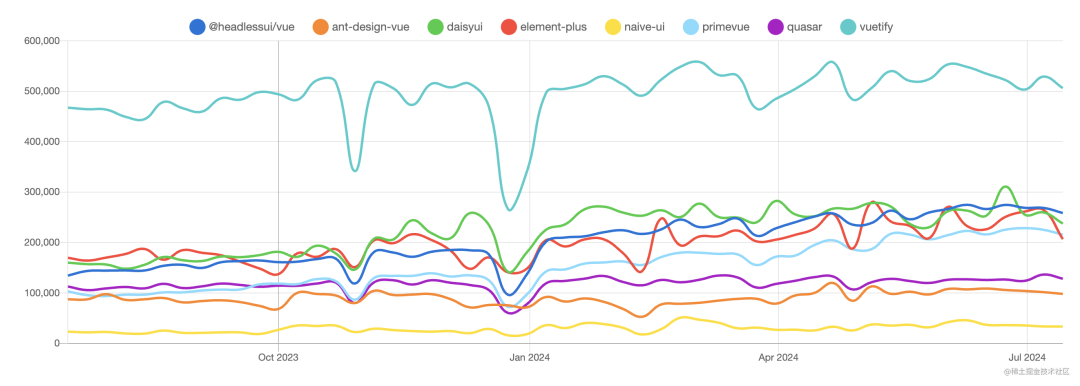
2024年Vue组件库大比拼:谁将成为下一个Element?
2024 年,Vue生态蓬勃发展,越来越多的开发者开始探索更适合自己项目的组件库。 今天我们来看一下2024年最受欢迎的几款Vue开源组件库,除了Element,开发者们还有哪些选择呢? 1.Vuetify Vuetify是由社区支持的Vue组件库&…...

SS9283403 sqlite3交叉编译并部署到SS928(六)
1.Sqlite3下载 连接:SQLite Download Page 2.解压 tar zxvf sqlite-autoconf-3460000.tar.gz 3.配置并编译 进入解压目录,打开命令行,输入如下命令 ./configure CCaarch64-mix210-linux-gcc --hostarm-linux --prefix/home/mc/work/sqlite…...

java3d-1_4_0_01-windows-i586.exe
下载 Java 3D API 安装 C:\Program Files\Java\Java3D\1.4.0_01\bin C:\Java\jre6 C:\Java\jdk1.6.0_45 C:\Windows 记录下这 4 个目录,去检查下 4 哥目录下文件多了什么 检查目录① C:\Program Files\Java\Java3D\1.4.0_01\bin 检查目录② C:\Java\jre6 C:…...

Vue3中的history模式路由:打造无缝导航体验!
Hey小伙伴们,今天给大家带来Vue3中使用history模式路由的实战案例!🌟 🔍 项目背景 Vue3的路由功能非常强大,可以帮助我们轻松实现单页面应用中的页面切换。但是你知道吗?默认情况下Vue Router使用的是has…...

python(6)
一、datetime函数 方法一: 前一个datetime是模块。后一个datetime是类型 方法二: 方法三: 二、逆序字符串 三 、旋转字符串...

以Zed项目为例学习大型Rust项目的组织与管理
说明 Zed项目代码:https://github.com/zed-industries/zed.git本文项目代码:https://github.com/VinciYan/zed_workspace.git Zed是一款由Atom创始人开发的高性能、协作友好的现代开源代码编辑器,使用Rust编写,集成AI辅助功能&a…...

正点原子imx6ull-mini-Linux驱动之Linux RS232/485/GPS 驱动实验(23)
错误1:我一直找不到为什么我的minicom用不了,编译啥的都通过了,原来是我的密码文件命名错了,我就习以为常的命名为password,谁知道应该是passwd,所以以后该复制的还是复制,不然就容易找不到源头…...

用户上下文打通+本地缓存Guava
文章目录 🌞 Sun Frame:SpringBoot 的轻量级开发框架(个人开源项目推荐)🌟 亮点功能📦 spring cloud模块概览常用工具 🔗 更多信息1.设计1.链路流程2.详细设计 2.网关过滤器获取唯一标识放到Hea…...
-MFC-C/C++ - 树形视图(Tree Control) - CTreeCtrl)
Windows图形界面(GUI)-MFC-C/C++ - 树形视图(Tree Control) - CTreeCtrl
公开视频 -> 链接点击跳转公开课程博客首页 -> 链接点击跳转博客主页 目录 树形视图(Tree Control) - CTreeCtrl 创建和初始化 添加和删除项 获取和设置项属性 操作项 项选择变化 项双击 项展开 示例代码 树形视图(Tree Control) - CTreeCtrl 创建和初始…...

C语言 --- 枚举、位运算
(一)枚举 1.概念:枚举是指将变量的值一一列举出来,变量的值只限于列举出来的值的范围 2.作用:a.提高代码可读性;b.提高代码的安全性 3.枚举类型: enum 枚举名 { 列举各种值 //枚举元素或枚…...

12322222222
当您和老王不在同一个网段时,您们之间的通信需要通过路由器来实现。这是因为不同的网段被视为不同的网络,而路由器的作用之一就是连接不同的网络并负责数据包的转发。下面是详细的通信流程: 本地网络通信尝试:您的设备࿰…...

知识改变命运:Java 语言 【可变参数】
可变参数 概念:Java允许一个类中多个同名同功能但是参数不同的方法,封装为一个方法。 基本语法: 访问修饰符 返回值 方法名 (数据类型...参数名) { ...... }案例:写一个类名DyMethod 方法名sum 计算两个整数和,三个整…...

Android 11开发避坑:为什么你的App获取的Wifi MAC地址总是变?手把手教你配置固定MAC
Android 11开发实战:彻底解决Wifi MAC地址随机化问题最近在开发一个设备管理系统时,遇到了一个棘手的问题:我们的App在Android 11设备上获取的Wifi MAC地址每次都不一样,导致基于MAC地址的设备识别功能完全失效。经过一周的深入研…...
)
别再乱用npm install了!手把手教你用npx only-allow为项目指定包管理器(支持pnpm/yarn/npm)
用only-allow统一团队包管理器:从配置到CI的全流程指南 你是否曾经在拉取一个新项目后,面对npm install、yarn还是pnpm i的抉择感到困惑?或者更糟的是,团队成员混用不同包管理器导致node_modules结构不一致,引发各种诡…...

智能检索新范式,让AIAgent自主决策,提升RAG效率100%!
市面上的 RAG 系统,不管叫什么名字,本质上只有两种做法: 第一种,一次性检索。把用户的 query 向量化,从语料库里捞出 Top-K 个文档片段,拼成一个大 prompt 塞给模型。GraphRAG、HippoRAG、LightRAG 都属于…...

echarts中heatmap鼠标滚动禁用缩放,向下滚动
配置如下效果如下...

光效崩坏?噪点泛滥?色温漂移?——Midjourney专业级光效渲染全流程校准协议,含ACEScg色彩空间适配模板
更多请点击: https://kaifayun.com 第一章:光效崩坏、噪点泛滥与色温漂移的系统性归因诊断 图像采集链路中出现的光效崩坏、噪点泛滥与色温漂移并非孤立现象,而是光学设计、传感器响应、ISP管线调度及环境耦合失配共同作用的结果。三者常呈现…...

搞定这 5 个全栈电商项目,面试别再用 Todo-List 凑数了
找独立开发练手项目或者写简历项目时,最忌讳两件事:一是太简单(纯前端 Mock 数据,点两下就没了),二是太假(一上来就硬套微服务、消息队列、高并发,结果自己根本Hold不住)…...

网飞成立 AI 动画工作室,开启流媒体“原生 AI 制片时代”,中外布局逻辑有何不同?
1. Netflix“偷跑”在影视巨头关于 AIGC 的军备竞赛中,Netflix 再次加速。据外媒 TheVerge 报道,网飞于今年 3 月成立了名为 "INKubator" 的工作室,这是全球流媒体巨头中首个以生成式人工智能为核心的动画制作部门。此动作引发全球…...

Style-Bert-VITS2未来发展方向:从语音克隆到实时语音转换的技术演进路线
Style-Bert-VITS2未来发展方向:从语音克隆到实时语音转换的技术演进路线 【免费下载链接】Style-Bert-VITS2 Style-Bert-VITS2: Bert-VITS2 with more controllable voice styles. 项目地址: https://gitcode.com/gh_mirrors/st/Style-Bert-VITS2 Style-Bert…...

XZ6128A工作电压5-100V 输出电流5A 升压型大功率LED灯恒流驱动控制芯片
概述 XZ6128A是一款高效率、高精度的升压型大功率LED灯恒流驱动控制芯片。 XZ6128A内置高精度误差放大器,固定关断时间控制电路,恒流驱动电路等,特别适合大功率、多个高亮度LED灯串的恒流驱动。 XZ6128A采用固定关断时间的控制方式࿰…...

终极指南:Windows 10完美安装PL2303驱动,解决老旧USB转串口芯片兼容性问题
终极指南:Windows 10完美安装PL2303驱动,解决老旧USB转串口芯片兼容性问题 【免费下载链接】pl2303-win10 Windows 10 driver for end-of-life PL-2303 chipsets. 项目地址: https://gitcode.com/gh_mirrors/pl/pl2303-win10 你是否还在为Windows…...