Springboot IOC DI理解及实现+JUnit的引入+参数配置
一、JavaConfig
我们通常使用 Spring 都会使用 XML 配置,随着功能以及业务逻辑的日益复杂,应用伴随着大量的 XML 配置文件以及复杂的 bean 依赖关系,使用起来很不方便。
在 Spring 3.0 开始,Spring 官方就已经开始推荐使用 Java 配置来代替传统的 XML 配置了,它允许开发者将 bean 的定义和 Spring 的配置编写到到 Java 类中,不过似乎在国内并未推广盛行。当 Spring Boot 来临,人们才慢慢认识到 Java 配置的优雅,但是,也仍然允许使用经典的 XML 方式来定义 bean 和 配置 Spring。其有以下优势:
-
面向对象的配置。由于配置被定义为 JavaConfig 中的类,因此用户可以充分使用 Java 中的面向对象功能。一个配置类可以继承另一个,重写它的 @Bean 方法等。
-
减少或者消除 XML 配置。提供了一种纯 Java 的方式来配置与 XML 配置概念相似的 Spring 容器。
-
类型安全和重构友好。提供了一种类型安全的方法了来配置 Spring 容器,由于 Java 5 对泛型的支持,现在可以按类型而不是名称检索 bean,不需要任何的强制转换或者基于字符串的查找。
进行下面学习先搭建一个基于 Maven 构建的项目 java-config-demo,添加如下依赖:
<dependency><groupId>org.springframework</groupId><artifactId>spring-context</artifactId><version>5.0.8.RELEASE</version>
</dependency>
1、XML 方式配置 IoC
1.1、定义两个 Bean
public class SomeBean {private OtherBean otherBean;
public void setOtherBean(OtherBean otherBean) {this.otherBean = otherBean;}public SomeBean() {System.out.println("SomeBean 被创建");}public void init() {System.out.println("SomeBean 被初始化");}public void destroy() {System.out.println("SomeBean 被销毁");}// 省略 toString 方法
}
public class OtherBean { public OtherBean() {System.out.println("OtherBean 被创建");}
}
1.2、编写配置
在 XML 配置文件中去配置这些 Bean 交给 Spring 管理。
<!-- applicationContext.xml -->
<bean id="someBean" class="cn.bean.SomeBean"/>
1.3、启动 Spring
启动 Spring 读取该 XML 文件创建容器对象,从容器中获取 SomeBean 对象。
public class IoCTest {@Testpublic void testXmlConfig() {ApplicationContext ctx = new ClassPathXmlApplicationContexnt("classpath:applicationContext.xml");SomeBean someBean = ctx.getBean(SomeBean.class);System.out.println(someBean);}
}
2、JavaConfig 方式配置 IoC
JavaConfig 方式中使用注解彻底的替代 XML 文件,那么到底要怎么告诉 Spring 容器,bean 没有定义在 XML 文件中,而是定义在一个 Java 配置类中。
-
@Configuration:在类上贴该注解表示该类是 Spring 的配置类,具有 applicationContext.xml 文件的作用。 -
@Bean:在 Spring 的配置类的方法上贴该注解后,该方法返回的对象会交给 Spring 容器管理,替代 applicationContext.xml 中的 bean 标签。 -
@ComponentScan:在 Spring 配置类上贴该注解表示开启组件扫描器,默认扫描当前配置类所在的包,也可以自己指定,替代 XML 配置中的<context:component-scan />标签。 -
AnnotationConfigApplicationContext:该类是 ApplicationContext 接口的实现类,该对象是基于 JavaConfig 的方式来运作的 Spring 容器。
2.1、定义一个配置类
替代之前的 XML 文件,类中定义方法,返回 bean 对象交给 Spring 管理。
/**
* @Configuration
* 贴有该注解的类表示 Spring 的配置类
* 用于替代传统的 applicationContext.xml
*/
@Configuration
public class JavaConfig { /*** @Bean* 该注解贴在配置类的方法上,该方法会被 Spring 容器自动调用* 并且返回的对象交给 Spring 管理* 相当于 <bean id="someBean" class="cn.bean.SomeBean"/>*/@Beanpublic SomeBean someBean() {return new SomeBean();}
}
2.2、启动 Spring
加载配置类,启动 AnnotationConfigApplicationContext 容器对象,测试效果。
public class IoCTest {@Testpublic void testJavaConfig() {// 加载配置类,创建 Spring 容器ApplicationContext ctx = new AnnotationConfigApplicationContext(JavaConfig.class);// 从容器中取出 SomeBean 对象SomeBean someBean = ctx.getBean(SomeBean.class);System.out.println(someBean);}
}
2.3、@Bean 注解中的属性
在 XML 配置 bean 的方式中,我们可以在 bean 标签中的 id,name,init-method,destroy-method,scope 等属性来完成对应的配置,在使用 JavaConfig 方式中我们也一样能通过相应的配置来完成同样的效果,这些效果大多封装到 @Bean 注解的属性中。@Bean 注解中的属性有以下:
-
name:对应 bean 标签中的 name 属性,用于给 bean 取别名;
-
initMethod:对应 bean 标签中的 init-method 属性,配置 bean 的初始化方法;
-
destroyMethod:对应 bean 标签中的 destroy-method 属性,配置 bean 的销毁方法。
注意:在配置类的方式中有许多的默认规定,比如:
-
bean 的 id 就是当前方法名;
-
配置多例则是在方法上添加
@Scope("prototype")注解来实现,一般不用配,默认单例即可。
3、XML 方式配置 DI
<bean id="someBean" class="cn.bean.someBean"><property name="otherBean" ref="otherBean"/> </bean> <bean id="otherBean" class="cn.bean.OtherBean"/>
4、JavaConfig 方式配置 DI
在配置类方式中我们有两种方式可以完成依赖注入,无论是哪种方式,前提都是要先把 bean 交给 Spring 管理,然后在把 bean 注入过去后再使用 setter 方法设置关系。通用步骤:先把两个 bean 交给 Spring 管理。
@Bean
public SomeBean someBean() {SomeBean someBean = new SomeBean();return someBean;
}
@Bean
public OtherBean otherBean() {return new OtherBean();
}
4.1、通过方法形参注入
把需要注入的 bean 对象作为参数传入到另一个 bean 的方法声明中,形参名称最好跟 bean 的 id 一致。在容器里面有的 bean,都可以用这种方式注入。
// 在声明 SomeBean 的方法形参中直接注入 OtherBean 对象
@Bean
public SomeBean someBean(OtherBean otherBean) {SomeBean someBean = new SomeBean();someBean.setOtherBean(otherBean);return someBean;
}
4.2、调用方法注入
// 调用上面已经声明的 otherBean 方法
@Bean
public SomeBean someBean() {SomeBean someBean = new SomeBean();someBean.setOtherBean(otherBean());return someBean;
}
原理:Spring 容器在调用实例方法时,根据方法返回对象类型,判断容器中是否已经存在该类型的实例对象,如果不存在则执行实例方法,将返回对象实例交给容器管理,如果该实例已经存在了,直接从容器中拿已经存在实例对象方法,不执行实例方法。
5、使用 IoC DI 注解简化配置
以上案例中,在配置类内部去定义方法返回 bean 对象交给 Spring 管理的方式存在一个问题,就是如果需要创建的 bean 很多的话,那么就需要定义很多的方法,会导致配置类比较累赘,使用起来不方便。以前可以通过注解简化 XML 配置,现在同样也可以通过注解简化 JavaConfig,这里需要使用到 @ComponentScan 注解,等价于之前 XML 配置的 <context:component-scan base-package="贴了 IoC DI 注解的类所在的包"/>。
@ToString
@Component
public class SomeBean {private OtherBean otherBean;
@AutoWiredpublic void setOtherBean(OtherBean otherBean) {this.otherBean = otherBean;}public SomeBean() {System.out.println("SomeBean 被创建");}public void init() {System.out.println("SomeBean 被初始化");}public void destroy() {System.out.println("SomeBean 被销毁");}
}
@Component
public class OtherBean { public OtherBean() {System.out.println("OtherBean 被创建");}
}
<!-- applicationContext.xml  -->
<context:component-scan base-package="cn.bean"/>
@Configuration // 表示该类是 Spring 的配置类
@ComponentScan // 开启组件扫描器,默认扫描当前类所在的包,及其子包
public class JavaConfig { }
若需要扫描的包不是配置类所在的包时,我们可以通过注解中的 value 属性来修改扫描的包。
注意:组件扫描的方式只能扫描我们自己写的组件,若某个 bean 不是我们写的,则还是要通过在配置类中定义方法来处理,两者是可以同时存在的。
6、Spring Test 方式加载配置类
首先在 pom.xml 添加如下依赖:
<dependency><groupId>org.springframework</groupId><artifactId>spring-test</artifactId><version>5.0.8.RELEASE</version><scope>test</scope>
</dependency>
<dependency><groupId>junit</groupId><artifactId>junit</artifactId><version>4.12</version><scope>test</scope>
</dependency>
<dependency><groupId>org.junit.jupiter</groupId><artifactId>junit-jupiter-api</artifactId><version>5.6.3</version><scope>test</scope>
</dependency>
6.1、JUnit4 的方式
6.1.1、基于 XML
@RunWith(SpringJUnit4ClassRunner.class)
@ContextConfiguration("classpath:XML文件路径")
public class IoCTest { @Autowiredprivate SomeBean someBean;@Testpublic void test() {System.out.println(someBean);}
}
6.1.2、基于配置类
@ContextConfiguration 注解不仅支持 XML 方式启动 Spring 测试,也支持配置类的方式,配置 classes 属性来指定哪些类是配置类即可。
@RunWith(SpringJUnit4ClassRunner.class)
@ContextConfiguration(classes={配置类1.class, 配置类2.class, ...})
public class IoCTest {@Autowiredprivate SomeBean someBean;
@Testpublic void test() {System.out.println(someBean);}
}
6.2、JUnit5 的方式
注意测试类和测试方法都不用 public 修饰,测试类只需要贴 @SpringJUnitConfig 指定加载的配置即可。
@SpringJUnitConfig(配置类.class)
class IoCTest {@Autowiredprivate SomeBean someBean;
@Testvoid test() {System.out.println(someBean);}
}
7、配置类的导入
在 Spring 项目中一般都会有多个 Spring 的配置文件,分别配置不同的组件,最后关联到主配置文件中,该功能也是同样可以在配置类的方式中使用的。
7.1、XML 方式
<!-- 例如 mvc.xml 中导入 applicationContext.xml -->
<import resource="classpath:applicationContext.xml"/>
7.2、配置类方式
需要使用 @Import 来完成,指定导入的配置类。
// 主配置类
@Configuration
@Import(OtherJavaConfig.class) // 在主配置类中关联次配置类
public class JavaConfig { ... }// 次配置类
@Configuration
public class OtherJavaConfig { ... }// 测试
@SpringJUnitConfig(classes = JavaConfig.class) // 加载主配置类
public class IoCTest { ... }
7.3、配置类导入 XML 配置
需要使用 @ImportResource 来完成,指定导入 XML 配置文件的路径。
// 主配置类
@Configuration
@ImportResource("classpath:XML文件路径") // 在主配置类中关联 XML 配置
public class JavaConfig { ... }// 测试
@SpringJUnitConfig(classes = JavaConfig.class) // 加载主配置类
public class IoCTest { ... }
二、Spring Boot 介绍
Spring Boot 是由 Pivotal 团队提供的全新框架,其设计目的是用来简化新 Spring 应用的初始搭建以及开发过程。
人们把 Spring Boot 称为搭建程序的脚手架。其最主要作用就是帮我们快速的构建庞大的 Spring 项目,并且尽可能的减少一切 XML 配置,做到开箱即用,迅速上手,让我们关注与业务而非配置。
该框架非常火,目前新开项目几乎都是基于 Spring Boot 搭建,非常符合微服务架构要求,企业招聘大多都要求有 Spring Boot 开发经验,属于面试必问的点。
1、优点
-
创建独立运行的 Spring 应用程序;
-
可嵌入 Tomcat,无需部署 war 文件;
-
简化 Maven 配置;
-
自动配置 Spring;
-
提供生产就绪型功能,如:日志,健康检查和外部配置等;
-
不要求配置 XML;
-
非常容易和第三方框架集成起来。
2、缺点
-
版本更新较快,可能出现较大变化;
-
因为约定大于配置,所以经常会出现一些很难解决的问题。
三、Spring Boot 快速入门
1、使用 IDEA 创建 Spring Boot 工程
Spring Boot 建议使用官方提供的工具来快速构建项目。IDEA 自带该功能,但需要联网使用。
注意:官方提供的构建工具默认只能选择固定的版本,有些版本之间的差异非常大,所以如果需要选择某个版本可以自行在 pom.xml 文件中修改版本。
1.1、勾选依赖
1.2、编写 Controller 代码
@Controller
public class HelloController {@RequestMapping("/hello")@ResponseBodypublic String hello() {return "Hello Spring Boot";}
}
然后通过 main 方法启动程序,观察控制台输出内容,最后浏览器中输入 http://localhost:8080/hello 验证效果。
1.3、启动类和测试类
使用 IDEA 创建的项目会自动生成一个启动类,其实本质也是一个配置类,如下:
@SpringBootApplication
public class XxxApplication {public static void main(String[] args) {SpringApplication.run(XxxApplication.class, args);}
}
使用 IDEA 创建的项目会自动生成一个测试类,测试类贴有 @SpringBootTest 注解,可以通过通过注解属性指定加载的配置类,若没有指定,默认加载的是贴 @SpringBootApplication 注解的配置类,如下:
@SpringBootTest
class XxxApplicationTest {// ...
}
2、创建普通 Maven 工程
2.1、添加依赖
<!-- 打包方式 jar --> <packaging>jar</packaging> <parent><groupId>org.springframework.boot</groupId><artifactId>spring-boot-starter-parent</artifactId><version>2.3.3.RELEASE</version> </parent> <dependencies><dependency><groupId>org.springframework.boot</groupId><artifactId>spring-boot-starter-web</artifactId></dependency> </dependencies>
2.2、编写 Controller 代码
@Controller
public class HelloController {@RequestMapping("/hello")@ResponseBodypublic String hello() {return "Hello Spring Boot";}
}
2.3、编写启动程序
@SpringBootApplication
public class DemoApplication {public static void main(String[] args) {SpringApplication.run(DemoApplication.class, args);}
}
然后通过 main 方法启动程序,观察控制台输出内容,最后浏览器中输入 http://localhost:8080/hello 验证效果。
3、疑问
-
当前项目继承的 spring-boot-starter-parent 项目有什么用?
-
导入的依赖 spring-boot-starter-web 有什么用?
-
占用 8080 端口的 Tomcat9 服务器哪来的?
-
之前的 Web 应用打包是 war,为什么现在的打包方式是 jar?
-
@SpringBootApplication 注解有什么用?
-
main 方法中执行的代码 SpringApplication.run(..) 有什么用?
四、入门案例分析
1、spring-boot-starter-parent
Spring Boot 提供了一个名为 spring-boot-starter-parent 的工程,里面已经对各种常用依赖(并非全部)的版本进行了管理,我们的项目需要以这个项目为父工程,这样我们就不用操心依赖的版本问题了,需要什么依赖,直接引入坐标即可!
<parent><groupId>org.springframework.boot</groupId><artifactId>spring-boot-starter-parent</artifactId><version>2.3.3.RELEASE</version>
</parent>
继承是 Maven 中很强大的一种功能,继承可以使得子 pom 可以获得 parent 中的部分配置(groupId,version,dependencies,build,dependencyManagement 等),可以对子 pom 进行统一的配置和依赖管理。
-
parent 项目中的 dependencyManagement 里的声明的依赖,只具有声明的作用,并不实现引入,因此子项目需要显式的声明需要用的依赖。如果不在子项目中声明依赖,是不会从父项目中继承下来的;只有在子项目中写了该依赖项,并且没有指定具体版本,才会从父项目中继承该项,并且 version 和 scope 都读取自父 pom;另外若子项目中指定了版本号,那么会使用子项目中指定的 jar 版本。
-
parent 项目中的 dependencies 里声明的依赖会被所有的子项目继承。
2、Spring Boot Starter
Spring Boot 非常优秀的地方在于提供了非常多以 spring-boot-starter-* 开头的开箱即用的 starter 启动器(依赖包),使得我们在开发业务代码时能够非常方便的、不需要过多关注框架的配置,而只需要关注业务即可。
Spring Boot 在配置上相比 Spring 要简单许多,其核心在于 spring-boot-starter, 在使用 Spring Boot 来搭建一个项目时,只需要引入官方提供的 starter,就可以直接使用,免去了各种配置。
官方目前已提供的常见的 Starter 如下 :
spring-boot-starter:核心启动器,提供了自动配置,日志和 YAML 配置支持。
spring-boot-starter-aop:支持使用
Spring AOP和AspectJ进行切面编程。spring-boot-starter-freemarker:支持使用
FreeMarker视图构建 Web 应用。spring-boot-starter-test:支持使用
JUnit,测试Spring Boot应用。spring-boot-starter-web:支持使用
Spring MVC构建 Web 应用,包括RESTful应用,使用Tomcat作为默认的嵌入式容器。spring-boot-starter-actuator:支持使用 Spring Boot Actuator 提供生产级别的应用程序监控和管理功能。
spring-boot-starter-logging:提供了对日志的支持,默认使用 Logback。
有关 Spring Boot Starter 命名规范,所有官方发布的 Starter 都遵循以下命名模式:spring-boot-starter-*,其中 * 指特定的应用程序代号或名称。任何第三方提供的 Starter 都不能以 spring-boot 作为前缀,应该将应用程序代号或名称作为前缀,譬如 mybatis-spring-boot-starter。
3、Web 启动器
这是 SpringBoot 提供的 Web 启动器,是一个快速集成 Web 模块的工具包,包含 Spring MVC,Jackson 相关的依赖,以及嵌入了 Tomcat9 服务器,默认端口 8080。
<dependencies><dependency><groupId>org.springframework.boot</groupId><artifactId>spring-boot-starter-web</artifactId></dependency>
</dependencies>
需要注意的是,我们并没有在这里指定版本信息。因为 Spring Boot 的父工程已经对版本进行了管理了。
这个时候,我们会发现项目中多出了大量的依赖:
这些都是 Spring Boot 根据 spring-boot-starter-web 这个依赖自动引入的,而且所有的版本都已经管理好,不会出现冲突。
4、打包独立运行
对于 Spring Boot 项目来说无论是普通应用还是 Web 应用,其打包方式都是 jar 即可,当然 Web 应用也能打 war 包,但是需要额外添加许多插件来运行,比较麻烦。
默认的 Maven 打包方式是不能正常的打包 Spring Boot 项目的,需要额外的引入打包插件,才能正常的对 Spring Boot 项目打包,以后只要拿到该 jar 包就能脱离 IDE 工具独立运行了。
<!-- pom.xml 中添加插件 -->
<build><plugins><!-- Spring Boot 打包插件 --><plugin><groupId>org.springframework.boot</groupId><artifactId>spring-boot-maven-plugin</artifactId></plugin></plugins>
</build>
-
使用 maven 的 package 命令进行打包;
-
使用命令
java -jar xxx.jar运行 jar 包(--server.port=80)。
五、Spring Boot 参数配置
1、参数来源
-
命令行启动项目时传入的参数,如:
java -jar xxx.jar --server.port=80; -
application.properties 或者 application.yml 文件。
一般用的比较多的就是直接在 application.properties 或者 application.yml 配置,其次是命令行启动方式。
1.1、application.properties 语法
server.port=80
server.session-timeout=30
server.tomcat.uri-encoding=UTF-8spring.datasource.driverClassName=com.mysql.jdbc.Driver
spring.datasource.url=jdbc:mysql://localhost:3306/rbac
spring.datasource.username=root
spring.datasource.password=admin
1.2、application.yml 语法
server: port: 80session-timeout: 30 tomcat.uri-encoding: UTF-8 spring: datasource: url: jdbc:mysql://localhost:3306/crm username: root password: admin driverClassName: com.mysql.jdbc.Driver
2、配置优先级
一个项目中可以有多个配置文件存放在不同目录中,此时他们会遵循固定的优先级来处理有冲突的属性配置,优先级由高到底,高优先级的配置会覆盖低优先级的配置。用 application.properties 文件举例子,下面文件优先级由高到低排序:
-
项目/config/application.properties
-
项目/application.properties
-
classpath:config/application.properties
-
classpath:application.properties
一般都在 classpath:application.properties 做配置,其他方式不使用。
3、参数属性绑定
通过配置参数,来自定义程序的运行。一般配置参数编写 application.properties 或者我们自定义的 properties 文件中。
3.1、参数配置在自定义的 properties
回顾之前使用 XML 配置时,想让 Spring 知道我们指定自定义的 properties 文件,就需要如下配置:
# db.properties
jdbc.driverClassName=com.mysql.jdbc.Driver
jdbc.url=jdbc:mysql://localhost:3306/rbac
jdbc.username=root
jdbc.password=admin
<context:property-placeholder location="classpath:db.properties" system-properties-mode="NEVER"/>
而现在使用 JavaConfig 配置,就得使用 @PropertySource + @Value 两个注解配合完成。@PropertySource 的作用就等价于上面那段 XML 配置。
/*** @PropertySource:把属性配置加载到 Spring 的环境对象中* @Value:从 Spring 环境对象中根据 key 读取 value*/
@Configuration
@PropertySource("classpath:db.properties")
public class JavaConfig {@Value("${jdbc.driverClassName}")private String driverClassName;@Value("${jdbc.url}")private String url;@Value("${jdbc.username}")private String username;@Value("${jdbc.password}")private String password;
@Beanpublic MyDataSource dataSource() {MyDataSource dataSource = new MyDataSource();dataSource.setDriverClassName(driverClassName);dataSource.setUrl(url);dataSource.setUsername(username);dataSource.setPassword(password);return dataSource;}
}
3.2、参数配置在 application.properties
准备好 application.properties 和一个类 MyDataSource,配置如下:
# application.properties
jdbc.driverClassName=com.mysql.jdbc.Driver
jdbc.url=jdbc:mysql://localhost:3306/crm
jdbc.username=root
jdbc.password=admin
public class MyDataSource {private String driverClassName;private String url;private String username;private String password;// 省略 toString 方法
}
3.2.1、@Value 绑定单个属性
在自定义的类上绑定属性如下:
@Component
public class MyDataSource {@Value("${jdbc.driverClassName}")private String driverClassName;@Value("${jdbc.url}")private String url;@Value("${jdbc.username}")private String username;@Value("${jdbc.password}")private String password;
// 省略 toString 方法
}
@Configuration
@ComponentScan("上面类所在的包路径")
public class JavaConfig { }
在配置类上绑定属性如下:
@Configuration
public class JavaConfig { // @Value:从 Spring 环境对象中根据 key 读取 value@Value("${jdbc.driverClassName}")private String driverClassName;@Value("${jdbc.url}")private String url;@Value("${jdbc.username}")private String username;@Value("${jdbc.password}")private String password;@Beanpublic MyDataSource dataSource() {MyDataSource dataSource = new MyDataSource();dataSource.setDriverClassName(driverClassName);dataSource.setUrl(url);dataSource.setUsername(username);dataSource.setPassword(password);return dataSource;}
}
3.2.2、@ConfigurationProperties 绑定对象属性
若觉得上面的方式比较笨重,可以把前缀编写到 @ConfigurationProperties 属性上,并且设置类属性与需要绑定的参数名相同,可实现自动绑定,但是注意,若是使用测试类加载贴有 @Configuration 的配置类,则需要在配置类中添加 @EnableConfigurationProperties 注解;若是使用测试类加载贴有 @SpringBootApplication 的配置类,则不需要。
@Component
@ToString
@Setter
@ConfigurationProperties(prefix="jdbc")
public class MyDataSource {private String driverClassName;private String url;private String username;private String password;
}
或者像下面这样配置:
@Bean
@ConfigurationProperties("jdbc")
public MyDataSource dataSource() {return new MyDataSource();
}
@EnableConfigurationProperties 文档中解释:当 @EnableConfigurationProperties 注解应用到你的 @Configuration 时,任何贴 @ConfigurationProperties 注解的 beans 将自动被 Environment 进行属性绑定。
3.3、使用 Spring 的 Environment 对象绑定属性
当要绑定的参数过多时,直接在配置类中注入 Spring 的 Environment 对象, 这样就不需要贴上在字段或者形参上太多的 @Value 注解,相对比较简洁。
从 Environment 对象中可以获取到 application.properties 里面的参数,也可以获取到 @PropertySource 中的参数(即对配置在什么文件中没有要求)。
@Configuration
@PropertySource("classpath:db.properties")
public class JavaConfig {/*** environment:表示 Spring 的环境对象,该对象包含了加载的属性数据* 可以获取到 application.properties 里面的参数,也可以获取到 @PropertySource 中的参数* 但 application.properties 的优先级比 @PropertySource 高*/@Autowiredprivate Environment environment;
@Beanpublic MyDataSource dataSource() {MyDataSource dataSource = new MyDataSource();dataSource.setDriverClassName(environment.getProperty("jdbc.driverClassName"));dataSource.setUrl(environment.getProperty("jdbc.url"));dataSource.setUsername(environment.getProperty("jdbc.username"));dataSource.setPassword(environment.getProperty("jdbc.password"));return dataSource;}
}
相关文章:

Springboot IOC DI理解及实现+JUnit的引入+参数配置
一、JavaConfig 我们通常使用 Spring 都会使用 XML 配置,随着功能以及业务逻辑的日益复杂,应用伴随着大量的 XML 配置文件以及复杂的 bean 依赖关系,使用起来很不方便。 在 Spring 3.0 开始,Spring 官方就已经开始推荐使用 Java…...

CeresPCL 最小二乘插值(曲线拟合)
一、简介 在多项式插值时,当数据点个数较多时,插值会导致多项式曲线阶数过高,带来不稳定因素。因此我们可以通过固定幂基函数的最高次数 m(m < n),来对我们要拟合的曲线进行降阶。之前的函数形式就可以变为: 既然是最小二乘问题,那么就仍然可以使用Ceres来进行求解。 …...

【TCP/IP】自定义应用层协议,常见端口号
互联网中,主流的是 TCP/IP 五层协议 5G/4G 上网,是有自己的协议栈,要比 TCP/IP 更复杂(能够把 TCP/IP 的一部分内容给包含进去了) 应用层 可以代表我们所编写的应用程序,只要应用程序里面用到了网络通信…...

Frida 的下载和安装
首先要安装好 python 环境 安装 frida 和 工具包 pip install frida frida-tools 查看版本: frida --version 16.4.8 然后到 github 上下载对应 server ( 和frida 的版本一致 16.4.8) Releases frida/frida (github.com) 查看手机或…...

后端开发刷题 | 链表内指定区间反转【链表篇】
描述 将一个节点数为 size 链表 m 位置到 n 位置之间的区间反转,要求时间复杂度 O(n)O(n),空间复杂度 O(1)O(1)。 例如: 给出的链表为 1→2→3→4→5→NULL1→2→3→4→5→NULL, m2,n4 返回 1→4→3→2→5→NULL 数据范围: 链表…...

【NVMe系列-提问页与文章总结页面】
NVMe系列-提问页与文章总结页面 问题汇总NVMe协议是什么?PRP 与 PRP List是做什么的? 已写文章汇总 问题汇总 NVMe协议是什么? PRP 与 PRP List是做什么的? 已写文章汇总...

用生成器函数生成表单各字段
生成器函数生成表单字段是非常合适的用法,避免你要用纯javascript做后台时频繁的制作表单,而不能重复利用 //这里是javascript部分,formfiled.js //生成器函数对字段的处理,让各字段name\className\label\value\placeholder赋值到input的属性…...

【xilinx】O-RAN 无线电接口 - Vivado 2020.1 及更新工具版本的发行说明
描述 记录包含 O-RAN 无线电接口 LogiCORE IP 的发行说明和已知问题,包括以下内容: 一般信息已知和已解决的问题 解决方案 一般信息 可以在以下三个位置找到支持的设备: O-RAN 无线电接口 IP 产品指南(需要访问O-RAN 安全站点&…...

结营考试- 算法进阶营地 - DAY11
结营考试 - 算法进阶营地 - DAY11 测评链接; A - 打卡题 考点:枚举; 分析 枚举 a _①_ b _②_ c d,中两个运算符的 3 3 3 种可能性,尝试寻找一种符合要求的答案。 参考代码 #include <bits/stdc.h> usi…...

设计模式: 访问者模式
文章目录 一、介绍二、模式结构三、优缺点1、优点2、缺点 四、应用场景 一、介绍 Visitor 模式(访问者模式)是一种行为设计模式,它允许在不修改对象结构的前提下,增加作用于一组对象上新的操作。就增加新的操作而言,V…...

selenium底层原理详解
目录 1、selenium版本的演变 1.1、Selenium 1.x(Selenium RC时代) 1.2、Selenium 2.x(WebDriver整合时代) 1.3、Selenium 3.x 2、selenium原理说明 3、源码说明 3.1、启动webdriver服务建立连接 3.2、发送操作 1、seleni…...

【Solidity】继承
继承 Solidity 中使用 is 关键字实现继承: contract Father {function getNumber() public pure returns (uint) {return 10;}function getNumber2() public pure virtual returns (uint) {return 20;} }contract Son is Father {}现在 Son 就可以调用 Father 的 …...

docker 安装mino服务,启动报错: Fatal glibc error: CPU does not support x86-64-v2
背景 docker 安装mino服务,启动报错: Fatal glibc error: CPU does not support x86-64-v2 原因 Docker 镜像中的 glibc 版本要求 CPU 支持 x86-64-v2 指令集,而你的硬件不支持。 解决办法 降低minio对应的镜像版本 经过验证:qu…...

地图相册系统的设计与实现
摘 要 随着信息技术和网络技术的飞速发展,人类已进入全新信息化时代,传统管理技术已无法高效,便捷地管理信息。为了迎合时代需求,优化管理效率,各种各样的管理系统应运而生,各行各业相继进入信息管理时代&a…...

使用vh和rem实现元素响应式布局
示例代码 height: calc(100vh 30rem) vh(Viewport Height):vh是一个相对单位,代表浏览器窗口高度的百分比,例如20vh就是浏览器窗口高度的20%。 rem(root em):rem是通过html根元素…...
)
螺旋矩阵 II(LeetCode)
题目 给你一个正整数 n ,生成一个包含 1 到 n2 所有元素,且元素按顺时针顺序螺旋排列的 n x n 正方形矩阵 matrix 。 解题 def generateMatrix(n):matrix [[0] * n for _ in range(n)]top, bottom 0, n - 1left, right 0, n - 1num 1while top <…...

如何快速掌握一款MCU
了解MCU特点 rom ,ramgpiotimerpower 明确哪些资源是项目开发需要的 认真理解相关资料模块 开始编程 编写特别的验证程序(项目不紧)按照自己的理解编写(老司机,时间紧张) 掌握MCU基本功能 定时器 固…...

XSS-DOM
文章目录 源码SVG标签Dom-Clobbringtostring 源码 <script>const data decodeURIComponent(location.hash.substr(1));;const root document.createElement(div);root.innerHTML data;// 这里模拟了XSS过滤的过程,方法是移除所有属性,sanitize…...

uniapp去掉页面导航条
在pages.json文件中,globalStyle中添加 ”app-plus“:{"titleNView":false }...

MySQL数据库专栏(三)数据库服务维护操作
1、界面维护,打开服务窗口找到MySQL服务,右键单击可对服务进行启动、停止、重启等操作。 选择属性,还可以设置启动类型为自动、手动、禁用。 2、指令维护 卸载服务:sc delete [服务名称] 例如:sc delete MySQL 启动服…...

在鸿蒙HarmonyOS 5中实现抖音风格的点赞功能
下面我将详细介绍如何使用HarmonyOS SDK在HarmonyOS 5中实现类似抖音的点赞功能,包括动画效果、数据同步和交互优化。 1. 基础点赞功能实现 1.1 创建数据模型 // VideoModel.ets export class VideoModel {id: string "";title: string ""…...

2025盘古石杯决赛【手机取证】
前言 第三届盘古石杯国际电子数据取证大赛决赛 最后一题没有解出来,实在找不到,希望有大佬教一下我。 还有就会议时间,我感觉不是图片时间,因为在电脑看到是其他时间用老会议系统开的会。 手机取证 1、分析鸿蒙手机检材&#x…...

WordPress插件:AI多语言写作与智能配图、免费AI模型、SEO文章生成
厌倦手动写WordPress文章?AI自动生成,效率提升10倍! 支持多语言、自动配图、定时发布,让内容创作更轻松! AI内容生成 → 不想每天写文章?AI一键生成高质量内容!多语言支持 → 跨境电商必备&am…...

Redis数据倾斜问题解决
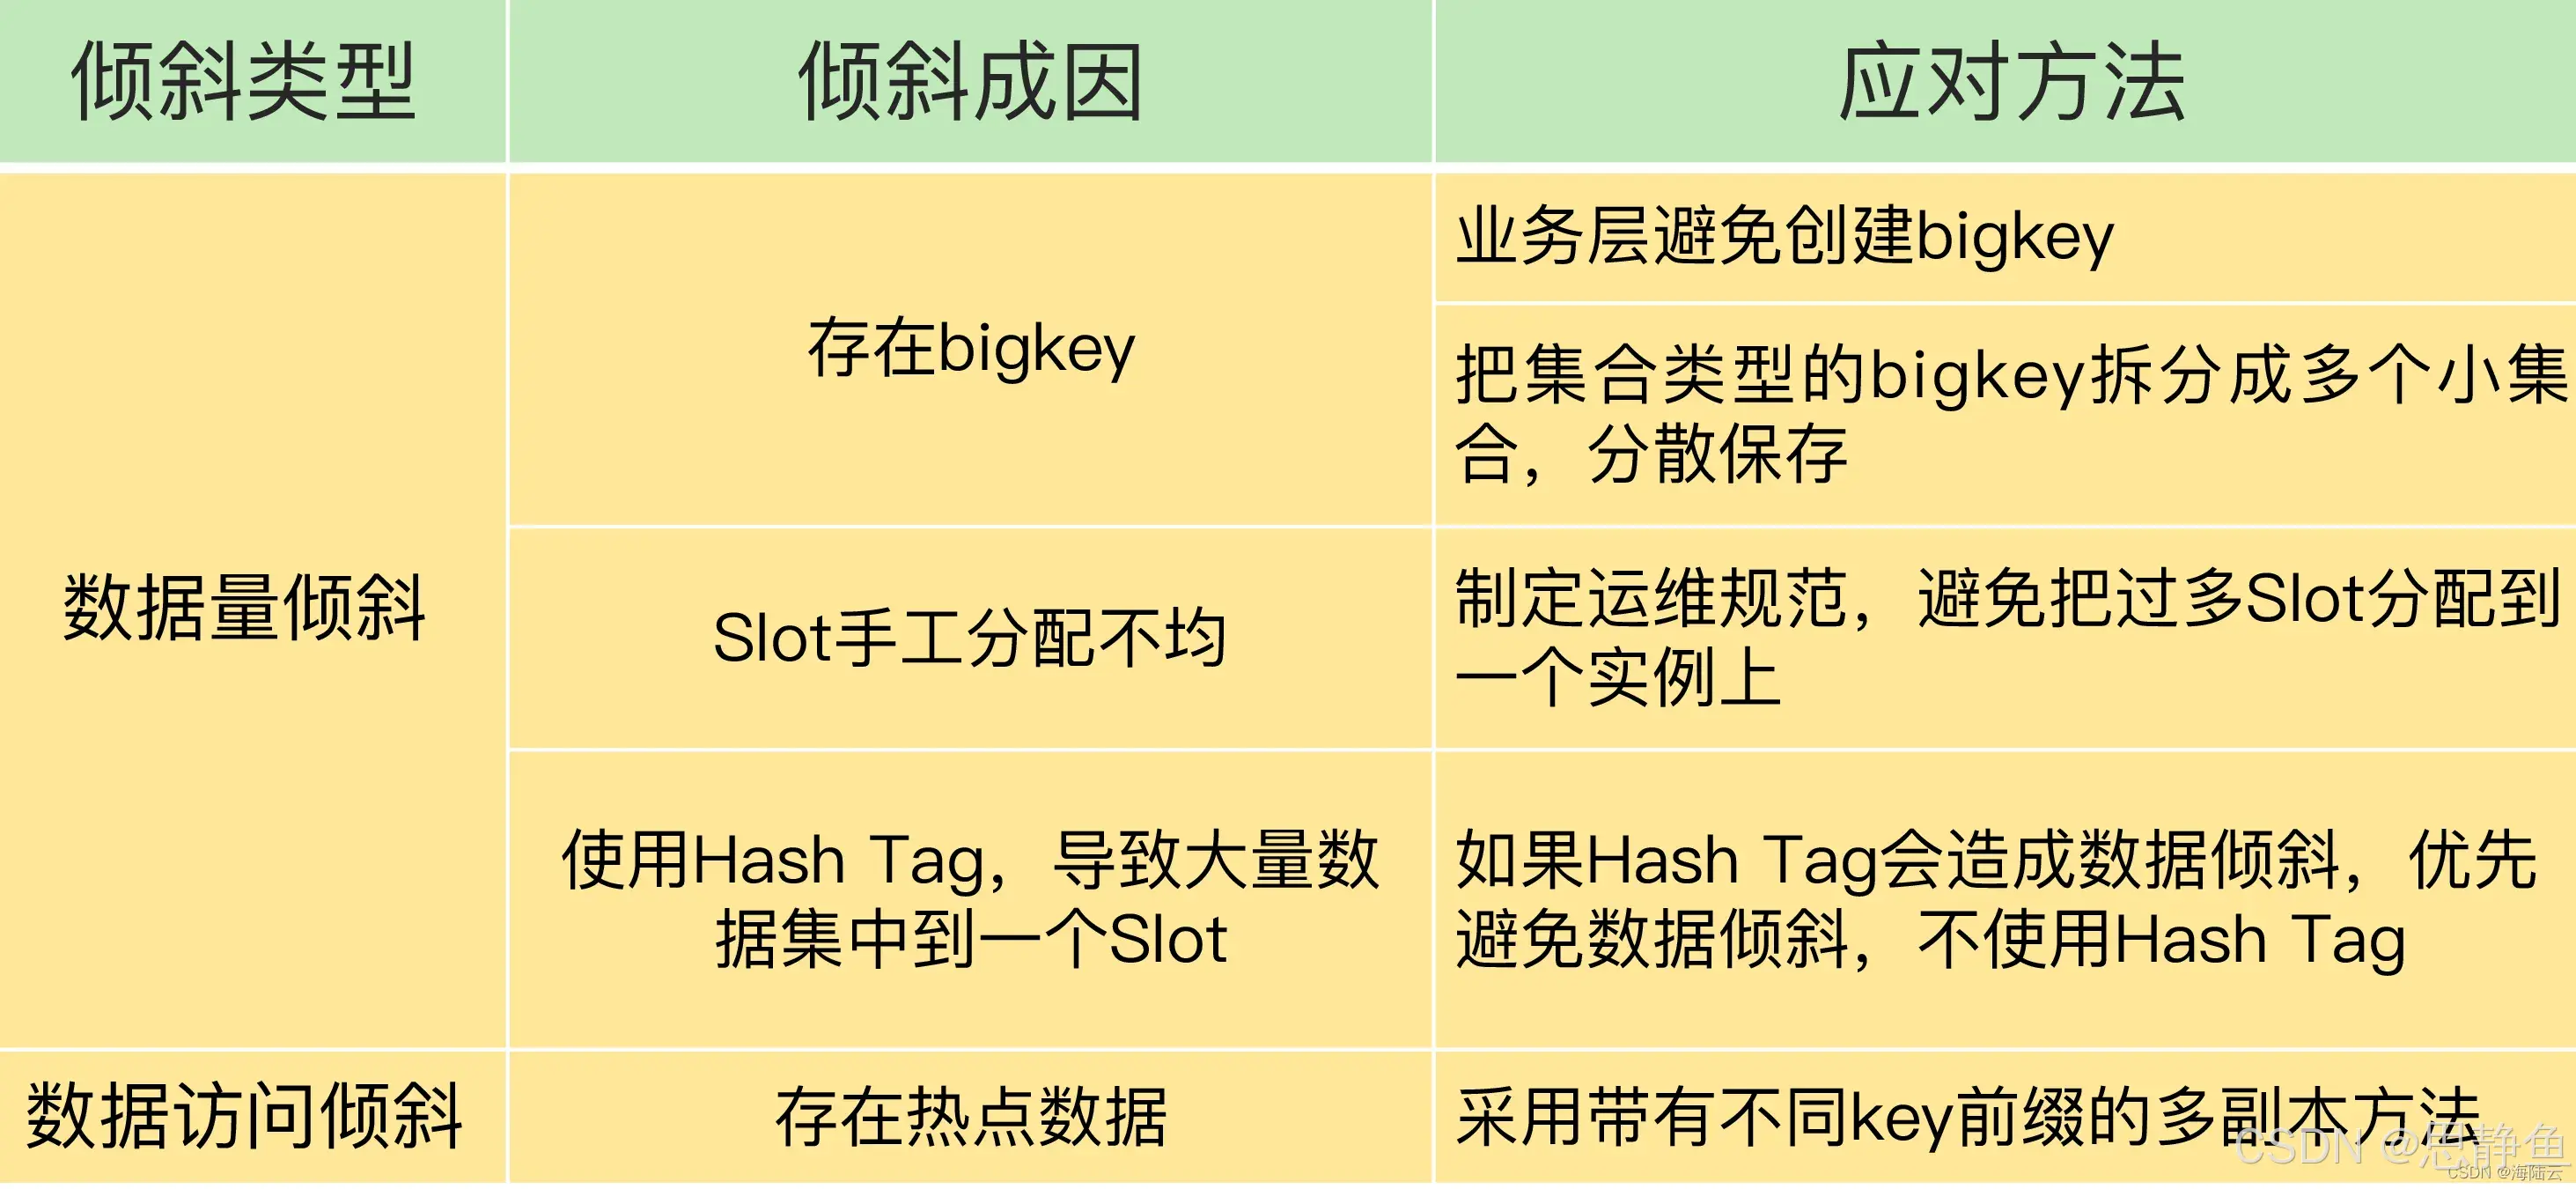
Redis 数据倾斜问题解析与解决方案 什么是 Redis 数据倾斜 Redis 数据倾斜指的是在 Redis 集群中,部分节点存储的数据量或访问量远高于其他节点,导致这些节点负载过高,影响整体性能。 数据倾斜的主要表现 部分节点内存使用率远高于其他节…...

【SpringBoot自动化部署】
SpringBoot自动化部署方法 使用Jenkins进行持续集成与部署 Jenkins是最常用的自动化部署工具之一,能够实现代码拉取、构建、测试和部署的全流程自动化。 配置Jenkins任务时,需要添加Git仓库地址和凭证,设置构建触发器(如GitHub…...

spring boot使用HttpServletResponse实现sse后端流式输出消息
1.以前只是看过SSE的相关文章,没有具体实践,这次接入AI大模型使用到了流式输出,涉及到给前端流式返回,所以记录一下。 2.resp要设置为text/event-stream resp.setContentType("text/event-stream"); resp.setCharacter…...

用 FFmpeg 实现 RTMP 推流直播
RTMP(Real-Time Messaging Protocol) 是直播行业中常用的传输协议。 一般来说,直播服务商会给你: ✅ 一个 RTMP 推流地址(你推视频上去) ✅ 一个 HLS 或 FLV 拉流地址(观众观看用)…...

开疆智能Ethernet/IP转Modbus网关连接鸣志步进电机驱动器配置案例
在工业自动化控制系统中,常常会遇到不同品牌和通信协议的设备需要协同工作的情况。本案例中,客户现场采用了 罗克韦尔PLC,但需要控制的变频器仅支持 ModbusRTU 协议。为了实现PLC 对变频器的有效控制与监控,引入了开疆智能Etherne…...

Qt/C++学习系列之列表使用记录
Qt/C学习系列之列表使用记录 前言列表的初始化界面初始化设置名称获取简单设置 单元格存储总结 前言 列表的使用主要基于QTableWidget控件,同步使用QTableWidgetItem进行单元格的设置,最后可以使用QAxObject进行单元格的数据读出将数据进行存储。接下来…...

npm install 相关命令
npm install 相关命令 基本安装命令 # 安装 package.json 中列出的所有依赖 npm install npm i # 简写形式# 安装特定包 npm install <package-name># 安装特定版本 npm install <package-name><version>依赖类型选项 # 安装为生产依赖(默认&…...
