kubeadm部署 Kubernetes(k8s) 高可用集群【V1.28 】
kubeadm是官方社区推出的一个用于快速部署kubernetes集群的工具。
calico.yaml
kubernertes-dashboard.yaml
1. 安装要求
在开始之前,部署Kubernetes集群机器需要满足以下几个条件:
- 10台机器,操作系统Openeuler22.03 LTS SP4
- 硬件配置:2GB或更多RAM,2个CPU或更多CPU,硬盘30GB或更多,docker 数据卷单独挂载
- 集群中所有机器之间网络互通
- 可以访问外网,需要拉取镜像,【镜像代理自行解决】
- 禁止swap分区
2. 准备环境
| 角色 | IP | 组件 | 功能描述 |
|---|---|---|---|
| Haproxy | 172.22.33.210 | haproxy | K8S入口,负载均衡 |
| k8s-master01 | 172.22.33.215 | docker,cri-dockerd,kube-apiserver,kube-scheduler,kube-controller-manager,kubelet,kube-proxy,coredns,calico | k8s master01节点 |
| k8s-master02 | 172.22.33.216 | docker,cri-dockerd,kube-apiserver,kube-scheduler,kube-controller-manager,kubelet,kube-proxy,calico | k8s master02节点 |
| k8s-master03 | 172.22.33.217 | docker,cri-dockerd,kube-apiserver,kube-scheduler,kube-controller-manager,kubelet,kube-proxy,calico | k8s master03节点 |
| k8s-node01 | 172.22.33.218 | docker,cri-dockerd,kubelet,kube-proxy,coredns,calico | k8s-node01 工作节点 |
| k8s-node02 | 172.22.33.219 | docker,cri-dockerd,kubelet,kube-proxy,coredns,calico | k8s-node02 工作节点 |
| k8s-node03 | 172.22.33.220 | docker,cri-dockerd,kubelet,kube-proxy,coredns,calico | k8s-node03 工作节点 |
| etcd-01 | 172.22.33.223 | etcd | etcd-01服务器 |
| etcd-02 | 172.22.33.224 | etcd | etcd-02服务器 |
| etcd-03 | 72.22.33.225 | etcd | etcd-03服务器 |
2.1 环境初始化
K8S 集群服务器 都需要配置
关闭防火墙:
$ systemctl stop firewalld
$ systemctl disable firewalld关闭selinux:
$ sed -i 's/enforcing/disabled/' /etc/selinux/config  # 永久
$ setenforce 0  # 临时关闭swap:[临时和永久关闭]
#临时关闭
$ swapoff -a#永久关闭
$ sed -ri 's/.*swap.*/#&/' /etc/fstab设置主机名:
$ hostnamectl set-hostname k8s-master01
$ hostnamectl set-hostname k8s-master02
$ hostnamectl set-hostname k8s-master03
$ hostnamectl set-hostname k8s-node01
$ hostnamectl set-hostname k8s-node02
$ hostnamectl set-hostname k8s-node03#在K8S上所有节点添加hosts:
$ cat >> /etc/hosts << EOF
172.22.33.215 k8s-master01
172.22.33.216 k8s-master02
172.22.33.217 k8s-master03
172.22.33.218 k8s-node01
172.22.33.219 k8s-node02
172.22.33.220 k8s-node03
EOF#开启内核路由转发
sed -i 's/net.ipv4.ip_forward=0/net.ipv4.ip_forward=1/g' /etc/sysctl.conf#将桥接的IPv4,IPV6流量传递到iptables的链:
$ cat > /etc/sysctl.d/k8s.conf << EOF
net.bridge.bridge-nf-call-ip6tables = 1
net.bridge.bridge-nf-call-iptables = 1
vm.swappiness = 0
EOF# 生效
$ sysctl --system#每个节点都需要安装 IPVS 的相关工具和加载ipvs内核模块
$ yum install ipvsadm#在所有节点执行以下命令
$ cat > /etc/sysconfig/modules/ipvs.modules <<EOF
#!/bin/bash
modprobe -- ip_vs
modprobe -- ip_vs_rr
modprobe -- ip_vs_wrr
modprobe -- ip_vs_sh
modprobe -- nf_conntrack_ipv4
EOF$ chmod 755 /etc/sysconfig/modules/ipvs.modules
$ bash /etc/sysconfig/modules/ipvs.modules#查看IPVS模块加载情况
$ lsmod | grep -e ip_vs -e nf_conntrack_ipv4
#能看到ip_vs ip_vs_rr ip_vs_wrr  ip_vs_sh nf_conntrack_ipv4  加载成功时间同步:
$ yum install ntpdate -y
$ ntpdate ntp.ntsc.ac.cn
3. 安装Docker/cri-dockerd/kubeadm/kubelet/kubectl
在所有K8S 集群的节点上,执行
**Kubernetes1.24 之后, ** 在k8s中使用docker,除了安装docker 以外,还需要=安装cri-dockerd 组件; 不然就使用Containerd
3.1.1 docker二进制包下载
docker-ce 社区下载地址:
$ wget https://mirrors.nju.edu.cn/docker-ce/linux/static/stable/x86_64/docker-20.10.24.tgz
3.1.2 解压,拷贝至/usr/bin 下
$ tar -xf docker-20.10.24.tgz
$ cp docker/* /usr/bin
$ which docker
3.1.3 编写docker.service文件
$ cat > /etc/systemd/system/docker.service <<EOF[Unit]
Description=Docker Application Container Engine
Documentation=https://docs.docker.com
After=network-online.target firewalld.service
Wants=network-online.target[Service]
Type=notify
ExecStart=/usr/bin/dockerd
ExecReload=/bin/kill -s HUP $MAINPID
LimitNOFILE=65535
LimitNPROC=65535
LimitCORE=65535
TimeoutStartSec=0
Delegate=yes
KillMode=process
Restart=on-failure
StartLimitBurst=3
StartLimitInterval=60s[Install]
WantedBy=multi-user.targetEOF
3.1.4 挂载docker默认存储路径[可选]
docker的默认工作路径在/var/lib/docker ,最好不修改默认存储路径,可以做软链接
#建立工作目录
$ mkdir /home/application/#格式化磁盘
$ mkfs.ext4 /dev/sdb#磁盘永久挂载
$ vim /etc/fstab
/dev/sdb  /home/application  ext4 defaults 0 0#使挂载生效
$ mount -a# 创建docker 工作目录
$ mkdir /home/application/docker#创建软链接
$ ln -s /home/application/docker /var/lib/
3.1.5 添加可执行权限
$ chmod +x /etc/systemd/system/docker.service
3.1.6 启动,加载,开机自启动
$ systemctl daemon-reload
$ systemctl start docker.service
$ systemctl enable docker.service
3.1.7 配置镜像加速器
$ mkdir -p /etc/docker
$ tee /etc/docker/daemon.json <<-'EOF'
{"registry-mirrors": ["https://docker.srebro.cn"],"exec-opts": ["native.cgroupdriver=systemd"]
}
EOF$ systemctl daemon-reload
$ systemctl restart docker
⚠️tips:
如果仓库不是https 的,需要在 /etc/docker/daemon.json 中 添加忽略;比如下方的示例
"insecure-registries": ["https://harbor.srebro.cn","https://it-docker.pkg.devops.com"]
3.2.1 二进制部署cri-dockerd
- 项目地址: https://github.com/Mirantis/cri-dockerd
# 下载
wget https://github.com/Mirantis/cri-dockerd/releases/download/v0.3.14/cri-dockerd-0.3.14.amd64.tgz
tar -xf cri-dockerd-0.3.14.amd64.tgz
cp cri-dockerd/cri-dockerd /usr/bin/
chmod +x /usr/bin/cri-dockerd# 配置启动文件
cat <<"EOF" > /usr/lib/systemd/system/cri-docker.service
[Unit]
Description=CRI Interface for Docker Application Container Engine
Documentation=https://docs.mirantis.com
After=network-online.target firewalld.service docker.service
Wants=network-online.target
Requires=cri-docker.socket[Service]
Type=notifyExecStart=/usr/bin/cri-dockerd --network-plugin=cni --pod-infra-container-image=registry.aliyuncs.com/google_containers/pause:3.9ExecReload=/bin/kill -s HUP $MAINPID
TimeoutSec=0
RestartSec=2
Restart=alwaysStartLimitBurst=3StartLimitInterval=60sLimitNOFILE=infinity
LimitNPROC=infinity
LimitCORE=infinityTasksMax=infinity
Delegate=yes
KillMode=process[Install]
WantedBy=multi-user.target
EOF# 生成socket 文件cat <<"EOF" > /usr/lib/systemd/system/cri-docker.socket
[Unit]
Description=CRI Docker Socket for the API
PartOf=cri-docker.service[Socket]
ListenStream=%t/cri-dockerd.sock
SocketMode=0660
SocketUser=root
SocketGroup=root[Install]
WantedBy=sockets.targetEOF# 启动CRI-DOCKER
systemctl daemon-reload
systemctl start cri-docker
systemctl enable cri-docker
systemctl is-active cri-docker
3.2.2 添加阿里云YUM软件源
$ cat > /etc/yum.repos.d/kubernetes.repo << EOF
[kubernetes]
name=Kubernetes
baseurl=https://mirrors.aliyun.com/kubernetes/yum/repos/kubernetes-el7-x86_64
enabled=1
gpgcheck=0
repo_gpgcheck=0
gpgkey=https://mirrors.aliyun.com/kubernetes/yum/doc/yum-key.gpg https://mirrors.aliyun.com/kubernetes/yum/doc/rpm-package-key.gpg
EOF
3.2.3 安装kubeadm,kubelet和kubectl
由于版本更新频繁,这里指定版本号部署:
# 查看所有的可用版本
$ yum list  kubeadm  kubelet kubectl --showduplicates | sort -r#在所有节点安装
$ yum install -y kubelet-1.28.2-0 kubeadm-1.28.2-0 kubectl-1.28.2-0$ systemctl enable kubelet
4. 部署Haproxy负载均衡
4.1 yum安装haproxy
在172.22.33.210 服务器上部署
yum -y install haproxy
4.2 修改配置文件
$ cat > /etc/haproxy/haproxy.cfg << EOF
globallog /dev/log  local0 warningchroot      /var/lib/haproxypidfile     /var/run/haproxy.pidmaxconn     4000user        haproxygroup       haproxydaemonstats socket /var/lib/haproxy/stats
defaultslog globaloption  httplogoption  dontlognulltimeout connect 5000timeout client 50000timeout server 50000#frontend monitor-in#bind *:33305#mode http#option httplog#monitor-uri /monitorfrontend kube-apiserverbind *:36443mode tcpoption tcplogdefault_backend kube-apiserverbackend kube-apiservermode tcpoption tcplogoption tcp-checkbalance roundrobindefault-server inter 10s downinter 5s rise 2 fall 2 slowstart 60s maxconn 250 maxqueue 256 weight 100server kube-apiserver-1 172.22.33.215:6443 check # Replace the IP address with your own.server kube-apiserver-2 172.22.33.216:6443 check # Replace the IP address with your own.server kube-apiserver-3 172.22.33.217:6443 check # Replace the IP address with your own.
EOF
4.3 启动Haproxy
$ systemctl enable haproxy
$ systemctl start haproxy
5.部署etcd 集群
5.1 ETCD集群环境
| 机器IP | 主机名 | etcd版本 |
|---|---|---|
| 172.22.33.223 | etcd-01 | v3.3.8 |
| 172.22.33.224 | etcd-02 | v3.3.8 |
| 172.22.33.225 | etcd-03 | v3.3.8 |
5.2 修改主机名,添加hosts解析
在每台主机上执行
设置主机名:
$ hostnamectl set-hostname etcd-01
$ hostnamectl set-hostname etcd-02
$ hostnamectl set-hostname etcd-03#在所有节点添加hosts:
$ cat >> /etc/hosts << EOF
172.22.33.223 etcd-01
172.22.33.224 etcd-02
172.22.33.225 etcd-03
EOF
5.3 下载软件包,创建etcd工作目录
在每台主机上执行
- etcd 软件包下载地址: https://github.com/etcd-io/etcd/releases/download/v3.5.15/etcd-v3.5.15-linux-amd64.tar.gz
#创建etcd工作目录
$ mkdir -p /home/application/etcd/{bin,cfg,data,ssl}# 下载软件包并解压
$ wget https://github.com/etcd-io/etcd/releases/download/v3.5.15/etcd-v3.5.15-linux-amd64.tar.gz
$ tar -xf etcd-v3.5.15-linux-amd64.tar.gz
$ mv etcd-v3.5.15-linux-amd64/{etcdctl,etcd} /home/application/etcd/bin/#验证etcd版本
$ /home/application/etcd/bin/etcd --version
etcd Version: 3.5.15
Git SHA: 9a5533382
Go Version: go1.21.12
Go OS/Arch: linux/amd64
5.4 使用cfssl 工具签发etcd 证书
在172.22.33.223 主机上执行
签发证书的动作只需要在一台服务器上完成,签发之后,拷贝证书即可
#下载cfssl 签发工具【可能背墙,自行备源】
[root@master1 ~]# curl -L https://pkg.cfssl.org/R1.2/cfssl_linux-amd64 -o /usr/local/bin/cfssl
[root@master1 ~]# curl -L https://pkg.cfssl.org/R1.2/cfssljson_linux-amd64 -o /usr/local/bin/cfssljson
[root@master1 ~]# curl -L https://pkg.cfssl.org/R1.2/cfssl-certinfo_linux-amd64 -o /usr/local/bin/cfssl-certinfo
[root@master1 ~]# chmod +x /usr/local/bin/cfssl*
- 签发证书-配置 CA 并创建 TLS 证书
创建 Certificate Authority(CA), 并为 etcd创建 TLS 证书。
# 切换到证书工作目录下
$ cd /home/application/etcd/ssl# 配置 CA 的操作参数和策略。这些参数决定了 CA 的行为,如证书的有效期、证书链的深度、使用的加密算法等
$ cat << EOF | tee ca-config.json
{"signing": {"default": {"expiry": "87600h"},"profiles": {"etcd": {"expiry": "87600h","usages": ["signing","key encipherment","server auth","client auth"]}}}
}
EOF# 配置CA 生成证书签名请求(CSR)
$ cat << EOF | tee ca-csr.json
{"CN": "etcd CA","key": {"algo": "rsa","size": 2048},"names": [{"C": "CN","L": "Nanjing","ST": "Nanjing"}]
}
EOF#生成 CA 凭证和私钥:
$ cfssl gencert -initca ca-csr.json | cfssljson -bare ca#结果将生成以下两个文件:
$ ls -l ca*.pem
-rw------- 1 root root 1679  8月 26 14:19 ca-key.pem
-rw-r--r-- 1 root root 1265  8月 26 14:19 ca.pem

- 签发etcd server证书
修改请求文件中hosts字段包含所有etcd节点IP,172.22.33.223,172.22.33.224 ,172.22.33.225
# 创建etcd 证书请求文件
$ cat << EOF | tee server-csr.json
{"CN": "etcd","hosts": ["172.22.33.223","172.22.33.224","172.22.33.225"],"key": {"algo": "rsa","size": 2048},"names": [{"C": "CN","L": "Nanjing","ST": "Nanjing"}]
}
EOF# 生成etcd server证书:
$ cfssl gencert -ca=ca.pem -ca-key=ca-key.pem -config=ca-config.json -profile=etcd server-csr.json | cfssljson -bare server#结果将生成以下两个文件:
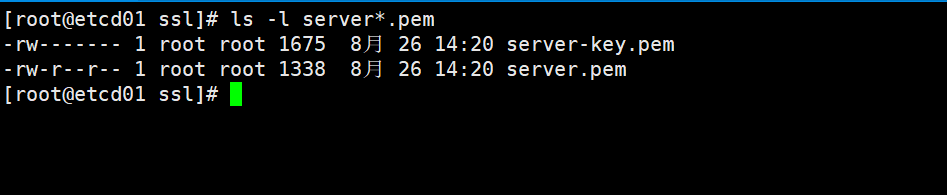
$ ls -l server*.pem
-rw------- 1 root root 1675 8月 26 14:20 server-key.pem
-rw-r--r-- 1 root root 1338 8月 26 14:20 server.pem
- 同步etcd 证书到其他节点
scp -rp /home/application/etcd/ssl/* 172.22.33.224:/home/application/etcd/ssl/*
scp -rp /home/application/etcd/ssl/* 172.22.33.225:/home/application/etcd/ssl/*
5.5 创建配置文件
172.22.33.223 etcd-01 节点
$ cd /home/application/etcd/cfg
$ cat >>  /home/application/etcd/cfg/etcd.conf << EOF
#[Member]
ETCD_NAME="etcd01"
ETCD_DATA_DIR="/home/application/etcd/data/default.etcd"
ETCD_LISTEN_PEER_URLS="https://172.22.33.223:2380"
ETCD_LISTEN_CLIENT_URLS="https://172.22.33.223:2379,http://127.0.0.1:2379"#[Clustering]
ETCD_INITIAL_ADVERTISE_PEER_URLS="https://172.22.33.223:2380"
ETCD_ADVERTISE_CLIENT_URLS="https://172.22.33.223:2379"
ETCD_INITIAL_CLUSTER="etcd01=https://172.22.33.223:2380,etcd02=https://172.22.33.224:2380,etcd03=https://172.22.33.225:2380"
ETCD_INITIAL_CLUSTER_TOKEN="etcd-cluster"
ETCD_INITIAL_CLUSTER_STATE="new"
ETCD_ENABLE_V2="true"#[Security]
ETCD_CERT_FILE="/home/application/etcd/ssl/server.pem"
ETCD_KEY_FILE="/home/application/etcd/ssl/server-key.pem"
ETCD_TRUSTED_CA_FILE="/home/application/etcd/ssl/ca.pem"
ETCD_CLIENT_CERT_AUTH="true"
ETCD_PEER_CERT_FILE="/home/application/etcd/ssl/server.pem"
ETCD_PEER_KEY_FILE="/home/application/etcd/ssl/server-key.pem"
ETCD_PEER_TRUSTED_CA_FILE="/home/application/etcd/ssl/ca.pem"
ETCD_PEER_CLIENT_CERT_AUTH="true"
EOF
172.22.33.224 etcd-02 节点
#[Member]
ETCD_NAME="etcd02"
ETCD_DATA_DIR="/home/application/etcd/data/default.etcd"
ETCD_LISTEN_PEER_URLS="https://172.22.33.224:2380"
ETCD_LISTEN_CLIENT_URLS="https://172.22.33.224:2379,http://127.0.0.1:2379"#[Clustering]
ETCD_INITIAL_ADVERTISE_PEER_URLS="https://172.22.33.224:2380"
ETCD_ADVERTISE_CLIENT_URLS="https://172.22.33.224:2379"
ETCD_INITIAL_CLUSTER="etcd01=https://172.22.33.223:2380,etcd02=https://172.22.33.224:2380,etcd03=https://172.22.33.225:2380"
ETCD_INITIAL_CLUSTER_TOKEN="etcd-cluster"
ETCD_INITIAL_CLUSTER_STATE="new"
ETCD_ENABLE_V2="true"#[Security]
ETCD_CERT_FILE="/home/application/etcd/ssl/server.pem"
ETCD_KEY_FILE="/home/application/etcd/ssl/server-key.pem"
ETCD_TRUSTED_CA_FILE="/home/application/etcd/ssl/ca.pem"
ETCD_CLIENT_CERT_AUTH="true"
ETCD_PEER_CERT_FILE="/home/application/etcd/ssl/server.pem"
ETCD_PEER_KEY_FILE="/home/application/etcd/ssl/server-key.pem"
ETCD_PEER_TRUSTED_CA_FILE="/home/application/etcd/ssl/ca.pem"
ETCD_PEER_CLIENT_CERT_AUTH="true"
EOF
172.22.33.225 etcd-03 节点
#[Member]
ETCD_NAME="etcd03"
ETCD_DATA_DIR="/home/application/etcd/data/default.etcd"
ETCD_LISTEN_PEER_URLS="https://172.22.33.225:2380"
ETCD_LISTEN_CLIENT_URLS="https://172.22.33.225:2379,http://127.0.0.1:2379"#[Clustering]
ETCD_INITIAL_ADVERTISE_PEER_URLS="https://172.22.33.225:2380"
ETCD_ADVERTISE_CLIENT_URLS="https://172.22.33.225:2379"
ETCD_INITIAL_CLUSTER="etcd01=https://172.22.33.223:2380,etcd02=https://172.22.33.224:2380,etcd03=https://172.22.33.225:2380"
ETCD_INITIAL_CLUSTER_TOKEN="etcd-cluster"
ETCD_INITIAL_CLUSTER_STATE="new"
ETCD_ENABLE_V2="true"#[Security]
ETCD_CERT_FILE="/home/application/etcd/ssl/server.pem"
ETCD_KEY_FILE="/home/application/etcd/ssl/server-key.pem"
ETCD_TRUSTED_CA_FILE="/home/application/etcd/ssl/ca.pem"
ETCD_CLIENT_CERT_AUTH="true"
ETCD_PEER_CERT_FILE="/home/application/etcd/ssl/server.pem"
ETCD_PEER_KEY_FILE="/home/application/etcd/ssl/server-key.pem"
ETCD_PEER_TRUSTED_CA_FILE="/home/application/etcd/ssl/ca.pem"
ETCD_PEER_CLIENT_CERT_AUTH="true"
EOF
5.6 创建etcd.service 文件
在每台主机上执行
$ cat >> /usr/lib/systemd/system/etcd.service << EOF
[Unit]
Description=Etcd Server
After=network.target
After=network-online.target
Wants=network-online.target[Service]
Type=notify
EnvironmentFile=/home/application/etcd/cfg/etcd.conf
ExecStart=/home/application/etcd/bin/etcd
Restart=on-failure
LimitNOFILE=65536[Install]
WantedBy=multi-user.target
EOF
5.7 启动etcd
在每台主机上执行
$ systemctl daemon-reload
$ systemctl enable etcd
$ systemctl start etcd# 检查etcd 服务是否正常
$ ps -ef | grep etcd | grep -v grep
root        7885       1  0 15:23 ?        00:00:00 /home/application/etcd/bin/etcd
5.8 etcd 集群服务可用性测试
使用etcdctl 工具测试,模拟写入数据,验证数据; etcdctl 工具,在安装包里有提供
#使用 etcdctl 工具快速检查指定的 etcd 节点(或节点集)的健康状态$  /home/application/etcd/bin/etcdctl --endpoints=https://172.22.33.223:2379,https://172.22.33.224:2379,https://172.22.33.225:2379 \
--cacert=/home/application/etcd/ssl/ca.pem \
--cert=/home/application/etcd/ssl/server.pem \
--key=/home/application/etcd/ssl/server-key.pem \
--write-out=table endpoint health
+----------------------------+--------+-------------+-------+
|          ENDPOINT          | HEALTH |    TOOK     | ERROR |
+----------------------------+--------+-------------+-------+
| https://172.22.33.224:2379 |   true | 16.120369ms |       |
| https://172.22.33.223:2379 |   true | 16.605784ms |       |
| https://172.22.33.225:2379 |   true | 19.851873ms |       |
+----------------------------+--------+-------------+-------+#使用 etcdctl 工具查看指定 etcd 节点(或节点集)当前的详细状态信息$ /home/application/etcd/bin/etcdctl --endpoints=https://172.22.33.223:2379,https://172.22.33.224:2379,https://172.22.33.225:2379 \
--cacert=/home/application/etcd/ssl/ca.pem \
--cert=/home/application/etcd/ssl/server.pem \
--key=/home/application/etcd/ssl/server-key.pem \
--write-out=table endpoint status
+----------------------------+------------------+---------+---------+-----------+------------+-----------+------------+--------------------+--------+
|          ENDPOINT          |        ID        | VERSION | DB SIZE | IS LEADER | IS LEARNER | RAFT TERM | RAFT INDEX | RAFT APPLIED INDEX | ERRORS |
+----------------------------+------------------+---------+---------+-----------+------------+-----------+------------+--------------------+--------+
| https://172.22.33.223:2379 |  b905915d4c303d2 |  3.5.15 |   20 kB |     false |      false |         2 |         11 |                 11 |        |
| https://172.22.33.224:2379 | 912027a2ec294592 |  3.5.15 |   20 kB |      true |      false |         2 |         11 |                 11 |        |
| https://172.22.33.225:2379 | 81330706eb2302ba |  3.5.15 |   20 kB |     false |      false |         2 |         11 |                 11 |        |
+----------------------------+------------------+---------+---------+-----------+------------+-----------+------------+--------------------+--------+#使用 etcdctl 工具验证测试 member$   /home/application/etcd/bin/etcdctl --endpoints=https://172.22.33.223:2379,https://172.22.33.224:2379,https://172.22.33.225:2379 \
--cacert=/home/application/etcd/ssl/ca.pem \
--cert=/home/application/etcd/ssl/server.pem \
--key=/home/application/etcd/ssl/server-key.pem \
--write-out=table member list
+------------------+---------+--------+----------------------------+----------------------------+------------+
|        ID        | STATUS  |  NAME  |         PEER ADDRS         |        CLIENT ADDRS        | IS LEARNER |
+------------------+---------+--------+----------------------------+----------------------------+------------+
|  b905915d4c303d2 | started | etcd01 | https://172.22.33.223:2380 | https://172.22.33.223:2379 |      false |
| 81330706eb2302ba | started | etcd03 | https://172.22.33.225:2380 | https://172.22.33.225:2379 |      false |
| 912027a2ec294592 | started | etcd02 | https://172.22.33.224:2380 | https://172.22.33.224:2379 |      false |
+------------------+---------+--------+----------------------------+----------------------------+------------+# etcdctl 工具验证测试数据读写
$  /home/application/etcd/bin/etcdctl --endpoints=https://172.22.33.223:2379,https://172.22.33.224:2379,https://172.22.33.225:2379 \
--cacert=/home/application/etcd/ssl/ca.pem \
--cert=/home/application/etcd/ssl/server.pem \
--key=/home/application/etcd/ssl/server-key.pem \
put srebro.cn hi
OK$ /home/application/etcd/bin/etcdctl --endpoints=https://172.22.33.223:2379,https://172.22.33.224:2379,https://172.22.33.225:2379 \
--cacert=/home/application/etcd/ssl/ca.pem \
--cert=/home/application/etcd/ssl/server.pem \
--key=/home/application/etcd/ssl/server-key.pem \
get srebro.cn
srebro.cn
OK
5.9 拷贝etcd 集群证书到K8S-master 节点上
在所有master 节点上执行
#创建etcd证书工作目录
$ mkdir -p /etc/kubernetes/pki/etcd#只需要拿etcd 集群中的任意一个节点上的证书,拷贝过去即可
$ scp -rp 172.22.33.223:/home/application/etcd/ssl/* /etc/kubernetes/pki/etcd/*
6. 部署Kubernetes Master
官方kubeadm 初始化说明:
-
https://kubernetes.io/zh/docs/reference/setup-tools/kubeadm/kubeadm-init/#config-file
-
https://kubernetes.io/docs/setup/production-environment/tools/kubeadm/create-cluster-kubeadm/#initializing-your-control-plane-node
6.1 准备好kubeadm-init.yaml初始化文件
6.1.1 使用外置ETCD 集群, 完成 kubeadm 初始化
⚠️ 包含etcd 证书
#在每个master 节点创建K8S,init 的工作目录
$ mkdir -p /etc/kubernetes/initcat >> /etc/kubernetes/init/kubeadm-init.yaml << EOF
---
apiVersion: kubeadm.k8s.io/v1beta3
bootstrapTokens:
- groups:- system:bootstrappers:kubeadm:default-node-tokentoken: 35sesk.5tm3tqc66tzlse8cttl: 24h0m0susages:- signing- authentication
kind: InitConfiguration
localAPIEndpoint:advertiseAddress: 172.22.33.223bindPort: 6443
nodeRegistration:criSocket: unix:///var/run/cri-dockerd.sockimagePullPolicy: IfNotPresentname: k8s-master01taints:- effect: NoSchedulekey: node-role.kubernetes.io/master
---
apiServer:certSANs:- kubernetes- kubernetes.default- kubernetes.default.svc- kubernetes.default.svc.cluster.local- 172.22.33.210- 172.22.33.215- 172.22.33.216- 172.22.33.217- 112.94.71.21- k8s.srebro.cntimeoutForControlPlane: 4m0s
apiVersion: kubeadm.k8s.io/v1beta3
certificatesDir: /etc/kubernetes/pki
clusterName: kubernetes
controlPlaneEndpoint: 172.22.33.210:36443
controllerManager: {}
dns: {}
etcd:external:endpoints:- "https://172.22.33.223:2379"- "https://172.22.33.224:2379"- "https://172.22.33.225:2379"caFile: /etc/kubernetes/pki/etcd/ca.pemcertFile: /etc/kubernetes/pki/etcd/server.pemkeyFile: /etc/kubernetes/pki/etcd/server-key.pem
imageRepository: registry.aliyuncs.com/google_containers
kind: ClusterConfiguration
kubernetesVersion: v1.28.2
networking:dnsDomain: cluster.localpodSubnet: 10.244.0.0/16serviceSubnet: 10.96.0.0/12
scheduler: {}
EOF
6.2 在所有master 节点上,pull 镜像到本地
init 之前,先下载镜像到master 机器上
#k8s-master01 节点上
$ kubeadm config images pull --config kubeadm-init.yaml[config/images] Pulled registry.aliyuncs.com/google_containers/kube-apiserver:v1.28.2
[config/images] Pulled registry.aliyuncs.com/google_containers/kube-controller-manager:v1.28.2
[config/images] Pulled registry.aliyuncs.com/google_containers/kube-scheduler:v1.28.2
[config/images] Pulled registry.aliyuncs.com/google_containers/kube-proxy:v1.28.2
[config/images] Pulled registry.aliyuncs.com/google_containers/pause:3.9
[config/images] Pulled registry.aliyuncs.com/google_containers/coredns:v1.10.1#k8s-master02 节点上
$ kubeadm config images pull --config kubeadm-init.yaml[config/images] Pulled registry.aliyuncs.com/google_containers/kube-apiserver:v1.28.2
[config/images] Pulled registry.aliyuncs.com/google_containers/kube-controller-manager:v1.28.2
[config/images] Pulled registry.aliyuncs.com/google_containers/kube-scheduler:v1.28.2
[config/images] Pulled registry.aliyuncs.com/google_containers/kube-proxy:v1.28.2
[config/images] Pulled registry.aliyuncs.com/google_containers/pause:3.9
[config/images] Pulled registry.aliyuncs.com/google_containers/coredns:v1.10.1#k8s-master03 节点上
$ kubeadm config images pull --config kubeadm-init.yaml[config/images] Pulled registry.aliyuncs.com/google_containers/kube-apiserver:v1.28.2
[config/images] Pulled registry.aliyuncs.com/google_containers/kube-controller-manager:v1.28.2
[config/images] Pulled registry.aliyuncs.com/google_containers/kube-scheduler:v1.28.2
[config/images] Pulled registry.aliyuncs.com/google_containers/kube-proxy:v1.28.2
[config/images] Pulled registry.aliyuncs.com/google_containers/pause:3.9
[config/images] Pulled registry.aliyuncs.com/google_containers/coredns:v1.10.1
6.3 在master01 节点上,完成kubeadm 初始化
$ cd /etc/kubernetes/init
$ kubeadm init --config kubeadm-init.yaml[init] Using Kubernetes version: v1.28.2
[preflight] Running pre-flight checks[WARNING Service-Kubelet]: kubelet service is not enabled, please run 'systemctl enable kubelet.service'
[preflight] Pulling images required for setting up a Kubernetes cluster
[preflight] This might take a minute or two, depending on the speed of your internet connection
[preflight] You can also perform this action in beforehand using 'kubeadm config images pull'
W0828 15:30:08.273727   10698 checks.go:835] detected that the sandbox image "registry.aliyuncs.com/google_containers/pause:3.7" of the container runtime is inconsistent with that used by kubeadm. It is recommended that using "registry.aliyuncs.com/google_containers/pause:3.9" as the CRI sandbox image.
[certs] Using certificateDir folder "/etc/kubernetes/pki"
[certs] Generating "ca" certificate and key
[certs] Generating "apiserver" certificate and key
[certs] apiserver serving cert is signed for DNS names [k8s-master01 k8s.srebro.cn kubernetes kubernetes.default kubernetes.default.svc kubernetes.default.svc.cluster.local] and IPs [10.96.0.1 172.22.33.223 172.22.33.226 172.22.33.224 112.94.71.21]
[certs] Generating "apiserver-kubelet-client" certificate and key
[certs] Generating "front-proxy-ca" certificate and key
[certs] Generating "front-proxy-client" certificate and key
[certs] External etcd mode: Skipping etcd/ca certificate authority generation
[certs] External etcd mode: Skipping etcd/server certificate generation
[certs] External etcd mode: Skipping etcd/peer certificate generation
[certs] External etcd mode: Skipping etcd/healthcheck-client certificate generation
[certs] External etcd mode: Skipping apiserver-etcd-client certificate generation
[certs] Generating "sa" key and public key
[kubeconfig] Using kubeconfig folder "/etc/kubernetes"
W0828 15:30:09.375139   10698 endpoint.go:57] [endpoint] WARNING: port specified in controlPlaneEndpoint overrides bindPort in the controlplane address
[kubeconfig] Writing "admin.conf" kubeconfig file
W0828 15:30:09.562271   10698 endpoint.go:57] [endpoint] WARNING: port specified in controlPlaneEndpoint overrides bindPort in the controlplane address
[kubeconfig] Writing "kubelet.conf" kubeconfig file
W0828 15:30:09.703979   10698 endpoint.go:57] [endpoint] WARNING: port specified in controlPlaneEndpoint overrides bindPort in the controlplane address
[kubeconfig] Writing "controller-manager.conf" kubeconfig file
W0828 15:30:09.998820   10698 endpoint.go:57] [endpoint] WARNING: port specified in controlPlaneEndpoint overrides bindPort in the controlplane address
[kubeconfig] Writing "scheduler.conf" kubeconfig file
[control-plane] Using manifest folder "/etc/kubernetes/manifests"
[control-plane] Creating static Pod manifest for "kube-apiserver"
[control-plane] Creating static Pod manifest for "kube-controller-manager"
[control-plane] Creating static Pod manifest for "kube-scheduler"
[kubelet-start] Writing kubelet environment file with flags to file "/var/lib/kubelet/kubeadm-flags.env"
[kubelet-start] Writing kubelet configuration to file "/var/lib/kubelet/config.yaml"
[kubelet-start] Starting the kubelet
[wait-control-plane] Waiting for the kubelet to boot up the control plane as static Pods from directory "/etc/kubernetes/manifests". This can take up to 4m0s
[apiclient] All control plane components are healthy after 18.596178 seconds
[upload-config] Storing the configuration used in ConfigMap "kubeadm-config" in the "kube-system" Namespace
[kubelet] Creating a ConfigMap "kubelet-config" in namespace kube-system with the configuration for the kubelets in the cluster
[upload-certs] Skipping phase. Please see --upload-certs
[mark-control-plane] Marking the node k8s-master01 as control-plane by adding the labels: [node-role.kubernetes.io/control-plane node.kubernetes.io/exclude-from-external-load-balancers]
[mark-control-plane] Marking the node k8s-master01 as control-plane by adding the taints [node-role.kubernetes.io/master:NoSchedule]
[bootstrap-token] Using token: 35sesk.5tm3tqc66tzlse8c
[bootstrap-token] Configuring bootstrap tokens, cluster-info ConfigMap, RBAC Roles
[bootstrap-token] Configured RBAC rules to allow Node Bootstrap tokens to get nodes
[bootstrap-token] Configured RBAC rules to allow Node Bootstrap tokens to post CSRs in order for nodes to get long term certificate credentials
[bootstrap-token] Configured RBAC rules to allow the csrapprover controller automatically approve CSRs from a Node Bootstrap Token
[bootstrap-token] Configured RBAC rules to allow certificate rotation for all node client certificates in the cluster
[bootstrap-token] Creating the "cluster-info" ConfigMap in the "kube-public" namespace
[kubelet-finalize] Updating "/etc/kubernetes/kubelet.conf" to point to a rotatable kubelet client certificate and key
[addons] Applied essential addon: CoreDNS
W0828 15:30:31.282450   10698 endpoint.go:57] [endpoint] WARNING: port specified in controlPlaneEndpoint overrides bindPort in the controlplane address
[addons] Applied essential addon: kube-proxyYour Kubernetes control-plane has initialized successfully!To start using your cluster, you need to run the following as a regular user:mkdir -p $HOME/.kubesudo cp -i /etc/kubernetes/admin.conf $HOME/.kube/configsudo chown $(id -u):$(id -g) $HOME/.kube/configAlternatively, if you are the root user, you can run:export KUBECONFIG=/etc/kubernetes/admin.confYou should now deploy a pod network to the cluster.
Run "kubectl apply -f [podnetwork].yaml" with one of the options listed at:https://kubernetes.io/docs/concepts/cluster-administration/addons/You can now join any number of control-plane nodes by copying certificate authorities
and service account keys on each node and then running the following as root:kubeadm join 172.22.33.210:36443 --token 35sesk.5tm3tqc66tzlse8c \--discovery-token-ca-cert-hash sha256:5a4476ac560c2c5c577abea0f1310c040385e4c12cfd9038734a68952c9fe815 \--control-plane Then you can join any number of worker nodes by running the following on each as root:kubeadm join 172.22.33.210:36443 --token 35sesk.5tm3tqc66tzlse8c \--discovery-token-ca-cert-hash sha256:5a4476ac560c2c5c577abea0f1310c040385e4c12cfd9038734a68952c9fe815
拷贝kubectl使用的连接k8s认证文件到默认路径
$ mkdir -p $HOME/.kube
$ sudo cp -i /etc/kubernetes/admin.conf $HOME/.kube/config
$ sudo chown $(id -u):$(id -g) $HOME/.kube/config
6.4 加入 Kubernetes Master 节点
因为我们的K8S集群已经初始化过了,再添加其他master 节点到集群中,首要添加是把已经初始化过的证书拷贝到其他master 节点上
6.4.1 在master02和master03节点复制相关证书
#创建K8S证书工作目录
$ mkdir -p /etc/kubernetes/pki/$ scp -r 172.22.33.215:/etc/kubernetes/pki/ca.* /etc/kubernetes/pki/
$ scp -r 172.22.33.215:/etc/kubernetes/pki/sa.* /etc/kubernetes/pki/
$ scp -r 172.22.33.215:/etc/kubernetes/pki/front-proxy-ca.* /etc/kubernetes/pki/#拷贝k8s-admin 文件
$ scp -r 172.22.33.215:/etc/kubernetes/admin.conf /etc/kubernetes/
6.4.2 把 master02和master03节点 添加到Kubernetes 集群中
使用刚刚 master01 在kubeadm init输出的kubeadm join命令:
#加入控制平面
$ kubeadm join 172.22.33.210:36443 --token 35sesk.5tm3tqc66tzlse8c \--discovery-token-ca-cert-hash sha256:5a4476ac560c2c5c577abea0f1310c040385e4c12cfd9038734a68952c9fe815 \--control-plane
6.4.3 在master01节点上查看master节点个数
$ kubectl get node
NAME           STATUS     ROLES                  AGE     VERSION
k8s-master01   NotReady   control-plane,master   8m26s   v1.28.2
k8s-master02   NotReady   control-plane,master   2m54s   v1.28.2
k8s-master03   NotReady   control-plane,master   59s     v1.28.2
可以看到,所有的master 节点都已经加入到集群中了;NotReady是需要等待CNI网络插件安装好
7. 加入Kubernetes Node 节点
- 官方文档: https://kubernetes.io/docs/reference/setup-tools/kubeadm/kubeadm-join/
在K8S node 节点上操作
| k8s-node01 | 172.22.33.218 |
|---|---|
| k8s-node02 | 172.22.33.219 |
| k8s-node03 | 172.22.33.220 |
使用刚刚master01 在kubeadm init输出的kubeadm join命令:
$ kubeadm join 172.22.33.210:36443 --token 35sesk.5tm3tqc66tzlse8c \--discovery-token-ca-cert-hash sha256:5a4476ac560c2c5c577abea0f1310c040385e4c12cfd9038734a68952c9fe815
默认token有效期为24小时,当过期之后,该token就不可用了。这时就需要重新创建token,可以直接在master 节点上,使用命令快捷生成:
$ kubeadm token create --print-join-command
8. 部署容器网络(CNI)
https://kubernetes.io/docs/setup/production-environment/tools/kubeadm/create-cluster-kubeadm/#pod-network
:::danger
注意:只需要部署下面其中一个,推荐Calico。
Calico是一个纯三层的数据中心网络方案,Calico支持广泛的平台,包括Kubernetes、OpenStack等。
Calico 在每一个计算节点利用 Linux Kernel 实现了一个高效的虚拟路由器( vRouter) 来负责数据转发,而每个 vRouter 通过 BGP 协议负责把自己上运行的 workload 的路由信息向整个 Calico 网络内传播。
此外,Calico 项目还实现了 Kubernetes 网络策略,提供ACL功能。
https://docs.projectcalico.org/getting-started/kubernetes/quickstart
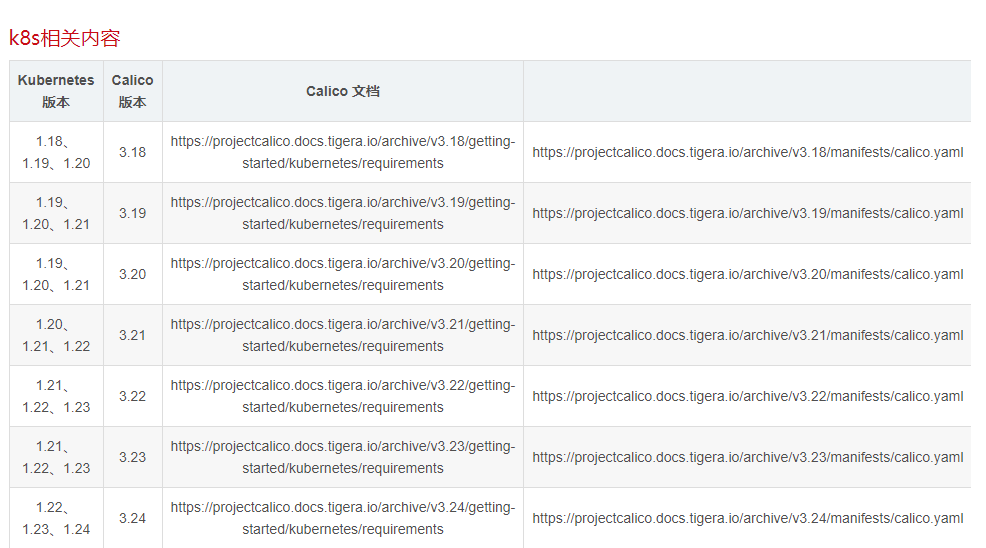
K8S版本和calico 版本的对应关系
参考链接:https://blog.csdn.net/qq_32596527/article/details/127692734
:::
$ wget https://projectcalico.docs.tigera.io/archive/v3.21/manifests/calico.yaml
下载完后还需要修改里面定义Pod网络(CALICO_IPV4POOL_CIDR),与前面kubeadm init指定的
--pod-network-cidr=10.244.0.0/16 保持一致; 默认是 192.168.0.0/16
- name: CALICO_IPV4POOL_CIDRvalue: "10.244.0.0/16"

修改完后应用清单:
$ kubectl apply -f calico.yaml
$ kubectl get pods -n kube-system
查看所有节点,以及pod,svc情况
$ kubectl get nodes
NAME           STATUS   ROLES                  AGE   VERSION
k8s-master01   Ready    control-plane,master   70m   v1.28.2
k8s-master02   Ready    control-plane,master   64m   v1.28.2
k8s-master03   Ready    control-plane,master   62m   v1.28.2
k8s-node01     Ready    <none>                 46m   v1.28.2
k8s-node02     Ready    <none>                 46m   v1.28.2
k8s-node03     Ready    <none>                 46m   v1.28.2
[root@openeuler ~]# kubectl get all -A
NAMESPACE     NAME                                           READY   STATUS    RESTARTS   AGE
default       pod/my-web-6b6c9df775-2p67z                    1/1     Running   0          45m
default       pod/my-web-6b6c9df775-76f8w                    1/1     Running   0          45m
default       pod/my-web-6b6c9df775-t2zrm                    1/1     Running   0          45m
default       pod/my-web-6b6c9df775-zs6db                    1/1     Running   0          45m
kube-system   pod/calico-kube-controllers-5bb48c55fd-vvktf   1/1     Running   0          52m
kube-system   pod/calico-node-7ng4l                          1/1     Running   0          52m
kube-system   pod/calico-node-lrf24                          1/1     Running   0          47m
kube-system   pod/calico-node-qxnxg                          1/1     Running   0          52m
kube-system   pod/calico-node-vwjt4                          1/1     Running   0          52m
kube-system   pod/coredns-7f89b7bc75-cc6gn                   1/1     Running   0          70m
kube-system   pod/coredns-7f89b7bc75-wsg29                   1/1     Running   0          70m
kube-system   pod/etcd-k8s-master01                          1/1     Running   0          70m
kube-system   pod/etcd-k8s-master02                          1/1     Running   0          65m
kube-system   pod/etcd-k8s-master03                          1/1     Running   0          62m
kube-system   pod/kube-apiserver-k8s-master01                1/1     Running   0          70m
kube-system   pod/kube-apiserver-k8s-master02                1/1     Running   0          65m
kube-system   pod/kube-apiserver-k8s-master03                1/1     Running   0          62m
kube-system   pod/kube-controller-manager-k8s-master01       1/1     Running   1          70m
kube-system   pod/kube-controller-manager-k8s-master02       1/1     Running   0          65m
kube-system   pod/kube-controller-manager-k8s-master03       1/1     Running   0          62m
kube-system   pod/kube-proxy-ck9lr                           1/1     Running   0          63m
kube-system   pod/kube-proxy-vzrs8                           1/1     Running   0          65m
kube-system   pod/kube-proxy-wxb78                           1/1     Running   0          70m
kube-system   pod/kube-proxy-z5chd                           1/1     Running   0          47m
kube-system   pod/kube-scheduler-k8s-master01                1/1     Running   1          70m
kube-system   pod/kube-scheduler-k8s-master02                1/1     Running   0          65m
kube-system   pod/kube-scheduler-k8s-master03                1/1     Running   0          62mNAMESPACE     NAME                 TYPE        CLUSTER-IP   EXTERNAL-IP   PORT(S)                  AGE
default       service/kubernetes   ClusterIP   10.96.0.1    <none>        443/TCP                  70m
kube-system   service/kube-dns     ClusterIP   10.96.0.10   <none>        53/UDP,53/TCP,9153/TCP   70mNAMESPACE     NAME                         DESIRED   CURRENT   READY   UP-TO-DATE   AVAILABLE   NODE SELECTOR            AGE
kube-system   daemonset.apps/calico-node   4         4         4       4            4           kubernetes.io/os=linux   52m
kube-system   daemonset.apps/kube-proxy    4         4         4       4            4           kubernetes.io/os=linux   70mNAMESPACE     NAME                                      READY   UP-TO-DATE   AVAILABLE   AGE
default       deployment.apps/my-web                    4/4     4            4           45m
kube-system   deployment.apps/calico-kube-controllers   1/1     1            1           52m
kube-system   deployment.apps/coredns                   2/2     2            2           70mNAMESPACE     NAME                                                 DESIRED   CURRENT   READY   AGE
default       replicaset.apps/my-web-6b6c9df775                    4         4         4       45m
kube-system   replicaset.apps/calico-kube-controllers-5bb48c55fd   1         1         1       52m
kube-system   replicaset.apps/coredns-7f89b7bc75                   2         2         2       70m
9. 测试kubernetes集群
- 验证Pod工作
- 验证Pod网络通信
- 验证DNS解析
在Kubernetes集群中创建一个pod,验证是否正常运行:
$ kubectl create deployment nginx --image=nginx
$ kubectl expose deployment nginx --port=80 --type=NodePort
$ kubectl get pod,svc
访问地址:http://NodeIP:Port
10. 部署 Dashboard[可选]
$ wget https://raw.githubusercontent.com/kubernetes/dashboard/v2.0.3/aio/deploy/recommended.yaml
默认Dashboard只能集群内部访问,修改Service为NodePort类型,暴露到外部:
$ vi recommended.yaml
...
kind: Service
apiVersion: v1
metadata:labels:k8s-app: kubernetes-dashboardname: kubernetes-dashboardnamespace: kubernetes-dashboard
spec:ports:- port: 443targetPort: 8443nodePort: 30001selector:k8s-app: kubernetes-dashboardtype: NodePort
...$ kubectl apply -f recommended.yaml
$ kubectl get pods -n kubernetes-dashboard
NAME                                         READY   STATUS    RESTARTS   AGE
dashboard-metrics-scraper-6b4884c9d5-gl8nr   1/1     Running   0          13m
kubernetes-dashboard-7f99b75bf4-89cds        1/1     Running   0          13m
访问地址:https://NodeIP:30001
创建service account并绑定默认cluster-admin管理员集群角色:
# 创建用户
$ kubectl create serviceaccount dashboard-admin -n kube-system
# 用户授权
$ kubectl create clusterrolebinding dashboard-admin --clusterrole=cluster-admin --serviceaccount=kube-system:dashboard-admin
# 获取用户Token
$ kubectl describe secrets -n kube-system $(kubectl -n kube-system get secret | awk '/dashboard-admin/{print $1}')
使用输出的token登录Dashboard。
11. 补充
11.1 将节点上的容器运行时从 Docker Engine 改为 containerd
官网参考:https://kubernetes.io/zh-cn/docs/tasks/administer-cluster/migrating-from-dockershim/change-runtime-containerd/
1、配置先决条件【上面环境初始化的时候如果做过了,直接忽略】
$ cat <<EOF | sudo tee /etc/modules-load.d/containerd.conf
overlay
br_netfilter
EOF$ sudo modprobe overlay
$ sudo modprobe br_netfilter# 设置必需的 sysctl 参数,这些参数在重新启动后仍然存在。
cat <<EOF | sudo tee /etc/sysctl.d/99-kubernetes-cri.conf
net.bridge.bridge-nf-call-iptables  = 1
net.ipv4.ip_forward                 = 1
net.bridge.bridge-nf-call-ip6tables = 1
EOF# Apply sysctl params without reboot
$ sudo sysctl --system
2、下线节点
将
<node-to-drain>替换为你所要下线的节点的名称
kubectl drain <node-to-drain> --ignore-daemonsets
3、停止 Docker 守护进程
systemctl stop kubelet
systemctl disable docker.service --now
4、二进制安装containerd
$ wget https://github.com/containerd/containerd/releases/download/v1.7.20/containerd-1.7.20-linux-amd64.tar.gz
$ tar -xf containerd-1.7.20-linux-amd64.tar.gz#复制bin下所有二进制文件到/usr/bin 目录下,并覆盖之前的文件
$ cp bin/* /usr/bin/
cp:是否覆盖'/usr/bin/containerd'? y
cp:是否覆盖'/usr/bin/containerd-shim'? y
cp:是否覆盖'/usr/bin/containerd-shim-runc-v2'? y
cp:是否覆盖'/usr/bin/ctr'? y#验证containerd的版本
$ containerd --version
containerd github.com/containerd/containerd v1.7.20 8fc6bcff51318944179630522a095cc9dbf9f353#创建containerd 配置文件
$ mkdir -p /etc/containerd#也可以使用生成的默认配置
$ containerd config default | sudo tee /etc/containerd/config.toml
修改containerd配置文件
$ cat > /etc/containerd/config.toml << EOF
disabled_plugins = []
imports = []
oom_score = 0
plugin_dir = ""
required_plugins = []
root = "/var/lib/containerd"
state = "/run/containerd"
temp = ""
version = 2[cgroup]path = ""[debug]address = ""format = ""gid = 0level = ""uid = 0[grpc]address = "/run/containerd/containerd.sock"gid = 0max_recv_message_size = 16777216max_send_message_size = 16777216tcp_address = ""tcp_tls_ca = ""tcp_tls_cert = ""tcp_tls_key = ""uid = 0[metrics]address = ""grpc_histogram = false[plugins][plugins."io.containerd.gc.v1.scheduler"]deletion_threshold = 0mutation_threshold = 100pause_threshold = 0.02schedule_delay = "0s"startup_delay = "100ms"[plugins."io.containerd.grpc.v1.cri"]device_ownership_from_security_context = falsedisable_apparmor = falsedisable_cgroup = falsedisable_hugetlb_controller = truedisable_proc_mount = falsedisable_tcp_service = trueenable_selinux = falseenable_tls_streaming = falseenable_unprivileged_icmp = falseenable_unprivileged_ports = falseignore_image_defined_volumes = falsemax_concurrent_downloads = 3max_container_log_line_size = 16384netns_mounts_under_state_dir = falserestrict_oom_score_adj = falsesandbox_image = "registry.aliyuncs.com/google_containers/pause:3.6"selinux_category_range = 1024stats_collect_period = 10stream_idle_timeout = "4h0m0s"stream_server_address = "127.0.0.1"stream_server_port = "0"systemd_cgroup = falsetolerate_missing_hugetlb_controller = trueunset_seccomp_profile = ""[plugins."io.containerd.grpc.v1.cri".cni]bin_dir = "/opt/cni/bin"conf_dir = "/etc/cni/net.d"conf_template = ""ip_pref = ""max_conf_num = 1[plugins."io.containerd.grpc.v1.cri".containerd]default_runtime_name = "runc"disable_snapshot_annotations = truediscard_unpacked_layers = falseignore_rdt_not_enabled_errors = falseno_pivot = falsesnapshotter = "overlayfs"[plugins."io.containerd.grpc.v1.cri".containerd.default_runtime]base_runtime_spec = ""cni_conf_dir = ""cni_max_conf_num = 0container_annotations = []pod_annotations = []privileged_without_host_devices = falseruntime_engine = ""runtime_path = ""runtime_root = ""runtime_type = ""[plugins."io.containerd.grpc.v1.cri".containerd.default_runtime.options][plugins."io.containerd.grpc.v1.cri".containerd.runtimes][plugins."io.containerd.grpc.v1.cri".containerd.runtimes.runc]base_runtime_spec = ""cni_conf_dir = ""cni_max_conf_num = 0container_annotations = []pod_annotations = []privileged_without_host_devices = falseruntime_engine = ""runtime_path = ""runtime_root = ""runtime_type = "io.containerd.runc.v2"[plugins."io.containerd.grpc.v1.cri".containerd.runtimes.runc.options]BinaryName = ""CriuImagePath = ""CriuPath = ""CriuWorkPath = ""IoGid = 0IoUid = 0NoNewKeyring = falseNoPivotRoot = falseRoot = ""ShimCgroup = ""SystemdCgroup = true[plugins."io.containerd.grpc.v1.cri".containerd.untrusted_workload_runtime]base_runtime_spec = ""cni_conf_dir = ""cni_max_conf_num = 0container_annotations = []pod_annotations = []privileged_without_host_devices = falseruntime_engine = ""runtime_path = ""runtime_root = ""runtime_type = ""[plugins."io.containerd.grpc.v1.cri".containerd.untrusted_workload_runtime.options][plugins."io.containerd.grpc.v1.cri".image_decryption]key_model = "node"[plugins."io.containerd.grpc.v1.cri".registry]config_path = ""[plugins."io.containerd.grpc.v1.cri".registry.auths][plugins."io.containerd.grpc.v1.cri".registry.configs][plugins."io.containerd.grpc.v1.cri".registry.headers][plugins."io.containerd.grpc.v1.cri".registry.mirrors][plugins."io.containerd.grpc.v1.cri".registry.mirrors."docker.io"]endpoint = ["https://docker.srebro.site"][plugins."io.containerd.grpc.v1.cri".registry.mirrors."gcr.io"]endpoint = ["https://gcr.srebro.site"][plugins."io.containerd.grpc.v1.cri".registry.mirrors."k8s.gcr.io"]endpoint = ["https://k8s-gcr.srebro.site"][plugins."io.containerd.grpc.v1.cri".registry.mirrors."quay.io"]endpoint = ["https://quay.srebro.site"][plugins."io.containerd.grpc.v1.cri".x509_key_pair_streaming]tls_cert_file = ""tls_key_file = ""[plugins."io.containerd.internal.v1.opt"]path = "/opt/containerd"[plugins."io.containerd.internal.v1.restart"]interval = "10s"[plugins."io.containerd.internal.v1.tracing"]sampling_ratio = 1.0service_name = "containerd"[plugins."io.containerd.metadata.v1.bolt"]content_sharing_policy = "shared"[plugins."io.containerd.monitor.v1.cgroups"]no_prometheus = false[plugins."io.containerd.runtime.v1.linux"]no_shim = falseruntime = "runc"runtime_root = ""shim = "containerd-shim"shim_debug = false[plugins."io.containerd.runtime.v2.task"]platforms = ["linux/amd64"]sched_core = false[plugins."io.containerd.service.v1.diff-service"]default = ["walking"][plugins."io.containerd.service.v1.tasks-service"]rdt_config_file = ""[plugins."io.containerd.snapshotter.v1.aufs"]root_path = ""[plugins."io.containerd.snapshotter.v1.btrfs"]root_path = ""[plugins."io.containerd.snapshotter.v1.devmapper"]async_remove = falsebase_image_size = ""discard_blocks = falsefs_options = ""fs_type = ""pool_name = ""root_path = ""[plugins."io.containerd.snapshotter.v1.native"]root_path = ""[plugins."io.containerd.snapshotter.v1.overlayfs"]root_path = ""upperdir_label = false[plugins."io.containerd.snapshotter.v1.zfs"]root_path = ""[plugins."io.containerd.tracing.processor.v1.otlp"]endpoint = ""insecure = falseprotocol = ""[proxy_plugins][stream_processors][stream_processors."io.containerd.ocicrypt.decoder.v1.tar"]accepts = ["application/vnd.oci.image.layer.v1.tar+encrypted"]args = ["--decryption-keys-path", "/etc/containerd/ocicrypt/keys"]env = ["OCICRYPT_KEYPROVIDER_CONFIG=/etc/containerd/ocicrypt/ocicrypt_keyprovider.conf"]path = "ctd-decoder"returns = "application/vnd.oci.image.layer.v1.tar"[stream_processors."io.containerd.ocicrypt.decoder.v1.tar.gzip"]accepts = ["application/vnd.oci.image.layer.v1.tar+gzip+encrypted"]args = ["--decryption-keys-path", "/etc/containerd/ocicrypt/keys"]env = ["OCICRYPT_KEYPROVIDER_CONFIG=/etc/containerd/ocicrypt/ocicrypt_keyprovider.conf"]path = "ctd-decoder"returns = "application/vnd.oci.image.layer.v1.tar+gzip"[timeouts]"io.containerd.timeout.bolt.open" = "0s""io.containerd.timeout.shim.cleanup" = "5s""io.containerd.timeout.shim.load" = "5s""io.containerd.timeout.shim.shutdown" = "3s""io.containerd.timeout.task.state" = "2s"[ttrpc]address = ""gid = 0uid = 0
EOF
使用systemd管理containerd ,并启动
$ cat > /etc/systemd/system/containerd.service << EOF[Unit]
Description=containerd container runtime
Documentation=https://containerd.io
After=network.target[Service]
ExecStart=/usr/bin/containerd
Restart=always
RestartSec=5
Delegate=yes
KillMode=process
OOMScoreAdjust=-999[Install]
WantedBy=multi-user.target
EOF$ systemctl daemon-reload
$ systemctl enable containerd
$ systemctl restart containerd
5、配置kubelet使用containerd并重启kubelet
$ vim /etc/sysconfig/kubelet
KUBELET_EXTRA_ARGS=--container-runtime=remote --container-runtime-endpoint=unix:///run/containerd/containerd.sock --cgroup-driver=systemd$ systemctl restart kubelet
6、验证节点处于健康状态
# 会显示出containerd版本,健康状态
$ kubectl get nodes -o wide
NAME         STATUS   ROLES                  AGE     VERSION    INTERNAL-IP     EXTERNAL-IP   OS-IMAGE                    KERNEL-VERSION                        CONTAINER-RUNTIME
k8s-master   Ready    control-plane,master   7d21h   v1.20.15   172.22.33.210   <none>        openEuler 22.03 (LTS-SP4)   5.10.0-221.0.0.124.oe2203sp3.x86_64   containerd://1.7.20
k8s-node1    Ready,SchedulingDisabled    <none>                 7d21h   v1.20.15   172.22.33.211   <none>        openEuler 22.03 (LTS-SP4)   5.10.0-221.0.0.124.oe2203sp3.x86_64   containerd://1.7.20
k8s-node2    Ready    <none>                 7d21h   v1.20.15   172.22.33.212   <none>        openEuler 22.03 (LTS-SP4)   5.10.0-221.0.0.124.oe2203sp3.x86_64   containerd://1.7.20
k8s-node3    Ready    <none>                 6d22h   v1.20.15   172.22.33.213   <none>        openEuler 22.03 (LTS-SP4)   5.10.0-221.0.0.124.oe2203sp3.x86_64   containerd://1.7.20
7、uncordon 节点
将
<node-to-uncordon>替换为你之前下线的节点的名称。
$ kubectl uncordon <node-to-uncordon>
8、再次验证
[root@k8s-master bin]# kubectl get nodes -o wide
NAME         STATUS   ROLES                  AGE     VERSION    INTERNAL-IP     EXTERNAL-IP   OS-IMAGE                    KERNEL-VERSION                        CONTAINER-RUNTIME
k8s-master   Ready    control-plane,master   7d21h   v1.20.15   172.22.33.210   <none>        openEuler 22.03 (LTS-SP4)   5.10.0-221.0.0.124.oe2203sp3.x86_64   containerd://1.7.20
k8s-node1    Ready    <none>                 7d21h   v1.20.15   172.22.33.211   <none>        openEuler 22.03 (LTS-SP4)   5.10.0-221.0.0.124.oe2203sp3.x86_64   containerd://1.7.20
k8s-node2    Ready    <none>                 7d21h   v1.20.15   172.22.33.212   <none>        openEuler 22.03 (LTS-SP4)   5.10.0-221.0.0.124.oe2203sp3.x86_64   containerd://1.7.20
k8s-node3    Ready    <none>                 6d22h   v1.20.15   172.22.33.213   <none>        openEuler 22.03 (LTS-SP4)   5.10.0-221.0.0.124.oe2203sp3.x86_64   docker://20.10.18
11.2 kubectl 命令补齐
$ yum install bash-completion -y
$ source /usr/share/bash-completion/bash_completion
$ source <(kubectl completion bash)
$ kubectl completion bash >/etc/bash_completion.d/kubectl
本文是原创文章,采用 CC BY-NC-ND 4.0 协议,完整转载请注明来自 运维小弟
相关文章:
kubeadm部署 Kubernetes(k8s) 高可用集群【V1.28 】
kubeadm是官方社区推出的一个用于快速部署kubernetes集群的工具。 calico.yaml kubernertes-dashboard.yaml 1. 安装要求 在开始之前,部署Kubernetes集群机器需要满足以下几个条件: 10台机器,操作系统Openeuler22.03 LTS SP4硬件配置&…...

【MySQL】MySQL Workbench下载安装、环境变量配置、基本MySQL语句、新建Connection
1.MySQL Workbench 下载安装: 进入网址:MySQL :: MySQL Workbench Manual :: 2 Installation (1)点击“MySQL Workbench on Windows”(下载Windows版本)(2)点击“Installing” &…...

CrowdStrike 的失败如何凸显了左移测试的重要性
通过自动化软件测试并将其左移,组织可以显著降低 CrowdStrike 等事件发生的风险。继续阅读,了解采用左移测试方法的强大之处。 Parasoft下载 测试中偷工减料的风险 CrowdStrike 软件更新失败是一个重要的教训,它让我们认识到早期、自动…...
HarmonyOS开发实战( Beta5版)高负载组件的渲染实践规范
简介 在应用开发中,有的页面需要在列表中加载大量的数据,就会导致组件数量较多或者嵌套层级较深,从而引起组件负载加重,绘制耗时增长。虽然可以通过组件复用避免组件重复创建,但是如果每个列表项中包含的组件较多&…...

NLP从零开始------16.文本中阶处理之序列到序列模型(1)
1. 序列到序列模型简介 序列到序列( sequence to sequence, seq2seq) 是指输入和输出各为一个序列(如一句话) 的任务。本节将输入序列称作源序列,输出序列称作目标序列。序列到序列有非常多的重要应用, 其中最有名的是机器翻译( machine translation), 机…...

【匈牙利汽车产业考察,开启新机遇】
匈牙利汽车工业发展历史悠久,拥有发达的基础设施和成熟的产业基础,全球20大汽车制造厂商中,有超过14家在匈牙利建立整车制造工厂和汽车零部件生产基地,比亚迪、宁德时代、欣旺达、蔚来等企业纷纷入驻。匈牙利位于东西方交汇处&…...

并行程序设计基础——动态进程管理
目录 一、组间通信域 二、动态创建新的MPI进程 1、MPI_COMM_SPAWN 2、MPI_COMM_GET_PARENT 3、MPI_COMM_SPAWN_MULTIPLE 三、独立进程间的通信 1、MPI_OPEN_PORT 2、MPI_COMM_ACCEPT 3、MPI_CLOSE_PORT 4、MPI_COMM_CONNECT 5、MPI_COMM_DISCONNECT 6、MPI_PUBLISH…...
使用教程)
C# 字符串(String)使用教程
在 C# 中,您可以使用字符数组来表示字符串,但是,更常见的做法是使用 string 关键字来声明一个字符串变量。string 关键字是 System.String 类的别名。 创建 String 对象 您可以使用以下方法之一来创建 string 对象: 通过给 Str…...

django之ForeignKey、OneToOneField 和 ManyToManyField
在Django中,ForeignKey、OneToOneField 和 ManyToManyField 是用于定义模型之间关系的字段类型。 ForeignKey ForeignKey 用于定义多对一的关系。例如,一个Employee可以属于一个Department,一个Department可以有多个Employee。 from djang…...

java.lang.IndexOutOfBoundsException: setSpan ( 0...x ) ends beyond length X
1,可能是EditText,setSelection(x)时超过了 输入框内容的实际长度导致的。 2,手机开启“拼写检查功能”,EditText设置了最大长度,选择提示的某一项文案时超过设置的最大长度限制,导致崩溃。 针对情况2 开…...

技术进展:CH-90树脂在去除硫酸钠柠檬酸钠溶液中铁锰离子上的应用
随着环境保护法规的日趋严格,以及工业生产中对产品纯度要求的不断提高,去除废水中的重金属离子已成为一个亟待解决的问题。铁和锰作为常见的杂质离子,在电池制造等行业中,对溶液纯度的影响不容忽视。 三元前驱体废水中通常含有硫…...
录屏时摄像头无法识别?如何录屏时打开摄像头,解决方案及录屏软件推荐
在数字时代,无论是游戏玩家、在线教育者还是企业培训师,录屏软件都已成为日常工作和娱乐中不可或缺的工具。但有时候想录制人物摄像头画面的时候,当录屏软件无法识别到摄像头时,这无疑会给用户带来不小的困扰。本文将提供一系列解…...

达梦数据库-DM8 企业版安装指南
一、DM8 企业版简介 达梦数据库(DM8)是中国自主研发的一款高性能数据库管理系统,广泛应用于企业级应用场景。DM8 企业版具备高可用性、强一致性和高性能等特点,支持多种操作系统和硬件平台。本文将详细介绍如何在 Kylin 操作系统上安装达梦数据库 DM8 企业版。 二、安装前…...

心脑血管科董田林医生:心律失常患者饮食,调养秘诀,助你找回健康心跳
在纷繁复杂的健康议题中,心律失常作为一种常见的心脏疾病,不仅影响着患者的生活质量,更牵动着每一个家庭的神经。幸运的是,通过科学合理的饮食调养,心律失常患者可以在很大程度上改善病情,逐步找回健康的心…...
)
期权杂记(一)
2024年9月5日: 切忌裸奔!如果你想暴富,押注期权还不如去澳门;做任何策略都可以多多关注希腊字母;对冲也是又方向性的,可以偏购,也可以偏沽,通过Delta Money来尝试计算;单…...
【MATLAB源码-第163期】基于matlab的BPSK+瑞利(rayleigh)信道下有无波束成形误码率对比仿真。
操作环境: MATLAB 2022a 1、算法描述 在通信系统中,波束成形(Beamforming)技术是一种广泛使用的信号处理技术,通过调整天线阵列中各个元素的相位和幅度,使得信号在特定方向上增强,在其他方向…...

【数据分享】2000-2022年我国省市县三级的逐日O3数据(免费获取\excel\shp格式)
空气质量数据是在我们日常研究中经常使用的数据!之前我们给大家分享了2000-2022年的省市县三级的逐日PM2.5数据、2013-2022年的省市县三级的逐日CO数据、2013-2022年的省市县三级的逐日SO2数据、2008-2022年我国省市县三级的逐日NO2数据和2000-2022年我国省市县三级…...

Python 的http.server库详细介绍
http.server 是 Python 标准库中的一个模块,用于创建基本的 HTTP 服务器。这个模块非常适合用于开发、测试、以及在本地网络中共享文件。以下是对 http.server 模块的详细介绍。 Python 官方文档:http.server — HTTP 服务器 模块概述 http.server 提…...

使用ffmpeg在视频中绘制矩形区域
由于项目需要对视频中的人脸做定位跟踪, 我先使用了人脸识别算法,对视频中的每个帧识别人脸、通过人脸库比对,最终记录坐标等信息。 然后使用ffmpeg中的 drawbox 滤镜功能,选择性的绘制区域。从而实现人脸定位跟踪 1、drawbox …...

计算机,数学,AI在社会模拟中的应用
这些模型通常属于社会模拟的范畴,利用计算机技术和复杂系统理论来模拟和预测社会动态。以下是几种常见的社会模拟模型: 1. 系统动力学模型 系统动力学模型通过建立数学方程来描述社会系统中的各种变量及其相互关系。这种模型适用于宏观层面的社会变化分…...

SDMatte效果展示:细碎边缘无断裂+透明区域灰度渐变真实
SDMatte效果展示:细碎边缘无断裂透明区域灰度渐变真实 1. 专业级抠图效果展示 SDMatte 作为一款专注于高质量图像抠图的AI模型,在处理复杂边缘和透明物体方面展现出惊人的专业级效果。让我们通过几个典型案例,看看它在实际应用中的表现。 …...

CC-Link IE转Modbus TCP集成实战:耐达讯自动化网关在五星级酒店节能改造中的应用
在工业自动化系统集成领域,异构网络的数据交互始终是一个核心痛点。控制层普遍采用高性能的CC-Link IE工业以太网,以确保高速、确定的实时通信;而设备层往往存在大量基于Modbus TCP协议的通用设备,如变频器、智能仪表和传感器。这…...

AI软件研发成本飙升的真相:3个被忽视的隐性成本源,今天不查明天多烧47%预算!
第一章:AI原生软件研发成本优化实战技巧 2026奇点智能技术大会(https://ml-summit.org) AI原生软件的研发成本常被模型训练开销主导,但实际可观测的浪费更多来自推理服务冗余、提示工程低效、以及缺乏细粒度资源编排。聚焦可落地的降本路径,…...
)
避开风控!影刀RPA抓取小红书评论的保姆级配置指南(含60秒间隔、Excel文本格式设置)
影刀RPA小红书评论采集实战:高稳定性配置与风控规避手册 第一次用影刀RPA抓取小红书评论时,我连续被封了三个账号——因为没意识到平台对高频请求的敏感度。后来通过反复测试发现,间隔时间设置差5秒就可能触发完全不同的风控等级。这份指南将…...

Qwen3.5-9B-AWQ-4bit企业应用案例:电商商品图智能标签生成实操
Qwen3.5-9B-AWQ-4bit企业应用案例:电商商品图智能标签生成实操 1. 电商商品标签的痛点与解决方案 在电商运营中,商品图片标签是影响搜索排名和转化率的关键因素。传统的人工打标方式面临三大挑战: 效率瓶颈:一个运营人员每天最…...
恫)
大卫小东(Sheldon)恫
Issue 概述 先来看看提交这个 Issue 的作者是为什么想到这个点子的,以及他初步的核心设计概念。?? 本 PR 实现了 Apache Gravitino 与 SeaTunnel 的集成,将其作为非关系型连接器的外部元数据服务。通过 Gravitino 的 REST API 自动获取表结构和元数据&…...

显示屏适配优势深度解析:交期与服务双维赋能品质把控
作为仪器设备厂商的客户品质人员,在显示屏选型过程中,交期稳定性与全流程服务能力是保障设备研发进度、量产交付及长期运维的核心要素。恒域威显示屏通过供应链整合、生产管控优化及服务体系创新,在交期响应与柔性交付、全周期服务支持等方面…...

3分钟解决游戏手柄兼容性难题:ViGEmBus的神奇力量
3分钟解决游戏手柄兼容性难题:ViGEmBus的神奇力量 【免费下载链接】ViGEmBus Windows kernel-mode driver emulating well-known USB game controllers. 项目地址: https://gitcode.com/gh_mirrors/vi/ViGEmBus 还在为心爱的游戏手柄在PC上无法使用而烦恼吗&…...

如何用Networx精准监控单个应用的网络流量?详细操作步骤解析
如何用Networx精准监控单个应用的网络流量?详细操作步骤解析 在数字化办公环境中,网络流量管理已成为提升效率的关键环节。想象一下这样的场景:团队协作时突然出现网络卡顿,却无法快速定位是哪个应用在占用带宽;或是需…...

“advisor复合电源模型:采用新增构型方法修改的优越性”
advisor复合电源模型。 采用新增构型方法修改的复合电源模型,比advisor书上那种在纯电基础上修改好很多,因为保留了自带的纯电模型,所以可方便比较有无超级电容的影响。 模型运行完全正常 无报错。搞过混合动力系统仿真的朋友都知道…...