开源通用验证码识别OCR —— DdddOcr 源码赏析(二)
文章目录
- 前言
- DdddOcr
- 分类识别
- 调用识别功能
- classification 函数源码
- classification 函数源码解读
- 1. 分类功能不支持目标检测
- 2. 转换为Image对象
- 3. 根据模型配置调整图片尺寸和色彩模式
- 4. 图像数据转换为浮点数据并归一化
- 5. 图像数据预处理
- 6. 运行模型,返回预测结果
- 总结
前言
DdddOcr 源码赏析
上文我们读到了分类识别部分的源码,这里我们继续往下进行

DdddOcr
DdddOcr是开源的通用验证码识别OCR
官方传送门
分类识别
调用识别功能
image = open("example.jpg", "rb").read()
result = ocr.classification(image)
print(result)
classification 函数源码
def classification(self, img, png_fix: bool = False, probability=False):if self.det:raise TypeError("当前识别类型为目标检测")if not isinstance(img, (bytes, str, pathlib.PurePath, Image.Image)):raise TypeError("未知图片类型")if isinstance(img, bytes):image = Image.open(io.BytesIO(img))elif isinstance(img, Image.Image):image = img.copy()elif isinstance(img, str):image = base64_to_image(img)else:assert isinstance(img, pathlib.PurePath)image = Image.open(img)if not self.use_import_onnx:image = image.resize((int(image.size[0] * (64 / image.size[1])), 64), Image.ANTIALIAS).convert('L')else:if self.__resize[0] == -1:if self.__word:image = image.resize((self.__resize[1], self.__resize[1]), Image.ANTIALIAS)else:image = image.resize((int(image.size[0] * (self.__resize[1] / image.size[1])), self.__resize[1]),Image.ANTIALIAS)else:image = image.resize((self.__resize[0], self.__resize[1]), Image.ANTIALIAS)if self.__channel == 1:image = image.convert('L')else:if png_fix:image = png_rgba_black_preprocess(image)else:image = image.convert('RGB')image = np.array(image).astype(np.float32)image = np.expand_dims(image, axis=0) / 255.if not self.use_import_onnx:image = (image - 0.5) / 0.5else:if self.__channel == 1:image = (image - 0.456) / 0.224else:image = (image - np.array([0.485, 0.456, 0.406])) / np.array([0.229, 0.224, 0.225])image = image[0]image = image.transpose((2, 0, 1))ort_inputs = {'input1': np.array([image]).astype(np.float32)}ort_outs = self.__ort_session.run(None, ort_inputs)result = []last_item = 0if self.__word:for item in ort_outs[1]:result.append(self.__charset[item])else:if not self.use_import_onnx:# 概率输出仅限于使用官方模型if probability:ort_outs = ort_outs[0]ort_outs = np.exp(ort_outs) / np.sum(np.exp(ort_outs))ort_outs_sum = np.sum(ort_outs, axis=2)ort_outs_probability = np.empty_like(ort_outs)for i in range(ort_outs.shape[0]):ort_outs_probability[i] = ort_outs[i] / ort_outs_sum[i]ort_outs_probability = np.squeeze(ort_outs_probability).tolist()result = {}if len(self.__charset_range) == 0:# 返回全部result['charsets'] = self.__charsetresult['probability'] = ort_outs_probabilityelse:result['charsets'] = self.__charset_rangeprobability_result_index = []for item in self.__charset_range:if item in self.__charset:probability_result_index.append(self.__charset.index(item))else:# 未知字符probability_result_index.append(-1)probability_result = []for item in ort_outs_probability:probability_result.append([item[i] if i != -1 else -1 for i in probability_result_index ])result['probability'] = probability_resultreturn resultelse:last_item = 0argmax_result = np.squeeze(np.argmax(ort_outs[0], axis=2))for item in argmax_result:if item == last_item:continueelse:last_item = itemif item != 0:result.append(self.__charset[item])return ''.join(result)else:last_item = 0for item in ort_outs[0][0]:if item == last_item:continueelse:last_item = itemif item != 0:result.append(self.__charset[item])return ''.join(result)classification 函数源码解读
1. 分类功能不支持目标检测
if self.det:raise TypeError("当前识别类型为目标检测")2. 转换为Image对象
if not isinstance(img, (bytes, str, pathlib.PurePath, Image.Image)):raise TypeError("未知图片类型")if isinstance(img, bytes):image = Image.open(io.BytesIO(img))elif isinstance(img, Image.Image):image = img.copy()elif isinstance(img, str):image = base64_to_image(img)else:assert isinstance(img, pathlib.PurePath)image = Image.open(img)3. 根据模型配置调整图片尺寸和色彩模式
if not self.use_import_onnx:image = image.resize((int(image.size[0] * (64 / image.size[1])), 64), Image.ANTIALIAS).convert('L')else:if self.__resize[0] == -1:if self.__word:image = image.resize((self.__resize[1], self.__resize[1]), Image.ANTIALIAS)else:image = image.resize((int(image.size[0] * (self.__resize[1] / image.size[1])), self.__resize[1]),Image.ANTIALIAS)else:image = image.resize((self.__resize[0], self.__resize[1]), Image.ANTIALIAS)if self.__channel == 1:image = image.convert('L')else:if png_fix:image = png_rgba_black_preprocess(image)else:image = image.convert('RGB')
- 如果使用dddocr的模型,则将图像调整为高度为64,同时保持原来的宽高比,同时将图片转为灰度图
- 如果使用自己传入的模型,则根据从charsets_path读取的charset info调整图片尺寸,之后根据charset 需要调整为灰度图片或RGB模式的图片,这里png_rgba_black_preprocess也是将图片转为RGB模式
def png_rgba_black_preprocess(img: Image):width = img.widthheight = img.heightimage = Image.new('RGB', size=(width, height), color=(255, 255, 255))image.paste(img, (0, 0), mask=img)return image
4. 图像数据转换为浮点数据并归一化
image = np.array(image).astype(np.float32)
image = np.expand_dims(image, axis=0) / 255.
- image = np.array(image).astype(np.float32):首先,将图像从PIL图像或其他格式转换为NumPy数组,并确保数据类型为float32。这是为了后续的数学运算,特别是归一化和标准化。
- image = np.expand_dims(image, axis=0) / 255.:然后,通过np.expand_dims在第一个维度(axis=0)上增加一个维度,这通常是为了符合某些模型输入的形状要求(例如,批处理大小)。之后,将图像数据除以255,将其归一化到[0, 1]区间内。
5. 图像数据预处理
if not self.use_import_onnx:image = (image - 0.5) / 0.5
else:if self.__channel == 1:image = (image - 0.456) / 0.224else:image = (image - np.array([0.485, 0.456, 0.406])) / np.array([0.229, 0.224, 0.225])image = image[0]image = image.transpose((2, 0, 1))
这段代码主要进行了图像数据的预处理,具体地,根据是否使用私人的onnx模型(self.use_import_onnx)以及图像的通道数(self.__channel),对图像数据image进行了不同的归一化处理。这种处理在机器学习和深度学习模型中是常见的,特别是当使用预训练的模型进行推理时,需要确保输入数据与模型训练时使用的数据具有相同的分布。
- 如果不使用私人的ONNX模型 (self.use_import_onnx 为 False, 也就是使用官方的模型)
图像数据image会先减去0.5,然后除以0.5,实现了一个简单的归一化,将图像的像素值从[0, 255]范围缩放到[-1, 1]范围。这种归一化方式可能适用于某些特定训练的模型。
- 如果使用私人的ONNX模型 (self.use_import_onnx 为 True)
- 首先,根据图像的通道数self.__channel进行不同的处理。
如果图像是单通道(self.__channel == 1),则图像数据image会先减去0.456,然后除以0.224,实现另一种归一化。这种归一化参数(0.456和0.224)是针对单通道图像(如灰度图)预训练的模型所使用的。- 如果图像是多通道(通常是RGB三通道),则图像数据image会先减去一个包含三个值的数组[0.485, 0.456, 0.406](这些值分别是RGB三通道的均值),然后除以另一个包含三个值的数组[0.229, 0.224, 0.225](这些值分别是RGB三通道的标准差或缩放因子)。这种归一化方式是为了将图像数据标准化到常见的分布,与许多预训练的深度学习模型(如ResNet, VGG等)训练时使用的数据分布相匹配。
- 接着,对于多通道图像,还执行了两个额外的步骤:
- image = image[0]:由于之前通过np.expand_dims增加了一个维度,这里通过索引[0]将其移除,恢复到原始的三维形状(高度、宽度、通道数)。
- image = image.transpose((2, 0, 1)):最后,将图像的维度从(高度、宽度、通道数)转换为(通道数、高度、宽度)。这是因为某些模型(特别是使用PyTorch等框架训练的模型)期望输入数据的维度顺序为(通道数、高度、宽度)。
6. 运行模型,返回预测结果
ort_inputs = {'input1': np.array([image]).astype(np.float32)}
ort_outs = self.__ort_session.run(None, ort_inputs)
result = []
if self.__word:for item in ort_outs[1]:result.append(self.__charset[item])
else:if not self.use_import_onnx:# 概率输出仅限于使用官方模型if probability:ort_outs = ort_outs[0]ort_outs = np.exp(ort_outs) / np.sum(np.exp(ort_outs))ort_outs_sum = np.sum(ort_outs, axis=2)ort_outs_probability = np.empty_like(ort_outs)for i in range(ort_outs.shape[0]):ort_outs_probability[i] = ort_outs[i] / ort_outs_sum[i]ort_outs_probability = np.squeeze(ort_outs_probability).tolist()result = {}if len(self.__charset_range) == 0:# 返回全部result['charsets'] = self.__charsetresult['probability'] = ort_outs_probabilityelse:result['charsets'] = self.__charset_rangeprobability_result_index = []for item in self.__charset_range:if item in self.__charset:probability_result_index.append(self.__charset.index(item))else:# 未知字符probability_result_index.append(-1)probability_result = []for item in ort_outs_probability:probability_result.append([item[i] if i != -1 else -1 for i in probability_result_index ])result['probability'] = probability_resultreturn resultelse:last_item = 0argmax_result = np.squeeze(np.argmax(ort_outs[0], axis=2))for item in argmax_result:if item == last_item:continueelse:last_item = itemif item != 0:result.append(self.__charset[item])return ''.join(result)else:last_item = 0for item in ort_outs[0][0]:if item == last_item:continueelse:last_item = itemif item != 0:result.append(self.__charset[item])return ''.join(result)
- 使用模型预测字符并拼接字符串,官方模型可以输出概率信息
argmax_result = np.squeeze(np.argmax(ort_outs[0], axis=2))这行代码在ort_outs[0]的第三个维度(axis=2)上应用np.argmax函数,以找到序列中每个元素最可能的字符索引。np.squeeze用于去除结果中维度为1的轴
总结
本文介绍了DdddOcr的分类识别任务的源码实现过程,主要是调整图片尺寸和色彩模式,以及图像数据的预处理,最后运行模型预测得到结果,下一篇文章中我们将继续阅读DdddOcr目标检测任务的源码实现过程,天命人,明天见!

相关文章:

开源通用验证码识别OCR —— DdddOcr 源码赏析(二)
文章目录 前言DdddOcr分类识别调用识别功能classification 函数源码classification 函数源码解读1. 分类功能不支持目标检测2. 转换为Image对象3. 根据模型配置调整图片尺寸和色彩模式4. 图像数据转换为浮点数据并归一化5. 图像数据预处理6. 运行模型,返回预测结果 …...

【个人笔记】VCS工具与命令
Title:VCS工具学习 一 介绍 是什么? VCS (Verilog Compiler Simulator) 是synopsys的verilog 仿真软件,竞品有Mentor公司的Modelsim、Cadence公司的NC-Verilog、Verilog—XL. VCS能够 分析、编译 HDL的design code,同时内置了 仿…...

面试进去8分钟就出来了,问的问题有点变态。。。
从小厂出来,没想到在另一家公司又寄了。 到这家公司开始上班,加班是每天必不可少的,看在钱给的比较多的份上,就不太计较了。没想到一纸通知,所有人不准加班,加班费不仅没有了,薪资还要降40%,这…...

探索MongoDB的Python之钥:pymongo的魔力
文章目录 探索MongoDB的Python之钥:pymongo的魔力背景:为什么选择pymongo?简介:pymongo是什么?安装:如何将pymongo纳入你的项目?基础用法:五个核心函数介绍1. 连接到MongoDB2. 选择数…...

【数据结构】顺序表和链表——顺序表(包含丰富算法题)
文章目录 1. 线性表2. 顺序表2.1 概念与结构2.2 分类2.2.1 静态顺序表2.2.2 动态顺序表 2.3 动态顺序表的实现2.4 顺序表算法题2.4.1 移除元素2.4.2 删除有序数组中的重复项2.4.3 合并两个有序数组 2.5 顺序表问题与思考 1. 线性表 线性表(linear list)…...

pod基础和镜像拉取策略
目录 pod概念 pod的分类 1.基础容器 pause 2.初始化容器 init 实验:定义初始化容器 init容器的作用 实验:如何在容器内部进行挂载 镜像拉取策略 pod概念 pod是k8s里面的最小单位,pod也是最小化运行容器的资源对象。容器是基于pod在k…...

53 mysql pid 文件的创建
前言 接上一篇文章 mysql 启动过程中常见的相关报错信息 在 mysql 中文我们在 “service mysql start”, “service mysql stop” 经常会碰到 mysql.pid 相关的错误信息 比如 “The server quit without updating PID file” 我们这里来看一下 mysql 中 mysql.pid 文件的…...

前端---对MVC MVP MVVM的理解
就需要从前端这些年的从无到有、从有到优的变迁过程讲一下。 1. Web1.0时代 在web1.0时代并没有前端的概念,开发一个web应用多数采用ASP.NET/Java/PHP编写,项目通常用多个aspx/jsp/php文件构成,每个文件中同时包含了HTML、CSS、JavaScript、…...

深度学习 --- VGG16能让某个指定的feature map激活值最大化图片的可视化(JupyterNotebook实战)
VGG16能让某个指定的feature map激活值最大化图片的可视化 在前面的文章中,我用jupyter notebook分别实现了,预训练好的VGG16模型各层filter权重的可视化和给VGG16输入了一张图像,可视化VGG16各层的feature map。深度学习 --- VGG16卷积核的可…...

1990-2022年各地级市gdp、一二三产业gdp及人均gdp数据
1990-2022年各地级市gdp、一二三产业gdp及人均gdp数据 1、时间:1990-2022年 2、来源:城市统计年鉴 3、指标:年度、城市名称、城市代码、城市类别、省份标识、省份名称、国内生产总值/亿元、第一产业占GDP比重(%)、第二产业占GDP比重(%)、第…...

c++ 原型模式
文章目录 什么是原型模式为什么要使用原型模式使用场景示例 什么是原型模式 用原型实例指定创建对象的种类,并通过拷贝这些原型创建新的对象,简单理解就是“克隆指定对象” 为什么要使用原型模式 原型模式(Prototype Pattern)是…...

论tomcat线程池和spring封装的线程池
Tomcat 中的线程池是什么? 内部线程池:Tomcat 确实有一个内部的线程池,用于处理 HTTP 请求,通常是org.apache.tomcat.util.threads.ThreadPoolExecutor 类的实例。这个线程池专门用于处理进入的 HTTP 请求和发送响应。可以通过 T…...

阿里P7大牛整理自动化测试高频面试题
最近好多粉丝咨询我,有没有软件测试方面的面试题,尤其是Python自动化测试相关的最新面试题,所以今天给大家整理了一份,希望能帮助到你们。 接口测试基础 1、公司接口测试流程是什么? 从开发那边获取接口设计文档、分…...

vue如何实现路由缓存
(以下示例皆是以vue3vitets项目为例) 场景一:所有路由都可以进行缓存 在渲染路由视图对应的页面进行缓存设置,代码如下: <template><router-view v-slot"{ Component, route }"><transiti…...

基于Openjdk容器打包运行jar程序
文章目录 应用场景基于Openjdk容器打包运行jar程序1.编译项目成jar包2.构建Dockerfile文件精简版-含jar包精简版-不含jar包带注释版-含jar包 3.编译Dockerfile成镜像。4.运行镜像: 应用场景 部署多版本jdk的应用程序。 基于Openjdk容器打包运行jar程序 1.编译项目…...

DNN学习平台(GoogleNet、SSD、FastRCNN、Yolov3)
DNN学习平台(GoogleNet、SSD、FastRCNN、Yolov3) 前言相关介绍1,登录界面:2,主界面:3,部分功能演示如下(1)识别网络图片(2)GoogleNet分类…...
)
HTTP协议(超文本传输协议)
HTTP请求消息 http请求消息组成: 请求行 :包含请求的方法 操作资源的地址 协议的版本号 http请求方法: GET:从服务器获取资源 POST:添加资源信息 PUT:请求服务器更新资源信息 DELETE:请…...
)
FFmpeg的日志系统(ubuntu 环境)
1. 新建.c文件 vim ffmpeg_log.c2. 输入文本 #include<stdio.h> #include<libavutil/log.h> int main() {av_log_set_level(AV_LOG_DEBUG);av_log(NULL,AV_LOG_INFO,"hello world");return 0; }当log level < AV_LOG_DEBUG 都可以印出来 #define A…...

浅析VO、DTO、DO、PO
一、概念介绍 POJO(plain ordinary java object) : 简单java对象,个人感觉POJO是最常见最多变的对象,是一个中间对象,也是我们最常打交道的对象。一个POJO持久化以后就是PO,直接用它传递、传递…...

android kotlin基础复习 enum
1、kotlin中,关键字enum来定义枚举类型。枚举类型可以包含多个枚举常量,并且每个枚举常量可以有自己的属性和方法。 2、测试代码: enum class Color{RED,YELLOW,BLACK,GOLD,BLUE,GREEN,WHITE }inline fun <reified T : Enum<T>>…...

内存分配函数malloc kmalloc vmalloc
内存分配函数malloc kmalloc vmalloc malloc实现步骤: 1)请求大小调整:首先,malloc 需要调整用户请求的大小,以适应内部数据结构(例如,可能需要存储额外的元数据)。通常,这包括对齐调整,确保分配的内存地址满足特定硬件要求(如对齐到8字节或16字节边界)。 2)空闲…...

如何在看板中体现优先级变化
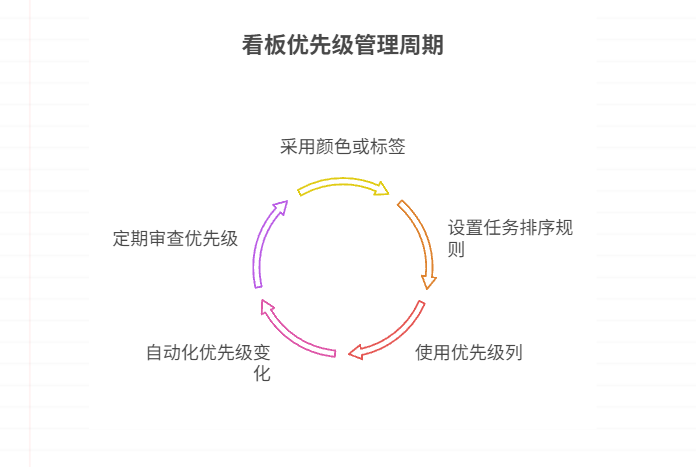
在看板中有效体现优先级变化的关键措施包括:采用颜色或标签标识优先级、设置任务排序规则、使用独立的优先级列或泳道、结合自动化规则同步优先级变化、建立定期的优先级审查流程。其中,设置任务排序规则尤其重要,因为它让看板视觉上直观地体…...

STM32+rt-thread判断是否联网
一、根据NETDEV_FLAG_INTERNET_UP位判断 static bool is_conncected(void) {struct netdev *dev RT_NULL;dev netdev_get_first_by_flags(NETDEV_FLAG_INTERNET_UP);if (dev RT_NULL){printf("wait netdev internet up...");return false;}else{printf("loc…...

微信小程序 - 手机震动
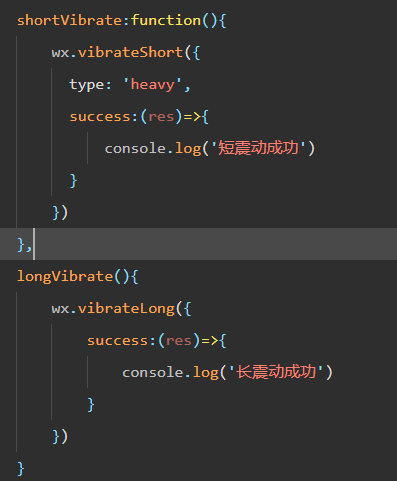
一、界面 <button type"primary" bindtap"shortVibrate">短震动</button> <button type"primary" bindtap"longVibrate">长震动</button> 二、js逻辑代码 注:文档 https://developers.weixin.qq…...

2025 后端自学UNIAPP【项目实战:旅游项目】6、我的收藏页面
代码框架视图 1、先添加一个获取收藏景点的列表请求 【在文件my_api.js文件中添加】 // 引入公共的请求封装 import http from ./my_http.js// 登录接口(适配服务端返回 Token) export const login async (code, avatar) > {const res await http…...

Python爬虫(一):爬虫伪装
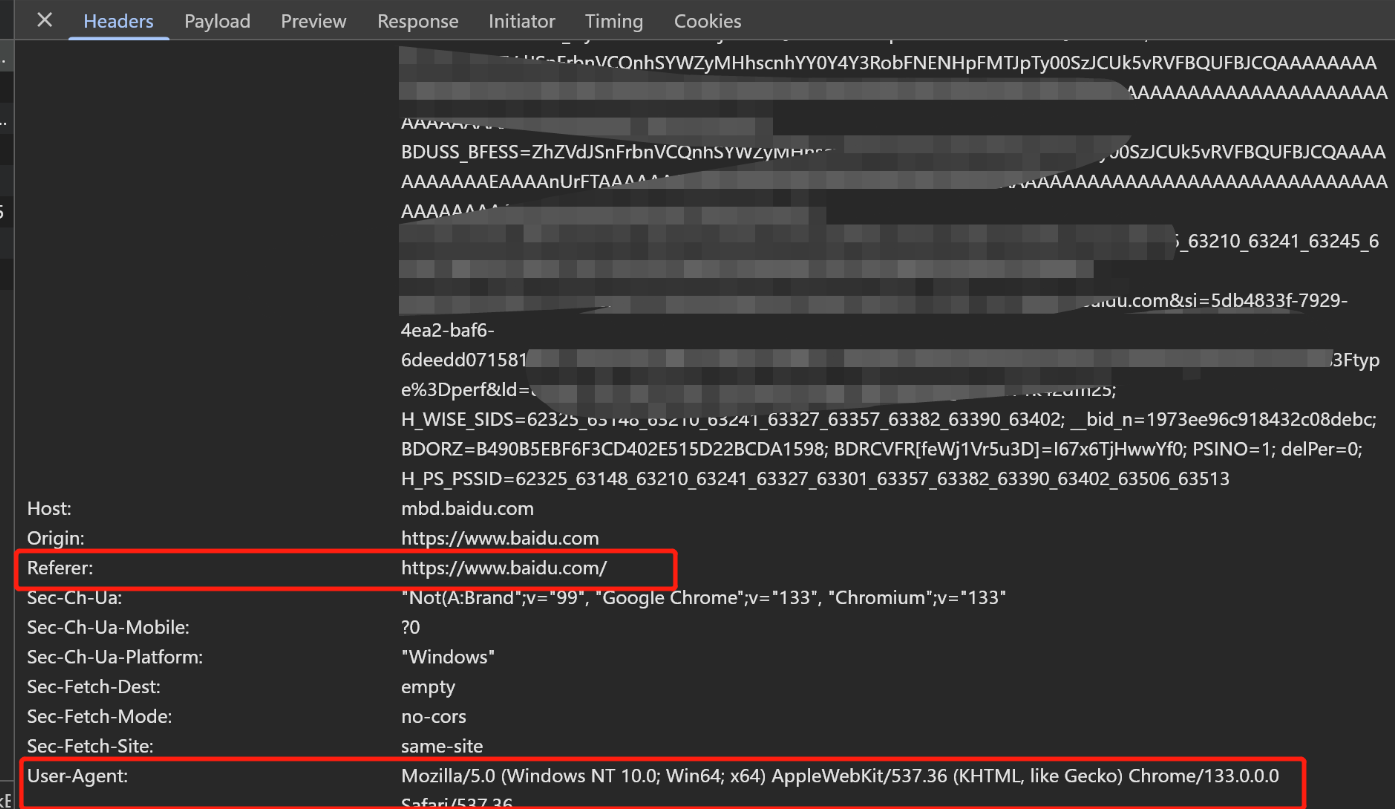
一、网站防爬机制概述 在当今互联网环境中,具有一定规模或盈利性质的网站几乎都实施了各种防爬措施。这些措施主要分为两大类: 身份验证机制:直接将未经授权的爬虫阻挡在外反爬技术体系:通过各种技术手段增加爬虫获取数据的难度…...

Python如何给视频添加音频和字幕
在Python中,给视频添加音频和字幕可以使用电影文件处理库MoviePy和字幕处理库Subtitles。下面将详细介绍如何使用这些库来实现视频的音频和字幕添加,包括必要的代码示例和详细解释。 环境准备 在开始之前,需要安装以下Python库:…...
中关于正整数输入的校验规则)
Element Plus 表单(el-form)中关于正整数输入的校验规则
目录 1 单个正整数输入1.1 模板1.2 校验规则 2 两个正整数输入(联动)2.1 模板2.2 校验规则2.3 CSS 1 单个正整数输入 1.1 模板 <el-formref"formRef":model"formData":rules"formRules"label-width"150px"…...

LangChain知识库管理后端接口:数据库操作详解—— 构建本地知识库系统的基础《二》
这段 Python 代码是一个完整的 知识库数据库操作模块,用于对本地知识库系统中的知识库进行增删改查(CRUD)操作。它基于 SQLAlchemy ORM 框架 和一个自定义的装饰器 with_session 实现数据库会话管理。 📘 一、整体功能概述 该模块…...

Mysql8 忘记密码重置,以及问题解决
1.使用免密登录 找到配置MySQL文件,我的文件路径是/etc/mysql/my.cnf,有的人的是/etc/mysql/mysql.cnf 在里最后加入 skip-grant-tables重启MySQL服务 service mysql restartShutting down MySQL… SUCCESS! Starting MySQL… SUCCESS! 重启成功 2.登…...
