九月五日(k8s配置)
一、安装环境
环境准备:(有阿里云)
k8s-master 192.168.1.11
k8s-node1 192.168.1.22
k8s-node2 192.168.1.33
二、前期准备
在k8s-master主机
[root@k8s-master ~]# vim /etc/hosts //做个域名劫持
192.168.1.11 k8s-master
192.168.1.22 k8s-node1
192.168.1.33 k8s-node2
1.配置yum源
[root@k8s-master ~]# cd /etc/yum.repos.d/
[root@k8s-master yum.repos.d]# vim kubernetes.repo
[kubernetes]
name=Kubernetes
baseurl=https://mirrors.aliyun.com/kubernetes/yum/repos/kubernetes-el7-x86_64/
enabled=1
gpgcheck=0
repo_gpgcheck=0
gpgkey=https://mirrors.aliyun.com/kubernetes/yum/doc/yum-key.gpg https://mirrors.aliyun.com/kubernetes/yum/doc/rpm-package-key.gpg
[root@k8s-master yum.repos.d]# vim docker-ce.repo
[docker-ce-stable]
name=Docker CE Stable - $basearch
baseurl=https://mirrors.aliyun.com/docker-ce/linux/centos/$releasever/$basearch/stable
enabled=1
gpgcheck=1
gpgkey=https://mirrors.aliyun.com/docker-ce/linux/centos/gpg
[docker-ce-stable-debuginfo]
name=Docker CE Stable - Debuginfo $basearch
baseurl=https://mirrors.aliyun.com/docker-ce/linux/centos/$releasever/debug-$basearch/stable
enabled=0
gpgcheck=1
gpgkey=https://mirrors.aliyun.com/docker-ce/linux/centos/gpg
[docker-ce-stable-source]
name=Docker CE Stable - Sources
baseurl=https://mirrors.aliyun.com/docker-ce/linux/centos/$releasever/source/stable
enabled=0
gpgcheck=1
gpgkey=https://mirrors.aliyun.com/docker-ce/linux/centos/gpg
[docker-ce-test]
name=Docker CE Test - $basearch
baseurl=https://mirrors.aliyun.com/docker-ce/linux/centos/$releasever/$basearch/test
enabled=0
gpgcheck=1
gpgkey=https://mirrors.aliyun.com/docker-ce/linux/centos/gpg
[docker-ce-test-debuginfo]
name=Docker CE Test - Debuginfo $basearch
baseurl=https://mirrors.aliyun.com/docker-ce/linux/centos/$releasever/debug-$basearch/test
enabled=0
gpgcheck=1
gpgkey=https://mirrors.aliyun.com/docker-ce/linux/centos/gpg
[docker-ce-test-source]
name=Docker CE Test - Sources
baseurl=https://mirrors.aliyun.com/docker-ce/linux/centos/$releasever/source/test
enabled=0
gpgcheck=1
gpgkey=https://mirrors.aliyun.com/docker-ce/linux/centos/gpg
[docker-ce-nightly]
name=Docker CE Nightly - $basearch
baseurl=https://mirrors.aliyun.com/docker-ce/linux/centos/$releasever/$basearch/nightly
enabled=0
gpgcheck=1
gpgkey=https://mirrors.aliyun.com/docker-ce/linux/centos/gpg
[docker-ce-nightly-debuginfo]
name=Docker CE Nightly - Debuginfo $basearch
baseurl=https://mirrors.aliyun.com/docker-ce/linux/centos/$releasever/debug-$basearch/nightly
enabled=0
gpgcheck=1
gpgkey=https://mirrors.aliyun.com/docker-ce/linux/centos/gpg
[docker-ce-nightly-source]
name=Docker CE Nightly - Sources
baseurl=https://mirrors.aliyun.com/docker-ce/linux/centos/$releasever/source/nightly
enabled=0
gpgcheck=1
gpgkey=https://mirrors.aliyun.com/docker-ce/linux/centos/gpg
[root@k8s-master yum.repos.d]# yum clean all && yum makecache
2.安装必备工具
[root@k8s-master yum.repos.d]# yum -y install wget jq psmisc vim net-tools telnet yum-utils device-mapper-persistent-data lvm2 git //安装必备工具
3.关闭 swap 分区
[root@k8s-master ~]# swapoff -a
[root@k8s-master ~]# sysctl -w vm.swappiness=0
vm.swappiness = 0
[root@k8s-master ~]# sed -ri '/^[^#]*swap/s@^@#@' /etc/fstab
4.同步时间
[root@k8s-master yum.repos.d]# cd
[root@k8s-master ~]# yum -y install ntpdate //同步时间
[root@k8s-master ~]# ntpdate time2.aliyun.com
[root@k8s-master ~]# crontab -e //编写计划任务
* 5 * * * /usr/sbin/ntpdate time2.aliyun.com
5. 配置 limit
[root@k8s-master ~]# ulimit -SHn 65535 //单个进程可以打开的⽂件数量将被限制为 65535
[root@k8s-master ~]# vim /etc/security/limits.conf
* soft nofile 65536
* hard nofile 131072
* soft nproc 65535
* hard nproc 655350
* soft memlock unlimited
* hard memlock unlimited
6. 安装 k8s ⾼可⽤性 Git 仓库
[root@k8s-master ~]# git clone https://gitee.com/dukuan/k8s-ha-install.git
7.重启
[root@k8s-master ~]# reboot
三、配置内核模块
1. 配置 ipvs 模块(centos可以不用做)
[root@k8s-master ~]# yum install ipvsadm ipset sysstat conntrack libseccomp -y
[root@k8s-master ~]# modprobe -- ip_vs
[root@k8s-master ~]# modprobe -- ip_vs_rr
[root@k8s-master ~]# modprobe -- ip_vs_wrr
[root@k8s-master ~]# modprobe -- ip_vs_sh
[root@k8s-master ~]# modprobe -- nf_conntrack
[root@k8s-master ~]# vim /etc/modules-load.d/ipvs.conf
# 在系统启动时加载下列 IPVS 和相关功能所需的模块
ip_vs # 负载均衡模块
ip_vs_lc # 用于实现基于连接数量的负载均衡算法
ip_vs_wlc # 用于实现带权重的最少连接算法的模块
ip_vs_rr # 负载均衡rr算法模块
ip_vs_wrr # 负载均衡wrr算法模块
ip_vs_lblc # 负载均衡算法,它结合了最少连接(LC)算法和基于偏置的轮询(Round Robin with Bias)算法
ip_vs_lblcr # 用于实现基于链路层拥塞状况的最少连接负载调度算法的模块
ip_vs_dh # 用于实现基于散列(Hashing)的负载均衡算法的模块
ip_vs_sh # 用于源端负载均衡的模块
ip_vs_fo # 用于实现基于本地服务的负载均衡算法的模块
ip_vs_nq # 用于实现NQ算法的模块
ip_vs_sed # 用于实现随机早期检测(Random Early Detection)算法的模块
ip_vs_ftp # 用于实现FTP服务的负载均衡模块
ip_vs_sh
nf_conntrack # 用于跟踪网络连接的状态的模块
ip_tables # 用于管理防护墙的机制
ip_set # 用于创建和管理IP集合的模块
xt_set # 用于处理IP数据包集合的模块,提供了与iptables等网络工具的接口
ipt_set # 用于处理iptables规则集合的模块
ipt_rpfilter # 用于实现路由反向路径过滤的模块
ipt_REJECT # iptables模块之一,用于将不符合规则的数据包拒绝,并返回特定的错误码
ipip # 用于实现IP隧道功能的模块,使得数据可以在两个网络之间进行传输
[root@k8s-master ~]# sysctl --system
[root@k8s-master ~]# systemctl enable systemd-modules-load.service
[root@k8s-master ~]# systemctl start systemd-modules-load.service
[root@k8s-master ~]# lsmod | grep -e ip_vs -e nf_conntrack //查看已写⼊加载的模块
2. 配置 k8s 内核
[root@k8s-master ~]# vim /etc/sysctl.d/k8s.conf
# 写入k8s所需内核模块
net.bridge.bridge-nf-call-iptables = 1 # 控制网络桥接与iptables之间的网络转发行为
net.bridge.bridge-nf-call-ip6tables = 1 # 用于控制网络桥接(bridge)的IP6tables过滤规则。当该参数设置为1时,表示启用对网络桥接的IP6tables过滤规则
fs.may_detach_mounts = 1 # 用于控制文件系统是否允许分离挂载,1表示允许
net.ipv4.conf.all.route_localnet = 1 # 允许本地网络上的路由。设置为1表示允许,设置为0表示禁止。
vm.overcommit_memory=1 # 控制内存分配策略。设置为1表示允许内存过量分配,设置为0表示不允许。
vm.panic_on_oom=0 # 决定当系统遇到内存不足(OOM)时是否产生panic。设置为0表示不产生panic,设置为1表示产生panic。
fs.inotify.max_user_watches=89100 # inotify可以监视的文件和目录的最大数量。
fs.file-max=52706963 # 系统级别的文件描述符的最大数量。
fs.nr_open=52706963 # 单个进程可以打开的文件描述符的最大数量。
net.netfilter.nf_conntrack_max=2310720 # 网络连接跟踪表的最大大小。
net.ipv4.tcp_keepalive_time = 600 # TCP保活机制发送探测包的间隔时间(秒)。
net.ipv4.tcp_keepalive_probes = 3 # TCP保活机制发送探测包的最大次数。
net.ipv4.tcp_keepalive_intvl =15 # TCP保活机制在发送下一个探测包之前等待响应的时间(秒)。
net.ipv4.tcp_max_tw_buckets = 36000 # TCP TIME_WAIT状态的bucket数量。
net.ipv4.tcp_tw_reuse = 1 # 允许重用TIME_WAIT套接字。设置为1表示允许,设置为0表示不允许。
net.ipv4.tcp_max_orphans = 327680 # 系统中最大的孤套接字数量。
net.ipv4.tcp_orphan_retries = 3 # 系统尝试重新分配孤套接字的次数。
net.ipv4.tcp_syncookies = 1 # 用于防止SYN洪水攻击。设置为1表示启用SYN cookies,设置为0表示禁用。
net.ipv4.tcp_max_syn_backlog = 16384 # SYN连接请求队列的最大长度。
net.ipv4.ip_conntrack_max = 65536 # IP连接跟踪表的最大大小。
net.ipv4.tcp_max_syn_backlog = 16384 # 系统中最大的监听队列的长度。
net.ipv4.tcp_timestamps = 0 # 用于关闭TCP时间戳选项。
net.core.somaxconn = 16384 # 用于设置系统中最大的监听队列的长度
[root@k8s-master ~]# reboot //保存后,所有节点重启,保证重启后内核依然加载
[root@k8s-master ~]# lsmod | grep --color=auto -e ip_vs -e nf_conntrack
[root@k8s-master ~]# yum -y install kubernetes
四、基本组件安装
1. 安装 Containerd
(1)安装 Docker
[root@k8s-master ~]# yum remove -y podman runc containerd docker
[root@k8s-master ~]# yum remove -y docker
[root@k8s-master ~]# yum -y install docker-ce docker-ce-cli containerd.io //安装Docker和containerd
(2)配置 Containerd 所需模块
[root@k8s-master ~]# cat <<EOF | sudo tee /etc/modules-load.d/containerd.conf //也可以用vim写
> overlay
> br_netfilter
> EOF
overlay
br_netfilter
[root@k8s-master ~]# modprobe -- overlay
[root@k8s-master ~]# modprobe -- br_netfilter
(3)配置 Containerd 所需内核
[root@k8s-master ~]# cat <<EOF | sudo tee /etc/sysctl.d/99-kubernetes-cri.conf
> net.bridge.bridge-nf-call-iptables = 1
> net.ipv4.ip_forward = 1
> net.bridge.bridge-nf-call-ip6tables = 1
> EOF
net.bridge.bridge-nf-call-iptables = 1
net.ipv4.ip_forward = 1
net.bridge.bridge-nf-call-ip6tables = 1
[root@k8s-master ~]# sysctl --system //使生效
(4)Containerd 配置⽂件
[root@k8s-master ~]# mkdir -p /etc/containerd
[root@k8s-master ~]# containerd config default | tee /etc/containerd/config.toml
[root@k8s-master ~]# vim /etc/containerd/config.toml
sandbox_image = "registry.cn-hangzhou.aliyuncs.com/google_containers/pause:3.9"
[root@k8s-master ~]# systemctl daemon-reload
[root@k8s-master ~]# systemctl start containerd.service
[root@k8s-master ~]# systemctl enable containerd.service
(5)配置 crictl 客户端连接的运⾏位置
[root@k8s-master ~]# vim /etc/crictl.yaml //配置容器运⾏环境的crictl.yml⽂件
runtime-endpoint: unix:///run/containerd/containerd.sock # 指定了容器运⾏时的地址为:unix://...
image-endpoint: unix:///run/containerd/containerd.sock # 指定了镜像运⾏时的地址为:unix://...
timeout: 10 # 设置了超时时间为10秒
debug: false # 关闭调试模式
2.安装 Kubernetes 组件
[root@k8s-master ~]# yum list kubeadm.x86_64 --showduplicates | sort -r #查询最新的Kubernetes版本号
[root@k8s-master ~]# yum install kubeadm-1.28* kubelet-1.28* kubectl-1.28* -y # 安装1.28最新版本kubeadm、kubelet和kubectl
[root@k8s-master ~]# systemctl daemon-reload
[root@k8s-master ~]# systemctl start kubelet
[root@k8s-master ~]# systemctl enable kubelet
[root@k8s-master ~]# kubeadm version //查看版本
3. Kubernetes 集群初始化
(1)Kubeadm 配置⽂件
[root@k8s-master ~]# vim kubeadm-config.yaml #修改kubeadm配置⽂件
apiVersion: kubeadm.k8s.io/v1beta3 # 指定Kubernetes配置文件的版本,使用的是kubeadm API的v1beta3版本
bootstrapTokens: # 定义bootstrap tokens的信息。这些tokens用于在Kubernetes集群初始化过程中进行身份验证
- groups: # 定义了与此token关联的组
- system:bootstrappers:kubeadm:default-node-token
token: 7t2weq.bjbawausm0jaxury # bootstrap token的值
ttl: 24h0m0s # token的生存时间,这里设置为24小时
usages: # 定义token的用途
- signing # 数字签名
- authentication # 身份验证
kind: InitConfiguration # 指定配置对象的类型,InitConfiguration:表示这是一个初始化配置
localAPIEndpoint: # 定义本地API端点的地址和端口
advertiseAddress: 192.168.15.11
bindPort: 6443
nodeRegistration: # 定义节点注册时的配置
criSocket: unix:///var/run/containerd/containerd.sock # 容器运行时(CRI)的套接字路径
name: k8s-master # 节点的名称
taints: # 标记
- effect: NoSchedule # 免调度节点
key: node-role.kubernetes.io/control-plane # 该节点为控制节点
---
apiServer: # 定义了API服务器的配置
certSANs: # 为API服务器指定了附加的证书主体名称(SAN),指定IP即可
- 192.168.15.11
timeoutForControlPlane: 4m0s # 控制平面的超时时间,这里设置为4分钟
apiVersion: kubeadm.k8s.io/v1beta3 # 指定API Server版本
certificatesDir: /etc/kubernetes/pki # 指定了证书的存储目录
clusterName: kubernetes # 定义了集群的名称为"kubernetes"
controlPlaneEndpoint: 192.168.15.11:6443 # 定义了控制节点的地址和端口
controllerManager: {} # 控制器管理器的配置,为空表示使用默认配置
etcd: # 定义了etcd的配置
local: # 本地etcd实例
dataDir: /var/lib/etcd # 数据目录
imageRepository: registry.cn-hangzhou.aliyuncs.com/google_containers # 指定了Kubernetes使用的镜像仓库的地址,阿里云的镜像仓库。
kind: ClusterConfiguration # 指定了配置对象的类型,ClusterConfiguration:表示这是一个集群配置
kubernetesVersion: v1.28.2 # 指定了kubernetes的版本
networking: # 定义了kubernetes集群网络设置
dnsDomain: cluster.local # 定义了集群的DNS域为:cluster.local
podSubnet: 172.16.0.0/16 # 定义了Pod的子网
serviceSubnet: 10.96.0.0/16 # 定义了服务的子网
scheduler: {} # 使用默认的调度器行为
[root@k8s-master ~]# kubeadm config migrate --old-config kubeadm-config.yaml --new-config new.yaml
(2)下载组件镜像
[root@k8s-master ~]# kubeadm config images pull --config /root/new.yaml
(3)集群初始化
[root@k8s-master ~]# kubeadm init --config /root/new.yaml --upload-certs //内存必须大点,4
G左右
后面这些记得保存,后面添加节点要用
kubeadm join 192.168.1.11:6443 --token 7t2weq.bjbawausm0jaxury \
--discovery-token-ca-cert-hash sha256:72dbccbe222cb2946d97d4d82eda448a2bf53f91e5610b698681d4f0f9cbaba5
(4)加载环境变量
[root@k8s-master ~]# vim .bashrc
export KUBECONFIG=/etc/kubernetes/admin.conf
[root@k8s-master ~]# source .bashrc
//初始化重置(可以清除以前初始化的东西)
[root@k8s-master ~]# kubeadm reset -f ; ipvsadm --clear ; rm -rf ~/.kube
day44
node1:
[root@k8s-node1 ~]# scp root@192.168.1.11:/etc/yum.repos.d/kubernetes.repo /etc/yum.repos.d/
[root@k8s-node1 ~]# scp root@192.168.1.11:/etc/yum.repos.d/docker-ce.repo /etc/yum.repos.d/
[root@k8s-node1 ~]# yum clean all && yum makecache
[root@k8s-node1 ~]# vim /etc/hosts
192.168.1.11 k8s-master
192.168.1.22 k8s-node1
192.168.1.33 k8s-node2
[root@k8s-node1 ~]# yum -y install wget jq psmisc vim net-tools telnet yum-utils device-mapper-persistent-data lvm2 git
[root@k8s-node1 ~]# swapoff -a
[root@k8s-node1 ~]# sysctl -w vm.swappiness=0
vm.swappiness = 0
[root@k8s-node1 ~]# yum -y install ntpdate
[root@k8s-node1 ~]# ntpdate time2.aliyun.com
[root@k8s-node1 ~]# ntpdate time2.aliyun.com
[root@k8s-node1 ~]# crontab -e
* 5 * * * /usr/sbin/ntpdate time2.aliyun.com
[root@k8s-node1 ~]# ulimit -SHn 65535
[root@k8s-node1 ~]# vim /etc/security/limits.conf
* soft nofile 65536
* hard nofile 131072
* soft nproc 65535
* hard nproc 655350
* soft memlock unlimited
* hard memlock unlimited
回到master设置免密登陆
[root@k8s-master ~]# ssh-keygen
[root@k8s-master ~]# ssh-copy-id root@192.168.1.22
[root@k8s-master ~]# ssh-copy-id root@192.168.1.33
回到node1
[root@k8s-node1 ~]# vim /etc/sysctl.d/k8s.conf
# 写入k8s所需内核模块
net.bridge.bridge-nf-call-iptables = 1 # 控制网络桥接与iptables之间的网络转发行为
net.bridge.bridge-nf-call-ip6tables = 1 # 用于控制网络桥接(bridge)的IP6tables过滤规则。当该参数设置为1时,表示启用对网络桥接的IP6tables过滤规则
fs.may_detach_mounts = 1 # 用于控制文件系统是否允许分离挂载,1表示允许
net.ipv4.conf.all.route_localnet = 1 # 允许本地网络上的路由。设置为1表示允许,设置为0表示禁止。
vm.overcommit_memory=1 # 控制内存分配策略。设置为1表示允许内存过量分配,设置为0表示不允许。
vm.panic_on_oom=0 # 决定当系统遇到内存不足(OOM)时是否产生panic。设置为0表示不产生panic,设置为1表示产生panic。
fs.inotify.max_user_watches=89100 # inotify可以监视的文件和目录的最大数量。
fs.file-max=52706963 # 系统级别的文件描述符的最大数量。
fs.nr_open=52706963 # 单个进程可以打开的文件描述符的最大数量。
net.netfilter.nf_conntrack_max=2310720 # 网络连接跟踪表的最大大小。
net.ipv4.tcp_keepalive_time = 600 # TCP保活机制发送探测包的间隔时间(秒)。
net.ipv4.tcp_keepalive_probes = 3 # TCP保活机制发送探测包的最大次数。
net.ipv4.tcp_keepalive_intvl =15 # TCP保活机制在发送下一个探测包之前等待响应的时间(秒)。
net.ipv4.tcp_max_tw_buckets = 36000 # TCP TIME_WAIT状态的bucket数量。
net.ipv4.tcp_tw_reuse = 1 # 允许重用TIME_WAIT套接字。设置为1表示允许,设置为0表示不允许。
net.ipv4.tcp_max_orphans = 327680 # 系统中最大的孤套接字数量。
net.ipv4.tcp_orphan_retries = 3 # 系统尝试重新分配孤套接字的次数。
net.ipv4.tcp_syncookies = 1 # 用于防止SYN洪水攻击。设置为1表示启用SYN cookies,设置为0表示禁用。
net.ipv4.tcp_max_syn_backlog = 16384 # SYN连接请求队列的最大长度。
net.ipv4.ip_conntrack_max = 65536 # IP连接跟踪表的最大大小。
net.ipv4.tcp_max_syn_backlog = 16384 # 系统中最大的监听队列的长度。
net.ipv4.tcp_timestamps = 0 # 用于关闭TCP时间戳选项。
net.core.somaxconn = 16384 # 用于设置系统中最大的监听队列的长度
[root@k8s-node1 ~]# yum -y install docker-ce docker-ce-cli containerd.io
[root@k8s-node1 ~]# vim /etc/modules-load.d/containerd.conf
overlay
br_netfilter
[root@k8s-node1 ~]# modprobe -- overlay
[root@k8s-node1 ~]# modprobe -- br_netfilter
[root@k8s-node1 ~]# vim /etc/sysctl.d/99-kubernetes-cri.conf
net.bridge.bridge-nf-call-iptables = 1
net.ipv4.ip_forward = 1
net.bridge.bridge-nf-call-ip6tables = 1
[root@k8s-node1 ~]# sysctl --system
[root@k8s-node1 ~]# vim /etc/containerd/config.toml
disabled_plugins = []
imports = []
oom_score = 0
plugin_dir = ""
required_plugins = []
root = "/var/lib/containerd"
state = "/run/containerd"
temp = ""
version = 2
[cgroup]
path = ""
[debug]
address = ""
format = ""
gid = 0
level = ""
uid = 0
[grpc]
address = "/run/containerd/containerd.sock"
gid = 0
max_recv_message_size = 16777216
max_send_message_size = 16777216
tcp_address = ""
tcp_tls_ca = ""
tcp_tls_cert = ""
tcp_tls_key = ""
uid = 0
[metrics]
address = ""
grpc_histogram = false
[plugins]
[plugins."io.containerd.gc.v1.scheduler"]
deletion_threshold = 0
mutation_threshold = 100
pause_threshold = 0.02
schedule_delay = "0s"
startup_delay = "100ms"
[plugins."io.containerd.grpc.v1.cri"]
device_ownership_from_security_context = false
disable_apparmor = false
disable_cgroup = false
disable_hugetlb_controller = true
disable_proc_mount = false
disable_tcp_service = true
drain_exec_sync_io_timeout = "0s"
enable_selinux = false
enable_tls_streaming = false
enable_unprivileged_icmp = false
enable_unprivileged_ports = false
ignore_deprecation_warnings = []
ignore_image_defined_volumes = false
max_concurrent_downloads = 3
max_container_log_line_size = 16384
netns_mounts_under_state_dir = false
restrict_oom_score_adj = false
sandbox_image = "registry.cn-hangzhou.aliyuncs.com/google_containers/pause:3.9"
selinux_category_range = 1024
stats_collect_period = 10
stream_idle_timeout = "4h0m0s"
stream_server_address = "127.0.0.1"
stream_server_port = "0"
systemd_cgroup = false
tolerate_missing_hugetlb_controller = true
unset_seccomp_profile = ""
[plugins."io.containerd.grpc.v1.cri".cni]
bin_dir = "/opt/cni/bin"
conf_dir = "/etc/cni/net.d"
conf_template = ""
ip_pref = ""
max_conf_num = 1
[plugins."io.containerd.grpc.v1.cri".containerd]
default_runtime_name = "runc"
disable_snapshot_annotations = true
discard_unpacked_layers = false
ignore_rdt_not_enabled_errors = false
no_pivot = false
snapshotter = "overlayfs"
[plugins."io.containerd.grpc.v1.cri".containerd.default_runtime]
base_runtime_spec = ""
cni_conf_dir = ""
cni_max_conf_num = 0
container_annotations = []
pod_annotations = []
privileged_without_host_devices = false
runtime_engine = ""
runtime_path = ""
runtime_root = ""
runtime_type = ""
[plugins."io.containerd.grpc.v1.cri".containerd.default_runtime.options]
[plugins."io.containerd.grpc.v1.cri".containerd.runtimes]
[plugins."io.containerd.grpc.v1.cri".containerd.runtimes.runc]
base_runtime_spec = ""
cni_conf_dir = ""
cni_max_conf_num = 0
container_annotations = []
pod_annotations = []
privileged_without_host_devices = false
runtime_engine = ""
runtime_path = ""
runtime_root = ""
runtime_type = "io.containerd.runc.v2"
[plugins."io.containerd.grpc.v1.cri".containerd.runtimes.runc.options]
BinaryName = ""
CriuImagePath = ""
CriuPath = ""
CriuWorkPath = ""
IoGid = 0
IoUid = 0
NoNewKeyring = false
NoPivotRoot = false
Root = ""
ShimCgroup = ""
SystemdCgroup =true
sandbox_image = "registry.cn-hangzhou.aliyuncs.com/google_containers/pause:3.9"
[plugins."io.containerd.grpc.v1.cri".containerd.untrusted_workload_runtime]
base_runtime_spec = ""
cni_conf_dir = ""
cni_max_conf_num = 0
container_annotations = []
pod_annotations = []
privileged_without_host_devices = false
runtime_engine = ""
runtime_path = ""
runtime_root = ""
runtime_type = ""
[plugins."io.containerd.grpc.v1.cri".containerd.untrusted_workload_runtime.options]
[plugins."io.containerd.grpc.v1.cri".image_decryption]
key_model = "node"
[plugins."io.containerd.grpc.v1.cri".registry]
config_path = ""
[plugins."io.containerd.grpc.v1.cri".registry.auths]
[plugins."io.containerd.grpc.v1.cri".registry.configs]
[plugins."io.containerd.grpc.v1.cri".registry.headers]
[plugins."io.containerd.grpc.v1.cri".registry.mirrors]
[plugins."io.containerd.grpc.v1.cri".x509_key_pair_streaming]
tls_cert_file = ""
tls_key_file = ""
[plugins."io.containerd.internal.v1.opt"]
path = "/opt/containerd"
[plugins."io.containerd.internal.v1.restart"]
interval = "10s"
[plugins."io.containerd.internal.v1.tracing"]
[plugins."io.containerd.metadata.v1.bolt"]
content_sharing_policy = "shared"
[plugins."io.containerd.monitor.v1.cgroups"]
no_prometheus = false
[plugins."io.containerd.runtime.v1.linux"]
no_shim = false
runtime = "runc"
runtime_root = ""
shim = "containerd-shim"
shim_debug = false
[plugins."io.containerd.runtime.v2.task"]
platforms = ["linux/amd64"]
sched_core = false
[plugins."io.containerd.service.v1.diff-service"]
default = ["walking"]
[plugins."io.containerd.service.v1.tasks-service"]
rdt_config_file = ""
[plugins."io.containerd.snapshotter.v1.aufs"]
root_path = ""
[plugins."io.containerd.snapshotter.v1.btrfs"]
root_path = ""
[plugins."io.containerd.snapshotter.v1.devmapper"]
async_remove = false
base_image_size = ""
discard_blocks = false
fs_options = ""
fs_type = ""
pool_name = ""
root_path = ""
[plugins."io.containerd.snapshotter.v1.native"]
root_path = ""
[plugins."io.containerd.snapshotter.v1.overlayfs"]
mount_options = []
root_path = ""
sync_remove = false
upperdir_label = false
[plugins."io.containerd.snapshotter.v1.zfs"]
root_path = ""
[plugins."io.containerd.tracing.processor.v1.otlp"]
[proxy_plugins]
[stream_processors]
[stream_processors."io.containerd.ocicrypt.decoder.v1.tar"]
accepts = ["application/vnd.oci.image.layer.v1.tar+encrypted"]
args = ["--decryption-keys-path", "/etc/containerd/ocicrypt/keys"]
env = ["OCICRYPT_KEYPROVIDER_CONFIG=/etc/containerd/ocicrypt/ocicrypt_keyprovider.conf"]
path = "ctd-decoder"
returns = "application/vnd.oci.image.layer.v1.tar"
[stream_processors."io.containerd.ocicrypt.decoder.v1.tar.gzip"]
accepts = ["application/vnd.oci.image.layer.v1.tar+gzip+encrypted"]
args = ["--decryption-keys-path", "/etc/containerd/ocicrypt/keys"]
env = ["OCICRYPT_KEYPROVIDER_CONFIG=/etc/containerd/ocicrypt/ocicrypt_keyprovider.conf"]
path = "ctd-decoder"
returns = "application/vnd.oci.image.layer.v1.tar+gzip"
[timeouts]
"io.containerd.timeout.bolt.open" = "0s"
"io.containerd.timeout.shim.cleanup" = "5s"
"io.containerd.timeout.shim.load" = "5s"
"io.containerd.timeout.shim.shutdown" = "3s"
"io.containerd.timeout.task.state" = "2s"
[ttrpc]
address = ""
gid = 0
uid = 0
[root@k8s-node1 ~]# systemctl enable --now containerd
[root@k8s-node1 ~]# systemctl start containerd
[root@k8s-node1 ~]# vim /etc/crictl.yaml
runtime-endpoint: unix:///run/containerd/containerd.sock
image-endpoint: unix:///run/containerd/containerd.sock
timeout: 10
debug: false
[root@k8s-node1 ~]# yum install kubeadm-1.28* kubelet-1.28* kubectl-1.28* -y
[root@k8s-node1 ~]# kubeadm join 192.168.1.11:6443 --token 7t2weq.bjbawausm0jaxury \
--discovery-token-ca-cert-hash sha256:72dbccbe222cb2946d97d4d82eda448a2bf53f91e5610b698681d4f0f9cbaba5
[root@k8s-node1 ~]# systemctl enable --now kubelet.service
去master查看
[root@k8s-master ~]# kubectl get node
NAME STATUS ROLES AGE VERSION
k8s-master NotReady control-plane 90m v1.28.2
k8s-node1 NotReady <none> 57s v1.28.2
[root@k8s-master ~]# ls //查看最开始下载的k8s ⾼可⽤性 Git 仓库
anaconda-ks.cfg k8s-ha-install kubeadm-config.yaml new.yaml
[root@k8s-master ~]# cd k8s-ha-install/
[root@k8s-master k8s-ha-install]# ls
calico.yaml krm.yaml LICENSE metrics-server-0.3.7 metrics-server-3.6.1 README.md
[root@k8s-master k8s-ha-install]# git checkout manual-installation-v1.28.x
分支 manual-installation-v1.28.x 设置为跟踪来自 origin 的远程分支 manual-installation-v1.28.x。
切换到一个新分支 'manual-installation-v1.28.x'
[root@k8s-master k8s-ha-install]# ls
bootstrap CoreDNS dashboard metrics-server README.md
calico csi-hostpath kubeadm-metrics-server pki snapshotter
[root@k8s-master k8s-ha-install]# cd calico/
[root@k8s-master calico]# POD_SUBNET=`cat /etc/kubernetes/manifests/kube-controller-manager.yaml | grep cluster-cidr= | awk -F= '{print $NF}'`
[root@k8s-master calico]# sed -i "s#POD_CIDR#${POD_SUBNET}#g" calico.yaml
[root@k8s-master calico]# kubectl apply -f calico.yaml
[root@k8s-master calico]# kubectl get po -n kube-system
相关文章:
)
九月五日(k8s配置)
一、安装环境 环境准备:(有阿里云) k8s-master 192.168.1.11 k8s-node1 192.168.1.22 k8s-node2 192.168.1.33 二、前期准备 在k8s-master主机 [rootk8s-master ~]# vim /etc/hosts …...

某极验4.0 -消消乐验证
⚠️前言⚠️ 本文仅用于学术交流。 学习探讨逆向知识,欢迎私信共享学习心得。 如有侵权,联系博主删除。 请勿商用,否则后果自负。 网址 aHR0cHM6Ly93d3cyLmdlZXRlc3QuY29tL2FkYXB0aXZlLWNhcHRjaGE 1. 浅聊一下 验证码样式 验证成功 - …...

洛谷 P10798 「CZOI-R1」消除威胁
题目来源于:洛谷 题目本质:贪心,st表,单调栈 解题思路:由于昨天联练习了平衡树,我就用平衡树STL打了个暴力,超时得了30分 这是暴力代码: #include<bits/stdc.h> using name…...
)
Pow(x, n)
题目 实现 pow(x, n) ,即计算 x 的 n 次幂函数(即,xn)。 示例 1: 输入:x 2.00000, n 10 输出:1024.00000示例 2: 输入:x 2.10000, n 3 输出:9.26100示…...
一文带你学会使用滑动窗口
🔥个人主页:guoguoqiang. 🔥专栏:leetcode刷题 209.长度最小的子数组 求最短长度之和等于目标值。 方法一: 暴力枚举(会超时) 从头开始遍历直到之和等于target然后更新结果。这…...

如何从0到1本地搭建whisper语音识别模型
文章目录 环境准备1. 系统要求2. 安装依赖项1:安装 Python 和虚拟环境2:安装 Whisper3:下载 Whisper 模型4:进行语音识别5:提高效率和精度6:开发和集成Whisper 是 OpenAI 发布的一个强大的语音识别模型,它可以将语音转换为文本,支持多语言输入,并且可以处理各种音频类…...

PyTorch 创建数据集
图片数据和标签数据准备 1.本文所用图片数据在同级文件夹中 ,文件路径为train/’ 2.标签数据在同级文件,文件路径为train.csv 3。将标签数据提取 train_csvpd.read_csv(train.csv)创建继承类 第一步,首先创建数据类对象 此时可以想象为单个数据单元的…...

[Java]SpringBoot登录认证流程详解
登录认证 登录接口 1.查看原型 2.查看接口 3.思路分析 登录核心就是根据用户名和密码查询用户信息,存在则登录成功, 不存在则登录失败 4.Controller Slf4j RestController public class LoginController {Autowiredprivate EmpService empService;/*** 登录的方法** param …...

【Day08】
目录 MySQL-多表查询-概述 MySQL-多表查询-内连接 MySQL-多表查询-外连接 MySQL-多表查询-[标量、列]子查询 MySQL-多表查询-[行、表]子查询 MySQL-多表查询-案例 MySQL-事务-介绍与操作 MySQL-事务-四大特性 MySQL-索引-介绍 MySQL-索引-结构 MySQL-索引-操作语法 …...

mongodb在Java中条件分组聚合查询并且分页(时间戳,按日期分组,年月日...)
废话不多说,先看效果图: SQL查询结果示例: 多种查询结果示例: 原SQL: db.getCollection("hbdd_order").aggregate([{// 把时间戳格式化$addFields: {orderDate: {"$dateToString": {"for…...
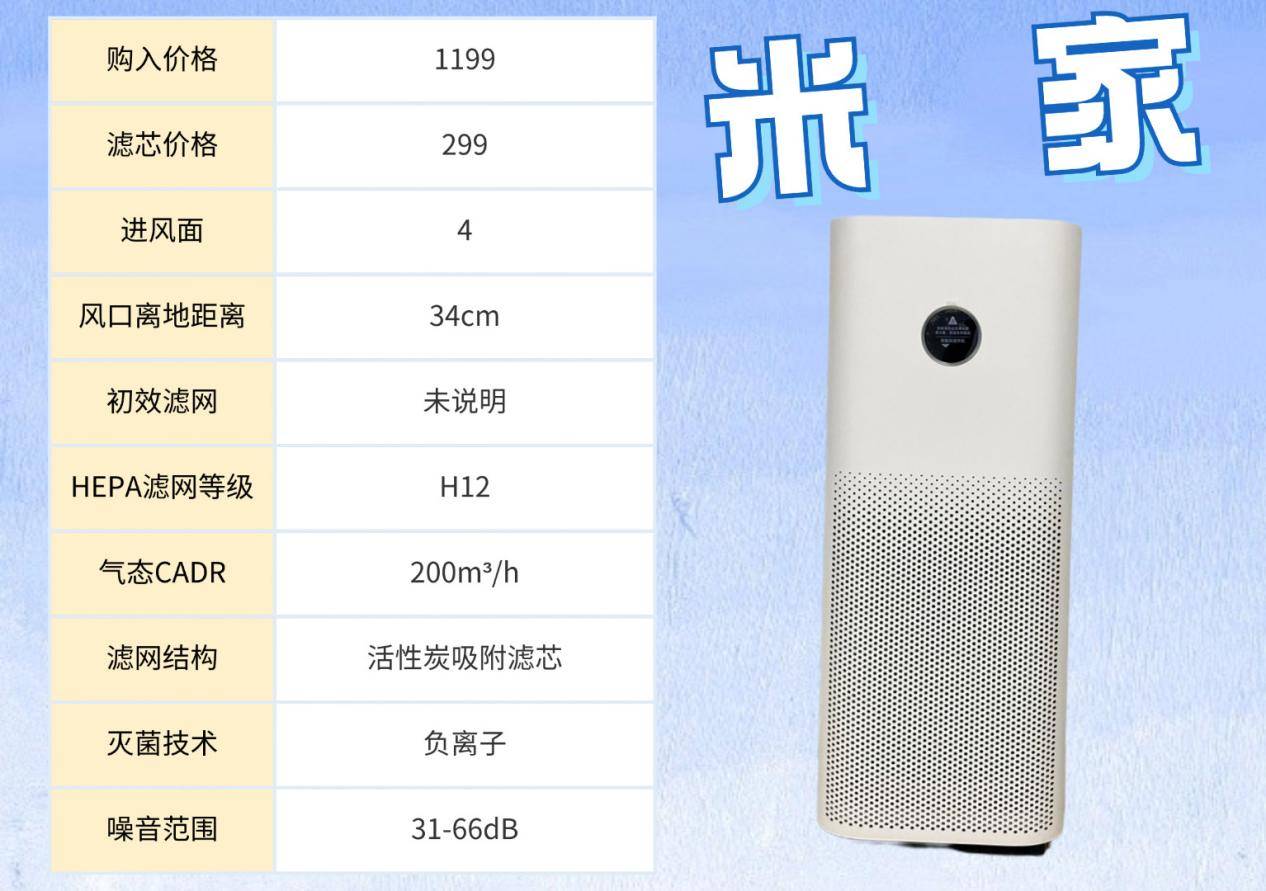
怎么样处理浮毛快捷又高效?霍尼韦尔、希喂、米家宠物空气净化器实测对比
掉毛多?掉毛快?猫毛满天飞对身体有危害吗?多猫家庭经验分享篇: 一个很有趣的现象,很多人在养猫、养狗后耐心都变得更好了。养狗每天得遛,养猫出门前得除毛,日复一日的重复磨练了极好的耐心。我家…...

什么是WebGL技术?有什么特点?应用领域有哪些?
WebGL(Web Graphics Library)技术是一种在Web浏览器中渲染交互式3D和2D图形的JavaScript API。以下是对WebGL技术的详细解析: 一、定义与起源 定义: WebGL全称Web Graphics Library,即网络图形库,它允许…...

500W逆变器(一)
EG8015_24V_500W 这款逆变器是基于 EG8015 SPWM 专用芯片而设计的方案。其额定的输出功率为 500 瓦, 最大输出功率为 600 瓦,输出电压为 220V10%,输出频率为 50Hz0.1Hz,额定输出电流为 2.3 安培。 穿越机降落的时候不要垂直降落,要…...

ubuntu 22.04 编译安装新内核
1、普通用户登录系统 查看当前内核版本 $ uname -r 5.15.0-118-generic 2、下载内核源码 www.kernel.org 用户home目录新建子目录linux,下载并解压 linux-5.15.165.tar.xz 3、创建起始的配置文件.config Configuration targets (见linux kernel i…...

Linux 文件权限与属性管理
概述 Linux 系统是一种典型的多用户系统,不同的用户处于不同的地位,拥有不同的权限。为了保护系统的安全性,Linux 对不同用户访问同一文件(包括目录文件)的权限做了详细的规定。 文件属性查看 在 Linux 中࿰…...
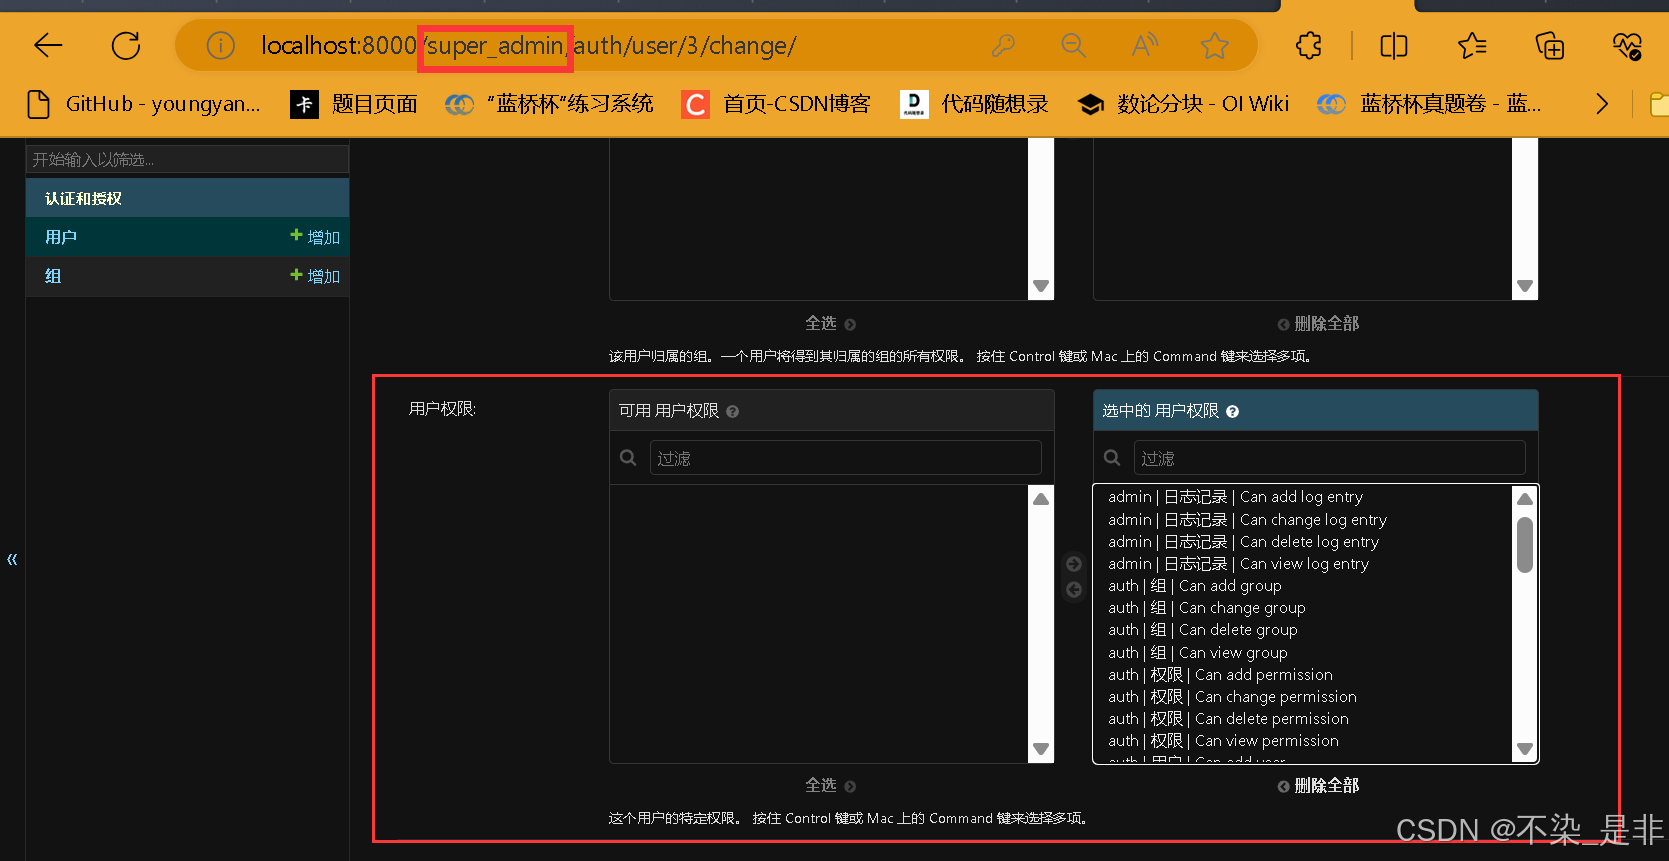
Django学习实战篇三(适合略有基础的新手小白学习)(从0开发项目)
前言: 在上一章中,我们对Django的Model层有了比较全面的认识,本章就来配置Django自带的admin。这里需要认识到,Django的Model层是很重要的一环,无论是对于框架本身还是对于基于Django框架开发的大多数系统而言。因为一…...

【SPIE独立出版,连续2届稳定EI检索!】2024年第三届信息学,网络与计算技术国际学术会议(ICINC2024,10月25-27)
2024年第三届信息学,网络与计算技术国际学术会议(ICINC2024)将于2024年10月25-27日于中国郑州召开。 会议将围绕信息技术与通信,网络与计算技术等在相关领域中的最新研究成果,为来自国内外高等院校、科学研究所、企事业单位的专家、教授、学者…...

.NET/C#⾯试题汇总系列:基础语法
1. 字符串中string strnull和string str""和string strstring.Empty的区别? string str null;:这种方式声明了一个字符串变量str,并将其初始化为null。这意味着str不指向任何实际的字符串对象。如果你试图访问str的属性或方法&…...

【论文阅读】SwiftTheft: A Time-Efficient Model Extraction Attack Framework(2024)
完整标题 SwiftTheft: A Time-Efficient Model Extraction Attack Framework Against Cloud-Based Deep Neural Networks 摘要 With the rise of artificial intelligence(人工智能) and cloud computing(云计算), machine-learning-as-a-service platforms(机器学习即…...

springcloud间通信的方式
在 Spring Cloud 中,主要有以下几种通信方式: 一、基于 HTTP 的 RESTful API 工作原理: 这是一种常见的通信方式,各个微服务通过发送 HTTP 请求来相互调用。服务提供者暴露 RESTful API 接口,服务消费者通过 HTTP 客户…...

全球AI范式变革与中国产业的破局路径
全球AI范式变革与中国产业的破局路径摘要当前全球人工智能产业正处于范式切换的关键节点,底层技术路线的竞争已经从参数规模竞赛转向认知框架的本质性革新。本文基于2026年行业最新发展动态,系统分析当前主流AI范式的内生性缺陷,梳理中美AI产…...

iMLite AI Map 2.1:嵌入式离线地图如何赋能智能穿戴独立导航
1. 项目概述:当智能穿戴“断网”后,如何实现精准导航?作为一名在智能硬件和嵌入式系统领域摸爬滚打了十多年的从业者,我见过太多“伪智能”产品。它们功能花哨,但一离开手机或网络,就立刻变成一块“砖”。尤…...

2026 河北 GEO 优化服务商测评:理性看实力,盘古开物AI智推适配才是硬道理
覆盖石家庄、唐山、保定、邯郸、邢台,立足华北,辐射全国,不搞噱头,只讲真实能力随着生成式 AI 全面融入商业营销,GEO 优化已经从河北企业的可选服务,变成抢占区域流量、提升线上可见度的重要方式。尤其制造…...

STM32CubeMX保姆级教程:从零配置STM32F103C8T6工程,5分钟点亮你的第一个LED
STM32CubeMX极简入门指南:5分钟实现LED控制全流程 第一次接触嵌入式开发时,那种既兴奋又忐忑的心情我至今记忆犹新。看着眼前这块小小的蓝色开发板,既想立刻让它"活"起来,又担心复杂的配置过程会让人望而却步。幸运的是…...
)
2026第四届“盘古石杯“晋级赛 手机取证 手搓复盘(write up)
手机取证1. 分析黄志远phone.E01检材,黄志远手机总共安装了多少款短视频应用?[答案格式:1]apk 分析里面,4 个。当时把 b 站也算上了2. 分析黄志远phone.E01检材,黄志远手机安装的龙虾应用的包名是什么?[答案…...

终极指南:3分钟掌握跨平台网络资源下载神器res-downloader
终极指南:3分钟掌握跨平台网络资源下载神器res-downloader 【免费下载链接】res-downloader 视频号、小程序、抖音、快手、小红书、直播流、m3u8、酷狗、QQ音乐等常见网络资源下载! 项目地址: https://gitcode.com/GitHub_Trending/re/res-downloader 还在为…...

AI Agent开发效率提升300%的7个核心框架选择逻辑:从LangChain到AutoGen,2024企业级选型权威对比
更多请点击: https://codechina.net 第一章:AI Agent开发效率提升300%的7个核心框架选择逻辑:从LangChain到AutoGen,2024企业级选型权威对比 企业在构建生产级AI Agent时,框架选型直接决定迭代速度、可观测性与多模态…...

在Python项目中集成多模型API如何利用Taotoken实现统一调用与管理
🚀 告别海外账号与网络限制!稳定直连全球优质大模型,限时半价接入中。 👉 点击领取海量免费额度 在Python项目中集成多模型API如何利用Taotoken实现统一调用与管理 1. 多模型接入的常见工程挑战 在开发基于大语言模型的Python应…...

嵌入式Linux入门首选:STM32MP157开发板核心优势与学习路径全解析
1. 项目概述:从“学什么”到“用什么学”的抉择每当有朋友或刚入行的新人问我,想入门嵌入式Linux,该从哪块板子开始,我的回答几乎总是绕不开STM32MP157。这听起来像是一个厂商的“标准答案”,但背后是我踩过无数坑、对…...

【限时解密】全球仅12家旅游公司跑通的AI Agent冷启动模型:含私有知识库构建SOP
更多请点击: https://codechina.net 第一章:【限时解密】全球仅12家旅游公司跑通的AI Agent冷启动模型:含私有知识库构建SOP 在旅游行业AI落地实践中,“冷启动难”长期制约Agent规模化部署——93%的试点项目因知识断层、意图歧义…...