Kamailio-基于Homer与heplify的SIP信令监控-2
接上篇,我们已经顺利地完成了服务的安装,下面就来看看如何配置并启动。
跟着我,你将学会:
- 下载并安装
- 踩坑:按照官方步骤来,可是网络条件不允许
- 获取YUM源
- 下载RPM包
- 手动解压安装
- 避坑
- 踩坑:按照官方步骤来,可是网络条件不允许
- 配置并启动(本篇)
- heplify
- heplify-server
- homer
- 配置数据库专用用户
- 初始化homer数据
- 创建配置数据库
- 创建数据数据库
- 创建数据表并修改权限
- 启动服务
- 如何使用 Homer 查询会话信息
- 登录平台
- 首页看板
- 会话详情
- 具体某条信令
- 自定义查询页面
配置并启动
配置主要有几个点,这边主要是依赖 PostgreSQL 来进行数据存储,以下主要讲 PG 数据的初始化。
heplify
Portable and Lightweight HEP Capture Agent for HOMER, Captures packets from wire and sends them to Homer
heplify 是一个终端采集工具,主要将数据推送到 heplify-server 使用
可以手动启动,也可以将其定义为一个 systemctl 的service 进行运作。官方是没有要求的,我下文会以service的形式运行。但是测试的话,可以先手动启动。
heplify-server
HEP Capture Server for HOMER
server是一个接受数据的服务,数据来自heplify,需要一个其启动的IP端口地址。
数据主要服务于前端的Homer,因此这边连接数据库,也主要是关心homer的schema、homer配置所在表、homer数据所在表,额外需要一个地址、用户。
我们来看看默认的配置文件,默认配置文件位于/opt/heplify-server/heplify-server.toml:
HEPAddr               = "0.0.0.0:9060"
HEPTCPAddr            = ""
HEPTLSAddr            = "0.0.0.0:9060"
HEPWSAddr             = "0.0.0.0:3000"
ESAddr                = ""
ESDiscovery           = true
LokiURL               = ""
LokiBulk              = 200
LokiTimer             = 4
LokiBuffer            = 100000
LokiHEPFilter         = [1,5,100]
LokiAllowOutOfOrder   = false
ForceHEPPayload	      = []
PromAddr              = ""
PromTargetIP          = ""
PromTargetName        = ""
DBShema               = "homer7"
DBDriver              = "postgres"
DBAddr                = "localhost:5432"
DBUser                = "postgres"
DBPass                = ""
DBDataTable           = "homer_data"
DBConfTable           = "homer_config"
DBBulk                = 200
DBTimer               = 4
DBBuffer              = 400000
DBWorker              = 8
DBRotate              = true
DBPartLog             = "2h"
DBPartSip             = "1h"
DBPartQos             = "6h"
DBDropDays            = 14
DBDropDaysCall        = 0
DBDropDaysRegister    = 0
DBDropDaysDefault     = 0
DBDropOnStart         = false
DBUsageProtection     = true
DBUsageScheme         = "percentage"
DBPercentageUsage     = "80%"
DBMaxSize             = "30MB"
Dedup                 = false
DiscardMethod         = []
AlegIDs               = []
CustomHeader          = []
SIPHeader             = []
LogDbg                = ""
LogLvl                = "info"
LogStd                = false
LogSys                = false
Config                = "./heplify-server.toml"
ConfigHTTPAddr        = ""# Examples:
# -------------------------------------
# ESAddr          = "http://127.0.0.1:9200"
# DBShema         = "homer7"
# DBDriver        = "postgres"
# LokiURL         = "http://localhost:3100/api/prom/push"
# LokiHEPFilter   = [1,5,100]
# PromAddr        = "0.0.0.0:8899"
# PromTargetIP    = "10.1.2.111,10.1.2.4,10.1.2.5,10.1.2.6,10.12.44.222"
# PromTargetName  = "sbc_access,sbc_core,kamailio,asterisk,pstn_gateway"
# AlegIDs         = ["X-CID","P-Charging-Vector,icid-value=\"?(.*?)(?:\"|;|$)","X-BroadWorks-Correlation-Info"]
# DiscardMethod   = ["OPTIONS","NOTIFY"]
# CustomHeader    = ["X-CustomerIP","X-Billing"]
# SIPHeader       = ["callid","callid_aleg","method","ruri_user","ruri_domain","from_user","from_domain","from_tag","to_user","to_domain","to_tag","via","contact_user"]
# LogDbg          = "hep,sql,loki"
# LogLvl          = "warning"
# ConfigHTTPAddr  = "0.0.0.0:9876"
# -------------------------------------
# To hot reload PromTargetIP and PromTargetName run:
# killall -HUP heplify-server
homer
Homer API Server and UI Webapplication
homer 的配置就是需要数据库的连接,不同的账号密码。兼容的组件和玩法也比较多,其他的配置项也是比较多的。
默认配置文件位于/usr/local/homer/etc/webapp_config.json:
{"database_data": {"LocalNode": {"help": "Settings for PGSQL Database (data)","node": "LocalNode","user": "homer_user","pass": "homer_password","name": "homer_data","keepalive": true,"host": "127.0.0.1"}},"hep_relay": {"help": "UDP socket to send HEP data on","host": "127.0.0.1","port": 9060},"database_config": {"help": "Settings for PGSQL Database (settings)","node": "LocalConfig","user": "homer_user","pass": "homer_password","name": "homer_config","keepalive": true,"host": "localhost"},"influxdb_config": {"enable": true,"help": "Settings for InfluxDB Database (optional)","user": "influx_user","pass": "influx_password","name": "homer_config","host": "http://127.0.0.1:8086","database": "homer","policy": "autogen"},"prometheus_config": {"enable": true,"help": "Settings for Prometheus Database (optional)","user": "admin","pass": "admin","host": "http://127.0.0.1:9090","api": "api/v1"},"swagger": {"enable": true,"api_json": "/usr/local/homer/etc/swagger.json","api_host": "127.0.0.1:9080"},"loki_config": {"help": "Settings for LOKI Database (optional)","user": "admin","password": "admin","param_query": "query_range","regexp": false,"host": "http://127.0.0.1:3100","template": "{job=\"heplify-server\"} |~ \"%callid%\"","external_url": "","api": "loki/api/v1","enable": true},"grafana_config": {"help": "Settings for Grafana","host": "http://127.0.0.1:3000","path": "grafana","token": "","proxy_control": false,"proxy_check": "simple","enable": true},"http_settings": {"help": "Settings for the HOMER Webapp Server. If you have gzip_static = false, please be sure that your dist directory has uncompressed .js files","host": "0.0.0.0","port": 9080,"root": "/usr/local/homer/dist","gzip": true,"path": "/","gzip_static": true,"debug": false},"transaction_settings": {"deduplicate": {"global": false}},"api_settings": {"enable_token_access": false,"add_captid_to_resolve": false},"https_settings": {"help": "SSL settings for homer-app","enable": false,"host": "0.0.0.0","port": 443,"min_tls_version": "1.2","use_mozilla_profile": true,"cert": "/usr/local/homer/tls/cert.pem","key": "/usr/local/homer/tls/key.pem"},"system_settings": {"help": "Settings for HOMER logs","logpath": "/usr/local/homer/log","logname": "homer-app.log","_loglevels": "can be: fatal, error, warn, info, debug, trace","loglevel": "error","logstdout": false},"dashboard_settings": {"_comment": "Here you can define a customs dashboards home","dashboard_home": "/usr/local/homer/etc/dashboard_home.json"},"auth_settings": {"_comment": "The type param can be internal, ldap, http_auth","type": "internal","_jwt_help": "Please generate own jwt secret using uuid or the flag generate-jwt-secret","jwt_secret": "","gravatar": false,"auth_token_header": "Auth-Token","gravatar_url": "https://www.gravatar.com/avatar/%s.jpg","token_expire": 1200,"user_groups": ["admin","user","support"]},"ldap_config": {"base": "dc=example,dc=com","host": "ldap.example.com","port": 389,"usessl": false,"skiptls": true,"binddn": "uid=readonlysuer,ou=People,dc=example,dc=com","bindpassword": "readonlypassword","userfilter": "(uid=%s)","groupfilter": "(memberUid=%s)","group_attributes": ["cn","memberOf","GroupAttribute","distinguishedName","dn","member"],"admingroup": "admin","adminmode": true,"usergroup": "HOMER_user","usermode": true,"attributes": ["dn","givenName","sn","mail","uid"],"skipverify": true,"anonymous": false,"userdn": "uid=%s,ou=People,dc=example,dc=com"},"http_auth": {"url": "http://localhost:1323","skipverify": true},"oauth2": {"enable": false,"client_id": "1234565","client_secret": "FAKE","project_id": "Homer OAuth","auth_uri": "https://accounts.google.com/o/oauth2/auth","token_uri": "https://oauth2.googleapis.com/token","auth_provider_x509_cert_url": "https://www.googleapis.com/oauth2/v1/certs","redirect_uri": "http://localhost:80/api/v3/oauth2/auth","service_redirect": "/api/v3/oauth2/redirect","profile_url": "https://www.googleapis.com/oauth2/v1/userinfo","provider_name": "google","grant_type": "authorization_code","response_type": "code","auth_style": 1,"user_token": "RandomURLSafeStringWithAMinimumLengthOf43Characters","scope": ["email","openid","profile"],"gravatar": false,"gravatar_url": "https://www.gravatar.com/avatar/%s.jpg","provider_image": ""},"decoder_shark": {"_comment": "Here you can do packet decoding using tshark application. Please define uid, gid if you run the app under root","active": false,"bin": "/usr/bin/tshark","protocols": ["1_call","1_registration","1_default"]}
}
配置数据库专用用户
对于homer服务,创建数据库专用用户。
使用管理员账户连接上PG后,执行。
create user homer with password 'homerpass';
初始化homer数据
从上面的配置就可以看到,有一个配置数据库和一个数据数据库,下面就对其进行初始化,需要用到pg的root用户。
创建配置数据库
$ homer-app -create-config-db -database-root-user=root -database-host=xx.xx.xx.xx -database-root-password=pass -database-homer-user=homerCONNECT to DB ROOT STRING: [host=192.168.5.109 user=root dbname=postgres sslmode=disable port=5432 password=root]HOMER - create db [homer_config] with [name=homer](/app/migration/migration.go:89)
[2024-08-20 18:08:30]  [148.72ms]  CREATE DATABASE "homer_config" OWNER "homer"
[0 rows affected or returned ]DONEHOMER - show usersRole name       |       Attributes
------------------------------------------------homer   |root    |       superuser, create databasetest    |DONE
登录确认:
psql (9.2.24, server 12.19)
WARNING: psql version 9.2, server version 12.0.Some psql features might not work.
Type "help" for help.postgres=# \lList of databasesName     | Owner | Encoding |  Collate   |   Ctype    | Access privileges
--------------+-------+----------+------------+------------+-------------------homer_config | homer | UTF8     | en_US.utf8 | en_US.utf8 |postgres     | root  | UTF8     | en_US.utf8 | en_US.utf8 |root         | root  | UTF8     | en_US.utf8 | en_US.utf8 |template0    | root  | UTF8     | en_US.utf8 | en_US.utf8 | =c/root          +|       |          |            |            | root=CTc/roottemplate1    | root  | UTF8     | en_US.utf8 | en_US.utf8 | =c/root          +|       |          |            |            | root=CTc/roottest         | root  | UTF8     | en_US.utf8 | en_US.utf8 | =Tc/root         +|       |          |            |            | root=CTc/root    +|       |          |            |            | test=CTc/root
(6 rows)
创建数据数据库
$ homer-app -create-data-db -database-root-user=root -database-host=xx.xx.xx.xx -database-root-password=pass -database-homer-user=homerHOMER - create db [homer_data] with [name=homer](/app/migration/migration.go:89)
[2024-08-20 18:10:25]  [115.71ms]  CREATE DATABASE "homer_data" OWNER "homer"
[0 rows affected or returned ]DONEHOMER - show usersRole name       |       Attributes
------------------------------------------------homer   |root    |       superuser, create databasetest    |DONE
登录确认:
psql (9.2.24, server 12.19)
WARNING: psql version 9.2, server version 12.0.Some psql features might not work.
Type "help" for help.postgres=# \lList of databasesName     | Owner | Encoding |  Collate   |   Ctype    | Access privileges
--------------+-------+----------+------------+------------+-------------------homer_config | homer | UTF8     | en_US.utf8 | en_US.utf8 |homer_data   | homer | UTF8     | en_US.utf8 | en_US.utf8 |postgres     | root  | UTF8     | en_US.utf8 | en_US.utf8 |root         | root  | UTF8     | en_US.utf8 | en_US.utf8 |template0    | root  | UTF8     | en_US.utf8 | en_US.utf8 | =c/root          +|       |          |            |            | root=CTc/roottemplate1    | root  | UTF8     | en_US.utf8 | en_US.utf8 | =c/root          +|       |          |            |            | root=CTc/roottest         | root  | UTF8     | en_US.utf8 | en_US.utf8 | =Tc/root         +|       |          |            |            | root=CTc/root    +|       |          |            |            | test=CTc/root
(7 rows)
创建数据表并修改权限
$ homer-app -create-table-db-configHOMER - creating tables for the config DB [dbname=homer_config]
Successful ping: 192.168.5.109, Type: config, Node: localnode
DONE$ homer-app -populate-table-db-config
Successful ping: 192.168.5.109, Type: config, Node: localnodeINFO[0000] SELECT * FROM "versions"                      module=gorm type=sqlHOMER - filling tables for the config DB [dbname=homer_config]reinstalling usersreinstalling global_settingsreinstalling auth_tokenreinstalling agent_location_sessionreinstalling hepsub_mapping_schemareinstalling user_settingsreinstalling mapping_schemareinstalling versionsDONE$ homer-app -upgrade-table-db-configHOMER - upgrading tables for the config DB [dbname=homer_config]
Successful ping: 192.168.5.109, Type: config, Node: localnode
DONE
完成以上步骤后,对应配置文件内的连接用户、地址、数据库名都做好调整,就可以准备启动服务了。
启动服务
启动heplify-server
$ systemctl start heplify-server
$ systemctl status heplify-server
● heplify-server.service - HEP Server & Switch in GoLoaded: loaded (/usr/lib/systemd/system/heplify-server.service; enabled; vendor preset: disabled)Active: active (running) since 五 2024-09-13 10:55:19 CST; 1s agoMain PID: 17504 (heplify-server)CGroup: /system.slice/heplify-server.service└─17504 /usr/local/bin/heplify-server -config=/etc/heplify-server.toml9月 13 10:55:19 192.168.5.167 systemd[1]: Started HEP Server & Switch in Go.
启动homer-app
$ systemctl start homer-app
$ systemctl status homer-app
● homer-app.service - Homer API Server and UI WebapplicationLoaded: loaded (/usr/lib/systemd/system/homer-app.service; disabled; vendor preset: disabled)Active: active (running) since 五 2024-09-13 10:55:59 CST; 1s agoMain PID: 17560 (homer-app)CGroup: /system.slice/homer-app.service└─17560 /usr/local/bin/homer-app9月 13 10:56:00 192.168.5.167 homer-app[17560]: ___ /  /::\
9月 13 10:56:00 192.168.5.167 homer-app[17560]: /__/\  /:/\:\     _____
9月 13 10:56:00 192.168.5.167 homer-app[17560]: \  \:\/:/__\/    |___  |
9月 13 10:56:00 192.168.5.167 homer-app[17560]: \  \::/            / /
9月 13 10:56:00 192.168.5.167 homer-app[17560]: \  \:\           / /
9月 13 10:56:00 192.168.5.167 homer-app[17560]: \  \:\         /_/
9月 13 10:56:00 192.168.5.167 homer-app[17560]: \__\/
9月 13 10:56:00 192.168.5.167 homer-app[17560]:
9月 13 10:56:00 192.168.5.167 homer-app[17560]:  Version: homer-app 1.5.3.
9月 13 10:56:00 192.168.5.167 homer-app[17560]: ⇨ http server started on [::]:9080
[root@192 ~]#
最终启动 heplify
/opt/heplify/heplify -i lo -hs ip:9060 -m SIP -dim REGISTER -pr 5060-5090
它的使用方法简单讲,就是基于什么网口、针对什么类型网络流量、是否需要过滤、端口范围是什么,抓到的数据推到哪里。
我上面的配置就是:针对lo网口上,端口5060-5090范围内的SIP消息,除却REGISTER消息,其他抓取的到后送到ip:9060地址。
看看它的详细用法:
$ /opt/heplify/heplify --help
Use heplify 1.66.7 like: /opt/heplify/heplify [option]-assembly_debug_logIf true, the github.com/google/gopacket/tcpassembly library will log verbose debugging information (at least one line per packet)-assembly_memuse_logIf true, the github.com/google/gopacket/tcpassembly library will log information regarding its memory use every once in a while.-b intInterface buffersize (MB) (default 32)-bpf stringCustom BPF to capture packets-collectonlysipcollect only sip-d stringEnable certain debug selectors [defrag,layer,payload,rtp,rtcp,sdp]-ddDeduplicate packets-di stringDiscard uninteresting packets by any string-didip stringDiscard uninteresting SIP packets by Destination IP(s)-diip stringDiscard uninteresting SIP packets by Source or Destination IP(s)-dim stringDiscard uninteresting SIP packets by Method [OPTIONS,NOTIFY]-disip stringDiscard uninteresting SIP packets by Source IP(s)-e	Log to stderr and disable syslog/file output-eof-exitExit on EOF of ReadFile-erspanerspan-fg uintFanout group ID for af_packet-fi stringFilter interesting packets by any string-fnum intThe total num of log files to keep (default 7)-fsize uintThe rotate size per log file based on byte (default 10485760)-fw intFanout worker count for af_packet (default 4)-hep-buffer-activateenable buffer messages if connection to HEP server broken-hep-buffer-debugenable debug buffer messages-hep-buffer-file stringfilename and location for hep-buffer file (default "HEP-Buffer.dump")-hep-buffer-max-size stringmax buffer size, can be B, KB, MB, GB, TB. By default - unlimited (default "0")-hi uintHEP node ID (default 2002)-hin stringHEP collector address [udp:127.0.0.1:9093]-hn stringHEP node Name-hp stringHEP node PW-hs stringHEP server address (default "127.0.0.1:9060")-i stringListen on interface (default "any")-keepalive uintkeep alive internal - 5 seconds by default. 0 - disable (default 5)-l stringLog level [debug, info, warning, error] (default "info")-lp intLoop count over ReadFile. Use 0 to loop forever (default 1)-m stringCapture modes [SIP, SIPDNS, SIPLOG, SIPRTCP] (default "SIPRTCP")-n stringLog filename (default "heplify.log")-nt stringNetwork types are [udp, tcp, tls] (default "udp")-o	Read packet for packet-p stringLog filepath (default "./")-pr stringPortrange to capture SIP (default "5060-5090")-prometheus stringprometheus metrics - ip:port. By default all IPs (default ":8090")-protobufUse Protobuf on wire-rf stringRead pcap file-rsUse packet timestamps with maximum pcap read speed-rt intPcap rotation time in minutes (default 60)-s intSnaplength (default 8192)-script-file stringScript file to execute on each packet-script-hep-filter stringHEP filter for script, comma separated list of HEP types (default "1")-sipassemblyIf true, sipassembly will be enabled-skipverifyskip certifcate validation-slLog to syslog-t stringCapture types are [pcap, af_packet] (default "af_packet")-tcpassemblyIf true, tcpassembly will be enabled-tcpsendretries uintNumber of retries for sending before giving up and reconnecting-versionShow heplify version-vlanvlan-wf stringPath to write pcap file-zfEnable pcap compression
命令行直接启动后,输出的东西很少,主要就是产生流量,然后去homer的页面看了。
因为命令行启动仅仅是测试,因为终端肯定还是会关掉的,那么service模式怎么配置呢?
$ cat /etc/systemd/system/heplify.service[Unit]Description=Captures packets from wire and sends them to HomerAfter=network.target[Service]WorkingDirectory=/opt/heplifyExecStart=/opt/heplify/heplify -i lo -hs ip:9060 -m SIP -dim REGISTER -pr "5060-5090"ExecStop=/bin/kill ${MAINPID}Restart=on-failureRestartSec=10sType=simple[Install]WantedBy=multi-user.target
其实就是熟悉的那条命令,只不过交由 systemctl 来管理。手动修改完指令后,reload一下,就可以尝试启动了。
$ systemctl start heplify
$ systemctl status heplify
● heplify.service - Captures packets from wire and sends them to HomerLoaded: loaded (/etc/systemd/system/heplify.service; enabled; vendor preset: disabled)Active: active (running) since 五 2024-09-13 10:53:05 CST; 2s agoProcess: 22817 ExecStop=/bin/kill ${MAINPID} (code=exited, status=0/SUCCESS)Main PID: 17288 (heplify)CGroup: /system.slice/heplify.service└─17288 /opt/heplify/heplify -i lo -hs ip:9060 -m SIP -dim REGISTER -pr 5060-50909月 13 10:53:05 ip systemd[1]: Started Captures packets from wire and sends them to Homer.
看看启动后的web页面成效:
后续再介绍每一个页面的功能和使用。
sipcapture对这块功能版图还是铺的比较大,结合kamailio也做了sipcature的模块,辅助实现更为更多会话或事务级别的功能,此外还使用过siptrace去发送hep数据。
这里有几点思考:
- 对于heplify,这个外部抓网口数据的,如果一个服务器上很多服务,各种各样的网络包数据,使用这个工具抓取并过滤,不知道是否合适。但是它的好处就是对于Kamailio没有任何影响。
- 对于siptrace,开源技术公司出品,他其实内部就是指定一个heplify-server的地址,和heplify是一样的情况,但是这个抓取就是KM的脚本可自行控制的,追或者不追都可以,模式可选,也可写入到KM自己的数据库中。相比较,KM自身发起可控,但对KM的流程需要增加一步,高并发的场景不知道效果性能如何?
- 对于sipcapture,商业化公司出品,围绕其他公司相关产品。个人觉得这个模块是取代heplify-server的,新部署一个KM使用sipcapture模块,来接受siptrace过来的数据,然后直接写到数据库中,类似于 heplify-server收到数据写入数据库的动作。介绍较少,版图太大,没搭建起来尝试,有尝试过的小伙伴可以分享一下。详见官方文档说明。
相关文章:
Kamailio-基于Homer与heplify的SIP信令监控-2
接上篇,我们已经顺利地完成了服务的安装,下面就来看看如何配置并启动。 跟着我,你将学会: 下载并安装 踩坑:按照官方步骤来,可是网络条件不允许 获取YUM源下载RPM包手动解压安装避坑 配置并启动…...
unity3d入门教程四
unity3d入门教程四 10.1坐标与旋转10.2物体的运动10.3(练习)掉头飞行11.1向量11.2向量间运算11.3向量夹角11.4物体的指向11.5(练习)飞向目标12.1屏幕坐标12.2屏幕的边界 10.1坐标与旋转 比如,节点的坐标用 Vector3 类型…...

无人机飞控的原理!!!
一、传感器系统 陀螺仪:用于检测无人机的角速度和角度,帮助确定无人机的姿态。 加速度计:用于检测无人机的加速度和倾斜角度,进一步辅助姿态判断。 磁力计(或罗盘):用于检测无人机的方向&…...
深入解析代理模式:静态代理、JDK 动态代理和 CGLIB 的全方位对比!
代理模式(Proxy Pattern)是一种结构型设计模式,它提供了对象的替身,即代理对象来控制对实际对象的访问。通过代理对象,可以在不修改目标对象的情况下,扩展或控制其功能。例如,代理模式可以用于延…...

51单片机快速入门之独立按键
51单片机快速入门之独立按键 这里我们需要用上一个仿真软件,只因不想硬件焊接:PROTEUS DESIGN SUITE PROTEUS DESIGN SUITE: PROTEUS DESIGN SUITE是一款由LabCenter Electronics开发的电子设计自动化(EDA)软件,广泛应用于电气工程和电子工…...

设计模式之工厂模式(通俗易懂--代码辅助理解【Java版】)
文章目录 设计模式概述1、工厂模式概述1)特点:2)主要角色:3)工作流程:4)优点5)缺点6)适用场景 2、简单工厂模式(静态工厂模式)1) 在简单工厂模式中,有三个主要…...

速盾:高防 cdn 分布式防御攻击?
在当今数字化时代,网络安全问题日益凸显,各种网络攻击手段层出不穷。为了保护企业和个人的网络资产安全,高防 CDN(Content Delivery Network,内容分发网络)成为了一种重要的防御手段。其中,分布…...
Unity3D类似于桌面精灵的功能实现
前言: 由于最近在做游戏魔改,很多功能在游戏里面没法实现(没错,说的就是排行榜),所以准备用Unity3D开发一个类似于桌面精灵的功能部件,实现效果如下: PS:有需要定制的老…...

Audio Over IP的PTP时钟初探
Audio Over IP的PTP时钟初探 这几天参加省局举办的技术能手比赛,第一次接触并了解AOIP(Audio Over IP)相关的理论和实践相关的知识。其中AoIP的时钟同步采用的是IEEE 1588 标准的PTP(Precision Time Protocol)基于网络…...
)
【加密社】深入理解TON智能合约 (FunC语法)
king: 摘要:在TON(TheOpenNetwork)区块链平台中,智能合约扮演着举足轻重的角色。本文将通过分析一段TON智能合约代码 带领读者学习dict(字典)和list(列表)在FunC语言中的用法&#x…...

笔试强训day11
游游的水果大礼包 #include <iostream> #define int long longusing namespace std; int n, m, a, b;signed main() {cin>>n>>m>>a>>b;int ret 0;for(int x 0; x < min(n / 2, m); x) // 枚举 1 号礼包的个数{int y min(n - x * 2, (m - …...

移动应用开发与测试赛题
引言 在现代车载系统开发中,UI设计和编程实现同样重要。本文将分别探讨车载系统的UI设计任务和相关的编程任务,帮助开发者全面了解车载系统开发的各个方面。 第一部分:UI设计任务 任务1:绘制"左转向视频显示"模块界面…...
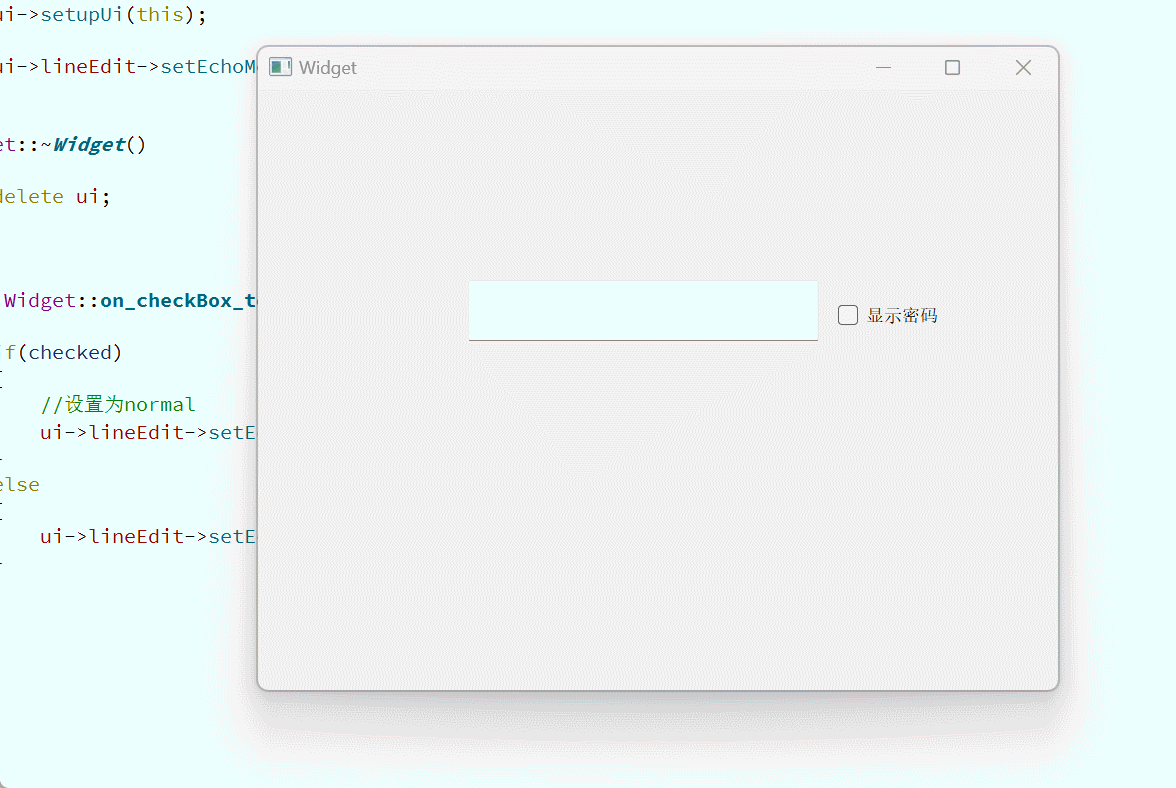
Qt常用控件——QLineEdit
文章目录 QLineEdit核心属性和信号基本示例正则表达式约束验证输入密码是否一致密码显示状态切换 QLineEdit核心属性和信号 QLineEdit用来表示单行输入,可以输入一段文本,但是不能替换 核心属性: 属性说明text输入框中的文本inputMask输入…...

(postman)接口测试进阶实战
1.内置和自定义的动态参数 内置的动态参数有哪些? ---{{$}}--是内置动态参数的标志 //自定义的动态参数 此处date.now()的作用就相当于上面的timestamp 2.业务闭环及文件接口测试 返回的url地址可以在网页中查询得到。 3. 常规断言,动态参数断言…...

R语言统计分析——功效分析(比例、卡方检验)
参考资料:R语言实战【第2版】 1、比例检验 当比较两个比例时,可使用pwr.2p.test()函数进行功效分析。格式为: pwr.2p.test(h, n, sig.level, power, alternative) 其中,h是效应值,n是各相同的样本量。效应值h的定义如…...

Leetcode 每日一题:Longest Increasing Path in a Matrix
写在前面: 今天我们继续看一道 图论和遍历 相关的题目。这道题目的背景是在一个矩阵当中找寻最长的递增数列长度。思路上非常好想,绝对和 DFS 相关,但是题目的优化要求非常高,对于语言和内存特性的考察特别丰富,如果是…...

ARCGIS PRO DSK MapTool
MapTool用于自定义地图操作工具,使用户能够在ArcGIS Pro中执行特定的地图交互操作。添加 打开MapTool1.vb文件,可以看到系统已经放出MapTool1类: Public Sub New()将 IsSketchTool 设置为 true 以使此属性生效IsSketchTool TrueSketchTyp…...

国网B接口 USC安防平台 海康摄像机配置
国网B接口海康摄像机配置介绍 如下以海康DS-NACN6432I-GLN摄像机为例,配置国网B接口设备接入流程,海康摄像机的固件版本为 V5.6.11 build 210109 210107。该设备为球机,支持国网B接口云台控制功能。图标编号可以对应二者的配置。 注意 同一…...

Win10安装.net FrameWork3.5失败解决方法
win10安装.net FrameWork3.5失败解决方法 已经好久没有来投稿了,实在最近业务缠身,忙的焦头烂额(呵~多么伟大的牛马) 但最近开发使用windows11实在是拉胯的不行,升级完就后悔,所以就一怒之下,重装了win10 可是,好家伙,我重装完遇到一个问题,就是在使用.Net Framework3.5,按照Mi…...

【pipenv】—— 虚拟环境管理工具近乎全面的总结
安装 pip install pipenv 使用和配置 设置虚拟环境文件创建在项目根目录 添加环境变量:WORKON_HOMEPIPENV_VENV_IN_PROJECT 创建虚拟环境时,自动换用指定的pip源 添加环境变量:PIPENV_TEST_INDEXhttps://pypi.tuna.tsinghua.edu…...

整合ssm框架,详细讲解
今天针对 SSM(SpringSpringMVCMyBatis)框架整合展开了学习,学习内容如下:我们在进行 JavaEE 开发时,为了实现解耦和提高开发效率,通常会采用 SSM(SpringSpringMVCMyBatis)框架整合的…...

iOS设备激活锁绕过全指南:AppleRa1n离线解锁解决方案
iOS设备激活锁绕过全指南:AppleRa1n离线解锁解决方案 【免费下载链接】applera1n icloud bypass for ios 15-16 项目地址: https://gitcode.com/gh_mirrors/ap/applera1n 你是否曾遇到过这样的情况:购买了一台二手iPhone,却发现设备被…...

ChartGPT终极指南:如何用AI快速生成专业图表
ChartGPT终极指南:如何用AI快速生成专业图表 【免费下载链接】chart-gpt AI tool to build charts based on text input 项目地址: https://gitcode.com/gh_mirrors/ch/chart-gpt 如果你还在为制作数据图表而烦恼,那么ChartGPT正是你需要的AI图表…...

卡片刷新三板斧:定时、定点、主动请求——搞清楚才不会乱
文章目录先搞明白谁在控制刷新方式一:定时刷新(updateDuration)方式二:定点刷新(scheduledUpdateTime)方式三:主动请求刷新(formHost.requestForm)三种方式对比卡片 UI 接…...
)
在 WSL 中下载安装 MySQL,连接到 SQLyog(MySQL 安装在 WSL vs Windows 本地对比)
本文详细介绍了在Linux系统中检查MySQL服务状态的方法,包括使用ps -ef | grep mysql命令和排除grep进程的优化版本。 同时提供了MySQL安装验证和WSL环境下的配置指南,重点解决SQLyog连接WSL中MySQL的问题。 关键步骤包括:修改MySQL配置文件中…...

从Mid360到自主移动:基于Fast-LIO与Move_Base的机器人导航实战拆解
1. Mid360激光雷达与Fast-LIO的适配实战 第一次拿到Livox Mid360激光雷达时,我完全被它36059的超大视场角惊艳到了。这款固态激光雷达不仅体积小巧,而且完全不用担心传统机械式雷达的电机磨损问题。但真正开始用它做SLAM时,才发现实物开发和仿…...

英雄联盟LCU自动化工具:3步打造你的专属智能游戏伴侣
英雄联盟LCU自动化工具:3步打造你的专属智能游戏伴侣 【免费下载链接】League-Toolkit An all-in-one toolkit for LeagueClient. Gathering power 🚀. 项目地址: https://gitcode.com/gh_mirrors/le/League-Toolkit 还在为英雄联盟中重复繁琐的操…...

如何在5分钟内掌握Illustrator智能填充神器Fillinger
如何在5分钟内掌握Illustrator智能填充神器Fillinger 【免费下载链接】illustrator-scripts Adobe Illustrator scripts 项目地址: https://gitcode.com/gh_mirrors/il/illustrator-scripts 还在为复杂的图案填充耗费数小时吗?今天我要为你介绍一款能彻底改变…...

LAMMPS效率翻倍秘籍:从单机到并行,你的MPICH配置真的对了吗?
LAMMPS效率翻倍秘籍:从单机到并行,你的MPICH配置真的对了吗? 在分子动力学模拟领域,LAMMPS因其开源特性和强大的计算能力成为研究者的首选工具。然而,许多用户在使用过程中常遇到一个令人沮丧的现象——明明配置了多核…...

Netgear路由器终极救援指南:如何用免费开源工具nmrpflash快速修复“变砖“设备
Netgear路由器终极救援指南:如何用免费开源工具nmrpflash快速修复"变砖"设备 【免费下载链接】nmrpflash Netgear Unbrick Utility 项目地址: https://gitcode.com/gh_mirrors/nmr/nmrpflash 当你的Netgear路由器因固件升级失败、意外断电或系统崩…...