SpringSecurity剖析
1、SpringSecurity 入门
1.1、简介
Spring Security是一个功能强大且高度可定制的身份验证和访问控制框架。它是用于保护基于Spring的应用程序的实际标准。Spring Security是一个框架,致力于为Java应用程序提供身份验证和授权。与所有Spring项目一样,Spring Security的真正强大之处在于可以轻松扩展以满足自定义要求。(官网地址)

1.2、技术方案对比
目前在整个Java开发的系统中,需要用于身份验证和访问控制框架的框架除了Spring Security, 还有一个就是Apache shiro框架。
Shiro:
Shiro是一个强大而灵活的开源安全框架,能够非常清晰的处理认证、授权、管理会话以及密码加密。如下是它所具有的特点:
- 易于理解的 Java Security API;
- 简单的身份认证(登录),支持多种数据源(LDAP,JDBC,Kerberos,ActiveDirectory等);
- 对角色的简单的鉴权(访问控制),支持细粒度的鉴权;
- 支持一级缓存,以提升应用程序的性能
- 内置的基于 POJO 企业会话管理,适用于 Web 以及非 Web 的环境
- 异构客户端会话访问
- 非常简单的加密 API
- 不跟任何的框架或者容器捆绑,可以独立运行。
SpringSecurity:
除了不能脱离Spring,shiro的功能它都有。而且Spring Security对Oauth、OpenID也有支持,Shiro则需要自己手动实现。Spring Security的权限细粒度更高。
OAuth在"客户端"与"服务提供商"之间,设置了一个授权层(authorization layer)。"客户端"不能直接登录"服务提供商",只能登录授权层,以此将用户与客户端区分开来。"客户端"登录授权层所用的令牌(token),与用户的密码不同。用户可以在登录的时候,指定授权层令牌的权限范围和有效期。
"客户端"登录授权层以后,"服务提供商"根据令牌的权限范围和有效期,向"客户端"开放用户储存的资料。
OpenID 系统的第一部分是身份验证,即如何通过 URI 来认证用户身份。目前的网站都是依靠用户名和密码来登录认证,这就意味着大家在每个网站都需要注册用户名和密码,即便你使用的是同样的密码。如果使用 OpenID ,你的网站地址(URI)就是你的用户名,而你的密码安全的存储在一个 OpenID 服务网站上(你可以自己建立一个 OpenID 服务网站,也可以选择一个可信任的 OpenID 服务网站来完成注册)。
与OpenID同属性的身份识别服务商还有ⅥeID,ClaimID,CardSpace,Rapleaf,Trufina ID Card等,其中ⅥeID通用账户的应用最为广泛。
1.3、应用场景
传统用户登录:

用户授权,在系统中用户拥有哪些权限

单一登录:
一个账号在同一时间只能在一个地方进行登录, 如果在其他地方进行第二次登录,则剔除之前登录操作。

集成CAS:
做单点登录,即多个系统只需登录一次,无需重复登录。

集成OAuth2:
做登录授权, 可以用于app登录和第三方登录(QQ,微信等), 也可以实现cas的功能.

1.4、入门案例
1.4.1、创建SpringBoot项目

1.4.2、未加依赖访问
package com.blnp.net.demo.controller;import org.springframework.web.bind.annotation.RequestMapping;
import org.springframework.web.bind.annotation.RestController;/*** <p></p>** @author lyb 2045165565@qq.com* @version 1.0* @since 2024/9/3 17:28*/
// 该注解为组合注解,等同于Spring中@Controller+@ResponseBody注解
@RestController
public class DemoController {@RequestMapping("/demo")public String demo(){return "Blnp spring Boot";}
}

1.4.3、添加依赖后访问
<!--添加Spring Security 依赖 -->
<dependency><groupId>org.springframework.boot</groupId><artifactId>spring-boot-starter-security</artifactId>
</dependency>
再次刷新访问后被自动跳转至SpringSecurity内置的登录页面了,如下所示:


这里有三点需要注意下:
- 表单的提交方式和路径: post /login
- input输入项的name值: username password
- 隐藏域input的name: 值为: _csrf value值为d4329889-796a-447a-9d08-69e56bc7c296
SpringBoot已经为SpringSecurity提供了默认配置,默认所有资源都必须认证通过才能访问。那么问题来了!此刻并没有连接数据库,也并未在内存中指定认证用户,如何认证呢?其实SpringBoot已经提供了默认用户名user,密码在项目启动时随机生成,如图:

认证通过后可以继续访问处理器资源:

2、SpringSecurity认证
2.1、认证方式&基本原理
在使用SpringSecurity框架,该框架会默认自动地替我们将系统中的资源进行保护,每次访问资源的时候都必须经过一层身份的校验,如果通过了则重定向到我们输入的url中,否则访问是要被拒绝的。那么SpringSecurity框架是如何实现的呢?
Spring Security功能的实现主要是由一系列过滤器相互配合完成。也称之为过滤器链。
2.1.1、过滤器链介绍

过滤器是一种典型的AOP思想,下面简单了解下这些过滤器链,后续再源码剖析中在涉及到过滤器链在仔细说明。
1、WebAsyncManagerIntegrationFilter:
- 完整路径:org.springframework.security.web.context.request.async.WebAsyncManagerIntegrationFilter
- 作用:根据请求封装获取WebAsyncManager,从WebAsyncManager获取/注册的安全上下文可调用处理拦截器
2、SecurityContextPersistenceFilter:
- 完整路径:org.springframework.security.web.context.SecurityContextPersistenceFilter
- 作用:SecurityContextPersistenceFilter主要是使用SecurityContextRepository在session中保存或更新一个SecurityContext,并将SecurityContext给以后的过滤器使用,来为后续fifilter建立所需的上下文。SecurityContext中存储了当前用户的认证以及权限信息。
3、HeaderWriterFilter:
- 完整路径:org.springframework.security.web.header.HeaderWriterFilter
- 作用:向请求的Header中添加相应的信息,可在http标签内部使用security:headers来控制
4、CsrfFilter:
- 完整路径:org.springframework.security.web.csrf.CsrfFilter
- 作用:csrf又称跨域请求伪造,SpringSecurity会对所有post请求验证是否包含系统生成的csrf的token信息,如果不包含,则报错。起到防止csrf攻击的效果。
5、LogoutFilter:
- 完整路径:org.springframework.security.web.authentication.logout.LogoutFilter
- 作用:匹配URL为/logout的请求,实现用户退出,清除认证信息。
6、UsernamePasswordAuthenticationFilter:
- 完整路径:org.springframework.security.web.authentication.UsernamePasswordAuthenticationFilter
- 作用:表单认证操作全靠这个过滤器,默认匹配URL为/login且必须为POST请求。
7、DefaultLoginPageGeneratingFilter:
- 完整路径:org.springframework.security.web.authentication.ui.DefaultLoginPageGeneratingFilter
- 作用:如果没有在配置文件中指定认证页面,则由该过滤器生成一个默认认证页面。
8、DefaultLogoutPageGeneratingFilter:
- 完整路径:org.springframework.security.web.authentication.ui.DefaultLogoutPageGeneratingFilter
- 作用:由此过滤器可以生产一个默认的退出登录页面
9、BasicAuthenticationFilter:
- 完整路径:org.springframework.security.web.authentication.www.BasicAuthenticationFilter
- 作用:此过滤器会自动解析HTTP请求中头部名字为Authentication,且以Basic开头的头信息。
10、RequestCacheAwareFilter:
- 完整路径:org.springframework.security.web.savedrequest.RequestCacheAwareFilter
- 作用:通过HttpSessionRequestCache内部维护了一个RequestCache,用于缓存 HttpServletRequest
11、SecurityContextHolderAwareRequestFilter:
- 完整路径:org.springframework.security.web.servletapi.SecurityContextHolderAwareRequestFilter
- 作用:针对ServletRequest进行了一次包装,使得request具有更加丰富的API
12、AnonymousAuthenticationFilter:
- 完整路径:org.springframework.security.web.authentication.AnonymousAuthenticationFilter
- 作用:当SecurityContextHolder中认证信息为空,则会创建一个匿名用户存入到SecurityContextHolder中。spring security为了兼容未登录的访问,也走了一套认证流程,只不过是一个匿名的身份。
13、SessionManagementFilter:
- 完整路径:org.springframework.security.web.session.SessionManagementFilter
- 作用:securityContextRepository限制同一用户开启多个会话的数量
14、ExceptionTranslationFilter:
- 完整路径:org.springframework.security.web.access.ExceptionTranslationFilter
- 作用:异常转换过滤器位于整个springSecurityFilterChain的后方,用来转换整个链路中出现的异常
15、FilterSecurityInterceptor:
- 完整路径:org.springframework.security.web.access.intercept.FilterSecurityInterceptor
- 作用:获取所配置资源访问的授权信息,根据SecurityContextHolder中存储的用户信息来决定其是否有权限。
2.1.2、认证方式
1、HttpBasic 认证
HttpBasic登录验证模式是Spring Security实现登录验证最简单的一种方式,也可以说是最简陋的一种方式。它的目的并不是保障登录验证的绝对安全,而是提供一种“防君子不防小人”的登录验证。
在使用的Spring Boot早期版本为1.X版本,依赖的Security 4.X版本,那么就无需任何配置,启动项目访问则会弹出默认的httpbasic认证。现在使用的是spring boot2.0以上版本(依赖Security5.X版本),HttpBasic不再是默认的验证模式,在spring security 5.x默认的验证模式已经是表单模式。
HttpBasic模式要求传输的用户名密码使用Base64模式进行加密。如果用户名是 "admin" ,密码是“ admin”,则将字符串"admin:admin" 使用Base64编码算法加密。加密结果可能是:YWtaW46YWRtaW4=。HttpBasic模式真的是非常简单又简陋的验证模式,Base64的加密算法是可逆的,想要破解并不难.

2、FormLogin 登录认证
Spring Security的HttpBasic模式,该模式比较简单,只是进行了通过携带Http的Header进行简单的登录验证,而且没有定制的登录页面,所以使用场景比较窄。对于一个完整的应用系统,与登录验证相关的页面都是高度定制化的,非常美观而且提供多种登录方式。这就需要SpringSecurity支持我们自己定制登录页面, spring boot2.0以上版本(依赖Security 5.X版本)默认会生成一个登录页面.

2.2、表单认证
2.2.1、自定义表单登录页面
在config包下编写SecurityConfiguration配置类。
特别说明:这里我列举两种配置方法,至于为什么两种配置方法是因为跟Spring Security 的版本有关,扩展 WebSecurityConfigurerAdapter 的配置方法在5.7.1版本以后或者SpringBoot 2.7.0版本以后已经被弃用了。
- SpringBoot 2.7.0 版本前用法:
import org.springframework.context.annotation.Configuration;
import org.springframework.security.config.annotation.web.builders.HttpSecurity;
import org.springframework.security.config.annotation.web.configuration.WebSecurityConfigurerAdapter;
@Configuration
public class SecurityConfiguration extends WebSecurityConfigurerAdapter {/*** http请求处理方法** @param http* @throws Exception*/@Overrideprotected void configure(HttpSecurity http) throws Exception {/*http.httpBasic()//开启httpbasic认证.and().authorizeRequests().anyRequest().authenticated();//所有请求都需要登录认证才能访问*/http.formLogin() //开启表单认证.and().authorizeRequests()..anyRequest().authenticated(); //所有请求都需要登录认证才能访问;}
}- SpringBoot 2.7.0 版本以后
@Slf4j
@Configuration
@EnableWebSecurity //开启SpringSecurity的默认行为
@RequiredArgsConstructor //bean注解
// 新版不需要继承WebSecurityConfigurerAdapter
public class WebSecurityConfig {// 这个类主要是获取库中的用户信息,交给securityprivate final UserDetailServiceImpl userDetailsService;// 这个的类是认证失败处理(我在这里主要是把错误消息以json方式返回)private final JwtAuthenticationEntryPoint authenticationEntryPoint;// 鉴权失败的时候的处理类private final JwtAccessDeniedHandler jwtAccessDeniedHandler;//	登录成功处理private final LoginSuccessHandler loginSuccessHandler;//	登录失败处理private final LoginFailureHandler loginFailureHandler;//	登出成功处理private final LoginLogoutSuccessHandler loginLogoutSuccessHandler;//	token过滤器private final JwtTokenFilter jwtTokenFilter;@Beanpublic AuthenticationManager authenticationManager(AuthenticationConfiguration authenticationConfiguration) throws Exception {return authenticationConfiguration.getAuthenticationManager();}// 加密方式@Beanpublic PasswordEncoder passwordEncoder() {return new BCryptPasswordEncoder();}/*** 核心配置*/@Beanpublic SecurityFilterChain filterChain(HttpSecurity http) throws Exception {log.info("------------filterChain------------");http//  禁用basic明文验证.httpBasic(Customizer.withDefaults())//  基于 token ,不需要 csrf.csrf(AbstractHttpConfigurer::disable)//  禁用默认登录页.formLogin(fl - > fl.loginPage(PathMatcherUtil.FORM_LOGIN_URL).loginProcessingUrl(PathMatcherUtil.TO_LOGIN_URL).usernameParameter("username").passwordParameter("password").successHandler(loginSuccessHandler).failureHandler(loginFailureHandler).permitAll())//  禁用默认登出页.logout(lt - > lt.logoutSuccessHandler(loginLogoutSuccessHandler))//  基于 token , 不需要 session.sessionManagement(session - > session.sessionCreationPolicy(SessionCreationPolicy.STATELESS))//  设置 处理鉴权失败、认证失败.exceptionHandling(exceptions - > exceptions.authenticationEntryPoint(authenticationEntryPoint).accessDeniedHandler(jwtAccessDeniedHandler))//  下面开始设置权限.authorizeHttpRequests(authorizeHttpRequest - > authorizeHttpRequest//  允许所有 OPTIONS 请求.requestMatchers(PathMatcherUtil.AUTH_WHITE_LIST).permitAll()//  允许直接访问 授权登录接口//						.requestMatchers(HttpMethod.POST, "/web/authenticate").permitAll()//  允许 SpringMVC 的默认错误地址匿名访问//						.requestMatchers("/error").permitAll()//  其他所有接口必须有Authority信息,Authority在登录成功后的UserDetailImpl对象中默认设置“ROLE_USER”//.requestMatchers("/**").hasAnyAuthority("ROLE_USER")//						.requestMatchers("/heartBeat/**", "/main/**").permitAll()//  允许任意请求被已登录用户访问,不检查Authority.anyRequest().authenticated())//  添加过滤器.addFilterBefore(jwtTokenFilter, UsernamePasswordAuthenticationFilter.class);//可以加载fram嵌套页面http.headers(headers - > headers.frameOptions(HeadersConfigurer.FrameOptionsConfig::sameOrigin));return http.build();}@Beanpublic UserDetailsService userDetailsService() {return userDetailsService::loadUserByUsername;}/*** 调用loadUserByUserName获取userDetail信息,在AbstractUserDetailsAuthenticationProvider里执行用户状态检查** @return*/@Beanpublic AuthenticationProvider authenticationProvider() {DaoAuthenticationProvider authProvider = new DaoAuthenticationProvider();authProvider.setUserDetailsService(userDetailsService);authProvider.setPasswordEncoder(passwordEncoder());return authProvider;}/*** 配置跨源访问(CORS)** @return*/@BeanCorsConfigurationSource corsConfigurationSource() {UrlBasedCorsConfigurationSource source = new UrlBasedCorsConfigurationSource();source.registerCorsConfiguration("/**", new CorsConfiguration().applyPermitDefaultValues());return source;}
}
弃用原因,这是因为Spring框架的开发人员鼓励用户转向基于组件的安全配置。
这里开始我也将SpringBoot的版本从3.3.3版本降回到2.3.4版本,为了方便后文的说明与复现。
1、发现问题
问题一:重定向次数过多

因为设置登录页面为login.html 后面配置的是所有请求都登录认证,陷入了死循环. 所以需要将login.html放行不需要登录认证。
//开启表单认证http.formLogin().and().authorizeRequests()//放行登录页.antMatchers("/login.html").permitAll().anyRequest()//表示所有请求都需要登录认证才能访问.authenticated();问题二:访问登录页显示404

spring boot整合thymeleaf 之后 所有的静态页面以放在resources/templates下面,所以得通过请求访问到模板页面, 将/login.html修改为 /toLoginPage
//开启表单认证http.formLogin().loginPage("/toLoginPage").and().authorizeRequests()//放行登录页.antMatchers("/toLoginPage").permitAll().anyRequest()//表示所有请求都需要登录认证才能访问.authenticated();问题三:访问登录页,页面样式丢失

因为访问login.html需要一些js , css , image等静态资源信息, 所以需要将静态资源放行, 不需要认证。
//解决静态资源被拦截的问题
web.ignoring().antMatchers("/css/**","/images/**","/js/**","/favion.ico","/login/**");

Spring Security 中,安全构建器HttpSecurity 和WebSecurity 的区别是:
- WebSecurity 不仅通过HttpSecurity 定义某些请求的安全控制,也通过其他方式定义其他某些请求可以忽略安全控制;
- HttpSecurity 仅用于定义需要安全控制的请求(当然HttpSecurity 也可以指定某些请求不需要安全控制);
- 可以认为HttpSecurity 是WebSecurity 的一部分, WebSecurity 是包含HttpSecurity 的更大的一个概念;
- 构建目标不同
- WebSecurity 构建目标是整个Spring Security 安全过滤器FilterChainProxy`,
- HttpSecurity 的构建目标仅仅是FilterChainProxy 中的一个SecurityFilterChain 。
2.2.2、表单登录
通过讲解过滤器链中我们知道有个过滤器UsernamePasswordAuthenticationFilter是处理表单登录的. 那么下面我们来通过源码观察下这个过滤器.

在源码中可以观察到, 表单中的input的name值是username和password, 并且表单提交的路径为/login , 表单提交方式method为post , 这些可以修改为自定义的值.
@Override
protected void configure(HttpSecurity http) throws Exception {//开启表单认证http.formLogin()//配置自定义登录页面.loginPage("/toLoginPage")//配置登录请求的URL.loginProcessingUrl("/login")//修改登录表单字段信息.usernameParameter("username").passwordParameter("password")//修改登录成功后跳转地址.successForwardUrl("/").and().authorizeRequests()//放行登录页.antMatchers("/toLoginPage").permitAll().anyRequest()//表示所有请求都需要登录认证才能访问.authenticated();//开闭CSRF防护http.csrf().disable();
}
最终登录成功后,显示如下图:

可以看到虽然登录成功了,但是页面又有一个新问题。

发现行内框架iframe这里出现问题了. Spring Security下,X-Frame-Options默认为DENY,非SpringSecurity环境下,X-Frame-Options的默认大多也是DENY,这种情况下,浏览器拒绝当前页面加载任何Frame页面,设置含义如下:
- DENY:浏览器拒绝当前页面加载任何Frame页面 此选择是默认的.
- SAMEORIGIN:frame页面的地址只能为同源域名下的页面
@Override
protected void configure(HttpSecurity http) throws Exception {//开启表单认证http.formLogin()//配置自定义登录页面.loginPage("/toLoginPage")//配置登录请求的URL.loginProcessingUrl("/login")//修改登录表单字段信息.usernameParameter("username").passwordParameter("password")//修改登录成功后跳转地址.successForwardUrl("/").and().authorizeRequests()//放行登录页.antMatchers("/toLoginPage").permitAll().anyRequest()//表示所有请求都需要登录认证才能访问.authenticated();//开闭CSRF防护http.csrf().disable();//允许Iframe页面加载配置http.headers().frameOptions().sameOrigin();
}
2.2.3、基于数据库实现认证功能
之前我们所使用的用户名和密码是来源于框架自动生成的, 那么我们如何实现基于数据库中的用户名和密码功能呢? 要实现这个得需要实现security的一个UserDetailsService接口, 重写这个接口里面 loadUserByUsername 即可。
编写MyUserDetailsService并实现UserDetailsService接口,重写loadUserByUsername方法。
import org.springframework.beans.factory.annotation.Autowired;
import org.springframework.security.core.GrantedAuthority;
import org.springframework.security.core.userdetails.UserDetails;
import org.springframework.security.core.userdetails.UserDetailsService;
import org.springframework.security.core.userdetails.UsernameNotFoundException;
import org.springframework.stereotype.Service;
import java.util.ArrayList;
import java.util.Collection;@Service
public class MyUserDetailsService implements UserDetailsService {@AutowiredUserService userService;/*** 根据username查询用户实体** @param username* @return* @throws UsernameNotFoundException*/@Overridepublic UserDetails loadUserByUsername(String username) throwsUsernameNotFoundException {User user = userService.findByUsername(username);if(user == null) {throw new UsernameNotFoundException(username); // 用户名没有找到}// 先声明一个权限集合, 因为构造方法里面不能传入nullCollection < ? extends GrantedAuthority > authorities = new ArrayList < > ();// 需要返回一个SpringSecurity的UserDetails对象UserDetails userDetails = new org.springframework.security.core.userdetails.User(user.getUsername(), "{noop}" + user.getPassword(), // {noop}表示不加密认证。true, // 用户是否启用 true 代表启用true, // 用户是否过期 true 代表未过期true, // 用户凭据是否过期 true 代表未过期true, // 用户是否锁定 true 代表未锁定authorities);return userDetails;}
}
在SecurityConfiguration配置类中指定自定义用户认证:
/*** 身份验证管理器** @param auth* @throws Exception*/
@Override
protected void configure(AuthenticationManagerBuilder auth) throws Exception {auth.userDetailsService(myUserDetailsService); // 使用自定义用户认证
}
2.2.4、密码加密认证
在基于数据库完成用户登录的过程中,我们所是使用的密码是明文的,规则是通过对密码明文添加 {noop} 前缀。那么下面 Spring Security 中的密码编码进行一些探讨。
Spring Security 中PasswordEncoder 就是我们对密码进行编码的工具接口。该接口只有两个功能:一个是匹配验证。另一个是密码编码。

算法介绍:
- BCrypt算法:
任何应用考虑到安全,绝不能明文的方式保存密码。密码应该通过哈希算法进行加密。 有很多标准的算法比如SHA或者MD5,结合salt(盐)是一个不错的选择。 Spring Security 提供了BCryptPasswordEncoder类,实现Spring的PasswordEncoder接口使用BCrypt强哈希方法来加密密码。BCrypt强哈希方法 每次加密的结果都不一样,所以更加的安全。
bcrypt算法相对来说是运算比较慢的算法,在密码学界有句常话:越慢的算法越安全。黑客破解成本越高.通过salt和const这两个值来减缓加密过程,它的加密时间(百ms级)远远超过md5(大概1ms左右)。对于计算机来说,Bcrypt 的计算速度很慢,但是对于用户来说,这个过程不算慢。bcrypt是单向的,而且经过salt和cost的处理,使其受攻击破解的概率大大降低,同时破解的难度也提升不少,相对于MD5等加密方式更加安全,而且使用也比较简单。
bcrypt加密后的字符串形如:$2a$10$wouq9P/HNgvYj2jKtUN8rOJJNRVCWvn1XoWy55N3sCkEHZPo3lyWq
其中$是分割符,无意义;2a是bcrypt加密版本号;10是const的值;而后的前22位是salt值;再然后的字符串就是密码的密文了;这里的const值即生成salt的迭代次数,默认值是10,推荐值12。
- 在项目中使用BCrypt:
首先看下PasswordEncoderFactories 密码器工厂:

之前我们在项目中密码使用的是明文的是noop , 代表不加密使用明文密码, 现在用BCrypt只需要将 noop 换成 bcrypt 即可。
@Override
public UserDetails loadUserByUsername(String username) throws
UsernameNotFoundException {User user = userService.findByUsername(username);if(user == null) {throw new UsernameNotFoundException(username); // 用户名没有找到}// 先声明一个权限集合, 因为构造方法里面不能传入nullCollection < ? extends GrantedAuthority > authorities = new ArrayList < > ();// 需要返回一个SpringSecurity的UserDetails对象UserDetails userDetails = neworg.springframework.security.core.userdetails.User(user.getUsername(), "{bcrypt}" + user.getPassword(), // {noop}表示不加密认证。 {bcrypt}加密认证 true, // 用户是否启用 true 代表启用true, // 用户是否过期 true 代表未过期true, // 用户凭据是否过期 true 代表未过期true, // 用户是否锁定 true 代表未锁定authorities);return userDetails;
}
同时需要将数据库中的明文密码修改为加密密码:

选择一个放入数据库即可。

2.2.5、获取当前登录用户
在传统web系统中, 我们将登录成功的用户放入session中, 在需要的时候可以从session中获取用户,那么Spring Security中我们如何获取当前已经登录的用户呢?
- SecurityContextHolder:
保留系统当前的安全上下文SecurityContext,其中就包括当前使用系统的用户的信息。
- SecurityContext:
安全上下文,获取当前经过身份验证的主体或身份验证请求令牌。
/*** 获取当前登录用户** @return*/
@RequestMapping("/loginUser")
@ResponseBody
public UserDetails getCurrentUser() {UserDetails userDetails = (UserDetails)SecurityContextHolder.getContext().getAuthentication().getPrincipal();return userDetails;
}
除了上述方法, Spring Security 还提供了2种方式可以获取.
/*** 获取当前登录用户** @return*/
@RequestMapping("/loginUser2")
@ResponseBody
public UserDetails getCurrentUser(Authentication authentication) {UserDetails userDetails = (UserDetails) authentication.getPrincipal();return userDetails;
}/*** 获取当前登录用户** @return*/
@RequestMapping("/loginUser3")
@ResponseBody
public UserDetails getCurrentUser(@AuthenticationPrincipal UserDetails userDetails) {return userDetails;
}
2.2.6、记住我
在大多数网站中,都会实现RememberMe这个功能,方便用户在下一次登录时直接登录,避免再次输入用户名以及密码去登录,Spring Security针对这个功能已经帮助我们实现, 下面我们来看下他的原理图。
简单的Token生成方法:

Token=MD5(username+分隔符+expiryTime+分隔符+password)
注意: 这种方式不推荐使用, 有严重的安全问题. 就是密码信息在前端浏览器cookie中存放. 如果cookie被盗取很容易破解.
<div class="form-group"><div><!--记住我 name为remember-me value值可选true yes 1 on 都行--><input type="checkbox" name="remember-me" value="true" />记住我</div>
</div>
@Override
protected void configure(HttpSecurity http) throws Exception {//开启表单认证http.formLogin()//配置自定义登录页面.loginPage("/toLoginPage")//配置登录请求的URL.loginProcessingUrl("/login")//修改登录表单字段信息.usernameParameter("username").passwordParameter("password")//修改登录成功后跳转地址.successForwardUrl("/")//开启记住我的功能.and().rememberMe()//设置token失效时间为两周.tokenValiditySeconds(1209600)//自定义表单name值.rememberMeParameter("remember-me").and().authorizeRequests()//放行登录页.antMatchers("/toLoginPage").permitAll().anyRequest()//表示所有请求都需要登录认证才能访问.authenticated();//开闭CSRF防护http.csrf().disable();//允许Iframe页面加载配置http.headers().frameOptions().sameOrigin();
}
持久化的Token生成方法:

存入数据库Token包含:
- token: 随机生成策略,每次访问都会重新生成
- series: 登录序列号,随机生成策略。用户输入用户名和密码登录时,该值重新生成。使用 remember-me功能,该值保持不变
- expiryTime: token过期时间。
CookieValue=encode(series+token)
/*** http请求处理方法** @param http* @throws Exception*/
@Override
protected void configure(HttpSecurity http) throws Exception {/*http.httpBasic()//开启httpbasic认证.and().authorizeRequests().anyRequest().authenticated();//所有请求都需要登录认证才能访问*/http.formLogin() //开启表单认证.loginPage("/toLoginPage") //自定义登录页面.loginProcessingUrl("/login") // 登录处理Url//.usernameParameter().passwordParameter(). 修改自定义表单name值..successForwardUrl("/") // 登录成功后跳转路径.and().authorizeRequests().antMatchers("/toLoginPage").permitAll() //放行登录页面与静态资源.anyRequest().authenticated() //所有请求都需要登录认证才能访问;.and().rememberMe() //开启记住我功能.tokenValiditySeconds(1209600) // token失效时间默认2周.rememberMeParameter("remember-me") // 自定义表单name值.tokenRepository(getPersistentTokenRepository()); // 设置tokenRepository// 关闭csrf防护http.csrf().disable();// 允许iframe加载页面http.headers().frameOptions().sameOrigin();
}@Autowired
DataSource dataSource;/*** 持久化token,负责token与数据库之间的相关操作** @return*/
@Bean
public PersistentTokenRepository getPersistentTokenRepository() {JdbcTokenRepositoryImpl tokenRepository = newJdbcTokenRepositoryImpl();tokenRepository.setDataSource(dataSource); //设置数据源// 启动时创建一张表, 第一次启动的时候创建, 第二次启动的时候需要注释掉, 否则会报错tokenRepository.setCreateTableOnStartup(true);return tokenRepository;
}
项目启动成功后,观察数据库,会帮助我们创建persistent_logins表。

当再次访问登录功能时,观察数据库,会插入一条记录.说明持久化token方式已经生效。


Cookie 伪造演示:
使用网页登录系统,记录remember-me的值,使用postman 伪造cookie。

安全验证:
/*** 根据用户ID查询用户** @return*/
@GetMapping("/{id}")
@ResponseBody
public User getById(@PathVariable Integer id) {//获取认证信息Authentication authentication = SecurityContextHolder.getContext().getAuthentication();// 判断认证信息是否来源于RememberMeif(RememberMeAuthenticationToken.class.isAssignableFrom(authentication.getClas s())) {throw new RememberMeAuthenticationException("认证信息来源于RememberMe, 请重新登录 ");}User user = userService.getById(id);return user;}
在重要操作步骤可以加以验证, true代表自动登录,则引导用户重新表单登录, false正常进行。
2.2.7、自定义登录成功&失败处理
在某些场景下,用户登录成功或失败的情况下用户需要执行一些后续操作,比如登录日志的搜集,或者在现在目前前后端分离的情况下用户登录成功和失败后需要给前台页面返回对应的错误信息, 有前台主导登录成功或者失败的页面跳转. 这个时候需要要到用到AuthenticationSuccessHandler与AnthenticationFailureHandler.
自定义成功处理:
实现AuthenticationSuccessHandler接口,并重写onAnthenticationSuccesss()方法。
自定义失败处理:
实现AuthenticationFailureHandler接口,并重写onAuthenticationFailure()方法;
@Override
protected void configure(HttpSecurity http) throws Exception {//开启表单认证http.formLogin()//配置自定义登录页面.loginPage("/toLoginPage")//配置登录请求的URL.loginProcessingUrl("/login")//修改登录表单字段信息.usernameParameter("username").passwordParameter("password")//修改登录成功后跳转地址.successForwardUrl("/").successHandler(myAuthenticationService).failureHandler(myAuthenticationService) //登录成功或者失败的处理//开启记住我的功能.and().rememberMe()//设置token失效时间为两周.tokenValiditySeconds(1209600)//自定义表单name值.rememberMeParameter("remember-me").and().authorizeRequests()//放行登录页.antMatchers("/toLoginPage").permitAll().anyRequest()//表示所有请求都需要登录认证才能访问.authenticated();//开闭CSRF防护http.csrf().disable();//允许Iframe页面加载配置http.headers().frameOptions().sameOrigin();
}
/*** 自定义登录成功或失败处理器,退出登录处理器*/
@Service
public class MyAuthenticationService implements AuthenticationSuccessHandler,AuthenticationFailureHandler, LogoutSuccessHandler {RedirectStrategy redirectStrategy = new DefaultRedirectStrategy();@AutowiredObjectMapper objectMapper;/*** 登录成功后处理逻辑** @param request* @param response* @param authentication* @throws IOException* @throws ServletException*/@Overridepublic void onAuthenticationSuccess(HttpServletRequest request, HttpServletResponse response, Authentication authentication) throws IOException, ServletException {System.out.println("登录成功后继续处理......");// 重定向到index页面// redirectStrategy.sendRedirect(request, response, "/");Map result = new HashMap();result.put("code", HttpStatus.OK.value());//200result.put("message", "登录成功");response.setContentType("application/json;charset=UTF-8");response.getWriter().write(objectMapper.writeValueAsString(result));}/*** 登录失败的处理逻辑** @param request* @param response* @param exception* @throws IOException* @throws ServletException*/@Overridepublic void onAuthenticationFailure(HttpServletRequest request, HttpServletResponse response, AuthenticationException exception) throws IOException, ServletException {System.out.println("登录失败后继续处理......");// 重定向到login页面// redirectStrategy.sendRedirect(request, response, "/toLoginPage");Map result = new HashMap();result.put("code", HttpStatus.UNAUTHORIZED.value());//401result.put("message", exception.getMessage());response.setContentType("application/json;charset=UTF-8");response.getWriter().write(objectMapper.writeValueAsString(result));}@Overridepublic void onLogoutSuccess(HttpServletRequest request, HttpServletResponse response, Authentication authentication) throws IOException, ServletException {System.out.println("退出之后继续处理...");redirectStrategy.sendRedirect(request, response, "/toLoginPage");}
}异步用户登录实现:
<form id="formLogin" action="/login" method="post"><div class="panel loginbox">.....<div style="padding:30px;"><input type="button" onclick="login()"class="button button-block bg-main textbig
input-big" value="登录"></div></div>
</form>
</div>
</div>
</div>
<script>function login() {$.ajax({type: "POST",//方法类型dataType: "json",//服务器预期返回类型url: "/login", // 登录urldata: $("#formLogin").serialize(),success: function (data) {console.log(data)if (data.code == 200) {window.location.href = "/";} else {alert(data.message);}}});}
</script>
2.2.8、退出登录
实现拓展类:
- 类全路径:org.springframework.security.web.authentication.logout.LogoutFilter
- 作用:匹配URL为/logout的请求,实现用户退出,清除认证信息。
只需要发送请求,请求路径为/logout即可, 当然这个路径也可以自行在配置类中自行指定, 同时退出操作也有对应的自定义处理LogoutSuccessHandler,退出登录成功后执行,退出的同时如果有remember-me的数据,同时一并删除。
- 前端页面
<a class="button button-little bg-red" href="/logout"><span class="icon-power-off"></span>退出登录
</a>- 后端代码
import com.fasterxml.jackson.databind.ObjectMapper;
import org.springframework.beans.factory.annotation.Autowired;
import org.springframework.http.HttpStatus;
import org.springframework.security.core.Authentication;
import org.springframework.security.core.AuthenticationException;
import org.springframework.security.web.DefaultRedirectStrategy;
import org.springframework.security.web.RedirectStrategy;
import org.springframework.security.web.authentication.AuthenticationFailureHandler;
import org.springframework.security.web.authentication.AuthenticationSuccessHandler;
import org.springframework.security.web.authentication.logout.LogoutSuccessHandler;
import org.springframework.stereotype.Service;
import javax.servlet.FilterChain;
import javax.servlet.ServletException;
import javax.servlet.http.HttpServletRequest;
import javax.servlet.http.HttpServletResponse;
import java.io.IOException;
import java.util.HashMap;
import java.util.Map;/*** 自定义登录成功,失败,退出处理类*/
@Service
public class MyAuthenticationService implements AuthenticationSuccessHandler,AuthenticationFailureHandler, LogoutSuccessHandler {private RedirectStrategy redirectStrategy = new DefaultRedirectStrategy();//................@Overridepublic void onLogoutSuccess(HttpServletRequest request, HttpServletResponse response, Authentication authentication) throwsIOException, ServletException {System.out.println("退出成功后续处理....");redirectStrategy.sendRedirect(request, response, "/toLoginPage");}
}
@Overrideprotected void configure(HttpSecurity http) throws Exception {//开启表单认证http.formLogin()//配置自定义登录页面.loginPage("/toLoginPage")//配置登录请求的URL.loginProcessingUrl("/login")//修改登录表单字段信息.usernameParameter("username").passwordParameter("password")//修改登录成功后跳转地址.successForwardUrl("/")//开启记住我的功能.and().rememberMe()//设置token失效时间为两周.tokenValiditySeconds(1209600)//自定义表单name值.rememberMeParameter("remember-me")/*** 退出相关操作配置**/.and().logout()//设置退出url地址.logoutUrl("/logout").logoutSuccessHandler(myAuthenticationService).and().authorizeRequests()//放行登录页.antMatchers("/toLoginPage").permitAll().anyRequest()//表示所有请求都需要登录认证才能访问.authenticated();//开闭CSRF防护http.csrf().disable();//允许Iframe页面加载配置http.headers().frameOptions().sameOrigin();}2.3、图形验证码认证
图形验证码一般是防止恶意,人眼看起来都费劲,何况是机器。不少网站为了防止用户利用机器人自动注册、登录、灌水,都采用了验证码技术。所谓验证码,就是将一串随机产生的数字或符号,生成一幅图片, 图片里加上一些干扰, 也有目前需要手动滑动的图形验证码. 这种可以有专门去做的第三方平台. 比如极验。spring security添加验证码大致可以分为三个步骤:
- 根据随机数生成验证码图片
- 将验证码图片显示到登录页面
- 认证流程中加入验证码校验
Spring Security的认证校验是由UsernamePasswordAuthenticationFilter过滤器完成的,所以我们的验证码校验逻辑应该在这个过滤器之前。验证码通过后才能到后续的操作. 流程如下:

自定义验证码过滤器 ValidateCodeFilter:
import org.springframework.beans.factory.annotation.Autowired;
import org.springframework.data.redis.core.StringRedisTemplate;
import org.springframework.stereotype.Component;
import org.springframework.util.StringUtils;
import org.springframework.web.bind.ServletRequestBindingException;
import org.springframework.web.filter.OncePerRequestFilter;
import javax.servlet.FilterChain;
import javax.servlet.ServletException;
import javax.servlet.http.HttpServletRequest;
import javax.servlet.http.HttpServletResponse;
import java.io.IOException;@Component
public class ValidateCodeFilter extends OncePerRequestFilter {@AutowiredMyAuthenticationService myAuthenticationService;@AutowiredStringRedisTemplate stringRedisTemplate;@Overrideprotected void doFilterInternal(HttpServletRequest httpServletRequest, HttpServletResponse httpServletResponse, FilterChain filterChain) throwsServletException, IOException {// 判断是否是登录请求,只有登录请求才去校验验证码if(httpServletRequest.getRequestURI().equals("/login") && httpServletRequest.getMethod().equalsIgnoreCase("post")) {try {validate(httpServletRequest);}catch (ValidateCodeException e) {myAuthenticationService.onAuthenticationFailure(httpServletRequest, httpServletResponse, e);return;}}//如果不是登录请求,直接调用后面的过滤器链filterChain.doFilter(httpServletRequest, httpServletResponse);}private void validate(HttpServletRequest request) throws ServletRequestBindingException {//获取ipString remoteAddr = request.getRemoteAddr();//拼接redis的keyString redisKey = ValidateCodeController.REDIS_KEY_IMAGE_CODE + "-" + remoteAddr;//从redis中获取imageCodeString redisImageCode = stringRedisTemplate.boundValueOps(redisKey).get();String imageCode = request.getParameter("imageCode");if(!StringUtils.hasText(imageCode)) {throw new ValidateCodeException("验证码的值不能为空!");}if(redisImageCode == null) {throw new ValidateCodeException("验证码已过期!");}if(!redisImageCode.equals(imageCode)) {throw new ValidateCodeException("验证码不正确!");}// 从redis中删除imageCodestringRedisTemplate.delete(redisKey);}
}
自定义验证码异常类:
import org.springframework.security.core.AuthenticationException;/*** 验证码异常类*/
public class ValidateCodeException extends AuthenticationException {public ValidateCodeException(String msg) {super(msg);}
}
security配置类:
@Autowired
ValidateCodeFilter validateCodeFilter;/*** http请求处理方法** @param http* @throws Exception*/
@Override
protected void configure(HttpSecurity http) throws Exception {/*http.httpBasic()//开启httpbasic认证.and().authorizeRequests().anyRequest().authenticated();//所有请求都需要登录认证才能访问*/// 加在用户名密码过滤器的前面http.addFilterBefore(validateCodeFilter, UsernamePasswordAuthenticationFilter.class);http.formLogin() //开启表单认证.loginPage("/toLoginPage") //自定义登录页面.loginProcessingUrl("/login") // 登录处理Url//.usernameParameter().passwordParameter(). 修改自定义表单name 值..successForwardUrl("/") // 登录成功后跳转路径.successHandler(myAuthenticationService) //自定义登录成功处理.failureHandler(myAuthenticationService) //自定义登录失败处理.and().logout().logoutUrl("/logout") //设置退出url.logoutSuccessHandler(myAuthenticationService) //自定义退出处理.and().authorizeRequests().antMatchers("/toLoginPage", "/code/**").permitAll() //放行登录页面与静态资源.anyRequest().authenticated() //所有请求都需要登录认证才能访问;.and().rememberMe() //开启记住我功能.tokenValiditySeconds(1209600) // token失效时间默认2周.rememberMeParameter("remember-me") // 自定义表单name值.tokenRepository(getPersistentTokenRepository()); // 设置tokenRepository// 关闭csrf防护http.csrf().disable();// 允许iframe加载页面http.headers().frameOptions().sameOrigin();
}
2.4、session 管理
Spring Security可以与Spring Session库配合使用,只需要做一些简单的配置就可以实现一些功能,如(会话过期、一个账号只能同时在线一个、集群session等)。
2.4.1、会话超时
配置session会话超时时间,默认为30分钟,但是Spring Boot中的会话超时时间至少为60秒。当session超时后, 默认跳转到登录页面。
#session设置
#配置session超时时间
server.servlet.session.timeout=60
自定义设置session超时后地址,设置session管理和失效后跳转地址。
http.sessionManagement()//设置session管理.invalidSessionUrl("/toLoginPage")// session无效后跳转的路径,默认是登录页面2.4.2、并发控制
并发控制即同一个账号同时在线个数,同一个账号同时在线个数如果设置为1表示,该账号在同一时间内只能有一个有效的登录,如果同一个账号又在其它地方登录,那么就将上次登录的会话过期,即后面的登录会踢掉前面的登录。
1、修改超时时间
#session设置
#配置session超时时间
server.servlet.session.timeout=600
2、设置最大会话数量
http.sessionManagement() //设置session管理.invalidSessionUrl("/toLoginPage") // session无效后跳转的路径, 默认是登录页面.maximumSessions(1) //设置session最大会话数量 ,1同一时间只能有一个用户登录.expiredUrl("/toLoginPage"); //设置session过期后跳转路径3、阻止用户第二次登录
sessionManagement也可以配置 maxSessionsPreventsLogin:boolean值,当达到maximumSessions设置的最大会话个数时阻止登录。
http.sessionManagement()//设置session管理.invalidSessionUrl("/toLoginPage")// session无效后跳转的路径, 默认是登录页面.maximumSessions(1)//设置session最大会话数量 ,1同一时间只能有一个用户登录.maxSessionsPreventsLogin(true)//当达到最大会话个数时阻止登录。.expiredUrl("/toLoginPage");//设置session过期后跳转路径2.4.3、集群 Session
实际场景中一个服务会至少有两台服务器在提供服务,在服务器前面会有一个nginx做负载均衡,用户访问nginx,nginx再决定去访问哪一台服务器。当一台服务宕机了之后,另一台服务器也可以继续提供服务,保证服务不中断。如果我们将session保存在Web容器(比如tomcat)中,如果一个用户第一次访问被分配到服务器1上面需要登录,当某些访问突然被分配到服务器二上,因为服务器二上没有用户在服务器一上登录的会话session信息,服务器二还会再次让用户登录,用户已经登录了还让登录就感觉不正常了。

解决这个问题的思路是用户登录的会话信息不能再保存到Web服务器中,而是保存到一个单独的库(redis、mongodb、jdbc等)中,所有服务器都访问同一个库,都从同一个库来获取用户的session信息,如用户在服务器一上登录,将会话信息保存到库中,用户的下次请求被分配到服务器二,服务器二从库中检查session是否已经存在,如果存在就不用再登录了,可以直接访问服务了。

引用依赖:
<!-- 基于redis实现session共享 -->
<dependency><groupid>org.springframework.session</groupid><artifactid>spring-session-data-redis</artifactid>
</dependency>
设置session存储类型:
#使用redis共享session
spring.session.store-type=redis
2.5、CSRF 防护机制
2.5.1、什么是 CSRF?
CSRF(Cross-site request forgery),中文名称:跨站请求伪造。
你这可以这么理解CSRF攻击:攻击者盗用了你的身份,以你的名义发送恶意请求。CSRF能够做的事情包括:以你名义发送邮件,发消息,盗取你的账号,甚至于购买商品,虚拟货币转账......造成的问题包括:个人隐私泄露以及财产安全。
CSRF这种攻击方式在2000年已经被国外的安全人员提出,但在国内,直到06年才开始被关注,08年,国内外的多个大型社区和交互网站分别爆出CSRF漏洞,如:NYTimes.com(纽约时报)、Metafilter(一个大型的BLOG网站),YouTube和百度HI......而现在,互联网上的许多站点仍对此毫无防备,以至于安全业界称CSRF为“沉睡的巨人”。
2.5.2、CSRF 的原理

从上图可以看出,要完成一次CSRF攻击,受害者必须依次完成三个步骤:
- 登录受信任网站A,并在本地生成Cookie。
- 在不登出A的情况下,访问危险网站B。
- 触发网站B中的一些元素
2.5.3、CSRF 的防御策略
在业界目前防御 CSRF 攻击主要有三种策略:验证 HTTP Referer 字段;在请求地址中添加 token 并验证;在 HTTP 头中自定义属性并验证。
1、验证 HTTP Referer 字段:
根据 HTTP 协议,在 HTTP 头中有一个字段叫 Referer,它记录了该 HTTP 请求的来源地址。在通常情况下,访问一个安全受限页面的请求来自于同一个网站,在后台请求验证其 Referer 值,如果是以自身安全网站开头的域名,则说明该请求是是合法的。如果 Referer 是其他网站的话,则有可能是黑客的 CSRF 攻击,拒绝该请求。
2、在请求地址中添加 token 并验证:
CSRF 攻击之所以能够成功,是因为黑客可以完全伪造用户的请求,该请求中所有的用户验证信息都是存在于 cookie 中,因此黑客可以在不知道这些验证信息的情况下直接利用用户自己的cookie 来通过安全验证。要抵御 CSRF,关键在于在请求中放入黑客所不能伪造的信息,并且该信息不存在于 cookie 之中。可以在 HTTP 请求中以参数的形式加入一个随机产生的 token,并在服务器端建立一个拦截器来验证这个 token,如果请求中没有 token 或者 token 内容不正确,则认为可能是 CSRF 攻击而拒绝该请求。
3、在 HTTP 头中自定义属性并验证:
这种方法也是使用 token 并进行验证,和上一种方法不同的是,这里并不是把 token 以参数的形式置于 HTTP 请求之中,而是把它放到 HTTP 头中自定义的属性里。
2.5.4、SpringSecurity CSRF 的防御机制
- 完整类路径:org.springframework.security.web.csrf.CsrfFilter
- 作用:csrf又称跨站请求伪造,SpringSecurity会对所有post请求验证是否包含系统生成的csrf的token信息,如果不包含,则报错。起到防止csrf攻击的效果。(1. 生成token 2.验证token)
1、开启CSRF防护:
//开启csrf防护, 可以设置哪些不需要防护
http.csrf().ignoringAntMatchers("/user/save");
2、页面需要添加token值:
<input type="hidden" th:name="${_csrf.parameterName}" th:value="${_csrf.token}"/>2.6、跨域与CORS
2.6.1、跨域
跨域,实质上是浏览器的一种保护处理。如果产生了跨域,服务器在返回结果时就会被浏览器拦截(注意:此时请求是可以正常发起的,只是浏览器对其进行了拦截),导致响应的内容不可用. 产生跨域的几种情况有一下:
| 当前页面URL | 被请求页面URL | 是否跨域 | 原因 |
|---|---|---|---|
| http://www.blnp.com/ | http://www.blnp.com/index.html | 否 | 同源(协议、域名、端口号等一致) |
| http://www.blnp.com/ | https://www.blnp.com/index.html | 跨域 | 协议不同(http/https) |
| http://www.blnp.com/ | 百度一下,你就知道 | 跨域 | 主域名不同(blnp/baidu) |
| http://www.blnp.com/ | http://kuale.blnp.com/ | 跨域 | 子域名不同(www/kuale) |
| http://www.blnp.com:8080 | http://www.blnp.com:8090 | 跨域 | 端口号不同(8080/8090) |
2.6.2、解决跨域
1、JSONP
浏览器允许一些带src属性的标签跨域,也就是在某些标签的src属性上写url地址是不会产生跨域问题。
2、CORS 解决跨域
CORS是一个W3C标准,全称是"跨域资源共享"(Cross-origin resource sharing)。CORS需要浏览器和服务器同时支持。目前,所有浏览器都支持该功能,IE浏览器不能低于IE10。浏览器在发起真正的请求之前,会发起一个OPTIONS类型的预检请求,用于请求服务器是否允许跨域,在得到许可的情况下才会发起请求。
2.6.3、SpringSecurity 的CORS 支持
1、声明跨域配置源
/*** 跨域配置信息源** @return*/
public CorsConfigurationSource corsConfigurationSource() {CorsConfiguration corsConfiguration = new CorsConfiguration();// 设置允许跨域的站点corsConfiguration.addAllowedOrigin("*");// 设置允许跨域的http方法corsConfiguration.addAllowedMethod("*");// 设置允许跨域的请求头corsConfiguration.addAllowedHeader("*");// 允许带凭证corsConfiguration.setAllowCredentials(true);// 对所有的url生效UrlBasedCorsConfigurationSource source = new UrlBasedCorsConfigurationSource();source.registerCorsConfiguration("/**", corsConfiguration);return source;
}
2、开启跨域支持
//允许跨域
http.cors().configurationSource(corsConfigurationSource());
3、前端跨域测试代码
function toCors() {$.ajax({// 默认情况下,标准的跨域请求是不会发送cookie的xhrFields: {withCredentials: true},// 登录urlurl: "http://localhost:8090/user/1",success: function(data) {alert("请求成功." + data)}});
}
3、SpringSecurity 授权
3.1、简介
3.1.1、SpringSecurity 授权定义

说明:安全权限控制问题其实就是控制能否访问url
3.1.2、SpringSecurity 授权原理

在我们应用系统里面,如果想要控制用户权限,需要有2部分数据。
- 系统配置信息数据:写着系统里面有哪些URL,每一个url拥有哪些权限才允许被访问。
- 另一份数据就是用户权限信息:请求用户拥有权限
系统用户发送一个请求:系统配置信息和用户权限信息作比对,如果比对成功则允许访问。
当一个系统授权规则比较简单,基本不变时候,系统的权限配置信息可以写在我们的代码里面去的。比如前台门户网站等权限比较单一,可以使用简单的授权配置即可完成,如果权限复杂, 例如办公OA, 电商后台管理系统等就不能使用写在代码里面了. 需要RBAC权限模型设计.
3.2、SpringSecurity 授权
3.2.1、内置权限表达式
Spring Security 使用Spring EL来支持,主要用于Web访问和方法安全上, 可以通过表达式来判断是否具有访问权限. 下面是Spring Security常用的内置表达式. ExpressionUrlAuthorizationConfigurer 定义了所有的表达式:
| 表达式 | 说明 |
|---|---|
| permitAll | 指定任何人都允许访问。 |
| denyAll | 指定任何人都不允许访问 |
| anonymous | 指定匿名用户允许访问。 |
| rememberMe | 指定已记住的用户允许访问。 |
| authenticated | 指定任何经过身份验证的用户都允许访问,不包含 anonymous |
| fullyAuthenticated | 指定由经过身份验证的用户允许访问,不包含 anonymous和rememberMe |
| hasRole(role) | 指定需要特定的角色的用户允许访问, 会自动在角色前面插入'ROLE_' |
| hasAnyRole([role1,role2]) | 指定需要任意一个角色的用户允许访问, 会自动在角色前面插入'ROLE_' |
| hasAuthority(authority) | 指定需要特定的权限的用户允许访问 |
| hasAnyAuthority([authority,authority]) | 指定需要任意一个权限的用户允许访问 |
| hasIpAddress(ip) | 指定需要特定的IP地址可以访问 |
3.2.2、URL安全表达式
基于web访问使用表达式保护url请求路径.
1、设置 URL 访问权限
// 设置/user/** 访问需要ADMIN角色
http.authorizeRequests().antMatchers("/user/**").hasRole("ADMIN");
// 设置/user/** 访问需要PRODUCT角色和IP地址为127.0.0.1 .hasAnyRole("PRODUCT,ADMIN")
http.authorizeRequests().antMatchers("/product/**").access("hasAnyRole('ADMIN,PRODUCT') and hasIpAddress('127.0.0.1')");
// 设置自定义权限不足信息.
http.exceptionHandling().accessDeniedHandler(accessDeniedHandler);
2、MyAccessDeniedHandler自定义权限不足类
import org.springframework.security.access.AccessDeniedException;
import org.springframework.security.web.access.AccessDeniedHandler;
import org.springframework.stereotype.Component;
import javax.servlet.ServletException;
import javax.servlet.http.HttpServletRequest;
import javax.servlet.http.HttpServletResponse;
import java.io.IOException;
/*** 自定义权限不足信息*/
@Component
public class MyAccessDeniedHandler implements AccessDeniedHandler {@Overridepublic void handle(HttpServletRequest httpServletRequest, HttpServletResponse resp, AccessDeniedException e) throws IOException,ServletException {resp.setStatus(HttpServletResponse.SC_FORBIDDEN);resp.setContentType("text/html;charset=UTF-8");resp.getWriter().write("权限不足,请联系管理员!");}
}
3、设置用户对应的角色权限
// 先声明一个权限集合, 因为构造方法里面不能传入null
Collection < GrantedAuthority > authorities = new ArrayList < > ();
if("admin".equalsIgnoreCase(user.getUsername())) {authorities.add(new SimpleGrantedAuthority("ROLE_ADMIN"));
}
else {authorities.add(new SimpleGrantedAuthority("ROLE_PRODUCT"));
}
3.2.3、Web 安全表达式引用自定义 Bean 授权
1、定义自定义授权类
import org.springframework.security.core.Authentication;
import org.springframework.security.core.GrantedAuthority;
import org.springframework.security.core.userdetails.User;
import org.springframework.stereotype.Component;
import javax.servlet.http.HttpServletRequest;
import java.util.Collection;
/*** 自定义授权类*/
@Component
public class MyAuthorizationService {/*** 检查用户是否有对应的访问权限** @param authentication 登录用户* @param request 请求对象* @return*/public boolean check(Authentication authentication, HttpServletRequest request) {User user = (User) authentication.getPrincipal();// 获取用户所有权限Collection < GrantedAuthority > authorities = user.getAuthorities();// 获取用户名String username = user.getUsername();// 如果用户名为admin,则不需要认证if(username.equalsIgnoreCase("admin")) {return true;}else {// 循环用户的权限, 判断是否有ROLE_ADMIN权限, 有返回truefor(GrantedAuthority authority: authorities) {String role = authority.getAuthority();if("ROLE_ADMIN".equals(role)) {return true;}}}return false;}
}
2、配置类
//使用自定义Bean授权
http.authorizeRequests().antMatchers("/user/**").access("@myAuthorizationService.check(authentication,request)");
3、携带路径变量
/*** 检查用户是否有对应的访问权限** @param authentication 登录用户* @param request 请求对象* @param id 参数ID* @return*/
public boolean check(Authentication authentication, HttpServletRequest request, Integer id) {if(id > 10) {return false;}return true;
}//使用自定义Bean授权,并携带路径参数
http.authorizeRequests().antMatchers("/user/delete/{id}").access("@myAuthorizationService.check(authentication,request,#id)");
3.2.4、Method 安全表达式
针对方法级别的访问控制比较复杂, spring security 提供了4种注解分别是:
- @PreAuthorize
- @PostAuthorize
- @PreFilter
- @PostFilter
1、开启方法级别的注解配置
在security配置类中添加注解:
/*** Security配置类*/
@Configuration
@EnableGlobalMethodSecurity(prePostEnabled = true) //开启注解支持
public class SecurityConfiguration extends WebSecurityConfigurerAdapter
2、在方法上使用注解
@ProAuthorize: 注解适合进入方法前的权限验证
/*** 查询所有用户** @return*/
@RequestMapping("/findAll")
@PreAuthorize("hasRole('ADMIN')") //需要ADMIN权限
public String findAll(Model model) {List < User > userList = userService.list();model.addAttribute("userList", userList);return "user_list";
}
/*** 用户修改页面跳转** @return*/
@RequestMapping("/update/{id}")
@PreAuthorize("#id<10") //针对参数权限限定 id<10可以访问
public String update(@PathVariable Integer id, Model model) {User user = userService.getById(id);model.addAttribute("user", user);return "user_update";
}
@PostAuthorize:
@PostAuthorize在方法执行后再进行权限验证,适合验证带有返回值的权限, Spring EL 提供返回对象能够在表达式语言中获取到返回对象的 returnObject。
/*** 根据ID查询用户** @return*/
@GetMapping("/{id}")
@ResponseBody
@PostAuthorize("returnObject.username == authentication.principal.username ") //判断查询用户信息是否是当前登录用户信息.否则没有权限
public User getById(@PathVariable Integer id) {User user = userService.getById(id);return user;
}
@PreFilter:
可以用来对集合类型的参数进行过滤, 将不符合条件的元素剔除集合。
/*** 商品删除-多选删除** @return*/
@GetMapping("/delByIds")
@PreFilter(filterTarget = "ids", value = "filterObject%2==0") //剔除参数为基数的值
public String delByIds(@RequestParam(value = "id") List < Integer > ids) {for(Integer id: ids) {System.out.println(id);}return "redirect:/user/findAll";
}
@PostFilter:
可以用来对集合类型的返回值进行过滤, 将不符合条件的元素剔除集合。
/*** 查询所有用户-返回json数据** @return*/
@RequestMapping("/findAllTOJson")
@ResponseBody
@PostFilter("filterObject.id%2==0") //剔除返回值ID为偶数的值
public List < User > findAllTOJson() {List < User > userList = userService.list();return userList;
}
3.3、 基于数据库的RBAC数据模型的权限控制
我们开发一个系统,必然面临权限控制的问题,不同的用户具有不同的访问、操作、数据权限。形成理论的权限控制模型有:自主访问控制(DAC: Discretionary Access Control)、强制访问控制(MAC: Mandatory Access Control)、基于属性的权限验证(ABAC: Attribute-Based Access Control)等。最常被开发者使用也是相对易用、通用的就是RBAC权限模型(Role-Based Access Control)。
3.3.1、RBAC 权限模型简介
RBAC权限模型(Role-Based Access Control)即:基于角色的权限控制。模型中有几个关键的术语:
- 用户:系统接口及访问的操作者
- 权限:能够访问某接口或者做某操作的授权资格
- 角色:具有一类相同操作权限的总称
RBAC权限模型核心授权逻辑如下:
- 某用户是什么角色?
- 某角色具有什么权限?
- 通过角色对应的权限推导出用户的权限
3.3.2、RBAC 的演化
1、用户与权限直接关联

想到权限控制,人们最先想到的一定是用户与权限直接关联的模式,简单地说就是:某个用户具有某些权限。如图:
- 张三具有所有权限他可能是一个超级管理员.
- 李四,王五 具有添加商品和审核商品的权限有可能是一个普通业务员
这种模型能够清晰的表达用户与权限之间的关系,足够简单。但同时也存在问题:
- 现在用户是张三、李四,王五以后随着人员增加,每一个用户都需要重新授权
- 操作人员的他的权限发生变更后,需要对每个一个用户重新授予新的权限
2、用户与角色关联

这样只需要维护角色和权限之间的关系就可以了. 如果业务员的权限发生变更, 只需要变动业务员角色和权限之前的关系进行维护就可以了. 用户和权限就分离开来了. 如下图:

3.3.3、基于 RBAC 设计权限表结构
- 一个用户有一个或多个角色
- 一个角色包含多个用户
- 一个角色有多种权限
- 一个权限属于多个角色

3.3.4、基于SpringSecurity 实现RBAC权限管理
1、动态查询数据库中用户对应的权限
import com.baomidou.mybatisplus.core.mapper.BaseMapper;
import com.lagou.domain.Permission;
import org.apache.ibatis.annotations.Select;
import java.util.List;
public interface PermissionMapper extends BaseMapper < Permission > {/*** 根据用户ID查询权限** @param id* @return*/@Select("SELECT p.* FROM t_permission p,t_role_permission rp,t_roler, t_user_role ur, t_user u " + "WHERE p.id = rp.PID AND rp.RID = r.id AND r.id = ur.RID AND ur.UID = u.id AND u.id = #{id}")List < Permission > findByUserId(Integer id);
}
2、给登录用户授权
// 先声明一个权限集合, 因为构造方法里面不能传入null
Collection < GrantedAuthority > authorities = new ArrayList < > ();
// 查询用户对应所有权限
List < Permission > permissions = permissionService.findByUserId(user.getId());
for(Permission permission: permissions) {// 授权authorities.add(new SimpleGrantedAuthority(permission.getPermissionTag()));
}
3、设置访问权限
// 查询数据库所有权限列表
List < Permission > permissions = permissionService.list();
for(Permission permission: permissions) {//添加请求权限http.authorizeRequests().antMatchers(permission.getPermissionUrl()).hasAuthority(permission.getPermissionTag());
}
3.4、基于页面标签的权限控制
在jsp页面或者thymeleaf模板页面中我们可以使用spring security提供的权限标签来进行权限控制.要想使用thymeleaf为SpringSecurity提供的标签属性,首先需要引入thymeleaf-extras-springsecurity依赖支持。
引入依赖:
<!--添加thymeleaf为SpringSecurity提供的标签 依赖 -->
<dependency><groupId>org.thymeleaf.extras</groupId><artifactId>thymeleaf-extras-springsecurity5</artifactId><version>3.0.4.RELEASE</version>
</dependency>
声明使用:
!DOCTYPE html>
<html xmlns:th="http://www.thymeleaf.org" xmlns:sec="http://www.thymeleaf.org/extras/spring-security">
3.4.1、常用SpringSecurity 标签属性
- sec:authorize="isAuthenticated()"
判断用户是否已经登陆认证,引号内的参数必须是isAuthenticated()。
- sec:authentication=“name”
获得当前用户的用户名,引号内的参数必须是name。
- sec:authorize=“hasRole(‘role’)”
判断当前用户是否拥有指定的权限。引号内的参数为权限的名称
3.4.2、标签使用
<div class="leftnav"><div class="leftnav-title"><div sec:authorize="isAuthenticated()"><span sec:authentication="name"></span><img src="images/y.jpg" class="radius-circle rotate-hover" height="50"alt="" /></div></div><div sec:authorize="hasAuthority('user:findAll')"><h2><span class="icon-user"></span>系统管理</h2><ul style="display:block"><li><a href="/user/findAll" target="right"><span class="icon-caretright"></ span>用户管理</a></li><li><a href="javascript:void(0)" onclick="toCors()" target="right"><span class="icon-caret-right"></span>跨域测试</a></li></ul></div><div sec:authorize="hasAuthority('product:findAll')"><h2><span class="icon-pencil-square-o"></span>数据管理</h2><ul><li><a href="/product/findAll" target="right"><span class="iconcaret-right"></span>商品管理</a></li></ul></div>
</div>
4、源码剖析
4.1、过滤器链加载源码
4.1.1、过滤器链加载流程分析

4.1.2、源码分析
1、配置信息
# 安全过滤器自动配置
org.springframework.boot.autoconfigure.security.servlet.SecurityFilterAutoConfiguration
2、SecurityFilterAutoConfiguration类
@Configuration(proxyBeanMethods = false)
@ConditionalOnWebApplication(type = Type.SERVLET)
@EnableConfigurationProperties(SecurityProperties.class) // Security配置类
@ConditionalOnClass({AbstractSecurityWebApplicationInitializer.class,SessionCreationPolicy.class
})
@AutoConfigureAfter(SecurityAutoConfiguration.class) // 这个类加载完后去加载SecurityAutoConfiguration配置
public class SecurityFilterAutoConfiguration {//.....
}
3、SecurityAutoConfiguration类
@Configuration(proxyBeanMethods = false)
@ConditionalOnClass(DefaultAuthenticationEventPublisher.class)
@EnableConfigurationProperties(SecurityProperties.class)
@Import({SpringBootWebSecurityConfiguration.class,//web安全启用配置WebSecurityEnablerConfiguration.class, SecurityDataConfiguration.class
})
public class SecurityAutoConfiguration {//.....
}
4、WebSecurityEnablerConfiguration类
@Configuration(proxyBeanMethods = false)
@ConditionalOnBean(WebSecurityConfigurerAdapter.class)
@ConditionalOnMissingBean(name = BeanIds.SPRING_SECURITY_FILTER_CHAIN)
@ConditionalOnWebApplication(type = ConditionalOnWebApplication.Type.SERVLET)
@EnableWebSecurity
public class WebSecurityEnablerConfiguration {}
@Retention(value = java.lang.annotation.RetentionPolicy.RUNTIME)
@Target(value = {java.lang.annotation.ElementType.TYPE
})
@Documented
@Import({WebSecurityConfiguration.class,SpringWebMvcImportSelector.class,OAuth2ImportSelector.class
})
@EnableGlobalAuthentication
@Configuration
public @interface EnableWebSecurity {/*** Controls debugging support for Spring Security. Default is false.* @return if true, enables debug support with Spring Security*/boolean debug() default false;
}@EnableWebSecurity注解有两个作用:
- 加载了WebSecurityConfiguration配置类, 配置安全认证策略
- 加载了AuthenticationConfiguration, 配置了认证信息
5、WebSecurityConfiguration类
// springSecurity过滤器链声明
@Bean(name = AbstractSecurityWebApplicationInitializer.DEFAULT_FILTER_NAME)
public Filter springSecurityFilterChain() throws Exception {boolean hasConfigurers = webSecurityConfigurers != null && !webSecurityConfigurers.isEmpty();if(!hasConfigurers) {WebSecurityConfigurerAdapter adapter = objectObjectPostProcessor.postProcess(new WebSecurityConfigurerAdapter() {});webSecurity.apply(adapter);}return webSecurity.build(); //构建filter
}
4.2、认证流程源码
4.2.1、认证流程分析
在整个过滤器链中, UsernamePasswordAuthenticationFilter是来处理整个用户认证的流程的, 所以下面我们主要针对用户认证来看下源码是如何实现的?

4.2.2、源码跟踪
UsernamePasswordAuthenticationFilter:
public Authentication attemptAuthentication(HttpServletRequest request, HttpServletResponse response) throws AuthenticationException {//1.检查是否是post请求if(postOnly && !request.getMethod().equals("POST")) {throw new AuthenticationServiceException("Authentication method not supported: " + request.getMethod());}//2.获取用户名和密码String username = obtainUsername(request);String password = obtainPassword(request);if(username == null) {username = "";}if(password == null) {password = "";}username = username.trim();//3.创建AuthenticationToken,此时是未认证的状态UsernamePasswordAuthenticationToken authRequest = newUsernamePasswordAuthenticationToken(username, password);// Allow subclasses to set the "details" propertysetDetails(request, authRequest);//4.调用AuthenticationManager进行认证.return this.getAuthenticationManager().authenticate(authRequest);
}
UsernamePasswordAuthenticationToken:
public UsernamePasswordAuthenticationToken(Object principal, Object credentials) {super(null);this.principal = principal; //设置用户名this.credentials = credentials; //设置密码setAuthenticated(false); //设置认证状态为-未认证
}
AuthenticationManager-->ProviderManager-->AbstractUserDetailsAuthenticationProvider:
public Authentication authenticate(Authentication authentication)
throws AuthenticationException {Assert.isInstanceOf(UsernamePasswordAuthenticationToken.class, authentication,() - > messages.getMessage("AbstractUserDetailsAuthenticationProvider.onlySupports", "Only UsernamePasswordAuthenticationToken is supported "));// 1.获取用户名String username = (authentication.getPrincipal() == null) ? "NONE_PROVIDED" : authentication.getName();// 2.尝试从缓存中获取boolean cacheWasUsed = true;UserDetails user = this.userCache.getUserFromCache(username);if(user == null) {cacheWasUsed = false;try {//3.检索Useruser = retrieveUser(username,(UsernamePasswordAuthenticationToken) authentication);}//.....}try {//4. 认证前检查user状态preAuthenticationChecks.check(user);//5. 附加认证证检查additionalAuthenticationChecks(user,(UsernamePasswordAuthenticationToken) authentication);}//.....//6. 认证后检查user状态postAuthenticationChecks.check(user);//.....// 7. 创建认证成功的UsernamePasswordAuthenticationToken并将认证状态设置为truereturn createSuccessAuthentication(principalToReturn, authentication, user);
}
retrieveUser方法:
protected final UserDetails retrieveUser(String username, UsernamePasswordAuthenticationToken authentication)
throws AuthenticationException {prepareTimingAttackProtection();try {//调用自定义UserDetailsService的loadUserByUsername的方法UserDetails loadedUser = this.getUserDetailsService().loadUserByUsername(username);if(loadedUser == null) {throw new InternalAuthenticationServiceException("UserDetailsService returned null, which is an interface contract violation ");}return loadedUser;}//....
}
additionalAuthenticationChecks方法:
protected void additionalAuthenticationChecks(UserDetails userDetails, UsernamePasswordAuthenticationToken authentication)
throws AuthenticationException {//.....// 1.获取前端密码String presentedPassword = authentication.getCredentials().toString();// 2.与数据库中的密码进行比对if(!passwordEncoder.matches(presentedPassword, userDetails.getPassword())) {logger.debug("Authentication failed: password does not match stored value ");throw new BadCredentialsException(messages.getMessage("AbstractUserDetailsAuthenticationProvider.badCredentials", "Bad credentials"));}
}
AbstractAuthenticationProcessingFilter--doFilter方法:
public void doFilter(ServletRequest req, ServletResponse res, FilterChain chain)
throws IOException, ServletException {//.....Authentication authResult;try {//1.调用子类方法authResult = attemptAuthentication(request, response);//...//2.session策略验证sessionStrategy.onAuthentication(authResult, request, response);}//....// 3.成功身份验证successfulAuthentication(request, response, chain, authResult);
}
successfulAuthentication方法:
protected void successfulAuthentication(HttpServletRequest request, HttpServletResponse response, FilterChain chain, Authentication authResult)
throws IOException, ServletException {//....// 1.将认证的用户放入SecurityContext中SecurityContextHolder.getContext().setAuthentication(authResult);// 2.检查是不是记住我rememberMeServices.loginSuccess(request, response, authResult);...// 3.调用自定义MyAuthenticationService的onAuthenticationSuccess方法successHandler.onAuthenticationSuccess(request, response, authResult);
}
4.3、记住我流程源码
4.3.1、流程分析

4.3.2、源码跟踪
AbstractAuthenticationProcessingFilter--successfulAuthentication方法:
protected void successfulAuthentication(HttpServletRequest request, HttpServletResponse response, FilterChain chain, Authentication authResult)
throws IOException, ServletException {//....// 1.将认证的用户放入SecurityContext中SecurityContextHolder.getContext().setAuthentication(authResult);// 2.检查是不是记住我rememberMeServices.loginSuccess(request, response, authResult);//...// 3.调用自定义MyAuthenticationService的onAuthenticationSuccess方法successHandler.onAuthenticationSuccess(request, response, authResult);
}
loginSuccess方法-->onLoginSuccess:
protected void onLoginSuccess(HttpServletRequest request, HttpServletResponse response, Authentication successfulAuthentication) {// 1.获取用户名String username = successfulAuthentication.getName();// 2.创建persistentTokenPersistentRememberMeToken persistentToken = new PersistentRememberMeToken(username, generateSeriesData(), generateTokenData(), new Date());try {// 3. 插入数据库tokenRepository.createNewToken(persistentToken);// 4. 写入浏览器cookieaddCookie(persistentToken, request, response);}catch (Exception e) {logger.error("Failed to save persistent token ", e);}
}
RememberMeAuthenticationFilter:
public void doFilter(ServletRequest req, ServletResponse res, FilterChain chain)
throws IOException, ServletException {HttpServletRequest request = (HttpServletRequest) req;HttpServletResponse response = (HttpServletResponse) res;if(SecurityContextHolder.getContext().getAuthentication() == null) {// 1. 检查是否是记住我登录. 如果是完成自动登录Authentication rememberMeAuth = rememberMeServices.autoLogin(request, response);if(rememberMeAuth != null) {try {// 2.调用authenticationManager再次认证rememberMeAuth = authenticationManager.authenticate(rememberMeAuth);// 3.将认证的用户在重新放入SecurityContext中SecurityContextHolder.getContext().setAuthentication(rememberMeAuth);//......}//......}//.....// 4.调用下一个过滤器chain.doFilter(request, response);}
}
autoLogin方法:
public final Authentication autoLogin(HttpServletRequest request, HttpServletResponse response) {// 1.获取rememberMeCookieString rememberMeCookie = extractRememberMeCookie(request);// 2.检查是否存在if(rememberMeCookie == null) {return null;}//.....UserDetails user = null;try {// 3.解码CookieString[] cookieTokens = decodeCookie(rememberMeCookie);// 4.根据cookie完成自动登录user = processAutoLoginCookie(cookieTokens, request, response);// 5.检查user状态userDetailsChecker.check(user);logger.debug("Remember-me cookie accepted");// 6.创建认证成功的RememberMeAuthenticationToken并将认证状态设置为truereturn createSuccessfulAuthentication(request, user);}//.....return null;
}
processAutoLoginCookie方法:
protected UserDetails processAutoLoginCookie(String[] cookieTokens, HttpServletRequest request, HttpServletResponse response) {//....// 1.获取系列码和tokenfinal String presentedSeries = cookieTokens[0];final String presentedToken = cookieTokens[1];// 2.根据token去数据库中查询PersistentRememberMeToken token = tokenRepository.getTokenForSeries(presentedSeries);.......// 3.在创建一个新的tokenPersistentRememberMeToken newToken = new PersistentRememberMeToken(token.getUsername(), token.getSeries(), generateTokenData(), new Date());try {// 4.修改数据库token信息tokenRepository.updateToken(newToken.getSeries(), newToken.getTokenValue(), newToken.getDate());// 5.写入浏览器addCookie(newToken, request, response);}// 6.根据用户名调用UserDetailsService查询UserDetailreturn getUserDetailsService().loadUserByUsername(token.getUsername());
}
4.4、CSRF流程源码
4.4.1、流程分析

4.4.2、源码跟踪
CsrfFilter:
protected void doFilterInternal(HttpServletRequest request, HttpServletResponse response, FilterChain filterChain)
throws ServletException, IOException {request.setAttribute(HttpServletResponse.class.getName(), response);// 1.取出tokenCsrfToken csrfToken = this.tokenRepository.loadToken(request);final boolean missingToken = csrfToken == null;if(missingToken) {// 2. 如果没有token,就重新生成tokencsrfToken = this.tokenRepository.generateToken(request);this.tokenRepository.saveToken(csrfToken, request, response);}// 3. 将csrfToken值放入request域中request.setAttribute(CsrfToken.class.getName(), csrfToken);request.setAttribute(csrfToken.getParameterName(), csrfToken);// 4. 匹配请求是否为post请求,不是则放行if(!this.requireCsrfProtectionMatcher.matches(request)) {filterChain.doFilter(request, response);return;}String actualToken = request.getHeader(csrfToken.getHeaderName());if(actualToken == null) {// 5.从request请求参数中取出csrfTokenactualToken = request.getParameter(csrfToken.getParameterName());}// 6.匹配两个token是否相等.if(!csrfToken.getToken().equals(actualToken)) {if(this.logger.isDebugEnabled()) {this.logger.debug("Invalid CSRF token found for " + UrlUtils.buildFullRequestUrl(request));}if(missingToken) {this.accessDeniedHandler.handle(request, response, new MissingCsrfTokenException(actualToken));}else {this.accessDeniedHandler.handle(request, response, new InvalidCsrfTokenException(csrfToken, actualToken));}return;}// 7. 如果相等则放行filterChain.doFilter(request, response);
}
4.5、授权流程源码
4.5.1、流程分析
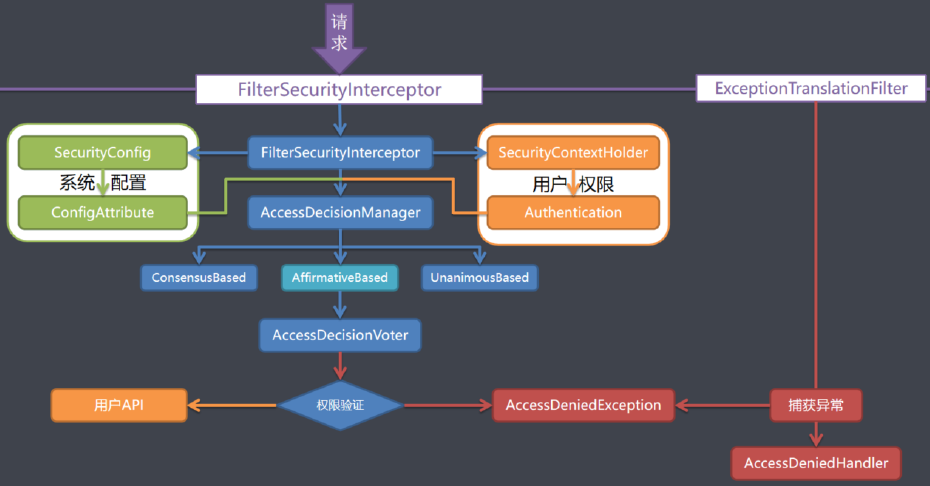
- AffirmativeBased(基于肯定)的逻辑是: 一票通过权
- ConsensusBased(基于共识)的逻辑是: 赞成票多于反对票则表示通过,反对票多于赞成票则将抛出 AccessDeniedException
- UnanimousBased(基于一致)的逻辑: 一票否决权
4.5.2、源码跟踪
FilterSecurityInterceptor:
public void doFilter(ServletRequest request, ServletResponse response, FilterChain chain) throws IOException, ServletException {FilterInvocation fi = new FilterInvocation(request, response, chain);// 调用invoke(fi);
}public void invoke(FilterInvocation fi) throws IOException, ServletException {if((fi.getRequest() != null).....}else {//...//前置调用InterceptorStatusToken token = super.beforeInvocation(fi);//....// 后置调用super.afterInvocation(token, null);}
}
AbstractSecurityInterceptor的beforeInvocation方法:
protected InterceptorStatusToken beforeInvocation(Object object) {// 1. 获取security的系统配置权限Collection < ConfigAttribute > attributes = this.obtainSecurityMetadataSource().getAttributes(object);//.....// 2. 获取用户认证的信息Authentication authenticated = authenticateIfRequired();// Attempt authorizationtry {// 3.调用决策管理器this.accessDecisionManager.decide(authenticated, object, attributes);}catch (AccessDeniedException accessDeniedException) {publishEvent(new AuthorizationFailureEvent(object, attributes, authenticated, accessDeniedException));// 4.无权限则抛出异常让ExceptionTranslationFilter捕获throw accessDeniedException;}//....
}
AffirmativeBased的decide方法:
public void decide(Authentication authentication, Object object, Collection < ConfigAttribute > configAttributes) throws
AccessDeniedException {int deny = 0;for(AccessDecisionVoter voter: getDecisionVoters()) {int result = voter.vote(authentication, object, configAttributes);if(logger.isDebugEnabled()) {logger.debug("Voter: " + voter + ", returned: " + result);}switch(result) {//一票通过,只要有一个投票器通过就允许访问case AccessDecisionVoter.ACCESS_GRANTED:return;case AccessDecisionVoter.ACCESS_DENIED:deny++;break;default:break;}}if(deny > 0) {throw new AccessDeniedException(messages.getMessage("AbstractAccessDecisionManager.accessDenied", "Access isdenied"));}//...
}
ExceptionTranslationFilter:
public void doFilter(ServletRequest req, ServletResponse res, FilterChain chain)
throws IOException, ServletException {HttpServletRequest request = (HttpServletRequest) req;HttpServletResponse response = (HttpServletResponse) res;try {// 1.调用下一个过滤器即FilterSecurityInterceptorchain.doFilter(request, response);logger.debug("Chain processed normally");}catch (IOException ex) {throw ex;}catch (Exception ex) {// 2.捕获FilterSecurityInterceptor并判断异常类型Throwable[] causeChain = throwableAnalyzer.determineCauseChain(ex);RuntimeException ase = (AuthenticationException)throwableAnalyzer.getFirstThrowableOfType(AuthenticationException.class, causeChain);if(ase == null) {ase = (AccessDeniedException)throwableAnalyzer.getFirstThrowableOfType(AccessDeniedException.class, causeChain);}if(ase != null) {if(response.isCommitted()) {throw new ServletException("Unable to handle the Spring Security Exception because the response is already committed. ", ex);}// 3.如果是AccessDeniedException异常则处理Spring Security异常handleSpringSecurityException(request, response, chain, ase);}//.....}}
handleSpringSecurityException方法:
private void handleSpringSecurityException(HttpServletRequest request, HttpServletResponse response, FilterChain chain, RuntimeException exception)
throws IOException, ServletException {if(exception instanceof AuthenticationException) {//...}else if(exception instanceof AccessDeniedException) {Authentication authentication = SecurityContextHolder.getContext().getAuthentication();if(authenticationTrustResolver.isAnonymous(authentication) || authenticationTrustResolver.isRememberMe(authentication)) {//.....}else {logger.debug("Access is denied (user is not anonymous); delegating to AccessDeniedHandler ", exception);//如果是AccessDeniedException异常则调用AccessDeniedHandler的handle方法accessDeniedHandler.handle(request, response,(AccessDeniedException) exception);}}
}
相关文章:
SpringSecurity剖析
1、SpringSecurity 入门 1.1、简介 Spring Security是一个功能强大且高度可定制的身份验证和访问控制框架。它是用于保护基于Spring的应用程序的实际标准。Spring Security是一个框架,致力于为Java应用程序提供身份验证和授权。与所有Spring项目一样,Sp…...

一文搞懂 Flink Graph 构建过程源码
一文搞懂 Flink Graph 构建过程 1. StreamGraph构建过程1.1 transform(): 构建的核心1.2 transformOneInputTransform1.3 构造顶点1.4 构造边1.5 transformSource1.6 transformPartition1.7 transformSink 1. StreamGraph构建过程 链接: 一文搞懂 Flink 其他重要源码点击我 e…...
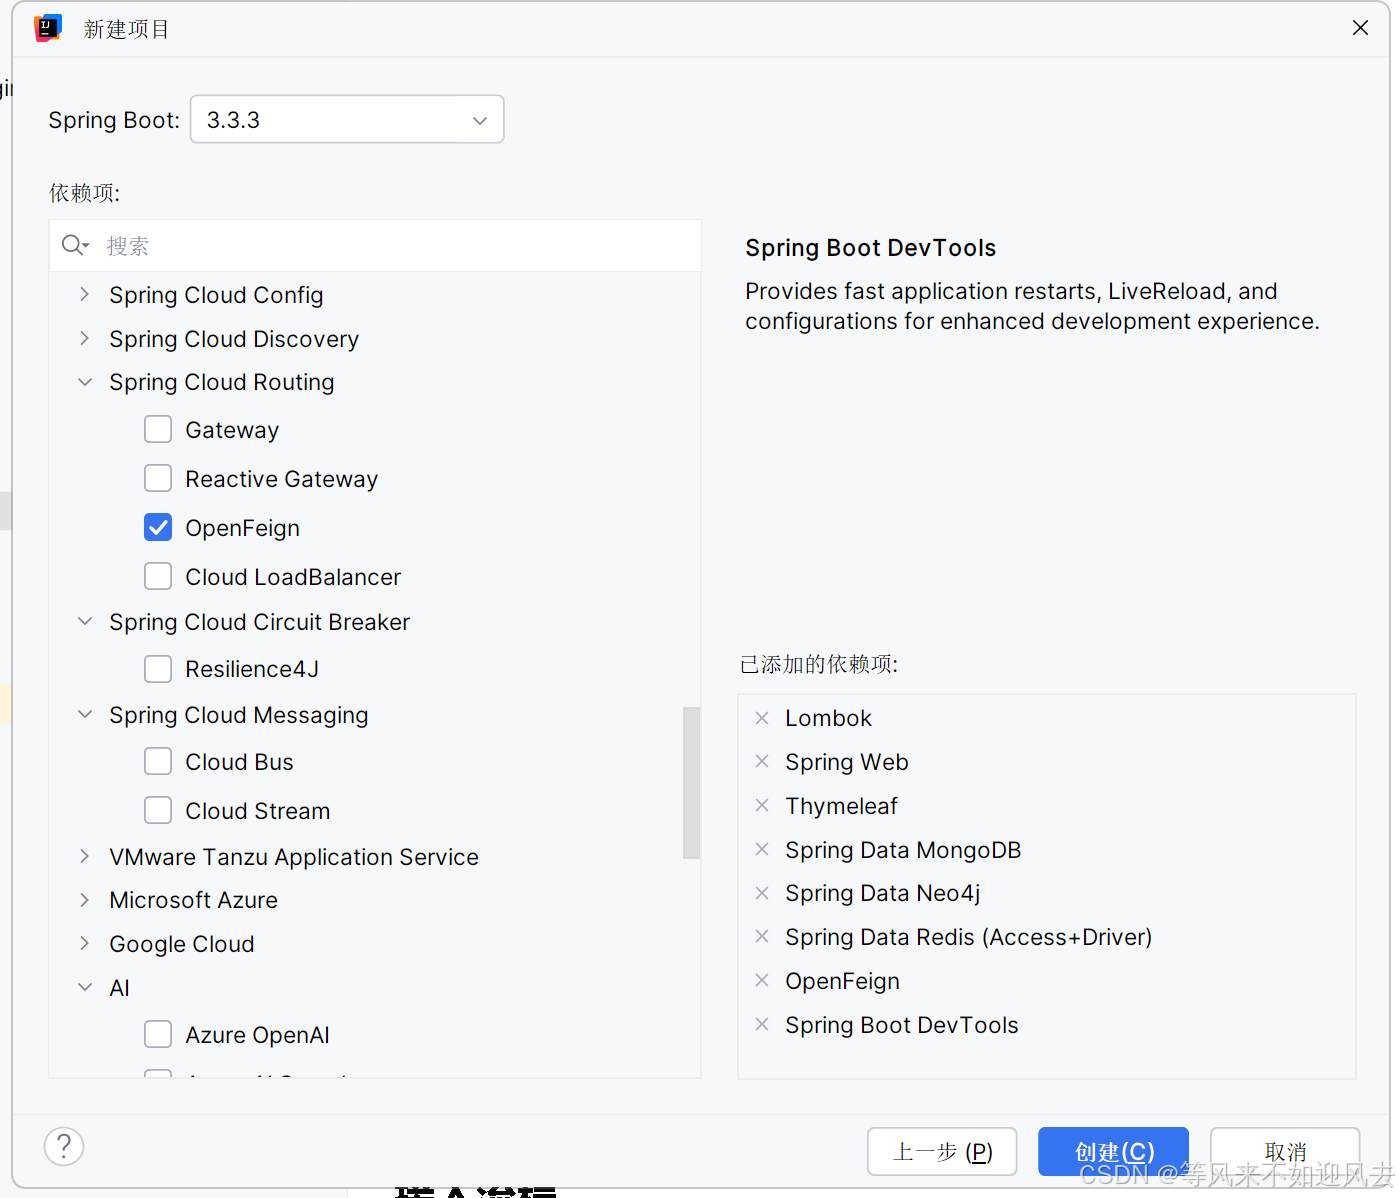
【spring】IDEA 新建一个spring boot 项目
参考新建项目-sprintboot 选择版本、依赖,我选了一堆 maven会重新下载一次么?...
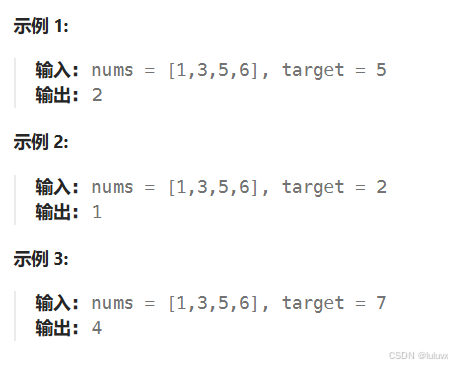
LeetCode[简单] 搜索插入位置
给定一个排序数组和一个目标值,在数组中找到目标值,并返回其索引。如果目标值不存在于数组中,返回它将会被按顺序插入的位置。 请必须使用时间复杂度为 O(log n) 的算法。 思路:类似与二分查找 唯一需要注意的是,搜索…...
Bootstrap框架的HTML示例)
(代码可运行)Bootstrap框架的HTML示例
Bootstrap:一套流行的前端开发框架,基于HTML、CSS和JavaScript,适用于快速构建响应式Web应用。 以下是一个使用Bootstrap构建的简单响应式Web应用的HTML示例: <!DOCTYPE html> <html lang"en"> <head&…...

IntelliJ IDEA 2024创建Java项目
一、前言 本文将带领大家手把手创建纯Java项目,不涉及Maven。如有问题,欢迎大家在评论区指正说明! 二、环境准备 名称版本jdk1.8idea2024 1.4操作系统win10 jdk的安装教程 idea的安装教程 三、创建项目 首先我们点击新建项目 然后我们…...

Python之 条件与循环(Python‘s Conditions and loops)
💝💝💝欢迎来到我的博客,很高兴能够在这里和您见面!希望您在这里可以感受到一份轻松愉快的氛围,不仅可以获得有趣的内容和知识,也可以畅所欲言、分享您的想法和见解。 推荐:Linux运维老纪的首页…...

C++学习,多态纯虚函数
多态字面意思是多种形态,当类之间存在层次结构,并且类之间是通过继承时,就会用到多态。多态允许通过基类指针或引用来调用派生类中的成员函数。这种机制允许函数,在运行时根据对象的实际类型来确定执行哪个函数,从而实…...

飞速(FS)与西门子联合打造交换机自动化灌装测试生产线
2024年9月,备受信赖的信息通信技术(ICT)解决方案提供商飞速(FS)与工业自动化领域的领先企业西门子公司正式宣布,双方共同打造的ILTP(智能灌装测试平台)和自动化生产线将正式启动。此…...

Vue组合式API:setup()函数
1、什么是组合式API Vue 3.0 中新增了组合式 API 的功能,它是一组附加的、基于函数的 API,可以更加灵活地组织组件代码。通过组合式 API 可以使用函数而不是声明选项的方式来编写 Vue 组件。因此,使用组合式 API 可以将组件代码编写为多个函…...

Redis底层数据结构(详细篇)
Redis底层数据结构 一、常见数据结构的底层数据结构1、动态字符串SDS(Simple Dynamic String)组成 2、IntSet组成如何保证动态如何确保有序呢? 底层如何查找的呢? 3、Dict(dictionary)3.1组成3.2 扩容3.3 收缩3.4 rehash 4、ZipList连锁更新问题总结特…...

树和二叉树基本术语、性质
总结二叉树的度、树高、结点数等属性之间的关系(通过王道书 5.2.3 课后小题来复习“二叉 树的性质”) 树的相关知识 叶子结点的度0 层次默认从1开始 有些题目从0 开始也不要奇怪 常见考点1:结点数总度数+1 常见考点2࿱…...

FEDERATED引擎
入门 MySQL引擎主要有以下几种: MyISAM:这是MySQL 5.5.5之前的默认存储引擎,不支持事务、外键约束和聚簇索引,适用于读多写少的场景。InnoDB:这是MySQL 5.5.5之后的默认存储引擎,支持事务、外键约束、行级…...

Android NDK工具
Android NDK工具 Android NDK Crash 日志抓取及定位 NDK-STACK 定位 NDK Crash 位置 只要执行如下代码就行: adb logcat | ndk-stack -sym /yourProjectPath/obj/local/armeabi-v7aPS: 必须是带symbols的so,也就是在’\app\src\main\obj\local\下面的…...

使用 Docker 进入容器并运行命令的详细指南
Docker 是一款开源的容器化平台,它可以将应用程序和依赖环境打包到一个可移植的“容器”中,以保证应用不受运行环境的影响。使用 Docker 容器化应用后,有时需要进入容器内部执行一些命令进行调试或管理。 一、Docker 基础命令 在开始进入容…...

【人工智能】OpenAI最新发布的o1-preview模型,和GPT-4o到底哪个更强?最新分析结果就在这里!
在人工智能的快速发展中,OpenAI的每一次新模型发布都引发了广泛的关注与讨论。2023年9月13日,OpenAI正式推出了名为o1的新模型,这一模型不仅是其系列“推理”模型中的首个代表,更是朝着类人人工智能迈进的重要一步。本文将综合分析…...

Spring Boot-版本兼容性问题
Spring Boot 版本兼容性问题探讨 Spring Boot 是一个用于构建微服务和现代 Java 应用的流行框架,随着 Spring Boot 版本的更新和发展,它在功能、性能和安全性上不断提升。但与此同时,Spring Boot 的版本兼容性问题也逐渐成为开发者必须关注的…...

Java原生HttpURLConnection实现Get、Post、Put和Delete请求完整工具类分享
这里博主纯手写了一个完整的 HTTP 请求工具类,该工具类支持多种请求方法,包括 GET、POST、PUT 和 DELETE,并且可以选择性地使用身份验证 token。亲测可用,大家可以直接复制并使用这段代码,以便在自己的项目中快速实现 HTTP 请求的功能。 目录 一、完整代码 二、调用示例…...

如何微调(Fine-tuning)大语言模型?
本文介绍了微调的基本概念,以及如何对语言模型进行微调。 从 GPT3 到 ChatGPT、从GPT4 到 GitHub copilot的过程,微调在其中扮演了重要角色。什么是微调(fine-tuning)?微调能解决什么问题?什么是 LoRA&…...

wopop靶场漏洞挖掘练习
1、SQL注入漏洞 1、在搜索框输入-1 union select 1,2,3# 2、输入-1 union select 1,2,database()# ,可以得出数据库名 3、输入-1 union select 1,2,group_concat(table_name) from information_schema.tables where table_schematest#,可以得出数据库中…...

告别手改脚本!用CANoe Panel面板做个变量控制台,测试效率翻倍
告别手改脚本!用CANoe Panel面板打造智能变量控制台 在车载网络测试领域,效率提升往往隐藏在那些被忽视的日常操作细节中。当测试工程师频繁打开CAPL脚本修改超时阈值、调整诊断ID或切换测试模式时,不仅打断了工作流,更在团队协作…...

GEO优化实操框架:GEO优化的正确姿势是“带着答案去找客户”
如果你是B2B企业的老板或市场负责人,你一定听过这句话: “我们网上曝光是不少,但来的询盘都不对——问价格的比问方案的还多,还有不少是学生做调研的。” 这不是你一个人遇到的问题。这是传统SEO和竞价广告的天然缺陷——你只能“…...

模拟IC设计避坑指南:用Cadence Virtuoso仿真,揭秘电流镜精度下降的3个元凶
模拟IC设计避坑指南:用Cadence Virtuoso仿真,揭秘电流镜精度下降的3个元凶 在模拟CMOS集成电路设计中,电流镜作为基础模块广泛应用于偏置电路、有源负载等场景。然而许多工程师在Cadence Virtuoso IC617中完成电流镜设计后,常会遇…...
)
告别Demo!用EMQX和Java模拟真实物联网设备上报数据流(Windows本地开发环境)
告别Demo!用EMQX和Java构建真实物联网数据流模拟方案 在物联网开发中,最令人头疼的莫过于缺乏真实设备进行测试。想象一下,当你精心设计的平台等待设备接入时,硬件团队却告诉你"下周才能交付原型机"。这种等待不仅拖延进…...

LrcHelper:3分钟掌握网易云音乐双语歌词下载,告别歌词烦恼
LrcHelper:3分钟掌握网易云音乐双语歌词下载,告别歌词烦恼 【免费下载链接】LrcHelper 从网易云音乐下载带翻译的歌词 Walkman 适配 项目地址: https://gitcode.com/gh_mirrors/lr/LrcHelper 你是否曾为找不到心爱歌曲的歌词而烦恼?或…...
)
从XTR文件看GNSS数据质量:如何利用Anubis报告优化你的测量方案(以GPS/BDS/Galileo为例)
从XTR文件解码GNSS数据质量:实战分析与优化策略 在GNSS测量领域,数据质量直接决定了最终定位结果的可靠性。XTR文件作为Anubis软件生成的质量报告,包含了大量反映GNSS观测质量的指标参数。对于有经验的工程师而言,这些数字不仅仅是…...

如何3步获取百度网盘真实下载地址实现满速下载
如何3步获取百度网盘真实下载地址实现满速下载 【免费下载链接】baidu-wangpan-parse 获取百度网盘分享文件的下载地址 项目地址: https://gitcode.com/gh_mirrors/ba/baidu-wangpan-parse 你是否曾被百度网盘的非会员下载速度困扰?当下载重要的工作文件、学…...

构建通用Docker工具镜像:从设计到实践的全流程指南
1. 项目概述:一个“反重力”的Docker镜像?看到这个镜像名runzhliu/docker-antigravity,很多人的第一反应可能是好奇和疑惑。在Docker Hub上,以“antigravity”(反重力)命名的镜像并不常见,它不像…...

AI增强型写作工具Hermes-Writer:为开发者打造的智能写作助手
1. 项目概述:一个面向开发者的智能写作助手最近在GitHub上看到一个挺有意思的项目,叫dav-niu474/Hermes-Writer。乍一看标题,你可能会觉得这又是一个普通的Markdown编辑器或者写作工具。但如果你点进去,仔细研究一下它的README、代…...

83.人工智能实战:RAG 表格问答怎么做?从前期发现“表格被切碎”到结构化解析、行列索引与答案校验
人工智能实战:RAG 表格问答怎么做?从前期发现“表格被切碎”到结构化解析、行列索引与答案校验 一、问题场景:Word 文档能答,Excel 表格一问就错 很多企业知识库不只有 Word 和 PDF,还有大量表格: 1. 报销标准表 2. 产品价格表 3. 客户等级表 4. SLA 服务等级表 5. 部门…...