MySQL5.7.42高可用MHA搭建及故障切换演示
系列文章目录
rpmbuild构建mysql5.7RPM安装包
MySQL基于GTID同步模式搭建主从复制
文章目录
- 系列文章目录
- 前言
- 一、MHA架构介绍
- 1.MHA的功能
- 2.MHA组成
- 3.MHA故障转移过程
- 4.MHA架构优缺点
- 二、环境准备
- 1.服务器免密
- 2.基于GTID主从复制搭建
- 3.下载mha组件
- 三、MHA组件安装
- 1.安装依赖
- 2.所有节点安装MHA node
- 3.管理节点安装MHA manager
- 4.daemontools工具安装
- 四、MHA配置
- 1.主库配置mha用户
- 2.生成MHA配置文件
- 3.manager节点拷贝master_ip_failover,master_ip_online_change文件到app1目录下并修改
- 4.检测主机ssh与数据库复制
- 5.主库启动VIP
- 五、手动切换测试
- 1.online切换测试
- 1.1.原主库信息查看
- 1.2.原从库信息查看
- 1.3.在线切换前确保 mha节点中的 manager是关闭状态
- 1.4.开始执行在线切换命令
- 1.5.切换结果检查
- 2.failover切换测试
- 2.1.手动启动masterha_manager进程
- 2.2.执行failover切换测试,通过手动kill主库192.168.56.130的mysql进程来模拟主库挂掉
- 2.3.此时从库192.168.56.131自动提升为新主库,主库变为192.168.56.131,原主库192.168.56.130起来后,需要手动配置为从库
- 六、配置MHA守护进程
- 七、启动mha守护进程
- 八、启动守护进程后Failover切换测试
- 1.manager节点上启动守护进程
- 2.192.168.56.130主库手动kill数据库进程
- 3.验证
- 总结
前言
在当今竞争激烈的商业环境中,企业依赖于高效、可靠的数据管理系统来支持其运营和决策。然而,数据库故障或性能瓶颈往往会对业务造成严重影响,导致服务中断、数据丢失,甚至客户流失。为了应对这些挑战,MHA(Master High Availability)架构逐渐成为企业保障数据可用性的关键解决方案。
MHA架构通过实现主数据库的高可用性,确保在发生故障时能够快速自动切换到备份实例,最大限度地减少停机时间。此外,MHA不仅提供故障转移功能,还支持在线备份和数据恢复,帮助企业在突发情况下迅速恢复正常运营。这种灵活性和可靠性使得MHA成为大型分布式系统和高负载应用的理想选择。
提示:以下是本篇文章正文内容,下面案例可供参考
一、MHA架构介绍
MHA是Master High Availability的缩写,它是目前MySQL高可用方面的一个相对成熟的解决方案,其核心是使用perl语言编写的一组脚本,是一套优秀的作为MySQL高可用性环境下故障切换和主从提升的高可用软件。在MySQL故障切换过程中,MHA能做到在0~ 30秒之内自动完成数据库的故障切换操作,并且能在最大程度上保证数据的一致性,以达到真正意义上的高可用。
基于MHA的架构不像MMM那样需要搭建主主复制,只需要搭建基本的主从复制架构即可。因为MHA在主库挂掉时,是在多个从库中选取出一个从库作为新的主库。MHA集群中的各节点彼此之间均需要基于ssh 互信通信,以实现远程控制及数据管理功能

1.MHA的功能
1、监控Master节点是否可用,当Master不可用时,能在多个Slave中选举出新的Master
2、提供了主从切换和故障转移功能,MHA会尝试在宕机的Master上保存binlog,在最大程度上保证事务不丢失。但如果是Master所在的服务器已经无法访问,或硬件层面出现了问题,则无法成功保存binlog
3、MHA可以与半同步复制结合,避免从库之间出现数据不一致的情况
4、支持MySQL基于GTID和基于日志点的两种复制方式
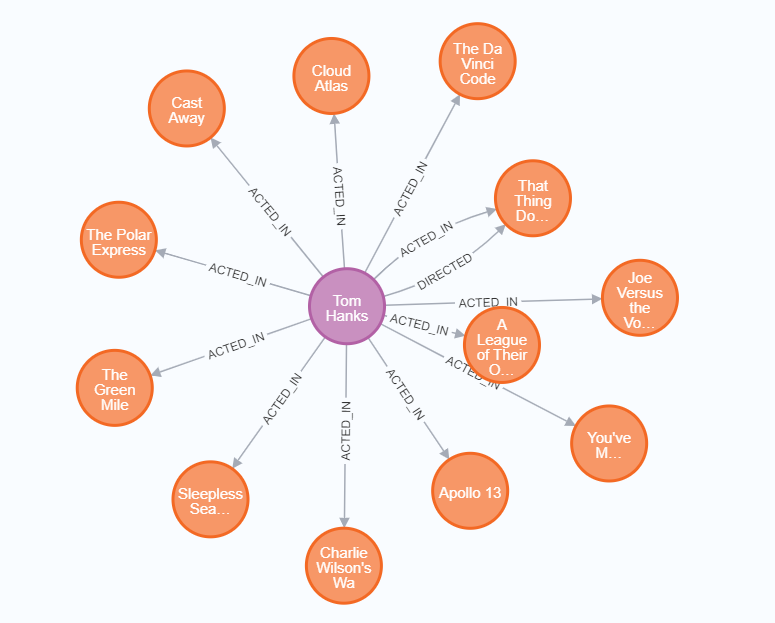
2.MHA组成
Manager节点:MHA Manager 可以单独部署在一台独立的机器上,管理多个 master-slave 集群;也可以部署在一台 slave 节点上。MHA Manager 会定时探测集群中的 master 节点。当 master 出现故障时,它可以自动将最新数据的 slave提升为新的 master, 然后将所有其他的 slave 重新指向新的 master。整个故障转移过程对应用程序完全透明
Master节点:主数据库。负责处理读写操作并将更改同步到备数据库。
Slave节点:从数据库。与主数据库保持同步,并在主数据库故障时接管其角色。
3.MHA故障转移过程
1、尝试使用ssh登录到宕机崩溃的Master节点上保存二进制日志事件(binlog events); 2、从多个Slave中识别含有最新更新的Slave,将其作为备选的Master; 3、然后基于该Slave同步差异的中继日志(relaylog)到其他的Slave上; 4、接着同步从原Master上保存的二进制日志事件(binlog events); 5、将备选的Master提升为新的Master; 6、使其他的Slave连接新的Master进行复制; 7、在新的Master启动vip地址,保证前端请求可以发送到新的Master。
4.MHA架构优缺点
| 优点 | 缺点 |
|---|---|
| 使用Perl脚本语言开发并且完全开源,开发者可以根据自己的需求进行二次开发 | MHA默认不提供虚拟IP功能,需要自行准备虚拟ip |
| 能够支持基于GTID和基于日志点的复制模式 | MHA启动后只会对Master进行监控,不会对Slave进行监控 |
| MHA在进行故障转移时更不易产生数据丢失 | 集群环境需要能够通过 ssh协议免密登录,存在一定的安全隐患 |
| 在一个监控节点上可以监控多个Replication集群 | MHA没有提供对Slave的读负载均衡功能,需要通过第三方工具来实现 |
二、环境准备
mysql版本5.7.42
mha版本mha4mysql-node-0.58.tar.gz、mha4mysql-manager-0.58.tar.gz、daemontools-0.76
默认以下服务器端口通信正常、防火墙关闭、selinux关闭
| ip | 作用 | 部署 |
|---|---|---|
| 192.168.56.130 | 主库 | mysql5.7.42、mha-node |
| 192.168.56.131 | 从库 | mysl5.7.42、mha-node |
| 192.168.56.132 | mha管理节点 | mha-node、mha manager、daemontools |
| 192.168.56.133 | vip | / |
1.服务器免密
因为从第一部分就已经明确了MHA集群中的各节点彼此之间均需要基于ssh 互信通信,以实现远程控制及数据管理功能,所以先进行免密操作
[root@python1 ~]# ssh-keygen -t rsa -f ~/.ssh/id_rsa -t rsa -N '' #生成私钥
[root@python1 ~]# ssh-copy-id -i ~/.ssh/id_rsa.pub root@192.168.56.131 #将生成的公私钥传给131机器
[root@python1 ~]# ssh-copy-id -i ~/.ssh/id_rsa.pub root@192.168.56.132 #将生成的公私钥传给131机器
131机器如法炮制
[root@python2 ~]# ssh-keygen -t rsa -f ~/.ssh/id_rsa -t rsa -N '' #生成私钥
[root@python2 ~]# ssh-copy-id -i ~/.ssh/id_rsa.pub root@192.168.56.130 #将生成的公私钥传给130机器
[root@python2 ~]# ssh-copy-id -i ~/.ssh/id_rsa.pub root@192.168.56.132 #将生成的公私钥传给131机器
[root@python3 ~]# ssh-keygen -t rsa -f ~/.ssh/id_rsa -t rsa -N '' #生成私钥
[root@python3 ~]# ssh-copy-id -i ~/.ssh/id_rsa.pub root@192.168.56.130 #将生成的公私钥传给130机器
[root@python3 ~]# ssh-copy-id -i ~/.ssh/id_rsa.pub root@192.168.56.131 #将生成的公私钥传给130机器
免密结果验证


至此,第一步免密操作完成
2.基于GTID主从复制搭建
在此不做过多描述,搭建过程可以参考顶部两篇文章链接地址。搭建完成如下图所示

至此,主从复制搭建完成
3.下载mha组件
mha-manager
https://github.com/yoshinorim/mha4mysql-manager/releases

mha-node
https://github.com/yoshinorim/mha4mysql-manager/releases

daemontools工具
https://cr.yp.to/daemontools/install.html

至此,组件准备完成
三、MHA组件安装
1.安装依赖
三个节点依次安装依赖包
[root@python1 ~]# yum install -y apr bc bison dos2unix expect gcc gcc-c++ iftop libaio libaio-devel libarchive libev lrzsz make MySQL-python nc ncurses-devel numactl numactl-devel perl-Config-IniFiles perl-Config-Tiny perl-DBD-mysql perl-DBI perl-ExtUtils-CBuilder perl-Log-Dispatch perl-Parallel-ForkManager perl-CPAN perl-Time-HiRes perl-ExtUtils-MakeMaker perl-Digest-MD5 perl-TermReadKey pigz python python-devel python-paramiko python-requests python-setuptools python-simplejson rsync sysstat trickle vim zlib zlib-devel mysql-devel
2.所有节点安装MHA node
所有mysql主从节点与manager节点均安装MHA node,将软件包mha4mysql-node-0.58.tar.gz上传至/root,并解压缩安装:此处只演示一个节点的安装过程,其余两个节点安装如法炮制即可
[root@python1 ~]# tar xf mha4mysql-node-0.56.tar.gz
[root@python1 ~]# cd mha4mysql-node
[root@python1 mha4mysql-node]# perl Makefile.PL
*** Module::AutoInstall version 1.03
*** Checking for Perl dependencies...
[Core Features]
- DBI        ...loaded. (1.627)
- DBD::mysql ...loaded. (4.023)
*** Module::AutoInstall configuration finished.
Checking if your kit is complete...
Looks good
Writing Makefile for mha4mysql::node
[root@python1 mha4mysql-node]# make
cp lib/MHA/BinlogManager.pm blib/lib/MHA/BinlogManager.pm
cp lib/MHA/BinlogPosFindManager.pm blib/lib/MHA/BinlogPosFindManager.pm
cp lib/MHA/BinlogPosFinderXid.pm blib/lib/MHA/BinlogPosFinderXid.pm
cp lib/MHA/BinlogHeaderParser.pm blib/lib/MHA/BinlogHeaderParser.pm
cp lib/MHA/BinlogPosFinder.pm blib/lib/MHA/BinlogPosFinder.pm
cp lib/MHA/BinlogPosFinderElp.pm blib/lib/MHA/BinlogPosFinderElp.pm
cp lib/MHA/NodeUtil.pm blib/lib/MHA/NodeUtil.pm
cp lib/MHA/SlaveUtil.pm blib/lib/MHA/SlaveUtil.pm
cp lib/MHA/NodeConst.pm blib/lib/MHA/NodeConst.pm
cp bin/filter_mysqlbinlog blib/script/filter_mysqlbinlog
/usr/bin/perl "-Iinc" -MExtUtils::MY -e 'MY->fixin(shift)' -- blib/script/filter_mysqlbinlog
cp bin/apply_diff_relay_logs blib/script/apply_diff_relay_logs
/usr/bin/perl "-Iinc" -MExtUtils::MY -e 'MY->fixin(shift)' -- blib/script/apply_diff_relay_logs
cp bin/purge_relay_logs blib/script/purge_relay_logs
/usr/bin/perl "-Iinc" -MExtUtils::MY -e 'MY->fixin(shift)' -- blib/script/purge_relay_logs
cp bin/save_binary_logs blib/script/save_binary_logs
/usr/bin/perl "-Iinc" -MExtUtils::MY -e 'MY->fixin(shift)' -- blib/script/save_binary_logs
Manifying blib/man1/filter_mysqlbinlog.1
Manifying blib/man1/apply_diff_relay_logs.1
Manifying blib/man1/purge_relay_logs.1
Manifying blib/man1/save_binary_logs.1
[root@python1 mha4mysql-node-0.58]# make install
Installing /usr/local/share/perl5/MHA/NodeUtil.pm
Installing /usr/local/share/perl5/MHA/SlaveUtil.pm
Installing /usr/local/share/perl5/MHA/NodeConst.pm
Installing /usr/local/share/man/man1/filter_mysqlbinlog.1
Installing /usr/local/share/man/man1/apply_diff_relay_logs.1
Installing /usr/local/share/man/man1/purge_relay_logs.1
Installing /usr/local/share/man/man1/save_binary_logs.1
Installing /usr/local/bin/filter_mysqlbinlog
Installing /usr/local/bin/apply_diff_relay_logs
Installing /usr/local/bin/purge_relay_logs
Installing /usr/local/bin/save_binary_logs
Appending installation info to /usr/lib64/perl5/perllocal.pod

命令解释
node组件安装后也会在/usr/local/bin 下面会生成几个脚本(这些工具通常由 MHAManager 的脚本触发,无需人为操作)主要如下:
save_binary_logs    保存和复制 master 的二进制日志
apply_diff_relay_logs   识别差异的中继日志事件并将其差异的事件应用于其他的 slave
filter_mysqlbinlog  去除不必要的 ROLLBACK 事件
purge_relay_logs    清除中继日志(不会阻塞sql线程)
至此,三个节点的mha-node组件安装完成
3.管理节点安装MHA manager
只在132机器上安装
[root@python3 ~]# tar xf mha4mysql-manager-0.58.tar.gz
[root@python3 ~]# cd mha4mysql-manager-0.58
[root@python3 mha4mysql-manager-0.58]# ls
AUTHORS  bin  COPYING  debian  inc  lib  Makefile.PL  MANIFEST  META.yml  README  rpm  samples  t  tests
[root@python3 mha4mysql-manager-0.56]# perl Makefile.PL
*** Module::AutoInstall version 1.03
*** Checking for Perl dependencies...
[Core Features]
- DBI                   ...loaded. (1.627)
- DBD::mysql            ...loaded. (4.023)
- Time::HiRes           ...loaded. (1.9725)
- Config::Tiny          ...loaded. (2.14)
- Log::Dispatch         ...loaded. (2.41)
- Parallel::ForkManager ...loaded. (1.18)
- MHA::NodeConst        ...loaded. (0.58)
*** Module::AutoInstall configuration finished.
Checking if your kit is complete...
Looks good
Writing Makefile for mha4mysql::manager
[root@python3 mha4mysql-manager-0.56]#  make && make install
cp lib/MHA/ManagerUtil.pm blib/lib/MHA/ManagerUtil.pm
cp lib/MHA/Config.pm blib/lib/MHA/Config.pm
cp lib/MHA/HealthCheck.pm blib/lib/MHA/HealthCheck.pm
cp lib/MHA/ManagerConst.pm blib/lib/MHA/ManagerConst.pm
cp lib/MHA/ServerManager.pm blib/lib/MHA/ServerManager.pm
cp lib/MHA/ManagerAdmin.pm blib/lib/MHA/ManagerAdmin.pm
cp lib/MHA/FileStatus.pm blib/lib/MHA/FileStatus.pm
cp lib/MHA/ManagerAdminWrapper.pm blib/lib/MHA/ManagerAdminWrapper.pm
cp lib/MHA/MasterFailover.pm blib/lib/MHA/MasterFailover.pm
cp lib/MHA/MasterRotate.pm blib/lib/MHA/MasterRotate.pm
cp lib/MHA/MasterMonitor.pm blib/lib/MHA/MasterMonitor.pm
cp lib/MHA/SSHCheck.pm blib/lib/MHA/SSHCheck.pm
cp lib/MHA/Server.pm blib/lib/MHA/Server.pm
cp lib/MHA/DBHelper.pm blib/lib/MHA/DBHelper.pm
cp bin/masterha_stop blib/script/masterha_stop
/usr/bin/perl "-Iinc" -MExtUtils::MY -e 'MY->fixin(shift)' -- blib/script/masterha_stop
cp bin/masterha_conf_host blib/script/masterha_conf_host
/usr/bin/perl "-Iinc" -MExtUtils::MY -e 'MY->fixin(shift)' -- blib/script/masterha_conf_host
cp bin/masterha_check_repl blib/script/masterha_check_repl
/usr/bin/perl "-Iinc" -MExtUtils::MY -e 'MY->fixin(shift)' -- blib/script/masterha_check_repl
cp bin/masterha_check_status blib/script/masterha_check_status
/usr/bin/perl "-Iinc" -MExtUtils::MY -e 'MY->fixin(shift)' -- blib/script/masterha_check_status
cp bin/masterha_master_monitor blib/script/masterha_master_monitor
/usr/bin/perl "-Iinc" -MExtUtils::MY -e 'MY->fixin(shift)' -- blib/script/masterha_master_monitor
cp bin/masterha_check_ssh blib/script/masterha_check_ssh
/usr/bin/perl "-Iinc" -MExtUtils::MY -e 'MY->fixin(shift)' -- blib/script/masterha_check_ssh
cp bin/masterha_master_switch blib/script/masterha_master_switch
/usr/bin/perl "-Iinc" -MExtUtils::MY -e 'MY->fixin(shift)' -- blib/script/masterha_master_switch
cp bin/masterha_secondary_check blib/script/masterha_secondary_check
/usr/bin/perl "-Iinc" -MExtUtils::MY -e 'MY->fixin(shift)' -- blib/script/masterha_secondary_check
cp bin/masterha_manager blib/script/masterha_manager
/usr/bin/perl "-Iinc" -MExtUtils::MY -e 'MY->fixin(shift)' -- blib/script/masterha_manager
Manifying blib/man1/masterha_stop.1
Manifying blib/man1/masterha_conf_host.1
Manifying blib/man1/masterha_check_repl.1
Manifying blib/man1/masterha_check_status.1
Manifying blib/man1/masterha_master_monitor.1
Manifying blib/man1/masterha_check_ssh.1
Manifying blib/man1/masterha_master_switch.1
Manifying blib/man1/masterha_secondary_check.1
Manifying blib/man1/masterha_manager.1
Installing /usr/local/share/perl5/MHA/Config.pm
Installing /usr/local/share/perl5/MHA/HealthCheck.pm
Installing /usr/local/share/perl5/MHA/ManagerConst.pm
Installing /usr/local/share/perl5/MHA/ServerManager.pm
Installing /usr/local/share/perl5/MHA/MasterFailover.pm
Installing /usr/local/share/perl5/MHA/MasterRotate.pm
Installing /usr/local/share/perl5/MHA/MasterMonitor.pm
Installing /usr/local/share/perl5/MHA/Server.pm
Installing /usr/local/share/perl5/MHA/DBHelper.pm
Installing /usr/local/share/man/man1/masterha_stop.1
Installing /usr/local/share/man/man1/masterha_conf_host.1
Installing /usr/local/share/man/man1/masterha_check_repl.1
Installing /usr/local/share/man/man1/masterha_check_status.1
Installing /usr/local/share/man/man1/masterha_master_monitor.1
Installing /usr/local/share/man/man1/masterha_check_ssh.1
Installing /usr/local/share/man/man1/masterha_master_switch.1
Installing /usr/local/share/man/man1/masterha_secondary_check.1
Installing /usr/local/share/man/man1/masterha_manager.1
Installing /usr/local/bin/masterha_stop
Installing /usr/local/bin/masterha_conf_host
Installing /usr/local/bin/masterha_check_repl
Installing /usr/local/bin/masterha_check_status
Installing /usr/local/bin/masterha_master_monitor
Installing /usr/local/bin/masterha_check_ssh
Installing /usr/local/bin/masterha_master_switch
Installing /usr/local/bin/masterha_secondary_check
Installing /usr/local/bin/masterha_manager
Appending installation info to /usr/lib64/perl5/perllocal.pod
[root@python3 scripts]# pwd
/root/mha4mysql-manager-0.56/samples/scripts
[root@python3 scripts]# ls
master_ip_failover  master_ip_online_change  power_manager  send_report
[root@python3 scripts]# cp -rp ./* /usr/local/bin/
[root@python3 bin]# cd /usr/local/bin/
[root@python3 bin]# chown root.root master_ip_*
[root@python3 mha4mysql-manager-0.58]# chmod +x /usr/local/bin/*

命令解释
masterha_check_ssh  检查 MHA 的 SSH 配置状况
masterha_check_repl 检查 MySQL 主从复制状况
masterha_manger 启动 manager的脚本
masterha_check_status   检测当前 MHA 运行状态
masterha_master_monitor 检测 master 是否宕机
masterha_master_switch  控制故障转移(自动或者手动)
masterha_conf_host  添加或删除配置的 server 信息
masterha_stop   关闭manager
masterha_secondary_check   从远程服务器建立tcp连接
master_ip_failover 自动切换时vip管理的脚本,不是必须
master_ip_online_change 在线切换时vip的管理,不是必须
power_manager 故障发生后关闭主机的脚本,不是必须
send_report 因故障切换后发送报警的脚本,不是必须
4.daemontools工具安装
在MHA管理节点上安装deamontools来将mha作为守护进程启动
[root@python3 ~]# tar xf daemontools-0.76.tar.gz
[root@python3 ~]# cd admin/
[root@python3 admin]# ls
daemontools-0.76
[root@python3 admin]# cd daemontools-0.76/
[root@python3 daemontools-0.76]# ls
package  src
[root@python3 daemontools-0.76]# cd package/
[root@python3 package]# ls
boot.inittab  boot.rclocal  commands  compile  files  install  README  run  run.inittab  run.rclocal  sharing  upgrade
[root@python3 package]# pwd
/root/admin/daemontools-0.76/package
[root@python3 package]# cd ..
[root@python3 daemontools-0.76]# ls
package  src
[root@python3 daemontools-0.76]# package/install #执行安装命令

报错及解决方法
[root@python3 daemontools-0.76]# package/install #执行安装命令报以下错误
./load envdir unix.a byte.a
/usr/bin/ld: errno: TLS definition in /lib64/libc.so.6 section .tbss mismatches non-TLS reference in envdir.o
/lib64/libc.so.6: error adding symbols: Bad value
collect2: error: ld returned 1 exit status
make: *** [envdir] Error 1
解决方法:
vim /root/admin/daemontools-0.76/src/conf-cc
# 在gcc 一行末尾增加
-include /usr/include/errno.h
# 更改后
gcc -O2 -Wimplicit -Wunused -Wcomment -Wchar-subscripts -Wuninitialized -Wshadow -Wcast-qual -Wcast-align -Wwrite-strings -include /usr/include/errno.h#再次执行即可安装成功
至此,MHA组件安装完毕
四、MHA配置
1.主库配置mha用户
mysql> grant all on *.* to 'mha'@'192.168.56.132' identified by 'jQHB31K18IBKgPsQps1Q';
Query OK, 0 rows affected, 1 warning (0.44 sec)mysql> flush privileges;
Query OK, 0 rows affected (0.18 sec)
2.生成MHA配置文件
在manager管理节点操作
#创建mha实例目录,名为app1
[root@python3 ~]# mkdir -p  /export/servers/mha/manager/app1/
添加以下app.cnf文件至app1目录下
[server default]
manager_workdir=/export/servers/app/mha/manager/app1 #mha实例目录
manager_log=/export/servers/app/mha/manager/app1/app.log
remote_workdir = /export/servers/app/mha/node
user=mha
password=jQHB31K18IBKgPsQps1Q #创建mha用户时设置的密码
repl_user=repl
repl_password=123456 #主从复制用户密码
ssh_user=root
master_binlog_dir=/export/servers/data/my3306/binlog #主库binlog日志位置
# 指定用于二次检查节点状态的脚本
secondary_check_script=/usr/bin/masterha_secondary_check -s 192.168.56.130 -s 192.168.190.131
ping_interval=3
master_ip_failover_script= /export/servers/app/mha/manager/app1/master_ip_failover
master_ip_online_change_script= /export/servers/app/mha/manager/app1/master_ip_online_change#主从信息
[server1]
hostname=192.168.56.130
port=3306
check_repl_delay = 0[server2]
hostname=192.168.56.131
port=3306
candidate_master=1
check_repl_delay = 0
3.manager节点拷贝master_ip_failover,master_ip_online_change文件到app1目录下并修改
因为自带的这两个perl脚本不能直接使用
master_ip_failover
[root@python3 scripts]# cp -rp /usr/local/bin/master_ip_failover /export/servers/mha/manager/app1/
#!/usr/bin/env perl
use strict;
use warnings FATAL => 'all';use Getopt::Long;
use MHA::DBHelper;my $vip = "192.168.56.133";
my $net_mask = "255.255.255.0";
my $gateway = "192.168.56.2";
my $device = "ens33";
my $key = "0";
my $ssh_start_vip = "/sbin/ifconfig $device:$key $vip netmask $net_mask && /sbin/arping -c 3 -s $vip -I $device $gateway";
my $ssh_stop_vip = "/sbin/ifconfig $device:$key down";
my $exit_code = 0;my ($command,        $ssh_user,         $orig_master_host,$orig_master_ip, $orig_master_port, $new_master_host,$new_master_ip,  $new_master_port,  $new_master_user,$new_master_password
);
GetOptions('command=s'             => \$command,'ssh_user=s'            => \$ssh_user,'orig_master_host=s'    => \$orig_master_host,'orig_master_ip=s'      => \$orig_master_ip,'orig_master_port=i'    => \$orig_master_port,'new_master_host=s'     => \$new_master_host,'new_master_ip=s'       => \$new_master_ip,'new_master_port=i'     => \$new_master_port,'new_master_user=s'     => \$new_master_user,'new_master_password=s' => \$new_master_password,
);exit &main();sub main {if ( $command eq "stop" || $command eq "stopssh" ) {# $orig_master_host, $orig_master_ip, $orig_master_port are passed.# If you manage master ip address at global catalog database,# invalidate orig_master_ip here.my $exit_code = 1;eval {print "\n\n\n***************************************************************\n";print "Disabling the VIP - $vip on old master: $orig_master_host\n";print "***************************************************************\n\n\n\n";&stop_vip();$exit_code = 0;};if ($@) {warn "Got Error: $@\n";exit $exit_code;}exit $exit_code;}elsif ( $command eq "start" ) {# all arguments are passed.# If you manage master ip address at global catalog database,# activate new_master_ip here.# You can also grant write access (create user, set read_only=0, etc) here.my $exit_code = 10;eval {my $new_master_handler = new MHA::DBHelper();# args: hostname, port, user, password, raise_error_or_not$new_master_handler->connect( $new_master_ip, $new_master_port,$new_master_user, $new_master_password, 1 );## Set read_only=0 on the new master$new_master_handler->disable_log_bin_local();print "Set read_only=0 on the new master.\n";$new_master_handler->disable_read_only();## Creating an app user on the new masterprint "Creating app user on the new master..\n";$new_master_handler->enable_log_bin_local();$new_master_handler->disconnect();## Update master ip on the catalog database, etc#FIXME_xxx;print "\n\n\n***************************************************************\n";print "Enabling the VIP - $vip on new master: $new_master_host \n";print "***************************************************************\n\n\n\n";&start_vip();$exit_code = 0;};if ($@) {warn $@;# If you want to continue failover, exit 10.exit $exit_code;}exit $exit_code;}elsif ( $command eq "status" ) {# do nothingexit 0;}else {&usage();exit 1;}
}# A simple system call that enable the VIP on the new master
sub start_vip() {`ssh $ssh_user\@$new_master_host \" $ssh_start_vip \"`;
}
# A simple system call that disable the VIP on the old_master
sub stop_vip() {`ssh $ssh_user\@$orig_master_host \" $ssh_stop_vip \"`;
}sub usage {print
"Usage: master_ip_failover --command=start|stop|stopssh|status --orig_master_host=host --orig_master_ip=ip --orig_master_port=port --new_master_host=host --new_master_ip=ip --new_master_port=port\n";
}
master_ip_online_change
[root@python3 app1]# cp -rp /usr/local/bin/master_ip_online_change .
#!/usr/bin/env perl
use strict;
use warnings FATAL => 'all';use Getopt::Long;
use MHA::DBHelper;
use MHA::NodeUtil;
use Time::HiRes qw( sleep gettimeofday tv_interval );
use Data::Dumper;my $vip = "192.168.56.133";
my $net_mask = "255.255.255.0";
my $gateway = "192.168.56.2";
my $device = "ens33";
my $key = "0";
my $ssh_start_vip = "/sbin/ifconfig $device:$key $vip netmask $net_mask && /sbin/arping -c 3 -s $vip -I $device $gateway";
my $ssh_stop_vip = "/sbin/ifconfig $device:$key down";
my $exit_code = 0;my $_tstart;
my $_running_interval = 0.1;
my ($command,              $orig_master_is_new_slave, $orig_master_host,$orig_master_ip,       $orig_master_port,         $orig_master_user,$orig_master_password, $orig_master_ssh_user,     $new_master_host,$new_master_ip,        $new_master_port,          $new_master_user,$new_master_password,  $new_master_ssh_user,
);
GetOptions('command=s'                => \$command,'orig_master_is_new_slave' => \$orig_master_is_new_slave,'orig_master_host=s'       => \$orig_master_host,'orig_master_ip=s'         => \$orig_master_ip,'orig_master_port=i'       => \$orig_master_port,'orig_master_user=s'       => \$orig_master_user,'orig_master_password=s'   => \$orig_master_password,'orig_master_ssh_user=s'   => \$orig_master_ssh_user,'new_master_host=s'        => \$new_master_host,'new_master_ip=s'          => \$new_master_ip,'new_master_port=i'        => \$new_master_port,'new_master_user=s'        => \$new_master_user,'new_master_password=s'    => \$new_master_password,'new_master_ssh_user=s'    => \$new_master_ssh_user,
);exit &main();sub current_time_us {my ( $sec, $microsec ) = gettimeofday();my $curdate = localtime($sec);return $curdate . " " . sprintf( "%06d", $microsec );
}sub sleep_until {my $elapsed = tv_interval($_tstart);if ( $_running_interval > $elapsed ) {sleep( $_running_interval - $elapsed );}
}sub get_threads_util {my $dbh                    = shift;my $my_connection_id       = shift;my $running_time_threshold = shift;my $type                   = shift;$running_time_threshold = 0 unless ($running_time_threshold);$type                   = 0 unless ($type);my @threads;my $sth = $dbh->prepare("SHOW PROCESSLIST");$sth->execute();while ( my $ref = $sth->fetchrow_hashref() ) {my $id         = $ref->{Id};my $user       = $ref->{User};my $host       = $ref->{Host};my $command    = $ref->{Command};my $state      = $ref->{State};my $query_time = $ref->{Time};my $info       = $ref->{Info};$info =~ s/^\s*(.*?)\s*$/$1/ if defined($info);next if ( $my_connection_id == $id );next if ( defined($query_time) && $query_time < $running_time_threshold );next if ( defined($command)    && $command eq "Binlog Dump" );next if ( defined($user)       && $user eq "system user" );nextif ( defined($command)&& $command eq "Sleep"&& defined($query_time)&& $query_time >= 1 );if ( $type >= 1 ) {next if ( defined($command) && $command eq "Sleep" );next if ( defined($command) && $command eq "Connect" );}if ( $type >= 2 ) {next if ( defined($info) && $info =~ m/^select/i );next if ( defined($info) && $info =~ m/^show/i );}push @threads, $ref;}return @threads;
}sub main {if ( $command eq "stop" ) {## Gracefully killing connections on the current master# 1. Set read_only= 1 on the new master# 2. DROP USER so that no app user can establish new connections# 3. Set read_only= 1 on the current master# 4. Kill current queries# * Any database access failure will result in script die.my $exit_code = 1;eval {## Setting read_only=1 on the new master (to avoid accident)my $new_master_handler = new MHA::DBHelper();# args: hostname, port, user, password, raise_error(die_on_error)_or_not$new_master_handler->connect( $new_master_ip, $new_master_port,$new_master_user, $new_master_password, 1 );print current_time_us() . " Set read_only on the new master.. ";$new_master_handler->enable_read_only();if ( $new_master_handler->is_read_only() ) {print "ok.\n";}else {die "Failed!\n";}$new_master_handler->disconnect();# Connecting to the orig master, die if any database error happensmy $orig_master_handler = new MHA::DBHelper();$orig_master_handler->connect( $orig_master_ip, $orig_master_port,$orig_master_user, $orig_master_password, 1 );## Drop application user so that nobody can connect. Disabling per-session binlog beforehand$orig_master_handler->disable_log_bin_local();print current_time_us() . " Drpping app user on the orig master..\n";#FIXME_xxx_drop_app_user($orig_master_handler);## Waiting for N * 100 milliseconds so that current connections can exitmy $time_until_read_only = 15;$_tstart = [gettimeofday];my @threads = get_threads_util( $orig_master_handler->{dbh},$orig_master_handler->{connection_id} );while ( $time_until_read_only > 0 && $#threads >= 0 ) {if ( $time_until_read_only % 5 == 0 ) {printf"%s Waiting all running %d threads are disconnected.. (max %d milliseconds)\n",current_time_us(), $#threads + 1, $time_until_read_only * 100;if ( $#threads < 5 ) {print Data::Dumper->new( [$_] )->Indent(0)->Terse(1)->Dump . "\n"foreach (@threads);}}sleep_until();$_tstart = [gettimeofday];$time_until_read_only--;@threads = get_threads_util( $orig_master_handler->{dbh},$orig_master_handler->{connection_id} );}## Setting read_only=1 on the current master so that nobody(except SUPER) can writeprint current_time_us() . " Set read_only=1 on the orig master.. ";$orig_master_handler->enable_read_only();if ( $orig_master_handler->is_read_only() ) {print "ok.\n";}else {die "Failed!\n";}## Waiting for M * 100 milliseconds so that current update queries can completemy $time_until_kill_threads = 5;@threads = get_threads_util( $orig_master_handler->{dbh},$orig_master_handler->{connection_id} );while ( $time_until_kill_threads > 0 && $#threads >= 0 ) {if ( $time_until_kill_threads % 5 == 0 ) {printf
"%s Waiting all running %d queries are disconnected.. (max %d milliseconds)\n",current_time_us(), $#threads + 1, $time_until_kill_threads * 100;if ( $#threads < 5 ) {print Data::Dumper->new( [$_] )->Indent(0)->Terse(1)->Dump . "\n"foreach (@threads);}}sleep_until();$_tstart = [gettimeofday];$time_until_kill_threads--;@threads = get_threads_util( $orig_master_handler->{dbh},$orig_master_handler->{connection_id} );}## Terminating all threadsprint current_time_us() . " Killing all application threads..\n";$orig_master_handler->kill_threads(@threads) if ( $#threads >= 0 );print current_time_us() . " done.\n";$orig_master_handler->enable_log_bin_local();$orig_master_handler->disconnect();## After finishing the script, MHA executes FLUSH TABLES WITH READ LOCKprint "\n\n\n***************************************************************\n";print "Disabling the VIP - $vip on old master: $orig_master_host\n";print "***************************************************************\n\n\n\n";&stop_vip();$exit_code = 0;};if ($@) {warn "Got Error: $@\n";exit $exit_code;}exit $exit_code;}elsif ( $command eq "start" ) {my $exit_code = 10;eval {my $new_master_handler = new MHA::DBHelper();# args: hostname, port, user, password, raise_error_or_not$new_master_handler->connect( $new_master_ip, $new_master_port,$new_master_user, $new_master_password, 1 );## Set read_only=0 on the new master$new_master_handler->disable_log_bin_local();print current_time_us() . " Set read_only=0 on the new master.\n";$new_master_handler->disable_read_only();## Creating an app user on the new masterprint current_time_us() . " Creating app user on the new master..\n";#FIXME_xxx_create_app_user($new_master_handler);$new_master_handler->enable_log_bin_local();$new_master_handler->disconnect();## Update master ip on the catalog database, etcprint "\n\n\n***************************************************************\n";print "Enabling the VIP - $vip on new master: $new_master_host \n";print "***************************************************************\n\n\n\n";&start_vip();$exit_code = 0;};if ($@) {warn "Got Error: $@\n";exit $exit_code;}exit $exit_code;}elsif ( $command eq "status" ) {# do nothingexit 0;}else {&usage();exit 1;}
}# A simple system call that enable the VIP on the new master
sub start_vip() {`ssh $new_master_ssh_user\@$new_master_host \" $ssh_start_vip \"`;
}
# A simple system call that disable the VIP on the old_master
sub stop_vip() {`ssh $orig_master_ssh_user\@$orig_master_host \" $ssh_stop_vip \"`;
}sub usage {print
"Usage: master_ip_online_change --command=start|stop|status --orig_master_host=host --orig_master_ip=ip --orig_master_port=port --new_master_host=host --new_master_ip=ip --new_master_port=port\n";die;
}
以上两个文件主要修改以下配置内容即可
总结:修改/export/servers/app/mha/manager/app1/master_ip_failover与/export/servers/app/mha/manager/app1/master_ip_online_change中的vip,net_mask子网掩码, gateway网关, device网卡设备, key序号,记下面几个配置为实际值:
my $vip = "192.168.56.133";
my $net_mask = "255.255.255.0";
my $gateway = "192.168.56.1";
my $device = "ens33";
my $key = "0";
4.检测主机ssh与数据库复制
在manager节点执行。检查ssh是否成功
[root@python3 app1]# masterha_check_ssh --conf=/export/servers/app/mha/manager/app1/app.cnf
Wed Sep 18 23:01:41 2024 - [warning] Global configuration file /etc/masterha_default.cnf not found. Skipping.
Wed Sep 18 23:01:41 2024 - [info] Reading application default configuration from /export/servers/mha/manager/app1/app.cnf..
Wed Sep 18 23:01:41 2024 - [info] Reading server configuration from /export/servers/mha/manager/app1/app.cnf..
Wed Sep 18 23:01:41 2024 - [info] Starting SSH connection tests..
Wed Sep 18 23:01:43 2024 - [debug]
Wed Sep 18 23:01:41 2024 - [debug]  Connecting via SSH from root@192.168.56.131(192.168.56.131:22) to root@192.168.56.130(192.168.56.130:22)..
/usr/bin/python: No module named virtualenvwrapper
virtualenvwrapper.sh: There was a problem running the initialization hooks.If Python could not import the module virtualenvwrapper.hook_loader,
check that virtualenvwrapper has been installed for
VIRTUALENVWRAPPER_PYTHON=/usr/bin/python and that PATH is
set properly.
Wed Sep 18 23:01:42 2024 - [debug]   ok.
Wed Sep 18 23:01:43 2024 - [debug]
Wed Sep 18 23:01:41 2024 - [debug]  Connecting via SSH from root@192.168.56.130(192.168.56.130:22) to root@192.168.56.131(192.168.56.131:22)..
/usr/bin/python: No module named virtualenvwrapper
virtualenvwrapper.sh: There was a problem running the initialization hooks.If Python could not import the module virtualenvwrapper.hook_loader,
check that virtualenvwrapper has been installed for
VIRTUALENVWRAPPER_PYTHON=/usr/bin/python and that PATH is
set properly.
Wed Sep 18 23:01:42 2024 - [debug]   ok.
Wed Sep 18 23:01:43 2024 - [info] All SSH connection tests passed successfully.
在manager节点执行。检查复制是否成功
[root@python3 app1]# masterha_check_repl --conf=/export/servers/app/mha/manager/app1/app.cnf
Wed Sep 18 21:29:52 2024 - [warning] Global configuration file /etc/masterha_default.cnf not found. Skipping.
Wed Sep 18 21:29:52 2024 - [info] Reading application default configuration from /export/servers/app/mha/manager/app1/app.cnf..
Wed Sep 18 21:29:52 2024 - [info] Reading server configuration from /export/servers/app/mha/manager/app1/app.cnf..
Wed Sep 18 21:29:52 2024 - [info] MHA::MasterMonitor version 0.58.
Wed Sep 18 21:29:56 2024 - [info] GTID failover mode = 1
Wed Sep 18 21:29:56 2024 - [info] Dead Servers:
Wed Sep 18 21:29:56 2024 - [info] Alive Servers:
Wed Sep 18 21:29:56 2024 - [info]   192.168.56.130(192.168.56.130:3306)
Wed Sep 18 21:29:56 2024 - [info]   192.168.56.131(192.168.56.131:3306)
Wed Sep 18 21:29:56 2024 - [info] Alive Slaves:
Wed Sep 18 21:29:56 2024 - [info]   192.168.56.131(192.168.56.131:3306)  Version=5.7.42-log (oldest major version between slaves) log-bin:enabled
Wed Sep 18 21:29:56 2024 - [info]     GTID ON
Wed Sep 18 21:29:56 2024 - [info]     Replicating from 192.168.56.130(192.168.56.130:3306)
Wed Sep 18 21:29:56 2024 - [info]     Primary candidate for the new Master (candidate_master is set)
Wed Sep 18 21:29:56 2024 - [info] Current Alive Master: 192.168.56.130(192.168.56.130:3306)
Wed Sep 18 21:29:56 2024 - [info] Checking slave configurations..
Wed Sep 18 21:29:56 2024 - [info] Checking replication filtering settings..
Wed Sep 18 21:29:56 2024 - [info]  binlog_do_db= , binlog_ignore_db=
Wed Sep 18 21:29:56 2024 - [info]  Replication filtering check ok.
Wed Sep 18 21:29:56 2024 - [info] GTID (with auto-pos) is supported. Skipping all SSH and Node package checking.
Wed Sep 18 21:29:56 2024 - [info] Checking SSH publickey authentication settings on the current master..
/usr/bin/python: No module named virtualenvwrapper
virtualenvwrapper.sh: There was a problem running the initialization hooks.If Python could not import the module virtualenvwrapper.hook_loader,
check that virtualenvwrapper has been installed for
VIRTUALENVWRAPPER_PYTHON=/usr/bin/python and that PATH is
set properly.
Wed Sep 18 21:29:56 2024 - [info] HealthCheck: SSH to 192.168.56.130 is reachable.
Wed Sep 18 21:29:56 2024 - [info]
192.168.56.130(192.168.56.130:3306) (current master)+--192.168.56.131(192.168.56.131:3306)Wed Sep 18 21:29:56 2024 - [info] Checking replication health on 192.168.56.131..
Wed Sep 18 21:29:56 2024 - [info]  ok.
Wed Sep 18 21:29:56 2024 - [info] Checking master_ip_failover_script status:
Wed Sep 18 21:29:56 2024 - [info]   /export/servers/app/mha/manager/app1/master_ip_failover --command=status --ssh_user=root --orig_master_host=192.168.56.130 --orig_master_ip=192.168.56.130 --orig_master_port=3306
Wed Sep 18 21:29:56 2024 - [info]  OK.
Wed Sep 18 21:29:56 2024 - [warning] shutdown_script is not defined.
Wed Sep 18 21:29:56 2024 - [info] Got exit code 0 (Not master dead).MySQL Replication Health is OK.
5.主库启动VIP
主库服务器操作
在主库上手动启vip:192.168.56.133,注意将vip换成实际vip,网关换成实际网关:
[root@python1 ~]# /sbin/ifconfig ens33:0 192.168.56.133&&/sbin/arping -I ens33 -c 3 -s 192.168.56.133 192.168.56.255
ARPING 192.168.56.255 from 192.168.56.133 ens33
Sent 3 probes (3 broadcast(s))
Received 0 response(s)执行ifconfig查看vip是否启动
[root@python1 run]# ifconfig
ens33: flags=4163<UP,BROADCAST,RUNNING,MULTICAST>  mtu 1500inet 192.168.56.130  netmask 255.255.255.0  broadcast 192.168.56.255ether 00:50:56:31:e6:79  txqueuelen 1000  (Ethernet)RX packets 177145  bytes 13064094 (12.4 MiB)RX errors 0  dropped 0  overruns 0  frame 0TX packets 879570  bytes 1920161943 (1.7 GiB)TX errors 0  dropped 0 overruns 0  carrier 0  collisions 0ens33:0: flags=4163<UP,BROADCAST,RUNNING,MULTICAST>  mtu 1500inet 192.168.56.133  netmask 255.255.255.0  broadcast 192.168.56.255ether 00:50:56:31:e6:79  txqueuelen 1000  (Ethernet)

至此,vip开启成功,mha配置完成
五、手动切换测试
1.online切换测试
原主库为192.168.56.130,设置new_master_host=192.168.56.131进行在线切换
1.1.原主库信息查看
mysql> show variables like '%read_only%';
+-----------------------+-------+
| Variable_name         | Value |
+-----------------------+-------+
| innodb_read_only      | OFF   |
| read_only             | OFF   |
| super_read_only       | OFF   |
| transaction_read_only | OFF   |
| tx_read_only          | OFF   |
+-----------------------+-------+
5 rows in set (0.00 sec)mysql> show master status\G;
*************************** 1. row ***************************File: mysql-bin.000010Position: 194Binlog_Do_DB: Binlog_Ignore_DB:
Executed_Gtid_Set: eb9c1fa5-7421-11ef-a597-00505631e679:1-2005
1 row in set (0.00 sec)ERROR:
No query specified#vip此时绑定在130主库机器上
[root@python1 ~]# ip a
1: lo: <LOOPBACK,UP,LOWER_UP> mtu 65536 qdisc noqueue state UNKNOWN group default qlen 1000link/loopback 00:00:00:00:00:00 brd 00:00:00:00:00:00inet 127.0.0.1/8 scope host lovalid_lft forever preferred_lft foreverinet6 ::1/128 scope host valid_lft forever preferred_lft forever
2: ens33: <BROADCAST,MULTICAST,UP,LOWER_UP> mtu 1500 qdisc pfifo_fast state UP group default qlen 1000link/ether 00:50:56:31:e6:79 brd ff:ff:ff:ff:ff:ffinet 192.168.56.130/24 brd 192.168.56.255 scope global noprefixroute ens33valid_lft forever preferred_lft foreverinet 192.168.56.133/24 brd 192.168.56.255 scope global secondary ens33:0valid_lft forever preferred_lft foreverinet6 fe80::250:56ff:fe31:e679/64 scope link valid_lft forever preferred_lft forever
1.2.原从库信息查看
mysql> show variables like '%read_only%';
+-----------------------+-------+
| Variable_name         | Value |
+-----------------------+-------+
| innodb_read_only      | OFF   |
| read_only             | ON    |
| super_read_only       | ON    |
| transaction_read_only | OFF   |
| tx_read_only          | OFF   |
+-----------------------+-------+
5 rows in set (0.00 sec)mysql> show slave status\G;
*************************** 1. row ***************************Slave_IO_State: Waiting for master to send eventMaster_Host: 192.168.56.130Master_User: replMaster_Port: 3306Connect_Retry: 60Master_Log_File: mysql-bin.000010Read_Master_Log_Pos: 194Relay_Log_File: mysqld-relay-bin.000014Relay_Log_Pos: 367Relay_Master_Log_File: mysql-bin.000010Slave_IO_Running: YesSlave_SQL_Running: Yes........

1.3.在线切换前确保 mha节点中的 manager是关闭状态
[root@python3 ~]# ps -ef |grep mha
root       9233   9197  0 23:28 pts/0    00:00:00 grep --color=auto mha[root@python3 ~]#  masterha_check_status --conf=/export/servers/app/mha/manager/app1/app.cnf
app1 is stopped(2:NOT_RUNNING).
1.4.开始执行在线切换命令
[root@python3 ~]# masterha_master_switch --conf=/export/servers/app/mha/manager/app1/app.cnf \--master_state=alive --new_master_host=192.168.56.131 --new_master_port=3306 \--orig_master_is_new_slave --interactive=0
Thu Sep 19 23:21:58 2024 - [info] MHA::MasterRotate version 0.56.
Thu Sep 19 23:21:58 2024 - [info] Starting online master switch..
Thu Sep 19 23:21:58 2024 - [info]
Thu Sep 19 23:21:58 2024 - [info] * Phase 1: Configuration Check Phase..
Thu Sep 19 23:21:58 2024 - [info]
Thu Sep 19 23:21:58 2024 - [warning] Global configuration file /etc/masterha_default.cnf not found. Skipping.
Thu Sep 19 23:21:58 2024 - [info] Reading application default configuration from /export/servers/mha/manager/app1/app.cnf..
Thu Sep 19 23:21:58 2024 - [info] Reading server configuration from /export/servers/mha/manager/app1/app.cnf..
Thu Sep 19 23:21:59 2024 - [warning] SQL Thread is stopped(no error) on 192.168.56.130(192.168.56.130:3306)
Thu Sep 19 23:21:59 2024 - [info] Multi-master configuration is detected. Current primary(writable) master is 192.168.56.130(192.168.56.130:3306)
Thu Sep 19 23:21:59 2024 - [info] Master configurations are as below:
Master 192.168.56.130(192.168.56.130:3306), replicating from 192.168.56.131(192.168.56.131:3306)
Master 192.168.56.131(192.168.56.131:3306), replicating from 192.168.56.130(192.168.56.130:3306), read-onlyThu Sep 19 23:21:59 2024 - [info] GTID failover mode = 1
Thu Sep 19 23:21:59 2024 - [info] Current Alive Master: 192.168.56.130(192.168.56.130:3306)
Thu Sep 19 23:21:59 2024 - [info] Alive Slaves:
Thu Sep 19 23:21:59 2024 - [info]   192.168.56.131(192.168.56.131:3306)  Version=5.7.42-log (oldest major version between slaves) log-bin:enabled
Thu Sep 19 23:21:59 2024 - [info]     GTID ON
Thu Sep 19 23:21:59 2024 - [info]     Replicating from 192.168.56.130(192.168.56.130:3306)
Thu Sep 19 23:21:59 2024 - [info]     Primary candidate for the new Master (candidate_master is set)
Thu Sep 19 23:21:59 2024 - [info] Executing FLUSH NO_WRITE_TO_BINLOG TABLES. This may take long time..
Thu Sep 19 23:21:59 2024 - [info]  ok.
Thu Sep 19 23:21:59 2024 - [info] Checking MHA is not monitoring or doing failover..
Thu Sep 19 23:21:59 2024 - [info] Checking replication health on 192.168.56.131..
Thu Sep 19 23:21:59 2024 - [info]  ok.
Thu Sep 19 23:21:59 2024 - [info] 192.168.56.131 can be new master.
Thu Sep 19 23:21:59 2024 - [info]
From:
192.168.56.130(192.168.56.130:3306) (current master)+--192.168.56.131(192.168.56.131:3306)To:
192.168.56.131(192.168.56.131:3306) (new master)+--192.168.56.130(192.168.56.130:3306)
Thu Sep 19 23:21:59 2024 - [info] Checking whether 192.168.56.131(192.168.56.131:3306) is ok for the new master..
Thu Sep 19 23:21:59 2024 - [info]  ok.
Thu Sep 19 23:21:59 2024 - [info] ** Phase 1: Configuration Check Phase completed.
Thu Sep 19 23:21:59 2024 - [info]
Thu Sep 19 23:21:59 2024 - [info] * Phase 2: Rejecting updates Phase..
Thu Sep 19 23:21:59 2024 - [info]
Thu Sep 19 23:21:59 2024 - [info] Executing master ip online change script to disable write on the current master:
Thu Sep 19 23:21:59 2024 - [info]   /export/servers/app/mha/manager/app1/master_ip_online_change --command=stop --orig_master_host=192.168.56.130 --orig_master_ip=192.168.56.130 --orig_master_port=3306 --orig_master_user='mha' --orig_master_password='jQHB31K18IBKgPsQps1Q' --new_master_host=192.168.56.131 --new_master_ip=192.168.56.131 --new_master_port=3306 --new_master_user='mha' --new_master_password='jQHB31K18IBKgPsQps1Q' --orig_master_ssh_user=root --new_master_ssh_user=root   --orig_master_is_new_slave
Thu Sep 19 23:22:00 2024 032251 Set read_only on the new master.. ok.
Thu Sep 19 23:22:00 2024 037554 Drpping app user on the orig master..
Thu Sep 19 23:22:00 2024 038610 Waiting all running 1 threads are disconnected.. (max 1500 milliseconds)
{'Time' => '3004','db' => undef,'Id' => '97','User' => 'repl','State' => 'Master has sent all binlog to slave; waiting for more updates','Command' => 'Binlog Dump GTID','Info' => undef,'Host' => '192.168.56.131:42612'}
Thu Sep 19 23:22:00 2024 543946 Waiting all running 1 threads are disconnected.. (max 1000 milliseconds)
{'Time' => '3004','db' => undef,'Id' => '97','User' => 'repl','State' => 'Master has sent all binlog to slave; waiting for more updates','Command' => 'Binlog Dump GTID','Info' => undef,'Host' => '192.168.56.131:42612'}
Thu Sep 19 23:22:01 2024 048719 Waiting all running 1 threads are disconnected.. (max 500 milliseconds)
{'Time' => '3005','db' => undef,'Id' => '97','User' => 'repl','State' => 'Master has sent all binlog to slave; waiting for more updates','Command' => 'Binlog Dump GTID','Info' => undef,'Host' => '192.168.56.131:42612'}
Thu Sep 19 23:22:01 2024 553285 Set read_only=1 on the orig master.. ok.
Thu Sep 19 23:22:01 2024 557665 Waiting all running 1 queries are disconnected.. (max 500 milliseconds)
{'Time' => '3005','db' => undef,'Id' => '97','User' => 'repl','State' => 'Master has sent all binlog to slave; waiting for more updates','Command' => 'Binlog Dump GTID','Info' => undef,'Host' => '192.168.56.131:42612'}
Thu Sep 19 23:22:02 2024 058575 Killing all application threads..
Thu Sep 19 23:22:02 2024 060537 done.***************************************************************
Disabling the VIP - 192.168.56.133 on old master: 192.168.56.130
***************************************************************/usr/bin/python: No module named virtualenvwrapper
virtualenvwrapper.sh: There was a problem running the initialization hooks.If Python could not import the module virtualenvwrapper.hook_loader,
check that virtualenvwrapper has been installed for
VIRTUALENVWRAPPER_PYTHON=/usr/bin/python and that PATH is
set properly.
Thu Sep 19 23:22:02 2024 - [info]  ok.
Thu Sep 19 23:22:02 2024 - [info] Locking all tables on the orig master to reject updates from everybody (including root):
Thu Sep 19 23:22:02 2024 - [info] Executing FLUSH TABLES WITH READ LOCK..
Thu Sep 19 23:22:02 2024 - [info]  ok.
Thu Sep 19 23:22:02 2024 - [info] Orig master binlog:pos is mysql-bin.000010:194.
Thu Sep 19 23:22:02 2024 - [info]  Waiting to execute all relay logs on 192.168.56.131(192.168.56.131:3306)..
Thu Sep 19 23:22:02 2024 - [info]  master_pos_wait(mysql-bin.000010:194) completed on 192.168.56.131(192.168.56.131:3306). Executed 0 events.
Thu Sep 19 23:22:02 2024 - [info]   done.
Thu Sep 19 23:22:02 2024 - [info] Getting new master's binlog name and position..
Thu Sep 19 23:22:02 2024 - [info]  mysql-bin.000005:194
Thu Sep 19 23:22:02 2024 - [info]  All other slaves should start replication from here. Statement should be: CHANGE MASTER TO MASTER_HOST='192.168.56.131', MASTER_PORT=3306, MASTER_AUTO_POSITION=1, MASTER_USER='repl', MASTER_PASSWORD='xxx';
Thu Sep 19 23:22:02 2024 - [info] Executing master ip online change script to allow write on the new master:
Thu Sep 19 23:22:02 2024 - [info]   /export/servers/app/mha/manager/app1/master_ip_online_change --command=start --orig_master_host=192.168.56.130 --orig_master_ip=192.168.56.130 --orig_master_port=3306 --orig_master_user='mha' --orig_master_password='jQHB31K18IBKgPsQps1Q' --new_master_host=192.168.56.131 --new_master_ip=192.168.56.131 --new_master_port=3306 --new_master_user='mha' --new_master_password='jQHB31K18IBKgPsQps1Q' --orig_master_ssh_user=root --new_master_ssh_user=root   --orig_master_is_new_slave
Thu Sep 19 23:22:02 2024 621597 Set read_only=0 on the new master.
Thu Sep 19 23:22:02 2024 623264 Creating app user on the new master..
***************************************************************
Enabling the VIP - 192.168.56.133 on new master: 192.168.56.131
***************************************************************
Thu Sep 19 23:22:05 2024 - [info]  ok.
Thu Sep 19 23:22:05 2024 - [info]
Thu Sep 19 23:22:05 2024 - [info] * Switching slaves in parallel..
Thu Sep 19 23:22:05 2024 - [info]
Thu Sep 19 23:22:05 2024 - [info] Unlocking all tables on the orig master:
Thu Sep 19 23:22:05 2024 - [info] Executing UNLOCK TABLES..
Thu Sep 19 23:22:05 2024 - [info]  ok.
Thu Sep 19 23:22:05 2024 - [info] Starting orig master as a new slave..
Thu Sep 19 23:22:05 2024 - [info]  Resetting slave 192.168.56.130(192.168.56.130:3306) and starting replication from the new master 192.168.56.131(192.168.56.131:3306)..
Thu Sep 19 23:22:05 2024 - [info]  Executed CHANGE MASTER.
Thu Sep 19 23:22:05 2024 - [info]  Slave started.
Thu Sep 19 23:22:05 2024 - [info] All new slave servers switched successfully.
Thu Sep 19 23:22:05 2024 - [info]
Thu Sep 19 23:22:05 2024 - [info] * Phase 5: New master cleanup phase..
Thu Sep 19 23:22:05 2024 - [info]
Thu Sep 19 23:22:06 2024 - [info]  192.168.56.131: Resetting slave info succeeded.
Thu Sep 19 23:22:06 2024 - [info] Switching master to 192.168.56.131(192.168.56.131:3306) completed successfully.
当出现Switching master to 192.168.56.131(192.168.56.131:3306) completed successfully.字样代表在线切换成功,接着可以检查新主从库的相关信息
1.5.切换结果检查
检查192.168.56.131是否为新主库
mysql> show slave status\G; #当在192.168.56.131执行查看slave状态信息时,提示为空
Empty set (0.00 sec)ERROR:
No query specifiedmysql> show master status\G;
*************************** 1. row ***************************File: mysql-bin.000005Position: 194Binlog_Do_DB: Binlog_Ignore_DB:
Executed_Gtid_Set: eb9c1fa5-7421-11ef-a597-00505631e679:1-2005
1 row in set (0.00 sec)ERROR:
No query specifiedmysql> show variables like '%read_only%';
+-----------------------+-------+
| Variable_name         | Value |
+-----------------------+-------+
| innodb_read_only      | OFF   |
| read_only             | OFF   |
| super_read_only       | OFF   |
| transaction_read_only | OFF   |
| tx_read_only          | OFF   |
+-----------------------+-------+
5 rows in set (0.00 sec)
同时vip192.168.56.133也漂移到了131机器上

检查192.168.56.130是否为新从库
mysql> show variables like '%read_only%';
+-----------------------+-------+
| Variable_name         | Value |
+-----------------------+-------+
| innodb_read_only      | OFF   |
| read_only             | ON    |
| super_read_only       | ON    |
| transaction_read_only | OFF   |
| tx_read_only          | OFF   |
+-----------------------+-------+
5 rows in set (0.00 sec)mysql> show slave status\G;
*************************** 1. row ***************************Slave_IO_State: Waiting for master to send eventMaster_Host: 192.168.56.131Master_User: replMaster_Port: 3306Connect_Retry: 60Master_Log_File: mysql-bin.000005Read_Master_Log_Pos: 194Relay_Log_File: mysqld-relay-bin.000002Relay_Log_Pos: 367Relay_Master_Log_File: mysql-bin.000005Slave_IO_Running: YesSlave_SQL_Running: Yes......................

此时,在线切换演示完成,同理,也可以将新主库192.168.56.131切换为192.168.56.130,只需要替换--new_master_host=192.168.56.130这个即可,检查切换是否成功也用如上方法即可
2.failover切换测试
2.1.手动启动masterha_manager进程
[root@python3 app1]# masterha_manager --conf=/export/servers/app/mha/manager/app1/app.cnf
Thu Sep 19 11:26:41 2024 - [warning] Global configuration file /etc/masterha_default.cnf not found. Skipping.
Thu Sep 19 11:26:41 2024 - [info] Reading application default configuration from /export/servers/app/mha/manager/app1/app.cnf..
Thu Sep 19 11:26:41 2024 - [info] Reading server configuration from /export/servers/app/mha/manager/app1/app.cnf..
Thu Sep 19 11:27:25 2024 - [warning] Global configuration file /etc/masterha_default.cnf not found. Skipping.
Thu Sep 19 11:27:25 2024 - [info] Reading application default configuration from /export/servers/app/mha/manager/app1/app.cnf..
Thu Sep 19 11:27:25 2024 - [info] Reading server configuration from /export/servers/app/mha/manager/app1/app.cnf..
2.2.执行failover切换测试,通过手动kill主库192.168.56.130的mysql进程来模拟主库挂掉
[root@python1 ~]# kill -9 主库进程pid
2.3.此时从库192.168.56.131自动提升为新主库,主库变为192.168.56.131,原主库192.168.56.130起来后,需要手动配置为从库
#在192.168.56.130机器上操作
mysql> change master to master_host='192.168.56.131', master_port=3306, master_user='repl' , master_password='123456' ,master_auto_position=1;
Query OK, 0 rows affected, 2 warnings (0.05 sec)mysql> show slave status\G;
*************************** 1. row ***************************Slave_IO_State: Waiting for master to send eventMaster_Host: 192.168.56.131Master_User: replMaster_Port: 3306Connect_Retry: 60Master_Log_File: mysql-bin.000002Read_Master_Log_Pos: 194Relay_Log_File: mysqld-relay-bin.000002Relay_Log_Pos: 367Relay_Master_Log_File: mysql-bin.000002Slave_IO_Running: YesSlave_SQL_Running: Yes
注意: 发生一次切换后masterha_manager进程自动停止。此时去manager节点查看manager进程,发现不存在
[root@python3 app1]# ps -ef |grep manager
root       9821   3952  0 11:29 pts/0    00:00:00 grep --color=auto manager
六、配置MHA守护进程
创建实例app1的守护进程文件,即/export/servers/mha/manager/app1/run文件
[root@python3 ~]# cat >>/export/servers/app/mha/manager/app1/run <<EOF
> #!/bin/sh
> exec masterha_manager --conf=/export/servers/app/mha/manager/app1/app.cnf --wait_on_monitor_error=60 --wait_on_failover_error=60 >> /export/servers/app/mha/manager/app1/app.log 2>&1
> EOF
给run文件授权
[root@python3 ~]# chmod 755 /export/servers/app/mha/manager/app1/run
七、启动mha守护进程
配置完成后即可使用daemontool来启动/停止mha监控进程
启动mha监控:
[root@python3 ~]# svc -u /export/servers/app/mha/manager/app1/
svc: warning: unable to control /export/servers/app/mha/manager/app1/: file does not exist
启动的时候如果报下面的错误:
svc: warning: unable to control /export/servers/app/mha/manager/app1/: file does not exist按照下面解决:
[root@python3 app1]# nohup supervise /export/servers/app/mha/manager/app1/ > svsrun.log 2>&1 &
直接使用上面的supervise启动,然后会自动生成supervise目录,我们就可以使用svc命令了停止mha监控
[root@python3 ~]# svc -d /export/servers/mha/manager/app1/
[root@python3 app1]# ps -ef |grep mha
root      10525  10419  0 11:51 pts/0    00:00:00 supervise /export/servers/app/mha/manager/app1/
root      10526  10525  4 11:51 pts/0    00:00:00 perl /usr/local/bin/masterha_manager --conf=/export/servers/app/mha/manager/app1/app.cnf --wait_on_monitor_error=60 --wait_on_failover_error=60[root@python3 app1]# svc -d /export/servers/app/m
mha/          mysql-5.7.42/
[root@python3 app1]# svc -d /export/servers/mha/manager/app1/ #停止守护进程
[root@python3 app1]# ps -ef |grep mha
root      10525  10419  0 11:51 pts/0    00:00:00 supervise /export/servers/mha/manager/app1/
root      10629  10419  0 11:53 pts/0    00:00:00 grep --color=auto mha
八、启动守护进程后Failover切换测试
mha监控进程作为守护进程启动后,我们需要测试mysql故障后是否能够自动切换,这里我们还是手动杀掉192.168.56.131主库上的mysql进程,此时从库192.168.56.130自动提升为新主库,主库变为192.168.56.130,自动切换成功,待原主库192.168.56.131起来后,需要手动重新配置为从库
1.manager节点上启动守护进程
[root@python3 ~]# svc -u /export/servers/app/mha/manager/app1/
[root@python3 ~]# ps -ef |grep mha
root       9692   9691  1 23:44 pts/0    00:00:00 perl /usr/local/bin/masterha_manager --conf=/export/servers/app/mha/manager/app1/app.cnf --wait_on_monitor_error=60 --wait_on_failover_error=60[root@python3 app1]# masterha_check_status --conf=/export/servers/app/mha/manager/app1/app.cnf
app (pid:10712) is running(0:PING_OK), master:192.168.56.130
2.192.168.56.130主库手动kill数据库进程
[root@python1 ~]# ps -ef  |grep mysql
root       4028      1  0 22:09 pts/0    00:00:00 /bin/sh /export/servers/app/mysql-5.7.42/bin/mysqld_safe --defaults-file=/export/servers/data/my3306/my.cnf --user=mysql
mysql      5483   4028  0 22:10 pts/0    00:00:14 /export/servers/app/mysql-5.7.42/bin/mysqld --defaults-file=/export/servers/data/my3306/my.cnf --basedir=/export/servers/app/mysql-5.7.42 --datadir=/export/servers/data/my3306/data --plugin-dir=/export/servers/app/mysql-5.7.42/lib/plugin --user=mysql --log-error=/export/servers/data/my3306/log/mysqld-err.log --open-files-limit=655340 --pid-file=/export/servers/data/my3306/run/mysqld.pid --socket=/export/servers/data/my3306/run/mysqld.sock --port=3306
[root@python1 mha4mysql-node-0.56]# kill -9 4028  5483
3.验证
kill原主库192.168.56.130mysql进程后,vip漂移到了192.168.56.131机器上,如下所示


原主库192.168.56.130起来后,需要手动重新配置为从库
[root@python1 ~]# mysql -uroot -p -S /export/servers/data/my3306/run/mysqld.sock
Enter password:
Welcome to the MySQL monitor.  Commands end with ; or \g.
Your MySQL connection id is 2
Server version: 5.7.42-log Source distributionCopyright (c) 2000, 2023, Oracle and/or its affiliates.Oracle is a registered trademark of Oracle Corporation and/or its
affiliates. Other names may be trademarks of their respective
owners.Type 'help;' or '\h' for help. Type '\c' to clear the current input statement.mysql> change master to master_host='192.168.56.131', master_port=3306,master_user='repl',master_password='123456' ,master_auto_position=1;
Query OK, 0 rows affected, 2 warnings (0.05 sec)mysql> start slave;
Query OK, 0 rows affected (0.05 sec)mysql> show slave status\G;
*************************** 1. row ***************************Slave_IO_State: Master_Host: 192.168.56.131Master_User: replMaster_Port: 3306Connect_Retry: 60Master_Log_File: Read_Master_Log_Pos: 4Relay_Log_File: mysqld-relay-bin.000001Relay_Log_Pos: 4Relay_Master_Log_File: Slave_IO_Running: YesSlave_SQL_Running: Yes
也可以观察mha日志/export/servers/app/mha/manager/app1/app.log是否有错误信息。
因为这个app.log日志在上述第六部分配置MHA守护进程进行了配置,也可以查看日志

总结
以上就是要分享的内容,实现了一主一从一MHA的搭建过程,并实现了在线主从切换测试、主库宕机离线测试等功能,它还有具体的命令使用方法,等后续完善!!!
相关文章:
MySQL5.7.42高可用MHA搭建及故障切换演示
系列文章目录 rpmbuild构建mysql5.7RPM安装包 MySQL基于GTID同步模式搭建主从复制 文章目录 系列文章目录前言一、MHA架构介绍1.MHA的功能2.MHA组成3.MHA故障转移过程4.MHA架构优缺点 二、环境准备1.服务器免密2.基于GTID主从复制搭建3.下载mha组件 三、MHA组件安装1.安装依赖…...

快速搭建最简单的前端项目vue+View UI Plus
1 引言 Vue是一套用于构建Web前端界面的渐进式JavaScript框架。它以其易学易用、性能出色、灵活多变而深受开发者喜爱,并且与其他前端框架(如React和Angular)相比,在国内市场上受到了广泛的认可和使用。点击进入官方…...

倍增练习(1)
A - ST 表 && RMQ 问题 题目思路:st表的板子题用于静态区间求最值,通过倍增的思想,先通过预处理将各个区间的最大值通过转移式求出f[i][j] max(f[i][j - 1], f[i (1 << (j - 1))][j - 1]);然后再进行重叠查询查询,k log2(r - l 1);,max(f[l][k], f[r - (1 &l…...

MATLAB 在数学建模中的深入应用:从基础到高级实践
目录 前言 一、MATLAB基础知识 1.1 MATLAB工作环境简介 1.1.1 命令窗口(Command Window) 1.1.2 工作区(Workspace) 1.1.3 命令历史(Command History) 1.1.4 编辑器(Editor) 1…...

Unity 设计模式 之 【什么是设计模式】/ 【为什么要使用设计模式】/ 【架构和设计模式的区别】
Unity 设计模式 之 【什么是设计模式】/ 【为什么要使用设计模式】/ 【架构和设计模式的区别】 目录 Unity 设计模式 之 【什么是设计模式】/ 【为什么要使用设计模式】/ 【架构和设计模式的区别】 一、简单介绍 二、 Unity 设计模式 1、Unity 开发中使用设计模式的特点 2…...

[数据集][目标检测]智慧交通铁路异物入侵检测数据集VOC+YOLO格式802张7类别
数据集格式:Pascal VOC格式YOLO格式(不包含分割路径的txt文件,仅仅包含jpg图片以及对应的VOC格式xml文件和yolo格式txt文件) 图片数量(jpg文件个数):802 标注数量(xml文件个数):802 标注数量(txt文件个数):802 标注类别…...

飞驰云联FTP替代方案:安全高效文件传输的新选择
FTP协议广泛应用各行业的文件传输场景中,由于FTP应用获取门槛低、使用普遍,因此大部分企业都习惯使用FTP进行文件传输。然而面临激增的数据量和网络安全威胁的不断演变,FTP在传输安全性与传输性能上有所欠缺,无法满足企业现在的高…...

Hive内置集合函数-size,map_keys,map_values,sort_array,array_contains
1. Hive内置Collection Functions 以下函数为Hive是提供的内置集合函数: 返回类型函数(签名)函数说明intsize(Map<K.V>)Returns the number of elements in the map type.intsize(Array)Returns the number of elements in the array type.arraymap_keys(Map<K.V>…...

Exchange Online 计划 2 部署方案
目录 前言 一、前期准备 1. 了解 Exchange Online 计划 2 的功能 2. 系统要求 3. 网络要求 4. 账户和许可 二、安装和配置 Exchange Online 计划 2 1. 注册 Microsoft 365 订阅 2. 验证域 3. 用户和许可证分配 4. 迁移现有邮箱 迁移步骤 三、配置 Exchange Online …...
图数据库的力量:深入理解与应用 Neo4j
图数据库的力量:深入理解与应用 Neo4j 文章目录 图数据库的力量:深入理解与应用 Neo4j1、什么是 Neo4j?版本说明 2、Neo4j 的部署和安装Neo4j Web 工具介绍 3、体验 Neo4j加载数据查询数据数据结构 4、Cypher 入门创建数据查询数据关系深度查…...

Deutsch intensiv C1 Schreiben
Deutsch intensiv C1 Schreiben Part A1, Kasten Part A 1, Kasten (1)zeigt (A) (2)gibt Auskunft ber (A)/darber (3)liefert Daten/Informationen ber(A)/darber (4)stellt(A) dar...

大数据新视界 --大数据大厂之DevOps与大数据:加速数据驱动的业务发展
💖💖💖亲爱的朋友们,热烈欢迎你们来到 青云交的博客!能与你们在此邂逅,我满心欢喜,深感无比荣幸。在这个瞬息万变的时代,我们每个人都在苦苦追寻一处能让心灵安然栖息的港湾。而 我的…...

实战OpenCV之图像阈值处理
基础入门 图像阈值处理是一种二值化技术,它基于预设的阈值,可以将图像中的像素分为两大类:一大类是背景,另一大类是前景或目标对象。这个过程涉及将图像中的每个像素值与阈值进行比较,并根据比较结果决定保留原始值还是…...

登录后继续执行方法
场景 点击按钮,检测到未登录,直接跳转到登录页,登录成功后,返回页面继续执行刚才的点击事件 思路 在跳转时用一个队列存储该事件,登录成功后执行队列里的事件 队列 class Queue {constructor() {this.task []}cl…...

JVM-类加载器的双亲委派模型详解
JVM中存在三个默认的类加载器: BootstrapClassLoaderExtClassLoaderAppClassLoader AppClassLoader的父加载器是ExtClassLoader,ExtClassLoader的父加载器是 BootstrapClassLoader。 它们之间的关系是:AppClassLoader->ExtClassLoader-&…...

【计算机基础题目】Linux系统中文件权限 字母权限和数字权限的相互转换
创作日志: 很久之前对这个略有了解,但是现在完全忘记了,看到这类题目一脸懵逼,现在系统复习下。 1、权限的数字表示(3位) 在Linux系统中,文件权限由一个三位的八进制数表示,每一位代…...

VRRP协议原理
目录 VRRP概述 VRRP产生背景 VRRP介绍 VRRP相关概念 VRRP报文 VRRP的三种状态 VRRP工作原理 优先级和抢占 VRRP接口跟踪 VRRP概述 VRRP产生背景 通常同一网段内的所有主机都会配置相同的网关,以访问外部网络 当唯一的网关设备发生故障时,所有主…...

Dockerfile自定义制作镜像,其中10个指令的作用分析
docker容器中 做镜像是重要的技能。 docker commit只能制作比较简单的镜像, 要制作比较完善的镜像, 自定义程度比较高的, 就需要用到dockerfile dockerfile可以回溯历史 动态生成镜像。 FROM是基础镜像 CMD是在容器创建的时候默认的启动命令 …...

Linux6-vi/vim
1.vi与vim vi是Linux操作系统下的标准编辑器,类似Windows下的记事本 vim是vi的升级版,包括vi的所有功能,而且支持shell 2.vi/vim下的三种模式 vi/vim有三种模式:命令模式,插入模式和底行模式 命令模式:…...

2012年408考研真题-数据结构
8.【2012统考真题】求整数n(n≥0)的阶乘的算法如下,其时间复杂度是()。 int fact(int n){ if(n<1) return 1; return n*fact (n-1); } A. O(log2n) B. O(n) C. O(nlog2n) D. O(n^2) 解析: 观察代码,我们不…...

癫痫手术精准定位:基于脑电信号昼夜节律与多生物标志物的机器学习分析框架
1. 项目概述:当机器学习遇见脑电信号,如何让癫痫手术更精准?作为一名长期耕耘在生物医学信号处理与机器学习交叉领域的工程师,我常常思考如何将算法模型从实验室的“玩具”变成临床医生手中可靠的“手术刀”。癫痫,这个…...

Android 11开发避坑:为什么你的App获取的Wifi MAC地址总是变?手把手教你配置固定MAC
Android 11开发实战:彻底解决Wifi MAC地址随机化问题最近在开发一个设备管理系统时,遇到了一个棘手的问题:我们的App在Android 11设备上获取的Wifi MAC地址每次都不一样,导致基于MAC地址的设备识别功能完全失效。经过一周的深入研…...

鸿蒙系统微博应用锁常见问题解答
为微博设置应用锁后,不少用户会有各种疑问:忘记密码怎么办?会不会影响消息推送?能不能只锁定某些功能?应用锁耗电吗?本文将针对这些高频问题逐一解答,帮助您更好地使用鸿蒙系统(Harm…...

对比 Token Plan 与按量计费在 Taotoken 平台上的成本体感差异
🚀 告别海外账号与网络限制!稳定直连全球优质大模型,限时半价接入中。 👉 点击领取海量免费额度 对比 Token Plan 与按量计费在 Taotoken 平台上的成本体感差异 对于个人开发者或项目管理者而言,在接入大模型服务时&a…...

Lindy自动化效率翻倍的秘密:从零搭建高可靠多步骤任务流的7步黄金流程
更多请点击: https://intelliparadigm.com 第一章:Lindy自动化效率翻倍的秘密:从零搭建高可靠多步骤任务流的7步黄金流程 Lindy自动化平台以“越久越可靠”为设计哲学,将经典软件工程原则与现代可观测性实践深度融合。其核心优势…...

保姆级教程:在Windows 10上用QEMU+Kylin搭建可内外网访问的完整开发环境
在Windows 10上构建QEMUKylin全功能开发环境的终极指南当开发者需要在本地快速搭建一个隔离的国产操作系统开发环境时,QEMU虚拟化方案配合银河麒麟系统能提供高度灵活的沙箱体验。本文将手把手带你完成从零配置到内外网联通的完整工作流,涵盖虚拟化环境部…...

危急时刻的六条基本安全提示
人机协作,AI模型:Deepseek 仅供参考 危急时刻的六条基本安全提示 以下内容仅为通用性安全建议,供在紧急情况下保持冷静、保护自身安全时参考。所有建议均基于常理和公共安全常识,不包含任何具体操作细节或可能被不当使用的信息…...

超低功耗电池电压监控电路设计:从LM324到LPV324的硬件方案优化
1. 项目概述与核心需求解析在捣鼓各种电池供电的电子设备时,无论是自己做的无线传感器节点、便携式小工具,还是给孩子改装的玩具,有一个问题总是绕不开:你怎么知道电池快没电了?总不能每次都等到设备彻底罢工ÿ…...

通用物联网开发板设计:基于ESP8266的硬件集成与开发实践
1. 项目概述:为什么我们需要一块“通用”的物联网开发板?在捣鼓了几年物联网项目之后,我发现自己桌面上堆满了各种开发板:ESP8266、ESP32、Arduino Uno、STM32 Nucleo……每个项目都要重新连线、配置电源、焊接传感器接口…...

【RT-DETR实战】070、模型分析工具:PyTorch Profiler性能分析
上周在部署RT-DETR到边缘设备时遇到一个诡异现象:模型推理时延波动极大,有时30ms,偶尔突然跳到200ms。 盯着代码看了半天没发现逻辑问题,数据流也正常。这种时候,靠猜是没用的,必须上性能分析工具——PyTorch Profiler。 今天我们就来聊聊怎么用它揪出那些藏在细节里的…...