基于WebSocket实现简易即时通讯功能
代码实现
pom.xml
<dependency><groupId>org.springframework.boot</groupId><artifactId>spring-boot-starter-web</artifactId>
</dependency>
<dependency><groupId>org.springframework.boot</groupId><artifactId>spring-boot-starter-websocket</artifactId>
</dependency><dependency><groupId>org.springframework.boot</groupId><artifactId>spring-boot-starter-test</artifactId><scope>test</scope>
</dependency><dependency><groupId>org.apache.commons</groupId><artifactId>commons-lang3</artifactId><version>3.15.0</version>
</dependency>
配置信息
部分内容非必须,按自身需求处理即可
- WebSocketConfig
package com.example.im.config;import com.example.im.infra.handle.ImRejectExecutionHandler;
import org.springframework.context.annotation.Bean;
import org.springframework.context.annotation.Configuration;
import org.springframework.core.task.TaskExecutor;
import org.springframework.scheduling.concurrent.ThreadPoolTaskExecutor;
import org.springframework.web.socket.config.annotation.EnableWebSocket;
import org.springframework.web.socket.server.standard.ServerEndpointExporter;import javax.annotation.Resource;/*** @author PC*/
@Configuration
@EnableWebSocket
public class WebSocketConfig {@Resourceprivate WebSocketProperties webSocketProperties;@Beanpublic ServerEndpointExporter serverEndpoint() {return new ServerEndpointExporter();}/**** 配置线程池* @return 线程池*/@Beanpublic TaskExecutor taskExecutor() {WebSocketProperties.ExecutorProperties executorProperties = webSocketProperties.getExecutorProperties();ThreadPoolTaskExecutor executor = new ThreadPoolTaskExecutor();// 设置核心线程数executor.setCorePoolSize(executorProperties.getCorePoolSize());// 设置最大线程数executor.setMaxPoolSize(executorProperties.getMaxPoolSize());// 设置队列容量executor.setQueueCapacity(executorProperties.getQueueCapacity());// 设置线程活跃时间(秒)executor.setKeepAliveSeconds(executorProperties.getKeepAliveSeconds());// 设置默认线程名称executor.setThreadNamePrefix("im-");// 设置拒绝策略executor.setRejectedExecutionHandler(new ImRejectExecutionHandler());// 等待所有任务结束后再关闭线程池executor.setWaitForTasksToCompleteOnShutdown(true);return executor;}
}
- WebSocketProperties
package com.example.im.config;import com.example.im.infra.constant.ImConstants;
import org.springframework.boot.context.properties.ConfigurationProperties;
import org.springframework.context.annotation.Configuration;/*** @author PC*/
@Configuration
@ConfigurationProperties(prefix = "cus.ws")
public class WebSocketProperties {/*** 接收人是否排除自身,默认排除*/private Boolean receiverExcludesHimselfFlag = true;/*** 消息是否排除接收人信息,默认不排除*/private Boolean excludeReceiverInfoFlag = false;/*** 线程池信息*/private ExecutorProperties executorProperties = new ExecutorProperties();/*** 发送消息给指定人的分隔符,默认为@*/private String receiverSeparator = ImConstants.Symbol.AT;public Boolean getReceiverExcludesHimselfFlag() {return receiverExcludesHimselfFlag;}public void setReceiverExcludesHimselfFlag(Boolean receiverExcludesHimselfFlag) {this.receiverExcludesHimselfFlag = receiverExcludesHimselfFlag;}public Boolean getExcludeReceiverInfoFlag() {return excludeReceiverInfoFlag;}public void setExcludeReceiverInfoFlag(Boolean excludeReceiverInfoFlag) {this.excludeReceiverInfoFlag = excludeReceiverInfoFlag;}public String getReceiverSeparator() {return receiverSeparator;}public void setReceiverSeparator(String receiverSeparator) {this.receiverSeparator = receiverSeparator;}public ExecutorProperties getExecutorProperties() {return executorProperties;}public void setExecutorProperties(ExecutorProperties executorProperties) {this.executorProperties = executorProperties;}/*** 线程池信息*/public static class ExecutorProperties {/*** 核心线程数*/private int corePoolSize = 10;/*** 最大线程数*/private int maxPoolSize = 20;/*** 队列容量*/private int queueCapacity = 50;/*** 线程活跃时间(秒)*/private int keepAliveSeconds = 60;public int getCorePoolSize() {return corePoolSize;}public void setCorePoolSize(int corePoolSize) {this.corePoolSize = corePoolSize;}public int getMaxPoolSize() {return maxPoolSize;}public void setMaxPoolSize(int maxPoolSize) {this.maxPoolSize = maxPoolSize;}public int getQueueCapacity() {return queueCapacity;}public void setQueueCapacity(int queueCapacity) {this.queueCapacity = queueCapacity;}public int getKeepAliveSeconds() {return keepAliveSeconds;}public void setKeepAliveSeconds(int keepAliveSeconds) {this.keepAliveSeconds = keepAliveSeconds;}}
}
application.yml
server:port: 18080
cus:ws:exclude-receiver-info-flag: truereceiver-excludes-himself-flag: true
ws端口
- WebSocketEndpoint
注意:若按常规注入方式(非static修饰),在项目启动时setWebSocketMessageService是有值的,但是发送消息时WebSocketMessageService会变为null,需要用static修饰。
其原因为Spring的bean管理是单例的,但是WebSocket是多对象的,当新用户进入系统时,会创建一个新的WebSocketEndpoint对象,但是不会再注入WebSocketMessageService,这样就会导致其为null。若想解决该问题,可以使用static修饰WebSocketMessageService,static修饰的对象属于类,而非实例,其在类加载时即可进行初始化。
package com.example.im.endpoint;import com.example.im.app.service.WebSocketMessageService;
import org.slf4j.Logger;
import org.slf4j.LoggerFactory;
import org.springframework.beans.factory.annotation.Autowired;
import org.springframework.stereotype.Component;import javax.websocket.OnClose;
import javax.websocket.OnMessage;
import javax.websocket.OnOpen;
import javax.websocket.Session;
import javax.websocket.server.ServerEndpoint;
import java.util.ArrayList;
import java.util.Optional;
import java.util.concurrent.ConcurrentHashMap;/*** @author PC*/
@Component
@ServerEndpoint("/ws")
public class WebSocketEndpoint {private final static Logger logger = LoggerFactory.getLogger(WebSocketEndpoint.class);public static final ConcurrentHashMap<String, WebSocketEndpoint> WEB_SOCKET_ENDPOINT_MAP = new ConcurrentHashMap<>();private Session session;private static WebSocketMessageService webSocketMessageService;@Autowiredpublic void setWebSocketMessageService(WebSocketMessageService webSocketMessageService) {WebSocketEndpoint.webSocketMessageService = webSocketMessageService;}/*** 打开ws连接** @param session 会话*/@OnOpenpublic void onOpen(Session session) {//连接成功logger.info("The connection is successful:" + getUserName(session));this.session = session;WEB_SOCKET_ENDPOINT_MAP.put(getUserName(session), this);}/*** 断开ws连接** @param session 会话*/@OnClosepublic void onClose(Session session) {WEB_SOCKET_ENDPOINT_MAP.remove(getUserName(session));//断开连接logger.info("Disconnect:" + getUserName(session));}/*** 接收到的消息** @param message 消息内容*/@OnMessagepublic void onMessage(String message, Session session) {//接收消息String sendUserName = getUserName(session);logger.info(sendUserName + " send message: " + message);webSocketMessageService.sendMessage(sendUserName, message);}private String getUserName(Session session) {return Optional.ofNullable(session.getRequestParameterMap().get("userName")).orElse(new ArrayList<>()).stream().findFirst().orElse("anonymous_users");}public Session getSession() {return session;}public void setSession(Session session) {this.session = session;}
}
实现类
WebSocketMessageServiceImpl
package com.example.im.app.service.impl;import com.example.im.app.service.WebSocketMessageService;
import com.example.im.config.WebSocketProperties;
import com.example.im.endpoint.WebSocketEndpoint;
import org.apache.commons.lang3.BooleanUtils;
import org.apache.commons.lang3.StringUtils;
import org.slf4j.Logger;
import org.slf4j.LoggerFactory;
import org.springframework.beans.factory.annotation.Autowired;
import org.springframework.core.task.TaskExecutor;
import org.springframework.stereotype.Service;import java.io.IOException;
import java.util.ArrayList;
import java.util.List;
import java.util.Map;
import java.util.stream.Collectors;
import java.util.stream.Stream;/*** @author PC*/
@Service
public class WebSocketMessageServiceImpl implements WebSocketMessageService {private final static Logger logger = LoggerFactory.getLogger(WebSocketMessageServiceImpl.class);private WebSocketProperties webSocketProperties;@Autowiredpublic void setWebSocketProperties(WebSocketProperties webSocketProperties) {this.webSocketProperties = webSocketProperties;}private TaskExecutor taskExecutor;@Autowiredpublic void setTaskExecutor(TaskExecutor taskExecutor) {this.taskExecutor = taskExecutor;}@Overridepublic void sendMessage(String sendUserName, String message) {//包含@发给指定人,否则发给全部人if (StringUtils.contains(message, webSocketProperties.getReceiverSeparator())) {this.sendToUser(sendUserName, message);} else {this.sendToAll(sendUserName, message);}}private void sendToUser(String sendUserName, String message) {getReceiverName(sendUserName, message).forEach(receiverName -> taskExecutor.execute(() -> {try {if (WebSocketEndpoint.WEB_SOCKET_ENDPOINT_MAP.containsKey(receiverName)) {WebSocketEndpoint.WEB_SOCKET_ENDPOINT_MAP.get(receiverName).getSession().getBasicRemote().sendText(generatorMessage(message));}} catch (IOException ioException) {logger.error("send error:" + ioException);}}));}private void sendToAll(String sendUserName, String message) {for (Map.Entry<String, WebSocketEndpoint> webSocketEndpointEntry : WebSocketEndpoint.WEB_SOCKET_ENDPOINT_MAP.entrySet()) {taskExecutor.execute(() -> {if (webSocketProperties.getReceiverExcludesHimselfFlag() && StringUtils.equals(sendUserName, webSocketEndpointEntry.getKey())) {return;}try {webSocketEndpointEntry.getValue().getSession().getBasicRemote().sendText(generatorMessage(message));} catch (IOException ioException) {logger.error("send error:" + ioException);}});}}private List<String> getReceiverName(String sendUserName, String message) {if (!StringUtils.contains(message, webSocketProperties.getReceiverSeparator())) {return new ArrayList<>();}String[] names = StringUtils.split(message, webSocketProperties.getReceiverSeparator());return Stream.of(names).skip(1).filter(receiver ->!(webSocketProperties.getReceiverExcludesHimselfFlag() && StringUtils.equals(sendUserName, receiver))).collect(Collectors.toList());}/*** 根据配置处理发送的信息** @param message 原消息* @return 被处理后的消息*/private String generatorMessage(String message) {return BooleanUtils.isTrue(webSocketProperties.getExcludeReceiverInfoFlag()) ?StringUtils.substringBefore(message, webSocketProperties.getReceiverSeparator()) : message;}
}
测试
Postman访问WebSocket
点击new,新建WebSocket连接

创建ws连接
连接格式:ws://ip:port/endpoint
例如,本次实例demo的ws连接如下,userName为自定义参数,测试使用,非必须,根据自身需求调整即可
ws://127.0.0.1:18080/ws?userName=test1

点击Connect进行连接

为了方便测试,再创建三个ws连接,也进行Connect
ws://127.0.0.1:18080/ws?userName=test2
ws://127.0.0.1:18080/ws?userName=test3
ws://127.0.0.1:18080/ws?userName=test4
测试
连接后,在test1所在页面发送消息
- 首先测试@用户的情况

test2、test3可接收消息,test4无消息


- 而后测试发送给所有人的情况

test2、test3、test4均接收到消息


参考资料
[1].即时通讯demo
相关文章:
基于WebSocket实现简易即时通讯功能
代码实现 pom.xml <dependency><groupId>org.springframework.boot</groupId><artifactId>spring-boot-starter-web</artifactId> </dependency> <dependency><groupId>org.springframework.boot</groupId><artifa…...

2012年国赛高教杯数学建模D题机器人避障问题解题全过程文档及程序
2012年国赛高教杯数学建模 D题 机器人避障问题 图1是一个800800的平面场景图,在原点O(0, 0)点处有一个机器人,它只能在该平面场景范围内活动。图中有12个不同形状的区域是机器人不能与之发生碰撞的障碍物,障碍物的数学描述如下表:…...

Linux驱动开发——设备树
文章目录 1 什么是设备树?2 DTS、DTB和DTC3 DTS语法3.1 dtsi头文件3.2 设备节点3.3 标准属性3.4 根节点compatible属性3.5 向节点追加或修改内容 4 创建小型模板设备树5 设备树在系统中的体现6 绑定信息文档7 设备树常用OF操作函数7.1 查找节点的OF函数7.2 查找父/子…...

spring boot 2.7整合Elasticsearch Java client + ingest attachment实现文档解析
一、软件环境 软件版本号备注Spring boot2.7.23.x版本建议使用ElasticSearch8.xElasticSearch7.17.4ElasticSearch 7.x 可使用JDK 8 ElasticSearch 8.x 要求使用JDK 11 二、安装ElasticSearch 下载地址:https://artifacts.elastic.co/downloads/elasticsearch/el…...

一、PyCharm 基本快捷键总结
PyCharm 快捷键 前言一、编辑(Editing)二、查找/替换(Replace)三、运行(Running)四、重构(Refactoring)五、基本(General) 前言 下面我们将学习一些 Pycharm 中的快捷键来帮我们更好的使用工具。 一、编辑(Editing) 快捷键快捷键…...
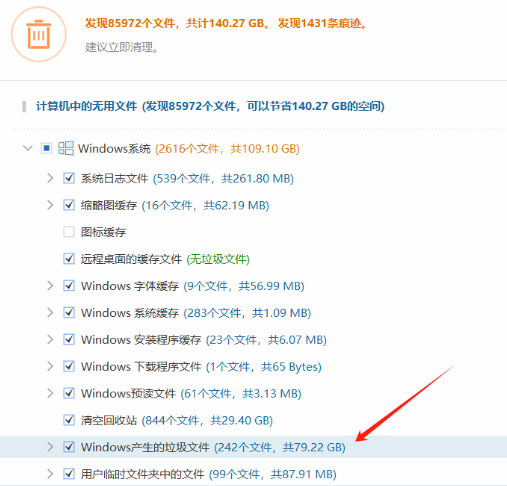
Windows系统C盘爆满了,如何清理?
Windows系统C盘爆满了,如何清理? 大家好,我是秋意零。 相信使用过Windows系统的朋友,都见过C盘那道靓丽的 “红色风景线” ! 我自己的Win10系统,已经使用了4-5年时间了。最近频频出现"红色风景线&q…...

【C++】踏上C++学习之旅(一):初识C++和命名空间
文章目录 前言1. 初识C2. C的发展阶段2. 命名空间2.1 为什么要有命名空间?2.2 命名空间的语法2.3 命名空间的原理2.4 使用命名空间的三种方式2.4.1 加命名空间名称及作用域限定符( :: )2.4.2 使用using关键字将命名空间中某个成员 引入2.4.3 使用using namespace 命…...

tensorflow入门案例手写数字识别人工智能界的helloworld项目落地1
参考 https://tensorflow.google.cn/?hlzh-cn https://tensorflow.google.cn/tutorials/keras/classification?hlzh-cn 项目资源 https://download.csdn.net/download/AnalogElectronic/89872174 文章目录 一、案例学习1、导入测试和训练数据集,定义模型ÿ…...

深度学习——线性神经网络(三、线性回归的简洁实现)
目录 3.1 生成数据集3.2 读取数据集3.3 定义模型3.4 初始化模型参数3.5 定义损失函数3.6 定义优化算法3.7 训练 在上一节中,我们通过张量来自定义式地进行数据存储和线性代数运算,并通过自动微分来计算梯度。实际上,由于数据迭代器、损失函数…...

本地部署 Milvus
本地部署 Milvus 1. Install Milvus in Docker2. Install Attu, an open-source GUI tool 1. Install Milvus in Docker curl -sfL https://raw.githubusercontent.com/milvus-io/milvus/master/scripts/standalone_embed.sh -o standalone_embed.shbash standalone_embed.sh …...

Git基础-配置http链接的免密登录
问题描述 当我们在使用 git pull 或者 git push 进行代码拉取或代码提交时, 若我们的远程代码仓库是 http协议的链接时,就是就会提示我们进行账号密码的登录。 每次都要登录,这未免有些麻烦。 本文介绍一下免密登录的配置。解决方案 1 执行…...
)
华为OD机试真题-编码能力提升-2024年OD统一考试(E卷)
最新华为OD机试考点合集:华为OD机试2024年真题题库(E卷+D卷+C卷)_华为od机试题库-CSDN博客 每一题都含有详细的解题思路和代码注释,精编c++、JAVA、Python三种语言解法。帮助每一位考生轻松、高效刷题。订阅后永久可看,持续跟新。 题目描述 为了提升软件编码能力,小…...
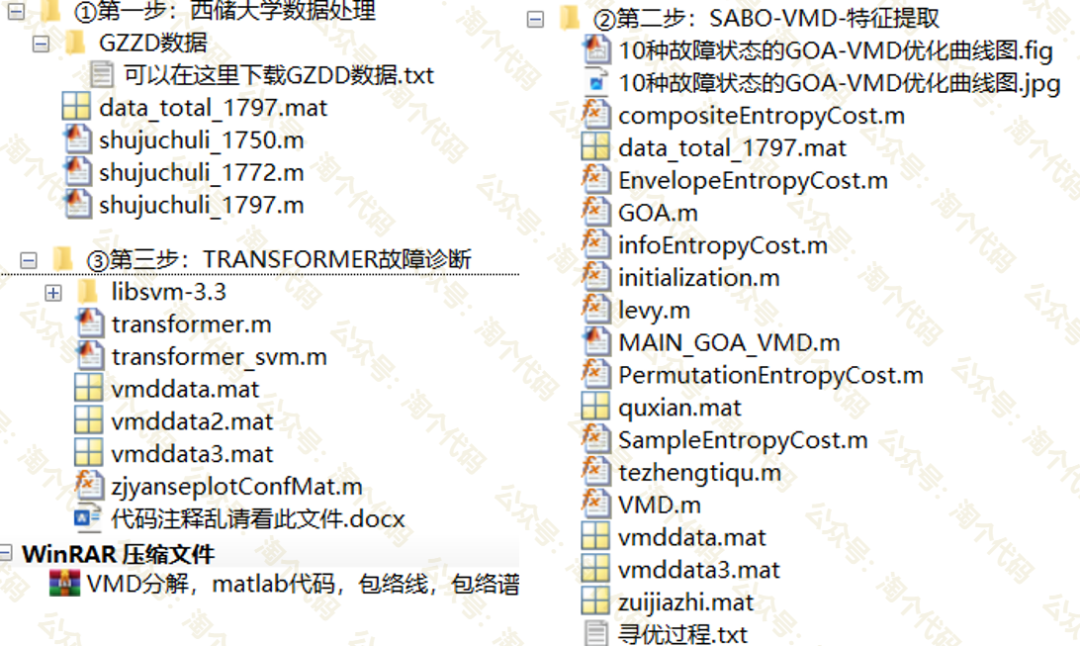
高被引算法GOA优化VMD,结合Transformer-SVM的轴承诊断,保姆级教程!
本期采用2023年瞪羚优化算法优化VMD,并结合Transformer-SVM实现轴承诊断,算是一个小创新方法了。需要水论文的童鞋尽快! 瞪羚优化算法之前推荐过,该成果于2023年发表在计算机领域三区SCI期刊“Neural Computing and Applications”…...

半小时速通RHCSA
1-7章: #01创建以上目录和文件结构,并将/yasuo目录拷贝4份到/目录下 #02查看系统合法shell #03查看系统发行版版本 #04查看系统内核版本 #05临时修改主机名 #06查看系统指令的查找路径 #07查看passwd指令的执行路径 #08为/yasuo/ssh_config文件在/mulu目录下创建软链…...

人工智能和机器学习之线性代数(一)
人工智能和机器学习之线性代数(一) 人工智能和机器学习之线性代数一将介绍向量和矩阵的基础知识以及开源的机器学习框架PyTorch。 文章目录 人工智能和机器学习之线性代数(一)基本定义标量(Scalar)向量&a…...

STM32外设应用详解
STM32外设应用详解 STM32微控制器是意法半导体(STMicroelectronics)推出的一系列基于ARM Cortex-M内核的高性能、低功耗32位微控制器。它们拥有丰富的外设接口和功能模块,可以满足各种嵌入式应用需求。本文将详细介绍STM32的外设及其应用&am…...
优化配置)
docker详解介绍+基础操作 (三)优化配置
1.docker 存储引擎 Overlay: 一种Union FS文件系统,Linux 内核3.18后支持 Overlay2:Overlay的升级版,docker的默认存储引擎,需要磁盘分区支持d-type功能,因此需要系统磁盘的额外支持。 关于 d-type 传送…...

细说Qt的状态机框架及其用法
文章目录 使用场景基本用法状态定义添加转换历史状态QStateMachine是Qt框架中用于构建状态机的一个类,它属于Qt的状态机框架(State Machine Framework)。这个框架提供了一种模型,用于设计响应不同事件(如用户输入、文件I/O或网络活动)的应用程序的行为。通过使用状态机,开发…...

Oracle-表空间与数据文件操作
目录 1、表空间创建 2、表空间修改 3、数据文件可用性切换操作 4、数据文件和表空间删除 1、表空间创建 (1)为 ORCL 数据库创建一个名为 BOOKTBS1 的永久表空间,数据文件为d:\bt01.dbf ,大小为100M,区采用自动扩展…...

C# WinForm实现画笔签名及解决MemoryBmp格式问题
目录 需求 实现效果 开发运行环境 设计实现 界面布局 初始化 画笔绘图 清空画布 导出位图数据 小结 需求 我的文章 《C# 结合JavaScript实现手写板签名并上传到服务器》主要介绍了 web 版的需求实现,本文应项目需求介绍如何通过 C# WinForm 通过画布画笔…...

技术团队的“信息透明”策略:报喜也报忧,反而更受信任
在软件测试领域,我们每天都在与“不确定性”打交道。一个隐藏的边界值、一次偶发的并发冲突、一个在特定机型上才能复现的诡异Bug,都足以让看似稳固的系统瞬间变得脆弱。然而,比起代码中的不确定性,更让测试团队感到无力的&#x…...

ARMv8系统寄存器详解与L2MERRSR_EL1应用
1. ARM系统寄存器概述在ARMv8架构中,系统寄存器是处理器内部用于控制和监控CPU运行状态的关键组件。这些寄存器不同于通用寄存器,它们专门用于系统级操作,如内存管理、异常处理、性能监控等。系统寄存器通过特定的指令进行访问,在…...

在DOSBox中运行Appler模拟器:重温Apple II的复古计算体验
1. 项目概述:在DOS的土壤里复活Apple II的灵魂如果你和我一样,对计算机历史的交汇点着迷,那么“在8086的机器上模拟一颗6502的心脏”这个想法本身就充满了极客浪漫主义色彩。Appler正是这样一个跨越时代的产物——一个专为MS-DOS编写的Apple …...

如何利用QGIS 3.22为机器学习任务高效构建遥感影像切片数据集
1. 为什么需要QGIS处理遥感影像数据 做机器学习项目时,最头疼的就是数据准备环节。特别是处理遥感影像这种"庞然大物",动辄几个GB的高分辨率图像,直接用Python脚本处理不仅效率低,还容易内存溢出。去年我做城市绿地识别…...

为什么顶尖考古团队已弃用传统文献管理?NotebookLM实现遗址报告生成效率提升300%的底层逻辑
更多请点击: https://intelliparadigm.com 第一章:NotebookLM考古学研究辅助的范式革命 NotebookLM 作为 Google 推出的基于文档理解的 AI 助手,正悄然重塑考古学研究的信息处理范式。传统考古工作依赖大量手写笔记、田野报告、碳十四测年数…...

普通人 0 基础能转网安吗?转行路径全面拆解,告诉你到底值不值得
前言 最近在后台有看到很多朋友问我关于网络安全转行的问题,今天做了一些总结,其中最多的是,觉得目前的工作活多钱少、不稳定、一眼望到头,还有一些就是目前工作稳定但是缺乏上升空间的。总的来说,大家主要的问题是&a…...

5G基站功率自适应算法突破
SummaryArticleObjectiveMethodComments统计机器翻译领域自适应综述解决统计机器翻译中训练数据和测试数据的领域分布不一致问题,提高翻译模型的性能和准确性基于数据选择的方法:选择和目标领域文本相似的源领域数据进行模型的训练。基于混合模型的方法&…...
)
【信息科学与工程学】计算机科学与自动化 第十篇 芯片设计04(5)
载流子统计与输运函数方程式详表 1. 载流子统计基础 (zailiu-1 ~ zailiu-100) 序号 名称 数学表达式/核心描述 参数说明 物理意义 应用场景 条件描述 zailiu-1 麦克斯韦-玻尔兹曼分布 f(E)=Ae−E/(kBT)或 f(v)=(2πkBTm)3/2e−mv2/(2kBT) E: 能量, v: 速度,…...
)
Jetson AGX Orin到手后,第一件事不是装CUDA,而是先搞定这个源(附nvidia-l4t-apt-source.list配置)
Jetson AGX Orin开发板开箱必做:正确配置软件源的深度指南 当你第一次拿到Jetson AGX Orin这款强大的边缘计算设备时,兴奋之余可能会迫不及待地想要安装CUDA、cuDNN等AI开发环境。但很多开发者都会在这里踩到一个"坑"——直接运行sudo apt ins…...

BilibiliDown终极指南:3步轻松下载B站高清视频与音频
BilibiliDown终极指南:3步轻松下载B站高清视频与音频 【免费下载链接】BilibiliDown (GUI-多平台支持) B站 哔哩哔哩 视频下载器。支持稍后再看、收藏夹、UP主视频批量下载|Bilibili Video Downloader 😳 项目地址: https://gitcode.com/gh_mirrors/bi…...