记录一次mmpretrain训练数据并转onnx推理
目录
1.前言
2.代码
3.数据形态【分类用】
4.配置文件
5.训练
6.测试-分析-混淆矩阵等等,测试图片效果等
7.导出onnx
8.onnx推理
9.docker环境简单补充
1.前言
好久没有做图像分类了,于是想用商汤的mmclassification快速搞一波,发现已经没有了。现在是mmpretrain集成。
2.代码
截止到我写文章,我是下载的GITHUB中的mmpretrain,我是main分支,是1.2版本。https://github.com/open-mmlab/mmpretrain![]() https://github.com/open-mmlab/mmpretrain 安装环境:
https://github.com/open-mmlab/mmpretrain 安装环境:
(1)跟着文档来就好
1.2依赖环境 — MMPretrain 1.2.0 文档![]() https://mmpretrain.readthedocs.io/zh-cn/latest/get_started.html 主要是这两步: cd mmpretrain --> pip install -U openmim && mim install -e .
https://mmpretrain.readthedocs.io/zh-cn/latest/get_started.html 主要是这两步: cd mmpretrain --> pip install -U openmim && mim install -e .
open-mmlab喜欢用mim来装东西,又快,又对。包括mmcv、mmdeploy、mmdet等。
(2)自己搞一个docker,我文章最后做补充文档~
3.数据形态【分类用】

可以看出,data下是训练集和验证集,然后是类名,类名下是各自图片,就这样就行了。
4.配置文件
代码里有个config文件,下面的resnet下面的,resnet50_8xb32_in1k.py抄一个过来做自己的,它里边还有如下一些配置文件:

依次把所有内容抄过来,做一个自己的配置文件。我放在config_me下边,叫my_resnet50_8xb32_in1k.py,最终内容如下边代码:
这里有两点需要注意,一个是去模型库下载预训练权重【读readme找模型库,对应配置文件下载的对应预训练pth】,第二个是dataset_type = 'CustomDataset'这里用自定义就行了,数据形态上边那样就行,不用、不用去改dateset下的imagenet、 coco啥的标签......
CLASS_NUMS = 8  # 你要分类的数量,比如我是8类
BATCH_SIZE = 20
TRAIN_NUM_WORKERS = 8
VAL_NUM_WORKERS = 4
TR_DATA_ROOT = "/xx/data/train"  # 训练集
VAL_DATA_ROOT = "/xx/data/val"  # 验证集
MAX_EPOCH = 600
MultiStepLR_list = [100, 200, 300]  # 学习率递减epoch分批
VAL_INTERVAL = 20  # 多少迭代验证一次
SAVE_INTERVAL = 50  # 多少迭代保存一次模型
LOG_INTERVAL = 100  # 多少迭代/批次打印一次
PRE_CHECKPOINT = "/configs_me/resnet50_8xb32_in1k_20210831-ea4938fc.pth"  # 去模型库下载与config文件相对应的预训练模型权重frozen_stagesss = 2  # -1不冻结层,这里选择冻结骨干2层# model settings
model = dict(type='ImageClassifier',backbone=dict(type='ResNet',depth=50,num_stages=4,out_indices=(3, ),frozen_stages=frozen_stagesss,     # 冻结主干网的层数style='pytorch'),neck=dict(type='GlobalAveragePooling'),head=dict(type='LinearClsHead',num_classes=CLASS_NUMS,in_channels=2048,  # load_from后就该2048  512报错# in_channels=512,loss=dict(type='CrossEntropyLoss', loss_weight=1.0),topk=(1, 5),  # 二分类啥的或者不用top5准确率的,用topk=(1, ),))# dataset settings
dataset_type = 'CustomDataset'
data_preprocessor = dict(num_classes=CLASS_NUMS,# RGB format normalization parametersmean=[123.675, 116.28, 103.53],std=[58.395, 57.12, 57.375],# convert image from BGR to RGBto_rgb=True,
)train_pipeline = [dict(type='LoadImageFromFile'),dict(type='RandomResizedCrop', scale=224),dict(type='RandomFlip', prob=0.5, direction='horizontal'),dict(type='PackInputs'),
]test_pipeline = [dict(type='LoadImageFromFile'),dict(type='ResizeEdge', scale=256, edge='short'),  # 缩放短边尺寸至 256pxdict(type='CenterCrop', crop_size=224),dict(type='PackInputs'),
]train_dataloader = dict(batch_size=BATCH_SIZE,num_workers=TRAIN_NUM_WORKERS,dataset=dict(type=dataset_type,data_root=TR_DATA_ROOT,# ann_file='meta/train.txt',# split='train',pipeline=train_pipeline),sampler=dict(type='DefaultSampler', shuffle=True),  # 默认采样# persistent_workers=True,  # 保持进程,缩短每个epoch准备时间
)val_dataloader = dict(batch_size=BATCH_SIZE,num_workers=VAL_NUM_WORKERS,dataset=dict(type=dataset_type,data_root=VAL_DATA_ROOT,# ann_file='meta/test.txt',# split='test',pipeline=test_pipeline),sampler=dict(type='DefaultSampler', shuffle=False),# persistent_workers=True,
)val_evaluator = dict(type='Accuracy', topk=(1, 5))  # 二分类不能用top1和top5
# val_evaluator = dict(type='Accuracy', topk=(1, ))# If you want standard test, please manually configure the test dataset
test_dataloader = val_dataloader
test_evaluator = val_evaluator# optimizer
optim_wrapper = dict(optimizer=dict(type='SGD', lr=0.01, momentum=0.9, weight_decay=0.0001))# learning policy
param_scheduler = dict(type='MultiStepLR', by_epoch=True, milestones=MultiStepLR_list, gamma=0.5)# train, val, test setting
train_cfg = dict(by_epoch=True, max_epochs=MAX_EPOCH, val_interval=VAL_INTERVAL)
val_cfg = dict()
test_cfg = dict()# NOTE: `auto_scale_lr` is for automatically scaling LR,
# based on the actual training batch size.
# auto_scale_lr = dict(base_batch_size=256)
# 通过默认策略自动缩放学习率,此策略适用于总批次大小 256
# 如果你使用不同的总批量大小,比如 512 并启用自动学习率缩放
# 我们将学习率扩大到 2 倍# defaults to use registries in mmpretrain
default_scope = 'mmpretrain'# configure default hooks
default_hooks = dict(# record the time of every iteration.timer=dict(type='IterTimerHook'),# print log every 100 iterations.logger=dict(type='LoggerHook', interval=LOG_INTERVAL),# enable the parameter scheduler.param_scheduler=dict(type='ParamSchedulerHook'),# save checkpoint per epoch.checkpoint=dict(type='CheckpointHook', interval=SAVE_INTERVAL),# set sampler seed in distributed evrionment.sampler_seed=dict(type='DistSamplerSeedHook'),# validation results visualization, set True to enable it.visualization=dict(type='VisualizationHook', enable=False),
)# configure environment
env_cfg = dict(# whether to enable cudnn benchmarkcudnn_benchmark=False,# set multi process parametersmp_cfg=dict(mp_start_method='fork', opencv_num_threads=0),# set distributed parametersdist_cfg=dict(backend='nccl'),
)# set visualizer
vis_backends = [dict(type='LocalVisBackend')]
visualizer = dict(type='UniversalVisualizer', vis_backends=vis_backends)# set log level
log_level = 'INFO'# load from which checkpoint
load_from = PRE_CHECKPOINT# whether to resume training from the loaded checkpoint
resume = False# Defaults to use random seed and disable `deterministic`
randomness = dict(seed=None, deterministic=False)
5.训练
把tools文件夹下边的train.py,复制一份【PS.后边都指的复制到项目根目录下】,只改动如下代码,然后python train.py就可以训练了。【注意训练结果权重在你的work-dir指定目录下】
parser.add_argument('--config', default="config_me/my_resnet50_8xb32_in1k.py", help='train config file path')
parser.add_argument('--work-dir', default="my_train_result", help='the dir to save logs and models')
还可以加几句打印类别顺序:【还没试过,待定】
classes = runner.test_loop.dataloader.dataset.metainfo.get('classes')
print("=== 本次训练类别顺序: ======================")
print(classes)
print('=========================================')
6.测试-分析-混淆矩阵等等,测试图片效果等
同理,把tools下的test.py复制,改动如下,可以评估验证集:
parser.add_argument('--config', default="config_me/my_resnet50_8xb32_in1k.py", help='test config file path')parser.add_argument('--checkpoint', default="my_train_result/epoch_200.pth", help='checkpoint file')parser.add_argument('--work-dir', default="test_result", help='the directory to save the file containing evaluation metrics')# parser.add_argument('--out', default="test_result/res_epoch_20.pkl", help='the file to output results.') # 这个是保存为pkl可以同理, analyze_results.py复制一份出来,改动如下,可以分析模型对测试集的效果:
parser.add_argument('--config', default=default="config_me/my_resnet50_8xb32_in1k.py", help='test config file path')parser.add_argument('--result', default="test_result/res_epoch_20.pkl", help='test result json/pkl file')parser.add_argument('--out-dir', default="test_result/analyze", help='dir to store output files')同理, confusion_matrix.py复制一份出来,改动如下,可以计算验证集的混淆矩阵:
parser.add_argument('--config', default="config_me/my_resnet50_8xb32_in1k.py", help='test config file path')parser.add_argument('--ckpt_or_result', default="my_train_result/epoch_200.pth",type=str,help='The checkpoint file (.pth) or ''dumpped predictions pickle file (.pkl).')运行的时候,加上 --show 和--include-values等,显示带数字的混淆矩阵
同理,把demo下边的image_demo.py复制一份,改动如下,可以测试图片推理:
parser.add_argument('--img', default="data/val/3.jpg", help='Image file')parser.add_argument('--model', default="configs_me/my_resnet50_8xb32_in1k.py", help='Model name or config file path')parser.add_argument('--checkpoint', default="xxx/epoch_400.pth", help='Checkpoint file path.')parser.add_argument('--show',action='store_true',help='Whether to show the prediction result in a window.')parser.add_argument('--show-dir',default="test_111111111111111",type=str,help='The directory to save the visualization image.')7.导出onnx
这里用到mmdeploy, 把mmdeploy,git clone一个到本项目文件夹下,再cd到mmdeploy里,同样运行mim install -e .来安装mmdeploy。或者参考:Get Started — mmdeploy 1.3.1 文档
 目前我这里是:1.3.1版本
导出onnx脚本:export_onnx.py
# === mmdeploy方式导出onnx ====================================
from mmdeploy.apis import torch2onnx
from mmdeploy.backend.sdk.export_info import export2SDKimg = '随便一张测试图路径 xxx/xx。jpg'
work_dir = '另存onnx的目录'
save_file = 'epoch_500.onnx'
deploy_cfg = 'mmdeploy/configs/mmpretrain/classification_onnxruntime_static.py'
model_cfg = 'configs_me/my_resnet50_8xb32_in1k.py' # 训练的配置文件
model_checkpoint = 'train_res_1024/epoch_500.pth'  # 训练的pth结果
device = 'cpu'# 1. convert model to onnx
torch2onnx(img, work_dir, save_file, deploy_cfg, model_cfg, model_checkpoint, device)# 2. extract pipeline info for sdk use (dump-info)
export2SDK(deploy_cfg, model_cfg, work_dir, pth=model_checkpoint, device=device)
8.onnx推理
(1)mmdeploy推理方式
import os# === 使用mmdeploy推理onnx ===============================
from mmdeploy.apis import inference_model# 类别顺序:训练的时候,test时候,或者混淆矩阵那里可以打印出class顺序
classes = ["class1", "class2", "class3"]
data_paths = 'data/1 (1).png'model_cfg = 'configs_me/my_resnet50_8xb32_in1k.py'
deploy_cfg = 'mmdeploy/configs/mmpretrain/classification_onnxruntime_static.py'
data_paths= 'xxx/1.jpg'
backend_files = ['xxx/rscd_c8_2w_epoch_500.onnx']  # 刚导出的
device = 'cpu'# for img in os.listdir(data_paths):
img_path = data_paths
result = inference_model(model_cfg, deploy_cfg, backend_files, img_path, device)
socres = result[0].pred_score.cpu().numpy().tolist()
labels = result[0].pred_label.cpu().numpy().tolist()label = labels[0]
score = socres[label]
print("图片名:", img_path, "预测类别:", classes[label], "预测分数:", round(score, 4))
(2)onnx-runtime推理方式, 脱离框架【very nice !!!!!!!!!】
里边数据处理是参考 config文件里边图像,比如resize啥的要对。
import os
import onnxruntime
import cv2
import numpy as npdef resize_edge(image, scale=256, edge='short'):"""将图像的短边缩放到指定尺寸,保持宽高比不变"""h, w = image.shape[:2]if edge == 'short':if h < w:scale_ratio = scale / helse:scale_ratio = scale / welse:if h > w:scale_ratio = scale / helse:scale_ratio = scale / wnew_size = (int(w * scale_ratio), int(h * scale_ratio))resized_image = cv2.resize(image, new_size)return resized_imagedef center_crop(image, crop_size=224):"""从图像中心裁剪指定尺寸的区域"""h, w = image.shape[:2]center_x, center_y = w // 2, h // 2half_crop_size = crop_size // 2# 确定中心裁剪区域start_x = max(center_x - half_crop_size, 0)start_y = max(center_y - half_crop_size, 0)cropped_image = image[start_y:start_y + crop_size, start_x:start_x + crop_size]return cropped_imagedef pack_inputs(image):"""将图像转化为 3x224x224 格式并归一化"""# 调整通道顺序,变为3x224x224img_crop = image[:, :, ::-1].transpose(2, 0, 1).astype(np.float32)img_crop[0, :] = (img_crop[0, :] - 123.675) / 58.395img_crop[1, :] = (img_crop[1, :] - 116.28) / 57.12img_crop[2, :] = (img_crop[2, :] - 103.53) / 57.375return img_cropdef img_preprocess(image_path):"""图像预处理,以resnet50配置文件为例:test_pipeline = [dict(type='LoadImageFromFile'),dict(type='ResizeEdge', scale=256, edge='short'),  # 缩放短边尺寸至 256pxdict(type='CenterCrop', crop_size=224),dict(type='PackInputs'),]"""image = cv2.imread(image_path)resized_image = resize_edge(image, scale=256, edge='short')cropped_image = center_crop(resized_image, crop_size=224)final_image = pack_inputs(cropped_image)return final_imagedef img_infer(onnx_model, img_path):img_crop = img_preprocess(img_path)input = np.expand_dims(img_crop, axis=0)onnx_session = onnxruntime.InferenceSession(onnx_model, providers=['CPUExecutionProvider'])input_name = []for node in onnx_session.get_inputs():input_name.append(node.name)output_name = []for node in onnx_session.get_outputs():output_name.append(node.name)input_feed = {}for name in input_name:input_feed[name] = inputpred = onnx_session.run(None, input_feed)return pred  # 预测结果if __name__ == '__main__':onnx_model = "onnx_model/epoch_500.onnx"classes = ["class1", "class2", "class3"]  # 混淆矩阵和测试时候可以打印出来classes_explain = ["第一类", "第二类", "第三类"]# 一张图推理img_path = "data/1 (1).png"res = img_infer(onnx_model, img_path)print("图片名:", img_path, "预测类别:", classes_explain[np.argmax(res)], "预测分数:", round(np.max(res), 4))
补充分类指标:在onnx批量推理后,也可用sklearn评估。如:
from sklearn.metrics import classification_report
import numpy as np
# 假设真实标签和模型预测结果
y_true = np.array([0, 1, 2, 0, 1, 2, 0, 1, 2, 0, 1, 2, 0, 1, 2])
y_pred = np.array([0, 1, 2, 0, 0, 2, 2, 1, 2, 0, 1, 1, 0, 1, 2])
# 生成分类报告
report = classification_report(y_true, y_pred, target_names=['a', 'b', 'c'])
print(report)
# 计算混淆矩阵 cm = confusion_matrix(y_true, y_pred)
# 打印混淆矩阵 print("混淆矩阵:\n", cm)
9.docker环境简单补充
- dockerFile如下: 从阿里源拉一个torch的基础镜像.........
| # https://www.modelscope.cn/docs/环境安装 # GPU环境镜像(python3.10) FROM registry.cn-beijing.aliyuncs.com/modelscope-repo/modelscope:ubuntu22.04-cuda12.1.0-py310-torch2.3.0-tf2.16.1-1.15.0 # FROM registry.cn-hangzhou.aliyuncs.com/modelscope-repo/modelscope:ubuntu22.04-cuda12.1.0-py310-torch2.3.0-tf2.16.1-1.15.0 # FROM registry.us-west-1.aliyuncs.com/modelscope-repo/modelscope:ubuntu22.04-cuda12.1.0-py310-torch2.3.0-tf2.16.1-1.15.0 RUN mkdir /opt/code WORKDIR /opt/code |
- 构建镜像 docker build -t hezy_base_image .
- 创建容器 docker run --name hezy_mmcls -d -p 9528:22 --shm-size=1g hezy_base_image tail -f /dev/null
【-d 表示后台, -p表示端口映射 --shm-size 表示共享内存分配 tail -f /dev/null表示啥也不干】
- docker run还有些参数,可以酌情添加。
- docker exec -it 容器id /bin/bash: 命令可以进到容器
- docker images, docker ps | grep hezy: 查看镜像和容器等等
针对本次mmpretrain环境里边继续操作:
- 容器里边删除所有关于mm的环境【重装】,包括mmcls、openmim、mmdet、mmseg、mmpretrain等;
- 安装mmpretrain:https://mmpretrain.readthedocs.io/zh-cn/latest/get_started.html
- 验证:python demo/image_demo.py demo/demo.JPEG resnet18_8xb32_in1k --device cpu
- 补充:映射ssh等以及如下:
| vim /etc/ssh/sshd_config 下边这些设置放开: Port 22 AddressFamily any ListenAddress 0.0.0.0 PermitRootLogin yes PermitEmptyPasswords yes PasswordAuthentication yes #重启ssh service ssh restart # 设置root密码:passwd root 外边就root/root和IP:端口登录了。【其他shel或者pycharm等idea登录用】 |
相关文章:
记录一次mmpretrain训练数据并转onnx推理
目录 1.前言 2.代码 3.数据形态【分类用】 4.配置文件 5.训练 6.测试-分析-混淆矩阵等等,测试图片效果等 7.导出onnx 8.onnx推理 9.docker环境简单补充 1.前言 好久没有做图像分类了,于是想用商汤的mmclassification快速搞一波,发现已…...
shodan5,参数使用,批量查找Mongodb未授权登录,jenkins批量挖掘
查找美国安全局漏洞 nww.nsa.gov(美国安全局官方网站) net参数使用 搜索指定的ip网段 shodan search --limit 10 --fields ip_str,port net:208.88.84.0/24 (老美国家安全局的一个网段)可能直接访问不太行,可以使用host参数,得到域名再去…...

telnet 密码模式 访问路由器
telnet 密码访问华为路由器 模拟被访问路由 sy [Huawei]int g0/0/0 //选中 g0/0/0端口 [Huawei-GigabitEthernet0/0/0]ip add 192.168.1.1 24 //设置端口ip [Huawei]user-interface vty 0 4 //配置vty [Huawei-ui-vty0-4]set authentication password cipher huawei123 //设置…...

文心一言 VS 讯飞星火 VS chatgpt (380)-- 算法导论24.4 12题
十二、给出一个有效算法来解决 A x ⩽ b Ax⩽b Ax⩽b 的差分约束系统,这里 b b b 的所有元素为实数,而变量 x i x_i xi 中某个给定的子集是整数。如果要写代码,请用go语言。 文心一言: 差分约束系统问题通常用于解决带有约…...
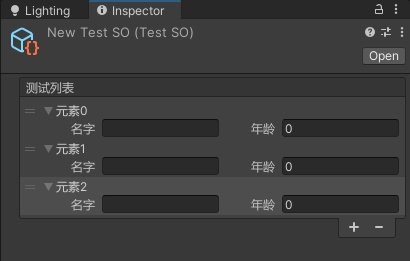
Unity自定义数组在Inspector窗口的显示方式
了解 单行高度:EditorGUIUtility.singleLineHeight获取 PropertyField 控件所需的高度:EditorGUI.GetPropertyHeight属性是否在Inspector窗口展开:SerializedProperty.isExpanded可重新排序列表类:ReorderableList绘制纯色矩形:EditorGUI.Dr…...
--SPCL论文阅读笔记(2024-10-29))
ERC论文阅读(03)--SPCL论文阅读笔记(2024-10-29)
SPCL论文阅读笔记 论文中心思想 这篇论文是研究ERC任务的论文,作者提出了监督原型对比学习的方法用于ERC任务。 论文 EMNLP2022 paper “Supervised Prototypical Contrastive Learning for Emotion Recognition in Conversation” 现存问题 现存的使用监督对…...

Straightforward Layer-wise Pruning for More Efficient Visual Adaptation
对于模型中冗余的参数,一个常见的方法是通过结构化剪枝方法减少参数容量。例如,基于幅度值和基于梯度的剪枝方法。尽管这些方法在传统训练上通用性,本文关注的PETL迁移有两个不可避免的问题: 显著增加了模型存储负担。由于不同的…...

喜讯 | 创邻科技杭州电子科技大学联合实验室揭牌成立!
近日,杭州电子科技大学图书情报专业硕士行业导师聘任仪式暨杭电-创邻图技术与数字化联合实验室(图书档案文物数字云联合研发中心)揭牌仪式在杭州电子科技大学隆重举行。杭州电子科技大学原副校长吕金海、研究生院副院长潘建江,科研…...

海外媒体发稿:如何打造媒体发稿策略
新闻媒体的发稿推广策略对于提升品牌知名度、吸引流量以及增加收入非常重要。本文将介绍一套在21天内打造爆款新闻媒体发稿推广策略的方法。 第一天至第七天:明确目标和定位 在这个阶段,你需要明确你的目标和定位,以便为你的新闻媒体建立一个…...

PyTorch模型保存与加载
1.保存与加载的概念(序列化与反序列化) 模型训练完毕之后,肯定想要把它保存下来,供以后使用,不需要再次去训练。 那么在pytorch中如何把训练好的模型,保存,保存之后又如何加载呢? 这就用需要序列化与反序列化,序列化与反序列化的概念如下图所示: 因为在内…...
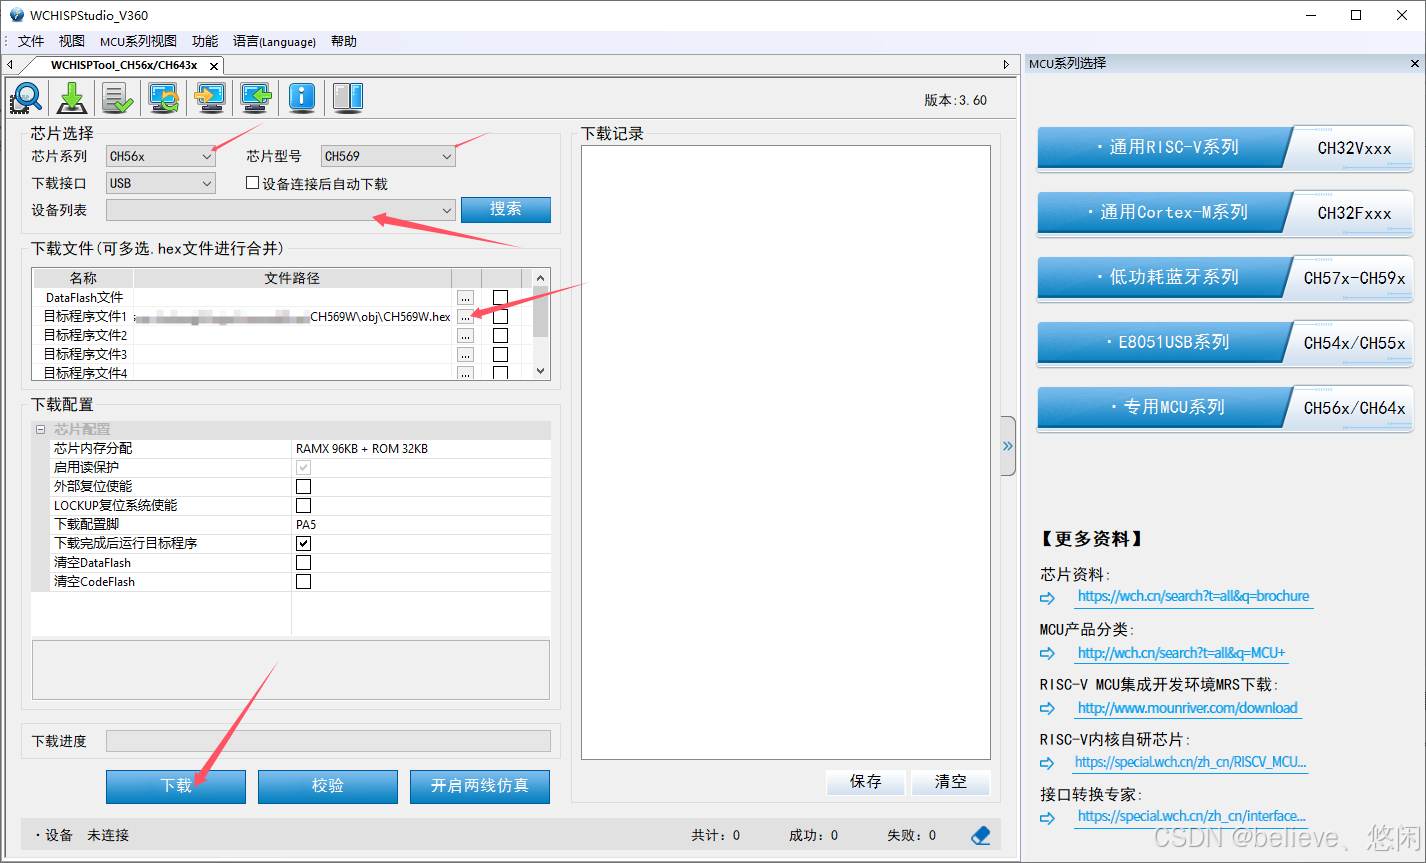
CH569开发前的测试
为了玩转准备Ch569的开发工作 ,准备了如下硬件和软件: 硬件 1.官方的 Ch569 开发板,官方买到的是两块插接在一起的;除了HSPI接口那里的电阻,这两块可以说是一样的。也意味着两块板子的开发也需要烧录两次;…...
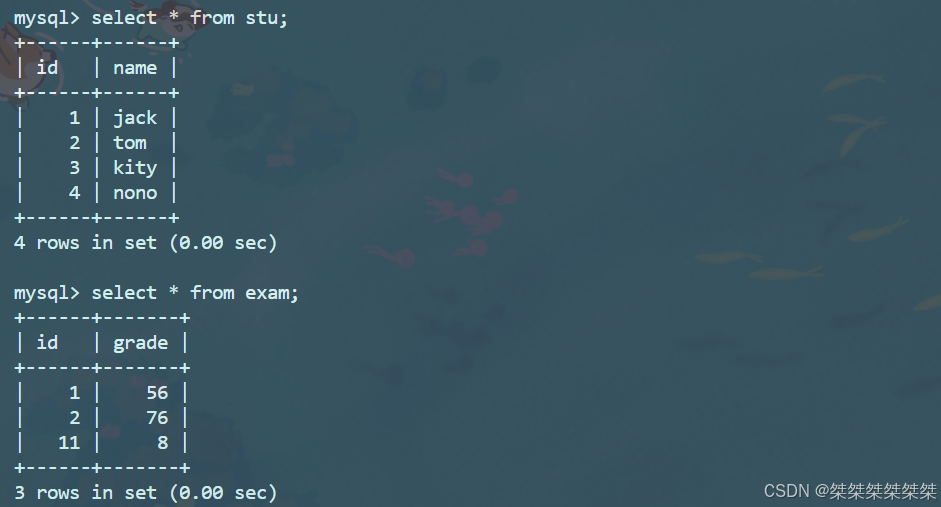
MySQL中表的外连接和内连接
内连接和外连接 表的连接分为内连接和外连接,内连接就是将需要连接的表形成笛卡尔积筛选;外连接分为左外连接和右外连接,左外连接为左侧的表需要完全显示,右外连接为右侧的表现需要完全显示。 文章目录 内连接和外连接内连接外…...

Ubuntu 上安装 Redmine 5.1 指南
文章目录 官网安装文档:命令步骤相关介绍GemRubyRailsBundler 安装 Redmine更新系统包列表和软件包:安装必要的依赖:安装 Ruby:安装 bundler下载 Redmine 源代码:安装 MySQL配置 Redmine 的数据库配置文件:…...
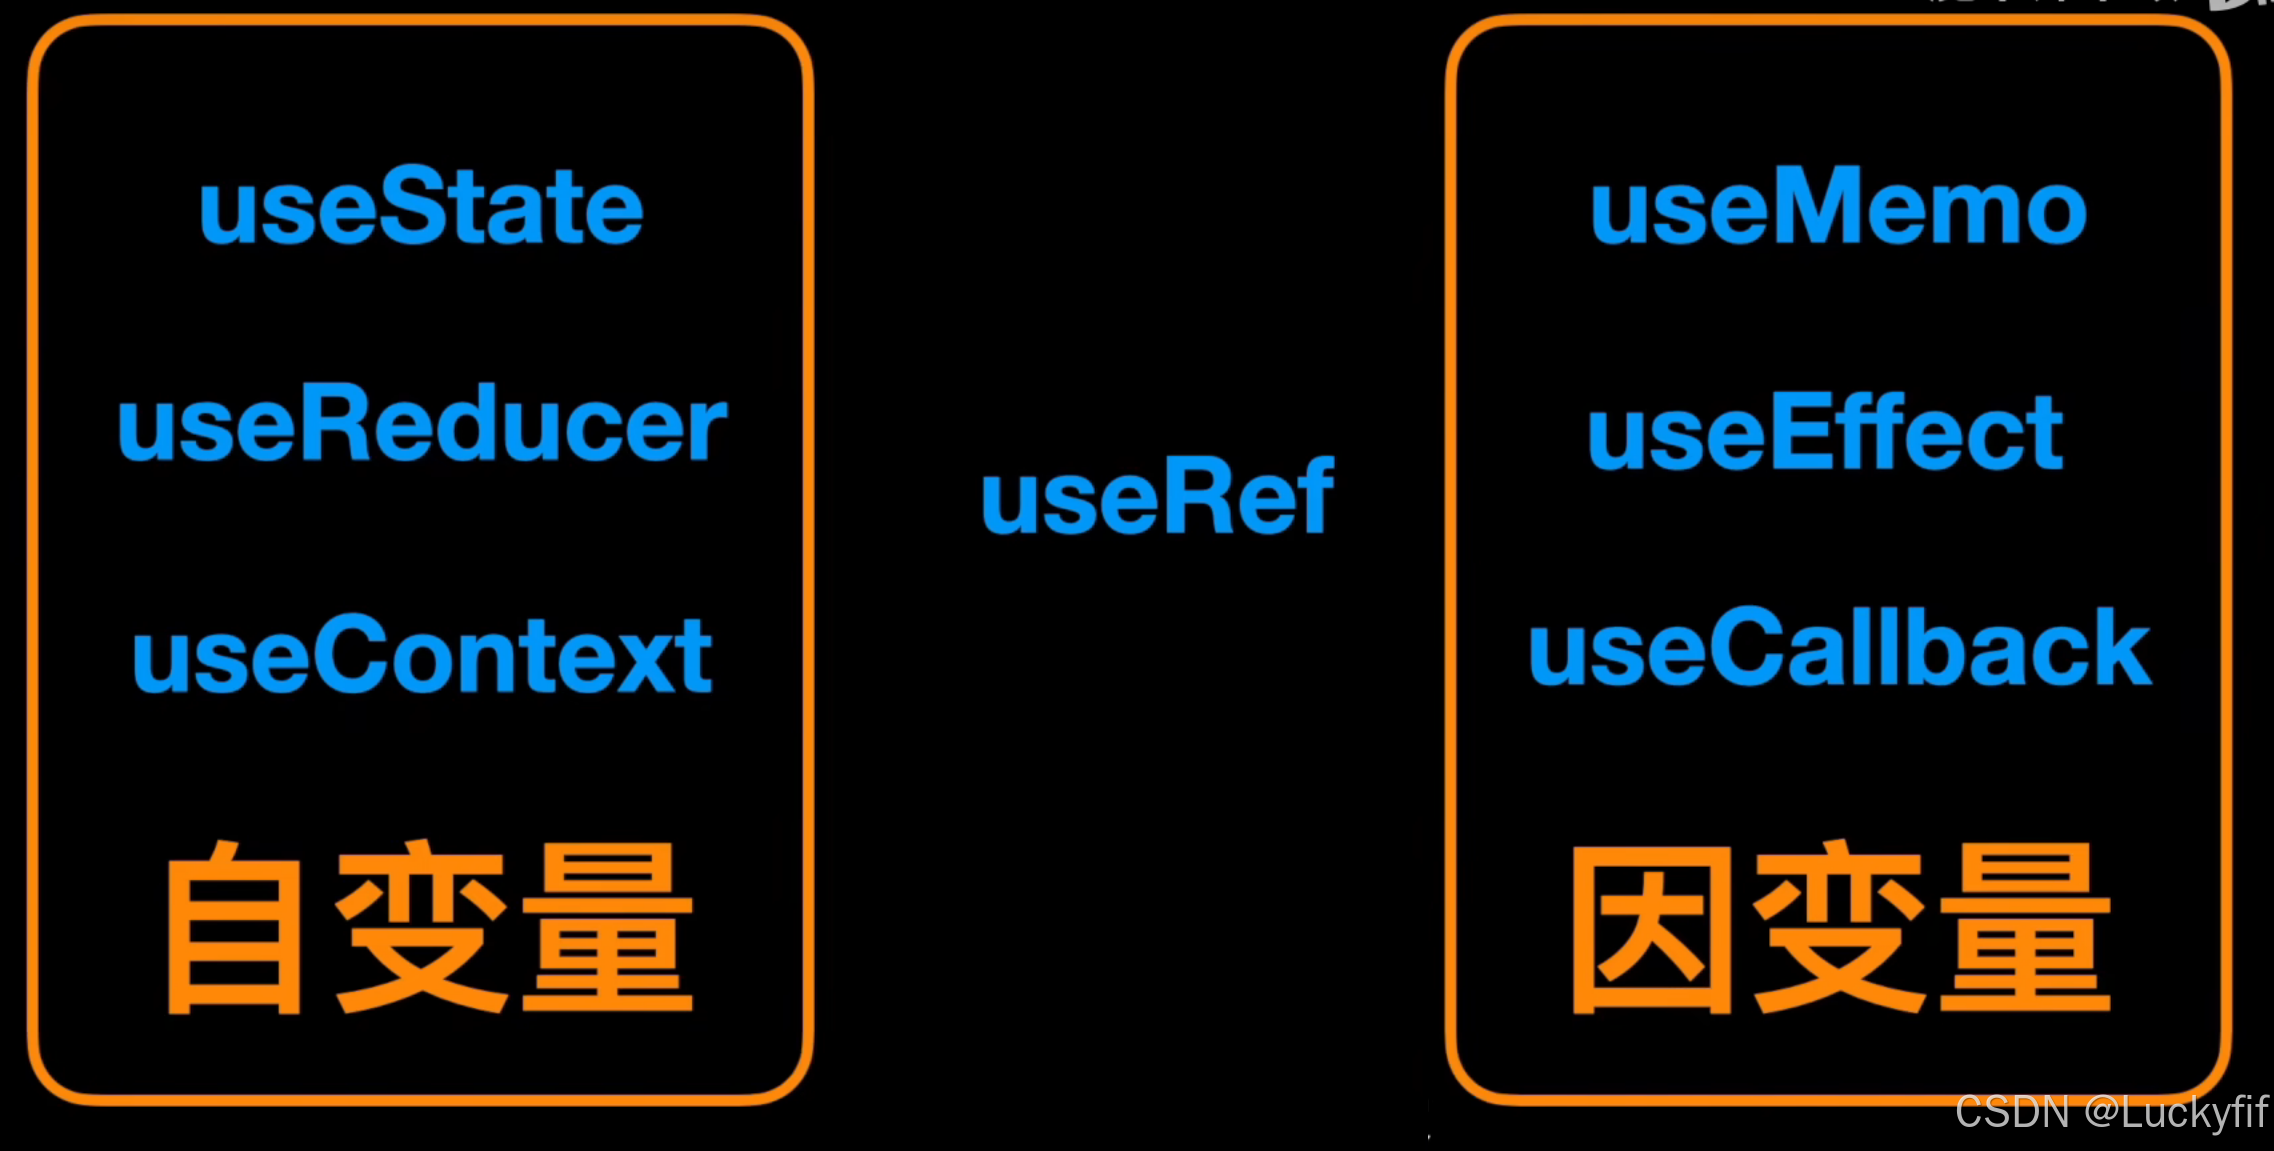
从变量的角度理解 Hooks , 变得更简单了
从变量角度理解Hooks 在React的世界里,Hooks的引入为函数式组件带来了前所未有的灵活性和能力。它们让我们得以完全摆脱class式的写法,在函数式组件中完成生命周期管理、状态管理、逻辑复用等几乎全部组件开发工作。这次,我们就从变量的角度…...
LabVIEW Modbus通讯稳定性提升
在LabVIEW开发Modbus通讯程序时,通讯不稳定是一个常见问题,可能导致数据丢失、延迟或错误。为了确保通讯的可靠性,可以从多个角度进行优化,以下是一些有效的解决方案,结合实际案例进行分析。 1. 优化通讯参数设置 通讯…...
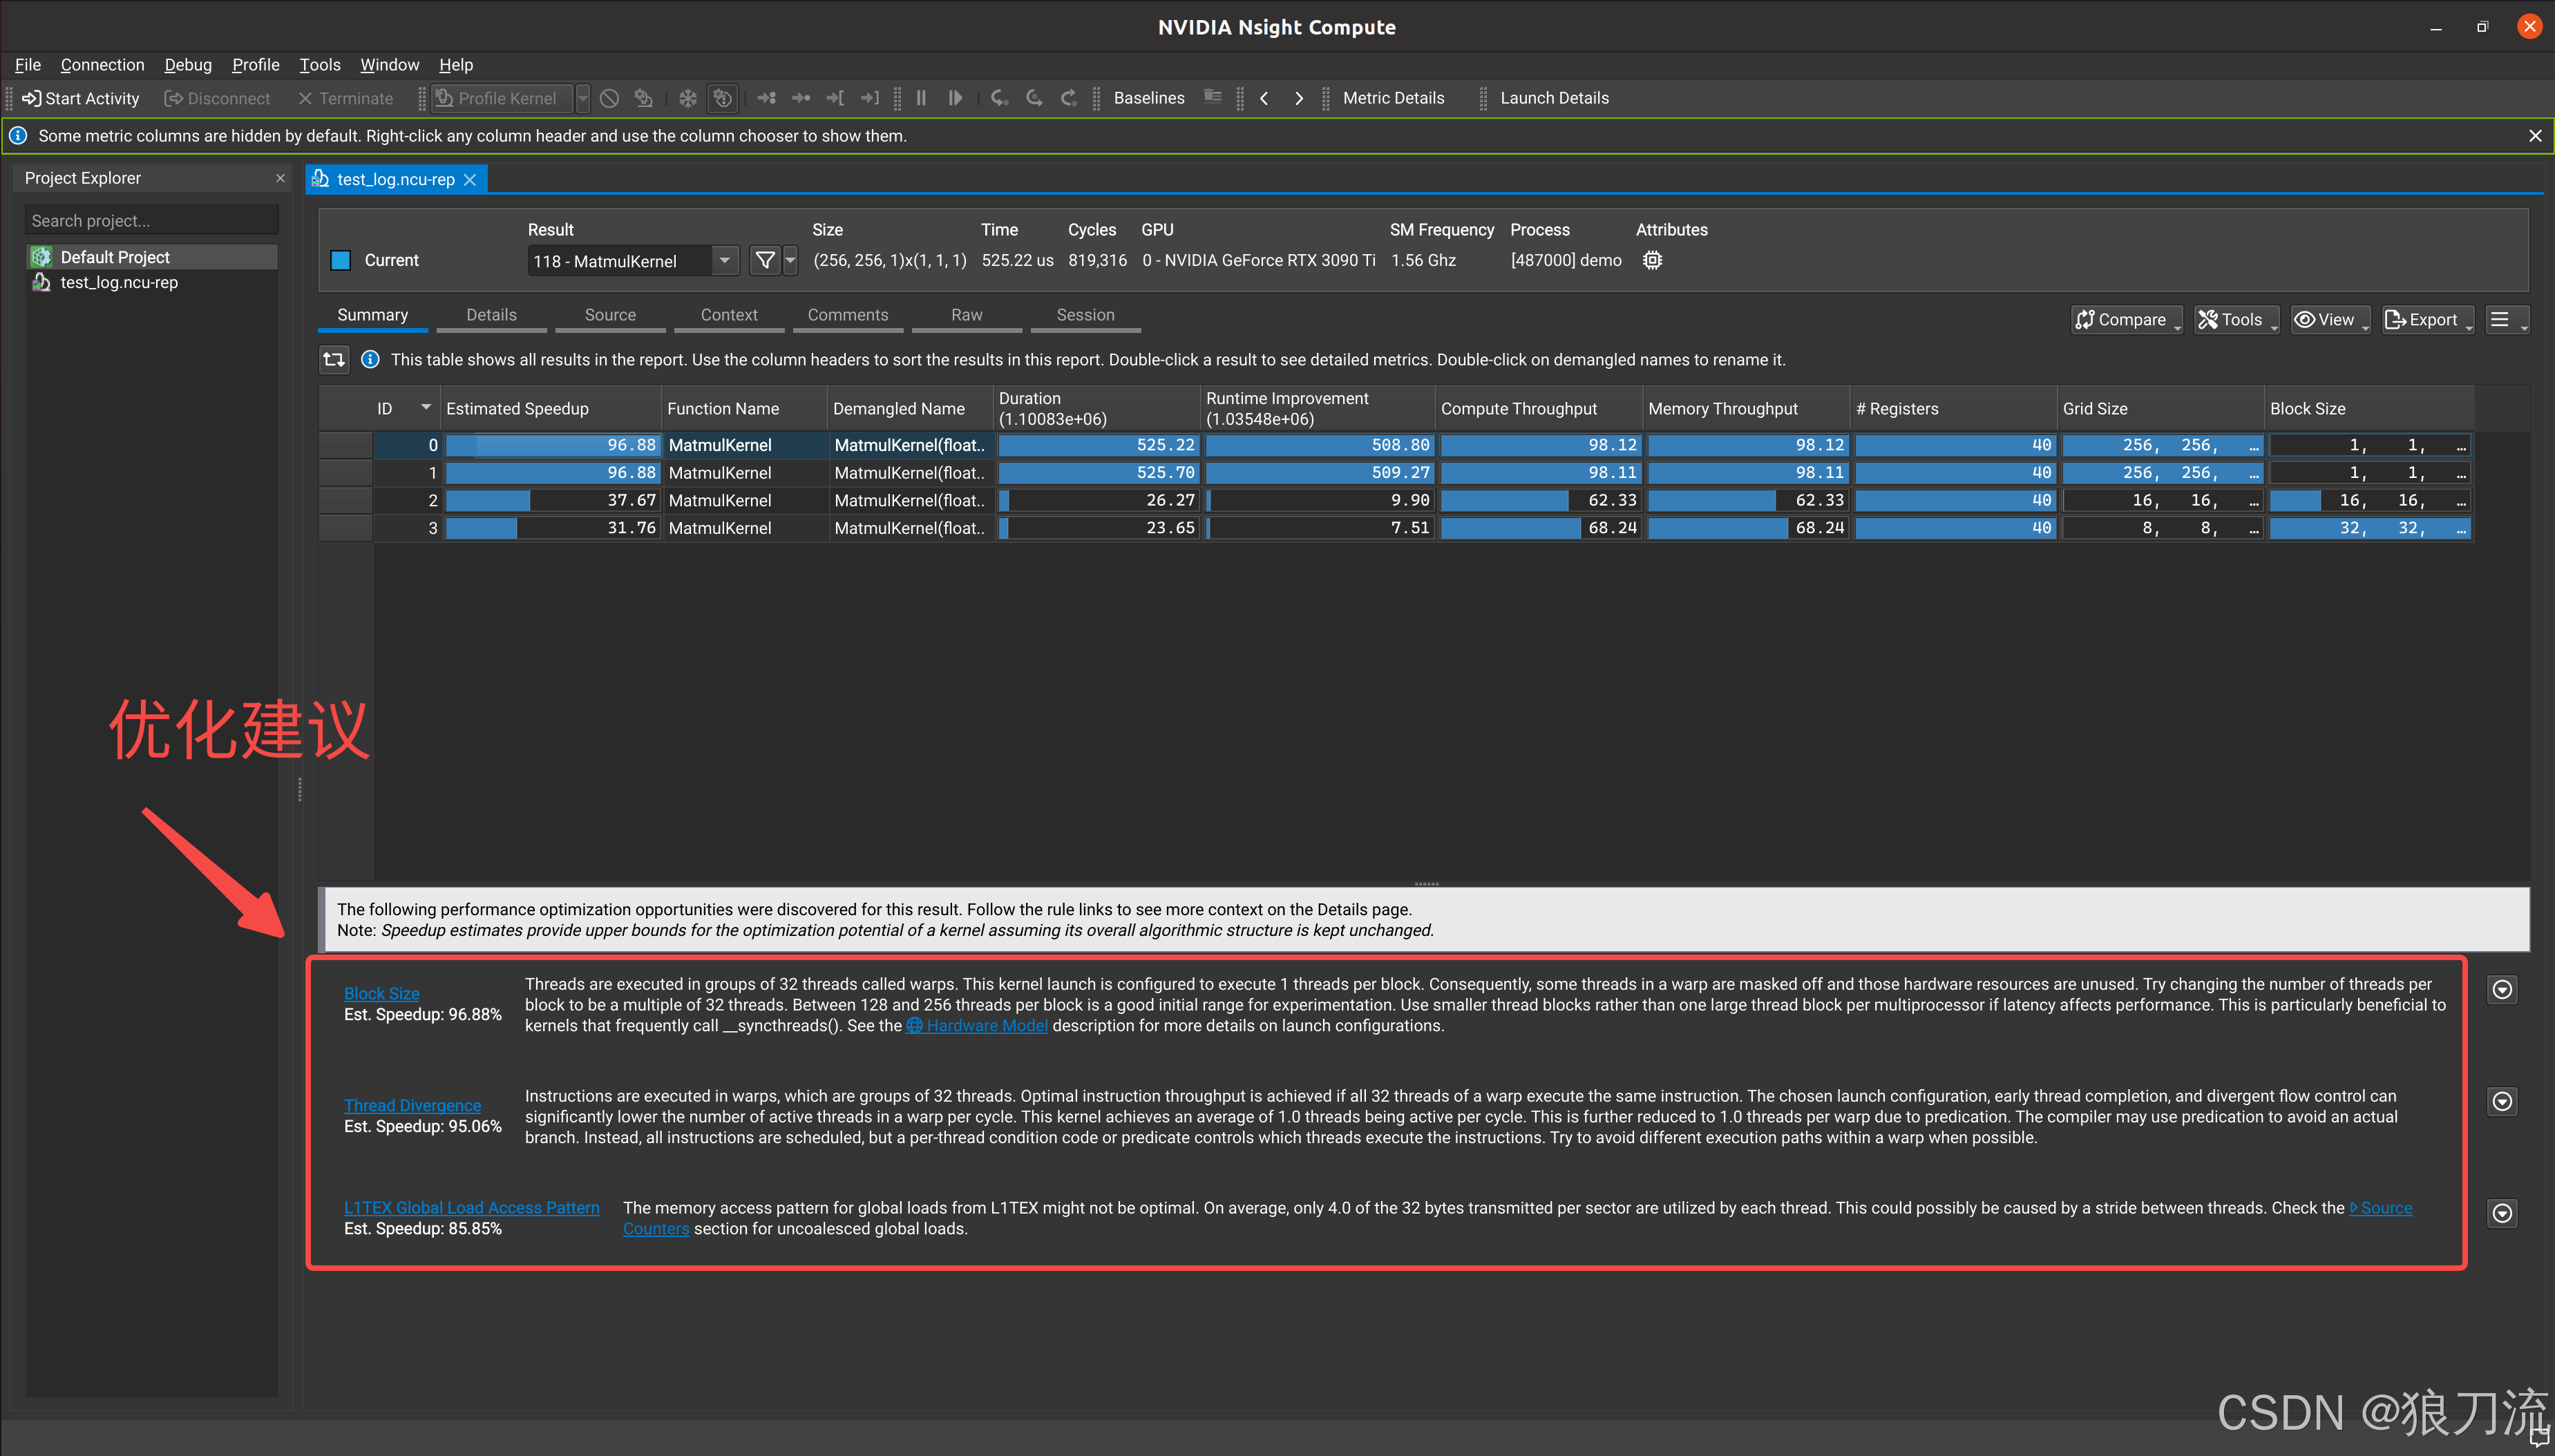
(8) cuda分析工具
文章目录 Nvidia GPU性能分析工具Nsight SystemNvidia GPU性能分析工具Nsight System Nvidia GPU性能分析工具Nsight System NVIDIA Nsight Systems是一个系统级的性能分析工具,用于分析和优化整个CUDA应用程序或系统的性能。它可以提供对应用程序整体性能的全面见…...

C语言 | Leetcode C语言题解之第517题超级洗衣机
题目: 题解: int findMinMoves(int* machines, int machinesSize){int sum0;for(int i0;i<machinesSize;i){summachines[i];}if(sum%machinesSize!0){return -1;}int psum/machinesSize;int ans0;int cur0;for(int i0;i<machinesSize;i){cur(mac…...
Java多线程编程基础
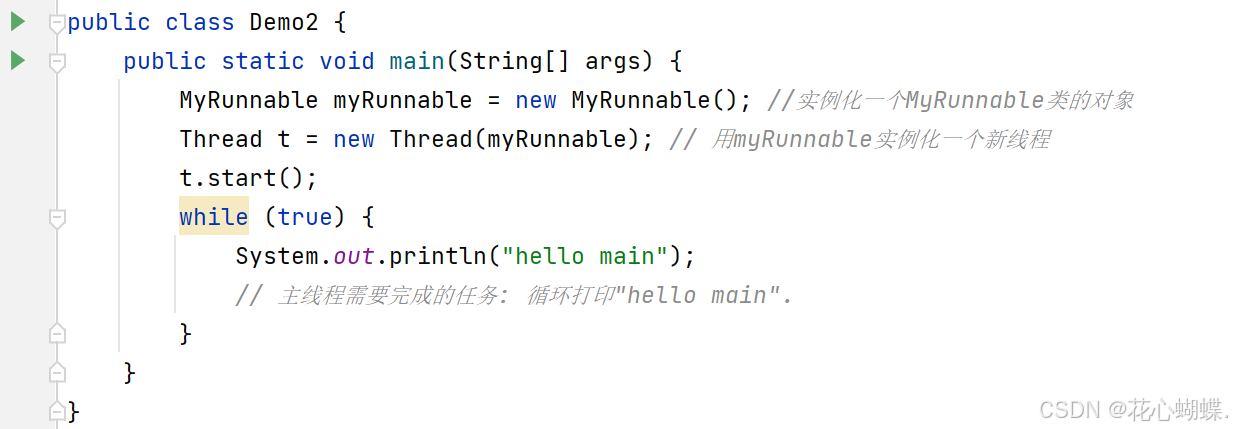
目录 编写第一个多线程程序 1. 方式一 : 继承Thread类, 重写run方法 2. 方式二: 实现Runnable接口, 重写run方法 3. 方式三: 使用Lambda表达式 [匿名内部类] [Lambda表达式] 在上个文章中, 我们了解了进程和线程的相关概念. 那么, 在Java中, 我们如何进行多线程编程呢? …...
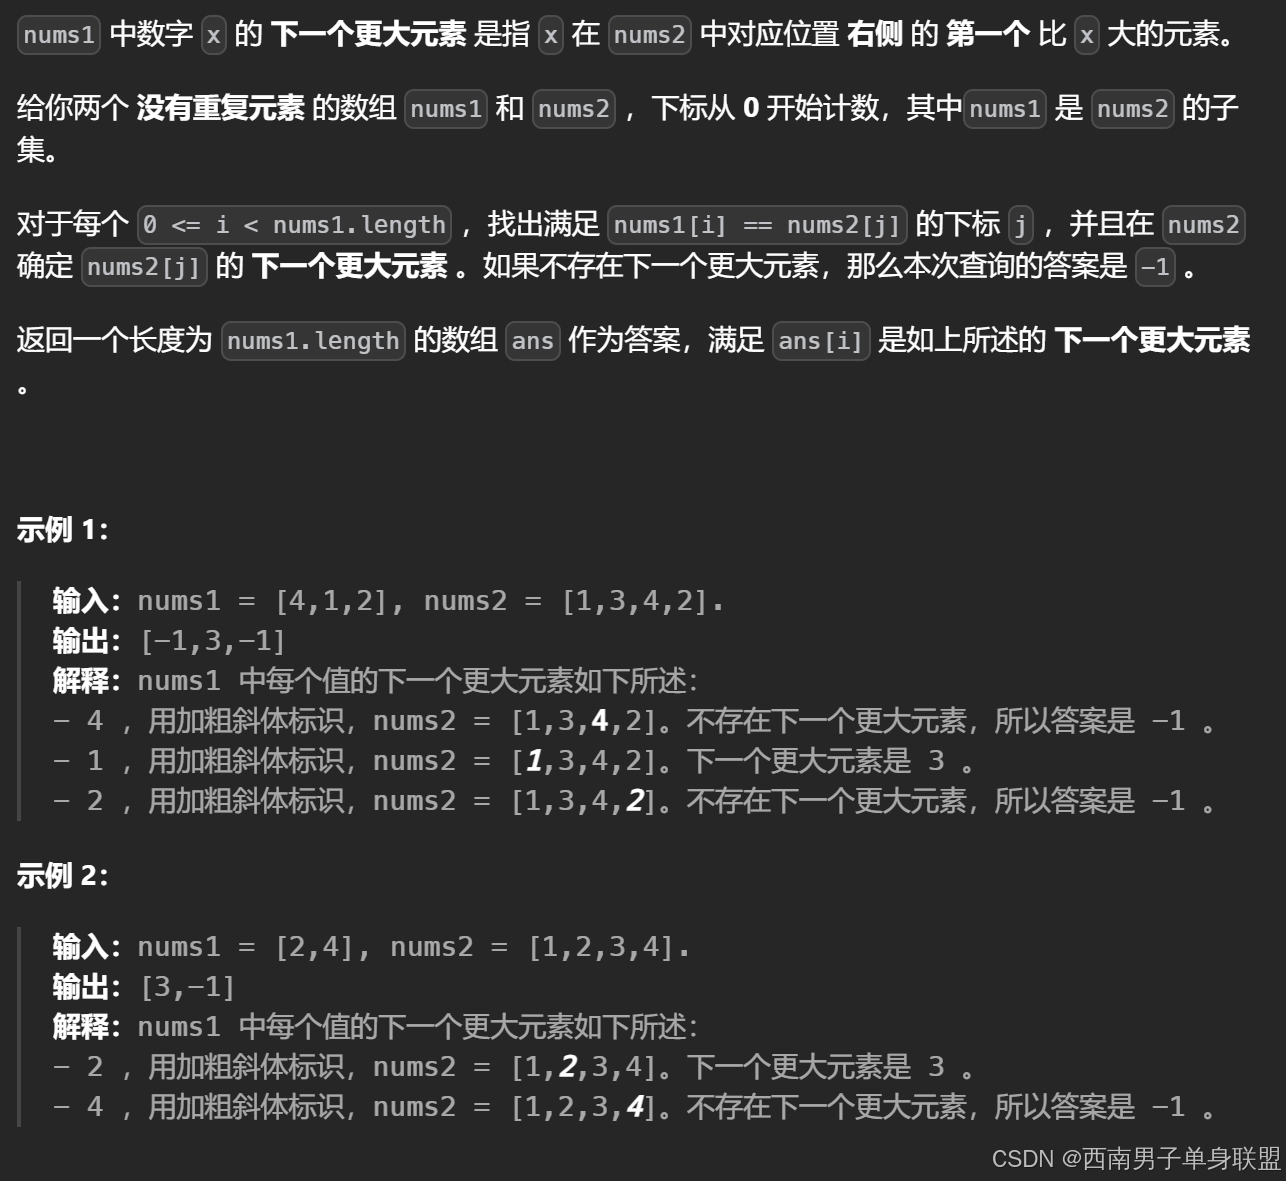
刷代随有感(134):单调栈——下一个更大元素I(难点涉及哈希表与单调栈的结合)
单调栈处理的是下标! 题干: 代码: class Solution { public:vector<int> nextGreaterElement(vector<int>& nums1, vector<int>& nums2) {stack<int>ddst;unordered_map<int,int>umap;vector<int…...
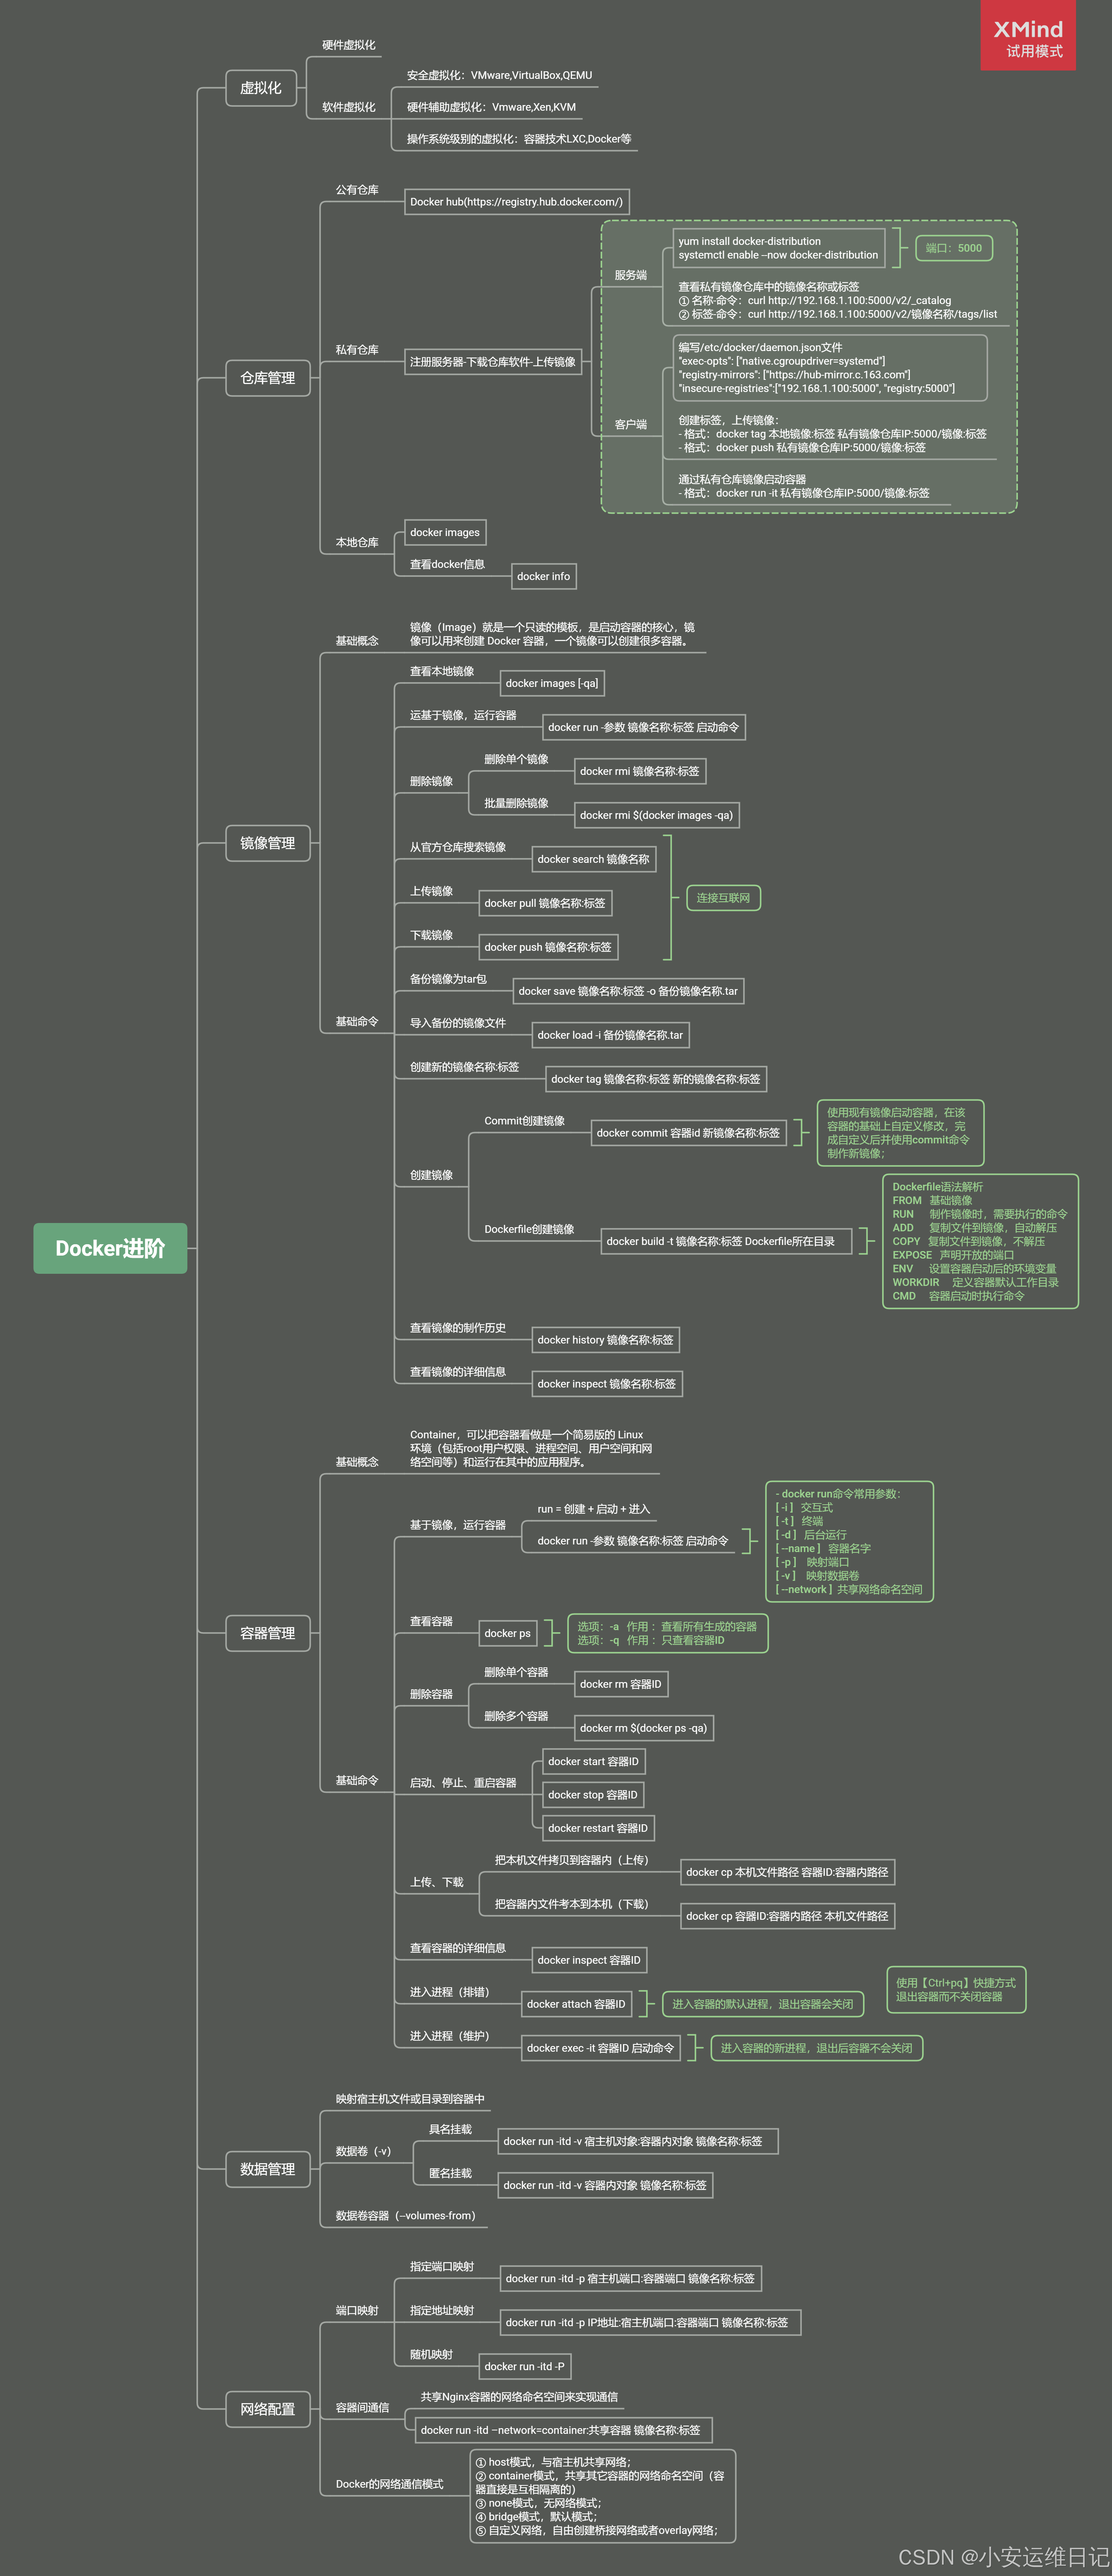
Linux云计算 |【第五阶段】CLOUD-DAY5
主要内容: 容器的镜像编排,commit简单镜像创建,Dockerfile制作服务镜像(语法、创建镜像)、创建复杂镜像(Docker微服务架构、示例:NGINXPHP)、私有仓库 一、简单镜像创建 1、自定义…...

在 Python 中使用 comtypes 时,大小写通常必须保持精确
wb excel.Workbooks.Open(file_path)print(f"文件已打开: {file_path}")后面的方法,大小写可以写错吗?这是一个非常经典的问题,答案是:在 Python 中使用 comtypes 时,大小写通常必须保持精确,不…...
)
SITS 2026发布12项技术白皮书+7套开源工具链:附CSDN认证工程师亲测部署清单(含GitHub直达链接)
更多请点击: https://intelliparadigm.com 第一章:CSDN主办SITS 2026:2026奇点智能技术大会亮点全解析 SITS 2026(Singularity Intelligence Technology Summit)由CSDN联合中国人工智能学会、中科院自动化所共同主办&…...

基于Godot引擎的模块化RTS游戏框架开发实战指南
1. 项目概述:当开放世界RTS遇上Godot引擎如果你和我一样,是个对即时战略游戏(RTS)有情怀,同时又对Godot引擎的轻量与高效念念不忘的开发者,那么看到“lampe-games/godot-open-rts”这个项目标题时ÿ…...

抖音内容高效采集实战:5个提升工作效率的开源方案
抖音内容高效采集实战:5个提升工作效率的开源方案 【免费下载链接】douyin-downloader A practical Douyin downloader for both single-item and profile batch downloads, with progress display, retries, SQLite deduplication, and browser fallback support. …...

WelsonJS:基于Windows原生WSH的现代JavaScript桌面应用开发框架
1. 项目概述:WelsonJS,一个被低估的Windows原生JavaScript框架如果你是一名Windows平台的开发者,或者经常需要处理一些自动化、脚本任务,你可能对Node.js、Electron甚至PowerShell都很熟悉。但今天我想聊一个有点“复古”却又极其…...

如何用nmrpflash拯救你的Netgear路由器:终极免费救援指南
如何用nmrpflash拯救你的Netgear路由器:终极免费救援指南 【免费下载链接】nmrpflash Netgear Unbrick Utility 项目地址: https://gitcode.com/gh_mirrors/nmr/nmrpflash 你的Netgear路由器突然变成"砖头"了吗?固件升级失败、系统崩溃…...

OpenCore Legacy Patcher深度指南:让老旧Mac焕发新生的完整实战手册
OpenCore Legacy Patcher深度指南:让老旧Mac焕发新生的完整实战手册 【免费下载链接】OpenCore-Legacy-Patcher Experience macOS just like before 项目地址: https://gitcode.com/GitHub_Trending/op/OpenCore-Legacy-Patcher 你是否有一台被苹果官方"…...

为什么GitHub Copilot Review Mode在2026 Q1突然下线?真相藏在奇点大会发布的《AI原生审查伦理宪章》第7.2条中……
更多请点击: https://intelliparadigm.com 第一章:AI原生代码审查:2026奇点智能技术大会Code Review新范式 在2026奇点智能技术大会上,AI原生代码审查(AI-Native Code Review)正式取代传统人工规则引擎混合…...

炉石传说HsMod插件终极指南:55项功能完整配置与使用教程
炉石传说HsMod插件终极指南:55项功能完整配置与使用教程 【免费下载链接】HsMod Hearthstone Modification Based on BepInEx 项目地址: https://gitcode.com/GitHub_Trending/hs/HsMod HsMod是基于BepInEx框架开发的炉石传说多功能增强插件,为玩…...

OBS多路推流插件:突破单一平台限制,实现多平台直播同步的技术方案
OBS多路推流插件:突破单一平台限制,实现多平台直播同步的技术方案 【免费下载链接】obs-multi-rtmp OBS複数サイト同時配信プラグイン 项目地址: https://gitcode.com/gh_mirrors/ob/obs-multi-rtmp 在直播行业快速发展的今天,内容创作…...