Vue3中使用LogicFlow实现简单流程图
实现结果

实现功能:
- 拖拽创建节点
- 自定义节点/边
- 自定义快捷键
- 人员选择弹窗
- 右侧动态配置组件
- 配置项获取/回显
- 必填项验证
自定义节点与拖拽创建节点
拖拽节点面板node-panel.vue
<template><div class="node-panel"><divv-for="(item, key) in state.nodePanel":key="key"class="approve-node"@mousedown="dragNode(item)"><div class="node-shape" :class="'node-' + item.type"></div><div class="node-label">{{ item.text }}</div></div></div>
</template><script lang="ts" setup>
import { ILogicFlowNodePanelItem } from "@/types/logic-flow";
import LogicFlow from "@logicflow/core";
import { reactive } from "vue";
const props = defineProps<{ lf?: LogicFlow }>();
const state = reactive({nodePanel: [{type: "approver",text: "用户活动",},{type: "link",text: "连接点",},{type: "review",text: "传阅",},],
});
const dragNode = (item: ILogicFlowNodePanelItem) => {props.lf?.dnd.startDrag({type: item.type,text: item.text,});
};
</script>
自定义节点/边index.ts
/*** @description 注册节点* @export* @param {LogicFlow} lf* @return {*}*/
export function registeNode(lf: ShallowRef<LogicFlow | undefined>) {/*** @description 自定义开始节点*/class StartNode extends CircleNode {getShape() {const { x, y } = this.props.model;const style = this.props.model.getNodeStyle();return h("g", {}, [h("circle", {...style,cx: x,cy: y,r: 30,stroke: "#000",fill: "#000",}),]);}getText() {const { x, y, text } = this.props.model;return h("text",{x: x,y: y,fill: "#fff",textAnchor: "middle",alignmentBaseline: "middle",style: { fontSize: 12 },},text.value);}}class StartNodeModel extends CircleNodeModel {setAttributes() {this.r = 30;this.isSelected = false;}getConnectedTargetRules() {const rules = super.getConnectedTargetRules();const geteWayOnlyAsTarget = {message: "开始节点只能连出,不能连入!",validate: (source?: BaseNodeModel, target?: BaseNodeModel) => {let isValid = true;if (target) {isValid = false;}return isValid;},};rules.push(geteWayOnlyAsTarget);return rules;}getConnectedSourceRules() {const rules = super.getConnectedSourceRules();const onlyOneOutEdge = {message: "开始节点只能连出一条线!",validate: (source?: BaseNodeModel, target?: BaseNodeModel) => {let isValid = true;if (source?.outgoing.edges.length) {isValid = false;}return isValid;},};rules.push(onlyOneOutEdge);return rules;}createId() {return uuidv4();}}lf.value?.register({type: "start",view: StartNode,model: StartNodeModel,});/*** @description 自定义发起节点*/class LaunchNode extends RectNode {getShape() {const { x, y, width, height, radius } = this.props.model;const style = this.props.model.getNodeStyle();return h("g", {}, [h("rect", {...style,x: x - width / 2,y: y - height / 2,rx: radius,ry: radius,width: 120,height: 50,stroke: "#000",fill: "#000",}),]);}getText() {const { x, y, text, width, height } = this.props.model;return h("foreignObject",{x: x - width / 2,y: y - height / 2,className: "foreign-object",style: {width: width,height: height,},},[h("p",{style: {fontSize: 12,width: width,height: height,lineHeight: height + "px",whiteSpace: "nowrap",overflow: "hidden",textOverflow: "ellipsis",textAlign: "center",padding: "0 8px",boxSizing: "border-box",margin: "0",color: "#fff",},},text.value),]);}}class LaunchModel extends RectNodeModel {setAttributes() {this.width = 120;this.height = 50;this.radius = 4;this.isSelected = false;}getConnectedSourceRules() {const rules = super.getConnectedSourceRules();const notAsTarget = {message: "不能连接自己",validate: (source?: BaseNodeModel, target?: BaseNodeModel) => {let isValid = true;if (source?.id === target?.id) {isValid = false;}return isValid;},};rules.push(notAsTarget);return rules;}createId() {return uuidv4();}}lf.value?.register({type: "launch",view: LaunchNode,model: LaunchModel,});/*** @description 自定义审批节点*/class ApproverNode extends RectNode {getShape() {const { x, y, width, height, radius } = this.props.model;const style = this.props.model.getNodeStyle();return h("g", {}, [h("rect", {...style,x: x - width / 2,y: y - height / 2,rx: radius,ry: radius,width: 120,height: 50,stroke: "#facd91",fill: "#facd91",}),]);}getText() {const { x, y, text, width, height } = this.props.model;return h("foreignObject",{x: x - width / 2,y: y - height / 2,className: "foreign-object",style: {width: width,height: height,},},[h("p",{style: {fontSize: 12,width: width,height: height,lineHeight: height + "px",whiteSpace: "nowrap",overflow: "hidden",textOverflow: "ellipsis",textAlign: "center",padding: "0 8px",boxSizing: "border-box",margin: "0",},},text.value),]);}}class ApproverModel extends RectNodeModel {setAttributes() {this.width = 120;this.height = 50;this.radius = 4;this.isSelected = false;}getConnectedSourceRules() {const rules = super.getConnectedSourceRules();const notAsTarget = {message: "不能连接自己",validate: (source?: BaseNodeModel, target?: BaseNodeModel) => {let isValid = true;if (source?.id === target?.id) {isValid = false;}return isValid;},};rules.push(notAsTarget);return rules;}createId() {return uuidv4();}}lf.value?.register({type: "approver",view: ApproverNode,model: ApproverModel,});/*** @description 自定义连接点节点*/class LinkNode extends RectNode {getShape() {const { x, y, width, height, radius } = this.props.model;const style = this.props.model.getNodeStyle();return h("g", {}, [h("rect", {...style,x: x - width / 2,y: y - height / 2,rx: radius,ry: radius,width: 120,height: 50,stroke: "#caf982",fill: "#caf982",}),]);}getText() {const { x, y, text, width, height } = this.props.model;return h("foreignObject",{x: x - width / 2,y: y - height / 2,className: "foreign-object",style: {width: width,height: height,},},[h("p",{style: {fontSize: 12,width: width,height: height,lineHeight: height + "px",whiteSpace: "nowrap",overflow: "hidden",textOverflow: "ellipsis",textAlign: "center",padding: "0 8px",boxSizing: "border-box",margin: "0",},},text.value),]);}}class LinkModel extends RectNodeModel {setAttributes() {this.width = 120;this.height = 50;this.radius = 4;this.isSelected = false;}getConnectedSourceRules() {const rules = super.getConnectedSourceRules();const notAsTarget = {message: "不能连接自己",validate: (source?: BaseNodeModel, target?: BaseNodeModel) => {let isValid = true;if (source?.id === target?.id) {isValid = false;}return isValid;},};rules.push(notAsTarget);return rules;}createId() {return uuidv4();}}lf.value?.register({type: "link",view: LinkNode,model: LinkModel,});/*** @description 自定义传阅节点*/class ReviewNode extends RectNode {getShape() {const { x, y, width, height, radius } = this.props.model;const style = this.props.model.getNodeStyle();return h("g", {}, [h("rect", {...style,x: x - width / 2,y: y - height / 2,rx: radius,ry: radius,width: 120,height: 50,stroke: "#81d3f8",fill: "#81d3f8",}),]);}getText() {const { x, y, text, width, height } = this.props.model;return h("foreignObject",{x: x - width / 2,y: y - height / 2,className: "foreign-object",style: {width: width,height: height,},},[h("p",{style: {fontSize: 12,width: width,height: height,lineHeight: height + "px",whiteSpace: "nowrap",overflow: "hidden",textOverflow: "ellipsis",textAlign: "center",padding: "0 8px",boxSizing: "border-box",margin: "0",},},text.value),]);}}class ReviewModel extends RectNodeModel {setAttributes() {this.width = 120;this.height = 50;this.radius = 4;this.isSelected = false;}getConnectedSourceRules() {const rules = super.getConnectedSourceRules();const notAsTarget = {message: "不能连接自己",validate: (source?: BaseNodeModel, target?: BaseNodeModel) => {let isValid = true;if (source?.id === target?.id) {isValid = false;}return isValid;},};rules.push(notAsTarget);return rules;}createId() {return uuidv4();}}lf.value?.register({type: "review",view: ReviewNode,model: ReviewModel,});/*** @description 结束节点*/class FinishNode extends CircleNode {getShape() {const { x, y } = this.props.model;const style = this.props.model.getNodeStyle();return h("g", {}, [h("circle", {...style,cx: x,cy: y,r: 30,stroke: "#000",fill: "#000",}),]);}getText() {const { x, y, text } = this.props.model;return h("text",{x: x,y: y,fill: "#fff",textAnchor: "middle",alignmentBaseline: "middle",style: { fontSize: 12 },},text.value);}}class FinishModel extends CircleNodeModel {setAttributes() {this.r = 30;this.isSelected = false;}getConnectedSourceRules() {const rules = super.getConnectedSourceRules();const notAsTarget = {message: "终止节点不能作为连线的起点",validate: () => false,};rules.push(notAsTarget);return rules;}createId() {return uuidv4();}}lf.value?.register({type: "end",view: FinishNode,model: FinishModel,});/*** @description 虚线*/class DashedLineModel extends PolylineEdgeModel {getEdgeStyle() {const style = super.getEdgeStyle();style.stroke = "#000";style.strokeDasharray = "3 3";return style;}}lf.value?.register({type: "dashedLine",view: PolylineEdge,model: DashedLineModel,});/*** @description 开始的连线*/class StartPolylineModel extends PolylineEdgeModel {setAttributes() {this.isSelected = false;this.isHitable = false;}}lf.value?.register({type: "startPolyline",view: PolylineEdge,model: StartPolylineModel,});
}
注册logicflow并使用自定义节点
<template><div class="logic-flow-container"><div class="logic-flow-header"><el-button type="primary" @click="getData">获取数据</el-button><el-button type="primary" @click="submit">提交</el-button></div><div class="logic-flow-main"><div class="logic-flow" ref="logicFlowRef"></div><Settingclass="logic-flow-setting":data="nodeData!":lf="lf":type="state.settingType"></Setting><NodePanel :lf="lf"></NodePanel></div><!-- 当lf有值 才能注册事件 --><Control v-if="lf" :lf="lf"></Control></div>
</template><script lang="ts">
export default { name: "LogicFlow" };
</script>
<script lang="ts" setup>
import LogicFlow from "@logicflow/core";
import "@logicflow/core/lib/style/index.css";
import "@logicflow/extension/lib/style/index.css";
import { onMounted, reactive, ref, ShallowRef, shallowRef } from "vue";
import NodePanel from "./components/node-panel.vue";
import { registeNode, registerKeyboard, requiredConfig } from "./index";
import { ElMessage } from "element-plus";
import Control from "./components/control.vue";
import Setting from "./components/setting.vue";
import { SettingType } from "@/types/logic-flow";const logicFlowRef = ref<HTMLDivElement>();
const nodeData = ref<LogicFlow.NodeData | LogicFlow.EdgeData>(); // 节点数据
const state = reactive({settingType: "all" as SettingType,
});
const lf = shallowRef<LogicFlow>();const getSettingInfo = (data: LogicFlow.NodeData | LogicFlow.EdgeData) => {switch (data.type) {case "launch":nodeData.value = data;state.settingType = data.type;break;case "approver":nodeData.value = data;state.settingType = data.type;break;case "link":nodeData.value = data;state.settingType = data.type;break;case "review":nodeData.value = data;state.settingType = data.type;break;case "polyline":case "dashedLine":nodeData.value = data;state.settingType = data.type;break;}
};
/*** @description 注册事件*/
const initEvent = (lf: ShallowRef<LogicFlow | undefined>) => {lf.value?.on("blank:click", (e) => {state.settingType = "all";});lf.value?.on("node:mousedown", ({ data }) => {lf.value?.selectElementById(data.id, false);getSettingInfo(data);});lf.value?.on("edge:click", ({ data }) => {lf.value?.selectElementById(data.id, false);getSettingInfo(data);});lf.value?.on("connection:not-allowed", (data) => {ElMessage.error(data.msg);return false;});lf.value?.on("node:dnd-add", ({ data }) => {// 选中节点 更改信息lf.value?.selectElementById(data.id, false);getSettingInfo(data);lf.value?.container.focus(); // 聚焦 能够使用键盘操作});
};
/*** @description 获取数据*/
const getData = () => {console.log(lf.value?.getGraphData());
};
/*** @description 提交 验证数据*/
const submit = () => {const { nodes } = lf.value?.getGraphData() as LogicFlow.GraphData;for (let index = 0; index < nodes.length; index++) {const data = nodes[index];const { properties } = data;// 循环配置项for (const key in properties) {// 数组配置项 判断是否为空if (Array.isArray(properties[key])) {if (requiredConfig[key] && properties[key].length === 0) {return ElMessage.error(`${data.text?.value}节点 ${requiredConfig[key]}`);}} else {// 非数组配置项 判断是否为空if (requiredConfig[key] && !properties[key]) {return ElMessage.error(`${data.text?.value}节点 ${requiredConfig[key]}`);}}}}console.log(lf.value?.getGraphData());
};onMounted(() => {lf.value = new LogicFlow({container: logicFlowRef.value!,grid: true,keyboard: {enabled: true,shortcuts: registerKeyboard(lf, nodeData),},textEdit: false,});registeNode(lf);initEvent(lf);lf.value.render({nodes: [{id: "node_1",type: "start",x: 100,y: 300,properties: {width: 60,height: 60,},text: {x: 100,y: 300,value: "开始",},},{id: "node_2",type: "launch",x: 100,y: 400,properties: {width: 120,height: 50,},text: {x: 100,y: 400,value: "发起流程",},},{id: "node_3",type: "end",x: 100,y: 600,properties: {width: 60,height: 60,},text: {x: 100,y: 600,value: "结束",},},],edges: [{id: "edge_1",type: "startPolyline",sourceNodeId: "node_1",targetNodeId: "node_2",},{id: "edge_2",type: "polyline",sourceNodeId: "node_2",targetNodeId: "node_3",},],});lf.value.translateCenter(); // 将图形移动到画布中央
});
</script>
右侧的配置设置
- 通过
componentIs实现不同的配置组件 - 通过logicflow的
setProperties()函数,将配置项注入节点/边的properties对象中,目的是传参和回显的时候方便


人员选择组件
正选、反选、回显,可作为一个单独组件使用,目前使用的是el-tree,数据量大时可考虑虚拟树

<template><MyDialogv-model="state.visible"title="选择人员"width="800px"@close="close"@cancel="close"@submit="submit"><div class="type"><label><span>发起人:</span><el-radio-group v-model="state.type"><el-radio value="1">指定人员</el-radio><el-radio value="2">角色</el-radio></el-radio-group></label></div><div class="panel"><div class="left-panel"><div class="panel-title">人员选择</div><div class="search"><el-inputv-model="state.filterText"style="width: 100%"placeholder="请输入筛选内容"/></div><div class="content"><el-treeref="treeRef":data="state.data"show-checkboxnode-key="key":check-on-click-node="true":filter-node-method="filterNode"@check-change="checkChange"/></div></div><div class="right-panel"><div class="panel-title">已选择</div><div class="content checked-content"><el-tagv-for="tag in state.checkedList":key="tag.key"closabletype="primary"@close="handleClose(tag.key)">{{ tag.label }}</el-tag></div></div></div></MyDialog>
</template><script lang="ts">
export default { name: "ChoosePerson" };
</script>
<script lang="ts" setup>
import { ElTree } from "element-plus";
import { nextTick, reactive, ref, watch } from "vue";
interface Tree {[key: string]: any;
}
const state = reactive({visible: false,type: "1",filterText: "",value: [],data: [{label: "张三",key: "1",},{label: "李四",key: "2",},{label: "王五",key: "3",children: [{label: "王五1",key: "31",},{label: "王五2",key: "32",},],},],checked: [] as string[],checkedList: [] as { label: string; key: string }[],
});
const treeRef = ref<InstanceType<typeof ElTree>>();
const emits = defineEmits(["submit"]);
/*** @description 筛选节点*/
watch(() => state.filterText,(val) => {treeRef.value!.filter(val);}
);
const open = (checked: string[]) => {state.visible = true;nextTick(() => {state.checked = checked;treeRef.value?.setCheckedKeys([...checked], false);});
};
const close = () => {state.visible = false;state.filterText = "";
};
const submit = () => {emits("submit", state.checked, state.checkedList);close();
};
/*** @description 筛选节点*/
const filterNode = (value: string, data: Tree) => {if (!value) return true;return data.label.includes(value);
};
/*** @description 选中节点*/
const checkChange = () => {// 已选的id string[] 用来提交state.checked = treeRef.value?.getCheckedNodes(true, false).map((item) => item.key) as string[];// 已选的对象 {label: string; key: string}[] 用来展示tagstate.checkedList = treeRef.value?.getCheckedNodes(true, false).map((item) => {return {label: item.label,key: item.key,};})!;
};
/*** @description 删除已选人员*/
const handleClose = (key: string) => {state.checkedList = state.checkedList.filter((item) => item.key !== key);treeRef.value?.setCheckedKeys(state.checkedList.map((item) => item.key),false);
};
/*** @description 清空已选人员*/
const clear = () => {state.checkedList = [];state.checked = [];treeRef.value?.setCheckedKeys([], false);
};
defineExpose({open,clear,
});
</script><style lang="scss" scoped>
.type {display: flex;align-items: center;margin-bottom: 20px;span {margin-right: 10px;}label {display: flex;align-items: center;}
}
.panel {width: 100%;display: flex;.left-panel {flex: 1;border: 1px solid #ccc;border-radius: 4px;.search {padding: 6px 10px;}}.right-panel {flex: 1;margin-left: 20px;border: 1px solid #ccc;border-radius: 4px;}.panel-title {padding: 10px 0;font-size: 14px;font-weight: bold;background-color: #f5f5f5;text-align: center;}.content {max-height: 400px;min-height: 200px;overflow: auto;}.checked-content {padding: 6px 10px;.el-tag + .el-tag {margin-left: 10px;}}
}
</style>
自定义快捷键,根据源码改编
/*** @description 注册键盘事件* @export* @param {(ShallowRef<LogicFlow | undefined>)} lf* @param {(Ref<LogicFlow.NodeData | LogicFlow.EdgeData | undefined>)} nodeData* @return {*}*/
export function registerKeyboard(lf: ShallowRef<LogicFlow | undefined>,nodeData: Ref<LogicFlow.NodeData | LogicFlow.EdgeData | undefined>
) {let copyNodes = undefined as LogicFlow.NodeData[] | undefined;let TRANSLATION_DISTANCE = 40;let CHILDREN_TRANSLATION_DISTANCE = 40;const cv = [{keys: ["ctrl + c", "cmd + c"],callback: () => {copyNodes = lf.value?.getSelectElements().nodes;},},{keys: ["ctrl + v", "cmd + v"],callback: () => {const startOrEndNode = copyNodes?.find((node) =>node.type === "start" ||node.type === "end" ||node.type === "launch");if (startOrEndNode) {return true;}if (copyNodes) {lf.value?.clearSelectElements();copyNodes.forEach(function (node) {node.x += TRANSLATION_DISTANCE;node.y += TRANSLATION_DISTANCE;node.text!.x += TRANSLATION_DISTANCE;node.text!.y += TRANSLATION_DISTANCE;return node;});let addElements = lf.value?.addElements({ nodes: copyNodes, edges: [] },CHILDREN_TRANSLATION_DISTANCE);if (!addElements) return true;addElements.nodes.forEach(function (node) {nodeData.value = node.getData();return lf.value?.selectElementById(node.id, true);});CHILDREN_TRANSLATION_DISTANCE =CHILDREN_TRANSLATION_DISTANCE + TRANSLATION_DISTANCE;}return false;},},{keys: ["backspace"],callback: () => {const elements = lf.value?.getSelectElements(true);if (elements) {lf.value?.clearSelectElements();elements.edges.forEach(function (edge) {return edge.id && lf.value?.deleteEdge(edge.id);});elements.nodes.forEach(function (node) {if (node.type === "start" ||node.type === "end" ||node.type === "launch") {return true;}return node.id && lf.value?.deleteNode(node.id);});return false;}},},];return cv;
}
仓库地址
在线预览
相关文章:

Vue3中使用LogicFlow实现简单流程图
实现结果 实现功能: 拖拽创建节点自定义节点/边自定义快捷键人员选择弹窗右侧动态配置组件配置项获取/回显必填项验证 自定义节点与拖拽创建节点 拖拽节点面板node-panel.vue <template><div class"node-panel"><divv-for"(item, k…...

《重学Java设计模式》之 工厂方法模式
《重学Java设计模式》之 建造者模式 《重学Java设计模式》之 原型模式 《重学Java设计模式》之 单例模式 模拟发奖多种商品 工程结构 奖品发放接口 package com.yys.mes.design.factory.store;public interface ICommodity {/*** Author Sherry* Date 14:20 2024/11/6**/voi…...

【大数据学习 | kafka】kafka的数据存储结构
以上是kafka的数据的存储方式。 这些数据可以在服务器集群上对应的文件夹中查看到。 [hexuanhadoop106 __consumer_offsets-0]$ ll 总用量 8 -rw-rw-r--. 1 hexuan hexuan 10485760 10月 28 22:21 00000000000000000000.index -rw-rw-r--. 1 hexuan hexuan 0 10月 28 …...
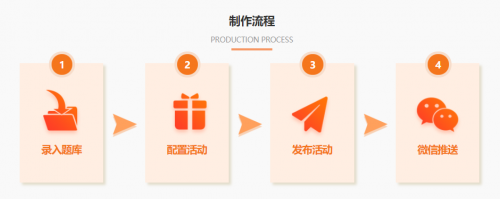
知识竞赛答题系统,线上答题小程序链接怎么做?
随着智能手机的普及,越来越多的单位开始在线上开展知识竞赛。这种形式的知识竞赛不仅易于操作,而且参与度更高。那么线上知识竞赛答题系统怎么做呢?自己可以做吗?答案是可以的!借助微信答题系统制作平台风传吧…...

基于SSM的社区物业管理系统+LW参考示例
1.项目介绍 系统角色:管理员、业主(普通用户)功能模块:管理员(用户管理、二手置换管理、报修管理、缴费管理、公告管理)、普通用户(登录注册、二手置换、生活缴费、信息采集、报事报修…...

android——jetpack startup初始化框架
一、jetpack startup Android Jetpack Startup是一个库,它简化了Android应用启动过程,尤其是对于那些需要处理复杂数据绑定和初始化逻辑的应用。它的核心在于提供了一个StartupComponent,用于声明应用的初始化逻辑,这个逻辑会在首…...
英伟达HOVER——用于人形机器人的多功能全身控制器:整合不同的控制模式且实现彼此之间的无缝切换
前言 前几天,一在长沙的朋友李总发我一个英伟达HOVER的视频(自从我今年年初以来持续不断的解读各大顶级实验室的最前沿paper、以及分享我司七月在具身领域的探索与落地后,影响力便越来越大了,不断加油 ),该视频说的有点玄乎&…...

GEE代码学习 day17
13.2 地球上到处都有许多图像吗? 我们可以使用下面的代码将这个 reducer count 应用于我们过滤后的 ImageCollection。我们将返回相同的数据集并筛选 2020 年,但没有地理限制。这将收集来自世界各地的图像,然后计算每个像素中的图像数量。以…...

论文阅读笔记-Covariate Shift: A Review and Analysis on Classifiers
前言 标题:Covariate Shift: A Review and Analysis on Classifiers 原文链接:Link\ 我们都知道在机器学习模型中,训练数据和测试数据是不同的阶段,并且,通常是是假定训练数据和测试数据点遵循相同的分布。但是实际上&…...

基于SSM+VUE守护萌宠宠物网站JAVA|VUE|Springboot计算机毕业设计源代码+数据库+LW文档+开题报告+答辩稿+部署教+代码讲解
源代码数据库LW文档(1万字以上)开题报告答辩稿 部署教程代码讲解代码时间修改教程 一、开发工具、运行环境、开发技术 开发工具 1、操作系统:Window操作系统 2、开发工具:IntelliJ IDEA或者Eclipse 3、数据库存储:…...

【在Linux世界中追寻伟大的One Piece】Socket编程TCP
目录 1 -> TCP socket API 2 -> V1 -Echo Server 2.1 -> 测试多个连接的情况 1 -> TCP socket API socket(): socket()打开一个网络通讯端口,如果成功的话,就像open()一样返回一个文件描述符。应用程序可以像读写文件一样用r…...

进入半导体行业需要具备哪些能力?
要进入半导体公司,尤其是从事工艺流程设计和制程优化的岗位,需要具备一定的跨学科背景。 以某公司招聘要求为例: **公司 招聘岗位:工艺工程师 该公司是一家从事半导体设备、工艺与材料研发、生产和销售的公司,面向…...

Nature重磅:AI化学家再升级!大幅提升实验效率,推动化学合成进入“智能化”新阶段
人工智能(AI)驱动的机器人,正在我们的生活中扮演着越来越重要的角色,而在化学合成实验室内,它们也在悄然改变着传统实验方式。 如今,科学家们在智能化学领域取得了新突破—— 来自英国利物浦大学的研究团…...

源代码泄漏怎么办?SDC沙盒成为破局利器
在数字化时代,源代码安全已成为企业关注的焦点。源代码的泄露不仅可能导致知识产权的损失,还可能被竞争对手利用,给企业带来巨大的经济损失和法律风险。因此,采取有效的源代码防泄漏措施至关重要。深信达的SDC沙盒防泄密软件&…...

【论文复现】基于图卷积网络的轻量化推荐模型
本文所涉及所有资源均在这里可获取。 📕作者简介:热爱跑步的恒川,致力于C/C、Java、Python等多编程语言,热爱跑步,喜爱音乐、摄影的一位博主。 📗本文收录于论文复现系列,大家有兴趣的可以看一看…...

使用ssh-key免密登录服务器或免密连接git代码仓库网站
ssh登录服务器场景 假设有两台机器,分别是: 源机器:主机A(hostA),ip:198.168.0.1 目标机器:主机B(hostB),ip:192.168.0.2 ssh-key免…...

自由学习记录(19)
unity核心也算是看完了吧,但觉得的确是少了点东西,之后再看mvc框架,和网络开发,,感觉有必要想想主次顺序了,毕竟在明年的3月之前尽量让自己更有贴合需求的能力 先了解一些相关概念,不用看懂&am…...

Elasticsearch中时间字段格式用法详解
Elasticsearch中时间字段格式用法详解 攻城狮Jozz关注IP属地: 北京 2024.03.18 16:27:51字数 758阅读 2,571 Elasticsearch(简称ES)是一个基于Lucene构建的开源、分布式、RESTful搜索引擎。它提供了全文搜索、结构化搜索以及分析等功能,广泛…...

蓝桥杯-网络安全比赛题目-遗漏的压缩包
小蓝同学给你发来了他自己开发的网站链接, 他说他故意留下了一个压缩包文件,里面有网站的源代码, 他想考验一下你的网络安全技能。 (点击“下发赛题”后,你将得到一个http链接。如果该链接自动跳转到https,…...

ES海量数据插入如何优化性能?
2024年10月NJSD技术盛典暨第十届NJSD软件开发者大会、第八届IAS互联网架构大会在南京召开。百度文心快码总经理臧志分享了《AI原生研发新范式的实践与思考》,探讨了大模型赋能下的研发变革及如何在公司和行业中落地,AI原生研发新范式的内涵和推动经验。 …...
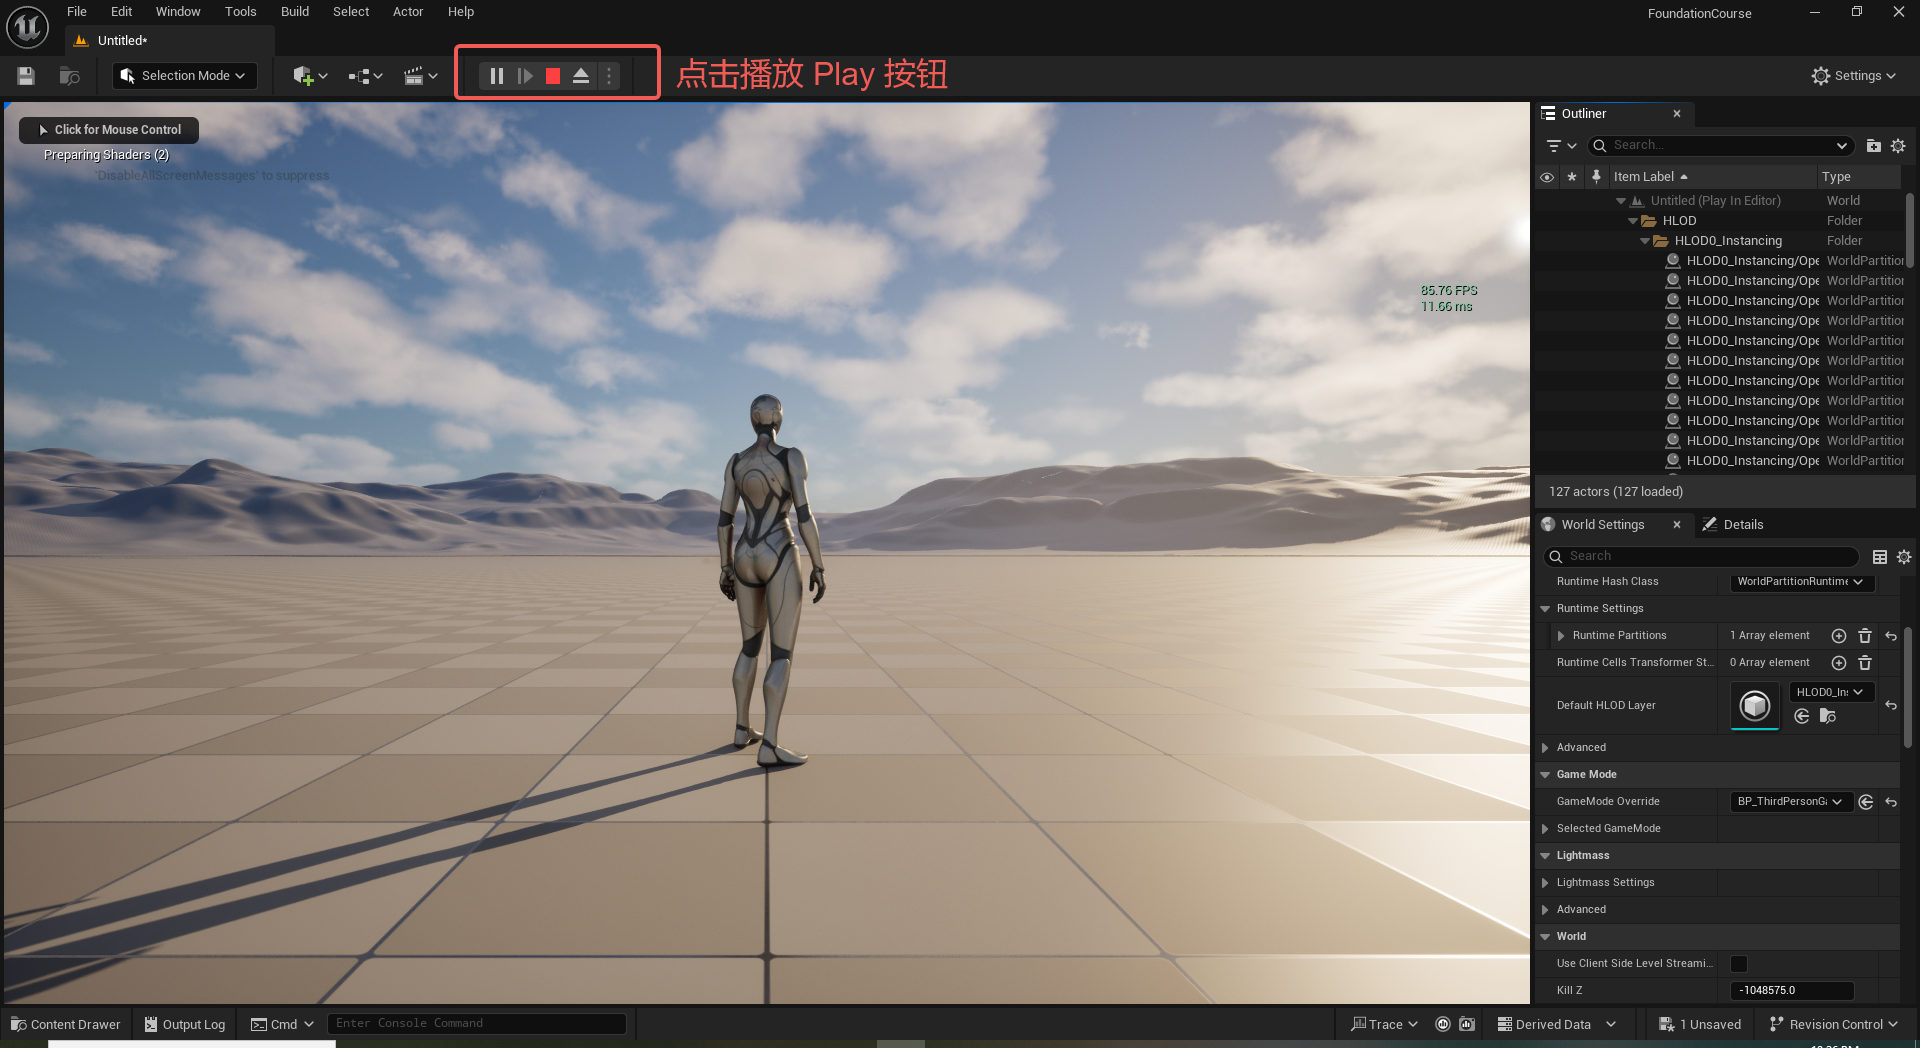
UE5 学习系列(二)用户操作界面及介绍
这篇博客是 UE5 学习系列博客的第二篇,在第一篇的基础上展开这篇内容。博客参考的 B 站视频资料和第一篇的链接如下: 【Note】:如果你已经完成安装等操作,可以只执行第一篇博客中 2. 新建一个空白游戏项目 章节操作,重…...
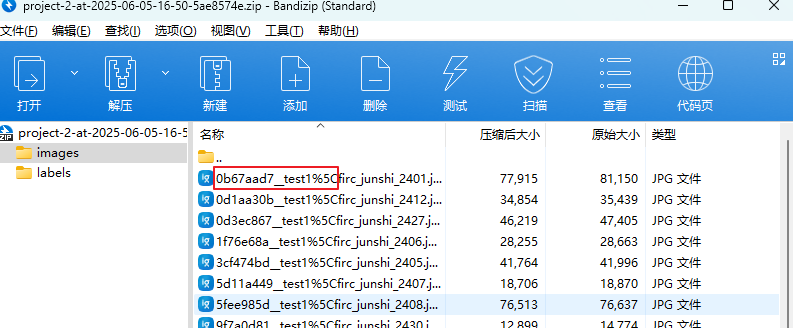
label-studio的使用教程(导入本地路径)
文章目录 1. 准备环境2. 脚本启动2.1 Windows2.2 Linux 3. 安装label-studio机器学习后端3.1 pip安装(推荐)3.2 GitHub仓库安装 4. 后端配置4.1 yolo环境4.2 引入后端模型4.3 修改脚本4.4 启动后端 5. 标注工程5.1 创建工程5.2 配置图片路径5.3 配置工程类型标签5.4 配置模型5.…...
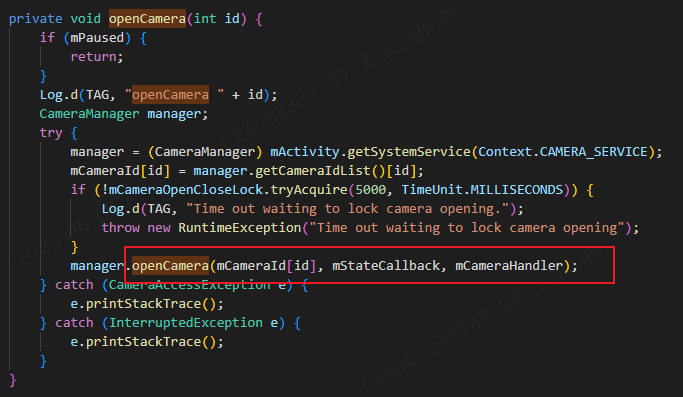
相机从app启动流程
一、流程框架图 二、具体流程分析 1、得到cameralist和对应的静态信息 目录如下: 重点代码分析: 启动相机前,先要通过getCameraIdList获取camera的个数以及id,然后可以通过getCameraCharacteristics获取对应id camera的capabilities(静态信息)进行一些openCamera前的…...
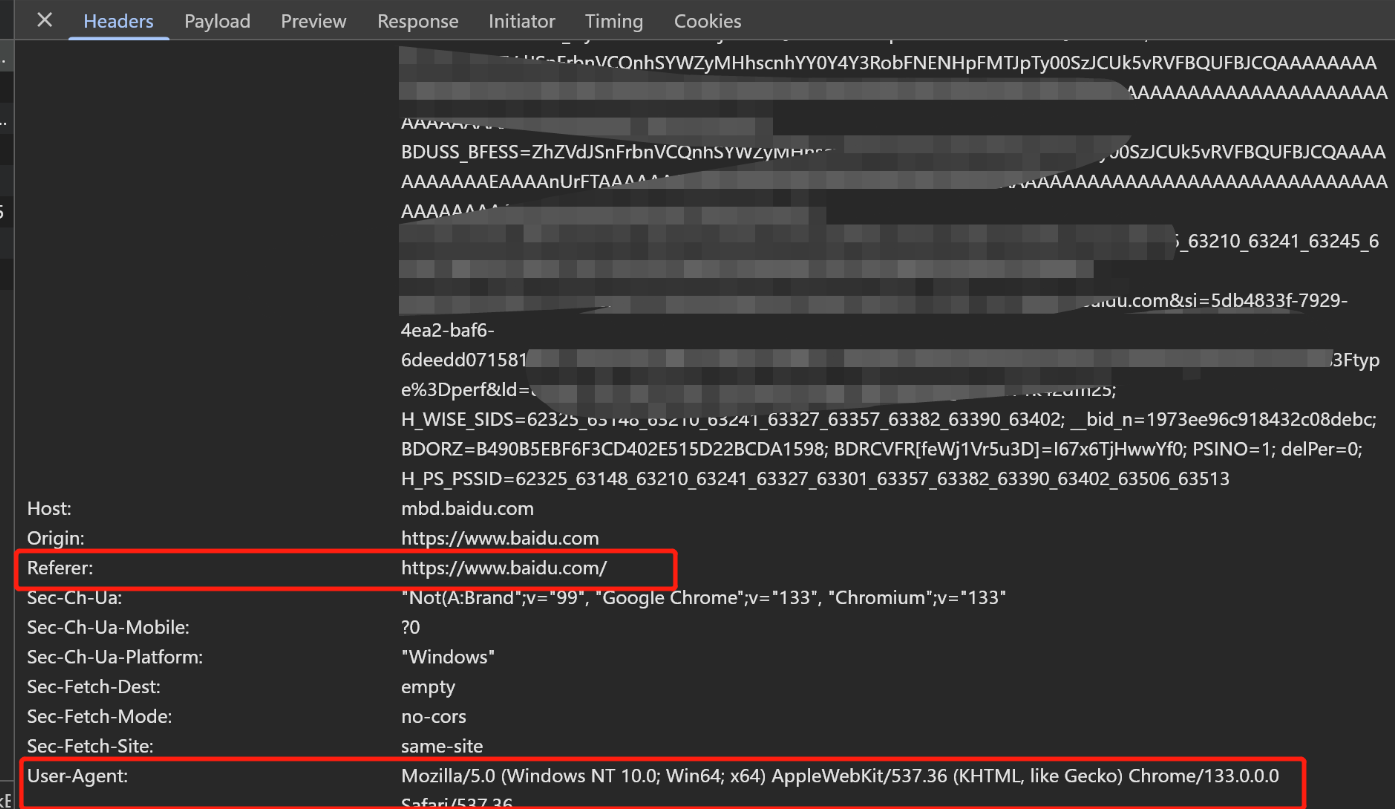
Python爬虫(一):爬虫伪装
一、网站防爬机制概述 在当今互联网环境中,具有一定规模或盈利性质的网站几乎都实施了各种防爬措施。这些措施主要分为两大类: 身份验证机制:直接将未经授权的爬虫阻挡在外反爬技术体系:通过各种技术手段增加爬虫获取数据的难度…...
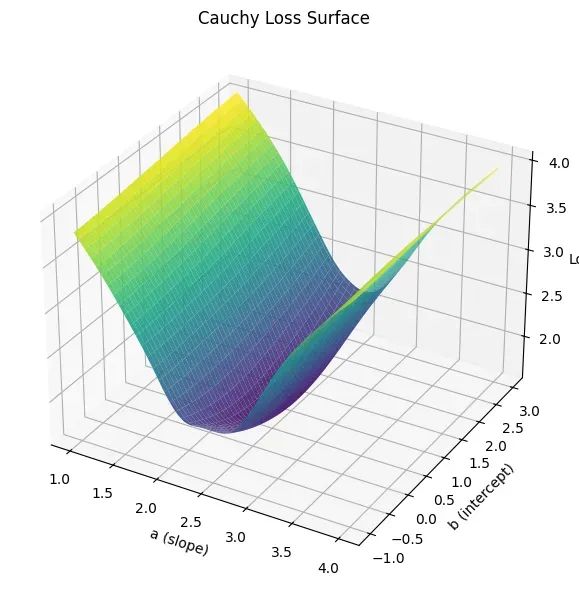
让回归模型不再被异常值“带跑偏“,MSE和Cauchy损失函数在噪声数据环境下的实战对比
在机器学习的回归分析中,损失函数的选择对模型性能具有决定性影响。均方误差(MSE)作为经典的损失函数,在处理干净数据时表现优异,但在面对包含异常值的噪声数据时,其对大误差的二次惩罚机制往往导致模型参数…...

NPOI Excel用OLE对象的形式插入文件附件以及插入图片
static void Main(string[] args) {XlsWithObjData();Console.WriteLine("输出完成"); }static void XlsWithObjData() {// 创建工作簿和单元格,只有HSSFWorkbook,XSSFWorkbook不可以HSSFWorkbook workbook new HSSFWorkbook();HSSFSheet sheet (HSSFSheet)workboo…...

数据库——redis
一、Redis 介绍 1. 概述 Redis(Remote Dictionary Server)是一个开源的、高性能的内存键值数据库系统,具有以下核心特点: 内存存储架构:数据主要存储在内存中,提供微秒级的读写响应 多数据结构支持&…...
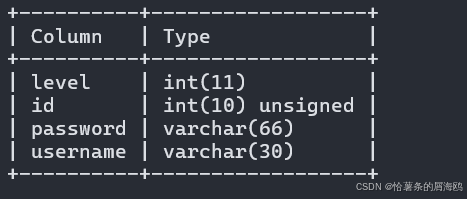
SQL注入篇-sqlmap的配置和使用
在之前的皮卡丘靶场第五期SQL注入的内容中我们谈到了sqlmap,但是由于很多朋友看不了解命令行格式,所以是纯手动获取数据库信息的 接下来我们就用sqlmap来进行皮卡丘靶场的sql注入学习,链接:https://wwhc.lanzoue.com/ifJY32ybh6vc…...
Axure零基础跟我学:展开与收回
亲爱的小伙伴,如有帮助请订阅专栏!跟着老师每课一练,系统学习Axure交互设计课程! Axure产品经理精品视频课https://edu.csdn.net/course/detail/40420 课程主题:Axure菜单展开与收回 课程视频:...

Axure Rp 11 安装、汉化、授权
Axure Rp 11 安装、汉化、授权 1、前言2、汉化2.1、汉化文件下载2.2、windows汉化流程2.3、 macOs汉化流程 3、授权 1、前言 Axure Rp 11官方下载链接:https://www.axure.com/downloadthanks 2、汉化 2.1、汉化文件下载 链接: https://pan.baidu.com/s/18Clf…...
