Python实现人脸识别算法并封装为类库
引言
人脸识别技术在现代社会中应用广泛,从安全监控到智能门锁,再到社交媒体中的照片标记功能,都离不开这项技术。本文将详细介绍如何使用Python实现基本的人脸识别算法,并将其封装为一个类库,以便在多个项目中复用。
环境准备
安装依赖
首先,确保你的环境中安装了以下库:
- OpenCV
- dlib
- face_recognition
你可以使用以下命令安装这些库:
pip install opencv-python
pip install dlib
pip install face_recognition
代码实现
1. 创建类库文件
我们将创建一个名为 face_recognition_lib.py 的文件,内容如下:
import cv2
import face_recognition
import numpy as np
from PIL import Image, ImageDrawclass FaceRecognition:def __init__(self, image_paths):"""初始化FaceRecognition类。:param image_paths: 已知人脸图像的路径列表"""self.known_face_encodings, self.known_face_names = self.load_and_encode_faces(image_paths)def load_and_encode_faces(self, image_paths):"""加载并编码已知人脸图像。:param image_paths: 已知人脸图像的路径列表:return: 已知人脸的编码和名称"""known_face_encodings = []known_face_names = []for image_path in image_paths:# 加载图片image = face_recognition.load_image_file(image_path)# 编码人脸face_encoding = face_recognition.face_encodings(image)[0]# 获取文件名作为名字name = image_path.split('/')[-1].split('.')[0]# 添加到已知人脸列表known_face_encodings.append(face_encoding)known_face_names.append(name)return known_face_encodings, known_face_namesdef real_time_face_recognition(self):"""实现实时人脸识别。"""# 打开摄像头video_capture = cv2.VideoCapture(0)while True:# 读取一帧ret, frame = video_capture.read()# 将帧转换为RGBrgb_frame = frame[:, :, ::-1]# 检测人脸位置face_locations = face_recognition.face_locations(rgb_frame)# 编码人脸face_encodings = face_recognition.face_encodings(rgb_frame, face_locations)# 遍历检测到的人脸for (top, right, bottom, left), face_encoding in zip(face_locations, face_encodings):# 匹配已知人脸matches = face_recognition.compare_faces(self.known_face_encodings, face_encoding)name = "Unknown"# 计算欧氏距离face_distances = face_recognition.face_distance(self.known_face_encodings, face_encoding)best_match_index = np.argmin(face_distances)if matches[best_match_index]:name = self.known_face_names[best_match_index]# 在帧上绘制矩形和标签cv2.rectangle(frame, (left, top), (right, bottom), (0, 0, 255), 2)cv2.rectangle(frame, (left, bottom - 35), (right, bottom), (0, 0, 255), cv2.FILLED)font = cv2.FONT_HERSHEY_DUPLEXcv2.putText(frame, name, (left + 6, bottom - 6), font, 1.0, (255, 255, 255), 1)# 显示结果cv2.imshow('Video', frame)# 按q键退出if cv2.waitKey(1) & 0xFF == ord('q'):break# 释放摄像头video_capture.release()cv2.destroyAllWindows()# 示例用法
if __name__ == "__main__":# 已知人脸图像路径image_paths = ['path/to/known_face_1.jpg','path/to/known_face_2.jpg',# 添加更多已知人脸图像路径]# 初始化FaceRecognition类face_recognition = FaceRecognition(image_paths)# 启动实时人脸识别face_recognition.real_time_face_recognition()
2. 详细解释
初始化
class FaceRecognition:def __init__(self, image_paths):"""初始化FaceRecognition类。:param image_paths: 已知人脸图像的路径列表"""self.known_face_encodings, self.known_face_names = self.load_and_encode_faces(image_paths)
在类的初始化方法中,我们传入已知人脸图像的路径列表,并调用 load_and_encode_faces 方法来加载和编码这些图像。
加载和编码已知人脸
def load_and_encode_faces(self, image_paths):"""加载并编码已知人脸图像。:param image_paths: 已知人脸图像的路径列表:return: 已知人脸的编码和名称"""known_face_encodings = []known_face_names = []for image_path in image_paths:# 加载图片image = face_recognition.load_image_file(image_path)# 编码人脸face_encoding = face_recognition.face_encodings(image)[0]# 获取文件名作为名字name = image_path.split('/')[-1].split('.')[0]# 添加到已知人脸列表known_face_encodings.append(face_encoding)known_face_names.append(name)return known_face_encodings, known_face_names
load_and_encode_faces 方法遍历传入的图像路径列表,加载每张图像并对其进行编码。编码后的特征向量和对应的名字被存储在两个列表中,分别返回。
实时人脸识别
def real_time_face_recognition(self):"""实现实时人脸识别。"""# 打开摄像头video_capture = cv2.VideoCapture(0)while True:# 读取一帧ret, frame = video_capture.read()# 将帧转换为RGBrgb_frame = frame[:, :, ::-1]# 检测人脸位置face_locations = face_recognition.face_locations(rgb_frame)# 编码人脸face_encodings = face_recognition.face_encodings(rgb_frame, face_locations)# 遍历检测到的人脸for (top, right, bottom, left), face_encoding in zip(face_locations, face_encodings):# 匹配已知人脸matches = face_recognition.compare_faces(self.known_face_encodings, face_encoding)name = "Unknown"# 计算欧氏距离face_distances = face_recognition.face_distance(self.known_face_encodings, face_encoding)best_match_index = np.argmin(face_distances)if matches[best_match_index]:name = self.known_face_names[best_match_index]# 在帧上绘制矩形和标签cv2.rectangle(frame, (left, top), (right, bottom), (0, 0, 255), 2)cv2.rectangle(frame, (left, bottom - 35), (right, bottom), (0, 0, 255), cv2.FILLED)font = cv2.FONT_HERSHEY_DUPLEXcv2.putText(frame, name, (left + 6, bottom - 6), font, 1.0, (255, 255, 255), 1)# 显示结果cv2.imshow('Video', frame)# 按q键退出if cv2.waitKey(1) & 0xFF == ord('q'):break# 释放摄像头video_capture.release()cv2.destroyAllWindows()
real_time_face_recognition 方法打开摄像头并读取视频流。对于每一帧,我们将其转换为RGB格式,检测人脸位置并编码。然后,我们将编码后的人脸与已知人脸进行匹配,并在帧上绘制矩形和标签。按 q 键可以退出程序。
3. 使用类库
创建一个名为 main.py 的文件,内容如下:
from face_recognition_lib import FaceRecognition# 已知人脸图像路径
image_paths = ['path/to/known_face_1.jpg','path/to/known_face_2.jpg',# 添加更多已知人脸图像路径
]# 初始化FaceRecognition类
face_recognition = FaceRecognition(image_paths)# 启动实时人脸识别
face_recognition.real_time_face_recognition()
4. 运行示例
确保你的环境中安装了所需的库:
pip install opencv-python
pip install dlib
pip install face_recognition
然后运行 main.py:
python main.py
5. 代码运行接口
为了使类库更加通用和易于集成,我们可以添加一些额外的方法和配置选项。以下是改进后的类库文件 face_recognition_lib.py:
import cv2
import face_recognition
import numpy as np
from PIL import Image, ImageDrawclass FaceRecognition:def __init__(self, image_paths, tolerance=0.6, model='hog'):"""初始化FaceRecognition类。:param image_paths: 已知人脸图像的路径列表:param tolerance: 人脸匹配的阈值:param model: 人脸检测模型('hog' 或 'cnn')"""self.tolerance = toleranceself.model = modelself.known_face_encodings, self.known_face_names = self.load_and_encode_faces(image_paths)def load_and_encode_faces(self, image_paths):"""加载并编码已知人脸图像。:param image_paths: 已知人脸图像的路径列表:return: 已知人脸的编码和名称"""known_face_encodings = []known_face_names = []for image_path in image_paths:# 加载图片image = face_recognition.load_image_file(image_path)# 编码人脸face_encoding = face_recognition.face_encodings(image)[0]# 获取文件名作为名字name = image_path.split('/')[-1].split('.')[0]# 添加到已知人脸列表known_face_encodings.append(face_encoding)known_face_names.append(name)return known_face_encodings, known_face_namesdef real_time_face_recognition(self, camera_index=0):"""实现实时人脸识别。:param camera_index: 摄像头索引"""# 打开摄像头video_capture = cv2.VideoCapture(camera_index)while True:# 读取一帧ret, frame = video_capture.read()# 将帧转换为RGBrgb_frame = frame[:, :, ::-1]# 检测人脸位置face_locations = face_recognition.face_locations(rgb_frame, model=self.model)# 编码人脸face_encodings = face_recognition.face_encodings(rgb_frame, face_locations)# 遍历检测到的人脸for (top, right, bottom, left), face_encoding in zip(face_locations, face_encodings):# 匹配已知人脸matches = face_recognition.compare_faces(self.known_face_encodings, face_encoding, tolerance=self.tolerance)name = "Unknown"# 计算欧氏距离face_distances = face_recognition.face_distance(self.known_face_encodings, face_encoding)best_match_index = np.argmin(face_distances)if matches[best_match_index]:name = self.known_face_names[best_match_index]# 在帧上绘制矩形和标签cv2.rectangle(frame, (left, top), (right, bottom), (0, 0, 255), 2)cv2.rectangle(frame, (left, bottom - 35), (right, bottom), (0, 0, 255), cv2.FILLED)font = cv2.FONT_HERSHEY_DUPLEXcv2.putText(frame, name, (left + 6, bottom - 6), font, 1.0, (255, 255, 255), 1)# 显示结果cv2.imshow('Video', frame)# 按q键退出if cv2.waitKey(1) & 0xFF == ord('q'):break# 释放摄像头video_capture.release()cv2.destroyAllWindows()# 示例用法
if __name__ == "__main__":# 已知人脸图像路径image_paths = ['path/to/known_face_1.jpg','path/to/known_face_2.jpg',# 添加更多已知人脸图像路径]# 初始化FaceRecognition类face_recognition = FaceRecognition(image_paths, tolerance=0.6, model='hog')# 启动实时人脸识别face_recognition.real_time_face_recognition(camera_index=0)
6. 详细说明
初始化
def __init__(self, image_paths, tolerance=0.6, model='hog'):"""初始化FaceRecognition类。:param image_paths: 已知人脸图像的路径列表:param tolerance: 人脸匹配的阈值:param model: 人脸检测模型('hog' 或 'cnn')"""self.tolerance = toleranceself.model = modelself.known_face_encodings, self.known_face_names = self.load_and_encode_faces(image_paths)
我们在初始化方法中增加了 tolerance 和 model 参数,以便在实例化类时可以调整人脸匹配的阈值和检测模型。
实时人脸识别
def real_time_face_recognition(self, camera_index=0):"""实现实时人脸识别。:param camera_index: 摄像头索引"""# 打开摄像头video_capture = cv2.VideoCapture(camera_index)while True:# 读取一帧ret, frame = video_capture.read()# 将帧转换为RGBrgb_frame = frame[:, :, ::-1]# 检测人脸位置face_locations = face_recognition.face_locations(rgb_frame, model=self.model)# 编码人脸face_encodings = face_recognition.face_encodings(rgb_frame, face_locations)# 遍历检测到的人脸for (top, right, bottom, left), face_encoding in zip(face_locations, face_encodings):# 匹配已知人脸matches = face_recognition.compare_faces(self.known_face_encodings, face_encoding, tolerance=self.tolerance)name = "Unknown"# 计算欧氏距离face_distances = face_recognition.face_distance(self.known_face_encodings, face_encoding)best_match_index = np.argmin(face_distances)if matches[best_match_index]:name = self.known_face_names[best_match_index]# 在帧上绘制矩形和标签cv2.rectangle(frame, (left, top), (right, bottom), (0, 0, 255), 2)cv2.rectangle(frame, (left, bottom - 35), (right, bottom), (0, 0, 255), cv2.FILLED)font = cv2.FONT_HERSHEY_DUPLEXcv2.putText(frame, name, (left + 6, bottom - 6), font, 1.0, (255, 255, 255), 1)# 显示结果cv2.imshow('Video', frame)# 按q键退出if cv2.waitKey(1) & 0xFF == ord('q'):break# 释放摄像头video_capture.release()cv2.destroyAllWindows()
我们在 real_time_face_recognition 方法中增加了 camera_index 参数,以便可以选择不同的摄像头。同时,我们使用了 tolerance 和 model 参数来调整人脸匹配的阈值和检测模型。
7. 总结
通过上述步骤,我们成功实现了基于Python的人脸识别算法,并将其封装为一个类库。使用OpenCV和dlib库,我们可以轻松地加载和编码已知人脸,并在实时视频流中检测和识别人脸。希望这篇文章对你有所帮助!
相关文章:

Python实现人脸识别算法并封装为类库
引言 人脸识别技术在现代社会中应用广泛,从安全监控到智能门锁,再到社交媒体中的照片标记功能,都离不开这项技术。本文将详细介绍如何使用Python实现基本的人脸识别算法,并将其封装为一个类库,以便在多个项目中复用。…...

uniapp小程序分享使用canvas自定义绘制 vue3
使用混入结合canvas做小程序的分享 在混入里面定义一个全局共享的分享样式,在遇到特殊页面需要单独处理 utils/share.js import { ref } from vue; export default {onShow() {// 创建时设置统一页面的默认值uni.$mpShare {title: 分享的标题,path: /pages/home/…...

SpringCloud核心组件(四)
文章目录 NacosNacos 配置中心1.起源2.基本概念ProfileData IDGroup 3.基础配置a. bootstrap.ymlb. application.ymlc. nacos 中的配置 DataIDd.测试读取配置中心配置内容 4.配置隔离a.命名空间b.DataIDc.bootstrap.ymld.service 隔离 5.配置拆分a.配置拆分策略b.DataID 配置c.…...

如何把本地docker 镜像下载用到centos系统中呢?
如果需要将镜像下载到本地或在 CentOS 系统上使用该镜像,你可以按照以下步骤操作: 1. 拉取镜像 如果想将镜像从 Docker Hub 或其他镜像仓库下载到本地,可以使用 docker pull 命令。 如果使用的是本地构建的镜像(如 isc:v1.0.0&…...
Godot的开发框架应当是什么样子的?
目录 前言 全局协程还是实例协程? 存档! 全局管理类? UI框架? Godot中的异步(多线程)加载 Godot中的ScriptableObject 游戏流程思考 结语 前言 这是一篇杂谈,主要内容是对我…...

GitHub新手入门 - 从创建仓库到协作管理
GitHub新手入门 - 从创建仓库到协作管理 GitHub 是开发者的社交平台,同时也是代码托管的强大工具。无论是个人项目、开源协作,还是团队开发,GitHub 都能让你轻松管理代码、版本控制和团队协作。今天,我们将从基础开始,…...
作业25 深度搜索3
作业: #include <iostream> using namespace std; bool b[100][100]{0}; char map[100][100]{0}; int dx[4]{0,1,0,-1}; int dy[4]{1,0,-1,0}; int n,m; int sx,sy,ex,ey; int mink2147483647; void dfs(int,int,int); int main(){cin>>n>>m;for(…...

ubuntu20.04 colmap 安装2024.11最新
很多教程都很落后了,需要下载压缩包解压编译的很麻烦 现在就只需要apt install就可以了 apt更新 sudo apt update && sudo apt-get upgrade安装依赖 #安装依赖 sudo apt-get install git cmake ninja-build build-essential libboost-program-options-de…...
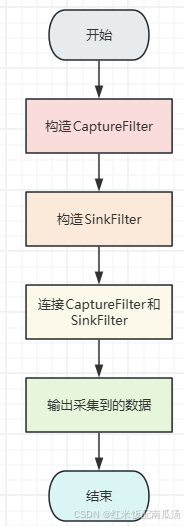
WebRTC视频 03 - 视频采集类 VideoCaptureDS 上篇
WebRTC视频 01 - 视频采集整体架构 WebRTC视频 02 - 视频采集类 VideoCaptureModule [WebRTC视频 03 - 视频采集类 VideoCaptureDS 上篇](本文) WebRTC视频 04 - 视频采集类 VideoCaptureDS 中篇 WebRTC视频 05 - 视频采集类 VideoCaptureDS 下篇 一、前…...
 详解)
python os.path.basename(获取路径中的文件名部分) 详解
os.path.basename 是 Python 的 os 模块中的一个函数,用于获取路径中的文件名部分。它会去掉路径中的目录部分,只返回最后的文件名或目录名。 以下是 os.path.basename 的详细解释和使用示例: 语法 os.path.basename(path) 参数 path&…...
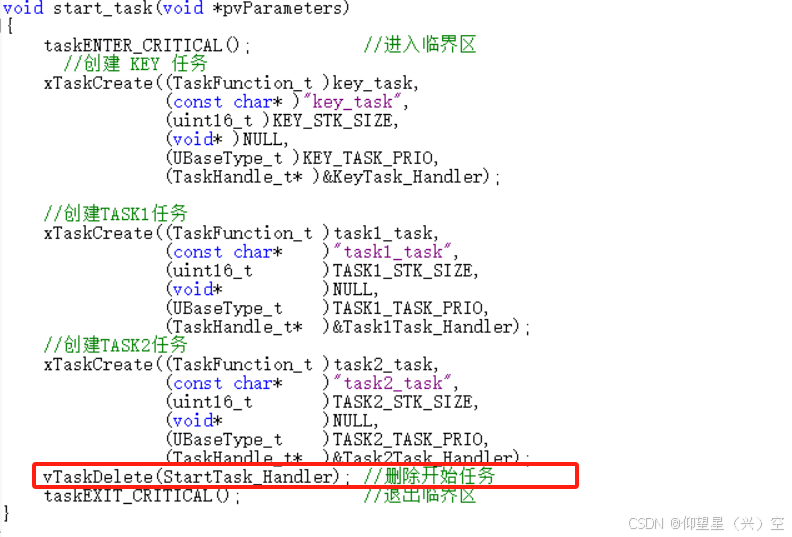
《FreeRTOS任务基础知识以及任务创建相关函数》
目录 1.FreeRTOS多任务系统与传统单片机单任务系统的区别 2.FreeRTOS中的任务(Task)介绍 2.1 任务特性 2.2 FreeRTOS中的任务状态 2.3 FreeRTOS中的任务优先级 2.4 在任务函数中退出 2.5 任务控制块和任务堆栈 2.5.1 任务控制块 2.5.2 任务堆栈…...

036集——查询CAD图元属性字段信息:窗体显示(CAD—C#二次开发入门)
提取CAD图元所有属性字段,通过窗体显示,效果如下:(curve改为entity) 代码如下: public void 属性查询() {List<Curve> ents Z.db.SelectEntities<Curve>();if (ents is null ||ents.Cou…...

Swift从0开始学习 函数和闭包 day2
一、函数 1.1函数定义 使用 func 来声明一个函数,使用名字和参数来调用函数。使用 -> 来指定函数返回值的类型。 示例:拼接字符串 //有参数和返回值的函数 func append1(name : String, description : String) -> String {return "\(name)…...
划分)
内网、公网(外网)划分
内网、公网(外网)划分 声明! 学习视频来自B站up主 泷羽sec 有兴趣的师傅可以关注一下,如涉及侵权马上删除文章 笔记只是方便各位师傅的学习和探讨,文章所提到的网站以及内容,只做学习交流,其…...

【linux】centos7 换阿里云源
相关文章 【linux】CentOS 的软件源(Repository)学习-CSDN博客 查看yum配置文件 yum的配置文件通常位于/etc/yum.repos.d/目录下。你可以使用以下命令查看这些文件: ls /etc/yum.repos.d/ # 或者 ll /etc/yum.repos.d/备份当前的yum配置文…...
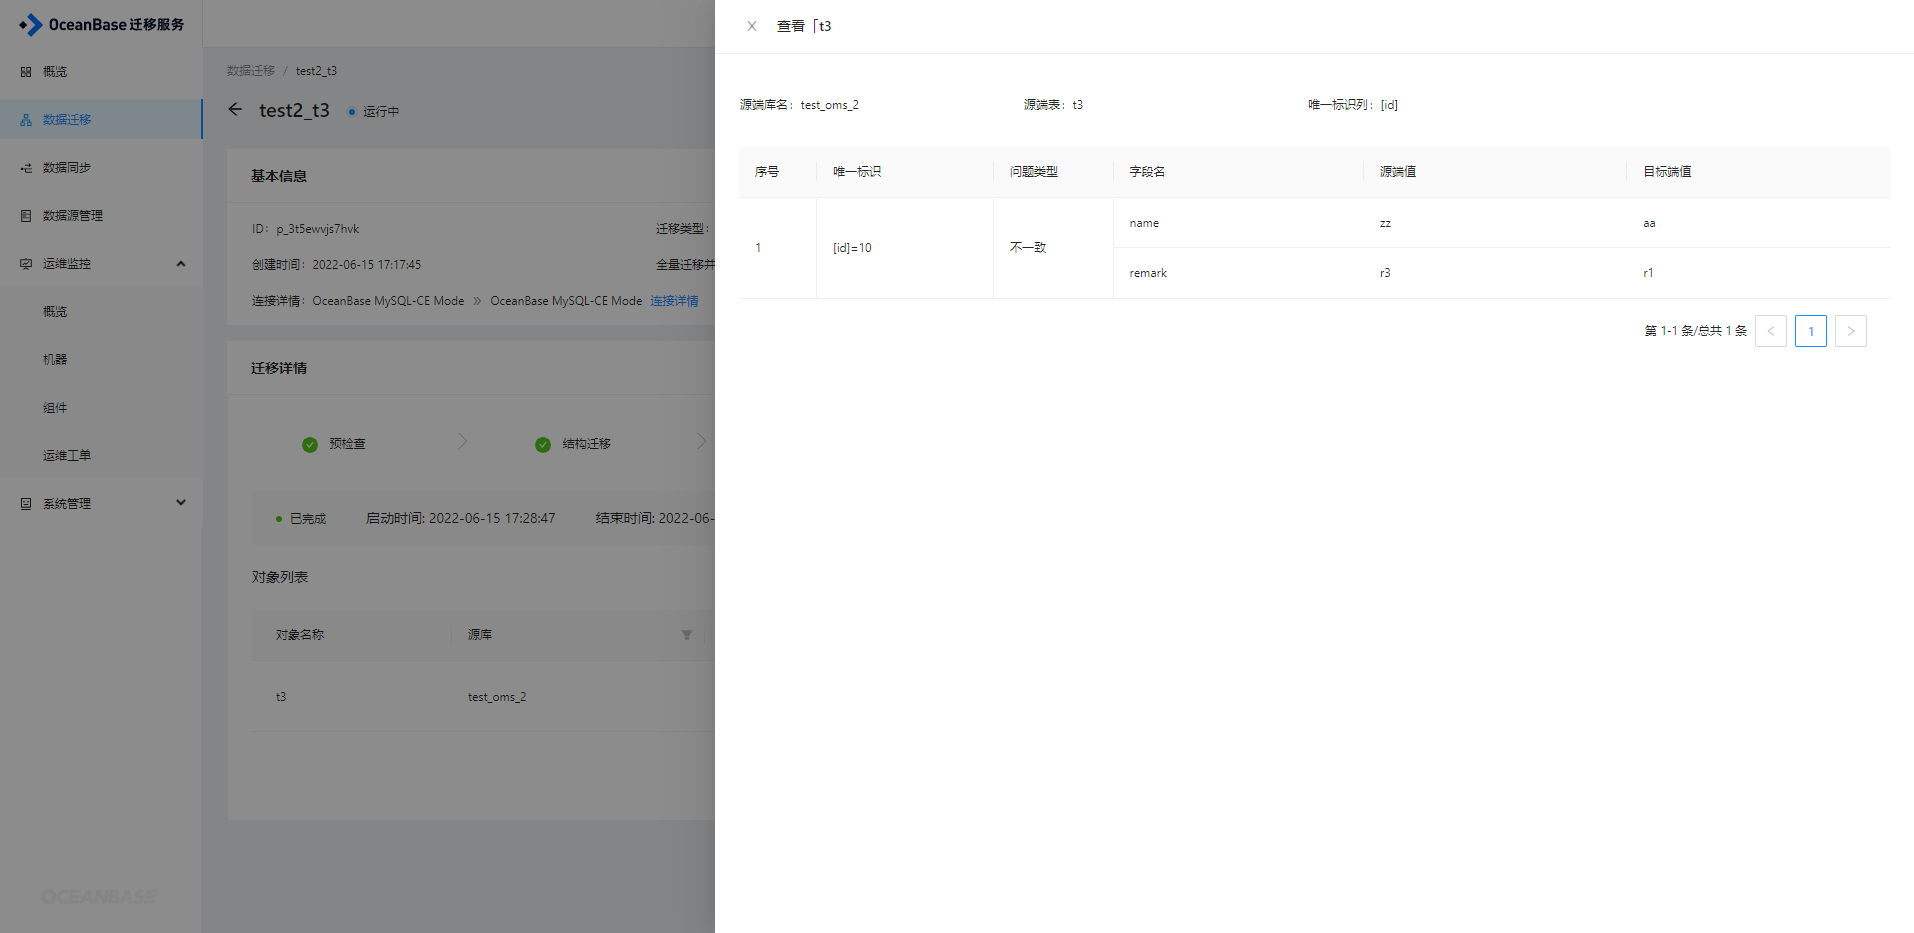
用OMS进行 OceanBase 租户间数据迁移的测评
基本概念 OceanBase迁移服务(,简称OMS),可以让用户在同构或异构 RDBMS 与OceanBase 数据库之间进行数据交互,支持数据的在线迁移,以及实时增量同步的复制功能。 OMS 提供了可视化的集中管控平台ÿ…...

【因果分析方法】MATLAB计算Liang-Kleeman信息流
【因果分析方法】MATLAB计算Liang-Kleeman信息流 1 Liang-Kleeman信息流2 MATLAB代码2.1 函数代码2.2 案例参考Liang-Kleeman 信息流(Liang-Kleeman Information Flow)是由 Liang 和 Kleeman 提出的基于信息论的因果分析方法。该方法用于量化变量之间的因果关系,通过计算信息…...

【Java基础知识系列】之Java类的初始化顺序
前言 类的初始化顺序 简单场景 代码示例 public class Person {private String name initName();private String initName() {System.out.println("【父类】初始化实例变量name");return "【父类】史蒂夫";}private int age;private static int staticVa…...

Swift 宏(Macro)入门趣谈(二)
概述 苹果在去年 WWDC 23 中就为 Swift 语言新增了“其利断金”的重要小伙伴 Swift 宏(Swift Macro)。为此,苹果特地用 2 段视频(入门和进阶)颇为隆重的介绍了它。 那么到底 Swift 宏是什么?有什么用&…...
vue elementui el-dropdown-item设置@click无效的解决方案
如图,直接在el-dropdown-item上面设置click,相应的method并没有被触发,查找资料发现需要在它的上级 el-dropdown 处使用 command 方法触发。 【template】 <el-dropdown placement"bottom-end" command"handleCommand&quo…...

国产多模态大模型崛起:技术、场景与未来挑战全解析
国产多模态大模型崛起:技术、场景与未来挑战全解析 引言 在人工智能浪潮席卷全球的背景下,多模态大模型已成为技术竞争的新高地。以GPT-4V、Gemini为代表的国际巨头展现了强大的图文理解与生成能力,而国产模型正凭借对中文场景的深度优化、独…...
)
python系列【仅供参考】;避开这些坑,你的Python爬虫才能稳定爬取IEEE Xplore(含反爬策略与MongoDB存储实战)
避开这些坑,你的Python爬虫才能稳定爬取IEEE Xplore(含反爬策略与MongoDB存储实战) 避开这些坑,你的Python爬虫才能稳定爬取IEEE Xplore(含反爬策略与MongoDB存储实战)---------------------避开这些坑,你的Python爬虫才能稳定爬取IEEE Xplore(含反爬策略与MongoDB存储…...

NotebookLM脑机接口部署避坑指南:TensorRT加速失效、电极位移漂移补偿、低信噪比场景下的9种fallback策略
更多请点击: https://codechina.net 第一章:NotebookLM脑机接口研究 NotebookLM 是 Google 推出的基于用户自有文档进行深度理解与推理的 AI 助手,虽其官方定位并非直接面向脑机接口(BCI)领域,但其底层架构…...

Layerdivider:3分钟搞定PSD分层,AI智能分层工具让设计效率提升500%
Layerdivider:3分钟搞定PSD分层,AI智能分层工具让设计效率提升500% 【免费下载链接】layerdivider A tool to divide a single illustration into a layered structure. 项目地址: https://gitcode.com/gh_mirrors/la/layerdivider 你是否曾经面对…...

Go语言秘钥管理:K8s Secret
Go语言秘钥管理:K8s Secret 1. Secret使用 import ("k8s.io/client-go/kubernetes""k8s.io/client-go/rest" )func getSecret(clientset *kubernetes.Clientset, name, namespace string) (string, error) {secret, err : clientset.CoreV1()…...

探索SillyTavern:为AI角色注入灵魂的PNG元数据魔法
探索SillyTavern:为AI角色注入灵魂的PNG元数据魔法 【免费下载链接】SillyTavern LLM Frontend for Power Users. 项目地址: https://gitcode.com/GitHub_Trending/si/SillyTavern 想象一下,当你分享一张角色图片时,你实际上是在分享一…...

从ok-skills项目解析技能树:设计理念、技术实现与工程实践
1. 项目概述与核心价值最近在GitHub上看到一个挺有意思的项目,叫“ok-skills”。光看这个名字,可能有点摸不着头脑,但点进去一看,发现这是一个关于“技能树”或“知识图谱”的开源项目。简单来说,它试图用一种结构化的…...
)
从Python到Shell:给AI/开发者的极简跨语言编程指南(附避坑对比)
从Python到Shell:给AI/开发者的极简跨语言编程指南(附避坑对比) 当Python开发者第一次接触Shell脚本时,往往会陷入两种极端:要么低估了Shell的能力,认为它只是简单的命令拼接;要么高估了它的复…...
)
【最新版本】OpenClaw 2.7.5 一键安装部署完整教程(包含安装包)
OpenClaw 一键安装包|一键部署,告别复杂环境配置 适配系统:Windows10/11 64 位当前版本:v2.7.5(虾壳云版)核心优势:全程可视化操作,无需命令行、无需手动配置 Python/Node.js&#…...

嵌入式Linux CPU频率固定:原理、方法与ElfBoard实战
1. 项目概述:为什么需要固定CPU频率?在嵌入式开发领域,尤其是像ElfBoard这样的ARM开发板上进行应用开发或性能调优时,CPU频率的动态调整(DVFS,动态电压频率调整)有时会成为一把双刃剑。对于追求…...