Opengl光照测试
代码
#include "Model.h"
#include "shader_m.h"
#include "imgui.h"
#include "imgui_impl_glfw.h"
#include "imgui_impl_opengl3.h"
//以上是放在同目录的头文件#include <glad/glad.h>
#include <GLFW/glfw3.h>
#include <glm/glm.hpp>
#include <glm/gtc/matrix_transform.hpp>
#include <glm/gtc/type_ptr.hpp>
#include <iostream>
#include <fstream>
#include <sstream>
#include <vector>
#include <array>  void framebuffer_size_callback(GLFWwindow* window, int width, int height);
void processInput(GLFWwindow* window);//相机位置控制函数
void keyCallbackrollpitchyaw(GLFWwindow* window, int key, int scancode, int action, int mods);//物体的平移和旋转函数const unsigned int SCR_WIDTH = 700;
const unsigned int SCR_HEIGHT = 452;glm::vec3 cameraPosition = glm::vec3(0.0f, 0.0f, 50.0f);//相机位置
glm::vec3 cameraFront = glm::vec3(0.0f, 0.0f, -1.0f);
glm::vec3 cameraUp = glm::vec3(0.0f, 1.0f, 0.0f);float lastX = SCR_WIDTH / 2.0f;
float lastY = SCR_HEIGHT / 2.0f;
bool firstMouse = true;float deltaTime = 0.0f;
float lastFrame = 0.0f;//旋转平移控制变量
float angleroll = 0.0f;
float anglepitch = 0.0f;
float angleyaw = 0.0f;
float translateX = 0.0f;
float translateY = 0.0f;
float translateZ = 0.0f;glm::vec3 pointLightPosition = glm::vec3(0.0f, 8.0f, 0.0f);//点光源
glm::vec3 pointLightPosition1 = glm::vec3(0.0f, 6.0f, 0.0f);
glm::vec3 pointLightPosition2 = glm::vec3(3.0f, 3.0f, 0.0f); glm::vec3 dirLightDirection = glm::vec3(0.0f, 0.0f, 0.0f);//平行光
glm::vec3 dirLightDirection1 = glm::vec3(0.0f, 0.0f, 0.0f);
glm::vec3 dirLightDirection2 = glm::vec3(0.0f, 0.0f, 0.0f);// 聚光灯的相关参数
glm::vec3 spotLightPosition = glm::vec3(0.0f, 0.0f, 0.0f);  // 聚光灯位置
glm::vec3 spotLightDirection = glm::normalize(glm::vec3(-1.0f, -1.0f, -1.0f));  // 聚光灯方向(指向原点或其他目标)
//glm::vec3 spotLightDirection = glm::normalize(glm::vec3(spotLightPosition.x, spotLightPosition.y, spotLightPosition.z));  // 聚光灯方向(指向原点或其他目标)
float spotLightCutOff = glm::cos(glm::radians(12.5f));  // 聚光灯的内角度(单位:弧度)
float spotLightOuterCutOff = glm::cos(glm::radians(17.5f));  // 聚光灯的外角度(单位:弧度)glm::vec3 spotLightPosition1 = glm::vec3(0.0f, 0.0f, 0.0f);  // 聚光灯位置
glm::vec3 spotLightDirection1 = glm::normalize(glm::vec3(-1.0f, -1.0f, -1.0f));  // 聚光灯方向(指向原点或其他目标)
//glm::vec3 spotLightDirection = glm::normalize(glm::vec3(spotLightPosition.x, spotLightPosition.y, spotLightPosition.z));  // 聚光灯方向(指向原点或其他目标)
float spotLightCutOff1 = glm::cos(glm::radians(12.5f));  // 聚光灯的内角度(单位:弧度)
float spotLightOuterCutOff1 = glm::cos(glm::radians(17.5f));  // 聚光灯的外角度(单位:弧度)glm::vec3 spotLightPosition2 = glm::vec3(0.0f, 0.0f, 0.0f);  // 聚光灯位置
glm::vec3 spotLightDirection2 = glm::normalize(glm::vec3(-1.0f, -1.0f, -1.0f));  // 聚光灯方向(指向原点或其他目标)
//glm::vec3 spotLightDirection = glm::normalize(glm::vec3(spotLightPosition.x, spotLightPosition.y, spotLightPosition.z));  // 聚光灯方向(指向原点或其他目标)
float spotLightCutOff2 = glm::cos(glm::radians(12.5f));  // 聚光灯的内角度(单位:弧度)
float spotLightOuterCutOff2 = glm::cos(glm::radians(17.5f));  // 聚光灯的外角度(单位:弧度)//物体颜色强度和光照强度
float ambientStrength = 0.0f;
float diffuseStrength = 0.7f;
float specularStrength = 0.3f;
float modelStrength = 1.0f;//Imgui
void renderImGui() {ImGui::Begin("Light Control");ImGui::SliderFloat("Model Strength", &modelStrength, 0.0f, 1.0f);ImGui::SliderFloat("Ambient Strength", &ambientStrength, 0.0f, 1.0f);ImGui::SliderFloat("Diffuse Strength", &diffuseStrength, 0.0f, 1.0f);ImGui::SliderFloat("Specular Strength", &specularStrength, 0.0f, 1.0f);ImGui::End();
}int main()
{glfwInit();glfwWindowHint(GLFW_CONTEXT_VERSION_MAJOR, 4);glfwWindowHint(GLFW_CONTEXT_VERSION_MINOR, 1);glfwWindowHint(GLFW_OPENGL_PROFILE, GLFW_OPENGL_CORE_PROFILE);GLFWwindow* window = glfwCreateWindow(SCR_WIDTH, SCR_HEIGHT, "ModelDemo", NULL, NULL);if (window == NULL){std::cout << "创建GLFW窗体失败" << std::endl;glfwTerminate();return -1;}glfwMakeContextCurrent(window);glfwSetFramebufferSizeCallback(window, framebuffer_size_callback);//glfwSetScrollCallback(window, scroll_callback);if (!gladLoadGLLoader((GLADloadproc)glfwGetProcAddress)){std::cout << "Failed to initialize GLAD" << std::endl;return -1;}glEnable(GL_DEPTH_TEST);//创建并编译shaderShader ImShader("LightTest.vs", "LightTest.fs");// 加载模型Model BallModel("sphere1.ply");//物体模型Model lightModel("spotlight3.ply"); // 用于表示点光源的模型Model lightModel1("spotlight3.ply"); // 用于表示点光源的模型Model lightModel2("spotlight3.ply"); // 用于表示点光源的模型Model lightModel3("spotlight3.ply"); // 用于表示聚光灯光源的模型Model lightModel4("spotlight3.ply"); // 用于表示聚光灯光源的模型Model lightModel5("spotlight3.ply"); // 用于表示聚光灯光源的模型//给物体赋予颜色的颜色图谱unsigned char ucColormap[256 * 3];FILE* file0 = fopen("colormap1.bin", "rb");std::memset(ucColormap, 0, 256 * 3);std::fread(ucColormap, 1, 256 * 3, file0);std::fclose(file0);int numColors = 256; GLubyte* colormapData = (GLubyte*)malloc(numColors * 3 * sizeof(GLubyte));for (int i = 0; i < numColors * 3; i++) {colormapData[i] = ucColormap[i]; }for (int i = 0; i < 2; i++) {std::printf("testColorMap #%d: R=%u, G=%u, B=%u\n", i, colormapData[i * 3], colormapData[i * 3 + 1], colormapData[i * 3 + 2]);}GLuint colormapTexture;glGenTextures(1, &colormapTexture);glBindTexture(GL_TEXTURE_1D, colormapTexture);glTexParameteri(GL_TEXTURE_1D, GL_TEXTURE_WRAP_S, GL_CLAMP_TO_EDGE);glTexParameteri(GL_TEXTURE_1D, GL_TEXTURE_MIN_FILTER, GL_LINEAR);glTexParameteri(GL_TEXTURE_1D, GL_TEXTURE_MAG_FILTER, GL_LINEAR);glTexImage1D(GL_TEXTURE_1D, 0, GL_RGB, numColors, 0, GL_RGB, GL_UNSIGNED_BYTE, colormapData);std::free(colormapData);glActiveTexture(GL_TEXTURE0);glUniform1i(glGetUniformLocation(ImShader.ID, "colormap"), 0);//颜色图谱结束glfwSetKeyCallback(window, keyCallbackrollpitchyaw);//控制模型旋转平移float left = -(float)SCR_WIDTH / 2.0f;//投影矩阵设置float right = (float)SCR_WIDTH / 2.0f;float bottom = -(float)SCR_HEIGHT / 2.0f;float top = (float)SCR_HEIGHT / 2.0f;float zNear = -1.0f;float zFar = 300.0f;IMGUI_CHECKVERSION();//IMGUI设置ImGui::CreateContext();ImGuiIO& io = ImGui::GetIO(); (void)io;ImGui::StyleColorsDark();ImGui_ImplGlfw_InitForOpenGL(window, true);ImGui_ImplOpenGL3_Init("#version 410");float modelStrength = 0.0f;//物体和光照强度初始化float ambientStrength = 0.7f;float diffStrength = 0.3f;float specularStrength = 1.0f;bool pointLightEnabled0 = false;bool pointLightEnabled1 = false;bool pointLightEnabled2 = false;bool spotLightEnabled = false;bool spotLightEnabled1 = false;bool spotLightEnabled2 = false;while (!glfwWindowShouldClose(window)){		float currentFrame = glfwGetTime();deltaTime = currentFrame - lastFrame;lastFrame = currentFrame;ImGui_ImplOpenGL3_NewFrame();ImGui_ImplGlfw_NewFrame();ImGui::NewFrame();		ImGui::Begin("Lighting Controls");ImGui::SliderFloat("Model Strength", &modelStrength, 0.0f, 1.0f);//调节范围ImGui::SliderFloat("Ambient Light Strength", &ambientStrength, 0.0f, 1.0f);ImGui::SliderFloat("Diffuse Light Strength", &diffStrength, 0.0f, 1.0f);ImGui::SliderFloat("Specular Light Strength", &specularStrength, 0.0f, 1.0f);ImGui::SliderFloat3("Camera Position", &cameraPosition[0], -10.0f, 10.0f);ImGui::SliderFloat3("Point Light Position", &pointLightPosition[0], -100.0f, 100.0f);ImGui::SliderFloat3("Point Light Position1", &pointLightPosition1[0], -100.0f, 100.0f);ImGui::SliderFloat3("Point Light Position2", &pointLightPosition2[0], -100.0f, 100.0f);ImGui::SliderFloat3("Spot Light Position", &spotLightPosition[0], -100.0f, 100.0f);//聚光灯//ImGui::SliderFloat3("Spot Light Direction", &spotLightDirection[0], -100.0f, 100.0f);ImGui::SliderFloat("Spot Light CutOff", &spotLightCutOff, cos(glm::radians(5.0f)), cos(glm::radians(45.0f)));  // 角度范围从 5 到 45 度ImGui::SliderFloat("Spot Light Outer CutOff", &spotLightOuterCutOff, cos(glm::radians(10.0f)), cos(glm::radians(45.0f)));  // 角度范围从 10 到 45 度ImGui::SliderFloat3("Spot Light Position1", &spotLightPosition1[0], -100.0f, 100.0f);//聚光灯//ImGui::SliderFloat3("Spot Light Direction", &spotLightDirection1[0], -100.0f, 100.0f);ImGui::SliderFloat("Spot Light CutOff1", &spotLightCutOff1, cos(glm::radians(5.0f)), cos(glm::radians(45.0f)));  // 角度范围从 5 到 45 度ImGui::SliderFloat("Spot Light Outer CutOff1", &spotLightOuterCutOff1, cos(glm::radians(10.0f)), cos(glm::radians(45.0f)));  // 角度范围从 10 到 45 度ImGui::SliderFloat3("Spot Light Position2", &spotLightPosition2[0], -100.0f, 100.0f);//聚光灯//ImGui::SliderFloat3("Spot Light Direction", &spotLightDirection[0], -100.0f, 100.0f);ImGui::SliderFloat("Spot Light CutOff2", &spotLightCutOff2, cos(glm::radians(5.0f)), cos(glm::radians(45.0f)));  // 角度范围从 5 到 45 度ImGui::SliderFloat("Spot Light Outer CutOff2", &spotLightOuterCutOff2, cos(glm::radians(10.0f)), cos(glm::radians(45.0f)));  // 角度范围从 10 到 45 度ImGui::SliderFloat3("Directional Light Direction", &dirLightDirection[0], -1.0f, 1.0f);ImGui::SliderFloat3("Directional Light Direction1", &dirLightDirection1[0], -1.0f, 1.0f);ImGui::SliderFloat3("Directional Light Direction2", &dirLightDirection2[0], -1.0f, 1.0f);ImGui::End();glClearColor(0.0f, 0.0f, 0.0f, 1.0f);glClear(GL_COLOR_BUFFER_BIT | GL_DEPTH_BUFFER_BIT);ImShader.use();glUniform1f(glGetUniformLocation(ImShader.ID, "modelStrength"), modelStrength);glUniform1f(glGetUniformLocation(ImShader.ID, "ambientStrength"), ambientStrength);glUniform1f(glGetUniformLocation(ImShader.ID, "diffStrength"), diffStrength);glUniform1f(glGetUniformLocation(ImShader.ID, "specularStrength"), specularStrength);glUniform3f(glGetUniformLocation(ImShader.ID, "pointLight.position"), pointLightPosition.x, pointLightPosition.y, pointLightPosition.z);glUniform3f(glGetUniformLocation(ImShader.ID, "pointLight1.position"),pointLightPosition1.x, pointLightPosition1.y, pointLightPosition1.z);glUniform3f(glGetUniformLocation(ImShader.ID, "pointLight2.position"),pointLightPosition2.x, pointLightPosition2.y, pointLightPosition2.z);glUniform3f(glGetUniformLocation(ImShader.ID, "spotLightPosition"), spotLightPosition.x, spotLightPosition.y, spotLightPosition.z);glUniform3f(glGetUniformLocation(ImShader.ID, "spotLightDirection"), spotLightDirection.x, spotLightDirection.y, spotLightDirection.z);glUniform1f(glGetUniformLocation(ImShader.ID, "spotLightCutOff"), spotLightCutOff);glUniform1f(glGetUniformLocation(ImShader.ID, "spotLightOuterCutOff"), spotLightOuterCutOff);glUniform3f(glGetUniformLocation(ImShader.ID, "spotLightPosition1"), spotLightPosition1.x, spotLightPosition1.y, spotLightPosition1.z);glUniform3f(glGetUniformLocation(ImShader.ID, "spotLightDirection1"), spotLightDirection1.x, spotLightDirection1.y, spotLightDirection1.z);glUniform1f(glGetUniformLocation(ImShader.ID, "spotLightCutOff1"), spotLightCutOff1);glUniform1f(glGetUniformLocation(ImShader.ID, "spotLightOuterCutOff1"), spotLightOuterCutOff1);glUniform3f(glGetUniformLocation(ImShader.ID, "spotLightPosition2"), spotLightPosition2.x, spotLightPosition2.y, spotLightPosition2.z);glUniform3f(glGetUniformLocation(ImShader.ID, "spotLightDirection2"), spotLightDirection2.x, spotLightDirection2.y, spotLightDirection2.z);glUniform1f(glGetUniformLocation(ImShader.ID, "spotLightCutOff2"), spotLightCutOff2);glUniform1f(glGetUniformLocation(ImShader.ID, "spotLightOuterCutOff2"), spotLightOuterCutOff2);glUniform3f(glGetUniformLocation(ImShader.ID, "directionalLight.position"), dirLightDirection.x, dirLightDirection.y, dirLightDirection.z);glUniform3f(glGetUniformLocation(ImShader.ID, "directionalLight1.position"), dirLightDirection1.x, dirLightDirection1.y, dirLightDirection1.z);glUniform3f(glGetUniformLocation(ImShader.ID, "directionalLight2.position"), dirLightDirection2.x, dirLightDirection2.y, dirLightDirection2.z);glUniform3f(glGetUniformLocation(ImShader.ID, "lightColor"), 1.0f, 1.0f, 1.0f);int viewPosLocation = glGetUniformLocation(ImShader.ID, "viewPos");glUniform3fv(viewPosLocation, 1, &cameraPosition[0]);processInput(window);//调整摄像机位置glm::mat4 projectiono = glm::ortho(left, right, bottom, top, zNear, zFar);glm::mat4 projection = glm::perspective(glm::radians(45.0f), (float)SCR_WIDTH / (float)SCR_HEIGHT, 0.1f, 1000.0f);glm::mat4 view = glm::lookAt(cameraPosition, cameraPosition + cameraFront, cameraUp);//设置着色器中用到的矩阵ImShader.setMat4("projection", projection);ImShader.setMat4("view", view);if (ImGui::Begin("Light Controls")) {if (ImGui::Button("Toggle Point Light 0")) {pointLightEnabled0 = !pointLightEnabled0;}if (ImGui::Button("Toggle Point Light 1")) {pointLightEnabled1 = !pointLightEnabled1;}if (ImGui::Button("Toggle Point Light 2")) {pointLightEnabled2 = !pointLightEnabled2;}if (ImGui::Button("Toggle Spot Light")) {spotLightEnabled = !spotLightEnabled;}if (ImGui::Button("Toggle Spot Light1")) {spotLightEnabled1 = !spotLightEnabled1;}if (ImGui::Button("Toggle Spot Light2")) {spotLightEnabled2 = !spotLightEnabled2;}ImGui::End();}// 模型变换矩阵的初始化glm::mat4 model = glm::mat4(1.0f);model = glm::scale(model, glm::vec3(6.0f, 6.0f, 6.0f));//放大尺寸//model = glm::rotate(model, glm::radians(270.0f), glm::vec3(0.0f, 0.0f, 1.0f));//旋转//model = glm::translate(model, glm::vec3(10.0f, -10.0f, -50.0f));//物体模型平移model = glm::rotate(model, glm::radians(anglepitch), glm::vec3(0.0f, 1.0f, 0.0f)); // y轴旋转model = glm::rotate(model, glm::radians(angleyaw), glm::vec3(0.0f, 0.0f, 1.0f)); // Zmodel = glm::rotate(model, glm::radians(angleroll), glm::vec3(1.0f, 0.0f, 0.0f)); // xmodel = glm::translate(model, glm::vec3(translateX, 0.0f, 0.0f));//平移model = glm::translate(model, glm::vec3(0.0f, translateY, 0.0f));model = glm::translate(model, glm::vec3(0.0f, 0.0f, translateZ));ImShader.setMat4("model", model);//设置模型矩阵model的函数,// 绘制模型物体BallModel.Draw(ImShader);// 计算从光源位置指向原点的方向glm::vec3 target = glm::vec3(0.0f, 0.0f, 0.0f);  // 坐标原点// 设置点光源0的模型变换矩阵if (pointLightEnabled0) {// 设置点光源的模型变换矩阵glm::mat4 lightModelMatrix = glm::mat4(1.0f);lightModelMatrix = glm::translate(lightModelMatrix, pointLightPosition);  // 将光源放置在 pointLightPositionglm::vec3 direction = glm::normalize(target - pointLightPosition);// 使用 glm::lookAt 函数创建一个朝向矩阵glm::mat4 orientationMatrix = -glm::lookAt(pointLightPosition, target, glm::vec3(0.0f, 1.0f, 0.0f));// 将朝向矩阵乘到模型矩阵上,确保它指向原点lightModelMatrix *= lightModelMatrix * glm::mat4(glm::mat3(orientationMatrix));  // 去除位移分量,只保留旋转部分lightModelMatrix = glm::scale(lightModelMatrix, glm::vec3(0.3f)); // 将光源球体缩小至合适大小// 设置着色器并传递点光源的位置ImShader.use();ImShader.setMat4("model", lightModelMatrix);  // 应用光源变换// 绘制点光源lightModel.Draw(ImShader);}// 设置点光源1的模型变换矩阵if (pointLightEnabled1) {glm::mat4 lightModelMatrix1 = glm::mat4(1.0f);lightModelMatrix1 = glm::translate(lightModelMatrix1, pointLightPosition1);  // 将光源放置在 pointLightPosition// 计算从光源位置指向原点的方向glm::vec3 direction1 = glm::normalize(target - pointLightPosition1);// 使用 glm::lookAt 函数创建一个朝向矩阵glm::mat4 orientationMatrix1 = -glm::lookAt(pointLightPosition1, target, glm::vec3(0.0f, 1.0f, 0.0f));// 将朝向矩阵乘到模型矩阵上,确保它指向原点lightModelMatrix1 *= lightModelMatrix1 * glm::mat4(glm::mat3(orientationMatrix1));  // 去除位移分量,只保留旋转部分lightModelMatrix1 = glm::scale(lightModelMatrix1, glm::vec3(0.3f)); // 将光源球体缩小至合适大小// 设置着色器并传递点光源的位置ImShader.use();ImShader.setMat4("model", lightModelMatrix1);  // 应用光源变换// 绘制点光源lightModel1.Draw(ImShader);}// 设置点光源2的模型变换矩阵if (pointLightEnabled2) {glm::mat4 lightModelMatrix2 = glm::mat4(1.0f);lightModelMatrix2 = glm::translate(lightModelMatrix2, pointLightPosition2);  // 将光源放置在 pointLightPosition// 计算从光源位置指向原点的方向glm::vec3 direction2 = glm::normalize(target - pointLightPosition2);// 使用 glm::lookAt 函数创建一个朝向矩阵glm::mat4 orientationMatrix2 = -glm::lookAt(pointLightPosition2, target, glm::vec3(0.0f, 1.0f, 0.0f));// 将朝向矩阵乘到模型矩阵上,确保它指向原点lightModelMatrix2 *= lightModelMatrix2 * glm::mat4(glm::mat3(orientationMatrix2));  // 去除位移分量,只保留旋转部分lightModelMatrix2 = glm::scale(lightModelMatrix2, glm::vec3(0.3f)); // 将光源球体缩小至合适大小// 设置着色器并传递点光源的位置ImShader.use();ImShader.setMat4("model", lightModelMatrix2);  // 应用光源变换// 绘制点光源lightModel2.Draw(ImShader);}// 计算从聚光灯光源位置指向原点的方向if (spotLightEnabled) {glm::mat4 lightModelMatrix3 = glm::mat4(1.0f);lightModelMatrix3 = glm::translate(lightModelMatrix3, spotLightPosition);  // 将光源放置在 pointLightPosition// 计算从光源位置指向原点的方向glm::vec3 direction3 = glm::normalize(spotLightPosition - target);// 使用 glm::lookAt 函数创建一个朝向矩阵glm::mat4 orientationMatrix3 = glm::lookAt(spotLightPosition, target, glm::vec3(0.0f, 1.0f, 0.0f));// 将朝向矩阵乘到模型矩阵上,确保它指向原点lightModelMatrix3 *= lightModelMatrix3 * glm::mat4(glm::mat3(orientationMatrix3));  // 去除位移分量,只保留旋转部分lightModelMatrix3 = glm::scale(lightModelMatrix3, glm::vec3(0.3f)); // 将光源球体缩小至合适大小// 设置着色器并传递点光源的位置ImShader.use();ImShader.setMat4("model", lightModelMatrix3);  // 应用光源变换// 绘制聚光灯光源lightModel3.Draw(ImShader);}// 计算从聚光灯光源位置指向原点的方向if (spotLightEnabled1){glm::mat4 lightModelMatrix4 = glm::mat4(1.0f);lightModelMatrix4 = glm::translate(lightModelMatrix4, spotLightPosition1);  // 将光源放置在 pointLightPosition// 计算从光源位置指向原点的方向glm::vec3 direction4 = glm::normalize(spotLightPosition1 - target);// 使用 glm::lookAt 函数创建一个朝向矩阵glm::mat4 orientationMatrix4 = glm::lookAt(spotLightPosition1, target, glm::vec3(0.0f, 1.0f, 0.0f));// 将朝向矩阵乘到模型矩阵上,确保它指向原点lightModelMatrix4 *= lightModelMatrix4 * glm::mat4(glm::mat3(orientationMatrix4));  // 去除位移分量,只保留旋转部分lightModelMatrix4 = glm::scale(lightModelMatrix4, glm::vec3(0.3f)); // 将光源球体缩小至合适大小// 设置着色器并传递点光源的位置ImShader.use();ImShader.setMat4("model", lightModelMatrix4);  // 应用光源变换// 绘制聚光灯光源lightModel4.Draw(ImShader);}// 计算从聚光灯光源位置指向原点的方向if (spotLightEnabled2){glm::mat4 lightModelMatrix5 = glm::mat4(1.0f);lightModelMatrix5 = glm::translate(lightModelMatrix5, spotLightPosition2);  // 将光源放置在 pointLightPosition// 计算从光源位置指向原点的方向glm::vec3 direction5 = glm::normalize(spotLightPosition2 - target);// 使用 glm::lookAt 函数创建一个朝向矩阵glm::mat4 orientationMatrix5 = glm::lookAt(spotLightPosition2, target, glm::vec3(0.0f, 1.0f, 0.0f));// 将朝向矩阵乘到模型矩阵上,确保它指向原点lightModelMatrix5 *= lightModelMatrix5 * glm::mat4(glm::mat3(orientationMatrix5));  // 去除位移分量,只保留旋转部分lightModelMatrix5 = glm::scale(lightModelMatrix5, glm::vec3(0.3f)); // 将光源球体缩小至合适大小// 设置着色器并传递点光源的位置ImShader.use();ImShader.setMat4("model", lightModelMatrix5);  // 应用光源变换// 绘制聚光灯光源lightModel5.Draw(ImShader);}ImGui::Render();ImGui_ImplOpenGL3_RenderDrawData(ImGui::GetDrawData());glfwSwapBuffers(window);glfwPollEvents();}glfwTerminate();return 0;
}void processInput(GLFWwindow* window)
{if (glfwGetKey(window, GLFW_KEY_ESCAPE) == GLFW_PRESS)glfwSetWindowShouldClose(window, true);float cameraSpeed = static_cast<float>(2.5 * deltaTime);if (glfwGetKey(window, GLFW_KEY_UP) == GLFW_PRESS)cameraPosition += cameraSpeed * cameraFront;if (glfwGetKey(window, GLFW_KEY_DOWN) == GLFW_PRESS)cameraPosition -= cameraSpeed * cameraFront;if (glfwGetKey(window, GLFW_KEY_LEFT) == GLFW_PRESS)cameraPosition -= glm::normalize(glm::cross(cameraFront, cameraUp)) * cameraSpeed;if (glfwGetKey(window, GLFW_KEY_RIGHT) == GLFW_PRESS)cameraPosition += glm::normalize(glm::cross(cameraFront, cameraUp)) * cameraSpeed;
}
void keyCallbackrollpitchyaw(GLFWwindow* window, int key, int scancode, int action, int mods) {if (key == GLFW_KEY_Q && action == GLFW_PRESS) { // 按键减少旋转角度anglepitch -= 2.0f;}else if (key == GLFW_KEY_W && action == GLFW_PRESS) { // 按键增加旋转角度anglepitch += 2.0f;}if (key == GLFW_KEY_A && action == GLFW_PRESS) { // 按键减少旋转角度angleroll -= 2.0f;}else if (key == GLFW_KEY_S && action == GLFW_PRESS) { // 按键增加旋转角度angleroll += 2.0f;}if (key == GLFW_KEY_Z && action == GLFW_PRESS) { // 按键减少旋转角度angleyaw -= 2.0f;}else if (key == GLFW_KEY_X && action == GLFW_PRESS) { // 按键增加旋转角度angleyaw += 2.0f;}//平移if (key == GLFW_KEY_U && action == GLFW_PRESS) {translateX -= 5.0f;}else if (key == GLFW_KEY_I && action == GLFW_PRESS) { translateX += 5.0f;}if (key == GLFW_KEY_J && action == GLFW_PRESS) { translateY -= 5.0f;}else if (key == GLFW_KEY_K && action == GLFW_PRESS) { translateY += 5.0f;}if (key == GLFW_KEY_N && action == GLFW_PRESS) { translateZ -= 5.0f;}else if (key == GLFW_KEY_M && action == GLFW_PRESS) { translateZ += 5.0f;}
}
void framebuffer_size_callback(GLFWwindow* window, int width, int height)
{glViewport(0, 0, width, height);
}
然后是配置一下glfw+glad环境


_USE_MATH_DEFINES;_CRT_SECURE_NO_WARNINGS;%(PreprocessorDefinitions)
assimp.lib
OpenMeshCored.lib
OpenMeshToolsd.lib
OpenMeshCore.lib
OpenMeshTools.lib
legacy_stdio_definitions.lib
glfw3.lib
opengl32.lib
相关文章:

Opengl光照测试
代码 #include "Model.h" #include "shader_m.h" #include "imgui.h" #include "imgui_impl_glfw.h" #include "imgui_impl_opengl3.h" //以上是放在同目录的头文件#include <glad/glad.h> #include <GLFW/glfw3.…...

OpenSIP2.4.11 向 FreeSWITCH 注册
应朋友要求做了个简单的测试,花费时间不过半小时,记录如下: OpenSIPS IP 地址:192.168.31.213 FreeSWITCH IP 地址:192.168.31.166 加载 uac_registrant 模块(这个模块依赖 uac_auth 模块,得…...

【C++】深入理解 C++ 优先级队列、容器适配器与 deque:实现与应用解析
个人主页: 起名字真南的CSDN博客 个人专栏: 【数据结构初阶】 📘 基础数据结构【C语言】 💻 C语言编程技巧【C】 🚀 进阶C【OJ题解】 📝 题解精讲 目录 前言📌 1. 优先级队列、容器适配器和 deque 概述✨1.1 什么是优…...

Android 开发与救砖工具介绍
Android 开发与救砖工具介绍 在 Android 开发和设备维护中,fastboot、adb 和 9008 模式是三个非常重要的工具和模式。它们各自有不同的用途和操作方式,对于开发者和技术支持人员来说,了解它们的功能和使用方法是必不可少的。 1. Fastboot …...

vue2和vue3:diff算法的区别?
Vue 2 和 Vue 3 在 diff 算法方面的主要区别是: Vue 2 使用普通的 diff 算法,它会遍历所有的节点进行比对。 Vue 3 引入了 patch flag 的概念,并且对 diff 算法进行了优化,比如在相同层级的节点间不会去递归比对已经被移除的节点…...

后端返回大数问题
这个问题并不难,但是在开发的时候没有注意到 后端返回了一个列表数据,包含id,这个id是一个大数,列表进入详情,需要将id传入到详情页面详情页面内部通过id获取数据一直404,id不正确找问题,从路由传参到请求数据发现id没有问题,然后和后端进行联调,发现后端返回的id和我获取的id…...

vue3: ref, reactive, readonly, shallowReactive
vue3: ref, reactive, readonly, shallowReactive 原文地址:https://mp.weixin.qq.com/s/S3jPZKEMBP8nQQObF5d2VA <template><!-- <ul><li v-for"item in list.arr">{{item}}</li></ul><button click.prevent"add"…...

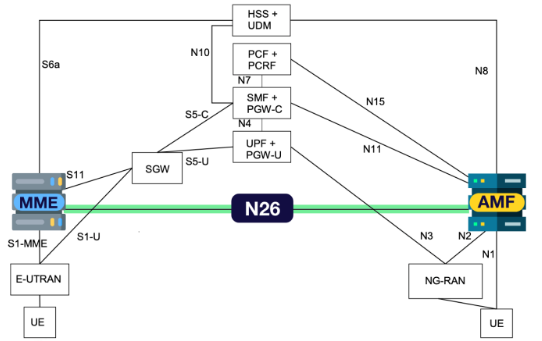
5G与4G互通的桥梁:N26接口
5G的商用部署进程将是一个基于4G系统进行的长期的替换、升级、迭代的过程,4G系统是在过渡到5G全覆盖过程中,作为保障用户业务连续性体验这一目的的最好补充。 因此4G/5G融合组网,以及互操作技术将是各大运营商在网络演进中需要重点考虑的问题…...

29-Elasticsearch 集群监控
Elasticsearch Stats 相关的 API ● Elasticsearch 提供了多个监控相关的 API ○ Node Stats: _nodes/stats ○ Cluster Stats: _cluster/stats ○ Index Stats: index_name/_stats Elasticsearch Task API ● 查看 Task 相关的 API ○ Pending Cluster Tasks…...

利用Excel批量生成含二维码的设备管理标签卡片
在日常办公中,批量制作标签是常见且繁琐的任务,尤其当这些标签需要包含大量数据并附带二维码以便快速扫描识别时,难度更是成倍增加。尽管传统的Word邮件合并功能在数据插入方面表现出色,但在二维码生成上却显得有些捉襟见肘。 为…...

小米运动健康与华为运动健康在苹手机ios系统中无法识别蓝牙状态 (如何在ios系统中开启 蓝牙 相册 定位 通知 相机等功能权限,保你有用)
小米运动健康与华为运动健康在苹手机ios系统中无法识别蓝牙状态 (解决方案在最下面,参考蓝牙权限设置方式举一反三开启其它模块的权限) 最近买了一台小米手表s4,但是苹手机ios系统中的 “小米运动健康” app 始终无法识别我手机…...

高亮变色显示文本中的关键字
效果 第一步:按如下所示代码创建一个用来高亮显示文本的工具类: public class KeywordUtil {/*** 单个关键字高亮变色* param color 变化的色值* param text 文字* param keyword 文字中的关键字* return*/public static SpannableString highLigh…...

Javascript垃圾回收机制-运行机制(大厂内部培训版本)
前言 计算机基本组成: 我们编写的软件首先读取到内存,用于提供给 CPU 进行运算处理。 内存的读取和释放,决定了程序性能。 冯诺依曼结构 解释和编译 这两个概念怎么理解呢。 编译相当于事先已经完成了可以直接用。好比去饭店吃饭点完上…...

【jvm】一个空Object对象的占多大空间
目录 1. 说明2. 结论 1. 说明 1.在Java中,一个空Object对象所占用的内存空间大小会受到JVM(Java虚拟机)实现和配置的影响,具体数值可能因不同JVM版本和配置而有所不同。2.但一般来说,可以基于一些通用的原则来估算这个…...

241114.学习日志——[CSDIY] [CS]数据结构与算法 [00]
CSDIY:这是一个非科班学生的努力之路,从今天开始这个系列会长期更新,(最好做到日更),我会慢慢把自己目前对CS的努力逐一上传,帮助那些和我一样有着梦想的玩家取得胜利!!&…...

The Planets: Earth -- 练习
环境搭建 该靶场环境来自Vulnhub -------- Difficulty: Easy 靶机与Kali的IP地址只需要在同一局域网即可(同一个网段,即两虚拟机处于同一网络模式),所以需要调整KALI和靶场的网络模式,为了方便测试本地采用NAT模式。 注意&…...

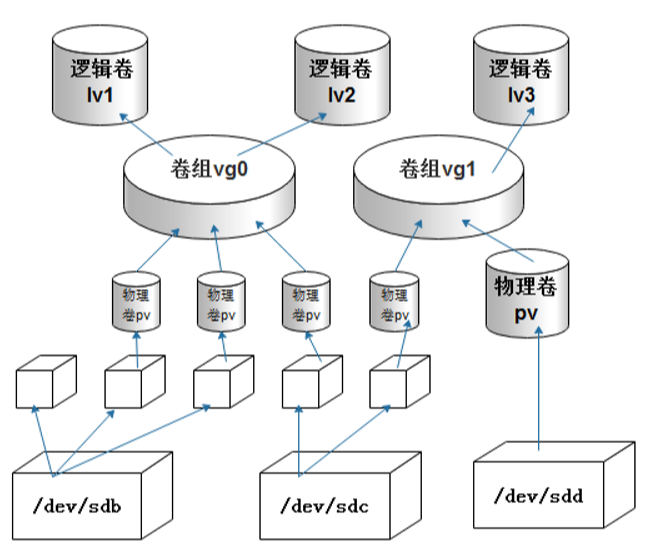
linux逻辑卷练习
目录 知识点: 常用命令 题目: 解题: 1)分区 2)创建物理卷 3)创建卷组 4)生成逻辑卷 "要带参数 -n" 5)扩容 6)格式化(添加文件系统) 7)挂…...

openai 论文Scaling Laws for Neural Language Models学习
2001.08361 (arxiv.org) 论文研究语言模型在交叉熵损失下的性能经验缩放定律:模型损失(性能)随模型大小、数据集大小和用于训练的计算量呈现缩放为幂律的关系,有些趋势跨越超过 7 个数量级。其他模型架构细节 (如网络…...

__VUE_PROD_HYDRATION_MISMATCH_DETAILS__ is not explicitly defined
VUE_PROD_HYDRATION_MISMATCH_DETAILS 未明确定义。您正在运行 Vue 的 esm-bundler 构建,它期望这些编译时功能标志通过捆绑器配置全局注入,以便在生产捆绑包中获得更好的tree-shaking优化。 Vue.js应用程序正在使用ESM(ECMAScript模块&#…...

基于PHP技术的校园站的设计与实现
毕业论文(基于PHP技术的校园站的设计与实现) 基于PHP技术的校园网站的设计与实现校园网作为教育、教学、科研、管理等工作的平台和基础设施,它的建立有助于加强师生之间的交流,改变传统的教学模式和教育管理方式,对促…...

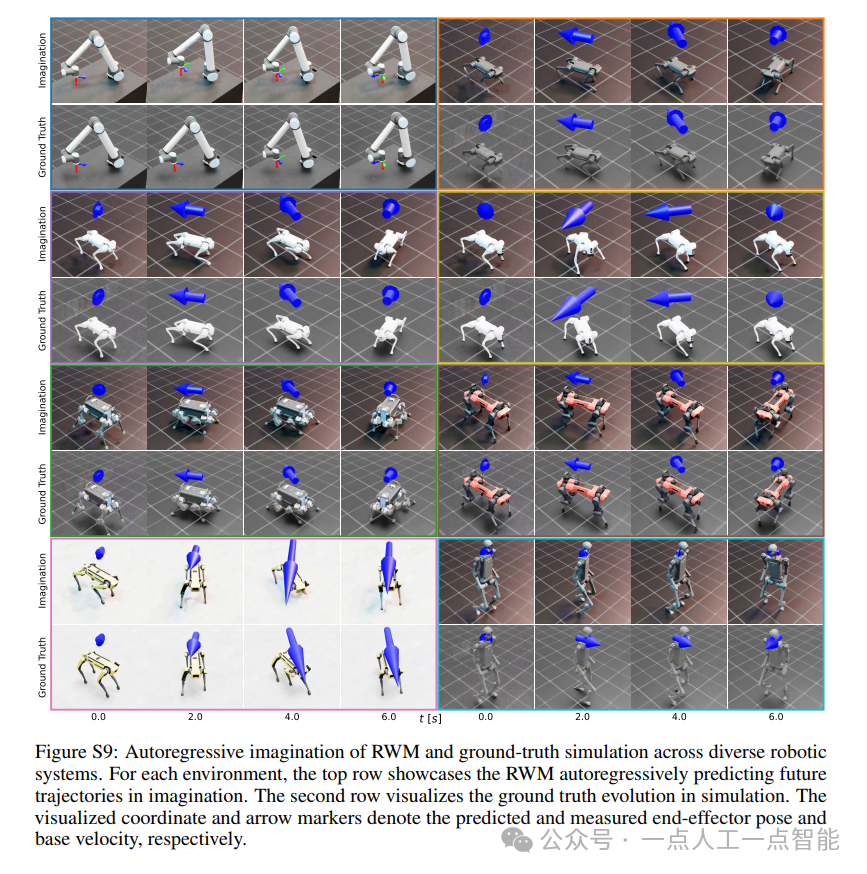
未来机器人的大脑:如何用神经网络模拟器实现更智能的决策?
编辑:陈萍萍的公主一点人工一点智能 未来机器人的大脑:如何用神经网络模拟器实现更智能的决策?RWM通过双自回归机制有效解决了复合误差、部分可观测性和随机动力学等关键挑战,在不依赖领域特定归纳偏见的条件下实现了卓越的预测准…...

变量 varablie 声明- Rust 变量 let mut 声明与 C/C++ 变量声明对比分析
一、变量声明设计:let 与 mut 的哲学解析 Rust 采用 let 声明变量并通过 mut 显式标记可变性,这种设计体现了语言的核心哲学。以下是深度解析: 1.1 设计理念剖析 安全优先原则:默认不可变强制开发者明确声明意图 let x 5; …...

多模态商品数据接口:融合图像、语音与文字的下一代商品详情体验
一、多模态商品数据接口的技术架构 (一)多模态数据融合引擎 跨模态语义对齐 通过Transformer架构实现图像、语音、文字的语义关联。例如,当用户上传一张“蓝色连衣裙”的图片时,接口可自动提取图像中的颜色(RGB值&…...

高危文件识别的常用算法:原理、应用与企业场景
高危文件识别的常用算法:原理、应用与企业场景 高危文件识别旨在检测可能导致安全威胁的文件,如包含恶意代码、敏感数据或欺诈内容的文档,在企业协同办公环境中(如Teams、Google Workspace)尤为重要。结合大模型技术&…...

什么是EULA和DPA
文章目录 EULA(End User License Agreement)DPA(Data Protection Agreement)一、定义与背景二、核心内容三、法律效力与责任四、实际应用与意义 EULA(End User License Agreement) 定义: EULA即…...

CRMEB 框架中 PHP 上传扩展开发:涵盖本地上传及阿里云 OSS、腾讯云 COS、七牛云
目前已有本地上传、阿里云OSS上传、腾讯云COS上传、七牛云上传扩展 扩展入口文件 文件目录 crmeb\services\upload\Upload.php namespace crmeb\services\upload;use crmeb\basic\BaseManager; use think\facade\Config;/*** Class Upload* package crmeb\services\upload* …...

Golang——7、包与接口详解
包与接口详解 1、Golang包详解1.1、Golang中包的定义和介绍1.2、Golang包管理工具go mod1.3、Golang中自定义包1.4、Golang中使用第三包1.5、init函数 2、接口详解2.1、接口的定义2.2、空接口2.3、类型断言2.4、结构体值接收者和指针接收者实现接口的区别2.5、一个结构体实现多…...

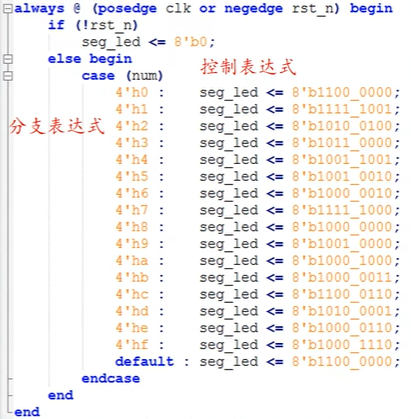
ZYNQ学习记录FPGA(二)Verilog语言
一、Verilog简介 1.1 HDL(Hardware Description language) 在解释HDL之前,先来了解一下数字系统设计的流程:逻辑设计 -> 电路实现 -> 系统验证。 逻辑设计又称前端,在这个过程中就需要用到HDL,正文…...

【阅读笔记】MemOS: 大语言模型内存增强生成操作系统
核心速览 研究背景 研究问题:这篇文章要解决的问题是当前大型语言模型(LLMs)在处理内存方面的局限性。LLMs虽然在语言感知和生成方面表现出色,但缺乏统一的、结构化的内存架构。现有的方法如检索增强生成(RA…...

Spring事务传播机制有哪些?
导语: Spring事务传播机制是后端面试中的必考知识点,特别容易出现在“项目细节挖掘”阶段。面试官通过它来判断你是否真正理解事务控制的本质与异常传播机制。本文将从实战与源码角度出发,全面剖析Spring事务传播机制,帮助你答得有…...
