修改Android Studio项目配置JDK路径和项目Gradle路径的GUI工具
概述
本工具提供了一个基于Python Tkinter的图形用户界面(GUI),用于帮助用户搜索并更新Android Studio项目中的config.properties文件里的java.home路径,以及workspace.xml文件中的last_opened_file_path路径。该工具旨在简化手动查找和编辑这些配置文件的过程,提高工作效率。
系统要求
- Python 3.x
- Tkinter库(通常随Python一起安装)
安装步骤
- 确保你的系统上已经安装了Python 3.x。
- 将上述提供的Python脚本保存到一个文件中,例如命名为
config_editor.py。 - 打开命令行工具(如CMD、PowerShell或终端)。
- 导航到包含
config_editor.py文件的目录。 - 运行脚本:
import tkinter as tk
from tkinter import scrolledtext
import os
import xml.etree.ElementTree as ET
import json# 定义查找配置配置文件的函数
def find_properties_files(directory):found_files = []for root, dirs, files in os.walk(directory):for file in files:if file.lower() == 'config.properties':found_files.append(os.path.join(root, file))return found_files# 定义读取java.home的函数
def read_java_home(file_path):try:with open(file_path, 'r', encoding='utf-8') as file:for line in file:if line.lower().startswith('java.home='):return line.strip()except Exception as e:log_text.insert(tk.END, f"读取配置文件 {file_path} 失败: {e}\n")return None# 定义写入java.home的函数
def write_java_home(file_path, new_line):try:with open(file_path, 'r+', encoding='utf-8') as file:lines = file.readlines()file.seek(0)file.truncate()found = Falsefor line in lines:if line.lower().startswith('java.home='):file.write(new_line + '\n')found = Trueelse:file.write(line)if not found:file.write(new_line + '\n')except Exception as e:log_text.insert(tk.END, f"写入配置文件 {file_path} 失败: {e}\n")# 搜索按钮点击事件
def on_search():directory = search_entry.get().strip()if not directory:directory = os.getcwd()log_text.delete(1.0, tk.END)found_files = find_properties_files(directory)if not found_files:status_label.config(text="没有找到任何config.properties配置文件")log_text.insert(tk.END, "没有找到任何config.properties配置文件\n")else:status_label.config(text=f"找到 {len(found_files)} 个config.properties配置文件")log_text.insert(tk.END, f"找到 {len(found_files)} 个config.properties配置文件\n")for file_path in found_files:log_text.insert(tk.END, f"处理配置文件: {file_path}\n")# 更新按钮点击事件
def on_update():new_value = entry_new_value.get().strip()if not new_value:#log_text.insert(tk.END, "新的java.home路径不能为空\n")status_label.config(text=f"新的java.home路径不能为空")returnlog_text.delete(1.0, tk.END)directory = search_entry.get().strip()if not directory:directory = os.getcwd()log_text.insert(tk.END, f"目标路径: {directory}\n")found_files = find_properties_files(directory)if not found_files:status_label.config(text="没有找到任何config.properties配置文件")log_text.insert(tk.END, "没有找到任何config.properties配置文件\n")else:status_label.config(text=f"找到 {len(found_files)} 个config.properties配置文件")log_text.insert(tk.END, f"找到 {len(found_files)} 个config.properties配置文件\n")for file_path in found_files:log_text.insert(tk.END, f"处理配置文件: {file_path}\n")current_java_home = read_java_home(file_path)if current_java_home:log_text.insert(tk.END, f"配置文件路径: {file_path}, 当前值: {current_java_home}, 已更新: java.home={new_value}\n")else:log_text.insert(tk.END, f"配置文件路径: {file_path}, 未找到java.home属性, 已更新: java.home={new_value}\n")write_java_home(file_path, f"java.home={new_value}")# 搜索workspace.xml配置文件
def on_workspace_xml_search():directory = search_entry.get().strip()if not directory:directory = os.getcwd()log_text.delete(1.0, tk.END)found_files = []for root, dirs, files in os.walk(directory):for file in files:if file.lower() == 'workspace.xml':found_files.append(os.path.join(root, file))if not found_files:log_text.insert(tk.END, "没有找到workspace.xml配置文件\n")else:status_label.config(text=f"找到 {len(found_files)} 个workspace.xml配置文件")log_text.insert(tk.END, f"找到 {len(found_files)} 个workspace.xml配置文件\n")for file_path in found_files:log_text.insert(tk.END, f"处理配置文件: {file_path}\n")# 更新workspace.xml配置文件
def on_workspace_xml_update():directory = search_entry.get().strip()if not directory:directory = os.getcwd()log_text.delete(1.0, tk.END)import json
import os
import tkinter as tk
from lxml import etree# 更新workspace.xml配置文件
def on_workspace_xml_update():directory = search_entry.get().strip()if not directory:directory = os.getcwd()# 获取新的 last_opened_file_pathnew_last_opened_file_path = new_last_opened_file_path_entry.get().strip()if not new_last_opened_file_path:messagebox.showerror("错误", "新的last_opened_file_path不能为空")return# 确保路径使用正斜杠new_last_opened_file_path = new_last_opened_file_path.replace("\\", "/")# 查找workspace.xml配置文件found_files = []for root, dirs, files in os.walk(directory):for file in files:if file.lower() == 'workspace.xml':found_files.append(os.path.join(root, file))if not found_files:messagebox.showinfo("信息", "没有找到workspace.xml配置文件")returnfor workspace_xml_path in found_files:log_text.insert(tk.END, f"处理配置文件: {workspace_xml_path}\n")try:# 读取并解析XML配置文件parser = etree.XMLParser(strip_cdata=False)  # 保持CDATA部分不变tree = etree.parse(workspace_xml_path, parser)root = tree.getroot()# 查找PropertiesComponent组件properties_component = root.find(".//component[@name='PropertiesComponent']")if properties_component is None:log_text.insert(tk.END, "找不到 PropertiesComponent 组件\n")continue# 提取CDATA内容cdata_content = properties_component.textif not cdata_content or not cdata_content.strip().startswith("<![CDATA[") or not cdata_content.strip().endswith("]]>"):log_text.insert(tk.END, "找不到 PropertiesComponent 组件或其 JSON 数据\n")continue# 去掉CDATA标记key_to_string_json = cdata_content.strip()[len("<![CDATA["):-len("]]>")].strip()log_text.insert(tk.END, f"原始 keyToString JSON 数据: {key_to_string_json}\n")# 使用json.loads解析JSON数据key_to_string_dict = json.loads(key_to_string_json, strict=False)# 获取旧的 last_opened_file_pathold_last_opened_file_path = key_to_string_dict.get('keyToString', {}).get('last_opened_file_path', '')log_text.insert(tk.END, f"修改前: last_opened_file_path={old_last_opened_file_path}\n")# 更新last_opened_file_pathkey_to_string_dict.setdefault('keyToString', {})['last_opened_file_path'] = new_last_opened_file_pathlog_text.insert(tk.END, f"修改后: last_opened_file_path={new_last_opened_file_path}\n")# 生成新的 JSON 数据# 保持原始 JSON 数据的格式new_key_to_string_json = json.dumps(key_to_string_dict, ensure_ascii=False, indent=None, separators=(',', ': '))# 构造新的CDATA内容new_cdata_content = "<![CDATA[" + new_key_to_string_json + "]]>"# 更新CDATA内容properties_component.text = new_cdata_content# 写回workspace.xml配置文件tree.write(workspace_xml_path, encoding='utf-8', xml_declaration=True, pretty_print=True)log_text.insert(tk.END, f"已更新或添加last_opened_file_path: {new_last_opened_file_path} 到 {workspace_xml_path}\n")except json.JSONDecodeError as e:log_text.insert(tk.END, f"JSON 解析错误: {e}\n")except Exception as e:log_text.insert(tk.END, f"处理配置文件 {workspace_xml_path} 失败: {e}\n")
import re
import os
import tkinter as tk
from tkinter import messagebox# 更新workspace.xml配置文件
def on_workspace_xml_update():directory = search_entry.get().strip()if not directory:directory = os.getcwd()# 获取新的 last_opened_file_pathnew_last_opened_file_path = new_last_opened_file_path_entry.get().strip()if not new_last_opened_file_path:#messagebox.showerror("错误", "新的last_opened_file_path不能为空")status_label.config(text=f"新的last_opened_file_path不能为空")return# 确保路径使用正斜杠new_last_opened_file_path = new_last_opened_file_path.replace("\\", "/")# 查找workspace.xml配置文件found_files = []for root, dirs, files in os.walk(directory):for file in files:if file.lower() == 'workspace.xml':found_files.append(os.path.join(root, file))if not found_files:messagebox.showinfo("信息", "没有找到workspace.xml配置文件")returnfor workspace_xml_path in found_files:# 读取配置文件内容with open(workspace_xml_path, 'r', encoding='utf-8') as file:content = file.read()# 查找包含 "last_opened_file_path" 的 JSON 字符串pattern = r'"last_opened_file_path"\s*:\s*"([^"]+)"'match = re.search(pattern, content)if match:# 替换 "last_opened_file_path" 的值old_value = match.group(1)content = re.sub(pattern, f'"last_opened_file_path": "{new_last_opened_file_path}"', content)# 写回配置文件with open(workspace_xml_path, 'w', encoding='utf-8') as file:file.write(content)log_text.insert(tk.END, f"已将 {old_value} 替换为 {new_last_opened_file_path} 在 {workspace_xml_path}\n")else:log_text.insert(tk.END, f"未找到 last_opened_file_path 在 {workspace_xml_path}\n")import tkinter as tk
from tkinter import scrolledtext
import tkinter.font as tkFont
import os
import re# RGB值
background_rgb = (43, 42, 51)
output_bg_rgb = (31, 31, 31)
output_fg_rgb = (255, 255, 255)  # 白色
button_bg_rgb = (31, 31, 31)  # 按钮背景颜色
button_fg_rgb = (0, 128, 0)  # 按钮文本颜色
entry_bg_rgb = (31, 31, 31)  # 输入框背景颜色
entry_fg_rgb = (255, 255, 255)  # 输入框文本颜色
label_bg_rgb = (43, 42, 51)  # 标签背景颜色
label_fg_rgb = (255, 255, 255)  # 标签文本颜色# 辅助函数
def create_label(parent, text, **kwargs):return tk.Label(parent,text=text,font=large_font,fg=f"#{label_fg_rgb[0]:02X}{label_fg_rgb[1]:02X}{label_fg_rgb[2]:02X}",bg=f"#{label_bg_rgb[0]:02X}{label_bg_rgb[1]:02X}{label_bg_rgb[2]:02X}",**kwargs)def create_entry(parent, **kwargs):return tk.Entry(parent,font=large_font,fg=f"#{entry_fg_rgb[0]:02X}{entry_fg_rgb[1]:02X}{entry_fg_rgb[2]:02X}",bg=f"#{entry_bg_rgb[0]:02X}{entry_bg_rgb[1]:02X}{entry_bg_rgb[2]:02X}",**kwargs)def create_button(parent, text, command, **kwargs):return tk.Button(parent,text=text,font=large_font,fg=f"#{button_fg_rgb[0]:02X}{button_fg_rgb[1]:02X}{button_fg_rgb[2]:02X}",bg=f"#{button_bg_rgb[0]:02X}{button_bg_rgb[1]:02X}{button_bg_rgb[2]:02X}",command=command,**kwargs)# 日志记录
def log(message):log_text.insert(tk.END, message + "\n")log_text.see(tk.END)  # 自动滚动到底部
# 创建主窗口
root = tk.Tk()
# 定义一个更大的字体(不加粗)
large_font = tkFont.Font(family="宋体", size=13)  # 调整字体大小,但不加粗
root.title("修改android-studio项目配置JDK路径和项目gradle路径")
#root.title("Config Properties & Workspace XML Editor")# 设置背景颜色
root.configure(bg=f"#{background_rgb[0]:02X}{background_rgb[1]:02X}{background_rgb[2]:02X}")# 定义一个更大的字体(不加粗)
large_font = tkFont.Font(family="宋体", size=13)  # 调整字体大小,但不加粗# 创建GUI组件
create_label(root, "请输入目录路径 (留空则使用当前路径),搜索config.properties中java.home值").pack(pady=5)
search_entry = create_entry(root, width=50)
search_entry.pack(pady=5)# 搜索config.properties按钮
search_button = create_button(root, "搜索android-studio项目配置JDK路径", on_search)
search_button.pack(pady=5)# 输入新的java.home值
create_label(root, "请输入新的java.home值=android-studio项目自定义配置JDK路径").pack(pady=9)
entry_new_value = create_entry(root, width=50)
entry_new_value.pack(pady=5)# 更新config.properties按钮
update_button = create_button(root, "更新android-studio配置JDK路径", on_update)
update_button.pack(pady=5)# 分隔符
tk.Frame(height=2, bd=1, relief=tk.SUNKEN).pack(fill=tk.X, padx=5, pady=5)# 搜索workspace.xml按钮
workspace_xml_search_button = create_button(root, "搜索workspace.xml", on_workspace_xml_search)
workspace_xml_search_button.pack(pady=5)# 输入新的last_opened_file_path
create_label(root, "请输入新的last_opened_file_path=你的android-studio的gradle路径").pack(pady=5)
new_last_opened_file_path_entry = create_entry(root, width=50)
new_last_opened_file_path_entry.pack(pady=5)# 更新workspace.xml按钮
workspace_xml_update_button = create_button(root, "更新workspace.xml=配置android-studio项目的gradle路径", on_workspace_xml_update)
workspace_xml_update_button.pack(pady=5)# 状态标签
status_label = create_label(root, "")
status_label.pack(pady=5)# 日志文本框
log_text = scrolledtext.ScrolledText(root,width=80,height=20,wrap=tk.WORD,font=large_font,fg=f"#{output_fg_rgb[0]:02X}{output_fg_rgb[1]:02X}{output_fg_rgb[2]:02X}",bg=f"#{output_bg_rgb[0]:02X}{output_bg_rgb[1]:02X}{output_bg_rgb[2]:02X}"
)
log_text.pack(pady=5)# 运行主循环
root.mainloop()
主窗口布局
- 输入目录路径:用户可以在这里输入Android Studio项目的根目录路径。如果留空,则默认使用当前工作目录。
- 搜索
config.properties:点击此按钮将搜索指定目录下的config.properties文件,并显示当前的java.home值。 - 输入新的
java.home值:用户可以在此输入新的JDK路径。 - 更新
config.properties:点击此按钮将更新config.properties文件中的java.home值为用户指定的新路径。 - 搜索
workspace.xml:点击此按钮将搜索指定目录下的workspace.xml文件,并显示当前的last_opened_file_path值。 - 输入新的
last_opened_file_path:用户可以在此输入新的Gradle路径。 - 更新
workspace.xml:点击此按钮将更新workspace.xml文件中的last_opened_file_path值为用户指定的新路径。 - 日志文本框:显示操作过程中的信息和结果。
使用步骤
- 启动程序:运行
config_editor.py后,会弹出一个窗口。 - 输入目录路径(可选):在“请输入目录路径 (留空则使用当前路径)”输入框中输入Android Studio项目的根目录路径。如果留空,则默认使用当前工作目录。
- 搜索
config.properties:点击“搜索android-studio项目配置JDK路径”按钮。程序会在指定目录下查找config.properties文件,并显示当前的java.home值。 - 更新
java.home值:- 在“请输入新的java.home值”输入框中输入新的JDK路径。
- 点击“更新android-studio配置JDK路径”按钮,程序会更新
config.properties文件中的java.home值。
- 搜索
workspace.xml:点击“搜索workspace.xml”按钮。程序会在指定目录下查找workspace.xml文件,并显示当前的last_opened_file_path值。 - 更新
last_opened_file_path值:- 在“请输入新的last_opened_file_path”输入框中输入新的Gradle路径。
- 点击“更新workspace.xml=配置android-studio项目的gradle路径”按钮,程序会更新
workspace.xml文件中的last_opened_file_path值。
- 查看日志:所有操作的结果都会显示在日志文本框中,包括成功消息和错误信息。
注意事项
- 确保你有足够的权限来读取和写入指定的文件。
- 在更新配置文件之前,请备份原始文件,以防意外发生。
- 请确保输入的路径是正确的,并且路径存在。
- 如果路径或文件名包含特殊字符,请确保它们被正确转义或引用。
通过以上步骤,你可以轻松地管理和更新Android Studio项目的配置文件,从而确保项目使用的JDK和Gradle路径是正确的。希望这个工具能帮助你提高开发效率!
相关文章:

修改Android Studio项目配置JDK路径和项目Gradle路径的GUI工具
概述 本工具提供了一个基于Python Tkinter的图形用户界面(GUI),用于帮助用户搜索并更新Android Studio项目中的config.properties文件里的java.home路径,以及workspace.xml文件中的last_opened_file_path路径。该工具旨在简化手动…...
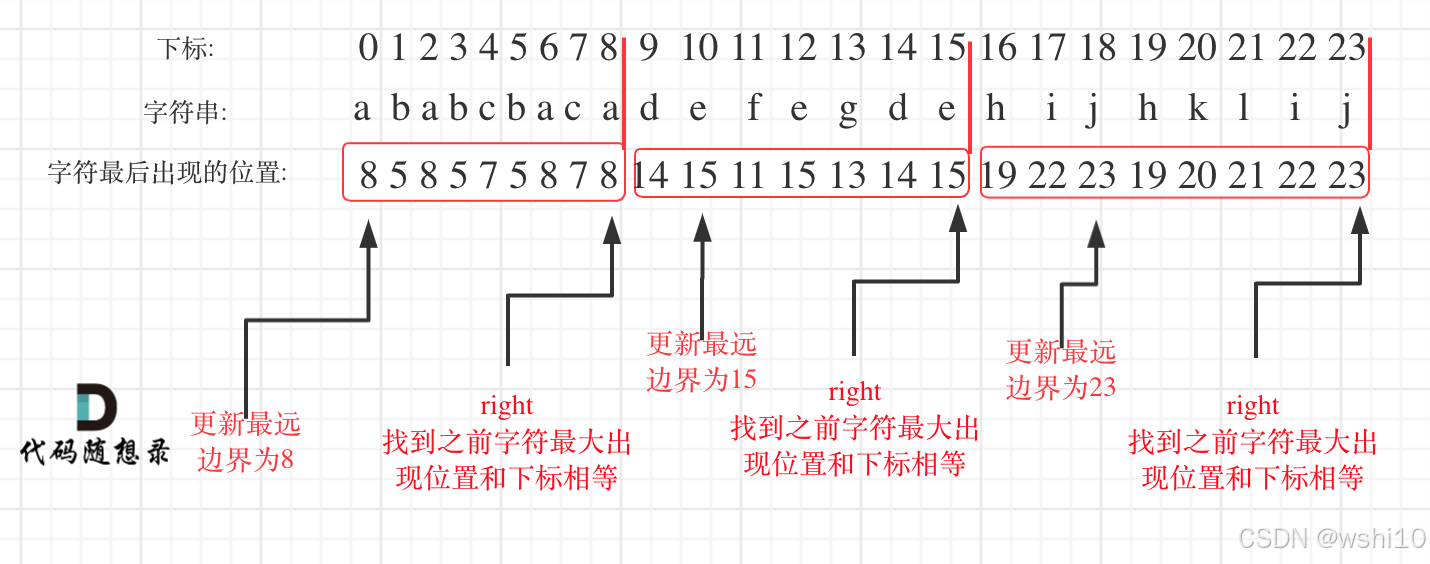
✅DAY30 贪心算法 | 452. 用最少数量的箭引爆气球 | 435. 无重叠区间 | 763.划分字母区间
452. 用最少数量的箭引爆气球 解题思路:首先把原数组按左边界进行排序。然后比较[i-1]的右边界和[i]的左边界是否重叠,如果重叠,更新当前右边界为最小右边界和[i1]的左边界判断是重叠。 class Solution:def findMinArrowShots(self, points:…...

关于Redis单线程模型以及IO多路复用的理解
IO多路复用 -> redis主线程 -> 事件队列 -> 事件处理器 1.IO多路复用机制的作用: 操作系统的多路复用机制(如 epoll、select)负责监听多个文件描述符(如客户端连接)上的事件。 当某个文件描述符上的事件就绪…...

学习ASP.NET Core的身份认证(基于Cookie的身份认证1)
B/S架构程序可通过Cookie、Session、JWT、证书等多种方式认证用户身份,虽然之前测试过用户登录代码,也学习过开源项目中的登录认证,但其实还是对身份认证疑惑甚多,就比如登录验证后用户信息如何保存、客户端下次连接时如何获取用户…...

奇门遁甲中看债务时用神该怎么取?
奇门遁甲中看债务的用神 一、值符 值符在债务关系中可代表债权人(放贷人)。例如在预测放贷时,以值符为放贷人,如果值符克天乙(借贷人)或者天乙生值符,这种情况下可以放贷;反之&#…...

Redis 集群主要有以下几种类型
Redis 集群主要有以下几种类型: 主从复制模式: 这种模式包含一个主数据库实例(master)与一个或多个从数据库实例(slave)。客户端可以对主数据库进行读写操作,对从数据库进行读操作,主…...

使用 Axios 拦截器优化 HTTP 请求与响应的实践
目录 前言1. Axios 简介与拦截器概念1.1 Axios 的特点1.2 什么是拦截器 2. 请求拦截器的应用与实践2.1 请求拦截器的作用2.2 请求拦截器实现 3. 响应拦截器的应用与实践3.1 响应拦截器的作用3.2 响应拦截器实现 4. 综合实例:一个完整的 Axios 配置5. 使用拦截器的好…...
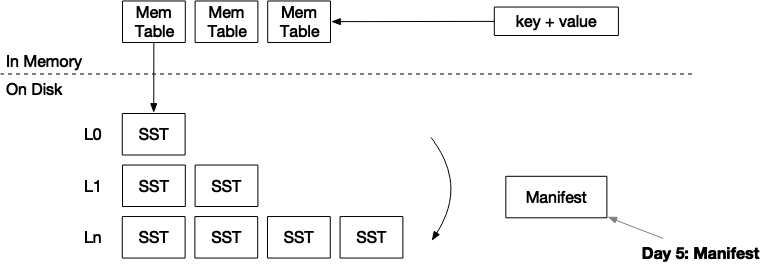
mini-lsm通关笔记Week2Day5
项目地址:https://github.com/skyzh/mini-lsm 个人实现地址:https://gitee.com/cnyuyang/mini-lsm Summary 在本章中,您将: 实现manifest文件的编解码。系统重启时从manifest文件中恢复。 要将测试用例复制到启动器代码中并运行…...

mybatis的动态sql用法之排序
概括 在最近的开发任务中,涉及到了一些页面的排序,其中最为常见的就是时间的降序和升序。这个有的前端控件就可以完成,但是对于一些无法用前端控件的,只能通过后端来进行解决。 后端的解决方法就是使用mybatis的动态sql拼接。 …...

OneToMany 和 ManyToOne
在使用 ORM(如 TypeORM)进行实体关系设计时,OneToMany 和 ManyToOne 是非常重要的注解,常用来表示两个实体之间的一对多关系。下面通过例子详细说明它们的使用场景和工作方式。 OneToMany 和 ManyToOne 的基本概念 ManyToOne 表示…...

《生成式 AI》课程 第3講 CODE TASK 任务3:自定义任务的机器人
课程 《生成式 AI》课程 第3講:訓練不了人工智慧嗎?你可以訓練你自己-CSDN博客 我们希望你创建一个定制的服务机器人。 您可以想出任何您希望机器人执行的任务,例如,一个可以解决简单的数学问题的机器人0 一个机器人,…...

反转链表、链表内指定区间反转
反转链表 给定一个单链表的头结点pHead(该头节点是有值的,比如在下图,它的val是1),长度为n,反转该链表后,返回新链表的表头。 如当输入链表{1,2,3}时,经反转后,原链表变…...

Debezium系列之:Debezium3版本使用快照过程中的指标
Debezium系列之:Debezium3版本使用快照过程中的指标 一、背景二、技术原理三、增量快照四、阻塞快照指标一、背景 使用快照技术的过程中可以观察指标,从而确定快照的进度二、技术原理 Debezium系列之:Debezium 中的增量快照Debezium系列之:Incremental snapshotting设计原理…...

第一讲,Opencv计算机视觉基础之计算机视觉概述
深度剖析计算机视觉:定义、任务及未来发展趋势 引言 计算机视觉(Computer Vision)是人工智能的重要分支之一,旨在让机器通过视觉感知和理解环境。随着深度学习的快速发展,计算机视觉在自动驾驶、安防监控、医疗影像等…...

数据结构(双向链表——c语言实现)
双向链表相比于单向链表的优势: 1. 双向遍历的灵活性 双向链表:由于每个节点都包含指向前一个节点和下一个节点的指针,因此可以从头节点遍历到尾节点,也可以从尾节点遍历到头节点。这种双向遍历的灵活性使得在某些算法和操作中&a…...

【新人系列】Python 入门(十一):控制结构
✍ 个人博客:https://blog.csdn.net/Newin2020?typeblog 📝 专栏地址:https://blog.csdn.net/newin2020/category_12801353.html 📣 专栏定位:为 0 基础刚入门 Python 的小伙伴提供详细的讲解,也欢迎大佬们…...

群核科技首次公开“双核技术引擎”,发布多模态CAD大模型
11月20日,群核科技在杭州举办了第九届酷科技峰会。现场,群核科技首次正式介绍其技术底层核心:基于GPU高性能计算的物理世界模拟器。并对外公开了两大技术引擎:群核启真(渲染)引擎和群核矩阵(CAD…...

【AI大模型引领变革】探索AI如何重塑软件开发流程与未来趋势
文章目录 每日一句正能量前言流程与模式介绍【传统软件开发 VS AI参与的软件开发】一、传统软件开发流程与模式二、AI参与的软件开发流程与模式三、AI带来的不同之处 结论 AI在软件开发流程中的优势、挑战及应对策略AI在软件开发流程中的优势面临的挑战及应对策略 结论 后记 每…...

linux 常用命令指南(存储分区、存储挂载、docker迁移)
前言:由于目前机器存储空间不够,所以‘斥巨资’加了一块2T的机械硬盘,下面是对linux扩容的一系列操作,包含了磁盘空间的创建、删除;存储挂载;docker迁移;anaconda3迁移等。 一、存储分区 1.1 …...

用pyspark把kafka主题数据经过etl导入另一个主题中的有关报错
首先看一下我们的示例代码 import os from pyspark.sql import SparkSession import pyspark.sql.functions as F """ ------------------------------------------Description : TODO:SourceFile : etl_stream_kafkaAuthor : zxxDate : 2024/11/…...
)
从选型到调参:伺服电机刚性、惯量比实战避坑指南(以台达/三菱为例)
伺服电机系统实战:从刚性调节到三环控制的深度优化 在工业自动化领域,伺服系统的性能直接决定了设备的精度与效率。去年参与的一个CNC机床改造项目中,我们遇到了一个典型问题:在加工复杂曲面时,机械臂末端总是出现微米…...

ShareGPT4Omni/ShareGPT4Video:构建可分享的AI对话知识库实战指南
1. 项目概述:当AI多模态模型遇上“分享”的刚需 最近在AI圈子里,一个现象级的开源项目“ShareGPT4Omni/ShareGPT4Video”引起了我的注意。乍一看标题,你可能以为这又是一个基于GPT-4的对话应用,但它的核心价值远不止于此。简单来说…...

终极指南:如何用SMUDebugTool免费深度调校你的AMD Ryzen处理器 [特殊字符]
终极指南:如何用SMUDebugTool免费深度调校你的AMD Ryzen处理器 🚀 【免费下载链接】SMUDebugTool A dedicated tool to help write/read various parameters of Ryzen-based systems, such as manual overclock, SMU, PCI, CPUID, MSR and Power Table. …...

告别远程桌面‘失忆症’:一招锁定xrdp端口,让你的XFCE会话永不丢失
告别远程桌面‘失忆症’:一招锁定xrdp端口,让你的XFCE会话永不丢失 远程办公和跨平台协作已成为现代开发者的日常,但当你正沉浸于代码世界时,突然的网络波动或客户端切换却让整个工作环境"人间蒸发"——这种经历恐怕每…...

AI代码生成质量评估2026:如何科学衡量Copilot类工具的真实价值
你的团队用了AI编码助手,但你真的知道它带来了多少价值吗?本文提供一套可落地的AI代码生成质量评估框架,从代码正确性到开发者体验,帮你用数据说话。一、为什么需要系统化评估"用了Copilot感觉快了不少"——这是最常见的…...

深入Acid引擎架构:模块化设计与现代C++17的最佳实践指南
深入Acid引擎架构:模块化设计与现代C17的最佳实践指南 【免费下载链接】Acid A high speed C17 Vulkan game engine 项目地址: https://gitcode.com/gh_mirrors/ac/Acid Acid引擎是一个基于Vulkan API的高性能C17游戏引擎,采用先进的模块化架构设…...

Java源码分析:`ReentrantLock`、`ReentrantReadWriteLock`与`LockSupport`深度解析
引言:从synchronized到可编程的锁 在Java并发编程的世界里,synchronized关键字曾是开发者控制线程同步的唯一选择。它简单、易用,并由JVM保证其正确性。然而,随着应用复杂度的提升,其固有的局限性——如无法中断、无法…...

【信息科学与工程学】【人工智能】【数字孪生】【游戏科学】主要数学模型-第八篇 计算血液学
计算血液学:理论与数学框架全体系 计算血液学是生物物理学、流体力学和反应动力学的交叉领域,研究血液作为多相智能流体的物理与数学原理。以下是从宏观血流到分子机制的全尺度数学模型体系。 一、血液流变学基础 模型类别 核心方程/定义 参数符号 物理意义 典型值范围 1. …...

HarmonyOS 6.0 跨端页面构建实践:从 UI 代码到热力交互卡片设计
HarmonyOS 6.0 跨端页面构建实践:从 UI 代码到热力交互卡片设计 前言 在 HarmonyOS 6.0 的跨端开发体系中,页面构建的核心目标已经从“能运行”逐步转向“高一致性体验 低成本跨端复用”。尤其是在多设备协同的场景下,一个 UI 组件不仅要适配…...

抖音下载器终极指南:3种场景下的高效内容获取方案
抖音下载器终极指南:3种场景下的高效内容获取方案 【免费下载链接】douyin-downloader A practical Douyin downloader for both single-item and profile batch downloads, with progress display, retries, SQLite deduplication, and browser fallback support. …...